WANT TO SAVE THIS RECIPE?
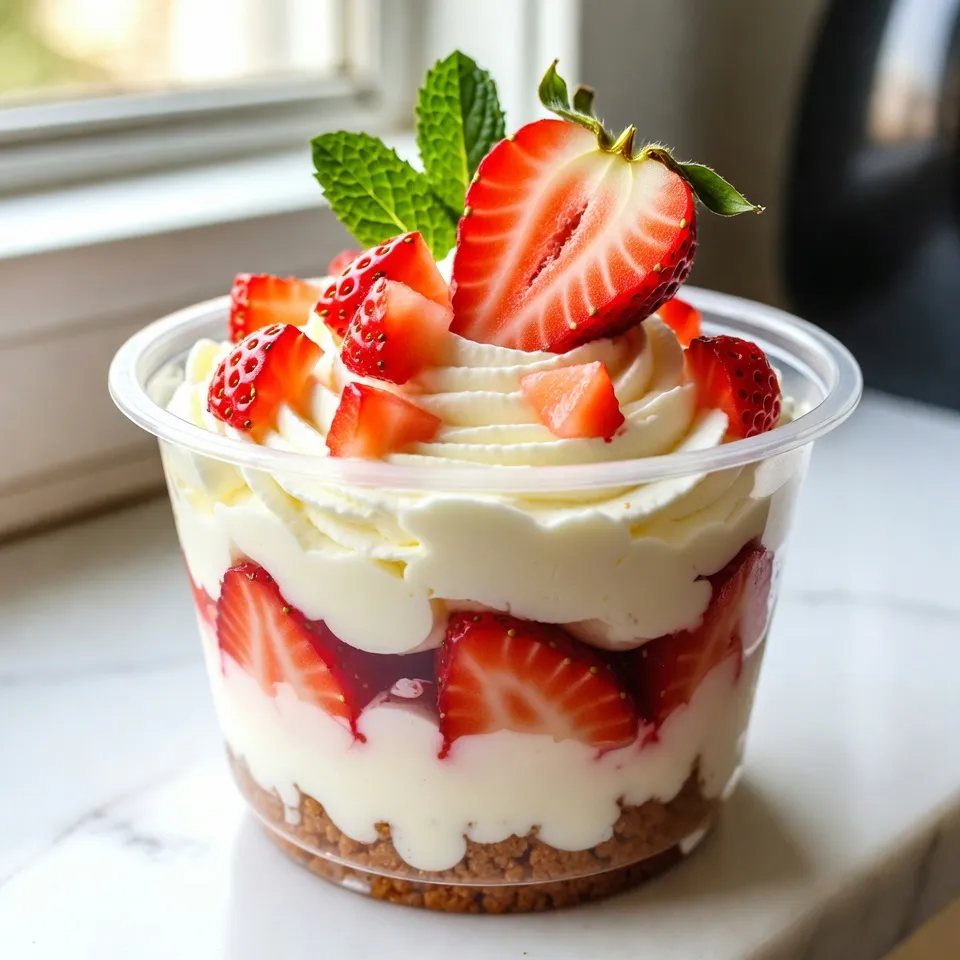
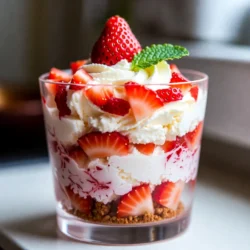
If you crave a sweet treat but want to skip the oven, these No-Bake Strawberry Cheesecake Cups are perfect for you! With layers of creamy cheesecake, crunchy graham crackers, and fresh strawberries, they are a breeze to make. Plus, I’ll share tips for easy variations and storage solutions. Let’s dive into this delicious dessert that will impress anyone without all the fuss!
Why I Love This Recipe
- Rich and Creamy Delight: The combination of cream cheese and whipped cream creates a luxurious texture that melts in your mouth.
- Fresh Flavor: Using fresh strawberries adds a burst of sweetness and a pop of color, making each cup visually appealing.
- Simple to Make: This recipe requires minimal ingredients and steps, making it perfect for both beginners and experienced cooks.
- Versatile Dessert: These Sweet Strawberry Bliss Cups can be customized with different fruits or toppings, allowing for endless variations!
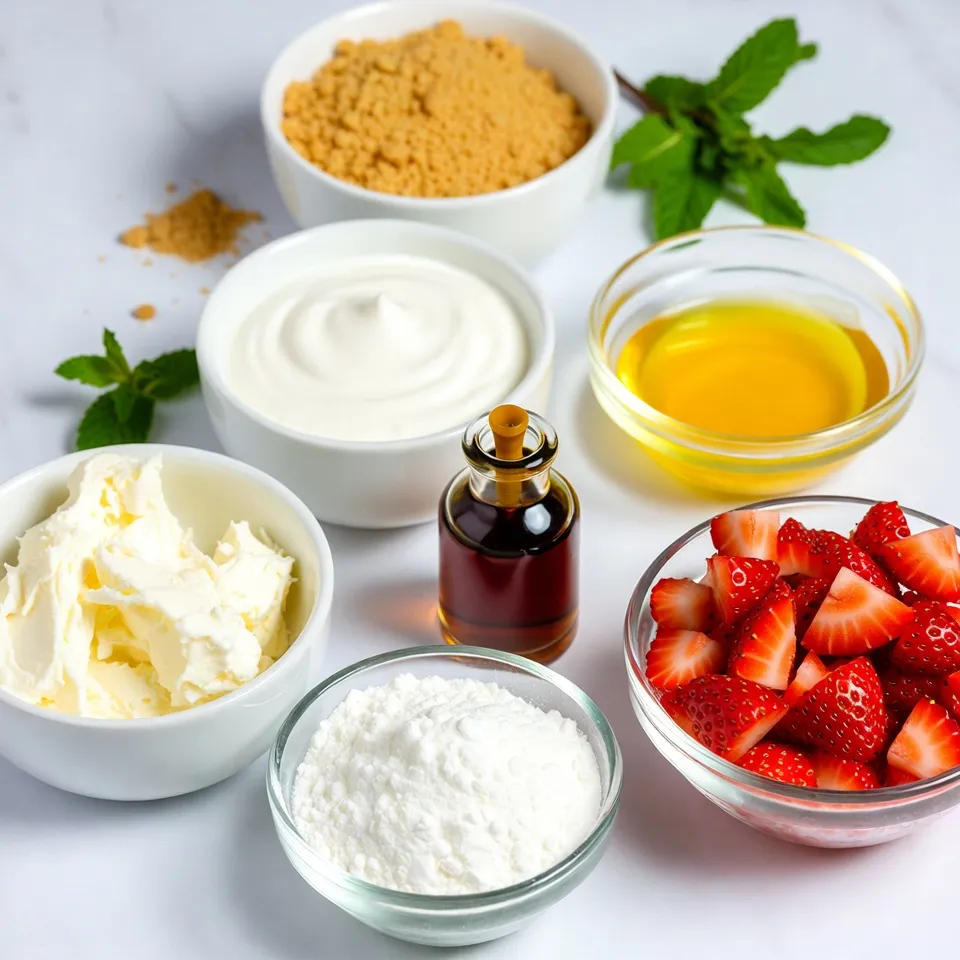
Ingredients
Main Ingredients for No-Bake Strawberry Cheesecake Cups
To make these tasty cheesecake cups, gather these main ingredients:
– 1 cup cream cheese, softened
– ½ cup powdered sugar
– 1 teaspoon vanilla extract
– 1 cup heavy whipping cream
– 1 cup fresh strawberries, diced
– ½ cup graham cracker crumbs
– 2 tablespoons unsalted butter, melted
These ingredients create a creamy and sweet base, with fresh strawberries adding a fruity touch.
Optional Garnishes
You can enhance your cheesecake cups with these garnishes:
– Fresh mint leaves
– Extra strawberry slices
These add color and a fresh flavor. They make your cups look fancy.
Ingredient Substitutions
If you need to swap out any ingredients, try these options:
– Use Greek yogurt instead of cream cheese for a tangy twist.
– Replace powdered sugar with honey or maple syrup for natural sweetness.
– Try coconut cream instead of heavy cream for a dairy-free version.
These substitutions can change the flavor and texture, making this recipe more personal to you.

Step-by-Step Instructions
Mixing the Cream Cheese Base
Start by taking a mixing bowl. Add 1 cup of softened cream cheese, ½ cup of powdered sugar, and 1 teaspoon of vanilla extract. Beat these ingredients with an electric mixer. Mix on medium speed until the blend is smooth and creamy. This step is key for a rich and tasty base.
Preparing the Whipped Cream
In another bowl, pour in 1 cup of heavy whipping cream. Use a hand mixer or a stand mixer to whip the cream. Keep mixing until stiff peaks form. This usually takes about 3 to 5 minutes. Stiff peaks will give your cheesecake a light texture.
Layering the Cheesecake Cups
– Adding the Graham Cracker Base
In a separate bowl, mix ½ cup of graham cracker crumbs with 2 tablespoons of melted unsalted butter. Stir well until the crumbs are fully coated. This mixture forms the crunchy base of your cups.
– Incorporating Fresh Strawberries
Grab your diced strawberries. You’ll need 1 cup. After layering the graham cracker base in your serving cups, add a layer of the cream cheese mixture. Next, sprinkle a layer of diced strawberries on top. This adds a fresh, fruity flavor.
– Repeating Layers
Continue adding layers. Start with another layer of the cream cheese mixture, then add more strawberries. Keep repeating these layers until you use all the ingredients. Make sure the last layer is the cream cheese mixture. This creates a beautiful finish for your cheesecake cups.
Tips & Tricks
Achieving the Perfect Whipped Cream
To make the best whipped cream, start with cold heavy cream. Cold cream whips faster and better. Use a clean bowl for mixing. Beat the cream on medium speed until you see stiff peaks. This takes about 3-5 minutes. Be careful! Overmixing can turn it into butter. Gently fold this whipped cream into your cream cheese mix. This keeps it fluffy and light.
Storage Tips for Cheesecake Cups
Store your cheesecake cups in the fridge. Use an airtight container to keep them fresh. They last for about 2-3 days. If you want to keep them longer, freeze the cups. Just remember to leave out any fresh fruit on top before freezing. When ready to eat, let them thaw in the fridge.
Serving Suggestions and Presentation Ideas
Presenting these cups can be fun. Use clear glasses to show off the layers. Add a fresh strawberry and a mint leaf on top for color. You can also drizzle some strawberry sauce over the top for extra flavor. If you have extra graham cracker crumbs, sprinkle some on top too. This adds a nice crunch and looks great!
Pro Tips
- Chill the Cream Cheese: Make sure your cream cheese is softened to room temperature for easier mixing. You can also place it in the microwave for a few seconds to soften it quickly.
- Whip the Cream Properly: For best results, use cold heavy cream and a chilled mixing bowl when whipping. This helps achieve stiff peaks more easily.
- Layering Technique: When layering, try to use the back of a spoon to spread the cream cheese mixture evenly. This prevents the layers from mixing together.
- Fresh Strawberries: Use ripe, fresh strawberries for the best flavor. If strawberries are out of season, consider using frozen strawberries that are thawed and drained.
Variations
Gluten-Free Options
You can make these cheesecake cups gluten-free. Use gluten-free graham crackers or almond flour for the crust. Both options work well and taste great. Always check labels to ensure no gluten is present. This way, everyone can enjoy the treat!
Fruit Alternatives for Different Flavors
Strawberries are delicious, but many fruits work too. Try blueberries, raspberries, or mangoes for a twist. Each fruit adds a unique flavor and color. Layer them just like the strawberries in the cups. Explore your favorite fruits and make it your own!
Dairy-Free Modifications
If you want a dairy-free option, use non-dairy cream cheese. You can also replace heavy cream with coconut cream. This keeps the creaminess while avoiding dairy. Just remember to whip the coconut cream until it’s fluffy. These swaps make the dessert friendly for all diets!
Storage Info
How to Store Leftovers
Store leftover cheesecake cups in the fridge. Use an airtight container to keep them fresh. These cups last for about 3 days. You can enjoy them cold straight from the fridge. Just remember to cover them well. This helps keep them from drying out.
Freezing the Cheesecake Cups
You can freeze these cheesecake cups if you want to keep them longer. Use freezer-safe containers or wrap them tightly in plastic wrap. They can last up to 2 months in the freezer. When you’re ready to eat them, move the cups to the fridge to thaw overnight. Do not refreeze once you thaw them.
Best Practices for Maintaining Freshness
To keep your cheesecake cups fresh, avoid adding strawberries until serving. Fresh fruit can get mushy if stored too long. Also, store them in the coldest part of your fridge. This helps keep the texture smooth and creamy. If you follow these tips, your no-bake cheesecake cups will taste great every time!
FAQs
How long do No-Bake Strawberry Cheesecake Cups last?
No-Bake Strawberry Cheesecake Cups can last about three to five days in the fridge. Store them in a covered container to keep them fresh. The strawberries may lose some texture over time. Enjoy them within a few days for the best taste.
Can I make these cheesecake cups in advance?
Yes, you can make these cheesecake cups a day ahead. Prepare them and refrigerate until you are ready to serve. This allows the flavors to mix, making them even tastier. Just add the garnish right before serving for a fresh look.
What can I use instead of cream cheese?
If you want to swap cream cheese, consider using Greek yogurt or mascarpone. Both options give a creamy texture. For a vegan choice, use cashew cream or silken tofu blended until smooth. Each will change the taste slightly, but they work well.
– Common troubleshooting tips for this recipe:
– If the mixture is too runny, whip the cream longer until stiff peaks form.
– If the crust is too crumbly, add a bit more melted butter.
– For a sweeter taste, adjust the powdered sugar to your liking.
– If your strawberries are too soft, use firmer ones for better texture.
No-Bake Strawberry Cheesecake Cups are simple and fun to make. We covered the key ingredients, steps, and tips to help you succeed. You learned about different variations and how to store your treats. Remember, you can switch up flavors and make this dessert fit your needs. Enjoy creating your cheesecake cups, whether for a treat or a special event. These refreshing desserts will delight anyone who tastes them. Make every bite count and share your creations with friends and famil
Sweet Strawberry Bliss Cups
Delicious layered dessert cups featuring cream cheese, whipped cream, strawberries, and graham cracker crust.
Prep Time 20 minutes mins
Total Time 20 minutes mins
Course Dessert
Cuisine American
Servings 4
Calories 250 kcal
- 1 cup cream cheese, softened
- 0.5 cup powdered sugar
- 1 teaspoon vanilla extract
- 1 cup heavy whipping cream
- 1 cup fresh strawberries, diced
- 0.5 cup graham cracker crumbs
- 2 tablespoons unsalted butter, melted
- none Fresh mint leaves for garnish (optional)
In a mixing bowl, combine the softened cream cheese, powdered sugar, and vanilla extract. Beat with an electric mixer on medium speed until smooth and creamy.
In another bowl, whip the heavy cream using a hand mixer or stand mixer until stiff peaks form, which usually takes 3-5 minutes.
Gently fold the whipped cream into the cream cheese mixture, taking care not to deflate the whipped cream. Mix until fully incorporated and smooth.
In a separate bowl, mix the graham cracker crumbs with melted butter until the crumbs are well-coated.
In serving cups or glasses, start by layering a spoonful of the graham cracker mixture at the bottom, pressing gently to form a base.
Add a generous layer of the cream cheese mixture on top of the crust.
Add a layer of diced strawberries, followed by another layer of the cream cheese mixture. Repeat the layers until all ingredients are used, finishing with cream cheese on the top layer.
Decorate the cups with a few fresh strawberry slices on top and a mint leaf for garnish if desired.
Can be garnished with fresh mint leaves for added flavor.
Keyword dessert, no-bake, strawberry
WANT TO SAVE THIS RECIPE?