Cherry Limeade Bars Refreshing Dessert Recipe

Looking for a fun and tasty dessert? These Cherry Limeade Bars hit the spot! With their sweet and tangy flavor, they’re perfect for warm days. I’ll guide you through simple steps to create this refreshing treat. Plus, I’ll share tips to make them just right. Read on to learn how to whip up this delightful recipe that everyone will love!

Ingredients

Complete Ingredients List

To make Cherry Limeade Bars, you need these simple ingredients:

– 1 cup graham cracker crumbs

– 1/2 cup unsalted butter, melted

– 1 cup granulated sugar

– Zest of 2 limes

– 1/2 cup fresh lime juice (about 4 limes)

– 2 cups fresh or frozen cherries, pitted and chopped

– 3 large eggs

– 1/4 teaspoon salt

These ingredients come together to create a burst of flavor. The graham cracker crust gives a nice crunch, while the cherry and lime mix adds freshness.

Ingredient Substitutions

If you want to change things up, here are some easy swaps:

– Use coconut crumbs instead of graham crackers for a tropical twist.

– Substitute margarine for butter to make it dairy-free.

– Try lemon juice instead of lime for a different zing.

– Replace granulated sugar with honey or agave for a natural sweetener.

These swaps keep the spirit of the recipe while letting you cater to your taste.

Optional Garnishes

Garnishes can make your bars look special. Here are some ideas:

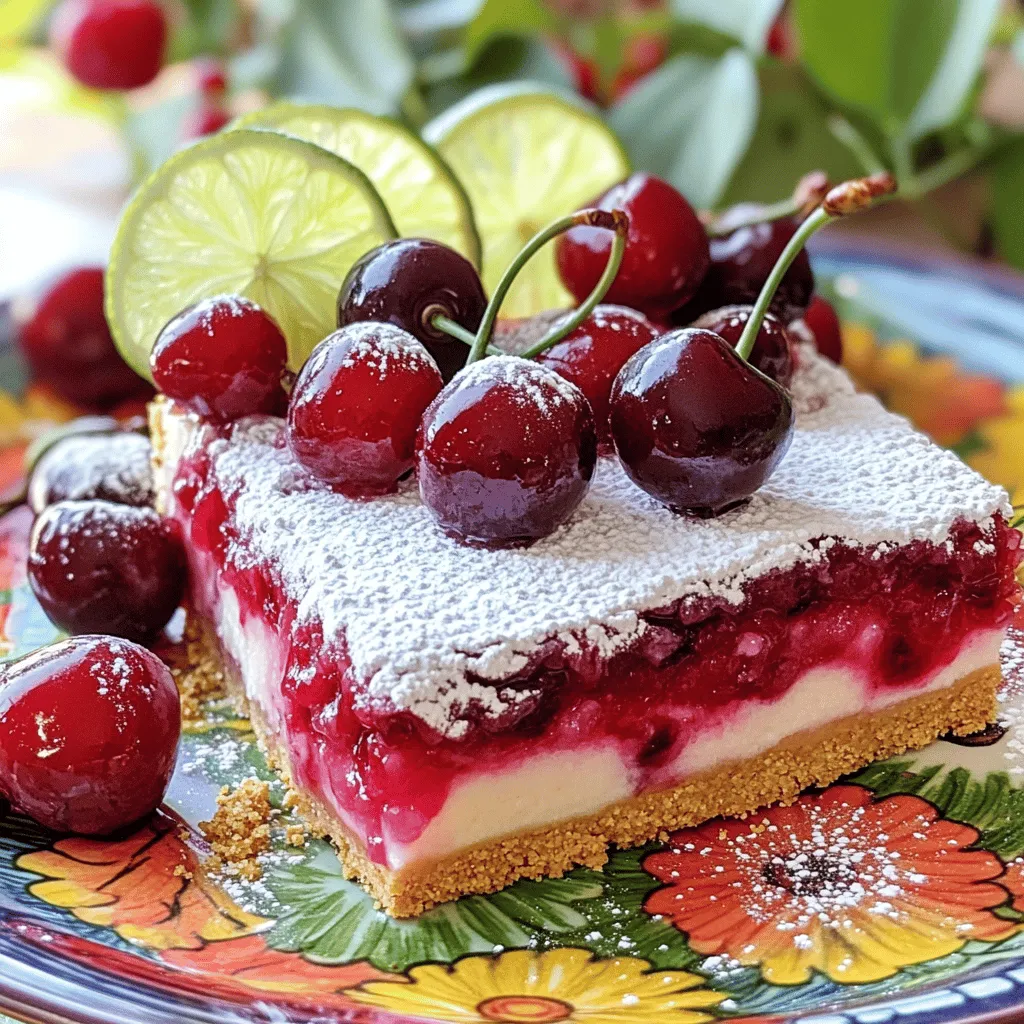
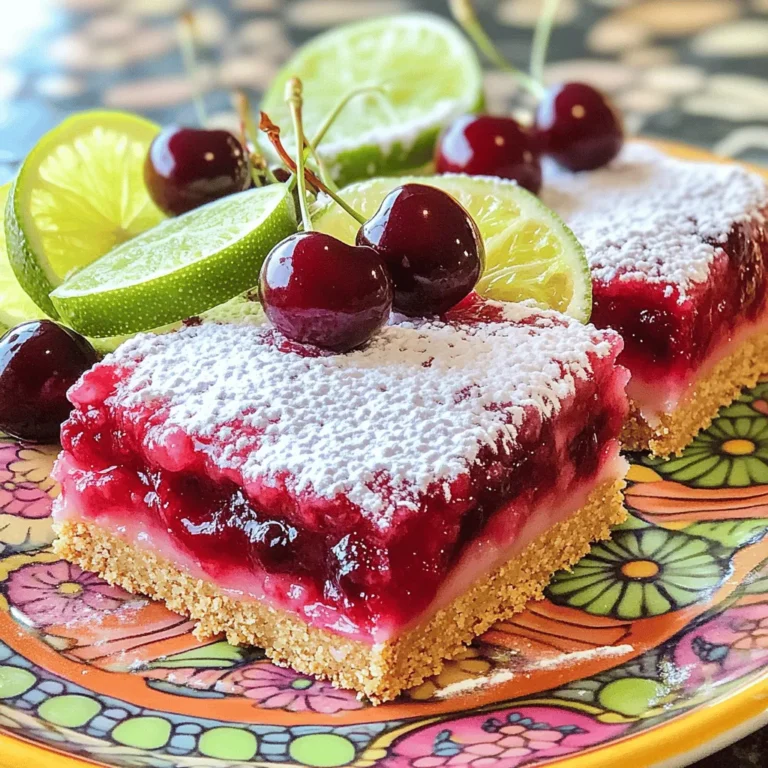
– Dust with powdered sugar for a sweet finish.

– Add lime slices on top for a pop of color.

– Use whole cherries for a fun touch.

– Serve with whipped cream for extra creaminess.

These little extras can make your Cherry Limeade Bars even more enjoyable. Just remember to have fun with it! For the full recipe, check the details above.

Step-by-Step Instructions

Preparation Steps

To start, gather your ingredients. You will need graham cracker crumbs, butter, sugar, limes, cherries, eggs, and salt. Preheat your oven to 350°F (175°C). Grease an 8×8 inch baking pan or line it with parchment paper. This helps with easy removal later.

In a medium bowl, mix the graham cracker crumbs and melted butter. Stir until all crumbs are wet. This mixture makes the crust. Press it firmly into the bottom of your prepared pan. Bake this crust for about 10 minutes. You want it lightly golden. Once done, take it out and let it cool.

Baking Process

Now, let’s make the filling. In another bowl, whisk together sugar, lime zest, lime juice, eggs, and salt. Mix well until everything blends. Next, fold in the chopped cherries. Do this gently to keep the cherries intact. Pour this mixture over the cooled crust. Bake for another 25-30 minutes. You will know it’s done when the center is set, and the edges puff slightly.

Cooling and Serving

After baking, remove the pan from the oven. Let it cool to room temperature. Once cooled, cover it and refrigerate for at least 2 hours. This helps the bars set properly. After chilling, cut the bars into squares. For a nice touch, dust with powdered sugar before serving. Serve them on a colorful plate with lime slices and whole cherries for a fun look. Enjoy your Cherry Limeade Bars! For the complete recipe, check out the Full Recipe section.

Tips & Tricks

How to Perfect Your Cherry Limeade Bars

To make the best Cherry Limeade Bars, focus on the crust. Use fresh graham cracker crumbs for a crunchy base. Aim for a golden color when baking the crust. This adds flavor and texture. When mixing the filling, combine the sugar and lime zest well. This step releases oils from the zest, boosting the lime flavor. Fold in the cherries gently to keep them whole. This keeps your bars looking great and tasting fresh. Let the bars chill fully in the fridge. This step helps them set up nicely.

Common Mistakes to Avoid

One common mistake is overbaking the bars. Check them often to avoid a dry texture. Another mistake is not cooling the crust before adding the filling. If you skip this, the filling can become runny. Make sure to use fresh cherries when possible. Frozen cherries can make the filling watery. Also, do not skip the salt in the filling. Salt enhances the sweet and tart flavors of the lime and cherry.

Best Tools and Equipment

For these bars, you need a few key tools. A good mixing bowl helps combine the ingredients well. A whisk is essential for mixing the eggs and sugar smoothly. Use a measuring cup for precise lime juice and sugar. A sharp knife is important for cutting the bars into even squares. Finally, a baking pan, preferably 8×8 inches, ensures even cooking. You can find a full recipe for Cherry Limeade Bars to guide you as you bake.
Variations

Different Fruit Options

You can change the fruit in Cherry Limeade Bars for fun twists. Instead of cherries, try using blueberries, raspberries, or diced strawberries. Each fruit adds its own flavor and color. Blueberries give a sweet burst, while raspberries add a nice tartness. You can even mix two or more fruits for a colorful treat. Just make sure to chop the fruit small so it mixes well.

Using Other Citrus Zest

Citrus zest can change the whole flavor of the bars. Instead of lime zest, use lemon or orange zest. Lemon zest offers a bright taste that pairs well with the sweetness of the fruit. Orange zest adds a sweet and fragrant note. You can also mix citrus zests for a unique flavor. Just keep the zest amount the same to balance the taste.

Gluten-Free and Vegan Alternatives

You can make these bars gluten-free and vegan easily. For a gluten-free crust, use gluten-free graham crackers or ground almonds. Replace the butter with coconut oil or vegan butter. To make it vegan, use flax eggs instead of regular eggs. Mix one tablespoon of ground flaxseed with three tablespoons of water and let it sit for a few minutes. This mix works great as a binder, just like eggs. These swaps help everyone enjoy the deliciousness of Cherry Limeade Bars. For the full recipe, check out the detailed instructions.

Storage Info

How to Store Leftover Bars

To keep your Cherry Limeade Bars fresh, place them in an airtight container. Make sure to layer parchment paper between the bars. This step prevents sticking. Store them in the fridge for best results. They will stay fresh and tasty for up to five days.

Freezing Instructions

You can freeze these bars for later enjoyment. First, let the bars cool completely. Then, cut them into squares. Wrap each square in plastic wrap tightly. Next, place the wrapped bars in a freezer-safe bag. They can last up to three months in the freezer. When you are ready to eat, thaw them in the fridge overnight.

Shelf Life and Freshness Tips

Cherry Limeade Bars taste best within the first few days. After that, they can lose some flavor and texture. For maximum freshness, always store them in the fridge. If you notice any change in smell or appearance, it is best to discard them. Enjoy these vibrant bars when they are fresh for the best experience!

FAQs

What are Cherry Limeade Bars?

Cherry Limeade Bars are a sweet and tart dessert. They feature a graham cracker crust. The filling has fresh cherries and lime juice. These bars are bright, refreshing, and perfect for warm days. They bring a fun twist to classic lemon bars.

Can I make these bars ahead of time?

Yes, you can make Cherry Limeade Bars ahead of time. They taste even better after chilling in the fridge. I recommend making them a day before your event. This way, they are ready to serve when you need them. Just keep them covered for freshness.

What can I serve with Cherry Limeade Bars?

Cherry Limeade Bars pair well with many treats. You can serve them with whipped cream or vanilla ice cream. Fresh fruit or a scoop of sorbet also works well. For a drink, try serving them with iced tea or lemonade.

How do I know when they are done baking?

You can tell when the bars are done by checking the center. It should be set and not jiggly. The edges might puff up slightly. A light golden color around the edges is also a good sign. Let them cool completely before cutting.

Can I use bottled lime juice instead of fresh?

You can use bottled lime juice if needed. However, fresh lime juice gives a better taste. Fresh juice has a bright flavor that is hard to beat. If you use bottled juice, choose one that is 100% lime juice for the best results. Check the label for any added sugars. For the full recipe, check the earlier section.

You learned how to make Cherry Limeade Bars by reviewing the key steps and ingredients. You found ways to customize the recipe, avoid mistakes, and choose the best tools. Now, you know how to store leftovers and keep them fresh. Cherry Limeade Bars are fun to make and share. With this guide, you’re ready to bake some delicious treats. Enjoy the process and let your creativity shine through!
To make Cherry Limeade Bars, you need these simple ingredients: - 1 cup graham cracker crumbs - 1/2 cup unsalted butter, melted - 1 cup granulated sugar - Zest of 2 limes - 1/2 cup fresh lime juice (about 4 limes) - 2 cups fresh or frozen cherries, pitted and chopped - 3 large eggs - 1/4 teaspoon salt These ingredients come together to create a burst of flavor. The graham cracker crust gives a nice crunch, while the cherry and lime mix adds freshness. If you want to change things up, here are some easy swaps: - Use coconut crumbs instead of graham crackers for a tropical twist. - Substitute margarine for butter to make it dairy-free. - Try lemon juice instead of lime for a different zing. - Replace granulated sugar with honey or agave for a natural sweetener. These swaps keep the spirit of the recipe while letting you cater to your taste. Garnishes can make your bars look special. Here are some ideas: - Dust with powdered sugar for a sweet finish. - Add lime slices on top for a pop of color. - Use whole cherries for a fun touch. - Serve with whipped cream for extra creaminess. These little extras can make your Cherry Limeade Bars even more enjoyable. Just remember to have fun with it! For the full recipe, check the details above. To start, gather your ingredients. You will need graham cracker crumbs, butter, sugar, limes, cherries, eggs, and salt. Preheat your oven to 350°F (175°C). Grease an 8x8 inch baking pan or line it with parchment paper. This helps with easy removal later. In a medium bowl, mix the graham cracker crumbs and melted butter. Stir until all crumbs are wet. This mixture makes the crust. Press it firmly into the bottom of your prepared pan. Bake this crust for about 10 minutes. You want it lightly golden. Once done, take it out and let it cool. Now, let's make the filling. In another bowl, whisk together sugar, lime zest, lime juice, eggs, and salt. Mix well until everything blends. Next, fold in the chopped cherries. Do this gently to keep the cherries intact. Pour this mixture over the cooled crust. Bake for another 25-30 minutes. You will know it's done when the center is set, and the edges puff slightly. After baking, remove the pan from the oven. Let it cool to room temperature. Once cooled, cover it and refrigerate for at least 2 hours. This helps the bars set properly. After chilling, cut the bars into squares. For a nice touch, dust with powdered sugar before serving. Serve them on a colorful plate with lime slices and whole cherries for a fun look. Enjoy your Cherry Limeade Bars! For the complete recipe, check out the Full Recipe section. To make the best Cherry Limeade Bars, focus on the crust. Use fresh graham cracker crumbs for a crunchy base. Aim for a golden color when baking the crust. This adds flavor and texture. When mixing the filling, combine the sugar and lime zest well. This step releases oils from the zest, boosting the lime flavor. Fold in the cherries gently to keep them whole. This keeps your bars looking great and tasting fresh. Let the bars chill fully in the fridge. This step helps them set up nicely. One common mistake is overbaking the bars. Check them often to avoid a dry texture. Another mistake is not cooling the crust before adding the filling. If you skip this, the filling can become runny. Make sure to use fresh cherries when possible. Frozen cherries can make the filling watery. Also, do not skip the salt in the filling. Salt enhances the sweet and tart flavors of the lime and cherry. For these bars, you need a few key tools. A good mixing bowl helps combine the ingredients well. A whisk is essential for mixing the eggs and sugar smoothly. Use a measuring cup for precise lime juice and sugar. A sharp knife is important for cutting the bars into even squares. Finally, a baking pan, preferably 8x8 inches, ensures even cooking. You can find a full recipe for Cherry Limeade Bars to guide you as you bake. {{image_2}} You can change the fruit in Cherry Limeade Bars for fun twists. Instead of cherries, try using blueberries, raspberries, or diced strawberries. Each fruit adds its own flavor and color. Blueberries give a sweet burst, while raspberries add a nice tartness. You can even mix two or more fruits for a colorful treat. Just make sure to chop the fruit small so it mixes well. Citrus zest can change the whole flavor of the bars. Instead of lime zest, use lemon or orange zest. Lemon zest offers a bright taste that pairs well with the sweetness of the fruit. Orange zest adds a sweet and fragrant note. You can also mix citrus zests for a unique flavor. Just keep the zest amount the same to balance the taste. You can make these bars gluten-free and vegan easily. For a gluten-free crust, use gluten-free graham crackers or ground almonds. Replace the butter with coconut oil or vegan butter. To make it vegan, use flax eggs instead of regular eggs. Mix one tablespoon of ground flaxseed with three tablespoons of water and let it sit for a few minutes. This mix works great as a binder, just like eggs. These swaps help everyone enjoy the deliciousness of Cherry Limeade Bars. For the full recipe, check out the detailed instructions. To keep your Cherry Limeade Bars fresh, place them in an airtight container. Make sure to layer parchment paper between the bars. This step prevents sticking. Store them in the fridge for best results. They will stay fresh and tasty for up to five days. You can freeze these bars for later enjoyment. First, let the bars cool completely. Then, cut them into squares. Wrap each square in plastic wrap tightly. Next, place the wrapped bars in a freezer-safe bag. They can last up to three months in the freezer. When you are ready to eat, thaw them in the fridge overnight. Cherry Limeade Bars taste best within the first few days. After that, they can lose some flavor and texture. For maximum freshness, always store them in the fridge. If you notice any change in smell or appearance, it is best to discard them. Enjoy these vibrant bars when they are fresh for the best experience! Cherry Limeade Bars are a sweet and tart dessert. They feature a graham cracker crust. The filling has fresh cherries and lime juice. These bars are bright, refreshing, and perfect for warm days. They bring a fun twist to classic lemon bars. Yes, you can make Cherry Limeade Bars ahead of time. They taste even better after chilling in the fridge. I recommend making them a day before your event. This way, they are ready to serve when you need them. Just keep them covered for freshness. Cherry Limeade Bars pair well with many treats. You can serve them with whipped cream or vanilla ice cream. Fresh fruit or a scoop of sorbet also works well. For a drink, try serving them with iced tea or lemonade. You can tell when the bars are done by checking the center. It should be set and not jiggly. The edges might puff up slightly. A light golden color around the edges is also a good sign. Let them cool completely before cutting. You can use bottled lime juice if needed. However, fresh lime juice gives a better taste. Fresh juice has a bright flavor that is hard to beat. If you use bottled juice, choose one that is 100% lime juice for the best results. Check the label for any added sugars. For the full recipe, check the earlier section. You learned how to make Cherry Limeade Bars by reviewing the key steps and ingredients. You found ways to customize the recipe, avoid mistakes, and choose the best tools. Now, you know how to store leftovers and keep them fresh. Cherry Limeade Bars are fun to make and share. With this guide, you're ready to bake some delicious treats. Enjoy the process and let your creativity shine through!

Cherry Limeade Bars

Indulge in the refreshing taste of Cherry Limeade Bars that are perfect for any occasion! This easy recipe combines a buttery graham cracker crust with a zesty cherry-lime filling that’s sure to delight your taste buds. With just a few simple ingredients, you can create these stunning bars that are both delicious and visually appealing. Click through to explore the full recipe and treat yourself to a slice of summer in every bite!

Ingredients
  

1 cup graham cracker crumbs

1/2 cup unsalted butter, melted

1 cup granulated sugar

Zest of 2 limes

1/2 cup fresh lime juice (about 4 limes)

2 cups fresh or frozen cherries, pitted and chopped

3 large eggs

1/4 teaspoon salt

Instructions
 

Preheat the oven to 350°F (175°C). Grease an 8x8 inch baking pan or line it with parchment paper for easy removal.

    In a medium bowl, combine the graham cracker crumbs and melted butter. Mix until all crumbs are evenly moistened.

      Press the mixture into the bottom of the prepared baking pan, creating a firm crust. Bake for about 10 minutes or until lightly golden. Remove from the oven and let cool.

        In another bowl, whisk together the sugar, lime zest, lime juice, eggs, and salt until well combined.

          Fold in the chopped cherries, mixing gently to distribute them evenly in the mixture.

            Pour the cherry-lime mixture over the cooled crust. Bake for an additional 25-30 minutes or until the center is set and the edges begin to slightly puff.

              Remove from the oven and let cool to room temperature, then refrigerate for at least 2 hours to fully set.

                Once chilled, cut into squares and dust with powdered sugar if desired before serving.

                  Prep Time: 15 minutes | Total Time: 2 hours 55 minutes | Servings: 16

                    - Presentation Tips: Serve the bars on a colorful plate, garnished with additional lime slices and a few whole cherries for a vibrant touch.

                      Leave a Comment

                      Recipe Rating