. Can I make this cake ahead of time? Yes, you can make this cake ahead of time. I recommend making it a day before you plan to serve it. This gives the flavors time to blend, and the texture will be even better. Just cover it well and store it in the fridge. How do I make it less sweet? To make it less sweet, reduce the amount of powdered sugar. You can also use less chocolate syrup. Both changes will help balance the sweetness. If you enjoy coffee flavor, add a bit more instant coffee for depth. What can I use instead of instant coffee? If you want to skip instant coffee, you can use brewed coffee. Just let it cool first. You can also try espresso powder for a stronger flavor. Adjust the amount based on your taste. Why isn’t my whipped cream thickening? If your whipped cream isn't thickening, the heavy cream may be too warm. Make sure it is cold before whipping. Also, check that you're using heavy cream, not light cream. Adding a bit of cornstarch can help stabilize it. How do I fix a soggy cake layer? To fix a soggy layer, reduce the soaking time of the cookies. If the cake is already made, try placing it in the fridge to firm up. You can also add a layer of crushed Oreos on top to absorb some moisture. Can I use other types of chocolate syrup? Yes, you can use different types of chocolate syrup. Dark chocolate syrup will give a richer flavor. You can also try flavored syrups, like hazelnut, for a twist. Just ensure it matches the overall taste. This blog covered the key ingredients, steps, and tips to make a delicious cake. I shared ways to enhance texture and presentation. You can also explore recipe variations and storage options. Remember, you can adjust serving sizes based on your needs. With these tips, you'll create a tasty treat that everyone will enjoy. So, roll up your sleeves and get baking. You’ve got this!](https://emmasdish.com/wp-content/uploads/2025/07/a2d200ba-92cd-4280-9fe0-b50dd786bfe2-768x768.webp)
Are you ready to impress your friends with a dessert that’s both easy and delicious? This Mocha Oreo Icebox Cake is your perfect answer! You’ll love how tasty it is with just a few simple ingredients like heavy cream, Oreo cookies, and instant coffee granules. Follow my easy steps to create a show-stopping dessert that everyone will enjoy. Let’s dive into this delightful treat!
Ingredients
Required Ingredients
– 2 cups heavy cream
– 1 cup powdered sugar
– 1 teaspoon vanilla extract
– 2 tablespoons instant coffee granules
– 1 cup milk
– 24 Oreo cookies
– 1/2 cup chocolate syrup
– Optional: Chocolate shavings and crushed Oreos for garnish
To make Mocha Oreo Icebox Cake, you need simple ingredients. Each one plays a key role in bringing flavor and texture to your dessert.
Heavy cream is the star here. When whipped, it becomes light and fluffy. This creates the cake’s creamy layers. Powdered sugar sweetens the cream, making it rich and delicious.
Vanilla extract adds depth. It enhances the other flavors and makes each bite taste better. Instant coffee granules bring a strong coffee taste. This is what gives the cake its mocha flavor.
Milk helps soften the Oreo cookies. You want them to soak just enough without getting soggy. The Oreo cookies are the base of this dessert. Their chocolatey goodness complements the cream perfectly.
Chocolate syrup adds a sweet touch. You’ll drizzle it between layers for extra chocolate flavor. Optional garnishes like chocolate shavings and crushed Oreos add fun and flair. They make your cake look fancy and tasty.
Gather these ingredients before you start. Having everything ready makes the process easy and fun.
Step-by-Step Instructions
Preparation Steps
1. Whip the cream
Start by pouring the heavy cream into a large mixing bowl. Use an electric mixer to whip the cream until soft peaks form. This step is key for a fluffy texture.
2. Combine milk with crushed Oreos
In another bowl, mix the milk with a few crushed Oreos. This adds a rich flavor to the cake. Crush them gently so they blend well.
3. Soak Oreos in milk
Take the Oreo cookies and dip each one into the milk for about 2-3 seconds. Make sure they soak just enough, but not too soggy! You want them soft but still holding their shape.
4. Layering the ingredients in a baking dish
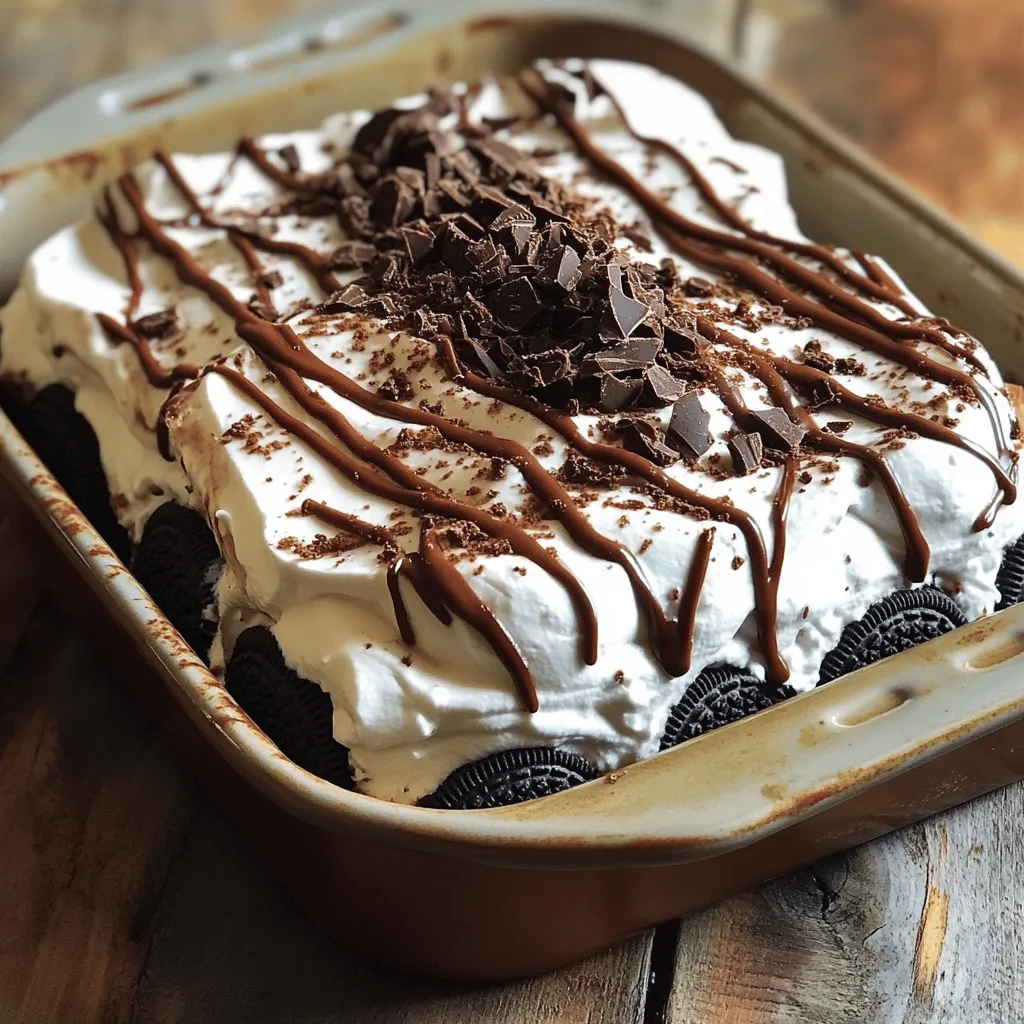
Use a 9×9-inch baking dish. Begin with a layer of soaked Oreos at the bottom. Then, spread a layer of the whipped cream mixture over the Oreos. Drizzle some chocolate syrup on top. Repeat this layering until you use all the ingredients. Finish with a layer of whipped cream.
5. Refrigeration time
Cover the dish with plastic wrap. Place it in the fridge for at least 4 hours, or overnight if you can wait. This helps all the flavors meld together and sets the cake perfectly.Enjoy this easy and tasty dessert!
Tips & Tricks
How to Achieve the Best Texture
To get the right texture, whip the cream until stiff peaks form. This step is key for a fluffy cake. When you whip the cream, take your time. It should be thick and hold its shape well.
Soaking the Oreos is also important. Dip each Oreo in the milk for just 2-3 seconds. If you soak them too long, they can get mushy. You want them soft but still holding their shape.
Timing for refrigeration matters too. I suggest letting your cake chill for at least 4 hours. Overnight is even better for the best taste and texture. It allows the flavors to blend and the cake to set nicely.
Presentation Tips
For garnishing, use chocolate shavings and crushed Oreos. They add a nice touch and look great. You can sprinkle them on top right before serving for a fresh look.
When serving, cut the cake into squares. This makes it easy to dish out. You can also serve it with a drizzle of extra chocolate syrup on the plate. This adds a pop of flavor and makes it look fancy. Enjoy your Mocha Oreo Icebox Cake!
Variations
Alternate Ingredients
You can switch up the cookies for fun. Try using chocolate Oreos for a richer taste. If you want a dairy-free option, use coconut cream instead of heavy cream. For flavor, you can change mocha to vanilla. Each choice gives a new twist to the classic cake.
Serving Size Adjustments
Scaling the recipe helps for big events. You can double all the ingredients to make a larger cake. For smaller servings, try using cups instead of a large dish. Layer the ingredients in cups for a cute, individual treat. This way, everyone can enjoy a personal portion.
Storage Info
How to Store Leftovers
To keep your Mocha Oreo Icebox Cake fresh, cover it tightly with plastic wrap. Place it in the fridge right after serving. This helps keep the flavors intact. Your cake stays fresh for up to three days. After that, the texture may change, and the Oreos can become too soft.
Freezing Options
If you want to save some cake for later, freezing is a great choice. Wrap the cake tightly in plastic wrap and then in aluminum foil. This will prevent freezer burn. You can freeze it for up to a month.
When you’re ready to enjoy your cake again, move it to the fridge for several hours to thaw. This allows it to regain its creamy texture. Enjoy your delicious treat whenever you like!
FAQs
Common Questions
Can I make this cake ahead of time?
Yes, you can make this cake ahead of time. I recommend making it a day before you plan to serve it. This gives the flavors time to blend, and the texture will be even better. Just cover it well and store it in the fridge.
How do I make it less sweet?
To make it less sweet, reduce the amount of powdered sugar. You can also use less chocolate syrup. Both changes will help balance the sweetness. If you enjoy coffee flavor, add a bit more instant coffee for depth.
What can I use instead of instant coffee?
If you want to skip instant coffee, you can use brewed coffee. Just let it cool first. You can also try espresso powder for a stronger flavor. Adjust the amount based on your taste.
Troubleshooting
Why isn’t my whipped cream thickening?
If your whipped cream isn’t thickening, the heavy cream may be too warm. Make sure it is cold before whipping. Also, check that you’re using heavy cream, not light cream. Adding a bit of cornstarch can help stabilize it.
How do I fix a soggy cake layer?
To fix a soggy layer, reduce the soaking time of the cookies. If the cake is already made, try placing it in the fridge to firm up. You can also add a layer of crushed Oreos on top to absorb some moisture.
Can I use other types of chocolate syrup?
Yes, you can use different types of chocolate syrup. Dark chocolate syrup will give a richer flavor. You can also try flavored syrups, like hazelnut, for a twist. Just ensure it matches the overall taste.
This blog covered the key ingredients, steps, and tips to make a delicious cake. I shared ways to enhance texture and presentation. You can also explore recipe variations and storage options. Remember, you can adjust serving sizes based on your needs. With these tips, you’ll create a tasty treat that everyone will enjoy. So, roll up your sleeves and get baking. You’ve got this!
. Can I make this cake ahead of time? Yes, you can make this cake ahead of time. I recommend making it a day before you plan to serve it. This gives the flavors time to blend, and the texture will be even better. Just cover it well and store it in the fridge. How do I make it less sweet? To make it less sweet, reduce the amount of powdered sugar. You can also use less chocolate syrup. Both changes will help balance the sweetness. If you enjoy coffee flavor, add a bit more instant coffee for depth. What can I use instead of instant coffee? If you want to skip instant coffee, you can use brewed coffee. Just let it cool first. You can also try espresso powder for a stronger flavor. Adjust the amount based on your taste. Why isn’t my whipped cream thickening? If your whipped cream isn't thickening, the heavy cream may be too warm. Make sure it is cold before whipping. Also, check that you're using heavy cream, not light cream. Adding a bit of cornstarch can help stabilize it. How do I fix a soggy cake layer? To fix a soggy layer, reduce the soaking time of the cookies. If the cake is already made, try placing it in the fridge to firm up. You can also add a layer of crushed Oreos on top to absorb some moisture. Can I use other types of chocolate syrup? Yes, you can use different types of chocolate syrup. Dark chocolate syrup will give a richer flavor. You can also try flavored syrups, like hazelnut, for a twist. Just ensure it matches the overall taste. This blog covered the key ingredients, steps, and tips to make a delicious cake. I shared ways to enhance texture and presentation. You can also explore recipe variations and storage options. Remember, you can adjust serving sizes based on your needs. With these tips, you'll create a tasty treat that everyone will enjoy. So, roll up your sleeves and get baking. You’ve got this!](https://emmasdish.com/wp-content/uploads/2025/07/a2d200ba-92cd-4280-9fe0-b50dd786bfe2-250x250.webp)
