Get ready to indulge in a sweet treat that combines the best of cookies and cream! My Cookies and Cream Fudge Bars are easy to make and bursting with flavor. With just a handful of ingredients, including creamy peanut butter and white chocolate, you can whip up this delicious dessert in no time. Whether you’re hosting a party or treating yourself, these fudge bars will surely satisfy your sweet tooth. Let’s dive into the recipe!
Ingredients
Main Ingredients
– 1 cup cookie crumbs (from chocolate sandwich cookies)
– 1 cup creamy peanut butter
– 1 cup sweetened condensed milk
– 1 ½ cups white chocolate chips
– 1 teaspoon vanilla extract
Optional Add-ins
– ½ cup crushed chocolate sandwich cookies (for topping)
– ¼ cup mini marshmallows (optional for extra texture)
To make these tasty Cookies and Cream Fudge Bars, you need simple ingredients. First, gather your cookie crumbs from chocolate sandwich cookies. You can crush them yourself or buy pre-made crumbs. Make sure you have creamy peanut butter. This will add richness and a nice flavor.
Next is sweetened condensed milk. This ingredient helps bind everything together and sweetens the fudge. You also need white chocolate chips. They melt beautifully and give a sweet touch to the bars. Don’t forget vanilla extract for that extra flavor boost.
For added fun, you can include crushed chocolate sandwich cookies as a topping. They add a nice crunch. Mini marshmallows are also a great option if you want a chewy texture. You can mix and match these ingredients based on what you like. Each choice makes the fudge more special and fun.
Step-by-Step Instructions
Preparation Steps
– Line an 8×8 inch baking dish with parchment paper.
– Mix 1 cup of cookie crumbs and 1 cup of creamy peanut butter in a bowl.
Combining Ingredients
– Pour in 1 cup of sweetened condensed milk. Mix until smooth.
– Melt 1 ½ cups of white chocolate chips in a microwave-safe bowl. Stir every 30 seconds.
Final Mixture Assembly
– Add the melted white chocolate and 1 teaspoon of vanilla extract to the mix.
– Gently fold in ½ cup of crushed chocolate cookies and ¼ cup of mini marshmallows, if using.
Setting the Fudge
– Pour the mixture into the prepared dish. Spread it evenly.
– Refrigerate for at least 3 hours until set firmly.
Tips & Tricks
Successful Fudge Bar Tips
To ensure a smooth blended mixture, combine the cookie crumbs and peanut butter well. Mix until there are no dry spots. When melting white chocolate, use 30-second intervals in the microwave. Stir after each interval. This helps avoid burning and keeps it smooth.
Serving Suggestions
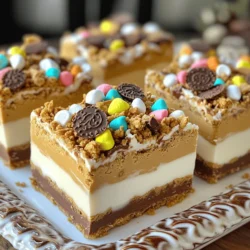
For plating, serve the fudge bars on a decorative platter. A drizzle of melted white chocolate adds a fun touch. You can also garnish with whole chocolate cookies for a playful look. Arrange the bars neatly for a beautiful display.
Common Mistakes to Avoid
One common mistake is overmixing the cookie folding step. Gently fold the crushed cookies in to keep some texture. Another mistake is not refrigerating long enough. The fudge needs at least three hours to set properly. Make sure you wait!

Variations
Flavor Variations
You can switch up the nut butter. Almond or cashew butter works great too. They add a unique flavor. If you love dark chocolate, try using dark chocolate chips instead of white. This change makes the fudge richer and more decadent.
Ingredient Swaps
If you need a gluten-free option, use gluten-free cookies. This swap keeps the taste and texture intact. You can also try different sweeteners, like honey or maple syrup. This gives you control over the sweetness.
Texture Variations
Want a crunch? Add chopped nuts or dried fruits like cranberries. This makes each bite exciting. You can also use fun toppings. Try sprinkles or candy pieces for color and fun. These little changes make the fudge bars feel special.
Storage Info
Best Practices for Storage
To keep your fudge bars fresh, store them in an airtight container. Use a container that fits the bars snugly. You want to avoid any air getting in. Place parchment paper between layers if stacking. This helps prevent them from sticking together.
Freezing Fudge Bars
You can freeze these fudge bars for longer storage. First, cut them into squares. Wrap each piece in plastic wrap. Then, place all the wrapped pieces in a freezer-safe bag. Make sure to remove as much air as you can. To thaw, simply take them out and let them sit at room temperature for about 30 minutes.
Shelf Life
These fudge bars can last up to a week at room temperature. However, they stay fresh longer in the fridge. In the fridge, they can last up to two weeks. Just make sure they are in an airtight container to keep them moist and tasty.
FAQs
What are Cookies and Cream Fudge Bars?
Cookies and Cream Fudge Bars are rich, sweet treats. They have a creamy base made with cookie crumbs and peanut butter. White chocolate gives them a smooth texture. Topped with crushed cookies, they are a fun twist on classic fudge.
Can I make these fudge bars ahead of time?
Yes, you can make these fudge bars ahead of time. Prepare them and refrigerate for at least three hours. They set well and taste even better after a day. Just store them in an airtight container.
How do I make the fudge gluten-free?
To make these fudge bars gluten-free, use gluten-free chocolate sandwich cookies. Many brands offer great options. Also, ensure your peanut butter is gluten-free. Check the labels to be safe.
Can I customize the recipe?
Absolutely! You can add different flavors to the fudge. Try almond or cashew butter instead of peanut butter. You can also swap in dark chocolate chips for a richer taste. Add nuts or dried fruits for more texture.
What can I use instead of sweetened condensed milk?
If you want a dairy-free option, use coconut cream. It works well for a creamy texture. You can also make your own by blending milk with sugar. This lowers the sugar content while keeping it sweet.
You’ve learned how to make delicious cookies and cream fudge bars. We covered the key ingredients, step-by-step instructions, and tips for success. Remember, you can customize flavors with different nut butters or toppings. Store leftovers in the fridge for long-lasting freshness. With this simple recipe, you’ll impress friends and family. Enjoy making and sharing these tasty treats!