Skip to content
DisclaimerTerms Of UseGDPR PolicyCookie Policy

Emmas Dish

  • Home
  • Drinks
  • Appetizers
  • Dinner
  • Dessert
  • About
  • Contact
  • Privacy Policy
DisclaimerTerms Of UseGDPR PolicyCookie Policy

Emma

- 2 cups cooked chicken, shredded - 1 cup corn kernels (fresh or frozen) - 1 cup black beans, drained and rinsed - 1 cup grated Monterey Jack cheese - 8 flour tortillas - 1 tablespoon olive oil - 1 small onion, diced - 2 cloves garlic, minced - 1 teaspoon cumin - 1/2 teaspoon smoked paprika - 1/4 teaspoon cayenne pepper (optional) - 2 cups sour cream - 1 cup chicken broth - Salt and pepper to taste - 1/4 cup chopped fresh cilantro (for garnish) These ingredients come together to create a rich and creamy flavor. You can use rotisserie chicken for a quick option. Fresh corn adds a sweet crunch, while black beans bring fiber and protein. Monterey Jack cheese melts beautifully, giving a rich taste. Flour tortillas help wrap up all the goodness inside. For the cooking essentials, olive oil helps sauté the onion and garlic, releasing their natural sweetness. The spices—cumin and smoked paprika—add warmth and depth. Cayenne pepper gives an optional kick if you like heat. Finally, sour cream and chicken broth make the white sauce creamy and tangy. With just a few simple items, you can craft a dish that delights the senses. Now that you know the ingredients, let’s move on to the fun part: cooking! {{ingredient_image_1}} 1. Preheat the oven to 375°F (190°C). 2. In a large skillet, heat 1 tablespoon of olive oil over medium heat. 3. Add 1 small diced onion and sauté for 3-4 minutes until it is soft. 4. Then, add 2 minced garlic cloves and cook for 1 more minute. 1. To the skillet, add 2 cups of shredded cooked chicken. 2. Next, add 1 cup of corn kernels and 1 cup of drained black beans. 3. Sprinkle in 1 teaspoon of cumin, 1/2 teaspoon of smoked paprika, and salt and pepper to taste. 4. Stir everything to mix well and heat for about 5 minutes. 1. In a separate bowl, mix 2 cups of sour cream with 1 cup of chicken broth. 2. Stir until smooth and season with salt and pepper to taste. 1. Spread a little white sauce on the bottom of a 9x13 inch baking dish. 2. Take an 8-inch flour tortilla and fill it with about 1/3 cup of the chicken mix. 3. Roll it up and place it seam-side down in the dish. 4. Repeat this step until all tortillas are filled. 5. Pour the remaining white sauce over the enchiladas, covering them well. 6. Top with 1 cup of grated Monterey Jack cheese. 1. Cover the dish with aluminum foil. 2. Bake for 20 minutes. 3. Uncover and bake for an additional 10 minutes until the cheese is bubbly. 1. Let the enchiladas cool for a few minutes. 2. Garnish with chopped fresh cilantro before serving. - Use rotisserie chicken for convenience. It saves time and tastes great. - Adjust spice levels to taste. Add more cayenne for heat or skip it for mild. - Substitute Greek yogurt for sour cream. This adds protein and a tangy flavor. - Experiment with different cheese blends. Try cheddar or pepper jack for a twist. - Prepare filling and sauce a day in advance. This makes dinner quick and easy. - You can assemble the enchiladas, cover, and refrigerate until you’re ready to bake. Pro Tips Use Rotisserie Chicken: For a quicker preparation, use store-bought rotisserie chicken instead of cooking your own. This saves time without sacrificing flavor. Customize the Heat: Adjust the amount of cayenne pepper based on your heat preference. You can also add diced jalapeños for an extra kick. Make Ahead: Assemble the enchiladas in advance and store them in the refrigerator. Bake them just before serving for a fresh, hot meal. Experiment with Cheeses: While Monterey Jack is delicious, try using a blend of cheeses like cheddar or pepper jack for a unique twist on flavor. {{image_2}} If you want a meatless meal, swap the chicken for sautéed mushrooms or extra beans. Mushrooms give a nice texture and flavor. You can use any beans, like pinto or kidney beans. This makes the dish hearty and satisfying. You still get that creamy goodness from the white sauce too! For a gluten-free option, use corn tortillas instead of flour tortillas. Corn tortillas are soft and work well with the sauce. They also add a lovely flavor that pairs nicely with the filling. This choice allows everyone to enjoy the enchiladas without worry. Do you like heat? Add jalapeños or increase the cayenne pepper in the filling. This adds a nice kick to your enchiladas. Adjust the spice to match your taste. You can add fresh jalapeños for a bold flavor or pickled ones for tang. Spice can really elevate this dish! Store your chicken enchiladas in an airtight container. They last for up to 3 days. This way, you can enjoy them again without losing flavor. Make sure they cool down before you seal them up. You can freeze your enchiladas before baking. Just wrap them well and place them in the freezer. They can stay good for up to 2 months. When you’re ready to bake, thaw them overnight in the fridge. To reheat your enchiladas, use the oven. Set it to 350°F (175°C). Bake them for about 20 minutes. This keeps the tortillas crispy and the cheese melted. If you want them extra warm, cover with foil for the first 10 minutes. Enjoy that fresh-baked taste! Yes, it’s a great time-saver! Rotisserie chicken is already cooked and tasty. You can shred it quickly and mix it into your filling. This shortcut cuts down on prep time. It also adds great flavor to your enchiladas. To make the sauce thicker, add more sour cream or reduce the chicken broth. Start with a little extra sour cream. Mix it well and check the texture. If it’s still too thin, cook down the broth a bit. This method gives you control over the sauce's creaminess. Consider rice, beans, or a fresh salad as sides. Rice adds a nice base, while beans offer extra protein. A fresh salad can balance the meal with bright flavors. You can also serve guacamole or chips for a fun touch. Yes, prepare and assemble the enchiladas up to a day prior and bake when ready. Just cover them well and store in the fridge. When you’re ready to eat, bake them straight from the fridge. This makes meal prep easy and stress-free. This blog post shared a tasty chicken enchilada recipe. You learned about the main ingredients and cooking essentials. I provided step-by-step instructions for ease. Tips and variations make it fun to personalize. You can store leftovers easily and even freeze them for later. Cooking should be simple and enjoyable. I hope you feel inspired to make these enchiladas soon. Enjoy every bite of your delicious creation!

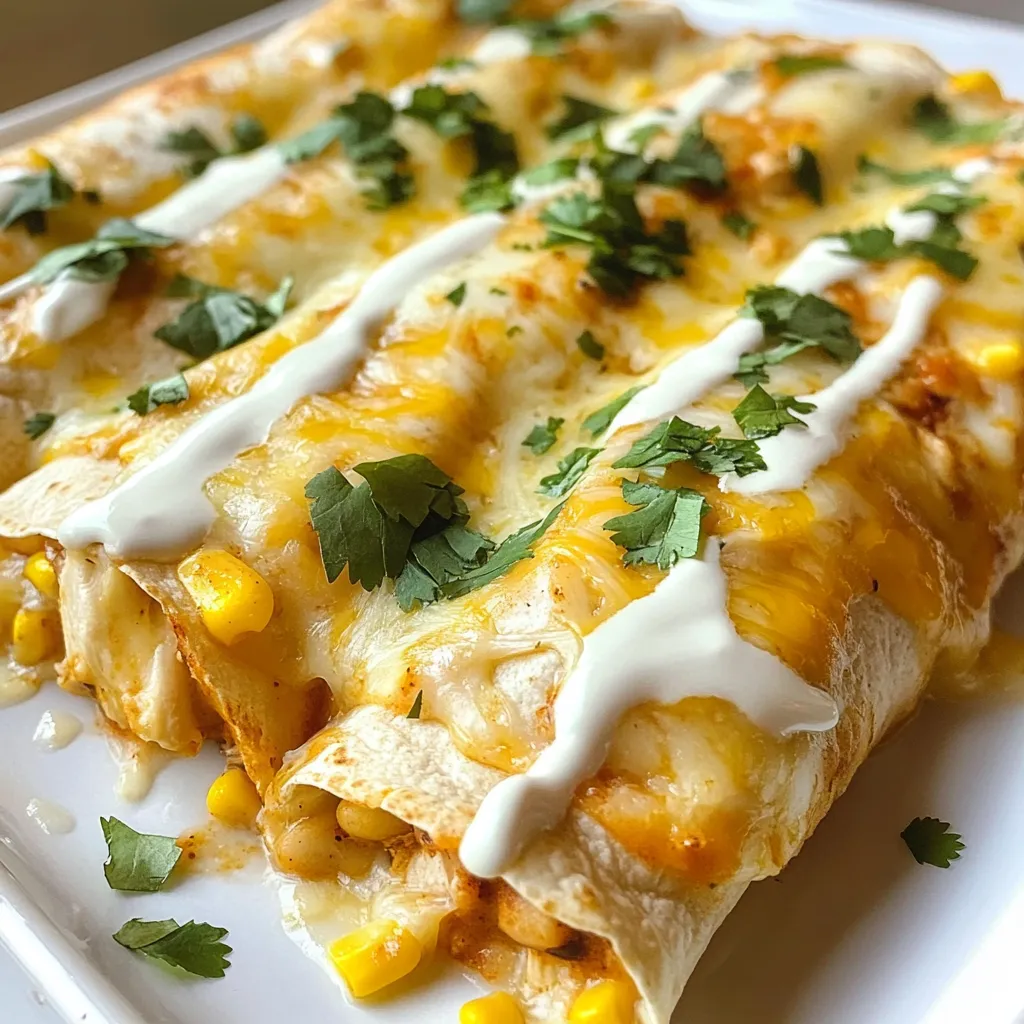
Chicken Enchiladas with White Sauce Simple Recipe

Are you ready to spice up your dinner routine? In this simple recipe for Chicken Enchiladas with White Sauce, I’ll

To make homemade Sloppy Joes, you need simple but tasty ingredients. Here’s what you’ll need: - 1 lb ground beef or turkey - 1 cup finely chopped onion - 1 cup finely chopped bell pepper (mix of red and green) - 2 cloves garlic, minced - 1 cup ketchup - 1 tablespoon Worcestershire sauce - 1 tablespoon brown sugar - 1 tablespoon apple cider vinegar - 1 teaspoon smoked paprika - 1 teaspoon mustard (yellow or Dijon) - Salt and pepper to taste - 4 hamburger buns - Optional: sliced pickles and sliced cheese for topping These ingredients blend well and create a rich flavor. The ground beef or turkey provides the base. The onions and bell peppers add crunch and sweetness. The seasonings and sauces bring everything together, making each bite delicious. {{ingredient_image_1}} Start by heating a large skillet over medium heat. Add the ground beef or turkey to the skillet. Use a spatula to break it into small pieces. Cook until it turns brown, which takes about 5-7 minutes. If you see grease pooling in the skillet, drain it. This keeps your Sloppy Joes from being too greasy. Next, add the chopped onions and bell peppers to the meat. Stir them in and let them cook for about 4-5 minutes. You want the veggies to soften and mix with the meat. After that, add the minced garlic. Cook for one more minute. This will bring out a lovely aroma. In a separate bowl, mix together the ketchup, Worcestershire sauce, brown sugar, apple cider vinegar, smoked paprika, mustard, salt, and pepper. Stir until it's all combined. Pour this sauce into the skillet with the meat and veggies. This is where the magic happens! Stir everything together well. Then, reduce the heat to low. Let the mixture simmer for about 10 minutes. This allows the flavors to blend and the sauce to thicken. Taste your mixture and adjust the seasoning if needed. A pinch more salt or a dash of pepper can make a big difference. While the Sloppy Joe mixture simmers, it’s time to toast your buns. You can use a dry skillet on the stove or an oven. If using a skillet, heat it over medium heat. Place the buns cut-side down and toast until they are golden brown. This adds a nice crunch and keeps them from getting soggy. Once everything is ready, it’s time to assemble your Sloppy Joes. Spoon the warm filling onto the toasted buns. If you like, add sliced pickles and cheese on top. Then, place the other half of the bun on top. Serve them warm and enjoy a hearty meal! You can change the meat in your Sloppy Joes to fit your taste. Ground turkey works great if you want a leaner option. If you prefer plant-based meals, use lentils or mushrooms. These options add unique flavors. If you like heat, add hot sauce. Just a few drops can spice things up. You can also try different kinds of mustard for a fun twist. Adjust the sauces to make the dish your own. When you brown your meat, use medium heat to get a nice color. Don’t rush this step; it helps add flavor. Break apart the meat as it cooks. This will help it brown evenly. For the veggies, sauté them until they are soft. Start with the onions and peppers first. Stir them often so they cook evenly. Add the garlic last for the best flavor. Cooking it for just a minute keeps its taste strong. For sides, crispy potato chips are a classic choice. They add crunch to the meal. You can also serve a simple salad for freshness. For a great presentation, use a wooden board to serve your Sloppy Joes. This gives a rustic look. Garnish each plate with a pickle spear for color and taste. Enjoy your tasty meal with friends and family! Pro Tips Choose Your Meat: For a healthier option, use ground turkey or chicken instead of beef. They both work well and are lower in fat. Customize Your Sauce: Feel free to add a few dashes of hot sauce or some chopped jalapeños for an extra kick! Perfectly Toasted Buns: For a crunchier texture, butter the outsides of your buns before toasting them in the skillet. Make It Ahead: The Sloppy Joe mixture can be made in advance and stored in the fridge for up to three days. Just reheat before serving! {{image_2}} You can make Sloppy Joes with many types of meat. If you want a vegetarian dish, try using lentils or mushrooms. Lentils give a nice texture and soak up flavors well. Mushrooms add a rich, earthy taste. These options make a great Sloppy Joe without meat. If you prefer meat, chicken or pork can work instead of beef or turkey. Ground chicken is lean and cooks quickly. Pork adds a sweet flavor. Just follow the same recipe steps for a tasty twist. The sauce is key to great Sloppy Joes. You can switch up the sauce for new flavors. Try using barbecue sauce for a smoky taste. Or, mix in some salsa for a fresh kick. You can also add extra spices or herbs. A little chili powder can add heat. Fresh basil or cilantro will bring brightness. Experiment until you find your favorite taste. You can choose different buns for serving. If you need gluten-free options, look for gluten-free hamburger buns. Whole wheat buns add a nutty flavor and more fiber. For something different, try serving your Sloppy Joe over rice or pasta. This makes a fun, filling meal. You can even serve it on a baked potato for a hearty dish. To keep your Sloppy Joes fresh, store them in the fridge. Use airtight containers to prevent air from entering. I recommend glass or plastic containers with lids. This helps maintain flavor and texture. Make sure to cool the filling first before sealing it in the container. Leftovers can last 3 to 4 days in the fridge. When you're ready to enjoy leftovers, reheat them safely. You can use the microwave or the stovetop. For the microwave, place the filling in a bowl. Cover it with a paper towel to avoid splatters. Heat in short bursts, stirring often. On the stovetop, use a skillet over low heat. Stir the filling until it's hot throughout. This keeps the meat juicy and tasty. If you want to save some Sloppy Joe filling for later, freezing is a great option. Allow the filling to cool completely, then transfer it to freezer-safe bags. Remove as much air as possible before sealing. Label the bags with the date. It can last up to three months in the freezer. When you're ready to eat, thaw the filling in the fridge overnight. You can reheat it on the stovetop or microwave. If it seems dry, add a splash of water or ketchup while reheating. This will keep it flavorful and moist. Sloppy Joes can last about 3 to 4 days in the fridge. To store them, place the filling in an airtight container. This keeps them fresh. Make sure to cool them before putting them in the fridge. Check for signs of spoilage before eating. If you see mold or smell something off, do not eat it. When in doubt, throw it out! Yes, you can make Sloppy Joes ahead of time! Cook the filling, let it cool, and store it in the fridge. This makes meal prep easy. When you’re ready to eat, reheat the filling on the stovetop or in the microwave. If using the stovetop, heat it on low, stirring often. This keeps it from sticking or burning. Sloppy Joes pair well with many side dishes. Some popular choices include: - Potato chips - Coleslaw - French fries - Corn on the cob - Salad For drinks, try sweet tea or a cold soda. These drinks complement the flavors in the Sloppy Joes. You can even serve it with a simple lemonade for a refreshing twist! You now have a complete guide on making Sloppy Joes. We covered ingredients, cooking steps, and tips for flavor. These meals are easy to make and adaptable. You can try different meats and sauces to find your favorite twist. Don't forget about storage and reheating, which keeps your leftovers fresh. Enjoy crafting and sharing these tasty sandwiches, whether for a family meal or a fun gathering. Try these ideas, and make your Sloppy Joes even better!

Homemade Sloppy Joes Simple and Flavorful Recipe

Are you ready to spice up your weeknight dinners? Homemade Sloppy Joes offer a tasty twist on a classic meal.

To make Chicken Pot Pie Pasta, gather these key ingredients: - 2 cups cooked pasta (penne or rigatoni works best) - 2 cups cooked chicken, shredded - 1 cup frozen mixed vegetables (peas, carrots, corn) - 1 cup chicken broth - 1 cup heavy cream - 1 teaspoon onion powder - 1 teaspoon garlic powder - 1 teaspoon dried thyme - 2 tablespoons olive oil - Salt and pepper to taste - 1/2 cup shredded cheddar cheese (optional for topping) - Fresh parsley, chopped (for garnish) These ingredients come together to create a creamy, comforting dish. The chicken and veggies add great flavor. The heavy cream makes it rich, while the pasta brings it all together. You can easily swap some ingredients if needed: - Pasta: Use gluten-free pasta for a gluten-free option. - Chicken: Replace with rotisserie chicken for faster prep. - Vegetables: Fresh veggies can be used instead of frozen. - Broth: Vegetable broth can replace chicken broth for a lighter taste. - Cream: Use half-and-half if you want a lighter sauce. These swaps keep the dish tasty while fitting your needs. For the best results, choose these pasta types: - Penne: Its shape holds the sauce well. - Rigatoni: The ridges catch all the creamy sauce. - Fusilli: Twisted shapes trap sauce and bits of chicken. Using the right pasta enhances the dish's texture and flavor. {{ingredient_image_1}} Start by cooking 2 cups of pasta. You can use penne or rigatoni. Follow the package instructions. Once the pasta is al dente, drain the water and set it aside. This step is key for a great texture. In a large skillet, add 2 tablespoons of olive oil. Heat it over medium heat. Then, add 2 cups of shredded chicken. Sauté the chicken for 2 to 3 minutes. You want it warmed through, not overcooked. Now, pour in 1 cup of chicken broth and 1 cup of heavy cream. Stir well to mix. Next, add 1 teaspoon of onion powder, 1 teaspoon of garlic powder, and 1 teaspoon of dried thyme. Season with salt and pepper to taste. Allow this mixture to simmer gently. This will create a rich, creamy sauce. After the sauce simmers, add the cooked pasta into the skillet. Toss the pasta well so that it coats in the creamy sauce. Let it cook for an additional 3 to 4 minutes. This helps the flavors come together nicely. If you like cheese, sprinkle 1/2 cup of shredded cheddar cheese on top. Let it melt slightly before serving. Finally, remove the skillet from heat and garnish with fresh chopped parsley. This adds color and a fresh taste. Enjoy your delicious Chicken Pot Pie Pasta! To make the best creamy sauce, balance flavors. Start with chicken broth and heavy cream. Heat them over medium heat until simmering. This step helps the sauce thicken nicely. Stir in onion powder, garlic powder, and thyme for flavor. Mix well and taste. Adjust salt and pepper as needed for your taste. If you want a richer sauce, add more cream. For a lighter sauce, use low-fat milk instead. Cooking pasta right is key. Use a large pot with plenty of water. Add salt to the water; it helps flavor the pasta. Cook the pasta until it's al dente, or firm to the bite. This keeps the texture nice when you mix it with the sauce. Drain the pasta but don’t rinse it. The starch helps the sauce stick better. If you plan to wait before serving, toss the pasta with a little olive oil to keep it from sticking. You can boost the flavor of your dish with some easy add-ons. Try adding fresh herbs like thyme or parsley at the end. They add brightness. For a kick, toss in a pinch of red pepper flakes. You can also mix in some cooked bacon or ham for extra depth. If you love cheese, feel free to add more than just cheddar. Parmesan or mozzarella can also work well. Each choice adds a new twist to this comforting dish. Pro Tips Use Rotisserie Chicken: For a quicker option, shred store-bought rotisserie chicken to save time on cooking and shredding. Customize Your Veggies: Feel free to swap in your favorite vegetables, like broccoli or bell peppers, to suit your taste. Adjust Creaminess: For a lighter dish, you can reduce the amount of heavy cream or substitute it with half-and-half. Make It Ahead: This dish can be prepared ahead of time and stored in the fridge. Just reheat before serving for a quick meal. {{image_2}} You can make a tasty vegetarian version of Chicken Pot Pie Pasta. Swap out the chicken for hearty mushrooms or chickpeas. These options add great texture and flavor. Use vegetable broth instead of chicken broth. For creaminess, you can use plant-based cream or cashew cream. Don't forget those frozen mixed veggies! They bring color and nutrients, making this dish just as comforting. If you want to change up the protein, try turkey or even shrimp. Cooked turkey works well and keeps the dish light. For shrimp, sauté them until pink and add them to the mix. You can also use tofu for a plant-based protein. Just ensure it’s firm and sautéed until golden. This gives a nice crunch and absorbs the creamy sauce beautifully. To lighten up this dish, consider using low-fat cream or milk. You can even replace cream with Greek yogurt for tanginess. Use whole wheat pasta for added fiber and nutrition. Reduce the amount of cheese or skip it altogether for a lower-calorie option. These changes still keep the dish creamy and satisfying, while making it easier on your waistline. To store your Chicken Pot Pie Pasta, let it cool down first. Then, place it in an airtight container. Make sure to seal it well. Store it in the fridge for up to three days. Always label the container with the date. This way, you’ll know when to eat it. When you’re ready to enjoy leftovers, take the pasta out of the fridge. You can heat it in the microwave or on the stovetop. If using the microwave, place it in a bowl and cover it. Heat in short bursts, stirring in between. If using the stovetop, add a splash of chicken broth or cream to keep it moist. Heat over low until it’s warm all the way through. You can freeze Chicken Pot Pie Pasta for later. First, let it cool completely. Then, place it in a freezer-safe container. Leave some space at the top for expansion. You can also use freezer bags. Squeeze out as much air as possible before sealing. It will last in the freezer for about three months. When you’re ready to eat, thaw it in the fridge overnight before reheating. Yes, using leftover rotisserie chicken is a great idea. It saves time and adds flavor. Just shred the chicken and add it to the pan. This makes the dish even quicker to prepare. To make Chicken Pot Pie Pasta gluten-free, use gluten-free pasta. There are many brands available that work well. Also, check the chicken broth for gluten-free labels. This way, you can enjoy the dish without worry. Chicken Pot Pie Pasta pairs well with a simple salad. A green salad with a light dressing complements the creamy dish. You can also serve it with crusty bread for a cozy meal. Chicken Pot Pie Pasta lasts about three to four days in the fridge. Store it in an airtight container to keep it fresh. Just reheat it gently in the microwave or on the stove when you’re ready to eat. Yes, you can prepare this meal ahead of time. Cook the pasta and make the sauce up to a day in advance. Just combine them before serving. This helps save time on busy nights. In this post, we explored the key ingredients, cooking steps, and helpful tips for Chicken Pot Pie Pasta. You learned how to sauté chicken and make a creamy sauce that blends perfectly with various pasta types. We also discussed plant-based options and how to store your leftovers. Embrace your creativity in the kitchen. This dish is delicious and versatile. Enjoy making it your own!

Chicken Pot Pie Pasta Comforting and Creamy Dish

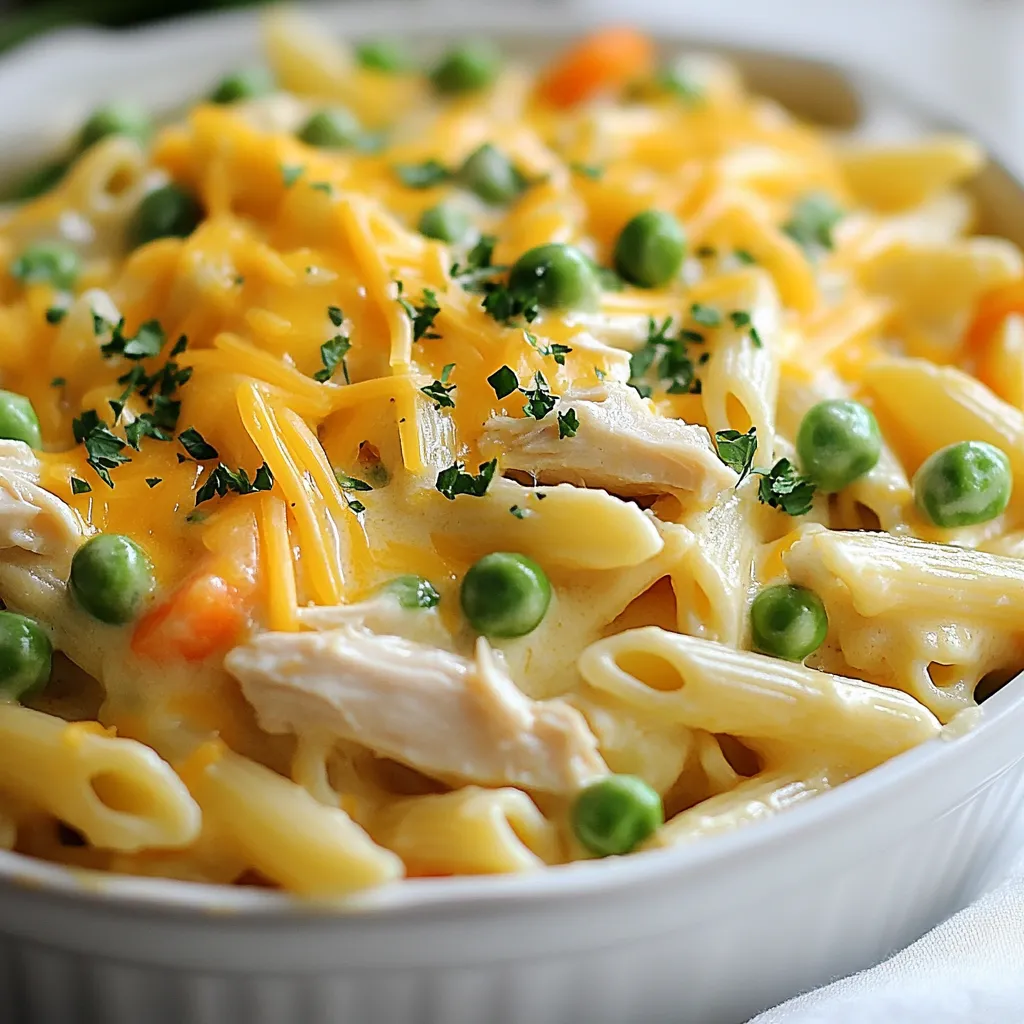
Are you ready to enjoy a warm, creamy dish that brings comfort to your dinner table? Chicken Pot Pie Pasta

To make Blueberry Cheesecake Swirl Cookies, you will need a few simple ingredients. Each one plays a key role in making these cookies tasty and fun. Here’s what you need: - 1 cup all-purpose flour - 1/2 teaspoon baking soda - 1/4 teaspoon salt - 1/4 cup unsalted butter, softened - 1/4 cup cream cheese, softened - 1/2 cup granulated sugar - 1/2 teaspoon vanilla extract - 1 egg - 1/2 cup fresh blueberries - 1 tablespoon lemon juice - 2 tablespoons powdered sugar (for blueberry swirl) Each ingredient adds flavor and texture. The flour gives the cookies structure. Baking soda helps them rise and become fluffy. Salt enhances the sweetness of the sugar. Softened butter and cream cheese create a rich, creamy base. They make the cookies taste like cheesecake. Sugar adds sweetness, while vanilla gives a warm, inviting flavor. The egg binds all the ingredients together. Fresh blueberries are the stars of the show. Their juice creates a beautiful swirl. Lemon juice brightens the flavor, making it zesty. Finally, powdered sugar mixes with the blueberries for a lovely swirl topping. Gather these ingredients, and you are ready to bake a delightful treat! {{ingredient_image_1}} 1. Preheat Oven and Prepare Baking Sheet Set your oven to 350°F (175°C). Line a baking sheet with parchment paper. This helps the cookies not stick. 2. Whisk Dry Ingredients Together In a medium bowl, mix 1 cup of all-purpose flour, 1/2 teaspoon of baking soda, and 1/4 teaspoon of salt. This blend makes sure the cookies rise well. 3. Cream Butter, Cream Cheese, and Sugar In a large bowl, beat together 1/4 cup of softened butter, 1/4 cup of softened cream cheese, and 1/2 cup of granulated sugar. Mix until it is smooth and fluffy. This step adds rich flavor. 1. Incorporate Egg and Vanilla Extract Add 1 egg and 1/2 teaspoon of vanilla extract to the buttery mix. Stir until everything is mixed well. 2. Combine Dry and Wet Mixtures Slowly add the dry mix to the wet mixture. Stir gently until just combined. Don’t overmix to keep the cookies soft. 1. Prepare the Blueberry Mixture In a small bowl, mash 1/2 cup of fresh blueberries with 1 tablespoon of lemon juice and 2 tablespoons of powdered sugar. This creates a fruity swirl. 2. Fold in Blueberries Gently fold half of the blueberry mix into the dough. Make sure it’s swirled, not fully mixed in. 3. Swirl Blueberry Mixture into Dough Use the rest of the blueberry mix to dollop onto the dough. Use a toothpick to create a marbled effect. This step makes each cookie unique. 1. Drop Cookie Dough on Baking Sheet Use tablespoons to drop the dough onto the prepared baking sheet. Leave space between each mound for spreading. 2. Add Blueberry Swirl Add the remaining blueberry swirl on top of each cookie. Swirl it gently with a toothpick. 3. Bake and Cool Bake the cookies for 10-12 minutes until the edges turn lightly golden. Let them cool on the sheet for a few minutes. Then, move them to a wire rack to cool completely. This cooling step helps them firm up. How to Avoid Overmixing To keep that beautiful swirl, mix gently. When you fold in the blueberry sauce, only stir until you see swirls. Too much mixing makes it one color. That takes away the fun of the blueberry swirl! Techniques for Marbling Use a toothpick or small spatula to swirl the blueberry mix. Start from the edge and move to the center. Make sure to keep the swirl light. This creates a lovely marble look that is eye-catching and tasty. Baking Time and Temperature Bake your cookies at 350°F (175°C) for 10-12 minutes. Look for light golden edges to know they are ready. This gives a soft inside and a slight crunch outside. Preventing Overbaking Keep an eye on your cookies as they bake. If you see the edges turning dark, take them out. Cookies continue to cook a bit after you remove them. This keeps them soft and chewy. Serving Suggestions Serve your cookies on a nice plate. Add a few fresh blueberries for color. This makes your cookies look special and inviting. Dusting with Powdered Sugar Sprinkle a little powdered sugar on top of the cookies. This adds sweetness and looks pretty. It’s a simple way to impress your guests! Pro Tips Use Fresh Blueberries: For the best flavor and texture, always opt for fresh blueberries instead of frozen ones. They will provide a burst of juice that enhances the cookie's overall taste. Don’t Overmix: When folding in the blueberry mixture, be careful not to overmix the dough. This will help maintain the beautiful swirl effect and keep the cookies tender. Chill the Dough: If you have time, chill the cookie dough for about 30 minutes before baking. This helps the cookies hold their shape and prevents them from spreading too much in the oven. Watch the Baking Time: Every oven is different, so keep an eye on the cookies as they bake. Remove them from the oven when the edges are lightly golden for the best texture. {{image_2}} Other Fruit Options You can switch up the blueberries for other fruits. Raspberries, strawberries, or blackberries work great too. Each fruit will bring its own taste twist. For example, raspberries add a nice tartness. Strawberries give a sweet flavor, making your cookies unique. Adding Chocolate Chips If you love chocolate, try adding chocolate chips. Mix in half a cup of chips with the dough. This adds a rich taste and a fun texture. The chocolate pairs well with the creamy cheesecake flavor. You can even use white chocolate for a sweeter treat. Gluten-Free Substitutions If you need gluten-free cookies, use gluten-free flour. Almond flour or a gluten-free blend works well. Just make sure to check the package for the right amount. This way, everyone can enjoy these tasty cookies. Vegan Modifications To make vegan cookies, swap the butter for coconut oil. Use a flax egg instead of a regular egg. Mix one tablespoon of flaxseed meal with two and a half tablespoons of water. Let it sit for a few minutes until it thickens. This will help bind the cookies without using eggs. - Best Storage Containers: I recommend using an airtight container for your cookies. This keeps them fresh. Glass or plastic containers work well. You can also use a zip-top bag if you don’t have other options. - Keeping Cookies Fresh: To keep your blueberry cheesecake swirl cookies fresh, store them at room temperature. They stay good for about five days. If you want them to last longer, consider freezing them. - Freezing Instructions: To freeze your cookies, let them cool completely first. Place them in a single layer on a baking sheet. Once frozen, transfer them to an airtight container or a zip-top bag. They can last for up to three months in the freezer. - Thawing Tips: When you’re ready to enjoy your cookies, take them out of the freezer. Let them sit at room temperature for about 30 minutes. If you want them warm, pop them in the oven at a low temp for a few minutes. Enjoy the fresh taste! You can check cookies by looking for a few signs. The edges should be lightly golden. The center should look set but still soft. If the cookies are too golden, they may be overbaked. Adjust baking time if needed. If your oven runs hot, reduce the time by a minute or two. If your cookies look too soft, give them an extra minute. Yes, you can use frozen blueberries. They may change the texture a bit. Frozen blueberries often have more juice, which can make the cookies wetter. You might end up with a softer cookie. To use frozen blueberries, add them straight from the freezer. Do not thaw them first. This will help keep the color and flavor more vibrant. To keep your cookies soft, use a few simple tips. First, don't overmix the dough. Overmixing can make them tough. Make sure to cream the butter and cream cheese well. This adds air and makes the cookies fluffy. Another tip is to store the cookies in an airtight container. This keeps moisture in and helps them stay soft longer. You can create delicious blueberry swirl cookies with simple steps and fresh ingredients. We covered essential ingredients, prep work, and mixing for the perfect dough. You learned tips to swirl without overmixing and bake them to perfection. We also discussed variations and storage tips to keep them fresh. Enjoy baking and sharing these cookies. They will impress anyone who tries them. Your creations can always adapt to new flavors or diets. So grab those blueberries and start baking!

Blueberry Cheesecake Swirl Cookies Delightful Treat

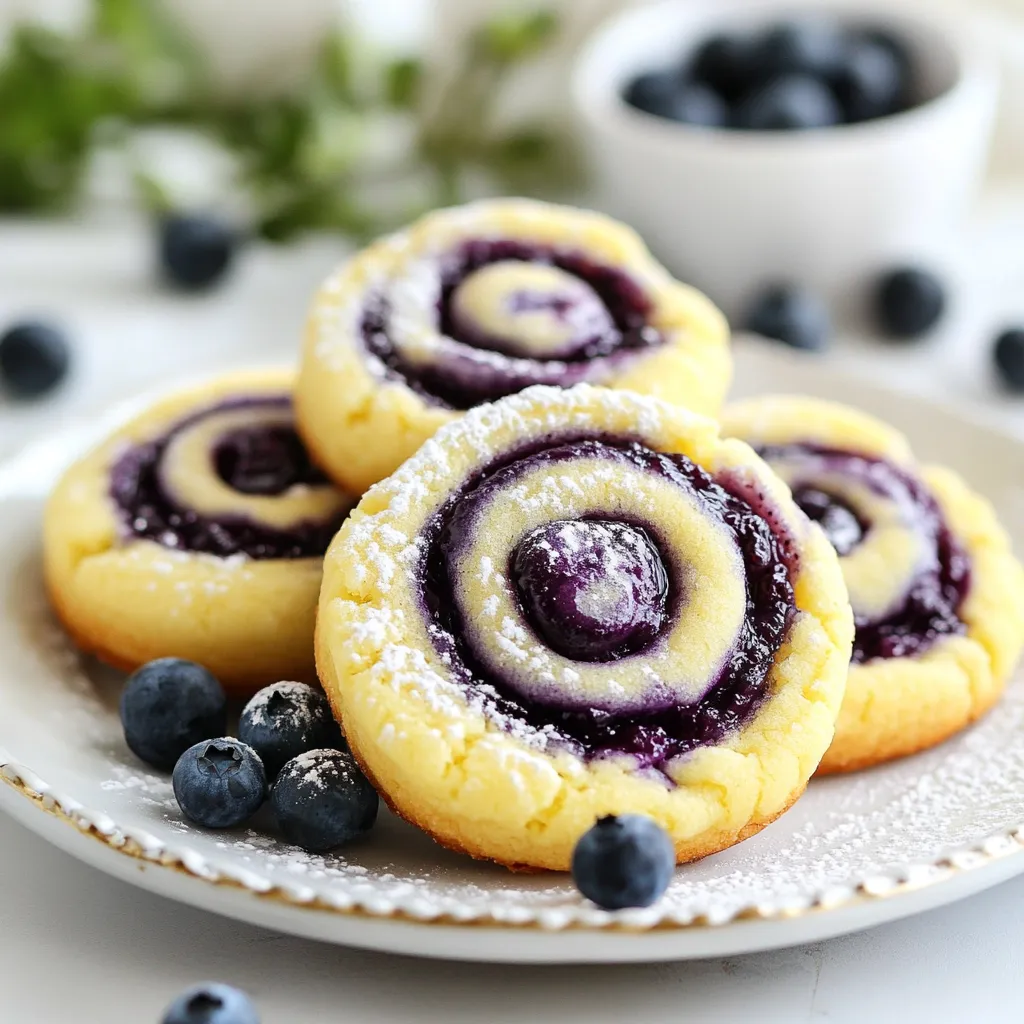
Are you ready to try a cookie that’s a true game changer? Blueberry Cheesecake Swirl Cookies blend creamy cheesecake and

- 4 chicken thighs, bone-in and skin-on - 1 cup basmati rice - 1 red bell pepper, sliced - 1 medium onion, finely chopped - 3 garlic cloves, minced - 2 cups chicken broth - 1 cup frozen peas - 2 tablespoons olive oil - Salt and pepper to taste I love using chicken thighs for this dish. They are juicy and tender. Basmati rice adds a lovely texture. Red bell pepper and onion give a sweet taste. Garlic brings a strong flavor. The chicken broth makes everything rich and savory. The peas add color and sweetness. - 1 teaspoon cumin - 1 teaspoon paprika - 1 teaspoon turmeric - 1 tablespoon aji amarillo paste (or adjust to taste) Cumin gives warmth and depth to the dish. Paprika adds a smokey taste. Turmeric gives a bright yellow color and mild flavor. Aji amarillo paste is key for authentic taste. This spicy paste brings a kick and unique flavor to the meal. - Fresh cilantro - Lemon wedges, for serving Fresh cilantro adds a burst of freshness. It pairs well with the rich flavors. Lemon wedges help brighten the dish. A squeeze of lemon gives a zesty finish. It’s perfect for balancing the savory notes of the chicken and rice. {{ingredient_image_1}} - Start by rinsing 1 cup of basmati rice under cold water. Keep rinsing until the water runs clear. This step removes excess starch and helps the rice stay fluffy. Drain the rice and set it aside. - Next, grab 4 chicken thighs. These should be bone-in and skin-on for the best flavor. Season them with salt, pepper, 1 teaspoon of cumin, 1 teaspoon of paprika, and 1 teaspoon of turmeric. Make sure to coat the chicken well with the spices. - Heat 2 tablespoons of olive oil in a large skillet or pot over medium-high heat. Once the oil is hot, add the chicken thighs, skin-side down. Sear them for about 5-7 minutes until they turn golden brown. Flip the chicken and cook for another 5 minutes. Then, remove the chicken from the skillet and set it aside. - In the same skillet, add 1 medium onion, finely chopped, and 3 minced garlic cloves. Sauté these for 2-3 minutes until they become soft and translucent. This step builds the base flavor for your dish. - Add 1 sliced red bell pepper and 1 tablespoon of aji amarillo paste to the onion and garlic mixture. Cook for another 2 minutes to let the flavors blend. - Stir in the rinsed rice, making sure it gets coated in the aromatic mix. Cook this for 1-2 minutes while stirring frequently. Then, pour in 2 cups of chicken broth and bring it to a boil. - Once boiling, reduce the heat to low. Return the chicken thighs to the pot, skin-side up, and cover with a lid. Let the rice simmer for about 20-25 minutes. In the last 5 minutes, sprinkle 1 cup of frozen peas on top and re-cover the pot. - When the cooking time is done, remove the pot from heat and let it sit covered for 5 more minutes. Fluff the rice with a fork, check the seasoning, and adjust salt and pepper if needed. - Finally, serve the chicken and rice on a platter. Garnish with fresh cilantro and lemon wedges for a bright finish. Searing the chicken thighs is key. It locks in moisture and adds a great taste. Start with hot oil and place the chicken skin-side down. Let it cook until golden brown. This step makes your dish shine. Adjusting spice levels is also important. If you love heat, add more aji amarillo paste. For milder flavors, use less. Taste as you go, and make it your own. For the best rice texture, rinse the basmati rice well. This removes excess starch. It helps the rice stay fluffy and separate. To prevent burning, keep an eye on the heat. Once you cover the pot, reduce the heat to low. This slow cook is key for perfect rice. Serve with fresh lime wedges and a side salad. These add brightness to the dish. For presentation, use a large platter. Place the chicken on top of the rice. Garnish with cilantro for color and a fresh taste. This makes the meal inviting! Pro Tips Marinate the Chicken: For even more flavor, marinate the chicken thighs in a mixture of olive oil, garlic, aji amarillo paste, and spices for a few hours or overnight before cooking. Use Fresh Herbs: Enhance the dish's aroma by adding fresh herbs like cilantro or parsley towards the end of cooking, just before serving. Adjust Spice Levels: If you prefer a spicier dish, consider adding more aji amarillo paste or even a pinch of cayenne pepper to the rice while cooking. Perfectly Cooked Rice: Avoid lifting the lid while the rice is cooking to ensure it steams properly and absorbs all the flavors without getting mushy. {{image_2}} You can switch up chicken parts in this dish. Use drumsticks or breasts if you prefer. They cook a bit differently, so adjust your cooking time. For a vegetarian option, try using tofu or chickpeas. They soak up the flavors well. You can also replace chicken broth with vegetable broth for a rich taste. Peru has many regions, and each offers unique twists. Coastal areas often add seafood to their chicken and rice. In the Andes, you'll find heartier ingredients, like potatoes. Each region uses local spices, which can change the flavor. Aji amarillo is popular everywhere, but some areas use aji panca for a smoky taste. Feel free to add extra vegetables. Carrots, green beans, or corn can bring more color and nutrition. You can also adjust the spices to fit your taste. If you like heat, add more aji amarillo paste or fresh chili peppers. This dish is all about making it yours while keeping those delicious flavors! To keep your Peruvian chicken and rice fresh, follow these tips: - Let the dish cool down to room temperature before storing. - Use airtight containers to seal in the flavors. - Divide the dish into smaller portions for easy access. If you want to freeze your leftovers, here's how: - Place the chicken and rice in freezer-safe bags or containers. - Remove as much air as possible before sealing. - For best results, eat the frozen portions within three months. When reheating, do this: - Thaw overnight in the fridge. - Heat gently in a pot or microwave until hot. How long can you keep your leftovers? - Refrigerated leftovers last about 3 to 4 days. - If you see any mold or off smells, throw it away. - Always trust your senses; if it seems bad, it probably is. To boost flavor, try adding herbs. Fresh cilantro is a great choice. You can also use lime juice for a zesty kick. A sprinkle of cheese can add creaminess. Experiment with spices like oregano or coriander for depth. You can adjust the aji amarillo paste for more heat. Don’t be shy; taste as you go! Each tweak lets you find your perfect flavor balance. Yes, you can use brown rice, but cooking times differ. Brown rice takes longer to cook than basmati. Plan for about 40-50 minutes for brown rice. Use more broth to ensure it cooks properly. Adjust the liquid ratio to 2 ½ cups for every cup of brown rice. It will offer a nuttier taste and a chewier texture. For sides, consider a fresh salad with avocado and tomatoes. A simple cucumber salad adds a nice crunch. Fried plantains can offer a sweet contrast. You can also serve it with roasted vegetables for extra color. Pairing with a light sauce, like salsa verde, can brighten the dish. Feel free to mix and match until you find your favorites! In this article, we explored how to make tasty Peruvian chicken and rice. We covered key ingredients like chicken thighs, basmati rice, and aromatic veggies. We also discussed essential spices and optional garnishes to elevate your dish. You learned step-by-step instructions for preparing and cooking, along with helpful tips for perfect flavor. As you try this recipe, remember you can adjust ingredients to match your taste. Enjoy creating your own version and share it with others!

Peruvian Chicken and Rice Flavorful Comfort Meal

Are you ready to dive into a comforting dish that warms the heart and delights the senses? Peruvian Chicken and

- Flank steak and marinade components - 1 lb flank steak - 1/4 cup fresh cilantro, chopped - 2 limes (juice and zest) - 2 tablespoons olive oil - 1 teaspoon cumin - 1 teaspoon paprika - 1 teaspoon garlic powder - Salt and pepper to taste - Bowl assembly ingredients - 1 cup jasmine rice - 1 can black beans, rinsed and drained - 1 cup corn (fresh or frozen) - 1 avocado, sliced - 1/2 cup cherry tomatoes, halved - Optional toppings and garnishes - Sour cream (optional, for topping) - Extra cilantro for garnish You will need fresh ingredients to get the best flavor. Flank steak gives a nice texture and taste. The marinade blends lime, cilantro, and spices for a zesty kick. Jasmine rice acts as a perfect base. Black beans and corn add fiber and sweetness. Avocado and tomatoes bring freshness. Finally, sour cream and extra cilantro add creaminess and color. Each ingredient plays a role in making your bowl tasty and fun. {{ingredient_image_1}} To start, you need to mix the marinade. In a small bowl, combine the lime juice, lime zest, chopped cilantro, olive oil, cumin, paprika, garlic powder, salt, and pepper. Stir it well until all the ingredients blend together. Next, take your flank steak and place it in a zip-lock bag. Pour the marinade over the steak. Seal the bag tightly to keep the flavors in. Store it in the refrigerator. I recommend marinating for at least 30 minutes but up to 2 hours for the best taste. For perfect jasmine rice, use a medium saucepan. Combine 1 cup of jasmine rice with 2 cups of water. Add a pinch of salt to enhance the flavor. Bring the water to a boil, then cover the pan. Lower the heat and let it simmer for about 15 minutes. This will let the rice absorb all the water. Once done, fluff the rice with a fork. Set it aside while you prepare the steak. Get your grill ready by heating it over medium-high heat. Remove the steak from the marinade and throw away the marinade. Place the steak on the grill. Cook it for about 3-5 minutes on each side for medium-rare. Adjust the time based on how well you like your steak. Once cooked, let the steak rest for 5 minutes. This helps keep it juicy. Slice it against the grain for the best texture. Now, it’s time to build your bowls. Start with a scoop of jasmine rice at the bottom. Add a portion of black beans and some corn on top. Then, place the sliced steak over the beans. Follow this with slices of avocado and halved cherry tomatoes. Drizzle extra lime juice if you want a bit more zing. To finish, add a dollop of sour cream on top if you like. Sprinkle some extra cilantro for a fresh touch. Serve the bowls immediately for the best taste and texture. For a great steak bowl, flank steak works best. It has a strong flavor and absorbs marinades well. Look for meat that is bright red with even marbling. This marbling adds fat, making it tender and juicy. Always pick a cut that is at least one inch thick. To ensure tenderness, let the steak rest after cooking. This helps keep the juices inside. Also, slice the steak against the grain. This makes each bite softer and easier to chew. To boost flavor, try adding fresh herbs like parsley or mint. You can also mix in spices such as chili powder or oregano for extra zest. A squeeze of fresh lime juice just before serving can brighten the dish. Homemade sauces can add depth too. A simple yogurt sauce with lime and garlic can be refreshing. You can also try a spicy salsa or chimichurri for a punch of flavor. For added nutrition, consider adding greens like spinach or kale. You can also include roasted vegetables, such as bell peppers or zucchini, for color and taste. When serving, be creative! Arrange the ingredients in a colorful way in the bowl. Use a scoop of rice as the base, then layer the beans, corn, and steak on top. Finish with avocado slices and cherry tomatoes for a vibrant look. This makes the dish not only tasty but beautiful too! Pro Tips Marinating Time: For the best flavor, marinate the steak for at least 2 hours. If you're short on time, even 30 minutes will add some flavor, but longer is better! Resting the Steak: Always let the steak rest for at least 5 minutes after grilling. This allows the juices to redistribute, ensuring each bite is juicy and tender. Rice Perfection: Rinse the jasmine rice before cooking to remove excess starch. This will help achieve a fluffier texture and prevent the grains from sticking together. Customize Your Bowls: Feel free to add other toppings like diced bell peppers, jalapeños, or shredded cheese to make your steak bowls even more delicious! {{image_2}} For a vegetarian or vegan twist, you can swap flank steak with grilled tofu or tempeh. Both options soak up flavors well and provide a good texture. You could also use jackfruit, which mimics shredded meat. If you want more protein, add chickpeas, lentils, or edamame. These options keep your bowl filling and rich in nutrients. If you want to switch up the base, try quinoa instead of jasmine rice. Quinoa is high in protein and adds a nutty flavor. Cauliflower rice is another great choice. It cuts carbs and creates a light, fresh feel. You can also use farro or barley for a chewy texture. Each option gives your bowl a unique taste. Change the citrus for a different zing. You can use orange or grapefruit juice for sweetness. Fresh herbs like mint or basil can add a fun twist. For heat, try jalapeños or a dash of hot sauce. Adjusting flavors can create a whole new dish, keeping things exciting. Mix and match to find your favorite balance. After you enjoy your cilantro lime steak bowls, store any leftovers in the fridge. Place them in an airtight container. This keeps the food fresh and safe. Consume the leftovers within three days for the best taste and quality. You can freeze components of your steak bowls for later use. For the best results, freeze the grilled steak, rice, and beans separately. Wrap each item tightly in plastic wrap and then place them in freezer bags. To eat, thaw overnight in the fridge. Reheat the steak on the grill or in a pan. Warm the rice and beans in the microwave or on the stove. To save time during busy weeks, prep your cilantro lime steak bowls ahead of time. Marinate the steak and cook the rice in advance. Store them in the fridge until you need them. You can also chop the veggies, like tomatoes and avocado, a day before serving. This way, you can assemble your bowls quickly when it's time to eat. To check the doneness of your steak, look for these signs: - Medium-rare: The steak feels soft and springs back. - Medium: The steak is firmer and has a bit of resistance. - Well-done: The steak feels very firm to the touch. Using a meat thermometer is the best way to be sure. Insert it into the thickest part of the steak. Aim for: - 130°F for medium-rare - 145°F for medium - 160°F for well-done Yes, you can marinate the steak overnight. This gives more flavor. I recommend a minimum of 30 minutes, but 1-2 hours is best. If you choose to marinate overnight, ensure it is in the fridge. This keeps it safe to eat. If you want alternatives to black beans, try these options: - Pinto beans - Chickpeas - Lentils - Cooked quinoa These options add protein and texture too! While fresh cilantro gives great flavor, you can use dried cilantro. However, use less dried than fresh. Dried herbs are stronger. A general rule is to use one-third of the amount. Fresh cilantro brightens your dish. If you love its taste, I recommend using it! Absolutely! You can add many toppings to make your bowl unique. Here are some ideas: - Sliced jalapeños for spice - Grated cheese for creaminess - Roasted vegetables for extra flavor - Sliced radishes for crunch Feel free to mix and match toppings to find your favorite combination! In this blog post, we explored how to create delicious steak bowls. We covered ingredients, marinating techniques, and cooking methods. Each step helps you build flavor and texture for a great meal. Remember to choose the right steak and don’t skip the toppings; they add exciting flavors. You can even customize the bowl for diet needs or personal taste. Enjoy your cooking journey, and have fun experimenting with different ingredients!

Cilantro Lime Steak Bowls Tasty and Simple Recipe

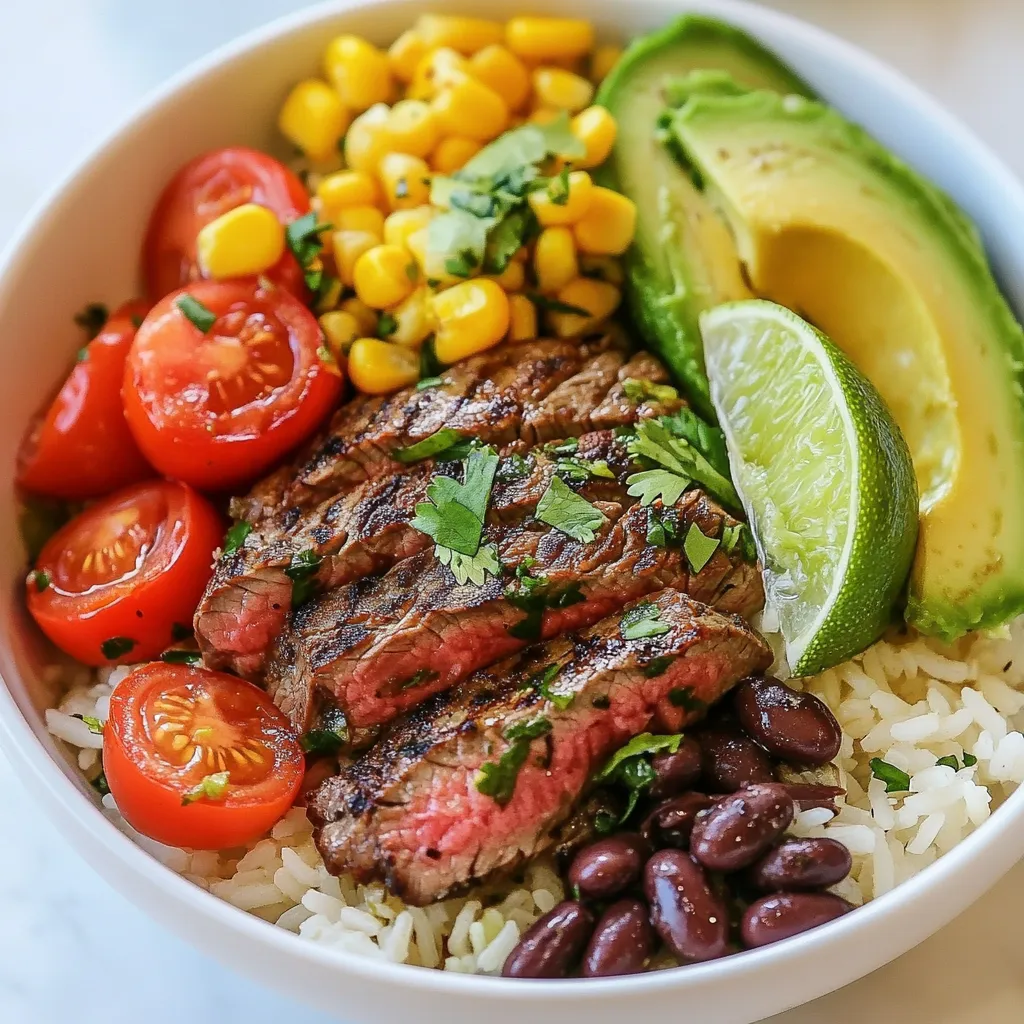
Ready to wow your taste buds? My Cilantro Lime Steak Bowls recipe is not only simple but bursting with flavor.

To make a tasty chilled lemon basil pasta salad, you need: - 8 ounces of fusilli or rotini pasta - 1 cup cherry tomatoes, halved - 1 cup cucumber, diced - 1/2 cup red bell pepper, finely chopped - 1/4 cup red onion, finely chopped - 1/4 cup black olives, sliced - 1/2 cup fresh mozzarella balls, halved - 1/4 cup fresh basil leaves, chopped - 1/4 cup olive oil - 2 tablespoons fresh lemon juice - Zest of 1 lemon - Salt and pepper to taste These ingredients bring bright flavors and textures. The pasta acts as a base, while the veggies add crunch. Fresh herbs like basil give aroma and taste. The lemon juice and zest provide a nice zing. You can add more fun to your salad with these optional ingredients: - Cooked chicken or shrimp for protein - Artichoke hearts for a tangy bite - Feta cheese for creaminess - Spinach for more greens - Sun-dried tomatoes for a sweet touch Feel free to mix and match. These add-ins can change the salad's flavor and make it more filling. While the lemon vinaigrette is great, try these dressings for a twist: - Balsamic vinaigrette for a sweet, tangy flavor - Italian dressing for a classic taste - Ranch dressing for creaminess - Pesto for a herby punch Each dressing gives a unique taste to your pasta salad. Experiment with different flavors to find your favorite! {{ingredient_image_1}} To start, boil water in a large pot. Add a pinch of salt to the water. Once the water boils, add 8 ounces of fusilli or rotini pasta. Cook it according to the package instructions, usually about 8-10 minutes. You want it al dente, firm but not hard. When the pasta is done, drain it in a colander. Rinse the pasta under cold water. This stops the cooking process. Set the pasta aside to cool. Next, grab a large mixing bowl. Cut 1 cup of cherry tomatoes in half. Dice 1 cup of cucumber into small pieces. Finely chop 1/2 cup of red bell pepper and 1/4 cup of red onion. Slice 1/4 cup of black olives. Halve 1/2 cup of fresh mozzarella balls. Finally, chop 1/4 cup of fresh basil leaves. Add all these ingredients to the mixing bowl. Stir gently to combine them. In a small bowl, add 1/4 cup of olive oil. Squeeze in 2 tablespoons of fresh lemon juice. Grate the zest from 1 lemon and add it to the bowl. Season with salt and pepper to taste. Use a whisk to mix all the ingredients together until they are well combined. This vinaigrette will give your salad a bright and zesty flavor. Now it’s time to put everything together. Add the cooled pasta to the bowl with the salad ingredients. Toss gently to mix them. Pour the lemon vinaigrette over the pasta salad. Mix gently again until everything is well coated. Cover the salad with plastic wrap or transfer it to an airtight container. Refrigerate it for at least 30 minutes. This chill time helps the flavors meld. Serve the salad cold, garnished with extra basil leaves for a pop of color. To cook pasta just right, follow these steps: - Use a large pot with plenty of water. - Add salt to the water for flavor. - Bring water to a boil before adding pasta. - Stir the pasta often to prevent sticking. - Cook until al dente, which means firm to the bite. - Drain and rinse pasta under cold water. This stops cooking and cools it down. Perfectly cooked pasta gives your salad a great texture. If you overcook it, your salad may turn mushy. Chilling your pasta salad helps the flavors blend. Here are some tips: - Always refrigerate for at least 30 minutes before serving. - Use a shallow dish to cool the salad faster. - Cover the bowl with plastic wrap or a lid. This keeps the salad fresh. For deeper flavor, chill it longer if you can. The longer it sits, the better it tastes! A beautiful presentation makes your salad more inviting. Here’s how to make it pop: - Serve in a large, shallow bowl for a nice display. - Add extra chopped basil on top for color. - Halve some cherry tomatoes and sprinkle them over the salad. This adds a fresh touch. A well-presented salad impresses your guests and makes the meal special. Pro Tips Cook Pasta Al Dente: For the best texture, cook your pasta al dente. This will prevent it from becoming mushy when mixed with the dressing and refrigerated. Use Fresh Ingredients: Fresh basil and ripe tomatoes will enhance the flavor of your salad significantly. Try to use seasonal produce for the best results. Chill Before Serving: Allowing the salad to chill in the refrigerator for at least 30 minutes helps the flavors meld together, making every bite delicious. Customize with Protein: If you'd like to make this salad more filling, consider adding grilled chicken, shrimp, or chickpeas for a boost of protein. {{image_2}} For a classic Italian pasta salad, switch up the ingredients. Use penne or rotini pasta. Add diced salami, pepperoni, or ham for a protein boost. Toss in artichoke hearts and sun-dried tomatoes for extra flavor. A mix of fresh herbs, like parsley and oregano, adds freshness. Drizzle with a balsamic vinaigrette to tie it all together. This salad is perfect for potlucks or family gatherings. Greek pasta salad is a fun twist. Start with your favorite pasta, like farfalle or fusilli. Add Kalamata olives, chopped cucumber, and bell peppers. Crumble feta cheese on top for a tangy taste. A dressing made of olive oil, red wine vinegar, and oregano pulls it all together. The salty feta and briny olives create a tasty Mediterranean vibe. Serve it chilled for a refreshing dish on warm days. If you want a vegetarian option, think outside the box. Use whole wheat or gluten-free pasta for a healthy base. Load up on colorful veggies like bell peppers, carrots, and peas. You can add chickpeas for protein and crunch. A creamy avocado dressing can replace traditional dressings. This adds healthy fats and a smooth texture. These salads are filling and perfect for lunch or dinner. To keep your cold pasta salad fresh, use a tight container. Glass or plastic containers work well. Make sure to cover it with a lid or plastic wrap. This keeps the salad from drying out. When stored in the fridge, cold pasta salad lasts about 3 to 5 days. The flavors get better as it sits. However, check for any signs of spoilage before eating. If it smells off or looks strange, throw it out. Freezing cold pasta salad is tricky. I do not recommend it for best taste. The texture changes when thawed. If you must freeze it, leave out fresh ingredients like tomatoes and basil. Use a freezer-safe container and eat within 2 months. When ready to eat, thaw in the fridge overnight. Yes, you can make pasta salad ahead of time. This dish tastes even better after chilling. Prepare it a few hours before serving. Store it in the fridge to keep it fresh. Fusilli and rotini are great choices for cold pasta salad. Their shapes hold the dressing well. You can also use penne or farfalle for a fun look. Choose any pasta that you enjoy. You can add protein easily. Cooked chicken, tuna, or shrimp work well. Beans like chickpeas or black beans are great, too. Just mix them in when you add the veggies. There are many tasty dressing options for pasta salad. You can use a balsamic vinaigrette for a sweet flavor. A yogurt-based dressing adds creaminess. Try a pesto for a fresh herb taste. Chilled lemon basil pasta salad is refreshing and simple. We covered key ingredients and how to make it. You can add flavors or choose dressings you love. I provided tips for cooking pasta and serving it well. Consider variations like Greek or vegetarian options to mix it up. Remember to store your salad properly for the best taste. Making pasta salad ahead saves time and brings joy to your meals. Enjoy your fresh creation!

Cold Pasta Salad Flavorful and Easy Recipe

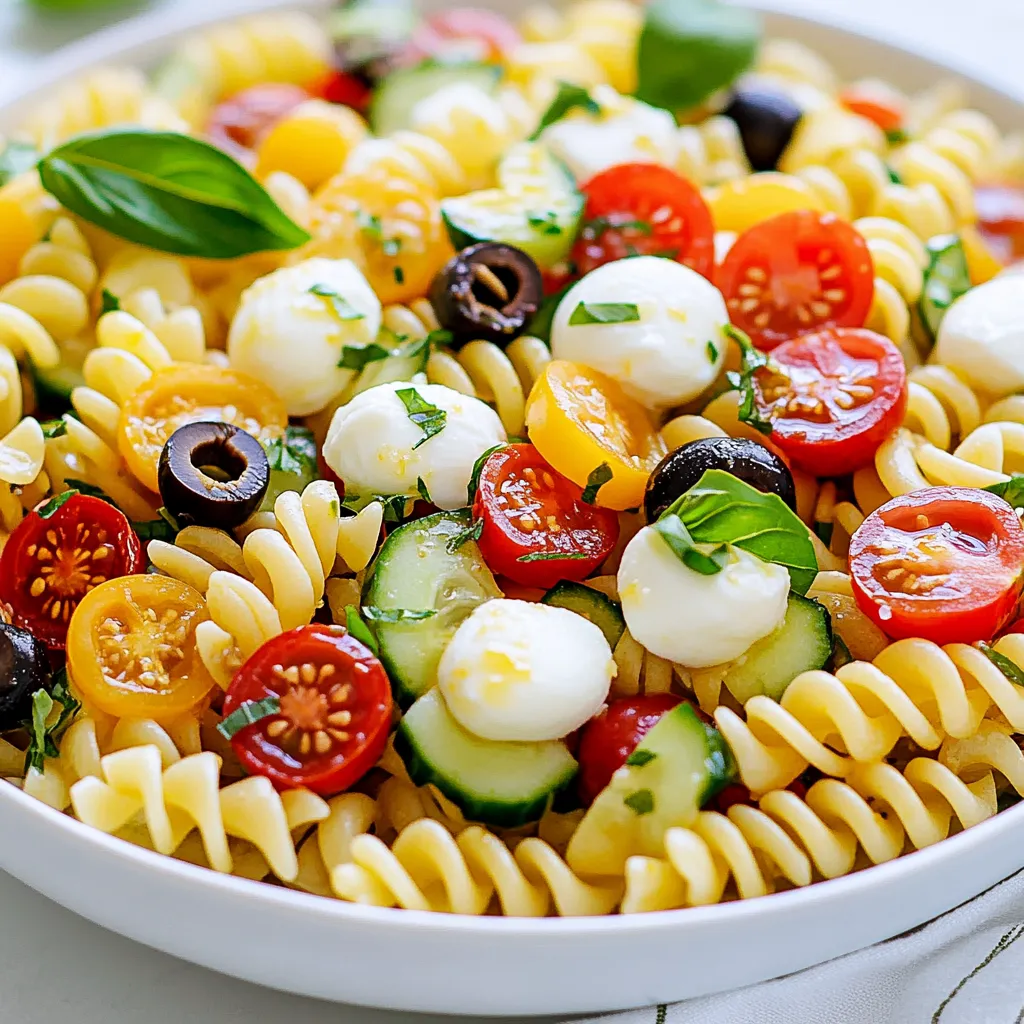
Are you ready to make a cold pasta salad that wows? This flavorful and easy recipe combines fresh ingredients and

- 1 lb (450g) boneless chicken thighs, cut into bite-sized pieces - 1 cup buttermilk (or regular milk) - 1 cup all-purpose flour - 1/2 cup cornstarch - 1 teaspoon baking powder - 1 teaspoon garlic powder - 1 teaspoon onion powder - 1/2 teaspoon black pepper - 1/2 teaspoon salt - 1/4 teaspoon cayenne pepper (optional, for heat) - 1/4 cup gochujang (Korean chili paste) - 2 tablespoons soy sauce - 2 tablespoons honey - 1 tablespoon sesame oil - 1 teaspoon minced garlic - 1 teaspoon minced ginger - 1 tablespoon rice vinegar - Sesame seeds and chopped green onions for garnish The chicken is key for this dish. I choose boneless thighs for their flavor and juiciness. The buttermilk helps tenderize the meat and adds a rich taste. For the breading, I mix flour and cornstarch. This combo gives a crispy coating that holds well. You can add spices to the breading mix to add depth. Garlic and onion powder work wonders here. A touch of cayenne gives some heat. If you prefer no spice, skip the cayenne. The sauce brings everything together. Gochujang gives a sweet heat, while honey adds a nice sweetness. Sesame oil brings a nutty taste. This sauce is sticky, which is perfect for coating the crispy chicken. Garnish your dish with sesame seeds and green onions. They add color and a fresh bite. This dish is not just food; it’s a flavor experience! {{ingredient_image_1}} Start with one pound of boneless chicken thighs. Cut them into small, bite-sized pieces. Place the chicken in a bowl. Pour in one cup of buttermilk. This helps make the chicken tender and adds flavor. Let it sit for at least 30 minutes. If you have more time, you can marinate it longer for even better taste. Next, grab a separate bowl. In this bowl, mix one cup of all-purpose flour and half a cup of cornstarch. Add one teaspoon of baking powder, one teaspoon of garlic powder, and one teaspoon of onion powder. Sprinkle in half a teaspoon of black pepper, half a teaspoon of salt, and a quarter teaspoon of cayenne pepper for some heat. Whisk everything together until it's well combined. Heat vegetable oil in a deep pot or frying pan. Aim for a temperature of 350°F (175°C). You need enough oil to fully cover the chicken pieces. After marinating, take the chicken out of the buttermilk. Let the extra buttermilk drip off. Coat each piece in the flour mixture, shaking off the excess. Carefully place the coated chicken into the hot oil. Fry in batches for about 4 to 5 minutes. You want them golden brown and crispy. Use a slotted spoon to remove the chicken and let it drain on paper towels. While the chicken fries, it's time to make the sauce. In a small saucepan, combine a quarter cup of gochujang, two tablespoons of soy sauce, and two tablespoons of honey. Add one tablespoon of sesame oil, one teaspoon of minced garlic, and one teaspoon of minced ginger. Pour in one tablespoon of rice vinegar. Heat this over medium heat. Stir constantly until it bubbles and thickens slightly. Once the chicken is crispy and the sauce is ready, it’s time to combine them. In a large mixing bowl, toss the fried chicken with the sauce. Make sure every piece is coated well. Now, plate the chicken and garnish it with sesame seeds and chopped green onions. Enjoy your Crispy Korean Popcorn Chicken! To get that perfect crunch, use a mix of flour and cornstarch. The cornstarch makes the coating light and crispy. Use a baking powder to add some lift as it fries. Make sure your oil is hot enough, around 350°F (175°C). Fry in small batches so each piece cooks evenly. Don’t overcrowd the pan; this keeps the oil temperature steady. Choose an oil with a high smoke point. Vegetable oil works well because it heats evenly. You can also use canola or peanut oil. These oils won’t change the flavor and help your chicken get that golden brown look. Marinate your chicken for at least 30 minutes. This makes the chicken juicy and adds flavor. If you have time, letting it sit for up to 2 hours is even better. The buttermilk helps tenderize the meat, making it more delicious. Pro Tips Marinate Longer for Flavor: For even more flavorful chicken, consider marinating for 1-2 hours or overnight in the refrigerator. Maintain Oil Temperature: Use a thermometer to keep the oil temperature consistent. If the oil is too hot, the chicken will burn; if too cool, it will absorb excess oil and become greasy. Double Dredge for Extra Crispiness: For an extra crunchy texture, dip the coated chicken back into the buttermilk and then back into the flour mixture before frying. Customize Your Sauce: Feel free to adjust the ingredients in the sauce to suit your taste, adding more honey for sweetness or more gochujang for spice. {{image_2}} If you love heat, try adding more cayenne pepper. It adds a punch to the crispy chicken. You can also mix in some sliced fresh chili peppers. This gives a spicy kick and a nice color. Adjust the sauce by adding more gochujang. Start with one extra tablespoon and taste as you go. The heat can really make this dish pop! Want to mix it up? Experiment with different sauces! A sweet and sour sauce works well. Just use equal parts of honey and vinegar. You can also try a sesame garlic sauce. Mix soy sauce, minced garlic, and sesame oil for a tasty twist. Whatever sauce you pick, it should balance sweetness and saltiness. Your options are endless! Looking for a vegetarian option? Substitute chicken with tofu. Use firm tofu for the best results. Press it to remove excess water before cutting it into bite-sized pieces. Marinate it like chicken to soak in flavor. Follow the same breading and frying steps. You’ll end up with crispy tofu that’s just as delicious as the chicken! To store leftover crispy Korean popcorn chicken, let it cool first. Place the chicken in an airtight container. Make sure to cover it tightly. Store it in the fridge for up to three days. This helps keep the chicken fresh and tasty. When you are ready to eat, reheating is key. Preheat your oven to 375°F (190°C). Spread the chicken on a baking sheet in a single layer. Bake for about 10-15 minutes, or until it is hot and crispy again. You can also use an air fryer for the same time to keep it crunchy. If you want to save some for later, freezing works great. Place cooled chicken in a freezer-safe bag. Remove as much air as possible and seal it. Freeze for up to three months. When you are ready to eat, thaw it in the fridge overnight. Then, reheat as mentioned above. Enjoy the flavor again! Yes, you can use chicken breast instead of thighs. The breast will be leaner. It cooks faster, so watch it closely. You can still follow the same marinade and breading steps. Just ensure the chicken is cooked through, reaching 165°F (75°C). To make this dish gluten-free, swap the all-purpose flour with a gluten-free blend. Also, check the cornstarch brand to ensure it’s gluten-free. For the sauce, use a gluten-free soy sauce. This way, you keep all the tasty flavors without gluten. Crispy Korean popcorn chicken pairs well with several sides. Here are some ideas: - Steamed rice or fried rice - Kimchi for a spicy kick - Fresh veggies like cucumber or carrots - A simple salad with sesame dressing These sides will add color and taste to your meal. To tone down the heat in the sauce, reduce the gochujang. Start with 2 tablespoons instead of 1/4 cup. You can also add more honey to sweeten it up. Another option is to mix in some regular chili sauce for flavor without too much heat. This keeps the dish enjoyable for everyone. We covered key ingredients for Crispy Korean Popcorn Chicken, from chicken to sauce. You learned step-by-step instructions for marinating, frying, and coating. I shared useful tips to get that perfect crisp, along with variations to spice it up or switch to tofu. Lastly, you now know how to store leftovers and reheat them. Enjoy experimenting with this dish. Your kitchen adventures are just beginning!

Crispy Korean Popcorn Chicken Irresistible Flavor Boost

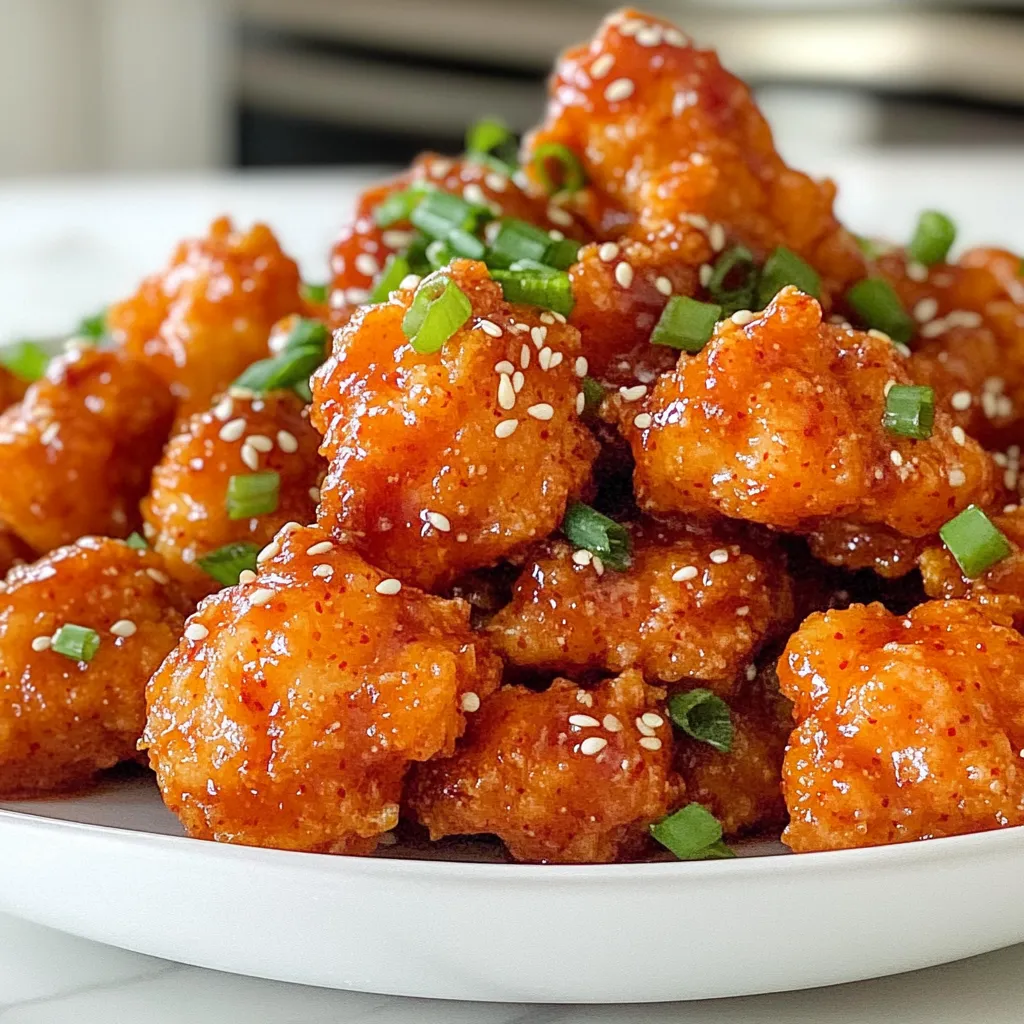
Are you ready to elevate your snack game? Crispy Korean popcorn chicken packs a flavor punch that’s hard to resist.

You need 1 pound of kielbasa sausage. Slice it into bite-sized pieces. This sausage adds a rich, smoky flavor. It gives the soup its hearty base. I love using kielbasa because it cooks fast and tastes great. Gather these vegetables: - 4 medium potatoes, diced - 1 large onion, chopped - 2 carrots, diced - 3 cloves garlic, minced You also need seasonings: - 1 teaspoon thyme - 1 teaspoon paprika - Salt and pepper to taste The potatoes bring creaminess. The onion and garlic add depth. Carrots add a sweet touch. Thyme and paprika bring warmth and flavor. These ingredients mix well to create a comforting dish. For liquids, have 4 cups of chicken broth and 1 cup of heavy cream. The broth forms the soup's base. It adds richness and a savory taste. The heavy cream makes it creamy and smooth. You can adjust the cream for your taste. This blend of ingredients creates a warm, filling meal. Each bite is a hug in a bowl! {{ingredient_image_1}} Start by heating 2 tablespoons of olive oil in a large pot over medium heat. Once the oil is hot, add 1 large chopped onion and 3 minced garlic cloves. Sauté them until the onion turns soft and clear, about 5 minutes. This step builds a solid flavor base for your soup. Next, toss in 1 pound of sliced kielbasa sausage. Cook it for around 5 to 7 minutes. You want the sausage to brown slightly. Browned kielbasa adds a nice depth. After that, stir in 2 diced carrots and 4 diced potatoes. Cook for another 3 minutes to soften the veggies. Now, pour in 4 cups of chicken broth. Add 1 teaspoon each of thyme and paprika, plus salt and pepper to taste. Bring the soup to a boil, then lower the heat and let it simmer for 20 minutes. Check the potatoes; they should be soft. Use a potato masher to mash half of the potatoes in the pot. This gives the soup a creamy texture. Stir in 1 cup of heavy cream and heat for another 5 minutes. Adjust the seasonings if needed. Your soup is almost ready to serve! To boost flavor, use fresh herbs. Thyme and parsley brighten the soup. For a richer taste, brown the kielbasa well. This adds depth and a nice texture. If you like creaminess, mash half the potatoes in the pot. This gives the soup a velvety feel. You can also add a splash of lemon juice for a hint of zest. Heat your pot before adding oil. This helps the onion and garlic cook evenly. Stir often to prevent sticking. When adding the broth, ensure it covers the vegetables well. Bring the soup to a boil, then lower the heat. Simmer gently for the best flavor. Taste the soup before serving. Adjust salt and pepper as needed for balance. Serve the soup hot for comfort on cool days. A sprinkle of chopped parsley adds color and freshness. Pair it with crusty bread for a full meal. You can also add a dollop of sour cream on top for extra creaminess. For a fun twist, serve it in bread bowls. This makes the meal even more special! Pro Tips Use Fresh Ingredients: Whenever possible, opt for fresh potatoes and herbs to enhance the flavor of your soup. Adjust Thickness: If you prefer a thicker soup, mash more potatoes or add a bit of cornstarch mixed with water to achieve your desired consistency. Flavor Boost: For an extra layer of flavor, consider adding a splash of white wine after sautéing the kielbasa and onions. Leftover Magic: This soup tastes even better the next day! Store leftovers in the fridge and reheat gently for a quick meal. {{image_2}} You can change some ingredients in Kielbasa Potato Soup. If you want a lighter soup, use turkey kielbasa instead of pork. This swap cuts fat but keeps flavor. You can also use vegetable broth for a vegetarian option. Try using half-and-half instead of heavy cream. This will still give a creamy texture. For a dairy-free soup, use coconut milk. It adds a hint of sweetness and works well with the kielbasa. Feel free to boost the veggie count! Adding celery gives a nice crunch. You can toss in green beans or peas for color. Spinach or kale adds nutrition and a pop of green. Just add these veggies during the last few minutes of cooking. This keeps them bright and fresh. You can also include bell peppers for a sweet note. Diced zucchini or squash adds a soft texture. The more veggies, the more flavors and nutrients in your bowl! If you love heat, spice it up! Add crushed red pepper flakes to the pot. Start with a small amount, then taste as you go. You can also use spicy sausage instead of regular kielbasa. Another great option is to stir in diced jalapeños. They give a fresh kick. For a smoky flavor, try adding chipotle peppers in adobo. This adds depth and warmth to the soup. Just remember, spice can build, so adjust to your taste! To keep your Kielbasa Potato Soup fresh, let it cool first. Pour the soup into an airtight container. Make sure to seal it tightly. You can store it in the fridge for 3 to 4 days. If you want to save it longer, freezing is a good option. When you’re ready to enjoy your soup again, take it out of the fridge. Heat it in a pot over medium heat. Stir it often to avoid sticking. If it seems thick, add a little bit of broth or water. You can also microwave it. Just cover it loosely and heat in short bursts. To freeze your soup, use a freezer-safe container. Leave some space at the top for expansion. You can also use freezer bags. Just flatten them for easy storage. Kielbasa Potato Soup can last up to 3 months in the freezer. When you’re ready to eat, thaw it in the fridge overnight before reheating. This keeps the flavor and texture nice. Yes, you can. If you want a different taste, try smoked sausage or turkey sausage. Both options add unique flavors to the soup. You can also use spicy sausage for an added kick. Just remember that different sausages may change the soup's flavor. To make Kielbasa Potato Soup healthier, consider these tips: - Use low-fat milk instead of heavy cream. - Add more vegetables like spinach or kale for nutrition. - Choose leaner sausage options, such as turkey or chicken sausage. - Reduce the amount of salt and use herbs for flavor. These changes will help keep the creamy taste but lower the calories. This soup pairs well with several sides. Here are my favorites: - Crusty bread for dipping. - A fresh garden salad for crunch. - Grilled cheese for comfort. Try these options to complete your meal and enjoy every bite! This blog post covered making a delicious Kielbasa potato soup. We explored key ingredients like sausage, vegetables, and useful liquids. I shared step-by-step instructions to guide you through the cooking process. Tips for flavor and texture improvements were provided, along with ways to vary the recipe. Remember, you can customize this soup to fit your taste. Experiment with ingredients and enjoy the warm, satisfying meal. Now, gather your supplies and start cooking! You’ll love each spoonful of your homemade soup.

Kielbasa Potato Soup Hearty and Comforting Delight

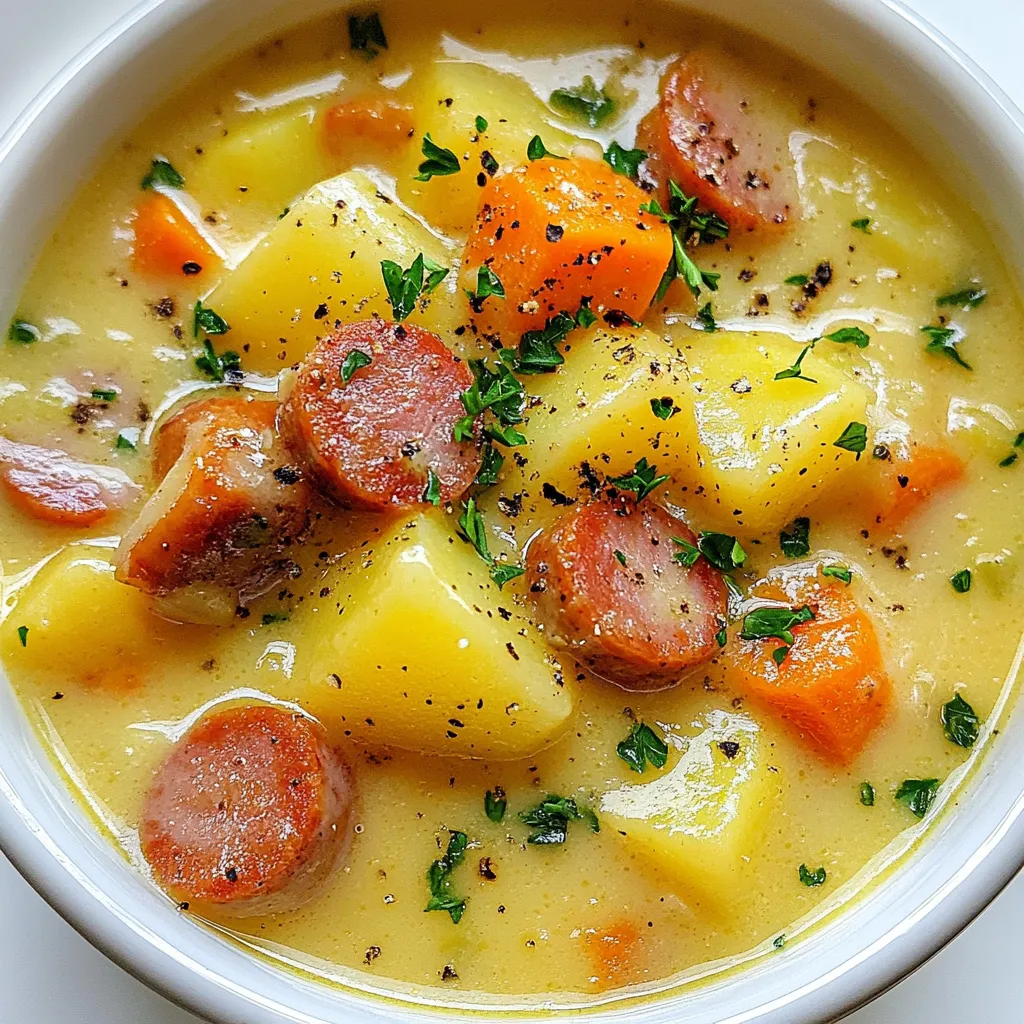
Warm up your dinner table with my Kielbasa Potato Soup! This dish is hearty, comforting, and packed with flavor. I’ll

- 8 oz spaghetti noodles - 1 lb ground beef - 2 tablespoons soy sauce - 2 tablespoons oyster sauce - 1 tablespoon sesame oil - 1 tablespoon cornstarch - 1 red bell pepper, thinly sliced - 1 cup snap peas, trimmed - 3 green onions, chopped - 2 cloves garlic, minced - 1 teaspoon ginger, grated - 1 teaspoon chili paste (adjust to taste) - ½ cup beef broth - Salt and pepper to taste - Sesame seeds for garnish When you gather ingredients, quality matters. Fresh vegetables and good beef make a difference. Use whole, firm bell peppers and bright green snap peas. For ground beef, choose lean cuts for less grease. For dietary needs, swap the ground beef with ground turkey or tofu. You can use gluten-free spaghetti for a gluten-free meal. Make sure to get low-sodium soy sauce if you want to cut back on salt. Always adjust flavors to fit your taste. Enjoy the cooking journey! {{ingredient_image_1}} To cook spaghetti, use a large pot of boiling salted water. Salting the water is key. It helps the pasta gain flavor. Cook the spaghetti until al dente, which means it should be firm but not hard. This usually takes around 8-10 minutes. After cooking, drain the spaghetti well and set it aside. In a medium bowl, mix ground beef with soy sauce, oyster sauce, sesame oil, and cornstarch. Use your hands to mix it well. This helps ensure the beef gets coated evenly. Always wash your hands before and after handling raw meat. It’s important for food safety. Heat a tablespoon of oil in a large skillet over medium-high heat. Add minced garlic, grated ginger, and thinly sliced red bell pepper. Stir-fry for about 2 minutes. Watch the garlic and ginger closely. They can burn quickly and ruin the dish. Push the vegetables to the side of the skillet. Add the beef mixture next. Cook for 5-7 minutes. Use a spatula to break apart the meat as it cooks. Keep the heat at medium-high. This helps to brown the beef without overcooking it. After the beef is browned, stir in snap peas and beef broth. Add chili paste, salt, and pepper to taste. Let the mixture simmer for 3-4 minutes. This helps the snap peas become tender and the flavors meld. Taste your dish and adjust the seasoning if needed. You can add more soy sauce or chili paste to suit your taste. For serving, plate the spaghetti and garnish with chopped green onions and a sprinkle of sesame seeds. This adds color and crunch to your dish. To boost the taste of Asian Ground Beef Spaghetti, I suggest adding some great sauces and spices. Here are my favorites: - Soy Sauce: Adds umami and saltiness. - Oyster Sauce: Adds depth and sweetness. - Sesame Oil: Gives a nutty flavor. - Chili Paste: Adds heat; adjust to your taste. For marinating the beef, mix it with soy sauce, oyster sauce, and sesame oil. Let it sit for at least 15 minutes. This makes the beef tastier and more tender. Using the right pans makes cooking easier. I recommend a large skillet or wok for stir-frying. These pans distribute heat well. They help cook the beef and veggies evenly. For mixing and serving, use a spatula and a large spoon. A spatula helps break apart the beef, while a spoon makes serving easy. Prep your ingredients before cooking. This means slicing the bell pepper, trimming the snap peas, and chopping onions ahead of time. It saves you from rushing later. While the spaghetti cooks, you can prepare the beef mixture. This way, you use your time wisely. Multitasking like this makes dinner fast and fun! Pro Tips Use Fresh Ingredients: Fresh vegetables and high-quality ground beef enhance the flavors of this dish, making it more vibrant and delicious. Adjust Spice Levels: Feel free to modify the amount of chili paste to suit your taste. Start with a small amount and add more if you prefer a spicier dish. Cook Noodles Al Dente: Cooking spaghetti until al dente ensures that the noodles maintain their texture and don’t become mushy when mixed with the sauce. Garnish for Flavor: Adding sesame seeds and green onions not only makes the dish visually appealing but also adds a nice crunch and freshness to each bite. {{image_2}} You can easily swap out ground beef for plant-based options. Try using lentils, mushrooms, or chickpeas. These ingredients add great texture and flavor. For a delicious sauce, use hoisin or teriyaki sauce. They add sweetness and depth to the dish. Want more heat? Add extra chili paste or red pepper flakes. Start with a teaspoon and adjust to your taste. You can also use sriracha or sambal oelek for added spice. These chili sauces have bold flavors that enhance the dish. Feel free to add more veggies to your dish. Carrots, broccoli, or zucchini work well. They add color and crunch. You can also mix in tofu or shrimp for extra protein. These options keep the meal interesting and satisfying. To keep your Asian ground beef spaghetti fresh, store leftovers in airtight containers. This helps lock in moisture and flavor. Make sure the dish cools down first before sealing it. I recommend using glass containers with tight lids. They are great for reheating and do not stain. If you want to save some for later, freezing is a good option. Pack the spaghetti in a freezer-safe container, leaving some space at the top. This allows the dish to expand. For best results, freeze it in single servings. When you are ready to eat, thaw it overnight in the fridge. Reheat it in a skillet over medium heat. Add a splash of beef broth to keep the texture nice. In the fridge, your leftovers will last about 3-4 days. If frozen, they can stay good for up to 3 months. Always check for signs of spoilage. If the spaghetti smells off or has a strange texture, it’s best to discard it. This ensures you enjoy your meal at its best. Yes, you can swap out spaghetti for other pasta types. Pros: - Different shapes can change the dish's look and feel. - Whole wheat or other grains add more fiber. Cons: - Cooking time may vary with other pasta. - Some pasta types may not hold the sauce well. This dish is not gluten-free as it uses spaghetti. You can use gluten-free noodles instead. Rice noodles or quinoa pasta are great choices. You can prep the beef and veggies ahead of time. 1. Mix the beef with sauces and store in the fridge. 2. Cut veggies and keep them in a sealed bag. Tips for reheating: - Heat gently on low. - Add a splash of broth for moisture. - Stir often to prevent sticking. One key pitfall is overcooking the beef. Beef should be browned but not dry. Another mistake is under-seasoning. Always taste as you cook and adjust. If your sauce is too thin, add more cornstarch mixed with water. This helps thicken it up. This blog post covered all the essential steps to create a delicious spaghetti dish. We explored the right ingredients, from detailed measurements to smart substitutions. You learned how to cook spaghetti perfectly and prepare a flavorful beef mixture while ensuring safety. I shared useful tips to enhance flavor and manage your cooking time efficiently. With variations like vegetarian and spicy options, you have the flexibility to customize the dish. Finally, I provided smart storage and reheating methods to keep your leftovers fresh. Enjoy your cooking journey!

Asian Ground Beef Spaghetti Flavorful and Simple Dish

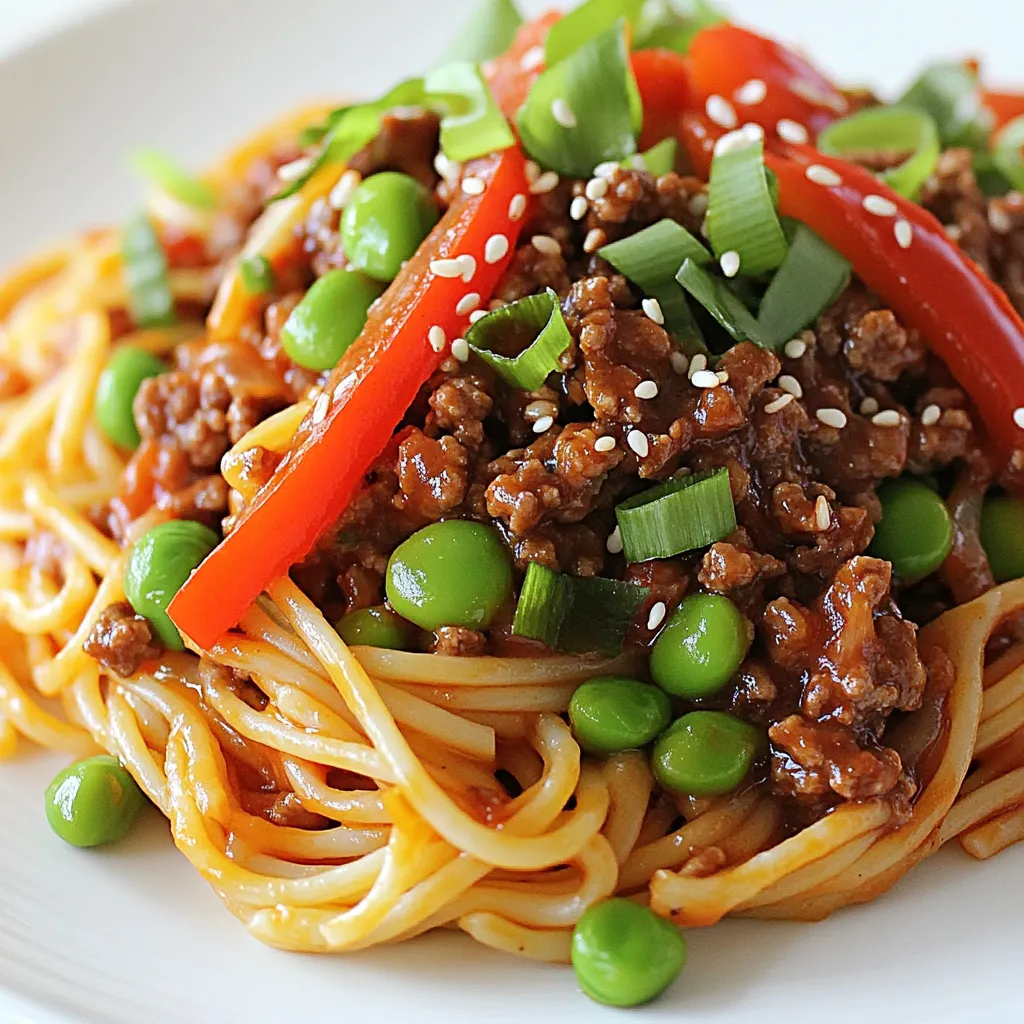
Looking for a quick and tasty dinner idea? This Asian Ground Beef Spaghetti is your answer! It’s easy to make

Older posts
Newer posts
← Previous Page1 … Page130 Page131 Page132 Next →

dsad

© 2025 Emmas Dish • Built with GeneratePress

Our Policies

  • Copyright Policy
  • Cookie Policy
  • GDPR Policy
  • Privacy Policy
  • Disclaimer
  • Terms Of Use

More Information

  • Home
  • About
  • Contact
  • Appetizers
  • Dessert
  • Dinner
  • Drinks
©2025, Emmas Dish About Back To Top