Skip to content
DisclaimerTerms Of UseGDPR PolicyCookie Policy

Emmas Dish

  • Home
  • Drinks
  • Appetizers
  • Dinner
  • Dessert
  • About
  • Contact
  • Privacy Policy
DisclaimerTerms Of UseGDPR PolicyCookie Policy

Emma

- 2 cups cooked chicken, shredded - 1 cup shredded cheese (gruyere or Monterey Jack work beautifully) - 1 cup enchilada sauce (store-bought or homemade) The base of cheesy chicken enchiladas is simple yet delicious. I love using cooked chicken because it makes the dish quick to prepare. You can use rotisserie chicken for an even faster meal. The cheese adds richness. Gruyere gives a nutty taste, while Monterey Jack melts well for that gooey texture we crave. The enchilada sauce, whether store-bought or homemade, brings a zesty kick that ties everything together. - ½ cup red bell pepper, diced - ½ cup onion, finely chopped - 1 tablespoon olive oil - 1 teaspoon ground cumin - 1 teaspoon garlic powder - Salt and pepper to taste Adding vegetables makes these enchiladas even better. Red bell peppers add sweetness and color. Onions provide a nice flavor base. Sautéing them in olive oil enhances their natural flavors. Ground cumin and garlic powder add warmth and depth. A pinch of salt and pepper brings all the flavors to life. - Fresh cilantro - Avocado slices Garnishes are the final touch. Fresh cilantro adds brightness and a herby taste. Avocado slices bring creaminess and balance out the spice. You can mix and match your toppings, but these two always work well. Enjoy your cheesy chicken enchiladas with these extras for a full-flavored meal! {{ingredient_image_1}} 1. Preheat the oven: Start by preheating your oven to 375°F (190°C). This step is key for a nice bake. 2. Sauté the veggies: In a skillet, heat 1 tablespoon of olive oil over medium heat. Add ½ cup of diced red bell pepper and ½ cup of finely chopped onion. Sauté these until they soften, about 5 minutes. This brings out the flavors. 3. Combine filling ingredients: In a large bowl, mix 2 cups of shredded chicken, the sautéed veggies, half of the cheese (1 cup), 1 teaspoon of ground cumin, 1 teaspoon of garlic powder, and salt and pepper to taste. Stir until everything is well blended. 4. Prepare tortillas: Warm 8 small corn tortillas in the microwave for about 20 seconds. This makes them easy to roll without breaking. 5. How to assemble the enchiladas: Spread a thin layer of enchilada sauce in the bottom of a baking dish. Take one tortilla, add a generous spoonful of the chicken mixture, then roll it tightly. Place it seam side down in the dish. Repeat this for all tortillas. 6. Adding sauce and cheese before baking: Once all enchiladas are in the baking dish, pour the rest of the enchilada sauce over the top. Then, sprinkle the remaining cheese evenly across the dish. This cheese will melt beautifully during baking. 7. Baking process and tips for perfect cheese melt: Cover the dish with foil and bake in the preheated oven for 20 minutes. After that, remove the foil and bake for an additional 10 minutes. Look for bubbling cheese that is slightly golden. 8. Cooling and garnishing before serving: Once baked, take the dish out and let it cool for a few minutes. Serve the enchiladas garnished with fresh cilantro and slices of avocado. This adds color and a fresh taste. Enjoy your meal! To make shredding chicken easy, use two forks. Hold one fork in each hand. Grab the chicken and pull it apart. You’ll get nice shreds fast. If you have a stand mixer, use it! Place the chicken in the bowl and mix on low. It shreds quickly and evenly. When warming tortillas, heat them in the microwave. Place them on a plate, cover with a damp paper towel, and heat for 20 seconds. This softens them, making them easy to roll without tearing. You can also warm them in a dry skillet for 30 seconds on each side. For the best flavor, mix cumin and garlic powder into the chicken. These add depth and warmth. You can also try adding a pinch of chili powder for some heat. Want more texture? Add black beans or corn to the filling. They boost flavor and add fiber. Mix them in with the chicken and veggies. If you want to try a slow cooker, it's easy! Combine all filling ingredients in the slow cooker. Cook on low for 4 hours. Then, when ready, assemble the enchiladas as usual. For oven settings, preheat to 375°F. Bake covered for 20 minutes. This keeps the enchiladas moist. Remove the foil and bake for another 10 minutes. This gives you a nice, bubbly cheese topping. Pro Tips Warm Tortillas: Warming the tortillas before filling them prevents them from cracking when you roll them up. Customize Your Filling: Feel free to add other ingredients like black beans, corn, or different spices to the chicken mixture for an extra flavor boost. Use a Mix of Cheeses: Combining different types of cheese can elevate the flavor profile. Try adding some pepper jack for a spicy kick! Let Them Rest: After baking, let the enchiladas sit for a few minutes before serving. This helps them hold their shape better when you plate them. {{image_2}} You can change the protein in this recipe easily. Use beef or ground turkey for a twist. If you want a vegetarian option, try black beans or lentils instead of chicken. Both options are tasty and fill you up! For cheese, if you're dairy-free, there are great alternatives. Look for brands that melt well. Some use cashews or soy, and they taste great in enchiladas. If you want to make your own enchilada sauce, it’s simple! Just blend tomatoes, chili powder, cumin, and garlic. This sauce gives your enchiladas a fresh taste. If you like heat, add jalapeños or cayenne pepper to the mix. You can also use store-bought spicy sauces for a quick fix. They add a kick that makes every bite exciting. Enchiladas pair well with sides like rice or a fresh salad. Try serving them with Mexican rice for a full meal. A simple green salad can add crunch and freshness to your plate. For toppings, go beyond avocado. Consider adding sour cream, diced tomatoes, or jalapeños. Fresh cilantro adds a burst of flavor too. These toppings will make your enchiladas even more fun to eat! To store leftovers properly, let the enchiladas cool down first. Place them in an airtight container. This helps keep them fresh and prevents drying out. You can store them in the fridge for up to three days. You can freeze enchiladas before or after baking. To freeze before baking, wrap each enchilada in plastic wrap. Place them in a freezer-safe bag, removing as much air as possible. For freezing after baking, let them cool completely. Then, cover them tightly with foil. Enchiladas can last up to three months in the freezer. To reheat, let them thaw overnight in the fridge. This keeps them from getting soggy. For the best results, reheat in the oven. Preheat the oven to 350°F. Place the enchiladas in a baking dish and cover with foil. Bake for about 20 minutes. This ensures even heating and keeps the texture nice. If you use a microwave, heat in short intervals. Try 1 to 2 minutes at a time. Check the enchiladas often to avoid overheating. This method helps maintain their flavor and texture. Can I use leftover rotisserie chicken? Yes, you can use leftover rotisserie chicken. It saves time and adds flavor. Just shred it into bite-sized pieces. This option is quick, and you can enjoy the enchiladas even faster. How can I make enchiladas vegetarian? To make vegetarian enchiladas, swap the chicken for black beans or lentils. You can also add veggies like zucchini or mushrooms. This change keeps the dish hearty and tasty while being meat-free. What should I do if my enchiladas are dry? If your enchiladas turn out dry, try adding more sauce before baking. You can also cover them with foil while baking to keep moisture in. Don’t forget to serve them with a side of sauce for extra flavor. How do I ensure my tortillas don't tear when assembling? Warm your tortillas before using them. A quick 20-second blast in the microwave makes them bendy. This warmth helps prevent tears, making assembly much easier. Are cheesy chicken enchiladas healthy? Cheesy chicken enchiladas can be healthy. They offer protein from chicken and nutrients from veggies. However, watch the cheese and sauce portions for lower calories. How can I make them healthier? To make them healthier, use whole-grain tortillas and less cheese. You can also load up on veggies and use low-sodium enchilada sauce. These changes keep the flavor while adding more nutrition. This blog post covers everything you need to know to make cheesy chicken enchiladas. We discussed key ingredients, step-by-step instructions, and helpful tips to perfect your dish. You learned about delicious variations and proper storage methods, too. By following these guidelines, you can create a meal that you and your loved ones will enjoy. Make your enchiladas tasty and easy to personalize. With practice, you'll have a go-to recipe for gatherings or cozy nights at home. Enjoy your cooking journey!

Cheesy Chicken Enchiladas Flavorful Family Favorite

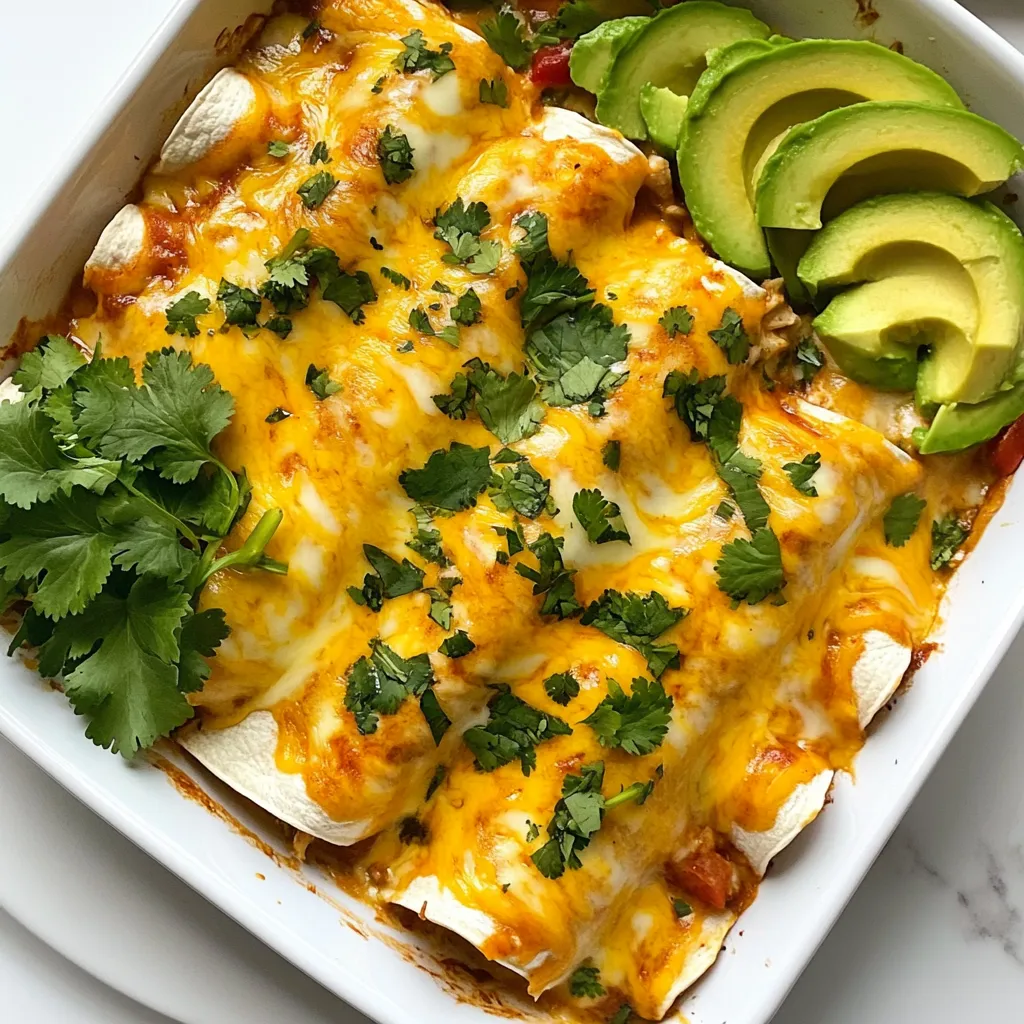
If you’re searching for a dish to bring the family together, look no further than cheesy chicken enchiladas. They are

- 6 large eggs - 1 ripe avocado - 2 tablespoons Greek yogurt - 1 tablespoon Dijon mustard - 1 teaspoon lime juice - 1/4 teaspoon garlic powder - 1/4 teaspoon smoked paprika - Salt and pepper to taste - Fresh cilantro When I make avocado deviled eggs, I focus on fresh, simple ingredients. The large eggs form the base and provide protein. I love using ripe avocados for smoothness and flavor. Greek yogurt adds creaminess and a bit of tang. For seasoning, Dijon mustard gives a nice kick. Lime juice brightens the dish. Garlic powder adds depth, and smoked paprika brings warmth. Salt and pepper enhance all the flavors. Finally, fresh cilantro makes a beautiful garnish. It adds color and a hint of herbiness. This combination creates a tasty and healthy snack that everyone loves. {{ingredient_image_1}} Start by placing your eggs in a saucepan. Cover them with cold water. Make sure the water is about an inch above the eggs. Turn the heat to medium and bring it to a boil. Once boiling, cover the saucepan and turn off the heat. Let the eggs sit for 10-12 minutes. After the time is up, carefully move the eggs to a bowl of ice water. Let them cool for about 5 minutes. This step helps make peeling easier. Once cooled, gently tap each egg on the counter. Peel the eggs carefully, removing the shell completely. Slice each egg in half lengthwise. Place the yolks into a mixing bowl and set the egg whites aside on a serving platter. To the bowl, add one ripe avocado, Greek yogurt, Dijon mustard, lime juice, salt, pepper, garlic powder, and smoked paprika. Mash everything together until it is smooth and creamy. You can use a fork or a potato masher for this. Now, it's time to fill the egg whites with your creamy avocado mixture. You can use a piping bag for a fancy look or a spoon for a quick fill. Finally, garnish with a sprinkle of smoked paprika and a small sprig of fresh cilantro for a nice touch. Enjoy your delicious avocado deviled eggs! To make perfect hard-boiled eggs, time is key. Start by placing the eggs in a pot. Cover them with cold water, about an inch above the eggs. Heat the pot over medium. Once the water boils, cover the pot and turn off the heat. Let the eggs sit for 10 to 12 minutes. This method prevents overcooking and keeps the yolks bright yellow. Next, cooling is crucial. After the time is up, move the eggs into a bowl of ice water. Let them chill for about 5 minutes. This step makes peeling easier. It also stops the cooking process, ensuring a creamy yolk. To make a creamy filling, Greek yogurt adds richness. If you don’t have Greek yogurt, you can use sour cream or even mayonnaise. Both will work well and add their own flavor. For the best texture, mash the yolks and avocado together. Use a fork to break them apart first. Then, mix in the yogurt and other ingredients until smooth. Ensure there are no lumps. A smooth filling will look better and taste great. Garnishing your deviled eggs adds flair. Try a sprinkle of smoked paprika for color and flavor. You can also add a tiny sprig of fresh cilantro on top. It adds a fresh touch. If you want to mix it up, consider using other herbs. Chives or dill can offer different flavors. Get creative with your presentation to impress your guests! Pro Tips Use Fresh Avocado: Ensure your avocado is perfectly ripe for the creamiest filling. A ripe avocado will be slightly soft to the touch but not mushy. Chill the Eggs: After boiling, cooling the eggs in ice water not only makes peeling easier but also helps to prevent the yolks from turning gray. Experiment with Flavors: Feel free to customize your filling by adding ingredients like sriracha for heat or finely chopped pickles for a tangy twist. Presentation Matters: For a stunning presentation, use a piping bag to fill the egg whites and garnish with additional herbs or spices. {{image_2}} To add a kick to your avocado deviled eggs, you can make them spicy. Diced jalapeños bring heat and flavor. You can also use hot sauce for an extra zing. Just mix in a teaspoon or two, and taste as you go. This adds a fun twist to the dish and wakes up your taste buds. For a Mediterranean flair, try adding feta cheese or olives. Crumbled feta gives a creamy, salty taste. Chop up some olives for a briny punch. Mix these ingredients with your avocado filling. This twist combines rich flavors and makes the dish more exciting. If you want a vegan version, it’s simple! Use plant-based yogurt instead of Greek yogurt. This keeps the creaminess without the dairy. You can even replace the eggs entirely! Just make a filling using mashed avocado and yogurt. This option is great for anyone avoiding animal products. To keep your avocado deviled eggs fresh, store them right. Place any leftovers in an airtight container. If you have leftovers, cover them well to prevent drying out. It’s best to eat them within two days for the best flavor and texture. You cannot freeze avocado deviled eggs. Freezing changes the texture of the avocado and eggs. This makes them watery and unappetizing. It’s best to enjoy them fresh. Eat your avocado deviled eggs within three days for peak freshness. After that, they may lose their creamy texture. If they look or smell off, it’s best to toss them out. Freshness is key for this tasty snack. To hard-boil eggs, place them in a saucepan. Cover them with cold water. Bring the water to a boil over medium heat. Once it boils, cover the saucepan and turn off the heat. Let the eggs sit for 10 to 12 minutes. This method gives you firm yolks without a green ring. After cooking, cool the eggs quickly in ice water for easy peeling. Yes, you can use any type of avocado. Hass avocados are popular due to their creamy texture. Other varieties, like Fuerte, also work well. Just ensure they are ripe. Ripe avocados blend smoothly, giving you the best flavor and texture. Avocado deviled eggs last about three days in the fridge if stored properly. Keep them in an airtight container to maintain freshness. However, they taste best when eaten fresh. The longer they sit, the more the avocado may brown. Absolutely, you can make this recipe in advance. Prepare the filling and store it in an airtight container. Keep the egg whites separate. When ready to serve, fill the egg whites with the avocado mixture. This keeps them fresh and prevents the eggs from getting soggy. This article covered how to make tasty avocado deviled eggs. We explored key ingredients like eggs, avocado, and Greek yogurt. I shared tips for boiling eggs effortlessly and making a smooth, creamy filling. You can also try fun variations, like adding spice or going vegan. Remember, you can store these eggs for later enjoyment. With these recipes and tips, you can impress your friends and family with easy, delicious snacks. Enjoy your cooking journey!

Avocado Deviled Eggs Flavorful and Healthy Snack

If you’re looking for a tasty and healthy snack, you’ve found it! Avocado deviled eggs combine creamy avocado with rich,

For this pizza, you can use flatbreads or naan. Both options work well. Flatbreads give a crispy base, while naan adds a soft touch. Choose what you like best. I often use two large pieces for a filling meal. You will need 1 cup of cooked chicken, shredded. This can be rotisserie chicken or leftovers. Mix this chicken with 1/2 cup of your favorite BBQ sauce. You can also make your own sauce if you prefer. Add a pinch of salt and pepper to taste. This mixture gives the pizza its rich flavor. For toppings, gather these ingredients: - 1 cup shredded mozzarella cheese - 1/2 cup thinly sliced red onion - 1/2 cup corn kernels (fresh or canned) - 1/4 cup chopped cilantro - Salt and pepper to taste The cheese melts beautifully, while the onion and corn add texture. Cilantro adds a fresh kick. Make sure to sprinkle salt and pepper for extra flavor. Each topping enhances the taste of the BBQ chicken flatbread pizza. {{ingredient_image_1}} First, gather your cooked chicken. Shredded chicken works best for this dish. In a bowl, mix the shredded chicken with 1/4 cup of BBQ sauce. Make sure to add a pinch of salt and pepper to bring out the flavor. Stir well so each piece of chicken gets coated. This step is key for a tasty flatbread. Next, grab your flatbreads or naan. Place them on a baking sheet. Brush the tops with olive oil. This helps them get nice and crisp in the oven. Spread the remaining BBQ sauce on each flatbread. Leave a bit of space at the edges to create a crust. Now, evenly distribute the BBQ chicken mixture over the sauce. Sprinkle the shredded mozzarella cheese over the chicken. Add thin slices of red onion and corn kernels on top. This will give your pizza extra texture and sweetness. Now it's time to bake! Preheat your oven to 425°F (220°C). Once it's hot, place the baking sheet in the oven. Bake for 12 to 15 minutes. Look for melted cheese and crispy edges. When done, take them out and let them cool for a few minutes. Before serving, sprinkle chopped cilantro on top. This adds a fresh touch. Slice the flatbreads into wedges and enjoy! Picking the best BBQ sauce is key. You want a sauce that has a nice balance of sweet and tangy. I love using a smoky sauce for a deeper flavor. Homemade sauces can be great too. Just mix ketchup, brown sugar, and a bit of vinegar. Taste as you go! For a crisp flatbread, oil is your friend. Brush each flatbread with olive oil before baking. This helps them turn golden and crunchy. Set your oven to 425°F (220°C) for the best results. Bake them until the edges are brown. Keep an eye on them to avoid burning. Garnishes add color and taste. I like to sprinkle fresh cilantro on top after baking. This gives a nice pop of green. You can also add red pepper flakes for heat or sliced jalapeños for extra spice. Serve with a side of BBQ sauce for dipping. Enjoy your flavorful meal! Pro Tips Use Fresh Ingredients: Fresh ingredients like cilantro, red onions, and corn can elevate the flavor profile of your flatbread pizza, making it more vibrant and delicious. Experiment with BBQ Sauces: Different BBQ sauces can change the entire taste of your pizza. Try varying levels of sweetness or smokiness to find your favorite combination. Customize Toppings: Feel free to add other toppings such as bell peppers, jalapeños, or even pineapple for a unique twist on the classic BBQ chicken flavor. Let it Cool: Allow the flatbreads to cool for a few minutes after baking to prevent burns and to help the cheese set slightly for easier slicing. {{image_2}} You can easily make a vegetarian BBQ flatbread pizza. Start by skipping the chicken. Instead, use grilled vegetables like bell peppers, zucchini, or mushrooms. You can also add black beans for extra protein. Use the same BBQ sauce and cheese. The flavors will mix well, and it will taste great! You can switch up the meat in this pizza. Try pulled pork for a smoky flavor. Shredded beef also works well. If you love spicy food, use spicy sausage. Each meat gives a unique taste to your pizza. Just mix it with the BBQ sauce like you do with chicken. If you need a gluten-free option, use gluten-free flatbreads. Many stores sell these now. You can also make your own with gluten-free flour. Just follow a simple recipe for flatbread. The rest of the toppings and sauce can stay the same. Your pizza will still be tasty and satisfying! After you make BBQ chicken flatbread pizza, let it cool down. Place the slices in an airtight container. You can keep it in the fridge for up to three days. Make sure to separate layers with parchment paper. This helps prevent sticking. When you are ready to enjoy leftovers, preheat your oven to 350°F (175°C). Place the slices on a baking sheet. Heat them for about 10 minutes. This keeps the crust crispy and the cheese melty. You can also use a microwave, but it may make the crust soft. Heat in 30-second bursts until warm. If you want to save some for later, you can freeze the pizza. First, let it cool completely. Wrap each slice in plastic wrap. Then, put them in a freezer-safe bag. They can last up to three months in the freezer. To eat, thaw in the fridge overnight, then reheat as mentioned above. You can use naan bread for a chewy texture. Tortillas work well too. Pita bread is another option. Each choice gives a unique taste. Choose what you enjoy most. Yes, you can! Prepare the chicken mixture and sauce in advance. Store them in the fridge for up to two days. You can also assemble the flatbreads and freeze them. Just bake them when ready. This saves time on busy nights. To add heat, mix cayenne pepper into the chicken. You can also use spicy BBQ sauce. Try adding sliced jalapeños for extra kick. Adjust the spice level to fit your taste. Enjoy the flavorful heat! BBQ chicken flatbread pizza combines fun and flavor in every bite. We covered great ingredients like flatbreads, chicken, and tasty toppings. I shared step-by-step instructions to make cooking easy. You learned tips for the perfect crisp and fun variations to try. Storing your pizza is simple, letting you enjoy leftovers too. Remember, this dish is flexible and can match your tastes. So, get creative and have fun in the kitchen!

BBQ Chicken Flatbread Pizza Flavorful Weeknight Meal

Looking for a quick, tasty meal that pleases everyone? Try BBQ Chicken Flatbread Pizza! It’s easy, fun, and packed with

- 1 pound ground beef or lamb - 1/2 cup breadcrumbs - 1/4 cup grated Parmesan cheese - 1/4 cup fresh parsley, chopped - 1 teaspoon dried oregano - 1/4 cup fresh lemon juice - Zest of 1 lemon - 1 teaspoon garlic powder - 1/2 teaspoon onion powder - Salt and pepper to taste - 2 tablespoons olive oil - 1 1/2 cups chicken broth - 1 egg, beaten - 1 tablespoon cornstarch (optional for thickening) The mix of these ingredients makes Greek meatballs so tasty. Ground beef or lamb gives them a rich flavor. Breadcrumbs help hold the meatballs together. Parmesan cheese adds a nice saltiness. Fresh parsley brings color and a hint of freshness. The lemon juice and zest give a bright, zesty kick. The dried oregano, garlic powder, and onion powder add depth to the flavor. Salt and pepper help bring all the tastes together. Olive oil is essential for frying. Chicken broth forms the base of the sauce. The beaten egg acts as a binder. Cornstarch can help thicken the sauce, but it is optional. Using these ingredients will make your dish shine. It’s simple, yet each item plays a vital role. As you cook, you’ll notice how they work together to create something special. {{ingredient_image_1}} - First, combine 1 pound of ground beef, 1/2 cup breadcrumbs, and 1/4 cup grated Parmesan cheese in a large bowl. - Add 1/4 cup of chopped fresh parsley, 1 teaspoon of dried oregano, 1 teaspoon of garlic powder, and 1/2 teaspoon of onion powder. - Add salt and pepper to taste. Mix everything well. - Now, add 1 beaten egg to the mixture. Mix it thoroughly until it is all combined. - Shape the mixture into small meatballs, about 1 inch wide. - Heat 2 tablespoons of olive oil in a large skillet over medium heat. - Add the meatballs in batches. Cook them for about 5-7 minutes until they are browned on all sides. - Once browned, remove the meatballs from the skillet and set them aside. - In the same skillet, pour in 1 1/2 cups of chicken broth, 1/4 cup of fresh lemon juice, and the zest of 1 lemon. - Bring it to a gentle simmer. - If you want a thicker sauce, mix 1 tablespoon of cornstarch with a little cold water to make a slurry. Stir it into the sauce. Cook for a few minutes until it thickens. - Return the browned meatballs to the skillet. - Cover and let them simmer in the sauce for about 10-15 minutes. This helps them absorb the bright lemon flavor. - Taste the sauce and adjust seasoning if needed. - To get brown meatballs, use medium heat. This helps the meat cook evenly. - Simmer meatballs in sauce for 10-15 minutes. This makes them tasty and tender. - Taste the sauce before serving. Adjust the salt and pepper if needed. - Consider adding minced garlic or fresh herbs. These will make the dish even better. - Garnish the dish with chopped parsley and lemon wedges. This adds color and freshness. - Serve the meatballs over rice or with crusty bread. Both options soak up the delicious sauce. Pro Tips Use Fresh Herbs: Fresh parsley adds a vibrant flavor to the meatballs and sauce, making the dish truly authentic. Don’t Overcrowd the Pan: Fry the meatballs in batches to ensure they brown evenly and maintain their shape. Adjust Lemon Flavor: If you prefer a milder lemon taste, start with less juice and gradually add more to suit your palate. Serve with Sides: These meatballs pair beautifully with rice, crusty bread, or a fresh Greek salad for a complete meal. {{image_2}} You can swap the ground beef with ground turkey or chicken. This change makes the dish lighter while keeping it tasty. If you need a gluten-free option, use gluten-free breadcrumbs. They work well in the meatball mixture and keep the texture nice. For a fun twist, add crumbled feta cheese to the meatballs. This gives them a creamy texture and a salty kick. You can also mix in different herbs like mint or dill. These herbs enhance the dish and add a fresh touch. You can serve these meatballs with many different sides. Try pasta or couscous for a filling meal. For a fun lunch, make a meatball wrap or sandwich. Use pita bread or a soft roll and add fresh veggies. This way, you create a delicious and easy meal that everyone will love. To store leftovers, keep them in an airtight container. This helps keep the meatballs fresh. You can store them in the fridge for up to three days. If you want to enjoy them later, plan ahead! You can freeze the meatballs and sauce together. First, let them cool completely. Then, place them in a freezer-safe container or bag. They will stay fresh for up to three months. When you're ready to eat, thaw them overnight in the fridge. To reheat, put the frozen meatballs in a pot. Add a splash of chicken broth to keep them moist. Heat them on low until warmed through. The best method for reheating is on the stove. Use low heat to avoid drying them out. Stir gently and add a bit of broth if needed. This keeps the meatballs tender and juicy. You can also use the microwave, but be cautious. Heat them in short bursts and check often to prevent drying. It takes about 40 minutes to cook Greek meatballs. This includes 15 minutes for prep and 25 minutes for cooking. You mix the ingredients and form the meatballs first. Then, you brown them in a skillet. After that, you make the lemon sauce and let the meatballs simmer. The time flies when you smell that lemony goodness! Yes, you can make these meatballs gluten-free. Use gluten-free breadcrumbs instead of regular ones. You can also use ground oats or crushed rice crackers. Both options work well. Just make sure all other ingredients are gluten-free too. This way, everyone can enjoy this tasty dish! You have many options for side dishes. Here are some great choices: - Rice or couscous: These soak up the lemon sauce well. - Crusty bread: Perfect for dipping in the sauce. - Greek salad: Fresh veggies balance the rich flavors of the meatballs. - Roasted vegetables: A colorful and healthy addition to the meal. Feel free to mix and match! In this blog post, I shared how to make Greek meatballs in lemon sauce using simple, fresh ingredients like ground beef or lamb, breadcrumbs, and lemon. You learned to mix, shape, and cook meatballs, creating a delightful sauce that enhances their flavor. Remember, you can adapt this recipe to your taste with different herbs or serving options. Enjoy these meatballs with rice, pasta, or in a wrap. I hope you make this dish and impress your friends and family!

Greek Meatballs in Lemon Sauce Tasty Family Dinner

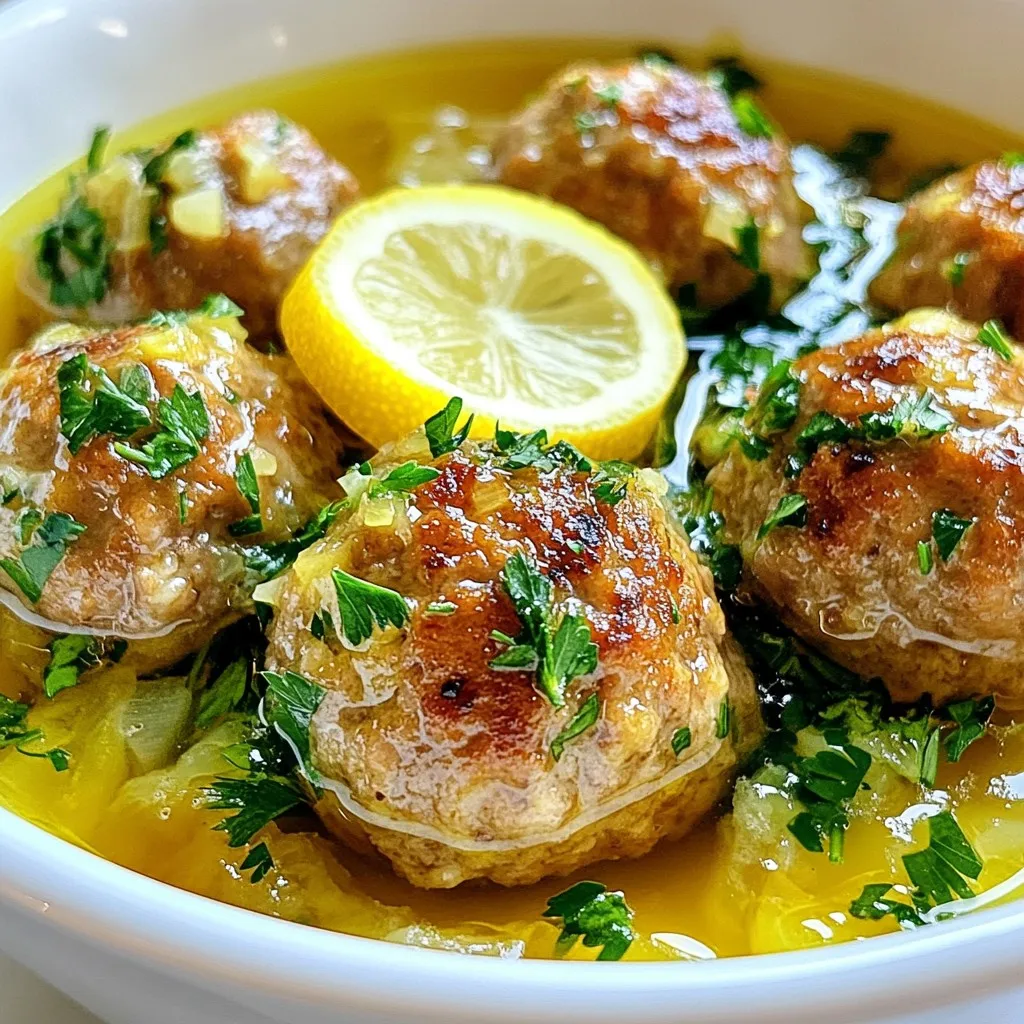
Are you ready to delight your family with a unique dinner? Greek Meatballs in Lemon Sauce is a dish that

For a delicious burger bowl, here are the main ingredients you need: - 1 pound ground beef (or turkey for a leaner option) - 1 teaspoon garlic powder - 1 teaspoon onion powder - 1 teaspoon smoked paprika - Salt and pepper to taste - 4 cups mixed greens (spinach, arugula, and romaine) - 1 cup cherry tomatoes, halved - 1 cucumber, diced - 1/2 cup pickles, sliced - 1 avocado, sliced - 1/2 cup shredded cheddar cheese - 1/4 cup ketchup - 1/4 cup mustard - Optional: sliced jalapeños for heat These ingredients create a flavorful base for your burger bowl. The ground beef or turkey brings the protein. The spices add zest. The greens and veggies provide crunch and freshness. You can customize your burger bowl with these tasty options: - Crispy bacon bits - Sliced olives - Roasted corn - Fresh herbs like cilantro or parsley - A dollop of sour cream or Greek yogurt Feel free to mix and match. Each topping can add a new flavor twist. If you want a spicy kick, add sliced jalapeños. You can easily adapt this recipe for different diets: - Use ground chicken or plant-based meat for a lighter option. - Swap mixed greens for kale or spring mix. - For a vegan bowl, skip the cheese and meat, and add black beans instead. - Use gluten-free condiments if needed. These swaps make the burger bowl suitable for everyone. You can enjoy this meal without missing out on flavor. {{ingredient_image_1}} To start, grab a mixing bowl. Add 1 pound of ground beef or turkey. Then, sprinkle in 1 teaspoon of garlic powder, 1 teaspoon of onion powder, and 1 teaspoon of smoked paprika. Next, add salt and pepper to taste. Mix gently until just combined. Be careful not to overwork the meat. Shape the mixture into 4 even patties. This helps them cook evenly. Now heat a skillet over medium-high heat. Add the patties to the skillet. Cook them for about 4-5 minutes on each side. This time will give you medium doneness. If you like them well done, cook a bit longer. Always check that they are fully cooked. You want them juicy, not dry. While the burgers cook, prepare your bowl base. Take a large bowl and layer in 4 cups of mixed greens. I like a mix of spinach, arugula, and romaine for a fresh taste. Once the burgers are ready, place them right on top of the greens. Next, arrange the halved cherry tomatoes, diced cucumber, sliced pickles, and avocado around the burger. To finish, sprinkle 1/2 cup of shredded cheddar cheese on each burger. Drizzle ketchup and mustard over the whole bowl as you like. For extra heat, add sliced jalapeños. Serve this bowl right away, mixing it all together as you eat. Enjoy! To cook the best burgers, use fresh meat. Ground beef or turkey works well. Mix in garlic powder, onion powder, and smoked paprika for flavor. Form four equal patties. Avoid pressing them too hard; this keeps them juicy. Cook on medium-high heat for 4 to 5 minutes on each side. Check for a nice brown crust. For medium doneness, look for an internal temp of 160°F. Let the burgers rest a few minutes before serving. This helps keep the juices inside. Seasoning is key to a tasty burger. Use garlic powder, onion powder, and smoked paprika in your meat mix. Add salt and pepper to taste. You can experiment with other spices too. Try cayenne for heat or Italian herbs for a twist. After cooking, top your burger with cheddar cheese for extra flavor. The cheese melts and adds richness. Don’t forget your favorite condiments like ketchup and mustard. They add moisture and tang to the bowl. A well-presented burger bowl makes the meal more fun. Start with a colorful base of mixed greens like spinach, arugula, and romaine. Place your burger on top, then artfully arrange cherry tomatoes, cucumber, and pickles around it. Add sliced avocado for creaminess and color. Sprinkle shredded cheddar on top for a finishing touch. Drizzle ketchup and mustard all over for a pop of color. If you like heat, toss in sliced jalapeños. Mixing the ingredients while you eat adds to the enjoyment. Pro Tips Use Fresh Ingredients: Always opt for fresh greens and ripe tomatoes for the best flavor in your burger bowls. Experiment with Seasonings: Feel free to add herbs like oregano or basil to the meat mixture for a unique twist. Customize Your Toppings: Personalize your burger bowl with your favorite toppings such as roasted red peppers or olives. Perfectly Cook Your Patties: Use a meat thermometer to ensure your patties reach an internal temperature of 160°F for beef or 165°F for turkey. {{image_2}} If you want a meat-free meal, try a vegetarian burger bowl. You can use black beans or chickpeas to form your patties. Just mash them well and mix in garlic powder, onion powder, and spices. Shape them into patties and cook like regular burgers. For toppings, add roasted vegetables, corn, and avocado. This bowl is packed with flavor and nutrients. Keto diets focus on low carbs. For a keto-friendly burger bowl, skip the bun and use lettuce or spinach as the base. Use ground beef or turkey, seasoned just like the original recipe. Top with cheese, avocado, and a dollop of sour cream. Add jalapeños for a spicy kick. This bowl keeps you full while staying low in carbs. You can explore global flavors in your burger bowls. Try a Mediterranean twist with feta cheese, olives, and a drizzle of olive oil. For an Asian flair, add sesame oil, sliced radishes, and green onions. Use ground pork and teriyaki sauce for a unique taste. Each variation brings new flavors to your table, making burger bowls exciting and fun. Store leftover burger bowls in airtight containers. This keeps them fresh. You can layer the ingredients separately or together. If you layer them together, the greens may get soggy. To reheat, use a microwave-safe dish. Heat your burger patties for about 1-2 minutes. Check the temperature to ensure they’re warm. If you prefer, you can reheat in a skillet. Just warm them over low heat for a few minutes. Avoid overheating, as this can dry them out. Meal prep makes lunch easy. Cook the burger patties in advance. Store them in the fridge for up to four days. Chop veggies early and store them in separate containers. This way, you can grab and assemble quickly. You can also prepare the dressings in advance. Just mix ketchup and mustard together for a quick sauce. Enjoy fresh meals all week without stress! Burger bowls are a fun way to enjoy burgers without the bun. They have all the flavors of a classic burger but in a bowl. You start with a base of greens, then add cooked burger patties and fresh veggies. It’s a fresh and colorful meal that’s easy to customize. Yes, you can make burger bowls ahead of time! Cook the burger patties and prepare the toppings. Keep each part in separate containers. When ready to eat, just assemble the bowl. This makes it easy for meal prep or quick lunches. The best toppings for burger bowls include: - Cherry tomatoes - Diced cucumber - Sliced pickles - Sliced avocado - Shredded cheese - Ketchup and mustard For extra flavor, you might add sliced jalapeños for a spicy kick. To make burger bowls gluten-free, use gluten-free ground meat. Most toppings are already gluten-free. Just check the labels on ketchup and mustard. Serve the burger on a bed of greens instead of using any bread. This keeps the meal tasty and safe for gluten-free diets. You’ve learned about making delicious burger bowls. We explored the main ingredients, cooking steps, and helpful tips. I shared ways to add your favorite toppings and even how to cater to special diets. Variations like vegetarian and keto make this meal fun and flexible. Don’t forget to store leftovers right and reheat them well. Enjoy experimenting with different flavors and presentations. With these ideas, you can create tasty meals for everyone. Burger bowls are simple, fun, and packed with flavor!

Burger Bowls Fresh and Flavorful Meal Idea

Looking for a fresh, tasty meal idea? Burger bowls are your answer! They mix all the hearty flavors of a

To make your stuffed Italian meatloaf, gather these key items: - 1.5 lbs ground beef - 1 cup Italian bread crumbs - 1/2 cup grated Parmesan cheese - 1/4 cup milk - 1/4 cup chopped fresh parsley - 1 egg - 2 cloves garlic, minced - 1 teaspoon dried oregano - 1 teaspoon dried basil - 1/2 teaspoon salt - 1/4 teaspoon black pepper - 1 cup marinara sauce (plus extra for serving) - 1 cup shredded mozzarella cheese - 1/2 cup roasted red peppers, chopped - 1/4 cup sliced black olives These ingredients create a rich and tasty meatloaf that is full of flavor. You can customize your meatloaf with these optional ingredients: - Spinach or kale for added greens - Feta cheese for a twist on flavors - Chopped onions for extra depth - Jalapeños for some heat These options let you put your own spin on the dish. If you need to change some items, here are some easy swaps: - Use turkey or chicken instead of beef for a lighter option. - Replace bread crumbs with crushed crackers or oats. - Swap Parmesan with cheddar or any cheese you like. - Use vegetable broth instead of milk for a dairy-free version. These substitutions can help you adjust the recipe to your taste and dietary needs. {{ingredient_image_1}} Start by preheating your oven to 350°F (175°C). In a large mixing bowl, combine these ingredients: - 1.5 lbs ground beef - 1 cup Italian bread crumbs - 1/2 cup grated Parmesan cheese - 1/4 cup milk - 1/4 cup chopped fresh parsley - 1 egg - 2 cloves garlic, minced - 1 teaspoon dried oregano - 1 teaspoon dried basil - 1/2 teaspoon salt - 1/4 teaspoon black pepper Mix everything well until it's blended smoothly. You want a nice and even mix for the best flavor. Next, take a sheet of parchment paper. Shape the meat mixture into a rectangle, about 1 inch thick. This will help with rolling. Spread a layer of marinara sauce evenly on top, leaving some space at the edges. Then, sprinkle a cup of shredded mozzarella cheese over the sauce. Add chopped roasted red peppers and sliced black olives for that extra kick. Now comes the fun part! Start rolling the meat mixture from one long side. Roll it carefully into a log shape. Make sure to tuck the fillings inside. Once rolled, secure the ends and place the meatloaf seam-side down in a baking dish. For extra flavor, brush any leftover marinara sauce on top. Bake the meatloaf in your preheated oven for 60 to 70 minutes. To check if it’s done, the internal temperature should reach 160°F (70°C). Once baked, let it rest for about 10 minutes before slicing. This helps keep all those juicy flavors locked in. Serve it with extra marinara sauce on the side for a delightful meal. Enjoy! To get the right texture, use fresh ingredients. Mix the ground beef with care. You want it well combined but not overworked. Overmixing can make the meatloaf dense. Adding Italian bread crumbs helps absorb moisture. This makes your meatloaf juicy and tender. Make sure your egg is well beaten before adding it. This helps bind the mixture without making it too heavy. Use a large mixing bowl for easy blending. A parchment paper sheet helps shape the meatloaf. A meat thermometer is key for checking doneness. It ensures your meatloaf hits 160°F (70°C). A baking dish is needed to hold the meatloaf while it bakes. A sharp knife will help you cut it evenly once it’s done. Don’t skip the resting time after baking. Letting it rest for about 10 minutes keeps it moist. If you rush to slice, it might fall apart. Avoid using dry bread crumbs. They can soak up too much moisture and lead to a dry meatloaf. Lastly, don’t forget to season well. A little extra salt and pepper can make a big difference in flavor. Pro Tips Use Fresh Herbs: Incorporating fresh parsley and basil enhances the flavor profile of the meatloaf, making it taste more vibrant and authentic. Don’t Overmix: When combining the meat mixture, mix just until combined. Overmixing can result in a dense and tough meatloaf. Let It Rest: Allow the meatloaf to rest for about 10 minutes after baking. This helps the juices redistribute, keeping the meatloaf moist when sliced. Experiment with Fillings: Feel free to customize the fillings. Try adding spinach, artichokes, or different cheeses to create your own signature stuffed meatloaf. {{image_2}} You can change the cheese in your stuffed meatloaf. While mozzarella gives a nice melt, you can try other cheeses too. Cheddar adds a sharp taste. Provolone brings an Italian twist. Goat cheese adds creaminess and tang. Mix and match to find your favorite! Adding veggies can boost flavor and nutrition. Spinach works well for a fresh taste. Mushrooms give a depth of flavor. You can also add zucchini or carrots, finely chopped. Feel free to get creative with different fillings. Just remember to keep them small for easy rolling. Seasonings can change the whole dish. If you want a kick, try red pepper flakes. For a more earthy flavor, add thyme or rosemary. You can also switch the marinara sauce. Barbecue sauce or pesto can make it unique. Find the blend that excites your palate! To store leftover stuffed meatloaf, let it cool first. Wrap it tightly in plastic wrap. You can also place it in an airtight container. This keeps it fresh for up to three days in the fridge. Make sure to label the container with the date. This way, you can track how long it has been stored. You can freeze stuffed meatloaf for longer storage. First, let it cool completely. Wrap it tightly in plastic wrap and then in aluminum foil. This prevents freezer burn. Label and date the package. The meatloaf can stay frozen for up to three months. For best results, slice it before freezing. This way, you can take out only what you need. When you’re ready to enjoy your meatloaf, reheat it properly. For best results, use the oven. Preheat your oven to 350°F (175°C). Place the meatloaf in an oven-safe dish and cover it with foil. This keeps it moist. Heat for about 25-30 minutes or until warmed through. If using the microwave, slice it first. Heat on a microwave-safe plate for 1-2 minutes. Check to ensure it’s heated evenly. Enjoy your delicious leftovers! Yes, you can make stuffed Italian meatloaf ahead of time. Prepare the meatloaf mixture and shape it. Place it in the fridge for up to 24 hours before baking. This saves time on busy days. Just remember to let it sit at room temp for about 15 minutes before baking. Stuffed Italian meatloaf pairs well with many sides. Here are some great options: - Fresh green salad - Garlic bread - Roasted vegetables - Mashed potatoes - Pasta with marinara sauce These sides add color and flavor to your meal. To check if the meatloaf is done, use a meat thermometer. Insert it into the center. It should read 160°F (70°C) for safe eating. You can also cut into the meatloaf. If the juices run clear and the meat is no longer pink, it’s ready. Let the meatloaf rest for about 10 minutes before slicing. This helps keep it juicy. In this post, we explored the making of stuffed Italian meatloaf. We covered key ingredients, preparation steps, and tips for perfect texture. Variations let you get creative with flavors and fillings. Plus, we shared how to store leftovers and reheat them well. Try these ideas to impress at your next meal. Stuffed Italian meatloaf is fun to make and enjoy! You’ll love how it tastes and feels special at the table. Get cooking and have fun with this dish!

Stuffed Italian Meatloaf Crafted for Flavorful Delight

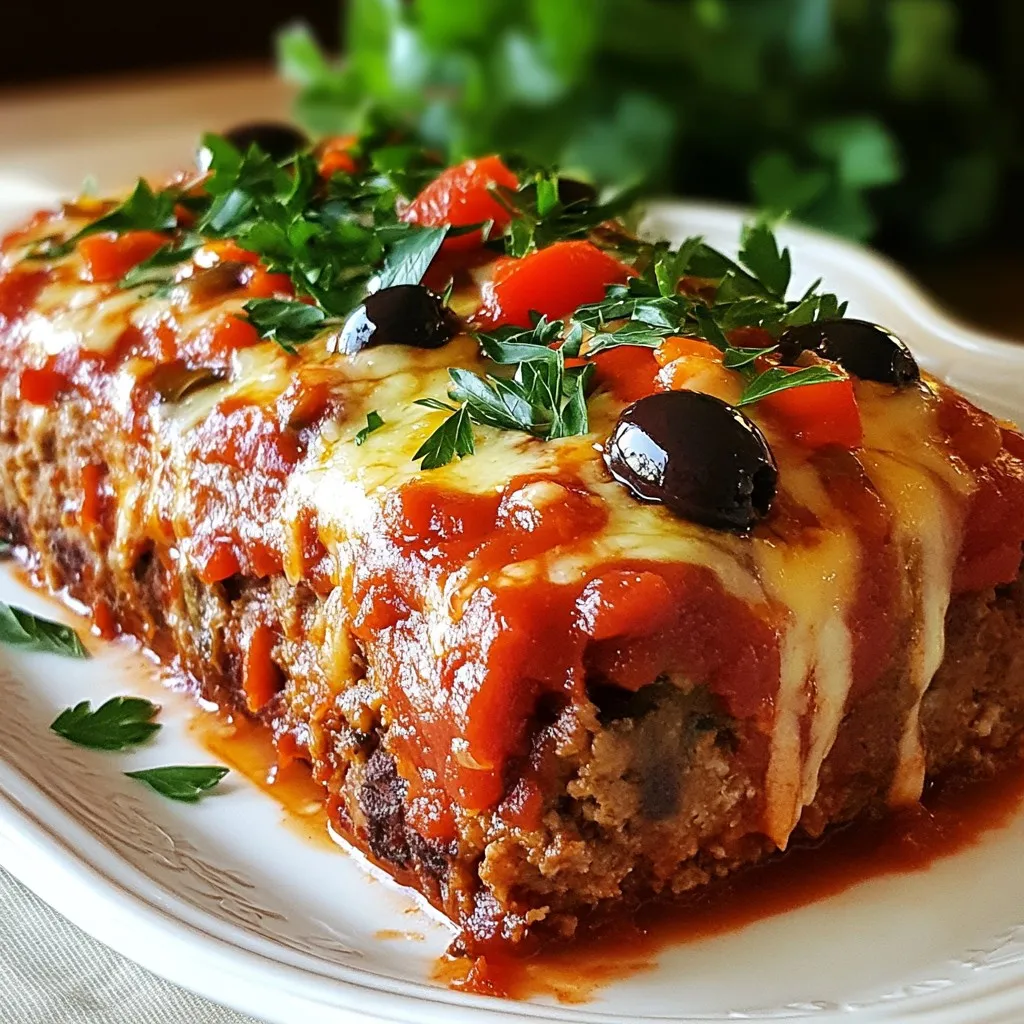
Are you ready to wow your family and friends with a dish that’s bursting with flavor? This stuffed Italian meatloaf

- 12 large jumbo pasta shells - 1 cup ricotta cheese - 1 cup fresh spinach, chopped - 1 cup mozzarella cheese, shredded - 1/2 cup grated Parmesan cheese - 1 egg, lightly beaten - 2 cloves garlic, minced - 1 teaspoon dried oregano - 1/2 teaspoon salt - 1/4 teaspoon black pepper - 2 cups marinara sauce - Fresh basil leaves for garnish I recommend using Galbani for ricotta cheese. Their cheese has a great flavor and texture. For mozzarella, try Sargento. It melts beautifully and adds that gooey finish. When it comes to marinara sauce, Rao's Homemade is a favorite. It has a rich taste that elevates the dish. You can use tofu instead of ricotta for a vegan option. Just blend it well with some lemon juice and nutritional yeast for added flavor. If you're gluten-free, look for gluten-free jumbo shells made from rice or corn. For a lighter option, use zucchini noodles instead of pasta shells. This gives you a fresh twist while keeping it healthy. {{ingredient_image_1}} First, bring a large pot of water to a boil. Add a pinch of salt to the water. Cook twelve jumbo pasta shells according to the package directions. You want them to be al dente, which means they should still be a bit firm. This helps them hold their shape while you cook them again later. Once cooked, drain the shells and set them aside to cool slightly. In a mixing bowl, combine one cup of ricotta cheese and one cup of chopped fresh spinach. Add half of the mozzarella cheese, along with half a cup of grated Parmesan cheese. Crack one egg into the bowl and add two cloves of minced garlic. Next, sprinkle in one teaspoon of dried oregano, half a teaspoon of salt, and a quarter teaspoon of black pepper. Mix all these ingredients well until they are fully combined. The filling should be creamy and rich. Now, it’s time to stuff the shells. Preheat your oven to 375°F (190°C). Grab a teaspoon or a piping bag for easy filling. Carefully fill each cooked shell with the ricotta-spinach mixture. Take a 9x13 inch baking dish and spread one cup of marinara sauce on the bottom. Place the stuffed shells in a single layer over the sauce. Pour the rest of the marinara sauce over the shells and sprinkle the remaining mozzarella cheese on top. Cover the dish with aluminum foil and bake for 25 minutes. After that, remove the foil and bake for another 10-15 minutes, until the cheese is bubbly and golden brown. Let the dish cool a few minutes before serving. Garnish with fresh basil leaves for a pop of color and flavor. To cook perfect pasta shells, use a large pot. Fill it with water and add salt. Bring the water to a rolling boil. Cook the shells until they are al dente, about 9 to 11 minutes. Stir gently to prevent sticking. Drain the shells and rinse them under cold water. This stops the cooking process and keeps them firm. Lay the shells flat on a clean towel to cool. For the best filling, mix your ingredients well. Use ricotta cheese, spinach, and half of the mozzarella. Add Parmesan cheese, an egg, garlic, oregano, salt, and pepper. Make sure to chop the spinach finely. This helps it mix easily into the ricotta. The filling should be creamy but not too runny. If it seems too wet, add more cheese or a bit of bread crumbs. When serving, place the stuffed shells on a plate with marinara sauce. Garnish with fresh basil leaves for color. You can also sprinkle extra Parmesan on top. Serve with a side salad or garlic bread for a full meal. This dish pairs well with a light red wine or sparkling water. Enjoy the flavors and share with friends! Pro Tips Cook the Shells Al Dente: Ensure you cook the pasta shells until al dente to prevent them from becoming mushy during baking. Customize Your Cheese: Feel free to mix in other cheeses like feta or goat cheese for a unique flavor twist in the filling. Add Extra Veggies: Enhance the filling by adding other vegetables such as mushrooms or bell peppers for added nutrition and flavor. Let It Rest: Allow the dish to cool for a few minutes after baking; this helps the flavors meld and makes serving easier. {{image_2}} You can add protein to your stuffed shells easily. Cooked chicken or turkey works well. Shred the meat and mix it into the ricotta filling. This adds flavor and makes the dish heartier. You can use rotisserie chicken for quick prep. Just make sure to balance the amount of meat with the cheese and spinach. Want to boost nutrition? Add more veggies! Chopped bell peppers, zucchini, or mushrooms blend well with spinach. Sauté them lightly before mixing them into the filling. This gives your dish extra texture and taste. You can also try using kale instead of spinach for a new twist. If you need a gluten-free option, look for gluten-free shells. Many brands now offer these. You can find them in most grocery stores. Cook them just like regular pasta. Fill and bake as usual. Your dinner will still taste amazing, and everyone can enjoy it! To store leftover stuffed shells, let them cool down first. Place them in an airtight container. You can keep them in the fridge for up to three days. This way, you can enjoy them later without losing flavor. Freezing is a great option for meal prep. After you make the stuffed shells, let them cool completely. Arrange them in a single layer on a baking sheet. Freeze until solid, then transfer to a freezer-safe bag. They can last for up to three months in the freezer. When you're ready to eat, preheat your oven to 350°F (175°C). Place the shells in a baking dish. Cover them with foil to keep them moist. Bake for about 20 minutes until heated through. You can also add a bit of marinara sauce on top for extra flavor. Enjoy your savory delight! Yes, you can make the stuffed shells ahead. Prepare them up to the baking step. Store them in the fridge for up to 24 hours. This saves time on busy days. Just cover the dish tightly with foil. When ready, bake as directed. You may need to add a few extra minutes to the baking time. If you want a substitute for ricotta cheese, use cottage cheese. Blend it until smooth for a similar texture. Cream cheese is another option. Just soften it first. You can also try silken tofu for a dairy-free choice. Each option gives a different flavor but works well in the recipe. You will know the stuffed shells are done when the cheese is bubbly and golden. Check for a slight browning on top. If you insert a knife, the filling should be hot. Let them cool for a few minutes before serving. This helps the flavors settle and makes them easier to serve. We covered every step to make delicious spinach ricotta stuffed shells. You learned about the key ingredients, cooking tips, and fun variations. Remember, you can swap ingredients if needed. Don't hesitate to store leftovers or prepare meals in advance. Enjoy those tasty shells any time. With these tips, you can impress your family and friends. Happy cooking!

Spinach Ricotta Stuffed Shells Savory Delight Recipe

Are you ready for a tasty treat? Spinach Ricotta Stuffed Shells are a creamy, cheesy delight! This recipe is simple

- 1 pound ground beef - 1 tablespoon sesame oil - 1/4 cup soy sauce - 1 tablespoon gochujang (Korean red chili paste) - 3 cloves garlic, minced - 1 inch piece ginger, grated - 2 tablespoons brown sugar - 1/2 cup shredded carrots - 1/2 cup steamed broccoli florets - 2 green onions, chopped - Sesame seeds for garnish Gathering your ingredients is vital for a smooth cooking process. The ground beef forms the heart of this dish, providing rich flavor and protein. Sesame oil adds a nutty aroma, enhancing the overall taste. Soy sauce introduces umami, while gochujang brings a delightful kick. For a fragrant base, use minced garlic and grated ginger. These ingredients not only boost flavor but also offer health benefits. Brown sugar balances the heat with sweetness. You can customize your veggies too. Shredded carrots and steamed broccoli add color and nutrition. Don’t forget the garnishes! Chopped green onions and sesame seeds bring a pop of freshness and texture. Having everything prepared before you start will make cooking easier and more enjoyable. {{ingredient_image_1}} 1. Heating oil and sautéing aromatics: Start by heating 1 tablespoon of sesame oil in a large skillet over medium heat. This oil gives a nice nutty flavor. Next, add 3 cloves of minced garlic and a 1-inch piece of grated ginger. Sauté them for about 1 minute until they smell amazing. 2. Cooking ground beef: Increase the heat to medium-high. Now, add 1 pound of ground beef to the skillet. Cook it for about 5-6 minutes. Use a spatula to break the beef apart as it cooks. You want it nice and browned. 1. Mixing in sauces and seasonings: Once the beef is browned, stir in 1/4 cup of soy sauce, 2 tablespoons of brown sugar, 1 tablespoon of gochujang, and 1/2 teaspoon of black pepper. The gochujang adds a great kick. 2. Adjusting flavor and consistency: Cook this mixture for another 2-3 minutes. This lets the flavors blend well. The sauce should thicken slightly, creating a rich coating for the beef. 1. Layering rice and beef mixture: To put it all together, start with a bowl of cooked rice. You can use white, brown, or jasmine rice. Scoop a generous amount of the beef mixture on top of the rice. 2. Adding vegetables and garnishes: Next, add some color! Sprinkle shredded carrots and steamed broccoli over the beef. Finish with sesame seeds and a few chopped green onions for garnish. This adds a lovely crunch and makes the dish look beautiful. To get the best beef texture, use a hot skillet. This helps the beef brown nicely. Browned meat adds flavor and a nice look. Break the meat apart as it cooks. This keeps it tender and juicy. Stir often for even cooking. Flavor melding is key. After adding sauces, let the mixture cook for a few minutes. This allows the flavors to mix well. The sauce should thicken slightly, which makes it richer. Once done, add green onions for a fresh note. For festive occasions, think color! Use bright bowls and arrange the food nicely. Layer rice, beef, and veggies for a pretty look. Adding sesame seeds on top makes it shine. You can also serve extra sesame seeds on the side for guests. Pair these bowls with simple side dishes. A fresh salad or pickled vegetables work great. They add crunch and balance the meal. A cold drink, like iced green tea, complements the flavors well. If you want to switch from ground beef, try ground turkey or chicken. These options work well in this recipe and keep it light. For a vegetarian twist, use crumbled tofu or tempeh. Both soak up flavors and offer a hearty bite. If you need a low-sodium option, look for low-sodium soy sauce. It still gives that savory taste without too much salt. You can also use tamari for a gluten-free choice. Pro Tips Use Lean Ground Beef: Opt for lean ground beef (90% lean or higher) to reduce excess fat and make your dish healthier without sacrificing flavor. Adjust Spice Level: If you prefer a milder flavor, reduce the amount of gochujang or omit it entirely. You can always add a little at the end to taste. Meal Prep Friendly: This dish is great for meal prep! Cook a larger batch and store it in the refrigerator for up to 4 days or freeze for longer storage. Fresh Herb Garnish: Enhance the flavor and presentation by adding fresh herbs like cilantro or mint alongside the green onions for a fresh twist. {{image_2}} You can switch up the protein in these bowls. Use ground chicken or turkey instead of beef. These options are leaner. They also soak up flavor well. If you want a meatless meal, try tofu. Firm tofu works best. Crumble it and sauté it like ground beef. This choice is high in protein and works great with the sauce. You can make these bowls as spicy as you like. Adjust the gochujang based on your taste. Start with less if you prefer milder flavors. You can add extra chili flakes for more heat. Just sprinkle them on top when serving. This way, everyone can enjoy their meal at their spice level. Feel free to mix in different veggies. Bell peppers and snap peas add color and crunch. You can also use seasonal vegetables. In summer, zucchini or corn work great. In fall, consider adding squash. This makes your meal fresh and fun. It also adds more nutrients to your bowls. To keep your Korean ground beef bowls fresh, store leftovers in the fridge. Use airtight containers to prevent moisture loss. Make sure to cool the food to room temperature before sealing it. This helps keep flavors intact and prevents bacteria growth. Your leftovers will stay good for about three to four days. You can freeze assembled bowls for later meals. Pack them in freezer-safe containers, leaving some space for expansion. When you’re ready to eat, thaw the bowls in the fridge overnight. To heat, use a microwave until hot, stirring halfway for even cooking. You can also reheat them on the stove over low heat. In the fridge, your Korean ground beef bowls last for three to four days. In the freezer, they can stay fresh for up to three months. Just remember to label your containers with dates. This way, you can enjoy them at their best quality. Gochujang is a thick, red chili paste from Korea. It has a nice spicy and sweet flavor. I use it to add depth to my dishes. It’s made from red chili powder, glutinous rice, fermented soybeans, and salt. This paste adds warmth and richness to the beef. Benefits of using gochujang include: - Adds unique flavor - Enhances the taste of sauces - Provides a mild heat - Pairs well with various ingredients You can mix gochujang into marinades or sauces. Start with a small amount, then taste as you go. Yes, you can make Korean Ground Beef Bowls ahead of time. This dish stores well in the fridge. It’s a great option for meal prep. Tips for meal prepping include: - Cook the beef mixture and cool it before storing. - Keep rice and vegetables separate until serving. - Use airtight containers to keep the food fresh. When you are ready to eat, warm the beef and rice. You can add fresh veggies right before serving for crunch. You can serve many side dishes with these bowls. They add variety and taste to your meal. Suggestions include: - Kimchi for a tangy kick - Steamed dumplings for extra flavor - A light salad with sesame dressing - Cold cucumber salad for freshness For beverages, I recommend iced green tea or a light lager. These pair nicely with the rich flavors of the dish. Korean Ground Beef Bowls are a tasty dish you can easily make. We covered the key ingredients like ground beef, sesame oil, and gochujang. I shared steps to cook and mix flavors well. Remember, tips for great texture and vibrant presentation make a big difference. You can even switch out proteins and veggies to suit your taste. Storing leftovers correctly keeps your meals fresh. Try these ideas and feel free to customize. Enjoy your cooking journey!

Korean Ground Beef Bowls Quick and Flavorful Meal

Looking for a quick and tasty meal? Korean Ground Beef Bowls are your answer! With just a few simple ingredients,

To make creamy pesto pasta, you need a few key ingredients. Here’s what you’ll need: - 12 oz. pasta of your choice (fettuccine or penne work well) - 1 cup fresh basil leaves - 1/4 cup pine nuts (toasted if desired) - 1/2 cup grated Parmesan cheese - 1/2 cup heavy cream - 3 cloves garlic, minced - 1/3 cup olive oil - Salt and pepper to taste These ingredients create a rich and tasty dish. The fresh basil brings a bright flavor. The Parmesan adds a nice cheesy touch. The cream makes it smooth and creamy. You can enhance this dish with some optional ingredients. These add a fun twist: - Cherry tomatoes, halved (for garnish) - Extra basil leaves (for garnish) Adding cherry tomatoes gives a lovely color. They also add a sweet burst of flavor. Extra basil leaves make the dish look fresh and vibrant. While you can use many types of pasta, some work better than others. I recommend: - Fettuccine - Penne - Farfalle Fettuccine holds onto the creamy pesto well. Penne and farfalle also catch the sauce nicely. Choose your favorite pasta for a delightful meal! {{ingredient_image_1}} Start by boiling a large pot of salted water. Add your pasta to the pot. Cook it until it is al dente, which usually takes around 8 to 10 minutes. Check the package for exact times. Once done, reserve 1 cup of pasta water. This water helps with the sauce later. Drain the pasta and set it aside. Next, grab a food processor. Add the fresh basil leaves, pine nuts, grated Parmesan cheese, and minced garlic. Sprinkle in a pinch of salt. Pulse the mixture until it is finely chopped. Now, with the processor running, slowly drizzle in the olive oil. Blend until the mixture is smooth. If it seems too thick, add a bit more olive oil to thin it out. In a large skillet, pour in the heavy cream over medium heat. Once the cream is warm, add the pesto you made. Stir it well and let it simmer for 2 to 3 minutes. Then, add the drained pasta to the skillet, tossing everything to coat. If the sauce is too thick, use the reserved pasta water a little at a time until you reach the right consistency. Lastly, season with salt and pepper to your taste. To make great pesto, texture matters. Start with fresh basil leaves. They bring bright flavor. Add toasted pine nuts for a nutty taste. Pulse them in a food processor until finely chopped. Slowly drizzle in olive oil while blending. This helps the pesto become smooth and creamy. If it feels too thick, add more oil. The right texture should be silky, not gritty. Cooking pasta is simple, but some steps help. Use a large pot and fill it with water. Add a good amount of salt; this flavors the pasta. Bring the water to a rolling boil before adding the pasta. Stir it occasionally to prevent sticking. Cook until it is al dente. This means it should be firm but not hard. Reserve a cup of pasta water before draining. This water can help adjust your sauce later. When serving creamy pesto pasta, a little flair goes a long way. Start with a clean plate. Twirl the pasta into a nest shape for height. Add halved cherry tomatoes on top for a pop of color. Finish with fresh basil leaves for a touch of green. This makes your dish look appealing and fresh. You can also sprinkle extra Parmesan cheese for added flavor and elegance. Pro Tips Use Fresh Ingredients: For the best flavor, opt for fresh basil and high-quality Parmesan cheese. Fresh ingredients make a noticeable difference in the taste of your pesto. Toast Your Nuts: Toasting pine nuts before adding them to the pesto enhances their flavor. Just a few minutes in a dry skillet will bring out their natural oils and nuttiness. Adjust Consistency: If your sauce is too thick, gradually add reserved pasta water to reach your desired creaminess. This also helps the sauce cling to the pasta better. Customize the Pesto: Feel free to add other ingredients like spinach or kale to your pesto for added nutrition, or substitute walnuts for pine nuts for a different flavor profile. {{image_2}} You can add protein to your creamy pesto pasta to make it heartier. Grilled chicken adds great flavor. Simply slice cooked chicken and mix it in. Shrimp is another tasty choice. Cook shrimp in a pan until pink and toss it with the pasta. You can even use cooked sausage or tofu if you like. For a vegetarian twist, skip the cheese and cream. Use cashew cream instead. Blend soaked cashews with water until smooth. You can also add nutritional yeast for a cheesy flavor. For vegan options, replace Parmesan with a vegan cheese. This keeps the dish rich and creamy without dairy. Switching up nuts and herbs can change your pasta's taste. Instead of pine nuts, try walnuts or almonds. Each nut gives a unique flavor. You can also mix in different herbs. Mint or arugula can add a fresh twist. Experiment with what you have at home for new flavors. To store leftover creamy pesto pasta, let it cool first. Place it in an airtight container. Make sure to seal it well. This helps keep it fresh. Store it in the fridge for up to three days. When you reheat creamy pesto pasta, do it slowly. Use a skillet over low heat. Add a splash of water or cream to keep it moist. Stir often to avoid sticking. You can also use a microwave. Heat it in short bursts, stirring in between. You can freeze creamy pesto pasta if you have lots left. Use a freezer-safe container. Leave some space at the top, as it will expand. Label the container with the date. It will stay good for about two months. To thaw, place it in the fridge overnight before reheating. You can use many kinds of pasta for creamy pesto. Fettuccine and penne are great choices. They hold the sauce well, giving every bite flavor. Other options include spaghetti or farfalle. Choose your favorite shape for a fun twist. Yes, you can make creamy pesto sauce ahead. Prepare the pesto and store it in the fridge. Keep it in an airtight container to keep it fresh. Just add the cream before using. This makes it easy when you want to cook later. To adjust the creaminess, add more or less cream. If you want it creamier, pour in extra heavy cream. For a lighter sauce, use less. You can also add a bit of reserved pasta water to change the texture. This helps you find your perfect mix. Garnishes add color and flavor. Cherry tomatoes are a great choice; their sweetness pairs well. Extra basil leaves give a fresh touch. You can also sprinkle more Parmesan cheese for richness. These simple touches make your dish look and taste even better. Creamy pesto pasta is easy to make with the right ingredients and steps. You learned about key ingredients, how to cook pasta, and prepare the sauce. I shared tips for great texture and tasty variations. Finally, I covered how to store and reheat your pasta for future meals. With these tips, you can enjoy delicious pasta any time. Try making this dish and impress yourself and others with your cooking skills. Enjoy your creamy pesto pasta adventure!

Creamy Pesto Pasta Simple and Flavorful Dish

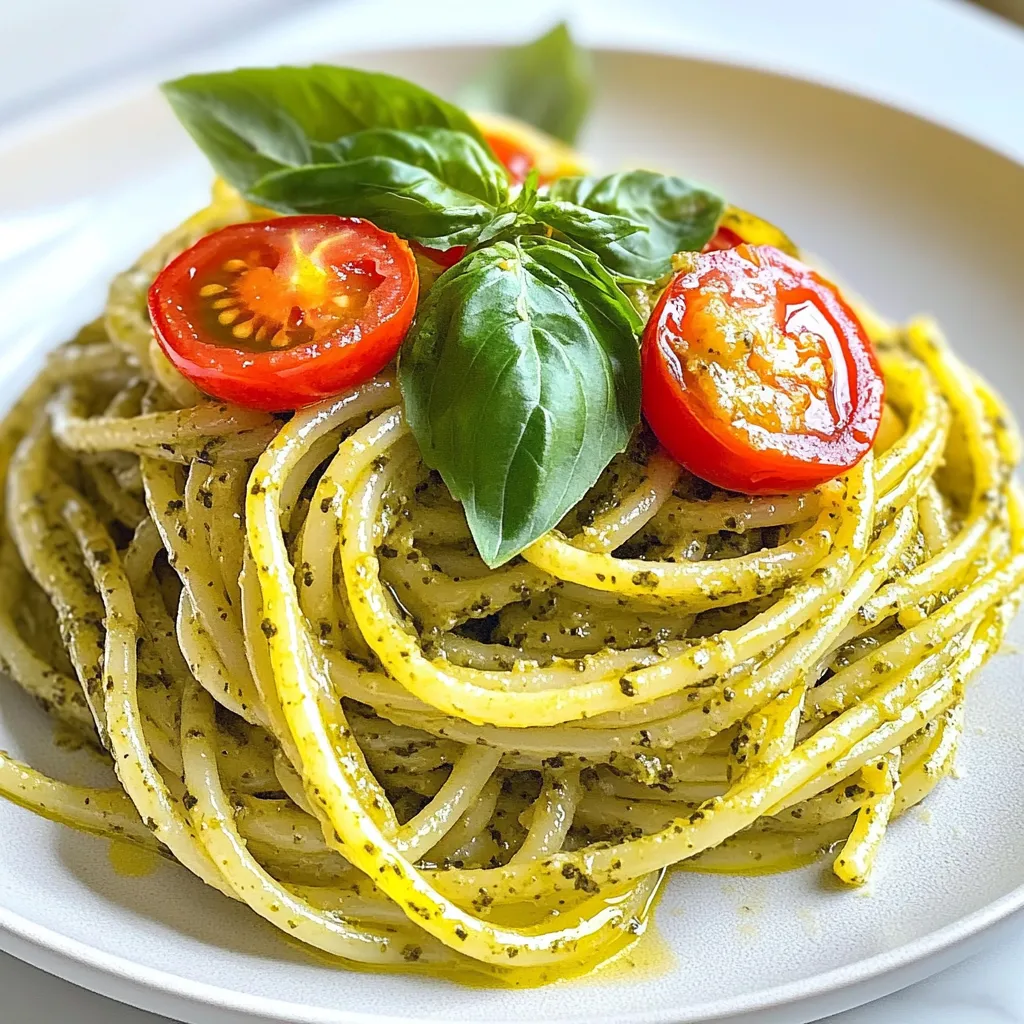
Welcome to the world of creamy pesto pasta! This dish is simple yet bursting with flavor. I’ll show you how

- 1 lb (450g) beef sirloin, thinly sliced - 2 tablespoons soy sauce - 1 tablespoon oyster sauce - 1 teaspoon sesame oil - 2 tablespoons vegetable oil - 1 red bell pepper, sliced - 1 yellow bell pepper, sliced - 1 cup broccoli florets - 1 cup snap peas - 3 cloves garlic, minced - 1 inch ginger, grated - 1 tablespoon cornstarch mixed with 2 tablespoons water (slurry) - Salt and pepper to taste - Cooked rice or noodles for serving - Sesame seeds for garnish - Green onions, chopped, for garnish The key to a great beef stir-fry is using fresh, quality ingredients. I often choose beef sirloin for its taste and tenderness. Slicing it thin helps it cook fast. Fresh vegetables add color and crunch. I love using red and yellow bell peppers for sweetness and broccoli for a healthy bite. Snap peas add a nice snap and texture. For sauces, soy sauce gives a savory depth. Oyster sauce adds a hint of sweetness and richness. Sesame oil brings a unique aroma. The cornstarch slurry thickens the sauce, making it cling to the beef and veggies. When you gather these ingredients, remember that fresh makes all the difference. Enjoying the vibrant colors and fresh scents is part of the fun! {{ingredient_image_1}} - Marinate the beef: Start by slicing 1 pound of beef sirloin into thin strips. In a bowl, mix the sliced beef with 2 tablespoons of soy sauce, 1 tablespoon of oyster sauce, and 1 teaspoon of sesame oil. Let it marinate for about 10 minutes. This step adds great flavor to the beef. - Prepare the vegetables: While the beef marinates, wash and slice your veggies. You will need 1 red bell pepper and 1 yellow bell pepper, both sliced. Also, prepare 1 cup of broccoli florets and 1 cup of snap peas. Having everything ready makes cooking quick and easy. - Heat oil and cook the beef: Heat 1 tablespoon of vegetable oil in a large skillet or wok over high heat. Once the oil is hot, add the marinated beef in batches. Stir quickly for 2 to 3 minutes until it turns brown. Remove the beef from the skillet and set it aside. Cooking in batches helps the beef brown well. - Sauté garlic and ginger: In the same skillet, add 1 tablespoon of vegetable oil. Then, add 3 minced garlic cloves and 1 inch of grated ginger. Sauté for about 30 seconds until you smell the aroma. This step boosts the dish's flavor. - Add veggies to the skillet: Now, toss in the sliced bell peppers, broccoli florets, and snap peas. Stir-fry for 3 to 4 minutes until the veggies are tender-crisp. This keeps them bright and fresh. - Return beef to the skillet: Add the cooked beef back into the skillet with the veggies. - Thicken the sauce: Mix 1 tablespoon of cornstarch with 2 tablespoons of water to create a slurry. Pour this into the skillet while stirring. Cook until the sauce thickens and coats the beef and veggies. Season with salt and pepper to taste. This final step brings all the flavors together. What cut of beef to choose I recommend using beef sirloin for this dish. It has great flavor and tenderness. Sirloin cooks quickly, making it perfect for stir-fry. You can find it at most grocery stores or butcher shops. Tips for slicing To slice beef easily, freeze it for about 30 minutes. This firms it up, making it easier to cut. Always slice against the grain. This helps keep the meat tender and juicy. High heat importance Always use high heat when cooking your stir-fry. This helps sear the beef quickly, locking in flavors. A hot surface also cooks the veggies fast, keeping them crispy. Cooking in batches Cook the beef in batches. This prevents overcrowding in the skillet. When the beef has space, it gets a nice brown color. This makes each bite delicious. Addition of spices Add spices like black pepper and red pepper flakes for a kick. You can also try garlic powder or onion powder. These spices boost the overall flavor of your dish. Alternative sauces and garnishes Feel free to switch up the sauces. You can use teriyaki or hoisin sauce instead. For garnishes, chopped green onions and sesame seeds add a nice touch. Pro Tips Marinate for Flavor: Allowing the beef to marinate for at least 10 minutes enhances its flavor and tenderness. For even better results, marinate for up to an hour in the refrigerator. High Heat is Key: Cooking on high heat ensures that the beef sears quickly, locking in juices and creating a nice texture. Make sure your skillet or wok is hot before adding ingredients. Veggie Variety: Feel free to mix in other vegetables like carrots, zucchini, or mushrooms to add more flavor and nutrition to your stir-fry. Perfect Serving: Serve over fluffy rice or noodles, and garnish with fresh green onions and sesame seeds to elevate both presentation and taste. {{image_2}} You can easily swap beef for tofu. Tofu absorbs flavor well and adds protein. Choose firm or extra-firm tofu for the best texture. For veggies, consider using: - Bell peppers - Carrots - Zucchini - Snow peas These veggies not only taste great but also add color. You can mix and match based on what you enjoy or have on hand. Changing the sauce can bring new life to your stir-fry. Teriyaki stir-fry sauce adds a sweet and savory taste. To make it, mix soy sauce, sugar, and a bit of ginger. Spicy Szechuan sauce offers a kick. Combine soy sauce, chili paste, and garlic for heat. Adjust the spice level to your liking. You can add more veggies for extra flavor and nutrition. Here are some to think about: - Mushrooms - Baby corn - Bok choy Seasonal veggies are also a great choice. During summer, use fresh asparagus or cucumbers. In fall, try adding pumpkin or squash. These choices enhance taste and make cooking fun! You can store leftover stir-fry in the fridge. First, let it cool down. Then, place it in an airtight container. This keeps the flavors fresh. I recommend using glass containers for easy reheating. They don’t stain and can go from fridge to microwave. The best way to reheat stir-fry is on the stove. Heat a pan over medium heat and add a splash of water. This helps steam the dish. Stir it gently to warm through. If using a microwave, cover it loosely to avoid sogginess. Heat in short bursts, stirring in between. Yes, you can freeze the stir-fry. To freeze, let it cool completely. Then, pack it in freezer-safe bags. Try to remove as much air as possible. This prevents freezer burn. To thaw, place it in the fridge overnight. You can also use the microwave on low power. Just stir it halfway through to ensure even heating. This beef stir-fry is quick to make. It takes about 10 minutes to prep and 10 minutes to cook. In total, you will spend around 20 minutes from start to finish. This makes it a great choice for busy weeknights or last-minute meals. Yes, you can use frozen vegetables. They save time and are convenient. Here are some pros and cons to consider: - Pros: - Frozen vegetables are pre-washed and cut, which saves prep time. - They have a long shelf life and reduce food waste. - Cons: - Frozen veggies may lose some crunch and flavor. - They can release extra moisture, which may affect the sauce. If you choose frozen, cook them a bit longer to ensure they heat through. You can serve this stir-fry with several tasty sides. Here are some great options: - Cooked rice: White or brown rice works well. - Noodles: Rice or egg noodles are great choices. - Salad: A simple green salad adds freshness. - Spring rolls: They add a nice crunch and flavor. These sides will complement your stir-fry and create a full meal. Enjoy! This blog post covered the essential ingredients and steps for a tasty beef stir-fry. From marinating this flavorful beef sirloin to sautéing fresh veggies, each step enhances the dish. I shared tips for choosing the right beef and perfecting your stir-fry skills. Plus, I offered variations, storage tips, and answers to common questions. By following these insights, you'll create a delicious meal every time. Enjoy the cooking process and make it your own! Happy stir-frying!

Quick Beef Stir-Fry with Veggies Flavorful and Fast Dish

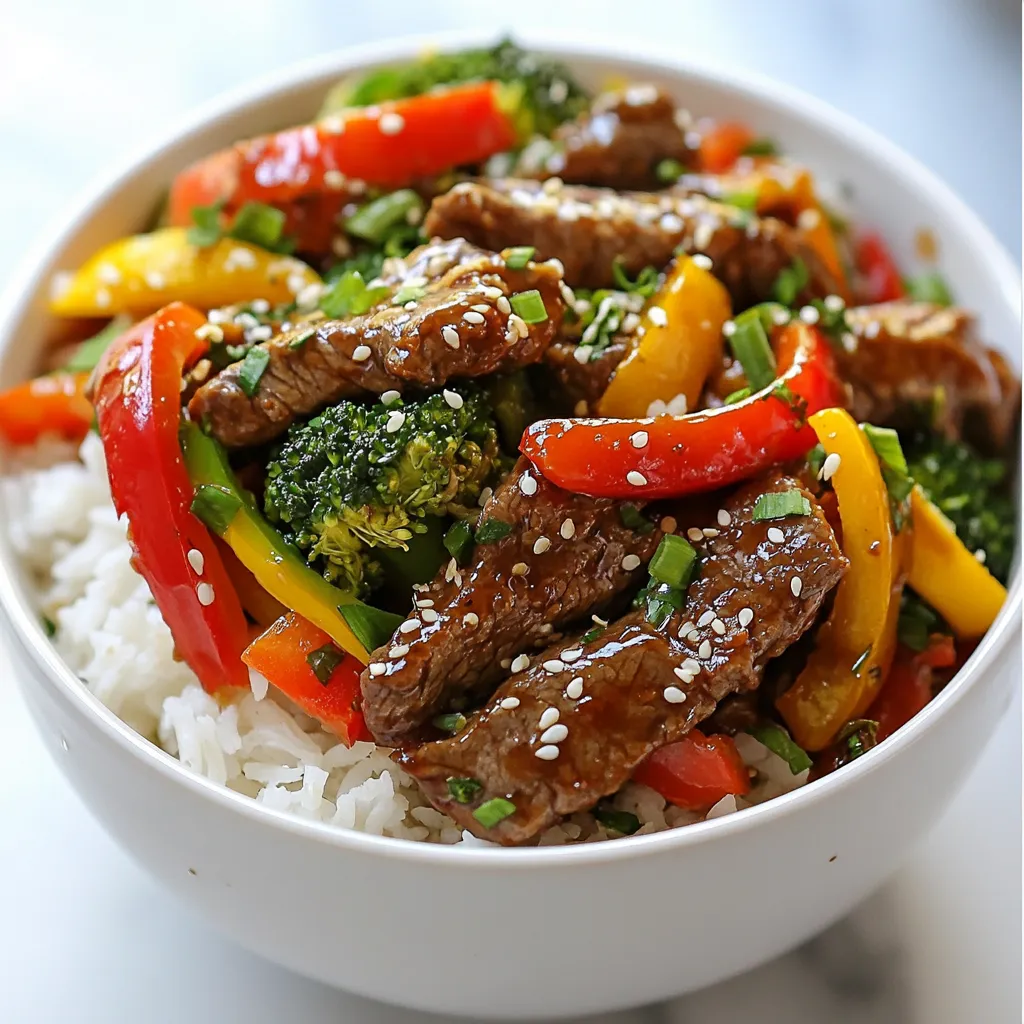
If you’re looking for a quick, tasty meal, this Quick Beef Stir-Fry with Veggies is perfect! With fresh beef and

Older posts
Newer posts
← Previous Page1 … Page132 Page133 Page134 … Page146 Next →

dsad

© 2025 Emmas Dish • Built with GeneratePress

Our Policies

  • Copyright Policy
  • Cookie Policy
  • GDPR Policy
  • Privacy Policy
  • Disclaimer
  • Terms Of Use

More Information

  • Home
  • About
  • Contact
  • Appetizers
  • Dessert
  • Dinner
  • Drinks
©2025, Emmas Dish About Back To Top