Skip to content
DisclaimerTerms Of UseGDPR PolicyCookie Policy

Emmas Dish

  • Home
  • Drinks
  • Appetizers
  • Dinner
  • Dessert
  • About
  • Contact
  • Privacy Policy
DisclaimerTerms Of UseGDPR PolicyCookie Policy

Emma

To make a delightful Apple Chai Latte, gather these simple ingredients: - 2 cups almond milk (or any milk of choice) - 1 medium apple, cored and chopped - 1 chai tea bag (or 1 tablespoon loose chai blend) - 1 tablespoon maple syrup (optional, adjust to taste) - 1/2 teaspoon ground cinnamon - 1/4 teaspoon ground ginger - 1/4 teaspoon ground nutmeg - 1/4 teaspoon cloves - Whipped cream or coconut cream for topping (optional) - Apple slices and cinnamon stick for garnish These ingredients blend to create a warm and cozy drink. Almond milk gives a nutty flavor, while the apple adds sweetness. Chai tea offers a spicy kick that rounds out the drink. Using maple syrup can enhance the sweetness, but you can leave it out if you prefer less sugar. The spices like cinnamon, ginger, nutmeg, and cloves bring warmth to the drink. Top it off with whipped cream or coconut cream for a treat! Garnishing with apple slices and a cinnamon stick makes it look pretty too. Enjoy this drink anytime you want something warm and comforting. {{ingredient_image_1}} - Combine ingredients in a saucepan. Start by taking a small saucepan. Add 2 cups of almond milk, 1 chopped apple, 1/2 teaspoon of ground cinnamon, 1/4 teaspoon of ground ginger, 1/4 teaspoon of ground nutmeg, and 1/4 teaspoon of cloves. Stir the mixture well. - Simmer apple and spices. Heat the saucepan over medium heat. Let the mixture come to a gentle simmer. Stir occasionally. Once it simmers, lower the heat. Let it gently simmer for 5-7 minutes. The apples should become soft and fragrant. - Steep chai tea. After simmering, remove the saucepan from heat. Add 1 chai tea bag into the mix. Let it steep for 5 minutes. This will infuse the tasty chai flavors into your drink. - Blend until smooth. Once steeped, take out the tea bag. Use an immersion blender to blend the mixture until smooth. If you don’t have one, carefully transfer it to a blender and blend it. - Sweeten and heat. Return the smooth mixture to the saucepan. If you want it sweeter, add 1 tablespoon of maple syrup. Heat gently until it's warm, but do not let it boil. - Pour and garnish. Now, pour your spiced apple chai latte into mugs. If you like, top it with whipped cream or coconut cream. For a lovely touch, garnish with apple slices and a cinnamon stick. Enjoy your cozy drink! Choosing the right milk Pick a milk you love. Almond milk gives a nutty flavor. Whole milk adds richness. Oat milk is creamy and great too. You can even try coconut milk for a tropical twist. Always choose what tastes best to you. Adjusting sweetness to taste Maple syrup adds a nice touch of sweetness. Start with one tablespoon. Taste and add more if needed. You can swap maple syrup for honey or agave if you prefer. Sweetness is all about your taste. Ideal garnishes for presentation Garnish your drink for flair. Use apple slices for a fresh look. A cinnamon stick adds warmth and spice. Whipped cream makes it feel special. Coconut cream is a great dairy-free option. Pairing with snacks or desserts Enjoy your latte with snacks. Try it with apple pie for a cozy combo. Cookies or muffins also pair well. A slice of pumpkin bread is perfect for fall. Choose what makes you happy! Pro Tips Use Fresh Apples: Fresh, crisp apples will enhance the flavor of your latte. Varieties like Honeycrisp or Fuji add natural sweetness and a lovely texture. Experiment with Spices: Feel free to adjust the spices according to your taste. Adding a pinch of cardamom or vanilla can elevate the chai flavor profile. Blending Techniques: For a super smooth texture, blend the mixture in small batches if using a traditional blender, and ensure the lid is vented to avoid pressure buildup. Serving Suggestions: This latte pairs wonderfully with a sprinkle of crushed nuts or a drizzle of caramel sauce for an extra touch of indulgence. {{image_2}} You can easily change the flavor of your Apple Chai Latte. One fun idea is to add caramel. It gives the drink a sweet, rich taste. Just drizzle some caramel sauce on top before serving. You can also incorporate vanilla extract. A splash of vanilla adds warmth and depth. Use about half a teaspoon to start. Taste and adjust based on your liking. Choosing the right milk can change your drink's taste. Oat milk is creamy and adds a mild sweetness. It pairs well with the spices in your latte. On the other hand, almond milk is lighter and has a nutty flavor. Both work great! If you want a classic taste, try dairy milk. It makes a rich and creamy base for your latte. You can use whole milk or even skim, depending on your preference. Each option gives a unique twist! To store leftovers, let your apple chai latte cool first. Pour it into an airtight container. It stays fresh for up to three days in the fridge. When reheating, use a saucepan over low heat. Stir gently to warm it up evenly. Avoid boiling, as it can change the taste. You can also microwave it in a safe cup. Heat in short bursts, stirring in between, until warm. Can you freeze apple chai latte? Yes, but it may change the texture. To freeze, pour the cooled latte into freezer-safe bags or containers. Leave space at the top, as it expands when frozen. It can last up to three months in the freezer. When you want to use it, thaw it in the fridge overnight. To reheat, warm it on the stove or in the microwave. Stir well to mix any separated ingredients. Enjoy your cozy drink! What is an Apple Chai Latte? An Apple Chai Latte is a warm drink that blends apple flavors with spicy chai. It combines almond milk, chai tea, and spices like cinnamon and nutmeg. You can enjoy it as a cozy treat on chilly days. The taste is sweet, spicy, and full of fall vibes. How can I make this vegan? To make this drink vegan, use almond milk or any plant-based milk. You can skip the whipped cream or use coconut cream instead. The rest of the ingredients are already vegan-friendly. Are there any health benefits to chai? Chai tea offers many health benefits. It has spices like ginger and cinnamon, which can help digestion. Chai is also rich in antioxidants, which may support your immune system. The warmth of chai can soothe and comfort on cold days. Nutritional information breakdown For each serving of the Apple Chai Latte, you get about: - Calories: 150 - Protein: 3g - Carbohydrates: 20g - Fat: 7g - Fiber: 2g - Sugar: 10g (with maple syrup) This drink is a tasty way to enjoy some nutrition while keeping warm! This blog post showed you how to make a delicious Apple Chai Latte. We covered the ingredients, step-by-step instructions, and tips for a great drink. Remember, you can adjust the sweetness and try different milks. Don’t forget about the fun variations and garnishes. This warm drink is easy to make and perfect to share. Try it out, and enjoy the cozy flavors in each sip. You’ll love the blend of spices and apple goodness!

Apple Chai Latte Flavorful and Cozy Drink Recipe

Warm up your day with a delicious Apple Chai Latte! This cozy drink combines sweet apples and spicy chai for

- 6 large eggs - 1/4 cup mayonnaise - 1 tablespoon Dijon mustard - 1 tablespoon lemon juice - 1/4 teaspoon garlic powder - Salt and pepper to taste - 1/2 cup celery, finely chopped - 1/4 cup red onion, finely chopped - 1/4 cup pickles, finely chopped - 1/2 cup panko breadcrumbs - 2 tablespoons olive oil - Fresh parsley, chopped (for garnish) To make crispy egg salad, gather these fresh ingredients first. The six large eggs are the stars of this dish. They give a rich and creamy base. The mayonnaise adds a smooth texture, while Dijon mustard gives a nice kick. Lemon juice brightens the flavors. Garlic powder adds depth without being too strong. Next, we need the crunch. The celery, red onion, and pickles add a refreshing bite. The panko breadcrumbs will make our salad crispy and fun. Finally, olive oil helps toast the breadcrumbs. Don't forget the parsley! It adds a pop of color and flavor on top. When you have these ingredients ready, you can start cooking. Each one plays a key role in making this dish delicious and satisfying. {{ingredient_image_1}} To start, place six large eggs in a saucepan. Cover them with cold water. Heat the pot on medium until the water boils. When it starts boiling, cover the pot. Remove it from heat and let the eggs sit for 12 minutes. This makes them perfect for egg salad. After 12 minutes, transfer the eggs to an ice bath. Let them cool for about five minutes. This helps with easy peeling. Next, prepare the dressing. In a bowl, mix 1/4 cup mayonnaise, 1 tablespoon Dijon mustard, and 1 tablespoon lemon juice. Add 1/4 teaspoon garlic powder, salt, and pepper to taste. Stir until well combined. If you want it creamier, add more mayonnaise. Taste and adjust flavors as needed. You want it just right for your salad. Now, let’s combine the ingredients. Chop the cooled eggs into small pieces. In a large mixing bowl, add the chopped eggs, 1/2 cup finely chopped celery, 1/4 cup finely chopped red onion, and 1/4 cup finely chopped pickles. Pour the dressing over the mixture. Gently stir until everything is well coated. This step is key for a tasty egg salad. For the crispy topping, heat 2 tablespoons of olive oil in a skillet over medium heat. Add 1/2 cup of panko breadcrumbs to the skillet. Toast them, stirring frequently. Cook until golden and crispy, which should take about 3 to 4 minutes. Remove from heat and let cool. This crispy element adds great texture to your egg salad. For serving, spoon the egg salad into bowls. Top each with the crispy panko. Garnish with fresh chopped parsley for a pop of color. You can serve this on bread or enjoy it in a bowl. Either way, it’s a delicious treat! Fresh eggs are key for a great egg salad. Older eggs can be harder to peel and may not taste as good. Always choose large, fresh eggs for the best results. To avoid sogginess, don’t let the egg salad sit too long before serving. Serve it right after mixing to keep that perfect crunch. You can add or substitute various ingredients for a twist. Try adding diced bell peppers for a sweet crunch. Swap the red onion for green onions for a milder taste. Adjust the garlic powder and salt to your liking. Taste as you go to find what works best for you. Prep your ingredients ahead of time to save time. Chop celery, onion, and pickles a day before and store them in the fridge. You can also use store-bought mayo and mustard to cut prep time. This way, you’ll whip up your egg salad in no time! Pro Tips Perfectly Boiled Eggs: For the best results, place the eggs in cold water and then bring to a boil. This method helps prevent cracking and ensures even cooking. Add Flavor to the Dressing: Feel free to customize the dressing by adding herbs like dill or chives for extra flavor. A pinch of cayenne pepper can also add a nice kick. Crunch Factor: Make sure to toast the panko breadcrumbs until they are golden brown for a delightful crunch. This step is key to achieving the crispy topping you desire. Chill for Best Flavor: Allow the egg salad to chill in the refrigerator for at least 30 minutes before serving. This resting time lets the flavors meld beautifully. {{image_2}} You can add cooked and crumbled bacon to your egg salad. This addition gives a nice crunch and a smoky flavor. The saltiness of the bacon also balances the creaminess of the dressing. If you enjoy bold flavors, consider using a bit of black pepper or smoked paprika to enhance the taste. Incorporating avocado into your egg salad brings creaminess. Simply mash ripe avocado and mix it in with the eggs. This adds healthy fats and a smooth texture. To balance the creaminess, add a squeeze of lemon juice. This will brighten the flavor and cut through the richness. For a twist, try adding olives and feta cheese. Chopped olives provide a briny taste, while feta adds a creamy texture. This variation gives your salad a Mediterranean flair. To complete the dish, sprinkle some dried oregano or fresh basil. This enhances the flavors and makes it more aromatic. To keep your crispy egg salad fresh, use airtight containers. Glass or plastic containers work well. Make sure they seal tightly to keep moisture out. You want to keep the ingredients crisp and tasty. Always store the salad in the fridge right after making it. This helps prevent bacteria growth and keeps it safe to eat. You can store your egg salad in the fridge for about three to five days. After this time, it may lose its flavor and texture. Watch for signs of spoilage, like a sour smell or discoloration. If it looks or smells off, it’s best to throw it away. Safety first! Reheating egg salad is usually not necessary. It tastes best cold. If you want to heat it, do so gently. Use a low setting on the stove or microwave. Heat it just enough to take the chill off. To keep the texture, avoid cooking it too long. Enjoy your crispy egg salad fresh for the best flavor! You can use yogurt or avocado instead of mayo. Both keep it creamy. Greek yogurt adds a tangy flavor. Avocado brings rich creaminess. Use mashed avocado for a smooth texture. Both options keep the mix flavorful and light. Balance flavors by adding lemon juice. This helps brighten the dish. Yes, you can prep parts in advance. Cook and chop eggs. Mix the salad base without the crispy topping. Store it in the fridge for up to two days. Add the crispy topping just before serving. This keeps it crunchy and fresh. I love using whole grain or sourdough bread. These offer great texture and flavor. You can also try rye or a soft baguette. For a lighter option, serve it on leafy greens. This keeps it fresh and adds a nice crunch. In this article, we explored how to make a tasty egg salad. We covered ingredients and detailed steps to prepare it perfectly. You learned how to create a crispy topping and enhance flavors with easy tricks. Remember, fresh eggs and proper storage are key to great taste. Feel free to experiment with variations like bacon or avocado. Enjoy crafting a delicious meal that can impress everyone at your table. Happy cooking!

Crispy Egg Salad Crunchy Flavorful Delight

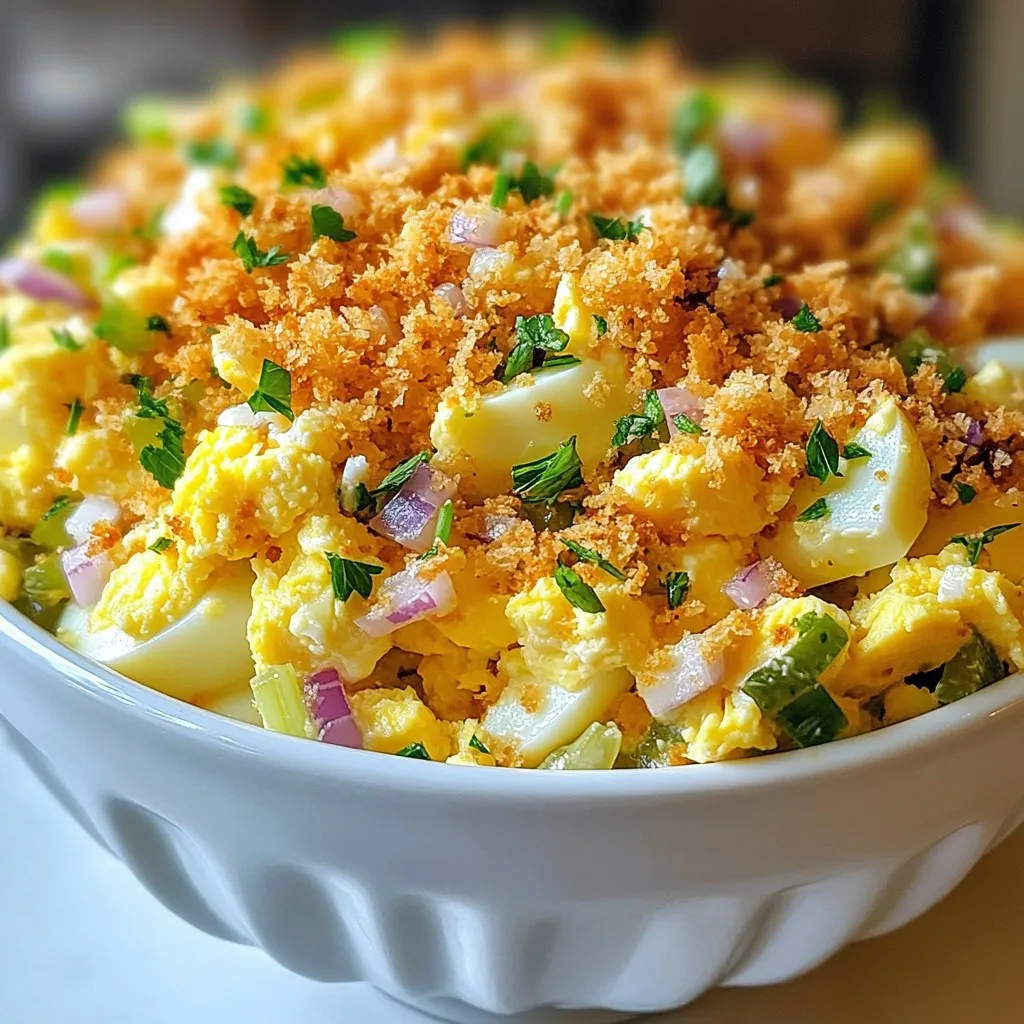
Are you ready to elevate your lunch game? This Crispy Egg Salad is a crunchy, flavorful delight that brings together

- 2 cups cooked brown rice - 1 lb grilled chicken breast, sliced - 1 cup sweet corn (fresh or canned) - 1 red bell pepper, diced - 1 avocado, diced - 1/2 cup red onion, finely chopped These main ingredients create a great base for your Street Corn Chicken Bowls. The brown rice provides fiber and makes the dish hearty. The grilled chicken adds protein and flavor. Fresh corn gives sweetness, while the red bell pepper and avocado add crunch and creaminess. - 1/2 cup crumbled feta cheese - Olive oil for grilling Feta cheese is optional, but it adds a nice tang. You can use olive oil to grill the chicken, adding a rich flavor while keeping it moist. - 1/2 teaspoon smoked paprika - 1/2 teaspoon chili powder - 1 tablespoon lime juice - 1/4 cup cilantro, chopped - Salt and pepper to taste These spices and herbs make your dish pop. The smoked paprika gives a warm flavor. Chili powder adds a little heat. Lime juice brightens everything up. Fresh cilantro adds a refreshing touch. You can adjust salt and pepper to fit your taste. When you gather these ingredients, you set yourself up for a delicious meal. Enjoy the process of making these bowls! {{ingredient_image_1}} First, take 1 pound of chicken breast. I like to marinate it to get great flavor. Mix olive oil, smoked paprika, chili powder, salt, and pepper in a bowl. Coat the chicken well. Let it marinate for at least 20 minutes. This step makes the chicken juicy and tasty. Now, heat your grill to medium. Grill the chicken for about 6 to 7 minutes on each side. Make sure it’s cooked through and no longer pink inside. Once done, let the chicken rest for a few minutes before slicing it. This resting time keeps it moist. Next, let's cook the corn. You can use fresh or canned corn. If using fresh, just cut it off the cob. Heat a small skillet over medium heat. Add a drizzle of olive oil to the pan. Then, add the corn and cook for about 5 minutes. Stir it occasionally. You want it to char a bit for great flavor. Season it with a pinch of salt, then remove it from the heat. This step adds a nice smoky taste to your bowls. Now it’s time to put everything together. Take four serving bowls and add 2 cups of cooked brown rice. This will be the base of your bowls. Next, layer the sliced grilled chicken on top of the rice. Add the charred corn next. Then, sprinkle diced red bell pepper, diced avocado, and chopped red onion on top. This adds color and crunch to your meal. Finally, drizzle lime juice over the bowls. Add fresh cilantro for a pop of flavor. If you like cheese, sprinkle crumbled feta on top. Your Street Corn Chicken Bowls are ready to serve! Enjoy them warm with extra lime wedges if you want. Marinating chicken adds great taste. Use olive oil, smoked paprika, and chili powder. Mix these with salt and pepper. Let the chicken sit for at least 20 minutes. This helps the flavors soak in. You can also marinate it for longer if you have time. Try to use fresh herbs for a brighter taste. Grilling chicken is simple and tasty. Heat your grill to medium. Cook each side for 6-7 minutes. Use a meat thermometer to check. The chicken should reach 165°F. Let it rest before slicing. This helps keep it juicy. If you want, you can also bake or pan-sear the chicken. Cooking corn adds a nice touch. Use fresh or canned corn. Heat olive oil in a skillet over medium heat. Add the corn and stir it. Cook for about 5 minutes. The goal is to get a lovely char. This gives the corn a sweet flavor. Don’t forget to season it with salt. This simple step makes a big difference! Pro Tips Marinate for Flavor: Allow the chicken to marinate for at least 30 minutes or even overnight for a deeper flavor profile. Fresh Corn Advantage: If possible, use fresh corn for grilling. It adds a sweet, juicy flavor that enhances the dish. Perfectly Cooked Chicken: Use a meat thermometer to ensure the chicken reaches an internal temperature of 165°F for safety and juiciness. Add a Spicy Kick: For an added kick, consider mixing some diced jalapeños into the bowl or topping it with hot sauce. {{image_2}} You can easily change this dish to make it vegetarian. Simply swap the grilled chicken for black beans or grilled zucchini. Both options add great taste and protein. You can also use grilled corn on the cob for a fresh flavor. This way, you keep the vibrant colors and textures while making it meat-free. Feel free to get creative with toppings! Here are some fun ideas: - Chopped jalapeños for heat - Diced tomatoes for freshness - Sliced radishes for crunch - Sour cream for creaminess - Shredded lettuce for added greens Mix and match these to find your favorite combo. You can even add a sprinkle of nuts or seeds for a delightful crunch. Sauces can really boost the taste. Here are a few to try: - A drizzle of creamy chipotle sauce for smoky spice - Cilantro lime dressing for zesty brightness - A splash of hot sauce for extra heat - Avocado crema for smooth richness These sauces can change the whole vibe of your bowl. Just pick one to add a new layer of flavor. To keep your street corn chicken bowls fresh, store them in an airtight container. Place all layers together, or keep them separate for better texture. If you layer them, the rice and chicken may soak up juices. You can store them in the fridge for up to three days. Label the container with the date so you know when to eat them. When you're ready to enjoy your leftovers, reheat them gently. Use the microwave for quick heating. Place the bowl in the microwave for 1-2 minutes. Stir halfway to ensure even heating. If you want to keep it crispy, heat on the stove. Add a splash of water in a pan, cover, and heat on low for about 5 minutes. If you want to save some bowls for later, you can freeze them. Make sure to cool everything completely before freezing. Use freezer-safe containers or bags. Remove as much air as possible. You can freeze the bowls for up to three months. To enjoy later, thaw them in the fridge overnight before reheating. Avoid freezing avocado or fresh toppings to keep them fresh. Yes, you can use frozen corn. Frozen corn cooks quickly and is sweet. Just thaw it before cooking. I recommend sautéing it in a skillet. This will add some nice flavors. Cook it until it is hot and slightly charred, about 5 minutes. This step will keep the dish tasty. If you want a different cheese, try goat cheese or queso fresco. Both give a creamy touch. You can also skip cheese if you prefer a lighter bowl. For a vegan option, use avocado or a nut-based cheese. Each of these options will keep your bowl tasty. To add heat, use more chili powder or cayenne pepper. Start with a small amount and taste. You can also add sliced jalapeños or hot sauce. Mixing in diced chipotle peppers gives a smoky spice. Adjust it to your heat level, and enjoy your spicy street corn chicken bowl! This blog post covered everything you need for tasty grilled chicken bowls. We looked at key ingredients, step-by-step cooking, and helpful tips. You learned how to add flavor with marinades and what to do with leftovers. I shared variations that cater to different diets and preferences. Remember, cooking is fun! Experiment with ingredients and enjoy new flavors. Happy cooking!

Street Corn Chicken Bowls Flavorful and Easy Recipe

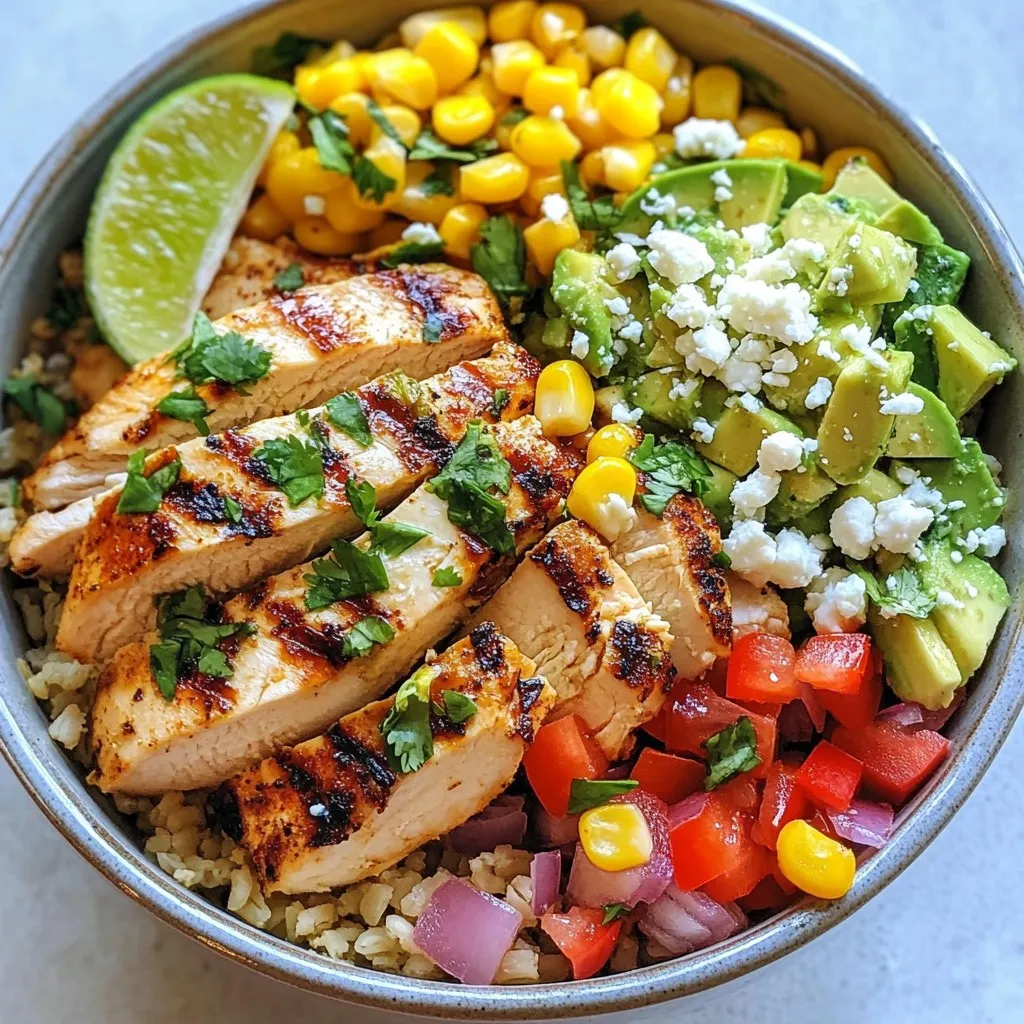
Craving a tasty and easy meal? Let me introduce you to Street Corn Chicken Bowls! This dish combines juicy grilled

To make these tasty cinnamon sugar pretzel bites, you need the following: - 1 ½ cups warm water (110°F - 115°F) - 1 packet (2 ¼ teaspoons) active dry yeast - ¼ cup granulated sugar - 4 cups all-purpose flour - ½ teaspoon salt - ½ cup baking soda - 1 large egg, beaten (for egg wash) - ½ cup unsalted butter, melted - ¾ cup granulated sugar (for coating) - 1 tablespoon ground cinnamon You can change some ingredients if needed: - If you don't have active dry yeast, use instant yeast. Use the same amount. - You can replace all-purpose flour with bread flour for a chewier texture. - If you need a dairy-free option, use melted coconut oil instead of butter. - Brown sugar works well too; it adds a deeper flavor. Gather these tools to make your pretzel bites: - Large mixing bowl for dough - Measuring cups and spoons for accuracy - Clean surface for kneading - Sharp knife or dough cutter for cutting - Slotted spoon for boiling - Baking sheet lined with parchment paper - Small bowl for egg wash - Oven for baking With these ingredients and tools, you're all set to create delicious cinnamon sugar pretzel bites! {{ingredient_image_1}} Making cinnamon sugar pretzel bites is fun and easy! First, gather your ingredients and tools. You will need warm water, yeast, sugar, flour, salt, baking soda, an egg, butter, sugar, and cinnamon. This recipe takes about 1 hour and 30 minutes, but most of that is waiting. You will make dough, boil, and bake the pretzel bites. 1. Start by mixing warm water and yeast in a large bowl. Let it sit for 5 minutes until it looks frothy. 2. Add ¼ cup of granulated sugar to the yeast mix. Stir it well to combine. 3. Gradually add 4 cups of flour and ½ teaspoon of salt. Mix until a soft dough forms. 4. Knead the dough on a floured surface for about 5 minutes. You want it to be smooth and elastic. 5. Place the dough in a greased bowl. Cover it with a kitchen towel. Let it rise in a warm spot for about 1 hour or until it doubles in size. 1. Preheat your oven to 425°F (220°C). Line a baking sheet with parchment paper. 2. In a large pot, bring 10 cups of water and ½ cup of baking soda to a boil. 3. After the dough has risen, punch it down. Turn it out onto a floured surface and divide it into 8 equal pieces. 4. Roll each piece into a rope, about 1 inch thick. Cut each rope into 1-inch pieces to make bite-sized nuggets. 5. Carefully drop the nuggets into the boiling water for about 30 seconds. Use a slotted spoon to remove them and place them on the baking sheet. 6. Brush the tops of the nuggets with a beaten egg. Then, sprinkle them with the cinnamon-sugar mix (¾ cup sugar and 1 tablespoon cinnamon). 7. Bake for 12 to 15 minutes until they turn golden brown. 8. Once baked, brush the warm pretzel bites with melted butter. Enjoy them fresh and warm! To make the best cinnamon sugar pretzel bites, start with the right water temperature. Warm water should be between 110°F and 115°F. This helps the yeast grow. Allow the yeast to sit until it gets frothy. This step is key for good rise. Knead the dough for about five minutes. It should feel smooth and elastic. If the dough feels sticky, add a bit more flour. Let it rise in a warm place for one hour. This makes the dough light and fluffy. When you shape your pretzel bites, roll each piece into a rope. Keep it about one inch thick. Cut them into bite-sized pieces. Make sure they are even in size for even cooking. Boil the pretzel bites in a mixture of water and baking soda. This adds a nice texture and flavor. Don't boil them for too long; thirty seconds is just right. Serve your warm pretzel bites in a rustic basket. Line the basket with parchment paper for a nice look. They taste great by themselves, but you can add dips too. Cream cheese frosting or vanilla glaze pairs well. You can also try a chocolate dip for a sweet twist. One common mistake is not letting the dough rise enough. If it’s not doubled in size, your bites will be dense. Another mistake is skipping the boiling step. This can lead to tough pretzel bites. Also, be careful with the baking time. If you leave them in the oven too long, they will burn. Keep an eye on them as they bake. Finally, don't forget to brush them with melted butter right after baking. This adds extra flavor and keeps them soft. Pro Tips Use Warm Water: Ensure the water is between 110°F and 115°F to properly activate the yeast, which helps the dough rise effectively. Knead Until Smooth: Knead the dough for about 5 minutes until it is smooth and elastic; this develops the gluten, giving pretzels their chewy texture. Boiling Step is Key: Boiling the pretzel nuggets in baking soda water before baking creates a unique crust and enhances the pretzel flavor. Brush with Butter: Brushing the baked pretzels with melted butter while they are still warm adds richness and helps the cinnamon sugar stick better. {{image_2}} You can change the flavor of your pretzel bites. Try adding a bit of vanilla extract to the dough for a sweet twist. For a fruity taste, mix in some finely chopped apples or dried cranberries. If you want a nutty flavor, add crushed nuts like almonds or pecans to the dough. These small changes make each batch unique and fun! Glazing your pretzel bites can add a special touch. After baking, try a simple glaze made of powdered sugar and milk. Just mix until smooth and drizzle it over the warm pretzels. You can also use chocolate or caramel sauce for a rich flavor. If you prefer savory, brush the bites with garlic butter after baking for a tasty garlic kick. If you want to skip the sweetness, go savory! Instead of cinnamon sugar, sprinkle the pretzel bites with Italian herbs like oregano or basil. You can also use cheese powder for a cheesy pretzel bite. Adding spices like paprika or cayenne gives a nice kick. These savory options are perfect for a snack at parties or game day! To keep your pretzel bites fresh, place them in an airtight container. This helps maintain their soft texture. Store them at room temperature for up to two days. If you want to keep them longer, use the freezing method. To freeze your pretzel bites, let them cool completely first. Then, line them in a single layer on a baking sheet. Freeze for about an hour until firm. Once frozen, transfer them to a freezer-safe bag or container. Label the bag with the date. They can last in the freezer for up to three months. To reheat frozen pretzel bites, preheat your oven to 350°F (175°C). Spread the bites on a baking sheet. Bake for 10-12 minutes until warm. If they are from room temperature, bake for about 5-7 minutes. For a crispier texture, toast them in a toaster oven. Enjoy them warm, brushed with melted butter and sprinkled with cinnamon sugar! Cinnamon sugar pretzel bites are soft, sweet snacks. They are small pieces of pretzel coated in cinnamon and sugar. The dough is made with warm water, yeast, flour, and sugar. After boiling, they get a golden crust in the oven. The best part? They are warm and buttery, perfect for snacking! Homemade pretzel bites last about 2 to 3 days when stored right. Keep them in an airtight container at room temperature. If you want them to last longer, you can freeze them. Just make sure they are fully cooled before freezing. Yes, you can make pretzel bites in advance! You can prepare the dough and shape the bites. Then, let them rise and boil them. After boiling, chill them in the fridge for up to a day. When ready to bake, simply brush with egg wash, coat with cinnamon sugar, and bake as usual. This makes it easy to enjoy fresh pretzel bites any time! In this post, we explored how to make delicious pretzel bites. We covered ingredients, tools, and step-by-step instructions. You learned tips for perfecting your bites and ideas for serving. We discussed variations and how to store leftovers. Remember, practice makes it easier each time. Enjoy trying different flavors and glazes. Homemade pretzel bites can be fun and tasty. They’ll impress your friends and family. Keep experimenting, and make them your own!

Cinnamon Sugar Pretzel Bites Tasty and Simple Recipe

Craving a sweet and salty treat? You’ll love these Cinnamon Sugar Pretzel Bites! They are easy to make and taste

- 2 ribeye steaks (about 1 inch thick) - 4 tablespoons unsalted butter, divided - 4 cloves garlic, minced - 1 tablespoon fresh thyme leaves - 1 tablespoon fresh rosemary leaves, chopped - 1 teaspoon salt - 1/2 teaspoon black pepper - 1 tablespoon olive oil - Lemon wedges, for serving The ingredients for my ultimate garlic butter steak are simple yet full of flavor. I always choose ribeye steaks because they have great marbling. This fat makes the meat juicy and tender. You need just four tablespoons of unsalted butter. This rich butter will help create that mouthwatering garlic flavor. Garlic is key in this dish, so I use four cloves, minced finely for the best taste. Fresh herbs like thyme and rosemary add depth. A little salt and black pepper bring out the flavors. You also need a splash of olive oil for cooking. Lemon wedges serve as a bright finish. They add a zesty burst when you squeeze them over the steak. Each ingredient plays an important role in creating the perfect steak. You can easily find these items at your local grocery store. {{ingredient_image_1}} First, take your ribeye steaks out of the fridge. Let them sit at room temperature for about 30 minutes. This helps the meat cook evenly. While the steaks sit, pat them dry using paper towels. This step is key to getting that nice crust. Next, season both sides of the steaks with salt and black pepper. Don’t be shy! A good amount of seasoning adds flavor. Now, let’s cook those steaks. Heat a large skillet or cast iron pan over medium-high heat. Add olive oil and wait until it's hot. Carefully place the seasoned steaks in the pan. Sear them for 4-5 minutes without moving them. You want a golden-brown crust to form. After 4-5 minutes, it’s time to flip the steaks. Lower the heat to medium and cook for another 4-5 minutes. This timing gives you a perfect medium-rare steak. If you prefer it cooked more, just add a minute or two. As the steaks near the end of cooking, it’s garlic butter time! Add 2 tablespoons of unsalted butter to the pan. Now, toss in the minced garlic, thyme, and rosemary. Tilt the pan slightly, letting the butter pool on one side. Use a spoon to baste the steaks with the melted butter and herbs. Do this for about 1-2 minutes. This step adds a burst of flavor and helps keep the meat juicy. After this, remove the steaks from the skillet. Place them on a plate and let them rest for 5-10 minutes. Resting helps the juices stay in the meat. Enjoy your juicy, flavorful garlic butter steak! To make a great steak, you must let it rest. Resting the steak helps the juices stay inside. If you skip this step, the meat will lose flavor. After cooking, cover the steak with foil and wait 5-10 minutes. This small step makes a big difference. Cooking times matter, too. For medium-rare, aim for 4-5 minutes on each side. Use a meat thermometer for best results. Aim for 130°F for perfect medium-rare. Adjust the time if you prefer your steak more done. Pair your garlic butter steak with tasty sides. Mashed potatoes and roasted veggies are great choices. A fresh salad adds color and crunch, too. You can even serve it with crispy fries for a fun twist. Presentation is key for a restaurant-style dish. Slice the steak against the grain for tender bites. Arrange the slices on a rustic plate or wooden board. Add herb sprigs and lemon wedges for a pop of color. This makes your meal look as good as it tastes! Pro Tips Let the Steaks Rest: After cooking, always allow your steaks to rest for at least 5-10 minutes. This helps to retain the juices and ensures a more flavorful bite. Use a Meat Thermometer: For perfectly cooked steak, use a meat thermometer. Aim for 130°F (54°C) for medium-rare, 140°F (60°C) for medium. Choose Quality Meat: Invest in high-quality ribeye steaks for the best flavor and tenderness. Look for marbling, which indicates fat distribution throughout the meat. Experiment with Herbs: Feel free to customize the herb blend based on your preference. Fresh basil, oregano, or dill can add unique flavors to your garlic butter. {{image_2}} You can easily swap ribeye for other cuts. Sirloin is a great choice. It’s leaner but still full of flavor. Filet mignon is another option. This cut is tender and melts in your mouth. Each cut brings its unique taste and texture. Adjust cooking times based on the cut. Thinner steaks will cook faster, while thicker ones need more time. You can cook garlic butter steak in different ways. Grilling gives a nice smoky flavor. It’s great for summer cookouts. Make sure your grill is hot before adding the steak. This helps create a tasty crust. Pan-searing is another method. It gives you a nice brown color. Use a cast iron skillet for the best results. Heat the oil over medium-high heat and add the steak. When using different methods, adjust the ingredients a bit. For grilling, you might want to skip the butter until the end. Baste the steak with garlic butter right before serving. This keeps the butter from burning on the grill. For pan-searing, add the garlic and herbs in the last minutes of cooking. This way, you get that rich flavor without burning the garlic. Try both methods and see which one you like best! To store garlic butter steak, first let it cool. Wrap each steak in plastic wrap. You can also use an airtight container. This keeps the steak from drying out. Store it in the fridge for up to three days. Make sure to keep the garlic butter with the steak. This adds flavor and moisture. If you want to store it longer, freeze it. Wrap the steak tightly in foil before placing it in a freezer bag. It can last up to three months in the freezer. When you reheat garlic butter steak, you want to keep it juicy and tasty. One method is to use the oven. Preheat the oven to 250°F (120°C). Place the steak on a baking sheet. Cover it with foil to avoid drying it out. Heat for about 20 minutes or until warm. Another way is to use a skillet. Heat it on low. Add a bit of butter or oil. Place the steak in the pan. Cover it with a lid to trap steam. This helps keep the steak tender. Reheat until warmed through, but don’t cook it again. Enjoy your flavorful steak without losing any taste! To check if your steak is done, use a meat thermometer. Insert it into the thickest part of the steak. Here are the ideal temperatures for doneness: - Rare: 120°F - Medium rare: 130°F - Medium: 140°F - Medium well: 150°F - Well done: 160°F Remember, the steak will keep cooking after you remove it from the heat. Pull it off the grill or pan a few degrees before it reaches your target. This ensures a juicy, tender bite. Yes, you can use salted butter. However, it will change the flavor. Unsalted butter lets you control the salt level in your dish. If you use salted butter, reduce the salt you add to the steak. This helps balance the flavors. Garlic butter steak pairs well with many sides. Here are some popular options: - Roasted vegetables like asparagus or Brussels sprouts - Creamy mashed potatoes or garlic mashed potatoes - Fresh salads with a tangy vinaigrette - Crispy baked potatoes with sour cream For drinks, try a bold red wine like Cabernet Sauvignon or a refreshing iced tea. These choices complement the rich flavor of the steak nicely. In this post, we talked about cooking delicious garlic butter ribeye steak. We covered ingredients, step-by-step instructions, and helpful tips. You learned how to prepare, cook, and serve steak like a pro. Remember, resting the steak and basting adds flavor. Explore different cuts and cooking methods to keep things exciting. By following these steps, you’ll impress anyone you serve this meal to. Enjoy your cooking journey and savor each bite!

Ultimate Garlic Butter Steak Irresistible Flavor Burst

Are you ready to take your dinner game to a whole new level? In this post, I’ll show you how

- Rotini pasta: This is the star of our dish. Rotini's twisted shape holds the creamy dressing well. It gives each bite a good mix of flavors. You want to cook it until it's al dente for the best texture. - Protein choices: You can use cooked chicken breast for a hearty option or turkey bacon for a lighter choice. Both add great flavor. Chicken is juicy, while turkey bacon has a nice crunch. - Fresh vegetables: Adding cherry tomatoes, cucumber, and red onion brings a fresh crunch to the salad. The tomatoes add sweetness. The cucumber gives a cool bite, and the onion adds sharpness. - The creamy dressing needs just a few simple items. You will mix mayonnaise, Dijon mustard, and lemon juice. This combo makes the dressing smooth and tangy. - Seasoning is key. Salt and pepper balance the flavors. The lemon juice brightens everything up, making each bite pop. - Fresh herbs like parsley are perfect for adding flavor. They also make the dish look fresh and colorful. - To present your salad nicely, try serving it in a large bowl. You can also use mason jars for a fun touch. A slice of tomato or a sprinkle of parsley on top makes it look appealing. {{ingredient_image_1}} To cook rotini pasta perfectly, bring a large pot of salted water to a boil. Add the rotini and cook according to the package instructions until it is al dente. This means the pasta should be firm to the bite. Once done, drain the pasta in a colander. Rinse it under cold water to stop the cooking process quickly. This cooling step helps keep the pasta from getting mushy. Start mixing your salad by adding the cooled pasta to a large mixing bowl. Then, add the cooked chicken, bacon bits, cherry tomatoes, cucumber, cheddar cheese, and red onion. It’s best to add these ingredients in this order for even distribution. Next, in a separate bowl, whisk together the mayonnaise, Dijon mustard, lemon juice, salt, and pepper. Pour this dressing over the pasta mixture. Toss everything gently until all the ingredients are well-coated with the dressing. Refrigerating the salad is key for flavor development. This helps all the tastes blend together. Cover the salad and chill it for at least 30 minutes. For the best results, you can chill it longer. The longer it sits, the better the flavors become. Before serving, sprinkle fresh chopped parsley on top for a nice touch. To make your dressing just right, taste it as you mix. Add more lemon juice for a zesty kick. If you want it creamier, add more mayonnaise. You can also mix in Greek yogurt for a lighter touch. To boost flavor without adding calories, consider using fresh herbs. Chopped basil or dill adds a fresh twist. You can also use spices like garlic powder or smoked paprika for depth. Serving Club Sandwich Pasta Salad can be fun! You can use a large bowl for a family meal. For gatherings, try individual mason jars. This makes it easy for guests to grab a serving. You can also serve it on a bed of lettuce for a crisp bite. A sprinkle of extra cheese on top can make it pop. One big mistake is overcooking your pasta. Cook it until it's al dente, so it stays firm. This helps the pasta hold up in the salad. Another mistake is not getting the dressing right. If it’s too thick, it won’t coat the pasta well. Add a splash of water or extra lemon juice to thin it out. Keeping these tips in mind will make your pasta salad shine! Pro Tips Cook Pasta Al Dente: Be sure to cook the rotini pasta until it’s al dente for the best texture in your salad. Use Fresh Ingredients: Opt for fresh vegetables and herbs to enhance the flavor and appearance of your pasta salad. Chill Before Serving: Allow the pasta salad to chill for at least 30 minutes to let the flavors meld together beautifully. Experiment with Dressings: Feel free to experiment with different dressings like ranch or vinaigrette for a unique twist. {{image_2}} You can easily change the proteins in this dish. If you prefer turkey, swap the chicken for diced turkey breast. For a vegetarian option, use chickpeas or tofu. These swaps keep the flavor while catering to your needs. Mixing in different veggies also adds variety. Try bell peppers or snap peas for crunch. You can even add corn for a sweet touch. Feel free to experiment with what you have on hand. For a fun twist, change the dressing. Use ranch or Italian dressing for a different flavor. You can even add pesto for a fresh taste. These changes can make simple meals more exciting. This pasta salad also works great for meal prep. Make a big batch and store it in jars. You'll have easy lunches for the week. Just grab a jar and enjoy! Using seasonal vegetables can make this dish even better. In spring, add asparagus or peas for freshness. In fall, consider roasted squash or Brussels sprouts. These ingredients bring new flavors and colors. You can also adjust the protein based on what you find. Fresh, local options often taste best. This keeps the meal exciting and helps you use what's in season. To keep your Club Sandwich Pasta Salad fresh, store it in the refrigerator. Use an airtight container. This helps keep the salad from drying out. Always let it cool before sealing. This prevents condensation from making it soggy. Can You Freeze Club Sandwich Pasta Salad? You can freeze this salad, but it's not ideal. The texture of the ingredients may change. If you want to freeze it, do so right after making it. Tips for thawing and reviving flavors When you thaw the salad, do it in the fridge overnight. This keeps the flavors intact. After thawing, check the texture. You may want to add fresh ingredients like tomatoes or parsley for extra freshness. How long does it stay fresh? In the fridge, the pasta salad will stay fresh for about 3 to 5 days. If you freeze it, it can last up to 2 months. Signs of spoilage to watch for Look for changes in color or smell. If it smells off or has a slimy texture, it's best to throw it away. Always trust your senses when checking for freshness. If you want a lighter option, try using Greek yogurt. It gives a creamy texture and adds protein. You can also mix sour cream and mustard for a tangy twist. Another choice is avocado. It adds healthy fats and a nice green color. Yes, you can prepare this pasta salad a day before serving. Just mix all the ingredients and store it in the fridge. This helps the flavors blend well. When you are ready to serve, give it a quick stir. If it seems dry, add a splash of dressing. Yes, you can make this pasta salad gluten-free. Just use gluten-free rotini pasta. Many brands offer great options made from rice or corn. They taste good and hold the dressing well, giving you the same yummy experience. In this blog post, we explored the key ingredients and steps to make a delicious Club Sandwich Pasta Salad. We discussed the importance of rotini pasta, protein choices like chicken and turkey bacon, and fresh veggies for texture. I shared tips for cooking, mixing, and chilling your salad for the best flavor. Remember, you can customize your dish with different proteins, dressings, and seasonal veggies. By storing it properly, you’ll keep it fresh longer. Enjoy making your pasta salad—it’s easy and tasty!

Club Sandwich Pasta Salad Tasty and Simple Recipe

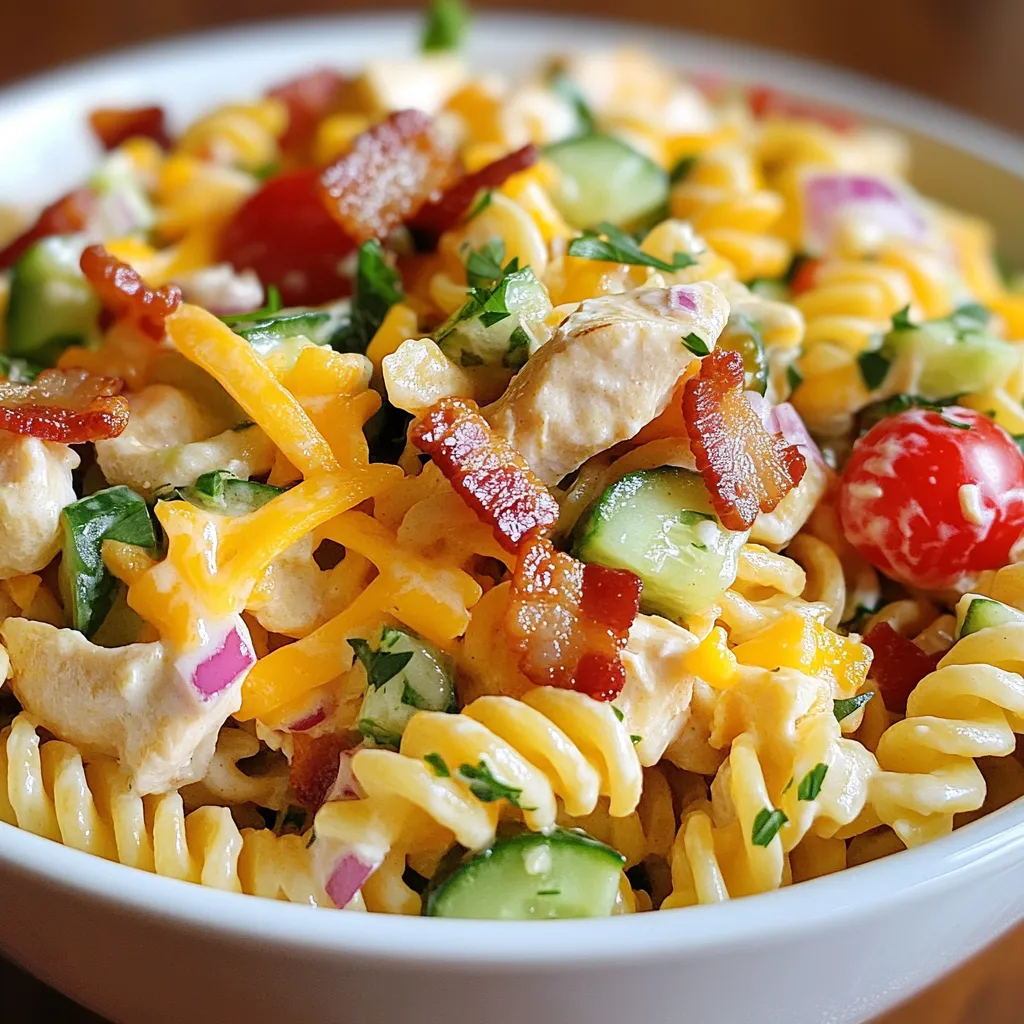
Are you ready to enjoy a fun twist on a classic? This Club Sandwich Pasta Salad is not only tasty,

- 1 cup graham cracker crumbs - 1/4 cup unsalted butter, melted - 2 tablespoons sugar - 16 oz cream cheese, softened - 1 cup powdered sugar - 1/2 cup sour cream - 1/4 cup fresh lemon juice - Zest of 1 lemon - 2 large eggs - 1 teaspoon vanilla extract - Fresh berries and mint leaves for garnish You can swap graham cracker crumbs for digestive biscuits if needed. Use coconut oil instead of butter for a dairy-free crust. If you want a lighter filling, replace cream cheese with ricotta cheese. For a sweeter taste, use honey instead of sugar. You can also use Greek yogurt instead of sour cream for a tangy twist. Always pick fresh lemons when making these cheesecakes. Look for lemons that feel heavy for their size and have a bright yellow skin. Avoid any with soft spots or blemishes. For the best cream cheese, choose a brand that is full-fat and softened. This makes mixing easier and gives a creamy texture. Fresh berries should be firm and vibrant in color. Check for any mold or squished fruit before using. {{ingredient_image_1}} First, preheat your oven to 325°F (160°C). Line a muffin tin with cupcake liners. In a mixing bowl, add 1 cup of graham cracker crumbs, 1/4 cup of melted unsalted butter, and 2 tablespoons of sugar. Mix well until it looks like wet sand. Take about 1 tablespoon of this mixture and press it into each cupcake liner. Bake the crusts for 10 minutes. Let them cool while you make the filling. In a large bowl, beat 16 oz of softened cream cheese with an electric mixer. Mix until smooth and creamy. Gradually add 1 cup of powdered sugar, mixing well. Then, add 1/2 cup of sour cream, 1/4 cup of fresh lemon juice, the zest of 1 lemon, 2 large eggs, and 1 teaspoon of vanilla extract. Beat until everything is well combined. Scrape the bowl's sides to mix thoroughly. Pour the cheesecake filling over each crust, filling them about three-quarters full. Bake for 20-25 minutes. The edges should set, but the centers should still jiggle slightly. After baking, turn off the oven and crack the door open. Let the cheesecakes cool in the oven for 30 minutes. This helps prevent cracks. Once cooled, refrigerate the mini cheesecakes for at least 4 hours, or overnight for the best taste. Enjoy garnishing them with fresh berries and mint leaves before serving! One main mistake is overbaking the cheesecakes. Keep an eye on them. They should jiggle slightly in the center when done. Another mistake is skipping the cooling step in the oven. This helps prevent cracks. Don't rush to chill them; refrigerate for at least four hours. This waiting makes a big difference in taste and texture. To get a smooth filling, beat your cream cheese well. Make sure it is soft first. This helps mix in the sugar and other ingredients evenly. Use room temperature eggs for a fluffier texture. When you add lemon juice and zest, fold them in gently. Over-mixing can cause air bubbles, which may lead to cracks. For a lovely finish, top each cheesecake with fresh berries. Strawberries and blueberries work great. Add a mint leaf for a pop of color. You can also drizzle some lemon glaze on top. For extra flair, use lemon zest as a sprinkle. Get creative and have fun with your toppings! Pro Tips Use Room Temperature Ingredients: Let your cream cheese, eggs, and sour cream sit out for about 30 minutes before mixing. This helps to create a smoother filling without lumps. Prevent Cracks: Cooling the cheesecakes gradually in the oven after baking helps to minimize cracks. Avoid opening the oven door immediately after baking. Experiment with Flavors: Try adding different citrus zest or extracts to the filling for a unique twist on the classic lemon flavor. Garnish Wisely: Fresh berries and mint not only enhance presentation but also add a refreshing taste contrast to the rich cheesecakes. {{image_2}} You can switch up the lemon flavor with many other fruits. Try berries like strawberries or blueberries for a sweet twist. You can also use mango or passion fruit for a tropical vibe. Just replace the lemon juice with the fruit juice and add zest. Each fruit brings its unique taste, making each mini cheesecake a new treat. If you need a gluten-free option, use gluten-free cookie crumbs. You can find these in stores or make your own by crushing gluten-free cookies. Almond flour works well too. Mix it with melted butter and sugar, just like the regular crust. This way, you can still enjoy a tasty crust without gluten. To make vegan mini cheesecakes, swap cream cheese for vegan cream cheese. Use coconut cream or cashew cream for a rich texture. Replace eggs with flax eggs or applesauce. For sweetness, use agave syrup instead of powdered sugar. This way, you get a creamy, tangy treat that everyone can enjoy. To keep your mini lemon cheesecakes fresh, store them in an airtight container. Place a piece of wax paper between layers to avoid sticking. Use the fridge for best flavor and texture. If you stack them, do so carefully. In the fridge, these mini cheesecakes stay good for about 5 days. Keep an eye out for any signs of spoilage, like changes in smell or texture. If you notice anything off, it’s best to toss them. You can freeze mini cheesecakes for up to 2 months. To do this, wrap each cheesecake tightly in plastic wrap, then place them in a freezer-safe bag. When you're ready to enjoy them, thaw them in the fridge overnight. This method keeps them safe and tasty. Yes, you can make these mini cheesecakes a day or two in advance. They store well in the fridge. Just keep them in an airtight container. This makes them perfect for parties or gatherings. The flavors may even improve as they sit. If you don’t have lemon juice, try using lime juice. Lime offers a similar tangy taste. You can also use vinegar, but use less than the lemon juice called for. Another option is to use lemon extract, but adjust the amount to taste. Check the edges when baking. They should be set and look firm. The centers should jiggle slightly, like gelatin. If they look too wobbly, give them more time. After baking, let them cool slowly in the oven to avoid cracks. In this post, we explored how to make mini lemon cheesecakes, covering everything from ingredients to storage. We discussed ingredient swaps, preparation tips, and common mistakes to avoid. You learned how to bake the perfect cheesecakes and even tried different flavors or vegan options. With this guide, you can enjoy delicious mini cheesecakes any time. Remember to store them well, and they will stay fresh for days. Let your creativity shine through in each bite. Happy baking!

Mini Lemon Cheesecakes Delightfully Tangy Treat

Get ready to experience a burst of sunshine with my Mini Lemon Cheesecakes! These delightful treats are perfect for any

- 2 boneless, skinless chicken breasts, sliced into strips - 8 oz linguine or spaghetti pasta - 3 tablespoons olive oil - 3 cloves garlic, minced - Zest of 1 lemon - 1/4 cup fresh lemon juice - 1/2 cup heavy cream - 1/2 cup grated Parmesan cheese - Salt and pepper to taste - Fresh basil leaves, for garnish When measuring, use a dry measuring cup for pasta. For liquids like lemon juice and cream, use a liquid measuring cup. This helps ensure accuracy. Use a kitchen scale for the chicken to get the right amount. Choose fresh ingredients for the best flavor. Look for chicken breasts that are firm and pink. The pasta should be high quality, like durum wheat. For the lemon, pick ones that feel heavy for their size. Fresh herbs like basil should be vibrant and green. Always check the expiration date on dairy products. {{ingredient_image_1}} First, boil a large pot of salted water. Add 8 ounces of linguine or spaghetti. Cook the pasta until it is al dente, usually around 8-10 minutes. Drain the pasta and set it aside. Don’t forget to save 1/2 cup of the pasta water. This water will help later. While the pasta cooks, heat 2 tablespoons of olive oil in a large skillet over medium heat. Slice 2 boneless, skinless chicken breasts into strips. Season them with salt and pepper. Add the chicken to the skillet and cook for 5-7 minutes. Make sure the chicken is browned and cooked through. Once done, take the chicken out and set it aside. In the same skillet, add another tablespoon of olive oil. Toss in 3 minced garlic cloves and sauté for 1 minute. Be careful not to burn the garlic, as it can turn bitter. Next, add the zest of 1 lemon and 1/4 cup of fresh lemon juice. Let it bubble for a minute to mix the flavors. Lower the heat and stir in 1/2 cup of heavy cream and 1/2 cup of grated Parmesan cheese. Mix until the cheese melts and the sauce is creamy. If the sauce is too thick, add some reserved pasta water until you like the consistency. Now, add the cooked chicken and drained pasta to the skillet. Toss everything together, so the pasta and chicken are well coated in the lemon sauce. Taste and adjust the salt and pepper if needed. This step brings all the flavors together. Plate the pasta while it’s warm. Garnish each plate with fresh basil leaves for a pop of color and flavor. This dish looks vibrant and tastes fantastic. Enjoy your Lemon Chicken Pasta! To boost the flavors in lemon chicken pasta, think about fresh herbs. Fresh basil adds a great touch. You can also use parsley for a nice color and taste. A pinch of red pepper flakes gives it a slight kick. For a richer flavor, consider adding a splash of white wine when you cook the garlic. Wine can bring a depth that works well with lemon. One common mistake is overcooking the chicken. Always check it at 5 to 7 minutes. If it turns dry, the dish loses its charm. Another mistake is forgetting to reserve pasta water. This water helps make the sauce creamy. Also, don’t skip the lemon zest. It adds a bright flavor that makes this dish special. Cook the pasta in salted water for the best taste. The salt helps flavor the pasta itself. When cooking the chicken, don’t overcrowd the pan. This keeps the heat high and browns the chicken evenly. For the sauce, stir gently. This helps the cream and cheese blend smoothly. Lastly, toss everything together in the skillet. This ensures the pasta and chicken soak up all the delicious lemon sauce. Pro Tips Use Fresh Ingredients: Fresh lemon juice and zest make a significant difference in flavor compared to bottled options. Reserve Pasta Water: Always save some pasta cooking water; it helps adjust the sauce's consistency and adds starch for a creamier texture. Don’t Overcook Chicken: To maintain juiciness, cook chicken until it’s just done; it will continue cooking slightly after being removed from the heat. Experiment with Herbs: Feel free to add other fresh herbs like parsley or dill for an extra burst of flavor and freshness. {{image_2}} To make this dish vegetarian, swap the chicken for sautéed mushrooms or zucchini. Both options add great texture and flavor. You can also use chickpeas for added protein. For the pasta, stick to the original choice or try whole wheat for extra fiber. The lemon sauce pairs well with these veggies. If you need a gluten-free option, choose gluten-free pasta made from rice or corn. These types cook well and taste great. Just make sure to check the sauce ingredients for gluten. Use gluten-free flour to thicken the sauce if needed. This way, you can still enjoy a creamy lemon pasta without worry. You can boost the flavor with some fun add-ins. Consider tossing in sun-dried tomatoes or roasted red peppers for a tangy punch. Fresh spinach adds color and nutrients, while capers lend a briny note. For spice lovers, a pinch of red pepper flakes brings warmth. Feel free to mix and match these options to create your perfect dish! You can store leftover lemon chicken pasta in an airtight container. Make sure it cools down first. Place it in the fridge for up to three days. If you want to keep it longer, consider freezing it. To reheat, use a skillet over low heat. Add a splash of water or broth to avoid drying it out. Stir often until warm. You can also use the microwave. Heat in short bursts, stirring in between. This way, it heats evenly. If you freeze lemon chicken pasta, do so without the fresh basil. Basil does not freeze well. Place the pasta in a freezer-safe container or bag. It can last up to three months. When ready to eat, thaw it in the fridge overnight before reheating. The best pasta for lemon chicken pasta is linguine or spaghetti. Both types hold the creamy sauce well. They also complement the chicken and lemon flavors nicely. You can choose either based on your preference. If you want a heartier option, try fettuccine. Yes, you can make this dish in advance. Cook the pasta and chicken first, then store them separately. Keep the lemon sauce in an airtight container. When ready to eat, reheat everything on low heat. Add a splash of water to thin the sauce if needed. Lemon chicken pasta can be a healthy choice. It has lean chicken and fresh lemon juice. The dish does include heavy cream and cheese, which add calories. You can make it lighter by using less cream or whole milk. Balance it with a side salad for more nutrients. Yes, you can replace heavy cream with lighter options. Use half-and-half or whole milk for a lower fat content. You can also try Greek yogurt for creaminess without the extra calories. Just mix it in slowly to avoid curdling when heating. In this blog post, we explored how to create a delicious lemon chicken pasta with clear steps. I shared ingredient details, step-by-step cooking methods, and helpful tips. You learned how to enhance flavors and avoid common mistakes. I also covered variations for different diets and storage tips for leftovers. Overall, this dish is versatile and easy to make. With the right ingredients and technique, you can enjoy a great meal. Happy cooking!

Lemon Chicken Pasta Easy and Flavorful Recipe

Craving a quick dinner that packs a punch of flavor? Lemon Chicken Pasta is your answer! This easy recipe combines

- 1 lb ground beef or turkey - 1/2 cup breadcrumbs - 1/4 cup grated Parmesan cheese - 1 large egg - 2 cloves garlic, minced - 1 tsp Italian seasoning - Salt and pepper to taste - 2 tbsp olive oil - 1 medium onion, diced - 2 carrots, diced - 2 celery stalks, diced - 4 cups chicken broth - 1 can (14 oz) diced tomatoes - 1 cup heavy cream - 1 cup fresh spinach - Fresh basil for garnish You will need either ground beef or turkey for the meatballs. Both options work great. I often use turkey for a lighter soup. The breadcrumbs and egg help the meatballs stay together. Garlic and Italian seasoning add flavor. The veggies are key. Onion, carrots, and celery create a solid base. Diced tomatoes bring in some sweetness and acidity. Heavy cream makes the soup rich and creamy, and fresh spinach adds color and nutrition. Don't forget the fresh basil for a lovely finish. - Additional vegetables (like bell peppers or zucchini) - Spices for extra flavor (like red pepper flakes) - Alternative toppings (like extra cheese or croutons) You can mix in more veggies if you want. Bell peppers or zucchini are tasty choices. For a little kick, add red pepper flakes. Lastly, consider topping your soup with extra cheese or croutons for added crunch and flavor. {{ingredient_image_1}} Mixing ingredients To start, grab a mixing bowl. Add 1 pound of ground beef or turkey. Next, add 1/2 cup of breadcrumbs and 1/4 cup of grated Parmesan cheese. Crack in 1 large egg and toss in 2 cloves of minced garlic. Sprinkle in 1 teaspoon of Italian seasoning, plus some salt and pepper to taste. Use your hands to mix everything well. Make sure it’s evenly combined. Shaping the meatballs Now, take small amounts of the mixture and roll them into balls about 1 inch wide. You should get around 20 meatballs. Once you shape them, set them aside on a plate. Sautéing vegetables In a large pot, heat 2 tablespoons of olive oil over medium heat. Add 1 medium diced onion, 2 diced carrots, and 2 diced celery stalks. Stir them and cook for about 5 minutes. You want the veggies to become tender and fragrant. Browning meatballs Carefully add your meatballs to the pot. Brown them on all sides for about 5 to 7 minutes. This step adds flavor and texture. Don’t crowd the pot; you may need to do this in batches. Adding liquids and simmering Once the meatballs are browned, pour in 4 cups of chicken broth and 1 can of diced tomatoes. Stir the mixture and bring it to a gentle simmer. Cook it for about 15 minutes. This allows the meatballs to cook through and flavors to blend. Final touches for creaminess After simmering, stir in 1 cup of heavy cream. Let the soup simmer for another 5 minutes. This step makes your soup rich and creamy. Finally, add 1 cup of fresh spinach and cook until it wilts, which takes about 2 minutes. Taste the soup and adjust the salt and pepper as needed. To achieve the best texture in meatballs, focus on mixing. Use your hands to blend the ground meat with breadcrumbs, cheese, egg, garlic, and seasonings. Don’t overmix; this can make them tough. When shaping the meatballs, aim for about 1 inch in diameter. This size cooks evenly and stays juicy. Roll them gently in your palms to create a smooth surface. To cook meatballs evenly, start by browning them in olive oil. This locks in flavor and moisture. Turn them gently to brown all sides, taking about 5 to 7 minutes. For a thicker soup, use less broth or add more heavy cream. You can also mash a few meatballs into the soup to create a creamy base. If you want it thinner, simply add more chicken broth until you reach your desired consistency. Balancing flavors is key. Taste your soup before serving and adjust with salt and pepper as needed. You can also add a pinch of Italian seasoning for an extra flavor kick. Pro Tips Use Fresh Herbs: Fresh basil and spinach can elevate the flavor of your soup. Add them at the end for a vibrant taste and color. Perfect Meatballs: For juicy meatballs, don’t overmix the meat mixture. Just combine until ingredients are incorporated. Adjust Creaminess: If you prefer a lighter soup, reduce the amount of heavy cream or substitute with half-and-half for a delicious result. Make Ahead: This soup can be made ahead and stored in the refrigerator for up to three days. Just reheat before serving! {{image_2}} You can change the meat in the recipe for a different taste. If you want a vegetarian or vegan option, try using lentils or chickpeas. They add protein and texture. You can also use plant-based ground meat. Just make sure it is seasoned well. For gluten-free options, swap the breadcrumbs for gluten-free breadcrumbs or crushed rice crackers. You can also add oat flour or almond flour. These options will help keep the meatballs together without gluten. To give your soup more flavor, add extra herbs and spices. Fresh or dried oregano, thyme, or even a pinch of red pepper flakes can make a big difference. You can also try adding a bay leaf while the soup simmers. Just remember to remove it before serving. If you want to change the soup's flavor for a regional twist, try adding some Italian sausage. This will bring a different spice and richness. You can also add a splash of white wine for depth. Another fun idea is to mix in some pesto just before serving for a fresh burst of flavor. To keep your creamy Italian meatball soup fresh, store it in an airtight container. Let the soup cool down before sealing it. This helps keep the flavors intact. You can store it in the fridge for about 3 to 4 days. If it lasts that long, you are lucky! If you want to save some for later, freezing is a great option. First, let the soup cool completely. Then, pour it into freezer-safe bags or containers. Leave some space at the top, as the soup will expand. You can freeze the soup for up to 3 months. When it's time to enjoy your soup again, thaw it in the fridge overnight. To reheat, pour the soup into a pot and warm it on low heat. Stir it often to prevent sticking. If it seems thick, add a splash of chicken broth or water. Enjoy your delicious meal again! How do I make the meatballs tender? To make tender meatballs, use a mix of beef and turkey. Adding breadcrumbs helps too. Ensure you don’t overmix the meat. A gentle hand keeps them light and fluffy. Can I use frozen meatballs? Yes, you can use frozen meatballs. Just add them straight to the soup without thawing. Cook them longer to make sure they're heated through. This saves time and still tastes great! What can I serve with this soup? This soup pairs well with crusty bread or a fresh salad. You can also try garlic bread for a nice crunch. A sprinkle of extra cheese on top adds a delicious touch! Is it possible to make this soup ahead of time? Absolutely! You can make this soup a day in advance. Just store it in the fridge. When ready to serve, heat it gently on the stove. The flavors will deepen overnight, making it even better! This blog post covered a tasty creamy Italian meatball soup recipe. You learned about the main ingredients like ground meat, veggies, and key seasonings. I shared step-by-step instructions for preparing meatballs and cooking the soup base. I also provided tips on perfecting meatballs and adjusting soup consistency. Remember, you can customize the soup with various add-ins and make it your own. Keep these ideas in mind for a delicious meal any time. Enjoy your cooking!

Creamy Italian Meatball Soup Hearty and Comforting Meal

Looking for a warm, filling dish that’s easy to make? Creamy Italian Meatball Soup might be your answer. This hearty

- Chicken: 2 chicken breasts, sliced into bite-sized pieces - Vegetables: 2 cups broccoli florets, 1 red bell pepper, sliced, 1 tablespoon minced garlic, 1 teaspoon grated ginger - Sauce Ingredients: 3 tablespoons low-sodium soy sauce, 1 tablespoon sesame oil, 1 tablespoon honey, 1 teaspoon cornstarch mixed with 2 tablespoons water - Additional Garnishes: Salt and pepper to taste, cooked rice or quinoa for serving, sesame seeds, and green onions for garnish Gathering the right ingredients makes cooking so much easier. I love using fresh chicken and bright veggies. The chicken breasts give great flavor and protein. Broccoli adds crunch and health. The red bell pepper makes the dish colorful. For the sauce, the soy sauce adds umami. Honey brings sweetness, while sesame oil gives depth. Mixing cornstarch with water thickens the sauce. This blend coats the chicken and veggies perfectly. You can serve this meal over rice or quinoa. It makes everything more filling. Adding sesame seeds and green onions on top makes it look nice. This dish is quick, simple, and full of flavor! {{ingredient_image_1}} Cooking the Chicken Start by heating a large skillet over medium-high heat. Add one tablespoon of sesame oil. Next, toss in 2 sliced chicken breasts. Season with salt and pepper. Cook for about 5-7 minutes. You want the chicken to turn golden and be cooked through. Adding Aromatics Once the chicken is ready, stir in 1 tablespoon of minced garlic and 1 teaspoon of grated ginger. This adds a lovely flavor. Cook for about 30 seconds until their scents fill the kitchen. Incorporating Vegetables Now it's time to add the veggies. Toss in 2 cups of broccoli florets and 1 sliced red bell pepper. Stir-fry these for about 3-4 minutes. You want them tender but still crisp. Making the Sauce In a small bowl, mix together 3 tablespoons of low-sodium soy sauce and 1 tablespoon of honey. Pour this sauce over the chicken and vegetables in the skillet. Stir well to coat everything evenly. Final Assembly To thicken the sauce, add 1 teaspoon of cornstarch mixed with 2 tablespoons of water. Stir this in and cook for another 2-3 minutes. Adjust the seasoning as needed. Finally, remove from heat and garnish with sesame seeds and sliced green onions. Serve the chicken and broccoli over rice or quinoa for a complete meal. Ensuring Chicken is Tender To keep chicken tender, choose fresh chicken breasts. Slice them into small pieces. This helps them cook evenly. Season lightly with salt and pepper. Only cook until golden and no longer pink. Avoid overcooking, as that makes the chicken tough. Perfecting Vegetable Texture For the best texture, use fresh broccoli and red bell pepper. Stir-fry them quickly in hot oil. Cook for about 3-4 minutes. You want them tender but still a bit crisp. This keeps their bright color and crunch. Thickening the Sauce To thicken the sauce, mix cornstarch with water until smooth. Add it to the skillet after the sauce. Stir well and cook for 2-3 minutes. This gives a nice glaze to the chicken and veggies. Best Accompaniments Serve the chicken and broccoli over cooked rice or quinoa. This adds a nice base. You can also use cauliflower rice for a lower-carb option. It soaks up the sauce well and makes each bite tasty. Garnishing Ideas For a pretty finish, sprinkle sesame seeds on top. Add sliced green onions for color and flavor. These little touches make your dish look and taste gourmet. Enjoy the bright flavors and textures! Pro Tips Marinate for Flavor: For even more flavorful chicken, marinate the sliced chicken breasts in soy sauce, garlic, and ginger for at least 30 minutes before cooking. Veggie Variations: Feel free to substitute or add other vegetables such as snap peas, carrots, or mushrooms for a colorful and nutritious dish. Perfectly Cooked Broccoli: To keep the broccoli vibrant and crisp, blanch it in boiling water for 1-2 minutes before adding to the skillet. Garnishing Tips: For a burst of freshness, add a squeeze of lime juice over the dish before serving, enhancing the flavors beautifully. {{image_2}} Chicken Alternatives You can swap chicken for other meats. Try turkey or pork for a different taste. If you want a lighter option, use shrimp. These choices will change the flavor, but they will still be delicious. Vegetable Options Feel free to mix in your favorite veggies. Snap peas, carrots, or bell peppers work great. You can even add mushrooms for an earthy flavor. Get creative and use what you have. This dish is very flexible! Gluten-Free Version To make this meal gluten-free, use tamari instead of soy sauce. Tamari has a similar taste but is safe for gluten-free diets. Always check labels to ensure there are no hidden gluten ingredients. Vegan Adaptation For a vegan twist, skip the chicken and use tofu or tempeh. Both options absorb flavors well and offer protein. Replace honey with maple syrup for sweetness. This keeps the dish plant-based while still tasting great. Refrigeration Guidelines You can store leftovers in the fridge. Use an airtight container. This keeps the dish fresh. It lasts for about 3-4 days. Make sure to cool it down first. This helps prevent bacteria growth. Freezing Tips For longer storage, freeze the chicken and broccoli mix. Place it in a freezer-safe bag or container. Remove as much air as possible. This helps avoid freezer burn. It is best to use within 2-3 months. When ready to eat, thaw in the fridge overnight. Best Methods for Reheating To reheat, use the stovetop for best results. Place the dish in a skillet over medium heat. Add a splash of water or broth to keep it moist. Stir often until heated through. You can also use a microwave. Heat in short bursts, stirring in between. This ensures even heating. How long does it take to cook chicken in a skillet? It takes about 5 to 7 minutes to cook chicken in a skillet. You want the chicken to be golden and cooked through. Always check that there is no pink inside the pieces. This way, you ensure it is safe to eat. Can I use frozen broccoli? Yes, you can use frozen broccoli. Just add it to the skillet when you add the chicken. Cook it a bit longer, about 5 to 6 minutes. This will help it thaw and heat through. It may also become softer than fresh broccoli. What can I serve with chicken broccoli skillet? You can serve chicken broccoli skillet with cooked rice or quinoa. Both options soak up the sauce well. You can also add a side salad for extra crunch. A nice piece of bread is great too. How do I make it spicier? To make it spicier, add some red pepper flakes to the skillet. Start with a small amount, like half a teaspoon. You can also use sriracha or chili sauce. Adjust to your taste for that perfect kick! In this post, I shared how to make a delicious chicken and vegetable dish. We went over ingredients, step-by-step cooking, and helpful tips to ensure success. Don't forget about the different ingredient swaps and dietary options for everyone. Storing leftovers is easy, and I provided simple reheating methods. Remember, whether you stick to the basics or make it your own, this recipe can delight every time. Enjoy exploring these ideas and make a meal that pleases you and your loved ones!

Chicken Broccoli Skillet Quick and Flavorful Meal

Looking for a quick and tasty meal? This Chicken Broccoli Skillet recipe is perfect for busy days. With tender chicken

Older posts
Newer posts
← Previous Page1 … Page133 Page134 Page135 … Page146 Next →

dsad

© 2025 Emmas Dish • Built with GeneratePress

Our Policies

  • Copyright Policy
  • Cookie Policy
  • GDPR Policy
  • Privacy Policy
  • Disclaimer
  • Terms Of Use

More Information

  • Home
  • About
  • Contact
  • Appetizers
  • Dessert
  • Dinner
  • Drinks
©2025, Emmas Dish About Back To Top