Skip to content
DisclaimerTerms Of UseGDPR PolicyCookie Policy

Emmas Dish

  • Home
  • Drinks
  • Appetizers
  • Dinner
  • Dessert
  • About
  • Contact
  • Privacy Policy
DisclaimerTerms Of UseGDPR PolicyCookie Policy

Emma

To make avocado egg salad lettuce wraps, gather the following ingredients: - 4 hard-boiled eggs, peeled and chopped - 1 ripe avocado, mashed - 2 tablespoons Greek yogurt (or mayonnaise) - 1 tablespoon Dijon mustard - 1 tablespoon lemon juice - 1 green onion, finely chopped - Salt and pepper to taste - 8 large lettuce leaves (Romaine or Butter lettuce works well) - Optional: Fresh herbs (cilantro or parsley), for garnish If you need some swaps, here are some ideas: - Use mashed ripe banana instead of avocado for a sweet twist. - Swap Greek yogurt for silken tofu for a vegan option. - Use yellow mustard if you lack Dijon mustard. - Replace green onions with chives or red onion for a different flavor. Let’s break down the health perks of these ingredients: - Hard-boiled eggs: They provide protein and essential vitamins like B12 and D. - Avocado: Packed with healthy fats and fiber, avocados help with heart health. - Greek yogurt: A great source of protein and probiotics, it aids digestion. - Dijon mustard: This adds flavor with low calories and some antioxidants. - Lemon juice: It offers vitamin C, which boosts immunity and skin health. - Green onion: Rich in vitamins A, C, and K, they support overall health. - Lettuce: Low in calories, it’s high in water and helps with hydration. - Fresh herbs: They add flavor and are rich in antioxidants and nutrients. These ingredients come together to create a dish that is not only tasty but also packed with nutrition. {{ingredient_image_1}} Start by gathering all your ingredients. You need: - 4 hard-boiled eggs, peeled and chopped - 1 ripe avocado, mashed - 2 tablespoons Greek yogurt (or mayonnaise) - 1 tablespoon Dijon mustard - 1 tablespoon lemon juice - 1 green onion, finely chopped - Salt and pepper to taste - 8 large lettuce leaves (Romaine or Butter lettuce works well) - Optional: Fresh herbs (cilantro or parsley), for garnish Make sure your eggs are hard-boiled. You can boil them ahead of time. The avocado should be ripe and easy to mash. This makes the salad creamy and rich. The lettuce leaves should be big enough to hold the filling. Romaine or Butter lettuce is great for this dish. In a mixing bowl, combine the chopped hard-boiled eggs and mashed avocado. Use a fork to mash them together. This helps blend the flavors. Next, add the Greek yogurt or mayonnaise, Dijon mustard, and lemon juice. Mix everything well until it looks creamy. The mayo or yogurt adds richness, while the mustard gives it a nice kick. Then, fold in the finely chopped green onion. This adds a fresh taste. Season with salt and pepper to your liking. Taste it as you go! Now it’s time to assemble your wraps. Take a large lettuce leaf and spoon about 2-3 tablespoons of the egg salad onto the center. Make sure not to overfill it. You want to wrap it easily. If you like, sprinkle some fresh herbs on top for added flavor and color. Then, gently wrap the lettuce around the filling. This creates a fun, handheld meal. Repeat this with the rest of the lettuce leaves and egg salad. Enjoy your fresh and flavorful avocado egg salad lettuce wraps! To get the best texture, mash the avocado well. It should be smooth, not chunky. Mix the avocado with the chopped eggs gently. This keeps the eggs intact while blending flavors. Use Greek yogurt for creaminess but not too much. Start with two tablespoons and adjust as needed. The goal is a creamy but not runny mix. If you like, add fresh herbs for a little crunch. Store any leftover egg salad in an airtight container. It stays fresh in the fridge for up to three days. Make sure to seal it well to keep it from drying out. If you notice the salad getting watery, stir gently before serving. You can also add more seasoning to freshen it up. These wraps are great for lunch or snacks. Serve them on a plate or in a lunch box. You can add slices of cucumber or tomato on the side for color. If you want extra crunch, try adding sliced radishes. For a fun twist, serve with a dipping sauce like ranch or a spicy mayo. Pro Tips Use Ripe Avocados: For the best flavor and creaminess, ensure your avocado is ripe. It should yield slightly to pressure when squeezed gently. Customize Seasoning: Feel free to experiment with spices like paprika or garlic powder to enhance the flavor profile of your egg salad. Chill Before Serving: For a refreshing taste, refrigerate the egg salad for about 30 minutes before serving. This allows the flavors to meld together. Choose the Right Lettuce: Romaine or Butter lettuce works best for wraps due to their sturdy leaves, which can hold the filling without tearing. {{image_2}} You can use many kinds of lettuce for your wraps. Romaine is crisp and sturdy. It holds the filling well. Butter lettuce is soft and has a lovely flavor. It wraps easily, making it a favorite. You can also try iceberg if you want a crunch. Each type adds a unique taste and texture. Adding more ingredients can enhance your avocado egg salad. Consider diced bell peppers for a sweet crunch. Chopped celery adds a nice bite. You might like to sprinkle in some paprika for extra flavor. Fresh herbs like cilantro or dill brighten up the dish. Don’t forget to adjust salt and pepper as you add these extras. While Greek yogurt or mayonnaise is great, you can try other dressings. A splash of hot sauce adds a kick. You might also enjoy a dollop of pesto for a herby touch. If you want a tangy twist, use a bit of vinegar. Each option brings its own flavor to the salad, making it fun to experiment. Store your avocado egg salad in an airtight container. This keeps it fresh and tasty. It is best to refrigerate it right after making. If you plan to eat it later, cover it tightly. This helps to avoid drying out or picking up other smells from the fridge. Freezing avocado egg salad is not ideal. The texture changes when frozen, making it watery. If you must freeze it, use a freezer-safe container. Keep in mind that the avocado may turn brown, and the salad may not taste as fresh when thawed. In the fridge, your avocado egg salad lasts about 3 to 4 days. Always check for signs of spoilage, like off smells or color changes. To keep it fresh, you can prepare the salad without avocado and mix it in before serving. This way, you enjoy the best taste and texture. Yes, you can make this dish vegan! To do this, replace the eggs with chickpeas. Mash the chickpeas to get a similar texture. Use avocado, vegan yogurt, and mustard just like the recipe states. You can also add spices for more flavor. This vegan twist keeps the dish creamy and tasty. The egg salad lasts about three to five days in the fridge. Store it in an airtight container to keep it fresh. If you notice any change in smell or color, it’s best to throw it away. Enjoy your salad within this time for the best taste. There are many fun ways to serve this salad! You can use different types of lettuce, like Romaine or Butter lettuce. Try adding it to whole grain bread for a sandwich. You can also serve it in bell pepper halves or on cucumber slices. For a crunchy bite, top it with nuts or seeds. The options are endless! This blog post covered how to make delicious avocado egg salad lettuce wraps. We explored key ingredients and their health benefits. We walked through preparation and mixing steps for perfect wraps. Tips helped you achieve the right texture and store leftovers. We also shared fun variations to keep it fresh. Finally, we answered common questions for your convenience. Enjoy making these wraps for a tasty and healthy meal!

Avocado Egg Salad Lettuce Wraps Fresh and Flavorful

Looking for a fresh, tasty twist on lunch? You’re in the right place! My Avocado Egg Salad Lettuce Wraps pack

- 12 oz fresh cranberries - 1 cup granulated sugar - 1 cup orange juice - Zest of 1 orange - Optional nuts - 1/2 teaspoon ground cinnamon - 1/4 teaspoon ground ginger - 1/4 teaspoon salt - Medium saucepan - Measuring cups and spoons - Stirring spoon For this easy cranberry sauce, fresh ingredients are key. I love using 12 ounces of fresh cranberries. They burst with flavor and color. Granulated sugar sweetens the sauce. You need one cup for balance. Orange juice adds a bright, zesty note. One cup brings a fresh tang. Don't forget the zest of one orange. It adds a fragrant touch. If you want some crunch, add optional nuts. Walnuts or pecans work great. They bring a lovely texture. Now, let’s talk about spices. Ground cinnamon adds warmth. Just half a teaspoon enhances the flavor. Ground ginger gives a little kick. Use 1/4 teaspoon for the right amount. A bit of salt, 1/4 teaspoon, helps all the flavors shine. For tools, you’ll need a medium saucepan. It holds all your ingredients well. Measuring cups and spoons ensure accuracy. A stirring spoon helps mix everything together. With these items, you’re set to make this delightful sauce! {{ingredient_image_1}} - Rinse and clean the cranberries. - Remove any damaged berries. First, I wash the cranberries under cold water. This step is key. It helps remove dirt and any unwanted stems. After rinsing, I look through the berries. I take out any that are soft or bruised. This keeps my sauce fresh and tasty. - Combine ingredients in the saucepan. - Heat until simmering. Next, I grab a medium saucepan. I add the cleaned cranberries, sugar, orange juice, and zest. I also toss in the cinnamon, ginger, and salt. Stir it all together. Then, I turn on the heat to medium. I wait for the mixture to start simmering. This usually takes a few minutes. - Check for thickness and bursting cranberries. - Incorporate chopped nuts if desired. Once it simmers, I keep cooking for about 10 to 15 minutes. I watch for the cranberries to burst. This means the sauce is thickening. If I want some crunch, I fold in chopped nuts during the last few minutes. After that, I take it off the heat and let it cool. To make the best cranberry sauce, focus on stirring. Stir the mixture often while it cooks. This helps the sauce not stick to the pan. Use a wooden spoon or a silicone spatula for best results. You know the sauce is done when you see most cranberries burst. The sauce should look thick and glossy. If it appears too runny, cook it a bit longer. Serving your cranberry sauce in a pretty bowl makes a difference. Choose a decorative dish to showcase its vibrant color. Garnish with whole cranberries and a mint sprig. This adds a festive touch. For the best serving dishes, look for shallow bowls. They let guests scoop up the sauce easily. Consider using a small ladle for serving. You can add extra flavor with spices. Ground cloves or allspice work well with this sauce. A splash of lemon juice adds brightness, too. If you want to sweeten without sugar, use maple syrup or honey. These options give a nice flavor twist while keeping it sweet. Pro Tips Use Fresh Cranberries: Fresh cranberries yield the best flavor and texture, making your sauce vibrant and delicious. Adjust Sweetness: Depending on your taste, feel free to adjust the amount of sugar. You can start with less and add more to your liking. Enhance Flavor: For an extra depth of flavor, consider adding a splash of vanilla extract or a hint of nutmeg. Storage Tips: This sauce can be made ahead of time and stored in the refrigerator for up to a week, making it a great option for holiday meals. {{image_2}} You can make your cranberry sauce special by adding different fruits. Apples and pears add sweetness and texture. Chop them into small pieces. Stir them in while cooking. You can also use dried fruits like raisins. They give a nice chewy bite. Add a half cup of raisins during the last few minutes of cooking. This will enhance the sauce's flavor and add depth. Nuts can add crunch to your sauce. Walnuts and pecans work well. You can replace them with almonds or hazelnuts. If you want a nut-free version, simply skip the nuts. The sauce will still taste great without them. You can also add seeds like pumpkin or sunflower seeds for a different twist. You might want your sauce thick or thin. To thicken it, cook it longer. Keep stirring until it reaches your desired thickness. If it gets too thick, add a splash of orange juice. For a smoother sauce, blend it with a hand mixer. If you like a chunky sauce, just mash some berries with a fork. This lets you control the texture based on your taste. To keep your cranberry sauce fresh, store it in the fridge. The best way is to use airtight containers. This helps keep moisture out and flavor in. Make sure the sauce cools before sealing. I usually let it cool for about 30 minutes. Then, place it in a container and pop it in the fridge. Freezing cranberry sauce is easy and great for later use. First, let the sauce cool completely. Next, pour it into a freezer-safe container. Leave some space at the top for expansion. When you want to use it, thaw it in the fridge overnight. You can also use the microwave to thaw it quickly. Just heat it in short bursts, stirring in between. Homemade cranberry sauce lasts about one week in the fridge. If you freeze it, it can last up to six months. Check for signs that the sauce has gone bad. If you see mold or it smells sour, it’s time to toss it. Always trust your senses! Yes, you can use frozen cranberries. They work great in this recipe. To prepare them, just rinse them under cold water. Remove any stems or bad berries. You can use them directly in the saucepan, but you may need to cook them a bit longer. This extra time helps them to thaw and burst nicely. Yes, cranberry sauce is gluten-free. All the ingredients in this recipe are safe for a gluten-free diet. You use fresh cranberries, sugar, orange juice, and spices. Make sure to check any packaged items, like nuts, to ensure they are gluten-free. You can easily adjust the sweetness of your cranberry sauce. If you like it sweeter, add more sugar a little at a time while cooking. Start with a few extra tablespoons. If you prefer it less sweet, reduce the sugar by a few tablespoons. Taste it as you go to find the right balance for your palate. You now know how to make a great cranberry sauce. We covered fresh ingredients, spices, and essential kitchen tools. I shared step-by-step instructions for a perfect sauce. You learned tips for both flavor and presentation. Plus, you discovered ways to customize it with different fruits and nuts. Remember, homemade cranberry sauce can elevate any meal. Enjoy experimenting with flavors and textures. With these tips, your sauce will be a hit. Safe storing ensures your tasty creation lasts longer. Now, go make some delicious cranberry sauce!

Easy Cranberry Sauce Simple and Delicious Recipe

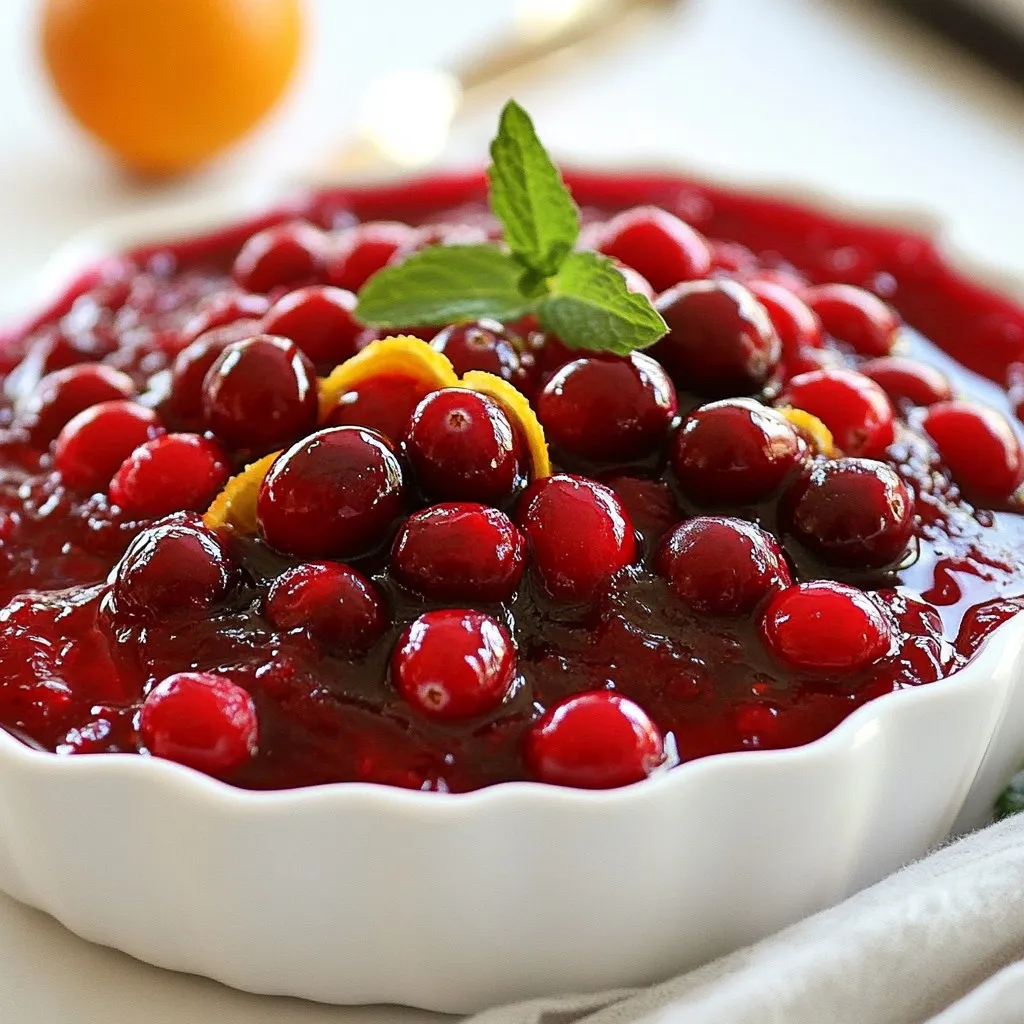
Looking for a simple way to make cranberry sauce? This easy recipe will impress your family and friends. With just

- Chicken: You need 2 large chicken breasts. Cut them into bite-sized pieces. This helps them cook evenly. - Zucchini: Use 3 medium zucchinis. Slice them into half-moons. They add a nice texture. - Vegetables and Seasonings: Include 1 red bell pepper (diced), 1 yellow onion (chopped), and 2 cloves of garlic (minced). Add 1 cup of halved cherry tomatoes for sweetness. For flavor, use 1 teaspoon of dried oregano, 1 teaspoon of dried basil, and 1/2 teaspoon of paprika. Don't forget salt and pepper to taste. Olive oil (2 tablespoons) helps with cooking. - Cheese Varieties: Feta cheese (1/2 cup, crumbled) gives a salty kick. You can also try mozzarella or goat cheese for a creamy touch. - Extra spices: Feel free to add red pepper flakes for heat or smoked paprika for a deeper flavor. - Baking dish: A 9x13 inch dish works best for this recipe. - Mixing bowl: Use a large bowl for combining all the ingredients. - Measuring utensils: Accurate measurements help keep the flavors balanced. {{ingredient_image_1}} - First, gather all your ingredients. You need chicken, zucchinis, and veggies. - Next, preheat your oven to 400°F (200°C). This step is key for even cooking. - In a greased 9x13 baking dish, layer the sliced zucchinis. Start at the bottom. - Then, add the marinated chicken on top. Spread it evenly over the zucchinis. - Now, add the diced red bell pepper and chopped onion. These add color and taste. - Sprinkle minced garlic over the dish. It gives a nice aroma. - Follow with halved cherry tomatoes. They add sweetness and moisture. - Finally, sprinkle crumbled feta cheese and sliced Kalamata olives. This gives a Mediterranean touch. - Cover the baking dish with aluminum foil. This keeps the moisture in while cooking. - Bake in the preheated oven for 25 minutes. This allows the chicken to cook through. - After 25 minutes, remove the foil. Bake for another 15-20 minutes. Look for tender veggies and fully cooked chicken. How do I marinate chicken? Marinating chicken is key to adding flavor. Mix olive oil, oregano, basil, paprika, salt, and pepper. Toss the chicken pieces in this mix. Let it soak for at least 30 minutes. This gives your chicken a burst of flavor. How to achieve tender vegetables? To get tender vegetables, slice zucchinis and bell peppers evenly. Layer them in the baking dish before adding the chicken. Cover the dish with foil for the first part of baking. This traps steam and helps cook the veggies well. Can I adjust the spices? Yes, spice adjustments can change the dish's vibe. If you like heat, add red pepper flakes. For a more earthy taste, try cumin. These tweaks let you personalize the dish. What ingredient substitutions can I make? Feel free to swap veggies based on your taste. If you don’t have zucchini, try eggplant or yellow squash. You can also change feta cheese to goat cheese for a creamier taste. What are some garnishing options? Garnishing can elevate your dish. Fresh parsley adds color and freshness. You can also sprinkle extra feta on top before serving. It looks great and tastes even better. What serving suggestions work well? Serve the Mediterranean Chicken Zucchini Bake with crusty bread or a simple salad. A light lemon vinaigrette pairs nicely. This makes the meal balanced and adds a refreshing touch. Pro Tips Tip Title: For an extra layer of flavor, marinate the chicken in olive oil, oregano, and lemon juice for at least an hour before cooking. Tip Title: Ensure the vegetables are evenly cut for uniform cooking; this helps achieve the perfect tenderness. Tip Title: Use fresh herbs if possible, as they provide a more vibrant flavor compared to dried herbs. Tip Title: Let the dish rest for a few minutes after baking; this allows the juices to redistribute for a juicier chicken. {{image_2}} You can change the veggies in your Mediterranean Chicken Zucchini Bake. Try using: - Eggplant instead of zucchini - Bell peppers other than red, like green or orange - Spinach or kale for a leafy twist For different proteins, consider swapping chicken for: - Turkey breast for a lean option - Shrimp or fish for a seafood flair - Tofu for a plant-based choice If you need gluten-free options, this recipe is already a great fit. Just check your feta cheese and olives. Look for brands that are gluten-free. For vegan alternatives, use: - Chickpeas or lentils instead of chicken - A vegan feta or nutritional yeast for cheese - Olive oil and herbs to keep the flavors bright To make this a one-pan meal, you can use a large skillet. Start by cooking the chicken first, then add the veggies and bake everything in one pan. This saves time on cleanup! For skillet variations, simply cook everything on the stove. Sauté the chicken and veggies together until tender. Add the cheese at the end for a melty finish. To keep your Mediterranean chicken zucchini bake fresh, refrigerate leftovers as soon as they cool. Place them in an airtight container. This helps to keep moisture in and air out. If you want to store it for a longer time, freezing is a great option. Portion it into smaller containers. This allows you to take out just what you need later. When you’re ready to enjoy leftovers, the oven is your best friend. Preheat it to 350°F (175°C). Place the dish in the oven for about 20 minutes. Cover it with foil to keep it moist. You can also use the microwave if you’re in a hurry. Just be sure to cover the dish. This keeps the heat in and helps maintain flavor. In the fridge, your Mediterranean chicken zucchini bake lasts about 3 to 4 days. Make sure to check it before eating. Look for any signs of spoilage. If it smells off or has a slimy texture, it's best to toss it. Always trust your nose and eyes when it comes to food safety. Can I use different meats? Yes, you can use other meats like turkey or pork. Just cut them into bite-sized pieces. Adjust the cooking time if you choose a different meat. Chicken cooks quickly, while some meats may take longer. What can I substitute for feta cheese? If you don't have feta, you can use goat cheese or ricotta. Both will add creaminess. You can also try mozzarella for a milder flavor. Adjust the amount based on your taste. How to know when the chicken is done? The chicken is done when it reaches 165°F (75°C). Use a meat thermometer for best results. The chicken should be white, not pink. Cut a piece in the center to check if it's cooked. Is it possible to prep this dish in advance? Yes, you can prep this dish a day ahead. Assemble the layers but do not bake. Cover it well and store in the fridge. Bake it the next day for a fresh meal. Can I make this recipe in a slow cooker? You can adapt this recipe for a slow cooker. Layer the ingredients in the cooker and set it on low. Cook for 4 to 6 hours. This will keep the chicken moist and tender. What to serve with Mediterranean Chicken Zucchini Bake? This dish pairs well with rice or quinoa. A simple green salad balances the meal. You can also serve it with crusty bread to soak up the flavors. This blog post highlighted how to create a tasty Mediterranean Chicken Zucchini Bake. We covered key ingredients, including chicken, zucchini, and seasonings. You learned step-by-step instructions for preparation, assembly, and baking. The tips offered tricks for enhancing flavor and presenting your dish. We also explored variations and proper storage methods. In conclusion, this dish is easy to customize to fit your tastes. Try different ingredients and enjoy the flavors! Happy cooking!

Mediterranean Chicken Zucchini Bake Flavor Boost

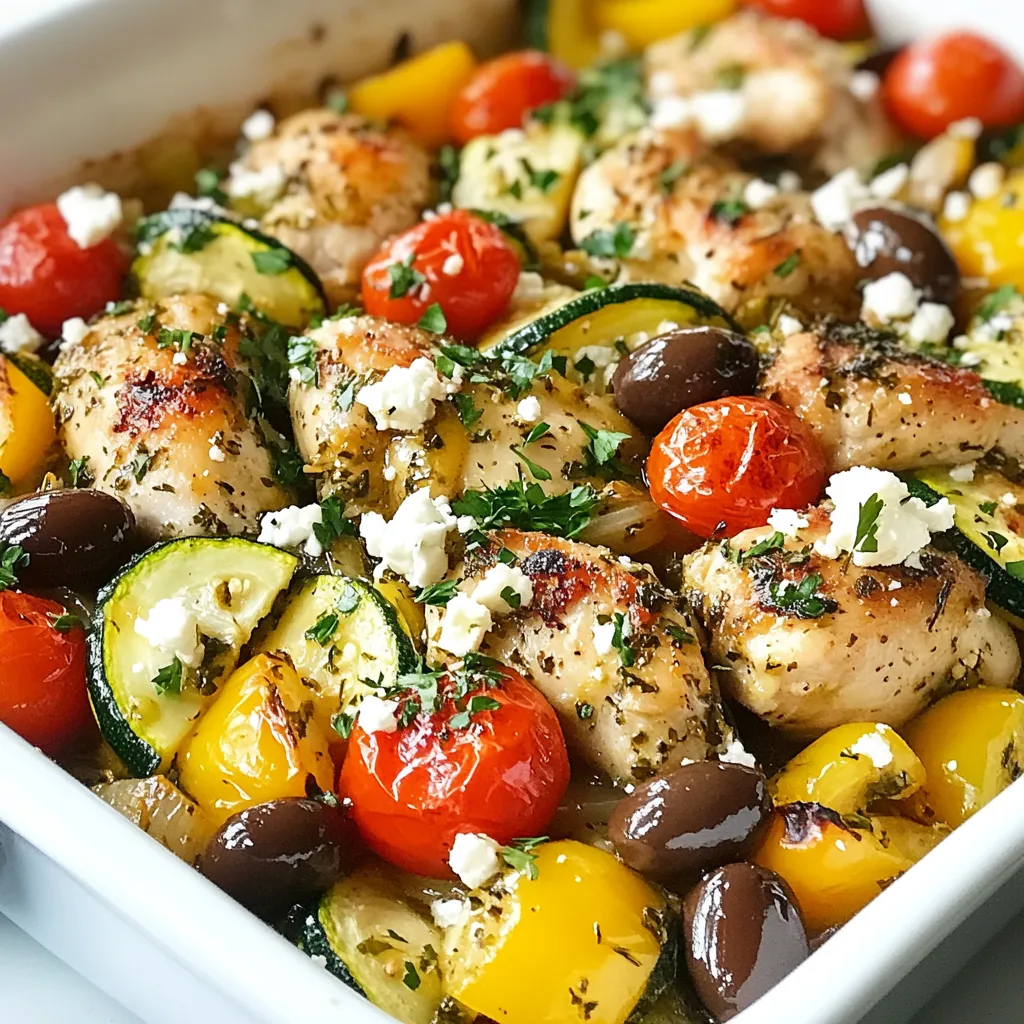
Are you ready to elevate your dinner game? This Mediterranean Chicken Zucchini Bake is packed with flavor and easy to

- 3 medium zucchinis, sliced into thin rounds - 1 cup marinara sauce - 1 cup shredded mozzarella cheese - 1/2 cup grated Parmesan cheese - 1 bell pepper, diced (any color) - 1 small red onion, diced - 1/2 cup black olives, sliced - 3 cloves garlic, minced - 1 teaspoon Italian seasoning - 1/2 teaspoon red pepper flakes (optional) - Salt and pepper to taste - Fresh basil leaves for garnish (optional) - 1 cup = 8 fluid ounces - 1/2 cup = 4 fluid ounces - 1 teaspoon = 5 milliliters - 1/2 teaspoon = 2.5 milliliters When you pick zucchini, look for ones that feel firm. The skin should be smooth and shiny. Avoid zucchini with soft spots or blemishes. Choose smaller zucchinis, as they tend to be sweeter and more tender. If you can, buy organic to avoid pesticides. Fresh zucchini will last about a week in your fridge. Store it in a plastic bag to keep it fresh longer. {{ingredient_image_1}} Start by washing the zucchinis. Slice them into thin rounds. This helps them cook evenly. Next, chop the bell pepper and red onion. I like to use a mix of colors for fun. Then, mince the garlic. This adds great flavor to the dish. In a large skillet, heat some oil over medium heat. Add the diced onion and bell pepper. Sauté them for about five minutes. You want them soft and fragrant. After that, stir in the minced garlic. Cook for another minute. This makes your kitchen smell amazing! Now, in a big bowl, combine the sliced zucchinis, sautéed veggies, marinara sauce, and seasonings. Add Italian seasoning, salt, and pepper. Mix well until the zucchini is coated. Grab a 9x13 inch baking dish. Spread half of the zucchini mixture evenly on the bottom. This creates a solid base for your casserole. Next, sprinkle half of the shredded mozzarella cheese on top. Now, layer the rest of the zucchini mixture over this cheese layer. Finish it off with the remaining mozzarella cheese. Sprinkle grated Parmesan and sliced black olives on top. If you like a kick, add some red pepper flakes too. Cover the baking dish with aluminum foil. This keeps the moisture in while it cooks. Bake it in your preheated oven at 375°F (190°C) for 30 minutes. After 30 minutes, remove the foil. Bake for an additional 15 minutes. This step melts the cheese and makes it golden. Allow the casserole to cool for five minutes before slicing. If you want, garnish with fresh basil leaves before serving. Enjoy this tasty meal! To make your zucchini pizza casserole extra tasty, use fresh ingredients. Fresh zucchinis give the best flavor. Slice them thin for even cooking. Don't skip the garlic; it adds a rich taste. Mix the marinara sauce well with the zucchini. Ensure every bite is flavorful. Layering is key. Spread the ingredients evenly to cook well. For a crispy top, bake uncovered the last 15 minutes. One mistake is using too much salt. The cheese and marinara are salty already. Avoid soggy zucchini by not overcooking them. If they sit too long, they release water. Drain any excess liquid before baking. Another common error is skipping the foil. Covering the dish helps cook the zucchini evenly. Remove it later to achieve a nice golden top. Bake your casserole at 375°F (190°C) for best results. Start with 30 minutes covered. After that, uncover and bake for 15 more minutes. If your oven runs hot, check a bit earlier. If you prefer a softer texture, add a few extra minutes. Always let it cool for about 5 minutes before slicing. This helps the layers hold together better. Pro Tips Prep Zucchini Ahead: To avoid excess moisture, slice and salt the zucchini beforehand, letting it sit for 15 minutes before patting it dry. Layer for Flavor: Consider adding layers of different vegetables like mushrooms or spinach for added flavor and nutrition. Cheese Variations: Experiment with different cheeses such as provolone or goat cheese for a unique twist on the classic mozzarella. Make it a Meal: Serve this casserole with a side salad or garlic bread to make it a complete and satisfying meal. {{image_2}} You can easily make a vegetarian version of this casserole. The recipe is already meat-free. You can add more veggies if you want. Think about spinach, mushrooms, or eggplant. Each veggie adds a new taste. You can also use different sauces, like pesto or spicy marinara. If you want to add meat, there are many choices. Ground beef or turkey works well. Just brown the meat before adding it to the mix. You can also use cooked sausage or pepperoni for extra flavor. These meats pair well with the zucchini and cheese. For a gluten-free version, check your marinara sauce. Some sauces contain gluten. You can also skip the breadcrumbs often found in other casseroles. Just focus on fresh veggies and cheese. This way, you still get a tasty meal without gluten. You can store your zucchini pizza casserole in the fridge. First, let it cool down. Transfer it to an airtight container. It will stay fresh for up to three days. Make sure to cover it well to keep the flavors locked in. When you want to enjoy the leftovers, preheat your oven to 350°F (175°C). Place the casserole in a baking dish. Cover it with foil to prevent drying out. Heat it for about 20 minutes. You can also microwave individual servings for quick snacks. Just heat for about 1-2 minutes, checking for warmth. If you want to save some for later, freezing is a great option. Let the casserole cool completely first. Then, cut it into portions. Wrap each piece tightly in plastic wrap, then place them in a freezer-safe bag. It should keep well for up to three months. When you’re ready to eat it, thaw in the fridge overnight. Reheat as mentioned above for a tasty meal. Yes, you can use different cheeses. If you want a sharp taste, try cheddar cheese. For a creamier texture, use provolone or fontina. Mixing cheeses can add depth to the flavor. I often mix mozzarella and cheddar for a tasty twist. Just keep the total amount close to two cups for best results. To add some heat, sprinkle red pepper flakes into the mix. You can also use spicy sausage or pepperoni for extra flavor. If you like a kick, add jalapeños or banana peppers. Adjust the amount to fit your taste. Start small and taste as you go. Yes, you can prep this casserole ahead of time. Just assemble it and cover it tightly. Store it in the fridge for up to two days. When ready to bake, let it sit at room temperature for 30 minutes. This helps it cook evenly. You can also freeze it for later. Just thaw it in the fridge overnight before baking. This blog post covered everything you need to know about making a delicious zucchini pizza casserole. We talked about choosing fresh ingredients, prepping, and baking. I shared tips to avoid common mistakes and offered variations for different diets. Remember, perfecting this dish takes practice. Trust your taste buds and have fun experimenting. You'll create a meal everyone will love. Keeping leftovers and reheating them well will ensure nothing goes to waste. Enjoy your cooking journey!

Zucchini Pizza Casserole Flavorful and Easy Meal

Looking for a delicious way to enjoy pizza flavors without the carbs? Enter my Zucchini Pizza Casserole! This dish is

- 1 pound potato gnocchi - 2 cups fresh spinach, chopped - 1 cup basil pesto - 1 cup heavy cream - 1 cup mozzarella cheese, shredded - 1/2 cup Parmesan cheese, grated - 2 cloves garlic, minced - Salt and pepper, to taste - 1 tablespoon olive oil - 1/4 teaspoon red pepper flakes (optional) - Fresh basil leaves, for garnish Potato gnocchi is a star in this dish. It adds a soft texture that pairs well with creamy sauces. Fresh spinach brings color and nutrition. Basil pesto offers a burst of herbal flavor, tying all elements together. Heavy cream makes the bake rich and smooth. Mozzarella and Parmesan cheeses melt beautifully, giving a perfect golden topping. Garlic adds a warm aroma that enhances all flavors. If you can't find potato gnocchi, use store-bought or homemade pasta. For a lighter option, swap heavy cream with half-and-half or a non-dairy cream. You can use kale or Swiss chard instead of spinach. If you want a different cheese, try cheddar or feta for a unique twist. For pesto, homemade versions can be made with other herbs, like cilantro or arugula. {{ingredient_image_1}} Start by gathering all your ingredients. You will need potato gnocchi, fresh spinach, basil pesto, heavy cream, mozzarella cheese, Parmesan cheese, garlic, olive oil, salt, pepper, red pepper flakes, and fresh basil leaves. This dish is quick and easy. You can make it in about 40 minutes. In a large pot, bring salted water to a boil. Add the potato gnocchi and cook them according to the package instructions. Watch for them to float to the top. This means they are done! Use a slotted spoon to take them out and set them aside. This step is key for a perfect texture. In a large skillet, heat olive oil over medium heat. Add minced garlic and sauté it for about one minute. The smell will be amazing! Next, toss in the chopped spinach. Cook until it wilts, which takes about 2 to 3 minutes. In a big mixing bowl, combine the cooked gnocchi, wilted spinach, basil pesto, and heavy cream. Mix it well so the gnocchi is coated evenly. Stir in half of the mozzarella and half of the Parmesan cheese. Season with salt, pepper, and red pepper flakes if you like some spice. Transfer the mixture into a greased 9x13 inch baking dish. Sprinkle the remaining mozzarella and Parmesan cheese on top. Preheat your oven to 400°F (200°C). Bake for 20 to 25 minutes. You want the cheese to be bubbly and golden brown. Once done, take it out of the oven and let it cool for a few minutes. Garnish with fresh basil leaves for color and flavor. Serve it warm and enjoy your creamy pesto spinach gnocchi bake! 1. Use Fresh Ingredients: Fresh spinach and quality pesto bring great flavor. 2. Don't Overcook the Gnocchi: Cook until they float. This means they are ready. 3. Mix Well: Coat the gnocchi evenly with the pesto and cream mixture. 4. Layer Cheese: Add cheese in layers for a rich, gooey texture. 5. Let it Rest: Allow the bake to cool a bit before serving. This helps it set. - Overcooking Spinach: Cook just until wilted. Too long makes it mushy. - Ignoring Seasoning: Don’t forget to add salt and pepper. It boosts flavor. - Not Greasing the Dish: A greased dish prevents sticking and makes serving easier. - Skipping Garnish: Fresh basil adds color and flavor. Use it! - Rushing the Bake: Bake until golden brown for the best taste and texture. - Add Red Pepper Flakes: For a spicy kick, add 1/4 teaspoon to the mix. - Use Garlic Powder: Sprinkle a bit for extra garlic flavor. - Try Different Cheeses: Swap mozzarella or Parmesan with fontina or goat cheese. - Mix in Sun-Dried Tomatoes: These add a tangy depth to the dish. - Experiment with Nuts: Pine nuts or walnuts can add a nice crunch. These tips will help you create a creamy pesto spinach gnocchi bake that shines in flavor and texture. Enjoy exploring these ideas to make it your own! Pro Tips Use Fresh Ingredients: Fresh spinach and high-quality pesto can significantly enhance the flavor of this dish. Customize the Cheese: Feel free to mix different cheeses like fontina or gouda for a unique twist on the flavor. Make it Creamier: For an even creamier texture, you can add a bit of cream cheese or ricotta to the mixture. Leftovers Storage: Store any leftovers in an airtight container in the fridge for up to 3 days; reheat gently to avoid overcooking. {{image_2}} If you want a vegetarian twist, the recipe already fits the bill. The gnocchi, spinach, and pesto make a delightful combo. For a vegan option, swap the heavy cream for coconut milk or a cashew cream. Use vegan cheese instead of mozzarella and Parmesan. These swaps keep the dish creamy and tasty while fitting your dietary needs. You can change the flavors easily. Try sun-dried tomatoes instead of or with spinach for a tangy kick. Swap the basil pesto for sun-dried tomato pesto for a different taste. You might also add some artichoke hearts for a unique flavor. If you want more spice, add more red pepper flakes or use a spicy pesto. To make this dish heartier, add proteins. Chicken or shrimp would work great. Just cook them in the skillet before adding spinach. For a vegetarian protein, add chickpeas or white beans. You can also mix in other veggies. Try bell peppers, zucchini, or mushrooms. These additions bring more color and texture to your creamy pesto spinach gnocchi bake. To store leftovers, let the gnocchi bake cool first. Place it in an airtight container. You can keep it in the fridge for up to three days. Just make sure to seal it tightly to keep it fresh. If you want, you can also cover it with plastic wrap. This keeps moisture in and prevents drying out. To reheat, preheat your oven to 350°F (175°C). Place the leftover gnocchi bake in an oven-safe dish. Cover it with foil to keep it from drying out. Heat for about 15-20 minutes, or until it’s warm all the way through. You can also microwave it. Just use a microwave-safe dish. Heat in short intervals, stirring in between, until hot. You can freeze the gnocchi bake for longer storage. After it cools, cut it into portions. Wrap each portion tightly in plastic wrap. Then place them in a freezer bag. Label the bag with the date. It can last up to three months in the freezer. When ready to eat, thaw it in the fridge overnight. Then you can reheat it as described above. Preparing the Gnocchi Bake takes about 15 minutes. Cooking the gnocchi and assembling the dish is quick. Baking it in the oven adds another 20-25 minutes. In total, you need about 40 minutes from start to finish. This makes it a great option for a weeknight meal. Yes, you can use frozen gnocchi. Just cook them according to the package directions. Frozen gnocchi will still taste great in this dish. They should be tender and soak up the creamy pesto flavor well. This dish pairs well with a simple green salad. A side of garlic bread also complements it nicely. You could even serve it with roasted vegetables for a colorful plate. These sides balance the rich flavors of the bake. Absolutely! This Gnocchi Bake is perfect for meal prep. You can make it ahead of time and store it in the fridge. Simply reheat it when you're ready to eat. It keeps well and tastes great even the next day. This blog post covered all you need to make a tasty gnocchi bake. We discussed ingredients, cooking steps, and helpful tips. I shared ideas for variations and how to store your leftovers too. Remember, you can mix it up with different ingredients to suit your taste. Avoid common mistakes to ensure perfect results. Enjoy your delicious dish!

Creamy Pesto Spinach Gnocchi Bake Savory Delight

Get ready for a dish that combines creamy goodness with fresh spinach and gnocchi! My Creamy Pesto Spinach Gnocchi Bake

For this creamy lemon orzo chicken soup, you need the following ingredients: - 1 tablespoon olive oil - 1 medium onion, diced - 2 cloves garlic, minced - 1 carrot, diced - 1 celery stalk, diced - 1 teaspoon dried thyme - 1 lb (450g) cooked chicken, shredded (rotisserie chicken works great!) - 6 cups chicken broth - 1 cup orzo pasta - 1 cup heavy cream - Juice of 1 lemon - Zest of 1 lemon - Salt and pepper to taste - Fresh parsley, chopped (for garnish) You can easily swap ingredients in this soup. Here are some options: - Use canola or avocado oil instead of olive oil. - If you don’t have fresh chicken, rotisserie chicken is a great choice. - For a lighter soup, replace heavy cream with half-and-half or coconut milk. - If you lack orzo, use rice or another small pasta. - Fresh herbs like dill or basil can replace thyme for a different flavor. This soup is quite flexible for various diets: - To make it gluten-free, swap regular orzo for gluten-free orzo. - If you follow a dairy-free diet, substitute heavy cream with coconut cream or almond milk. - The soup is high in protein from the chicken, making it filling and satisfying. - For a vegetarian version, replace chicken with chickpeas or lentils. By keeping these substitutions and dietary options in mind, you can enjoy this creamy lemon orzo chicken soup tailored to your needs! {{ingredient_image_1}} To start, gather all your ingredients. You need olive oil, onion, garlic, carrot, celery, thyme, chicken, broth, orzo, heavy cream, lemon juice, lemon zest, salt, and pepper. Dice the onion, carrot, and celery. Mince the garlic. Shred the chicken if you haven't done so. This makes everything ready for cooking. 1. Heat a large pot on medium heat and add the olive oil. 2. Add the diced onion and cook for about 3-4 minutes. The onion should be soft and clear. 3. Next, stir in the minced garlic, diced carrot, and diced celery. Cook for 2-3 minutes. The veggies should feel tender. 4. Now, sprinkle in the dried thyme and mix it all well. 5. Add the shredded chicken and pour in the chicken broth. Bring it to a gentle boil. 6. Once it is boiling, add the orzo pasta. Cook it according to the package, usually 8-10 minutes. Stir it from time to time. 7. Lower the heat and add the heavy cream, lemon juice, and lemon zest. Mix it all together until heated through. 8. Season with salt and pepper to taste. Let it simmer for another 5 minutes. This helps all the flavors mix well. 9. Finally, take it off the heat and serve hot. Don’t forget to sprinkle fresh parsley on top. To get the best texture, watch the orzo closely while cooking. If it cooks too long, it can get mushy. Stir gently to keep it from sticking. When you add the heavy cream, do it slowly. This helps it blend into the soup smoothly. If you want it creamier, you can add more cream. Always taste before serving. Adjust the salt and pepper as needed to make it just right! When making creamy lemon orzo chicken soup, some mistakes can ruin your dish. Overcooking the orzo is a common error. It can turn mushy and lose its nice bite. Always follow the package instructions for cooking time. Another mistake is skipping the sauté step. This step builds a strong flavor base. Make sure to cook your veggies until they are tender before adding broth. You can make your soup even better with a few simple tricks. Add a splash of white wine while sautéing. This gives a depth of flavor that lifts the whole dish. Try using fresh herbs like thyme or parsley to brighten the taste. Lemon zest adds a fresh note, so don’t skip it. Finally, taste and adjust salt and pepper as needed; this makes a big difference. For a cozy meal, serve this soup with crusty bread. It’s perfect for dipping! You can also pair it with a light salad. A simple green salad with lemon vinaigrette works well. For a fun twist, sprinkle some Parmesan cheese on top before serving. It melts nicely and adds richness to the soup. Pro Tips Use Fresh Herbs: Adding fresh thyme or parsley at the end enhances the soup's flavor and aroma. Adjust Creaminess: If you prefer a lighter soup, reduce the amount of heavy cream or substitute with half-and-half. Perfectly Cooked Orzo: To prevent orzo from becoming mushy, add it to the soup just 10 minutes before serving. Flavor Boost: For a more intense lemon flavor, consider adding an extra tablespoon of lemon juice and zest. {{image_2}} You can switch up the protein in this soup. If you want to try something new, use turkey instead of chicken. Rotisserie turkey works great, just like chicken. You can also use shredded beef for a heartier dish. If you love seafood, shrimp can add a nice twist. Simply add the shrimp during the last few minutes of cooking. This way, they cook through but stay tender. To make this dish vegetarian, skip the chicken and use veggie broth. Replace the heavy cream with coconut milk for a creamy texture. You can also use silken tofu blended until smooth. This gives a rich flavor while keeping it vegan. Add more vegetables, like spinach and bell peppers, for extra nutrition. Don't forget to add a bit of nutritional yeast for a cheesy flavor. You can change the soup's flavor easily. For a spicy kick, add red pepper flakes or a dash of hot sauce. If you like herbs, try adding fresh basil or dill. These herbs bring a fresh taste. You can also make it more citrusy by adding more lemon juice and zest. Experimenting with flavors can lead to your perfect bowl of soup! To keep your Creamy Lemon Orzo Chicken Soup fresh, use an airtight container. Make sure it cools down to room temperature first. This helps to prevent moisture build-up, which can make your soup soggy. Store it in the fridge for up to three days. If you plan to eat it later, consider separating the soup from any pasta. This keeps the orzo from soaking up too much broth. When it's time to enjoy your soup again, gently reheat it on the stove. Use low heat and stir often to avoid burning. If the soup seems too thick, add a splash of chicken broth or water. You can also microwave it, but make sure to heat it in short bursts. Stir between each burst to heat evenly. If you want to save your soup for later, freezing works well. Pour the cooled soup into freezer-safe bags or containers. Leave some space at the top, as liquid expands when frozen. Label each bag with the date. It can stay in the freezer for up to three months. When you're ready to eat it, thaw it overnight in the fridge before reheating. Yes, you can make this soup in a slow cooker. First, sauté the onion and garlic in a pan. Then, add them to your slow cooker with the other ingredients. Cook on low for 6-8 hours. Add orzo and cream in the last 30 minutes. This gives the soup a nice texture without overcooking the pasta. This soup lasts about 3-4 days in the fridge. Make sure to store it in an airtight container. The flavors deepen over time, making it even more tasty. Just remember to stir well before serving again. Yes, you can use whole grain orzo instead of regular orzo. Whole grain orzo adds more fiber and nutrients. Just be aware that it might take a bit longer to cook. Check the package for specific cooking times to get it just right. In this blog post, I covered the key ingredients, step-by-step cooking instructions, and helpful tips. You learned about various protein options, substitutions, and dietary needs. Understanding how to store, reheat, and freeze your soup is vital for enjoying it later. My final thoughts: with these insights, you can make a delicious, adaptable soup that suits your taste. Don't be afraid to experiment—your perfect bowl is just a recipe away!

Creamy Lemon Orzo Chicken Soup Easy and Cozy Dish

Looking for a warm, hearty dish that feels like a cozy hug? This Creamy Lemon Orzo Chicken Soup hits the

- Chicken and broth - 1 lb boneless, skinless chicken breasts - 4 cups chicken broth - Vegetables - 1 medium onion, diced - 3 cloves garlic, minced - 1 red bell pepper, diced - 1 can (15 oz) black beans, rinsed and drained - 1 can (15 oz) corn, drained - Spices and seasonings - 1 can (10 oz) enchilada sauce - 1 teaspoon ground cumin - 1 teaspoon chili powder - 1 teaspoon smoked paprika - Salt and pepper to taste - Toppings and garnishes - Fresh cilantro, chopped (for garnish) - Avocado, diced (for topping) - Shredded cheese (for topping) - Lime wedges (for serving) Each ingredient plays a key role in making this soup rich and tasty. The chicken provides protein, while the broth adds depth. The vegetables bring freshness and color. Spices like cumin and chili powder give it that warm flavor. Lastly, toppings like avocado and cheese make every bowl a treat. This mix of ingredients makes Chicken Enchilada Soup a favorite. {{ingredient_image_1}} - Prepping the chicken and vegetables Start by washing your chicken. Cut it into smaller pieces for easy cooking. Dice one medium onion and three cloves of garlic. Chop one red bell pepper into small bits. These will add great flavor to your soup. - Sautéing the aromatics In a large pot, heat one tablespoon of olive oil over medium heat. Add the diced onion. Cook it for about 3-4 minutes until it softens. Next, stir in the minced garlic and red bell pepper. Sauté for another 2 minutes until you smell their nice aroma. - Combining ingredients in the pot Now, it’s time to gather all the goodness. Add the chicken pieces to the pot. Pour in four cups of chicken broth and one can of enchilada sauce. Don’t forget to add one can of black beans and one can of corn. Sprinkle in one teaspoon each of ground cumin, chili powder, and smoked paprika. Season with salt and pepper to your liking. - Boiling and simmering the soup Bring the mixture to a boil. Once it bubbles, lower the heat to a gentle simmer. Cover the pot and let it cook for 20-25 minutes. This allows the chicken to cook through and the flavors to blend well. - Shredding the chicken After the chicken is cooked, take it out of the pot. Use two forks to shred it into bite-sized pieces. Return the shredded chicken back to the pot and stir everything together. - Final touches before serving Let the soup simmer for another 5 minutes. This helps the flavors meld perfectly. Taste the soup and adjust the seasoning if needed. If you want more flavor, add extra enchilada sauce. Serve your delicious soup hot and garnish with fresh cilantro, diced avocado, shredded cheese, and a squeeze of lime juice for that extra zing. - Adjusting seasoning: Taste your soup as it cooks. If it lacks flavor, add salt or more spices. I love to sprinkle in extra chili powder for a kick. Just a little can make a big difference! - Using fresh ingredients: Fresh veggies make your soup pop. Always use ripe tomatoes, crisp peppers, and fresh herbs. When I use fresh cilantro, it brightens the whole dish. It’s worth the effort! - Stovetop vs. slow cooker variations: You can make this soup on the stovetop or in a slow cooker. Stovetop cooking is quick and easy, taking about 50 minutes. If you use a slow cooker, it takes longer but allows flavors to deepen over time. Cook for 6-8 hours on low for best results. - Quick tips for meal prep: Chop your veggies ahead of time for easy cooking. You can also shred chicken in advance and store it in the fridge. This makes busy nights stress-free. Just heat, combine, and enjoy! Pro Tips Use Rotisserie Chicken: For a quicker version, substitute the raw chicken with pre-cooked rotisserie chicken. Just shred it and add it in the last few minutes of cooking. Adjust Spiciness: If you prefer a milder soup, opt for a mild enchilada sauce and reduce the chili powder. For added heat, consider adding diced jalapeños. Flavor Boost: To enhance the flavor, squeeze some fresh lime juice into the soup just before serving. This brightens the overall taste. Make It Creamy: For a creamy texture, stir in a dollop of sour cream or Greek yogurt just before serving. This adds richness to the soup. {{image_2}} You can easily change up the protein in this soup. If you prefer turkey, swap out the chicken for ground turkey. If you want a lighter option, try shredded rotisserie chicken. For those who follow a vegan or vegetarian diet, you can use beans or lentils instead of chicken. Chickpeas also work well, giving you a good protein boost. Replace the chicken broth with vegetable broth to keep it plant-based. To spice things up, consider adding extra chili powder or cayenne pepper. This will give your soup a nice kick. You could also add cumin for a deeper flavor. Garnishes make a big difference too. Try adding sliced jalapeños for heat or pickled red onions for tang. Fresh lime juice will brighten the flavors. Don't forget to top it with fresh cilantro, diced avocado, or even a dollop of sour cream for creaminess. Each of these adds a unique twist that can elevate your soup. To store your leftover chicken enchilada soup, let it cool first. Once cooled, pour it into airtight containers. Make sure to leave some space at the top for expansion. This soup stays fresh in the fridge for up to four days. For best taste, use glass or BPA-free plastic containers. When you want to reheat the soup, the best way is on the stove. Pour it into a pot over medium heat. Stir often until it’s hot all the way through. You can also use the microwave. Just put it in a microwave-safe bowl and cover it loosely. Heat in one-minute bursts, stirring in between. If you want to store the soup longer, freezing is a good option. Let it cool completely before transferring to freezer-safe bags or containers. Remove as much air as possible to prevent freezer burn. This soup can last up to three months in the freezer. When ready to eat, thaw it in the fridge overnight before reheating. How long does it take to cook? It takes about 50 minutes to cook Chicken Enchilada Soup. You spend 15 minutes prepping and 35 minutes cooking. The chicken simmers in the broth for about 20-25 minutes. This allows all the flavors to blend well. Can I use frozen chicken? Yes, you can use frozen chicken. Just add it to the pot with the broth and cook longer. Make sure the chicken reaches 165°F to ensure it is safe to eat. You might need to adjust the cooking time by 10-15 minutes. What to serve with Chicken Enchilada Soup? You can serve Chicken Enchilada Soup with tortilla chips or warm tortillas. A side of rice or a fresh salad pairs well too. Don't forget to offer lime wedges for squeezing. You can also add extra toppings like sour cream or jalapeños for more flavor. In this post, we covered how to make a tasty chicken enchilada soup. You learned about key ingredients like chicken, veggies, and spices. I shared steps for prepping and cooking the soup, as well as tips to enhance the flavor. You also explored variations and storage advice to keep your soup fresh. Now, you have the tools to make a delicious meal. Don't hesitate to experiment with flavors and enjoy this warm dish!

Savory Chicken Enchilada Soup Easy and Flavorful Recipe

If you love warm, hearty soups, you’ll adore my Savory Chicken Enchilada Soup recipe! This dish combines tender chicken, fresh

- 1 lb chicken breast, cut into bite-sized pieces - 2 tablespoons olive oil - 4 cloves garlic, minced - 1 cup heavy cream - 1 teaspoon dried Italian herbs - 1/4 cup grated Parmesan cheese - 1 cup spinach leaves, chopped - Salt and pepper to taste - Fresh parsley, chopped (for garnish) These main ingredients create a rich and tasty dish. The chicken brings protein, while the heavy cream adds creaminess. Garlic gives bold flavor, and spinach adds color and nutrients. - Salt - Pepper - Olive oil You likely keep these kitchen staples at home. They help enhance flavors and create a delicious meal. - Red pepper flakes for heat - Mushrooms for extra texture - Other greens like kale or Swiss chard Feel free to customize this recipe. Adding optional ingredients can change flavors and make it your own. {{ingredient_image_1}} First, get 1 pound of chicken breast. Cut the chicken into small, bite-sized pieces. Heat 2 tablespoons of olive oil in a large skillet over medium heat. Once the oil is hot, add the chicken pieces. Season them with salt and pepper. Cook the chicken for 5 to 7 minutes. You want it to be golden brown and fully cooked. When done, take the chicken out of the skillet and set it aside. In the same skillet, lower the heat to medium-low. Add 4 minced cloves of garlic. Sauté the garlic for about 1 minute. You want it fragrant but not burned. Next, pour in 1 cup of heavy cream. Stir the cream and garlic together. Let it simmer gently for 2 to 3 minutes. This helps the flavors mix well. Now, add 1 teaspoon of dried Italian herbs and 1/4 cup of grated Parmesan cheese. Stir continuously until the cheese melts and the sauce thickens. Add 1 cup of chopped spinach leaves to the creamy sauce. Cook until the spinach wilts, which takes about 2 minutes. Now, return the cooked chicken bites to the skillet. Make sure they are well coated with the creamy sauce. Taste the dish and adjust seasoning with more salt and pepper if needed. Cook for another 2 minutes to heat everything through. Serve warm with freshly chopped parsley on top for a nice touch. To make the sauce rich and creamy, use heavy cream. Heat the garlic gently to avoid burning. Stir the cream in slowly, letting it simmer. This helps to blend the flavors well. Add the dried Italian herbs and cheese last. This gives the sauce a nice, thick texture. Cut the chicken into small, even pieces. This helps them cook evenly and quickly. Sauté them until golden brown. This takes about 5-7 minutes. Make sure the chicken is cooked all the way through. Use a meat thermometer if needed; it should read 165°F. Garnish your dish with fresh parsley for a pop of color. Serve the chicken over pasta or rice for a complete meal. You can also use small bowls with toothpicks for a fun appetizer. Presentation matters; it makes your dish look extra special! Pro Tips Don’t Overcook the Chicken: Make sure to sauté the chicken just until golden brown and cooked through to keep it juicy and tender. Use Fresh Garlic: Fresh minced garlic adds a depth of flavor that powdered garlic cannot replicate, enhancing the dish's overall taste. Adjust the Creaminess: If you prefer a lighter sauce, substitute half of the heavy cream with chicken broth for a deliciously creamy yet lighter option. Add Extra Veggies: Feel free to incorporate other vegetables like mushrooms or bell peppers for added flavor and nutrition. {{image_2}} You can add more vegetables to this dish. Try bell peppers or broccoli. Both add color and flavor. Just chop them small so they cook quickly. Sauté them in the skillet before adding the garlic. This makes a tasty, colorful meal. You can also use zucchini or mushrooms for a different taste. For a low-carb meal, swap the heavy cream with coconut cream. This change cuts carbs and adds a nice flavor. You can also skip the pasta or rice. Serve the chicken on a bed of leafy greens instead. This keeps it light and healthy while still being delicious. To spice things up, add red pepper flakes to the sauce. Start with a pinch and adjust to your taste. You can also add diced jalapeños for a fresh kick. This adds heat and makes the dish exciting. Serve with a side of cooling ranch or yogurt dip for balance. To store your creamy garlic chicken bites, let them cool down first. Place the chicken in an airtight container. This keeps the flavors fresh. You can store them in the fridge for up to three days. If you plan to eat them later, ensure they are sealed well. When you are ready to eat, reheat the chicken on the stove. Use low heat to prevent burning. Stir the chicken often. You can add a splash of cream or broth to keep it moist. The microwave works too; just cover the dish and heat for 1-2 minutes. Check to ensure it's warm throughout. To freeze the creamy garlic chicken bites, let them cool completely. Place them in a freezer-safe bag or container. Make sure to remove as much air as possible. You can freeze them for up to three months. When ready to use, thaw in the fridge overnight. Reheat as mentioned above once thawed. You can serve creamy garlic chicken bites with many sides. Pasta is a great choice. It soaks up the sauce nicely. Fluffy rice also pairs well. If you want a lighter option, try a fresh salad. Roasted vegetables add color and nutrition. For a fun appetizer, use toothpicks and small bowls. Yes, you can make this dish dairy-free. Swap the heavy cream for coconut cream. It gives a nice flavor and richness. Use nutritional yeast instead of Parmesan cheese for a cheesy taste. Make sure to check the labels of your ingredients. Some brands have hidden dairy. The chicken is done when it reaches 165°F (75°C). Use a meat thermometer for accuracy. The chicken should be golden brown outside. Cut a piece open to check if it's white inside. If it looks pink, cook it a bit longer. Definitely! You can use turkey or pork instead of chicken. Cut them into bite-sized pieces like chicken. Adjust the cooking time based on the meat you choose. Ground meat works too, but cook it until brown and fully cooked. Enjoy mixing flavors and textures! This blog post covered how to make creamy garlic chicken bites with ease. We explored key ingredients, helpful tips, and ways to customize your dish. I shared steps for making the chicken and sauce, plus tricks for a perfect finish. Remember, you can adapt the recipe to suit your taste or dietary needs. With this guide, you're set to impress anyone with your cooking. Enjoy your kitchen adventure!

Creamy Garlic Chicken Bites Quick and Tasty Recipe

Are you ready to impress your family and friends with a quick and tasty dish? This Creamy Garlic Chicken Bites

- 1 cup rolled oats - 1/2 cup natural peanut butter - 1/4 cup honey or maple syrup - 1/2 cup dark chocolate chips - 1/4 cup ground flaxseed - 1/2 teaspoon vanilla extract - A pinch of salt - Optional: 1/4 cup chopped nuts or seeds The ingredients for these energy bites are simple and wholesome. Each one serves a purpose, bringing flavor and nutrition. The rolled oats give us fiber, while the peanut butter adds protein. Honey or maple syrup adds sweetness, balancing the flavors. Each serving contains about 150 calories. You get 5 grams of protein, 8 grams of fat, and 15 grams of carbs. This makes them perfect for a quick snack or energy boost. - Oats: They help keep your heart healthy. Oats also provide energy for your day. - Peanut Butter: This nut butter is rich in protein and healthy fats. It fills you up and gives you energy. - Flaxseed: Flaxseed is a great source of omega-3 fatty acids. It helps with digestion and is good for your skin. These ingredients not only taste great together but also support your health. Enjoy these energy bites as a tasty treat that helps keep you full and energized. {{ingredient_image_1}} - Combining dry and wet ingredients First, grab a mixing bowl. Add 1 cup of rolled oats, 1/4 cup of ground flaxseed, and a pinch of salt. Stir them together well. In a second bowl, mix 1/2 cup of natural peanut butter, 1/4 cup of honey (or maple syrup), and 1/2 teaspoon of vanilla extract. Make sure it’s smooth. Pour this wet mixture into the dry ingredients. Stir until everything is mixed well. - Chilling the mixture Once you combine everything, cover the bowl. Put it in the fridge for about 30 minutes. Chilling helps the mixture firm up, making it easier to roll into bites. - Forming into bites After chilling, take the bowl out of the fridge. Use your hands to roll the mixture into small balls about 1 inch wide. This is where the fun begins! You can make them any size you like, but bite-sized is best. - Proper storage techniques Place the rolled energy bites on a baking sheet. Line it with parchment paper for easy cleanup. Once you roll all of them, refrigerate again for 30 minutes. This helps the bites hold their shape. Store the bites in an airtight container in the fridge. They stay fresh for up to a week. - Avoiding common mistakes in preparation Make sure to measure your ingredients carefully. Too much or too little can change the texture. If your mixture feels too sticky, add a bit more oats. If it’s too dry, a splash of peanut butter can help. Always chill the mixture before rolling. This step is key for easy handling. You can make these energy bites more fun. Try adding spices like cinnamon for warmth or cocoa powder for extra chocolate flavor. Both spices give the bites a unique twist. You can also switch out honey for maple syrup. Maple syrup adds a nice sweetness. To change the texture, try using different nut butters. Almond butter or cashew butter works great. You can also add ingredients like chia seeds or chopped nuts. These make the bites crunchy and interesting. Serving these bites can be fun too! You can arrange them in a small bowl for a nice look. Add a sprinkle of cocoa powder or crushed nuts on top for flair. These small touches make your energy bites stand out. Pro Tips Chill for Better Texture: Refrigerating the mixture for at least 30 minutes helps the energy bites hold their shape and makes them easier to roll. Customize Your Flavors: Feel free to swap out the peanut butter for almond or cashew butter for a different flavor profile. Add Protein Boost: Incorporate a scoop of your favorite protein powder into the mixture for an extra nutritional kick. Storage Tips: Store the energy bites in an airtight container in the fridge to keep them fresh for up to a week. {{image_2}} You can easily make these energy bites nut-free. Just swap out the peanut butter. Try using sunflower seed butter instead. It has a similar creamy texture and taste. You can also use soy nut butter. Both options keep the bites tasty and safe for nut allergies. To make this recipe vegan, replace honey with maple syrup. This swap keeps it plant-based and sweet. Ensure you use dairy-free chocolate chips. They add the rich chocolate flavor without any animal products. These small changes keep the bites yummy and suitable for everyone. Want to switch up the taste? You can add dried fruits like cranberries, raisins, or apricots. They give a chewy texture and extra sweetness. You can also try different types of chocolate, like milk chocolate or white chocolate. Each chocolate brings a unique flavor to the bites. Mix and match to find your favorite combination! To keep your energy bites fresh, store them in airtight containers. This method helps to lock in flavor and moisture. Refrigerate them right after making. This will keep them firm and tasty. When stored correctly in the fridge, these bites last up to a week. If you notice any change in smell or texture, it's best to discard them. Always check for signs of spoilage before eating. For long-term storage, freezing is a great choice. Place the energy bites in a single layer on a baking sheet. Freeze them for about an hour, then transfer them to a zip-top bag. They can last up to three months in the freezer. Just thaw them in the fridge before enjoying. Chocolate Peanut Butter Energy Bites keep well in the fridge for up to a week. Store them in an airtight container. This helps them stay fresh and tasty. If you freeze them, they can last up to three months. Just remember to thaw them before enjoying! Yes, you can use crunchy peanut butter! It will add a nice texture to the bites. The bits of peanuts give a fun crunch. If you like creaminess, stick with smooth peanut butter. Absolutely! These energy bites are great for kids. They are packed with nutrients and taste delicious. Kids love the sweet flavor of chocolate and peanut butter. Plus, they are easy to grab as a snack. You can even get your kids involved in making them! If you want to swap out honey, maple syrup works well. You can also use agave syrup for a similar sweetness. Just make sure to use the same amount as listed in the recipe. Adjust it to your taste if needed. Yes, you can make these without chocolate! You can simply skip the chocolate chips. For added flavor, try mixing in dried fruits like raisins or cranberries. This keeps the bites sweet and tasty while changing the flavor profile. You now have a clear method for making Chocolate Peanut Butter Energy Bites. We covered ingredients, health benefits, and easy steps to create them. You learned how to customize flavors and textures, plus storage tips to keep them fresh. These bites are tasty and healthy, perfect for a quick snack. With the right choices, you can make them fit your needs. Enjoy experimenting with this simple recipe for a fun, rewarding treat!

Chocolate Peanut Butter Energy Bites Tasty and Nutritious

If you’re craving a quick snack that’s both delicious and good for you, look no further! Chocolate Peanut Butter Energy

- 1 medium butternut squash, peeled and cubed - 1 medium acorn squash, peeled and cubed - 1 onion, chopped - 2 cloves garlic, minced Butternut squash gives the soup a sweet, creamy base. Its smooth texture blends well. Acorn squash adds a nutty flavor that complements butternut. The onion and garlic bring warmth and depth to the dish. They create a great aroma, making your kitchen feel cozy. - 4 cups vegetable broth - 1 can (14 oz) coconut milk - 1 teaspoon ground ginger - 1 teaspoon ground cinnamon Vegetable broth forms the soup's base. It rounds out the flavors perfectly. Coconut milk adds creaminess and a hint of sweetness. Ginger and cinnamon elevate the taste. They provide warmth, making each spoonful comforting and delicious. - Pumpkin seeds - Fresh parsley - Coconut cream Garnishes add color and texture. Pumpkin seeds give a nice crunch. Fresh parsley brightens the dish and adds a pop of green. A drizzle of coconut cream makes it even creamier. These extras make your soup look inviting and taste even better. {{ingredient_image_1}} To start, you need to peel and cube the butternut and acorn squash. First, grab a sharp knife and a sturdy cutting board. Cut off the ends of the butternut squash. Then, carefully slice it in half lengthwise. Scoop out the seeds with a spoon. Now, peel the skin using a vegetable peeler. Cut the squash into cubes about one inch in size. For the acorn squash, cut it in half and remove the seeds. Peel it the same way as the butternut squash. Cube it into similar-sized pieces. This helps them cook evenly. Next, let’s cook the base. In a large pot, heat one tablespoon of olive oil over medium heat. Add the chopped onion. Sauté for about 5 minutes until it turns soft and clear. This adds a nice flavor to the soup. Now, stir in two cloves of minced garlic. Cook that for about one minute until you smell the garlic. Then, add the cubed butternut and acorn squashes to the pot. Mix them well with the onion and garlic. Pour in four cups of vegetable broth. Bring the mixture to a boil. Once it boils, reduce the heat to a simmer. Cover the pot and let it cook for about 20 minutes. You want the squash to be tender. After the squash is tender, remove the pot from the heat. Use an immersion blender to puree the soup until it is smooth. If you do not have an immersion blender, you can carefully transfer the soup in batches to a blender. Once the soup is pureed, return it to the pot. Stir in one can of coconut milk, one teaspoon of ground ginger, and one teaspoon of ground cinnamon. Season with salt and pepper to taste. Gently reheat the soup over low heat, stirring often. This ensures it warms through without boiling. Now, your cozy winter squash soup is ready to serve! To boost the flavor of your soup, you can add more spices. Try adding a pinch of nutmeg or a dash of cayenne for some heat. You can also mix in fresh herbs like thyme or rosemary to add depth. For creaminess, coconut milk is a great choice. Use full-fat coconut milk for a richer texture. If you want it even creamier, blend in some cashews. Just soak them in water for a few hours, then blend them into the soup. You can prepare this soup a day ahead. Just follow the recipe up to blending. Let it cool, then store it in the fridge. To freeze, pour the cooled soup into freezer-safe containers. It keeps well for up to three months. When you want to eat it, thaw it in the fridge overnight. Reheat in a pot over low heat, stirring often until warm. Serving your soup can be fun! Use deep bowls for a cozy feel. Add a swirl of coconut cream on top for a fancy touch. Sprinkle pumpkin seeds for a bit of crunch. Fresh parsley adds a pop of color. You can even serve the soup in hollowed-out squash for a cute, rustic look. Pro Tips Roasting the Squash: For a deeper flavor, roast the cubed squash in the oven at 400°F (200°C) for 25-30 minutes before adding it to the soup. This caramelizes the sugars and enhances the overall taste. Perfectly Smooth Texture: If you prefer an ultra-smooth texture, strain the soup through a fine-mesh sieve after blending. This step removes any remaining fibrous bits from the squash. Flavor Variations: Experiment with spices like nutmeg or cayenne pepper for additional warmth. You can also add a splash of apple cider vinegar for a hint of acidity that brightens the flavors. Storage Tips: This soup stores well in an airtight container in the fridge for up to 5 days or in the freezer for up to 3 months. Reheat gently on the stove over low heat for the best results. {{image_2}} You can switch up the squash in your soup. Try using spaghetti squash for a unique texture. Kabocha squash adds a sweet flavor and creamy feel. Both options give a fun twist to your cozy soup. Just remember to peel and cube them like the butternut and acorn squash. Want to make your soup heartier? Add beans or lentils. They boost protein and fiber. You can use canned beans for ease, like chickpeas or white beans. If you prefer lentils, add them during the cooking stage. They cook well in the broth and mix nicely with the squash. This addition makes your soup a full meal. If you like heat, add some chilies to your soup. You can use fresh chili peppers or red pepper flakes. Start with a small amount and taste as you go. This way, you control the spice level. The warmth from the chilies pairs well with the sweetness of the squash. It adds depth and makes each spoonful exciting. To enjoy your cozy winter squash soup, I suggest some tasty sides. Here are the best options: - Crusty bread: A slice of warm, crusty bread is perfect for dipping. - Salad: A light green salad with a lemon vinaigrette adds a fresh touch. - Cheese board: Pair it with a cheese board for a fun mix of flavors. - Roasted vegetables: These add texture and a savory element to the meal. These sides enhance the soup's warmth and flavor, making your meal more satisfying. Serve your soup hot for the best experience. Here’s how to keep it warm: - Reheat gently: If it cools down, reheat on low heat. Stir often to avoid burning. - Serve immediately: After blending, serve right away for optimal warmth. - Warm bowls: Consider warming your bowls in the oven before serving. This keeps the soup hot longer. Warm soup feels cozy and comforting, perfect for chilly days. Cozy winter squash soup shines during special meals or gatherings. Here are some great occasions to serve it: - Family dinners: It’s a great starter for a warm family meal. - Holiday gatherings: Serve it during the holidays for a festive touch. - Casual get-togethers: Perfect for a cozy night with friends. - Lunch or brunch: Enjoy it with a light salad or sandwich. This soup adds warmth and joy to any occasion, making it memorable for all. Yes, you can use frozen squash. Frozen squash is convenient and saves time. Just make sure to thaw it before cooking. Add it to the pot when you sauté the onion and garlic. Frozen squash may cook a bit faster, so watch for tenderness. You can use almond milk or cashew cream as a substitute. Both options add creaminess without the coconut flavor. If you want a richer taste, try heavy cream. You can also use unsweetened soy milk for a dairy-free option. This soup lasts about four to five days in the fridge. Store it in an airtight container. When you're ready to eat, just reheat it on the stove or in the microwave. The flavors will blend even more after a day or two! In this post, we explored cozy winter squash soup. We covered main ingredients like butternut and acorn squash, onion, and garlic. I shared tips for enhancing flavor and texture and suggested variations for extra enjoyment. You can even customize the soup to fit your taste. This soup is perfect for cold days and special gatherings. Enjoy trying these ideas and making the soup your own. Let the warm flavors bring comfort all winter long.

Cozy Winter Squash Soup Heartwarming and Easy Recipe

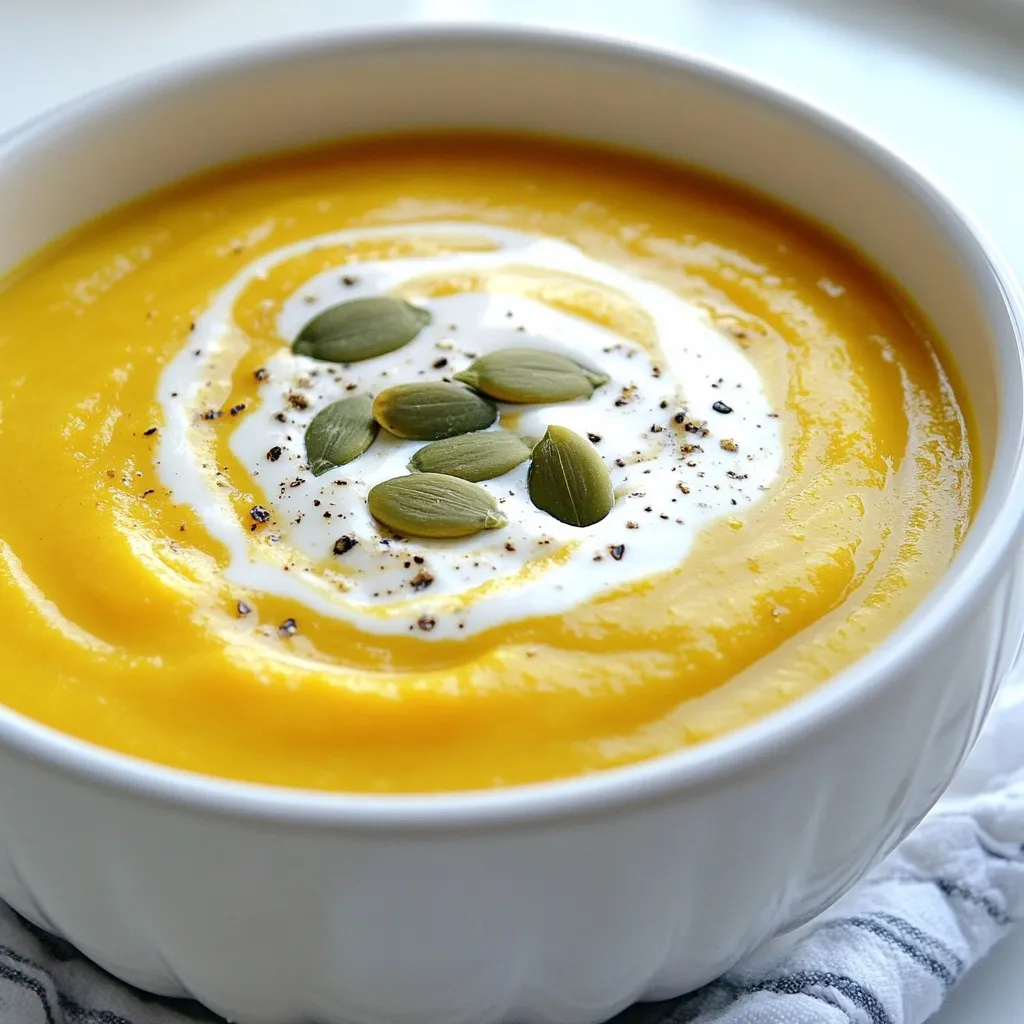
As the chill of winter settles in, there’s nothing quite like cozying up with a warm bowl of winter squash

Older posts
Newer posts
← Previous Page1 … Page137 Page138 Page139 … Page150 Next →

dsad

© 2025 Emmas Dish • Built with GeneratePress

Our Policies

  • Copyright Policy
  • Cookie Policy
  • GDPR Policy
  • Privacy Policy
  • Disclaimer
  • Terms Of Use

More Information

  • Home
  • About
  • Contact
  • Appetizers
  • Dessert
  • Dinner
  • Drinks
©2025, Emmas Dish About Back To Top