Skip to content
DisclaimerTerms Of UseGDPR PolicyCookie Policy

Emmas Dish

  • Home
  • Drinks
  • Appetizers
  • Dinner
  • Dessert
  • About
  • Contact
  • Privacy Policy
DisclaimerTerms Of UseGDPR PolicyCookie Policy

Emma

- 4 boneless, skinless chicken breasts - 1 cup all-purpose flour - 2 large eggs - 1 cup grated Romano cheese - 1 cup breadcrumbs (preferably panko for crunch) - 1/2 cup fresh lemon juice (about 2 lemons) - Zest of 1 lemon - 1/4 cup fresh parsley, chopped - 3 cloves garlic, minced - 1/4 teaspoon red pepper flakes (optional) - Salt and pepper - Olive oil for frying Lemon Chicken Romano shines with its simple yet flavorful ingredients. The star of this dish is the chicken, which is tender and juicy. I love using boneless, skinless chicken breasts for this recipe because they cook evenly and soak up all the flavors. Next, we add all-purpose flour for a nice coating. It helps the egg and breadcrumbs stick well. Speaking of breadcrumbs, I recommend panko for that extra crunch. It gives the chicken a delightful texture. Grated Romano cheese adds a rich, savory taste. It melts slightly during cooking, making every bite delightful. Now, let's talk about flavor enhancers. Fresh lemon juice is a must. It brightens the dish and adds a zesty kick. I also use lemon zest for an extra layer of lemon flavor. Garlic brings warmth and depth, while fresh parsley adds a pop of color and freshness. If you like a bit of heat, add red pepper flakes. They are optional, but they can make the dish exciting. Lastly, don't forget salt and pepper to enhance all the flavors. A little olive oil for frying ensures the chicken gets that golden, crispy crust. With these ingredients, you will create a delicious, flavorful dinner that everyone will love. {{ingredient_image_1}} Start by pounding the chicken breasts. This gets them to an even thickness. Use plastic wrap to cover them. A meat mallet works great for this task. Aim for about 1/2 inch thickness. Next, season your flour. Take a large plate and mix in a pinch of salt and pepper. This simple step adds flavor to your chicken. Now, let’s move to the dredging process. First, coat each chicken breast in the seasoned flour. Shake off any excess flour. Then, dip the chicken into the beaten eggs. Make sure to let any extra egg drip off. Finally, coat the chicken in the breadcrumb and cheese mixture. Press down firmly to make sure it sticks well. Heat olive oil in your skillet. You want about 1/4 inch of oil over medium heat. When the oil is hot, carefully add the breaded chicken. Cook in batches to avoid crowding. Fry each piece for about 4-5 minutes on each side. You want the chicken to be golden brown and fully cooked. Cut into the thickest part to check for doneness. It should not be pink inside. To get your chicken just right, focus on frying. Use a wide skillet and heat olive oil to the right temperature. Test the oil by dropping in a small piece of bread. If it sizzles, you're ready. Fry in batches to avoid sogginess. If too many pieces cook at once, they won't get crispy. For the perfect crunch, use panko breadcrumbs. They give a light and airy texture to the chicken. Warming the lemon-garlic sauce is key. Use low heat in a small saucepan. Stir occasionally to prevent burning. If the sauce is too sour, add a pinch of sugar. This will balance the flavors. You can also adjust the garlic to your taste. Add more for a stronger flavor or less for a milder touch. Garnishing adds a nice touch. Use fresh parsley to brighten the dish. Chop it finely and sprinkle it on top. For serving, place the chicken on a bright plate. Drizzle the warm sauce over the chicken. Arrange lemon wedges on the side for a pop of color. This makes your meal look as good as it tastes! Pro Tips Even Thickness: Ensure your chicken breasts are pounded to an even thickness to promote uniform cooking and avoid dryness. Panko for Crunch: Using panko breadcrumbs instead of regular breadcrumbs gives a delightful crunch to the chicken, enhancing the texture. Warm Sauce for Flavor: Heating the lemon-garlic sauce gently before serving helps to release the flavors and ensures it clings better to the chicken. Resting the Chicken: Letting the fried chicken rest for a few minutes on paper towels helps to retain its juiciness by allowing the moisture to redistribute. {{image_2}} You can change the cheese in this recipe. If you can't find Romano cheese, try Parmesan or Pecorino. Both add a nice salty flavor. For gluten-free options, use almond flour or gluten-free breadcrumbs. They work well and keep the dish tasty. To boost flavor, add fresh herbs like thyme or basil. These herbs pair well with lemon and chicken. You can also try spices like paprika or oregano. They add depth to the dish. For a twist, experiment with different citrus juices. Lime or orange juice can make it brighter. This dish pairs nicely with many sides. Try serving it with roasted vegetables or a fresh salad. Seasonal vegetables like zucchini or asparagus add color and taste. You can also serve it with pasta or rice for a hearty meal. These sides complement the lemony chicken well. To store your Lemon Chicken Romano, cool it down first. Place it in the fridge within two hours to keep it safe. Use airtight containers to keep the chicken fresh. Glass or plastic containers work well. Label them with the date before storing. When reheating, avoid the microwave if you can. It can make the chicken soggy. Instead, use the oven. Preheat it to 350°F (175°C). Place the chicken in a dish, cover it with foil, and heat for about 15-20 minutes. This helps keep the texture nice. Always check that the chicken reaches an internal temperature of 165°F (74°C) for safety. To freeze your Lemon Chicken Romano, wrap each piece tightly in plastic wrap. Place them in a freezer-safe bag or container. Try to remove as much air as possible. This keeps the chicken from getting freezer burn. When ready to use, thaw the chicken in the fridge overnight. This method helps maintain its flavor and texture. Lemon Chicken Romano is a bright and tasty dish. It features breaded chicken breasts, cooked to golden perfection. The dish gets its name from the Romano cheese, which adds a rich, salty flavor. This recipe draws influence from Italian cuisine, where lemon and cheese pair well with meats. The use of fresh lemon juice and zest gives it a zing that brightens the chicken. Over time, this dish has become a favorite in many homes and restaurants. Yes, you can prep Lemon Chicken Romano ahead of time. You can bread the chicken and store it in the fridge for up to a day. This makes cooking easier when you are ready to eat. You can also prepare the sauce in advance and keep it in the fridge. Just reheat it gently when you are ready to serve. If you can't find Romano cheese, you have several options. Pecorino Romano works well since it has a similar flavor. Parmesan cheese is another good choice, adding a nutty, salty taste. You can also use a mix of mozzarella and Parmesan for a milder flavor. Each option will still give your dish a tasty twist. Leftover Lemon Chicken Romano lasts about three to four days in the fridge. Store it in an airtight container for best results. If you want to keep it longer, you can freeze it. When frozen properly, it lasts up to three months. Always reheat leftovers until they reach a safe temperature before eating. This article covered the key steps in making Lemon Chicken Romano. We discussed the main ingredients, like chicken and Romano cheese, and how to prepare and cook the dish flawlessly. I shared tips for perfect breading and sauce prep, plus ideas for serving and storing leftovers. With these insights, you can make a delicious meal that impresses everyone. Enjoy your cooking journey!

Lemon Chicken Romano Flavorful Dinner Delight

Ready to impress your family with a mouth-watering dish? Lemon Chicken Romano is a delightful meal that combines juicy chicken

- 12 oz spaghetti - 1 lb ground beef - 1 onion, diced - 2 cloves garlic, minced - 28 oz crushed tomatoes - 1 tsp dried oregano - 1 cup ricotta cheese - 2 cups shredded mozzarella cheese - 1/2 cup grated Parmesan cheese - Salt and pepper to taste In this recipe, each ingredient plays a key role. The spaghetti forms the base of our dish, giving it structure. I prefer using 12 ounces of spaghetti for a nice balance. Ground beef adds heartiness and rich flavor. Diced onion and minced garlic bring depth and aroma. Crushed tomatoes create a delicious sauce. I use 28 ounces for a perfect consistency. Dried oregano enhances the flavor profile. It adds that classic Italian taste we love. Cheese is where the magic happens. Ricotta cheese gives creaminess. I add one cup to blend well with the sauce. Shredded mozzarella cheese adds gooeyness, and two cups ensure every bite is cheesy. Finally, grated Parmesan cheese adds a salty, nutty finish. Adjust salt and pepper to your taste for the best flavor. Each ingredient in Million Dollar Spaghetti works together to create a rich and flavorful delight. Enjoy cooking with these key components! {{ingredient_image_1}} To start, fill a large pot with water and set it on the stove. Add a pinch of salt to the water. Bring the water to a boil. Once boiling, add 12 oz of spaghetti. Cook the spaghetti according to the package instructions until it is al dente. This means it should be firm to the bite. Drain the spaghetti and set it aside for later. Next, grab a large skillet and drizzle some olive oil in it. Heat the skillet over medium heat. Add the diced onion and minced garlic to the skillet. Sauté them until they become translucent. This usually takes about 3-4 minutes. Then, add 1 lb of ground beef. Cook it until it is browned. Drain any excess fat from the skillet. Stir in 28 oz of crushed tomatoes, 1 tsp of dried oregano, 1 tsp of dried basil, 1 tsp of sugar, and salt and pepper to taste. Allow the sauce to simmer for about 15 minutes. This will help the flavors blend together nicely. Now it’s time to put everything together. Preheat your oven to 375°F (190°C). In a large mixing bowl, combine the cooked spaghetti with the meat sauce and 1 cup of ricotta cheese. Mix well until everything is well incorporated. Next, take a greased 9x13 inch baking dish. Layer half of the spaghetti mixture in the dish. Sprinkle half of the 2 cups of shredded mozzarella cheese on top. Add the rest of the spaghetti mixture on top of that. Finish by adding the remaining mozzarella and 1/2 cup of grated Parmesan cheese on top. Cover the dish with aluminum foil and bake it for 25 minutes. After that, remove the foil and bake for an additional 10-15 minutes. You want the cheese to be bubbly and golden. Once done, take the dish out of the oven. Let it cool for a few minutes before serving it up. - Using fresh herbs for enhanced flavor: Fresh herbs can make your dish pop. I love using fresh basil or parsley. Just chop them up and sprinkle them on top before serving. You will taste the difference! - Ensuring perfect al dente spaghetti: The key to great spaghetti is cooking it just right. Boil water with a pinch of salt. Cook the spaghetti until it’s firm but tender. This texture makes every bite enjoyable. - Recommended garnishes: For a lovely finish, add fresh basil leaves or a sprinkle of grated Parmesan. These simple touches make your meal look and taste amazing. - Pairing with sides or salads: Million Dollar Spaghetti pairs well with a crisp salad or garlic bread. A light side salad with greens and vinaigrette complements the rich flavors nicely. - Serving style in dishes: Serve the spaghetti in large, shallow bowls. This style allows everyone to see the layers of cheese and sauce. It makes the dish look inviting. - Photo inspiration for social media: Capture the moment! Take a photo of your plated spaghetti with a few fresh herbs on top. Natural light helps the colors pop, making it Instagram-ready. Pro Tips Perfect Pasta: Always cook spaghetti until al dente to retain its firmness and avoid mushiness when baking. Layering for Flavor: For a richer taste, consider adding a layer of sautéed vegetables like bell peppers or mushrooms in between the spaghetti layers. Cheese Variations: Mix different cheeses like fontina or gouda with mozzarella for a unique flavor profile. Rest Before Serving: Let the baked spaghetti rest for a few minutes before serving to help it set and make it easier to slice. {{image_2}} You can easily make Million Dollar Spaghetti meat-free. Start by using plant-based ground meat. This choice keeps the texture similar to the original dish. It also cuts back on fat. You can find many brands in stores today. Adding more veggies to the sauce makes it even better. Think about bell peppers, mushrooms, or zucchini. These veggies add color and flavor. They also provide extra nutrients. Just chop them up and sauté them with the onions and garlic. Cheese plays a big role in Million Dollar Spaghetti. You don’t have to stick with just mozzarella. Try different cheeses for fun flavors. Cheddar or provolone can bring a new twist. For a creamier mix, add cream cheese. This makes the dish rich and smooth. Simply mix in the cream cheese with the ricotta. It blends well and gives a special touch. Want some heat? Add spicy elements like red pepper flakes. They give a nice kick without being too hot. You can also use fresh chili peppers for more flavor. Herbs can change the taste a lot too. Add fresh parsley or thyme for bright notes. You can also try rosemary for a bold flavor. Mixing different herbs makes each bite exciting. After enjoying Million Dollar Spaghetti, store the leftovers in the fridge. Use an airtight container to keep it fresh. Make sure to cool the dish before sealing it. This helps prevent moisture buildup. The spaghetti can last up to four days in the refrigerator. When it’s time to reheat, use a microwave or oven. For the microwave, place the spaghetti in a bowl and cover it with a damp paper towel. This keeps the moisture in. Heat in short bursts, stirring in between. If using the oven, preheat to 350°F (175°C). Place the spaghetti in a baking dish and cover with foil. Heat for about 20 minutes or until warmed through. This keeps the flavors intact and makes it taste fresh. If you want to save some for later, freezing is a great option. First, let the spaghetti cool completely. Then, divide it into portions. This makes it easier to thaw later. Use freezer-safe containers or heavy-duty freezer bags. Make sure to remove as much air as possible before sealing. Million Dollar Spaghetti can be frozen for up to three months. When you’re ready to eat, thaw the spaghetti overnight in the fridge. For a quicker option, submerge the sealed bag in cold water. After thawing, reheat as mentioned above. This way, you enjoy a delicious meal without losing flavor. You can store Million Dollar Spaghetti in the fridge for about 3 to 5 days. Make sure to place it in an airtight container. This keeps it fresh and prevents odors from other foods. Yes, you can make Million Dollar Spaghetti ahead of time. Prepare it up to the baking step, then cover it and store it in the fridge. When ready to bake, just add 10 minutes to the cooking time. For a low-carb version, swap regular spaghetti with zucchini noodles or spaghetti squash. You can also use ground turkey or chicken instead of beef. This keeps the flavor but lowers the carbs. This blog post covered all the key steps to make Million Dollar Spaghetti. We discussed the main ingredients, like ground beef and cheese, and the cooking process. I shared useful tips for perfecting the dish. You can also try variations to suit your taste. In the end, this meal offers comfort and creativity. Whether you stick to the classic or explore alternatives, there’s something here for everyone. Enjoy cooking and sharing this delightful dish!

Million Dollar Spaghetti Rich and Flavorful Delight

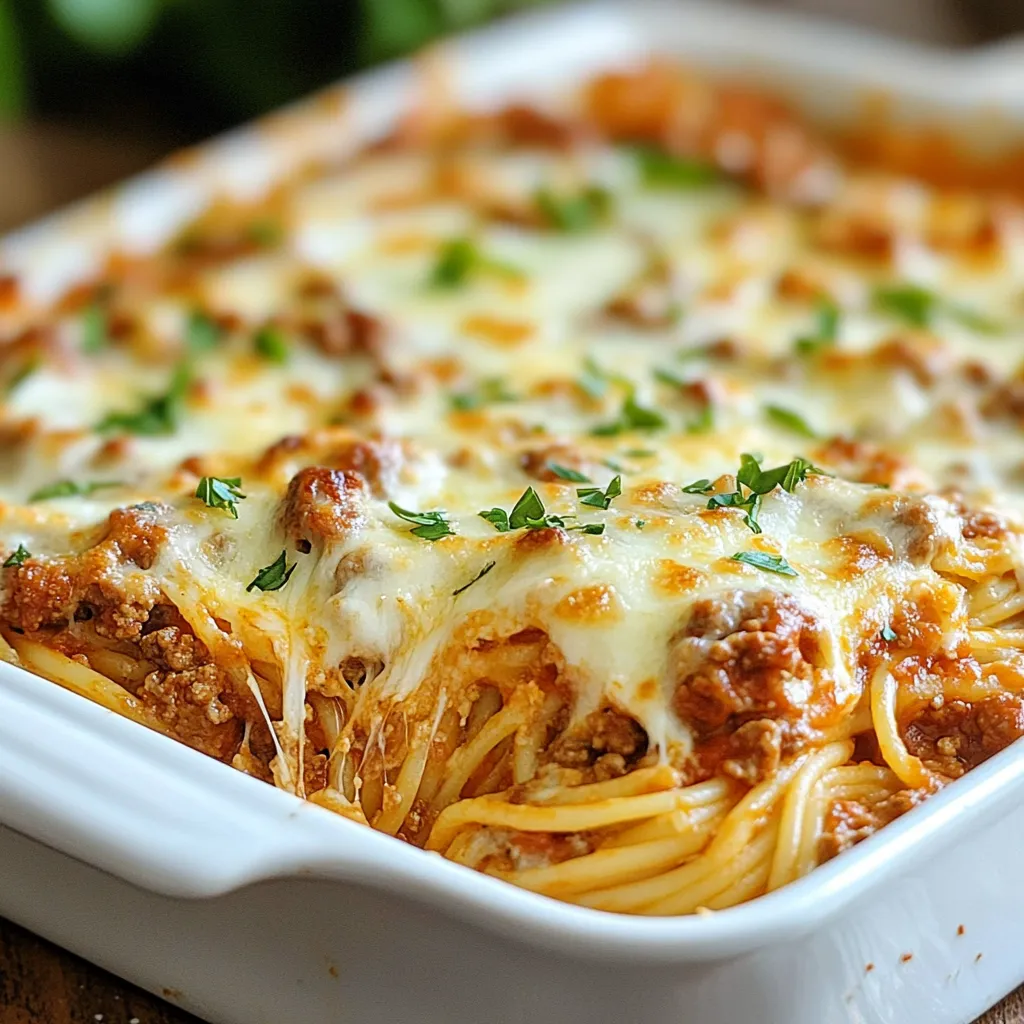
If you’re craving a dish that’s rich, cheesy, and downright delightful, Million Dollar Spaghetti is your answer. This easy recipe

- 4 medium zucchinis, thinly sliced - 1 lb ground turkey or chicken - 1/2 cup onion, diced - 2 cloves garlic, minced - 1 bell pepper, diced (any color) - 1 can (15 oz) crushed tomatoes - 1 tablespoon tomato paste - 1 tablespoon Italian seasoning - 1 teaspoon dried oregano - 1 cup shredded mozzarella cheese - 1/2 cup grated Parmesan cheese - Salt and pepper to taste - Fresh basil leaves for garnish (optional) To make a tasty Zucchini Pizza Casserole, you need fresh ingredients. Start with four medium zucchinis. Slice them thinly to create layers in the dish. Use one pound of ground turkey or chicken for protein. This adds flavor and helps fill you up. Next, add half a cup of diced onion and two cloves of minced garlic. They bring a nice aroma and taste to the dish. You can choose any color bell pepper, diced, to mix in. One can of crushed tomatoes will help bind the casserole together. Include a tablespoon of tomato paste for depth. Seasoning is important. Use one tablespoon of Italian seasoning and one teaspoon of dried oregano. These spices give the casserole a classic pizza flavor. For the cheesy goodness, add one cup of shredded mozzarella and half a cup of grated Parmesan cheese. Finally, don’t forget salt and pepper to taste. If you like a pop of color, consider fresh basil leaves for garnish. This dish is simple, yet full of flavor. You’ll enjoy every bite! {{ingredient_image_1}} 1. Start by heating a large skillet over medium heat. Add the ground turkey or chicken. Cook it until it's browned, about 5 to 7 minutes. Use a spoon to break it apart as it cooks. 2. Once the meat is brown, add the diced onion and minced garlic. Sauté these for about 3 to 4 minutes. You want the onion to look clear. 3. Next, stir in the diced bell pepper, crushed tomatoes, and tomato paste. Add the Italian seasoning and oregano. Season with salt and pepper. Let this mixture simmer for about 10 minutes. This will help it thicken. 1. While the sauce cooks, lay the sliced zucchini on a clean kitchen towel. Sprinkle a little salt over the zucchini. 2. Let the zucchini sit for 10 minutes. This helps to draw out extra moisture. 3. After 10 minutes, pat the zucchini slices dry with another towel. This step is key to avoid a soggy casserole. 1. Grab a greased 9x13 inch casserole dish. Start layering half of the zucchini slices on the bottom. 2. Pour half of the meat sauce over the zucchini. Then add half of the mozzarella and Parmesan cheese. 3. Repeat this step. Layer the remaining zucchini, meat sauce, and cheeses one more time. 1. Cover the casserole dish with aluminum foil. This helps keep the cheese from burning while it cooks. 2. Bake in the preheated oven at 375°F (190°C) for 30 minutes. 3. After 30 minutes, remove the foil. Bake for an additional 15 minutes. This will make the cheese bubbly and golden brown. 4. Once done, let it rest for about 5 to 10 minutes. If you like, garnish with fresh basil leaves before serving. Choosing the right zucchini Pick medium zucchinis that feel firm. Look for smooth skin with no blemishes. Fresh zucchinis hold their shape well. They will not turn mushy in the casserole. Avoiding excess moisture Zucchini has a lot of water. To keep your dish from being soggy, sprinkle salt on the slices. Let them sit for ten minutes. This draws out moisture. Afterward, pat them dry with a towel. This simple step makes a big difference in texture. Additional spices or ingredients Feel free to add your favorite spices. A pinch of red pepper flakes adds heat. You can also try paprika for a smoky flavor. Fresh herbs like thyme or rosemary work well too. Suggested cheese substitutions If you want a twist, use different cheeses. Try sharp cheddar for a bold taste. Gouda can add a nice creaminess. Mixing cheeses can make your casserole even tastier. Garnishing options Fresh basil leaves make a lovely garnish. They add a pop of color and freshness. You can also sprinkle extra cheese on top before serving. A drizzle of balsamic glaze can add a gourmet touch. Serving suggestions Serve your casserole hot from the oven. It pairs well with a simple green salad. You can also offer crusty bread on the side. This makes for a complete and satisfying meal. Pro Tips Slicing Zucchini Evenly: For uniform cooking and a better presentation, use a mandoline slicer to get evenly cut zucchini slices. Enhancing Flavor: Add a pinch of red pepper flakes to the meat sauce for a subtle heat that complements the dish beautifully. Moisture Control: Don’t skip the salting step for the zucchini; this helps draw out excess moisture, preventing a watery casserole. Cheese Variations: Feel free to mix different types of cheese, like cheddar or provolone, for a unique flavor profile in your casserole. {{image_2}} If you want a meatless dish, you can swap out the ground turkey or chicken for lentils or chickpeas. These options add protein and fiber. You can also use crumbled tofu or tempeh for a hearty texture. Add more veggies to boost flavor and nutrition. Consider mushrooms, spinach, or zucchini flowers as tasty additions. They mix well with the rich tomato sauce. To make this casserole gluten-free, use gluten-free pasta or skip the pasta altogether. You can also ensure all sauces and canned goods are labeled gluten-free. Look for brands that offer gluten-free crushed tomatoes and seasonings. This way, everyone can enjoy the meal without worry. For a low-carb version, replace the zucchini with cauliflower rice or shredded cabbage. This keeps the dish light and keto-friendly. You can also skip the cheese layer if you want fewer carbs. Using lower-carb marinara sauce is another great way to reduce carbs while keeping the flavor. Adjust your toppings based on your diet while enjoying this tasty dish. To keep your Zucchini Pizza Casserole fresh, store it properly. First, let it cool to room temperature. Then, place it in an airtight container. You can keep it in the fridge for up to four days. If you want to save it longer, freezing is a great option. Use a freezer-safe container or wrap it tightly in plastic wrap and foil. It can last up to three months in the freezer. When it's time to enjoy leftovers, reheating is key. The best method is to use the oven. Preheat it to 350°F (175°C). Place the casserole in an oven-safe dish and cover it with foil. This keeps it moist. Heat for about 20-25 minutes or until it's warm throughout. You can also use the microwave for quick reheating. Just place a single serving on a microwave-safe plate. Heat for 1-2 minutes, but check to avoid drying it out. Enjoy the comforting taste of this dish again! Zucchini Pizza Casserole lasts about 3 to 4 days in the fridge. Store it in an airtight container. This keeps it fresh and tasty. You can reheat it easily for a quick meal later. Yes, you can make this casserole ahead of time. Prepare it completely, then cover it and store it in the fridge. Bake it when you are ready to serve. This makes meal prep simple and saves time. If you want a different meat, try ground beef or pork. You can also use plant-based meat for a veggie version. This keeps the casserole hearty and delicious. Absolutely! Adding more cheese makes it even tastier. Try different types like cheddar or gouda. Just remember, more cheese can make it richer, so adjust to your liking. This blog post shared a simple way to make Zucchini Pizza Casserole. You learned about the key ingredients, step-by-step instructions, and tips for great flavor and texture. The post also covered variations for different diets and how to store leftovers. You can enjoy this dish in many ways, making it your own. Try different cheeses or spices to elevate your meal. With its easy preparation and tasty outcome, this casserole will become a favorite in your home.

Zucchini Pizza Casserole Tasty and Comforting Meal

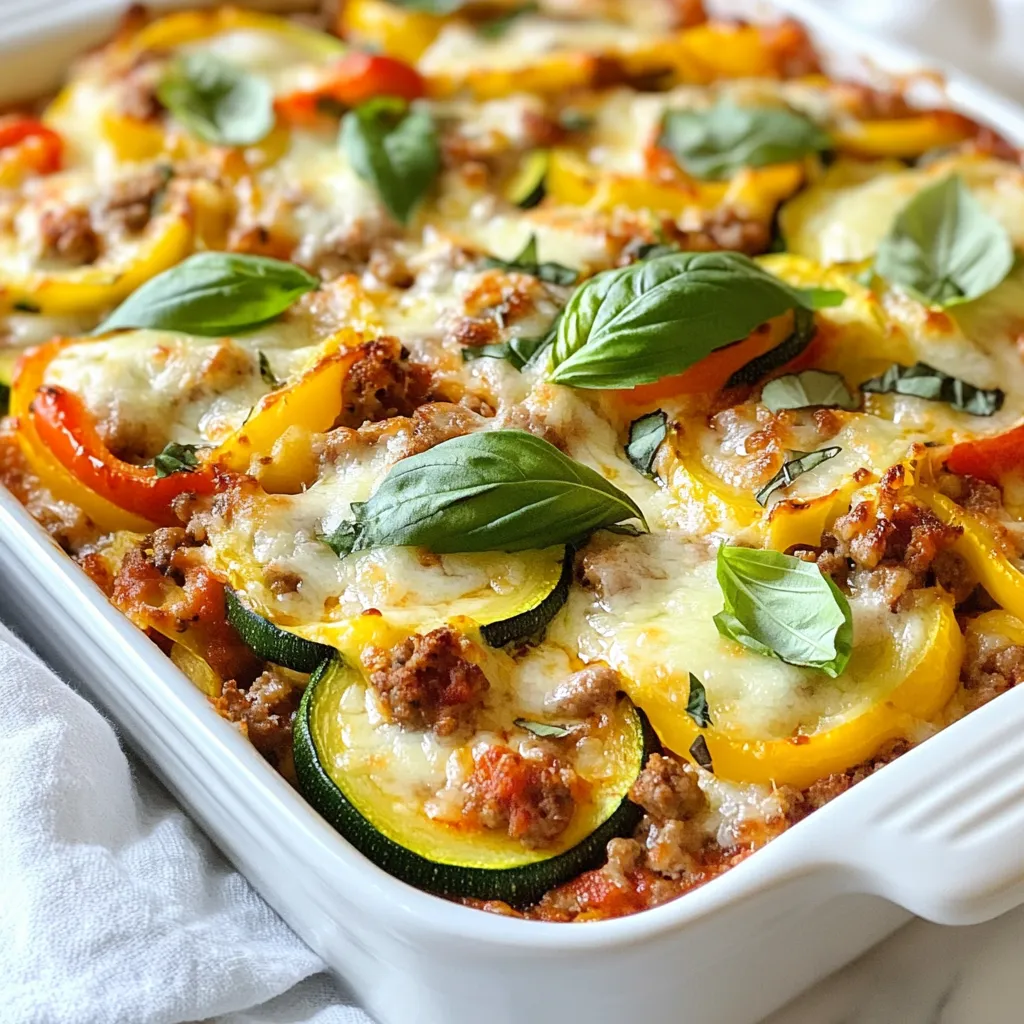
Looking for a tasty and comforting meal? My Zucchini Pizza Casserole offers the perfect blend of fresh flavors and satisfying

For these tasty enchiladas, you need: - 2 cups cooked chicken, shredded - 1 cup cream cheese, softened - 1 cup shredded Monterey Jack cheese - 1 cup Greek yogurt - 1 packet taco seasoning (low-sodium) - 6 large zucchini (for tortillas) - 1 tablespoon olive oil - 1 small onion, finely chopped - 2 cloves garlic, minced - 1 cup chicken broth - Salt and pepper to taste These ingredients work together to create a filling and creamy dish. The zucchini acts as your low-carb tortillas, giving a great texture. Cream cheese and Greek yogurt add a rich creaminess that makes these enchiladas stand out. You can enhance your enchiladas with: - Fresh cilantro, for garnish - Sliced jalapeños, optional for serving Fresh cilantro adds a nice pop of flavor, while jalapeños give a spicy kick. These toppings make your meal even more exciting! Each serving offers a balanced meal that is low in carbs. Here’s a rough estimate: - Calories: 350 - Protein: 30g - Fat: 20g - Carbohydrates: 10g - Fiber: 3g This meal is great for those watching their carbs but still wanting something hearty. Enjoying these enchiladas keeps you satisfied without the extra carbs! {{ingredient_image_1}} To make the zucchini tortillas, start by washing six large zucchinis. Use a vegetable peeler to slice them into thin strips, about 1/4 inch thick. Each strip should be long enough to roll around the filling. Set these zucchini strips aside. They will serve as the perfect low-carb wrap for your enchiladas. In a large skillet, heat one tablespoon of olive oil over medium heat. Add one small chopped onion and two minced garlic cloves. Sauté these for about 3 to 4 minutes until the onions are soft and clear. In a mixing bowl, combine two cups of shredded cooked chicken, one cup of softened cream cheese, half of the Monterey Jack cheese, one cup of Greek yogurt, and one packet of low-sodium taco seasoning. Mix well until it’s smooth. Add salt and pepper to taste. This rich filling will pack a tasty punch in each bite. Now, take a zucchini strip and place a generous spoonful of the chicken mixture at one end. Carefully roll it up tightly. Repeat this step with all the zucchini strips until you use all the filling. Place the rolled enchiladas seam-side down in a greased baking dish. In a small saucepan, warm one cup of chicken broth. Stir in the remaining Monterey Jack cheese until it melts into a creamy sauce. Pour this cheese sauce over the enchiladas. Cover the dish with foil and bake at 350°F (175°C) for 25 minutes. After that, remove the foil and bake for another 10 minutes until it’s bubbly and golden. Let it cool for a few minutes before serving. Enjoy the delicious flavors! To get the best taste from your Low Carb White Chicken Enchiladas, use fresh ingredients. Fresh garlic and onions add great depth. I also recommend using high-quality chicken. The taco seasoning gives a nice kick, so choose one you love. You can add extra spices like cumin or chili powder for more flavor. Cooking chicken can be quick and easy. I suggest using rotisserie chicken for speed. It’s already cooked and full of flavor. If you prefer to cook it, poach the chicken in chicken broth. This keeps the chicken moist and adds extra taste. Cook it until it’s fully done, then shred it for the enchiladas. Avoid overcooking the zucchini strips. If they are too soft, they won’t hold the filling well. Also, be careful not to skip the cheese sauce. It adds creaminess and binds the enchiladas together. Lastly, don’t forget to let the dish cool a bit before serving. This helps the flavors meld and makes it easier to eat. Pro Tips Use Fresh Zucchini: Ensure your zucchini is fresh and firm for the best texture. Older, softer zucchini can become mushy during baking. Customize the Filling: Feel free to add other ingredients such as black beans, corn, or diced peppers to the chicken mixture for extra flavor and nutrition. Control the Spice Level: Adjust the amount of taco seasoning according to your taste. For a milder dish, use less seasoning or opt for a mild variety. Let it Rest: After baking, let the enchiladas sit for a few minutes before serving. This helps the filling set and makes them easier to serve. {{image_2}} If you're on a keto diet, you can swap Greek yogurt with sour cream. This keeps the creamy texture while lowering carbs. In addition, you can use cauliflower tortillas instead of zucchini if you want a different taste. For a dairy-free option, use coconut cream and a dairy-free cheese blend. This keeps the dish friendly for those with lactose intolerance. The cheese sauce is delicious, but you can explore other flavors too. Try a green salsa or a red enchilada sauce if you want a punchy twist. You can even mix in some chipotle sauce for a smoky flavor. Just pour it over the enchiladas before baking to add depth. When serving, fresh toppings make a big difference. Consider adding chopped tomatoes or diced avocado for a fresh touch. Lime wedges add a zesty kick that brightens the dish. If you like spice, sliced jalapeños on top offer heat and crunch. Pair with a simple salad for a balanced meal. To store your leftovers, let the enchiladas cool completely. Then, place them in an airtight container. Keep them in the fridge for up to three days. Make sure to label your container with the date. This helps you use them before they go bad. When you’re ready to enjoy your leftovers, preheat your oven to 350°F (175°C). Place the enchiladas in a baking dish. Cover the dish with foil to keep them moist. Heat for about 15 to 20 minutes. You can also microwave them. Just cover them with a damp paper towel to keep them from drying out. Heat for one to two minutes, checking every 30 seconds. If you want to make these enchiladas ahead of time, freezing is a great option. Prepare the enchiladas as usual but do not bake them. Wrap each one tightly in plastic wrap. Place them in a freezer-safe bag or container. You can freeze them for up to three months. To cook, thaw in the fridge overnight, then bake as directed. Enjoy fresh flavors anytime! Yes, you can. I suggest using eggplant or bell peppers. Both work well. Slice them thinly, just like zucchini. You may need to adjust cooking times. Eggplant may need a bit more time to soften. Bell peppers add a nice crunch and color. Absolutely! These enchiladas are great for meal prep. You can make them ahead and store them. Just keep them in an airtight container. They last about three to four days in the fridge. You can also freeze them for longer storage. Just thaw and reheat when ready to eat. To lower sodium, choose low-sodium broth and seasoning. Use fresh herbs instead of seasoning packets. You can also omit added salt. This keeps the flavors fresh without extra sodium. Always taste as you go to balance flavors. Adjust to your liking while keeping it healthy. Low carb white chicken enchiladas offer a tasty twist on a classic dish. We explored key ingredients, step-by-step preparation, and helpful tips. You can easily adapt this recipe for different diets or load it with your favorite toppings. Remember to store leftovers properly and choose sauces that fit your taste. Embrace these enchiladas as a healthy choice. They fit well into meal prep, too. Enjoy making them your own and sharing with friends!

Low Carb White Chicken Enchiladas Easy Meal Idea

Craving a delicious meal that’s low in carbs? You’re in the right place! I’m excited to share my easy recipe

To make the Taco Bell Copycat Chicken Quesadilla, you need: - 2 cups cooked chicken, shredded - 1 ½ cups shredded cheddar cheese - ½ cup cream cheese, softened - ½ teaspoon garlic powder - ½ teaspoon onion powder - 1 teaspoon taco seasoning - 4 large flour tortillas - 2 tablespoons olive oil (for frying) - Salsa (for serving) - Fresh cilantro, chopped (for garnish) For the best taste, I suggest using: - Chicken: Rotisserie chicken adds great flavor. - Cheddar Cheese: Tillamook or Kraft make excellent choices. - Cream Cheese: Philadelphia is a well-known brand you can trust. - Taco Seasoning: Old El Paso or McCormick provide nice spice blends. These brands help give your quesadilla that authentic taste. If you have dietary needs, here are some swaps: - Chicken: Use shredded tofu for a vegetarian option. - Cheese: Try dairy-free cheese if you're lactose intolerant. - Tortillas: Corn tortillas can replace flour for a gluten-free option. - Cream Cheese: Use cashew cream for a vegan twist. These changes let everyone enjoy your delicious quesadilla! {{ingredient_image_1}} To start, grab a medium bowl. You need to mix the shredded chicken, cream cheese, garlic powder, onion powder, and taco seasoning. Stir well until everything is combined. This mix gives your quesadilla that creamy and tasty filling. Make sure the cream cheese is soft. It helps the mix blend smoothly. Next, take one large flour tortilla. Spread a quarter of your chicken mix over half of the tortilla. Top this with about ⅓ cup of shredded cheddar cheese. Fold the tortilla in half to cover the filling. Press down gently to seal it. This step keeps the filling inside while cooking. Heat 1 tablespoon of olive oil in a large skillet over medium heat. Place your quesadilla in the skillet. Cook it for about 2-3 minutes until it turns golden brown. Carefully flip the quesadilla. If the skillet looks dry, add another tablespoon of olive oil. Cook the other side for another 2-3 minutes, ensuring the cheese melts and the tortilla crisps up. Remove the quesadilla from the skillet and cut it into wedges. Repeat the process with the rest of your tortillas and filling. Enjoy these crispy delights warm with salsa and fresh cilantro on top. To get the best flavor, use fresh ingredients. Fresh herbs, like cilantro, enhance your dish. Choose quality chicken for the filling. You can roast or grill it for extra taste. Use full-fat cream cheese for a rich texture. Taco seasoning adds a nice kick, so don’t skip it. If you want more flavor, add a squeeze of lime. Having the right tools makes cooking easier. A large skillet works best for frying the quesadillas. You need a spatula to flip them safely. Use a medium bowl for mixing your filling. A sharp knife helps cut quesadillas into wedges. Consider using a cutting board to protect your counters. If you have a food processor, it can shred chicken quickly. One mistake is overstuffing the quesadilla. This makes it hard to flip. Another error is not preheating the skillet. A hot pan creates a crispy texture. Don’t rush the cooking time; each side needs 2-3 minutes. Lastly, avoid using low-fat cream cheese. It won’t melt as well, affecting the taste. Pro Tips Use Rotisserie Chicken: For a quicker option, use store-bought rotisserie chicken. It saves time and adds great flavor! Customize Your Cheese: Feel free to mix different types of cheese like Monterey Jack or Pepper Jack for added flavor and spice. Don't Overfill: Be careful not to overfill your quesadillas. This can make them difficult to flip and cause the filling to spill out. Keep It Warm: If making multiple quesadillas, keep them warm in a low oven (200°F) while you cook the rest to ensure they stay crispy. {{image_2}} To make a vegetarian version of the quesadilla, swap the chicken for black beans or grilled veggies. You can use 2 cups of cooked black beans or a mix of bell peppers, zucchini, and onions. This adds great flavor and texture. Also, keep the cream cheese and cheddar cheese for richness. You will still enjoy the same cheesy goodness without meat. If you love heat, add jalapeños or hot sauce. You can mix in 1-2 tablespoons of chopped jalapeños into the chicken mixture. For extra spice, drizzle hot sauce on the finished quesadilla. This will give your meal a nice kick. Just be careful; you can always add more heat, but you can't take it away! Cheese is key to a great quesadilla. While cheddar is classic, feel free to mix it up. Try using pepper jack cheese for a spicy flavor. Or, use mozzarella for a milder taste and gooey texture. You can even blend different cheeses for a unique twist. Just aim for about 1 ½ cups of cheese to keep it cheesy and delicious. Store leftover quesadillas in an airtight container. This keeps them fresh. You can place wax paper between layers to prevent sticking. They can last in the fridge for up to three days. If you want them longer, consider freezing. To reheat, use a skillet for the best results. Heat it over medium heat. Add a little oil to the pan for crispiness. Place the quesadilla in the skillet for about two to three minutes per side. You can also use a microwave, but it may make them soggy. To freeze, wrap each quesadilla tightly in plastic wrap. Then, place them in a freezer bag. Squeeze out as much air as you can. They can last up to three months in the freezer. When ready, thaw in the fridge overnight before reheating. To make this quesadilla from scratch, start with cooked chicken. Shred about 2 cups of it. In a bowl, mix the shredded chicken with ½ cup of softened cream cheese, ½ teaspoon of garlic powder, ½ teaspoon of onion powder, and 1 teaspoon of taco seasoning. Mix until everything blends well. Take a large flour tortilla and spread a quarter of the chicken mix over one half. Add ⅓ cup of shredded cheddar cheese on top. Fold the tortilla in half. Heat 1 tablespoon of olive oil in a skillet over medium heat. Cook the quesadilla for 2-3 minutes until golden. Flip it and cook for another 2-3 minutes. Cut into wedges and enjoy with salsa. Yes, you can make a gluten-free version. Simply swap regular flour tortillas for gluten-free tortillas. Many brands offer tasty options that work well. Check for cross-contamination if you have a severe allergy. The filling remains the same, so you can enjoy the same great taste. Each serving of this quesadilla has about 400-500 calories. It packs around 20-25 grams of protein. The fat content can be around 25 grams, depending on the cheese and oil used. There are also carbs from the flour tortillas, which can be about 40 grams per quesadilla. Check specific brands for exact values, as they can vary. You can get creative with your filling! Try adding black beans, corn, or even diced peppers for extra flavor. Want it spicy? Add jalapeños or a splash of hot sauce. For a cheesy twist, mix in Monterey Jack or pepper jack cheese. Each option can give your quesadilla a unique taste that you'll love. In this article, we explored how to make a Taco Bell Copycat Chicken Quesadilla. We detailed the key ingredients and shared brand recommendations. You learned step-by-step instructions for preparing and cooking. We discussed helpful tips to enhance flavor and avoid common mistakes. Variations for vegetarians and spice fans were highlighted, too. Don't forget about storage tips for leftovers. Enjoy crafting your own delicious quesadillas, whether for a meal or snack. With these insights, you’re ready to impress everyone with your tasty creations!

Taco Bell Copycat Chicken Quesadilla Simple Recipe

If you crave Taco Bell’s Chicken Quesadilla but want to save money, I’ve got the perfect recipe for you! In

- 4 medium-sized russet potatoes - 6 tablespoons unsalted butter, melted - 4 cloves garlic, minced - 2 tablespoons fresh rosemary, finely chopped (or 1 tablespoon dried) - 1 teaspoon salt - ½ teaspoon black pepper - 1 tablespoon fresh parsley, chopped (for garnish) - 1 tablespoon grated Parmesan cheese (optional) When I make Garlic Butter Hasselback Potatoes, I love using russet potatoes. Their starchy texture gives a great base. You need four medium-sized ones. Next, the heart of the flavor comes from the butter and garlic. I use six tablespoons of unsalted butter, melted. It blends well with four cloves of minced garlic. This mix creates a rich, savory taste. Fresh herbs lift the dish. I add two tablespoons of finely chopped rosemary. If fresh isn’t available, one tablespoon of dried works too. For seasoning, I use one teaspoon of salt and a half teaspoon of black pepper. Garnishing makes a difference. I sprinkle one tablespoon of fresh parsley on top before serving. If you want a cheesy touch, add one tablespoon of grated Parmesan cheese during baking. These ingredients make a flavorful side dish that impresses everyone at the table. {{ingredient_image_1}} 1. Preheat your oven to 425°F (220°C). This step makes sure your potatoes cook evenly. 2. Wash and scrub the potatoes to remove dirt. I like to use a vegetable brush. Make sure to pat them dry with a towel. 3. Cutting technique using chopsticks: Place each potato on a cutting board. Use a sharp knife to make slices. Space them about 1/4 inch apart. Stop before cutting all the way through. To help, place wooden chopsticks on each side of the potato. This way, you won't cut through. 1. In a small bowl, combine melted butter, minced garlic, chopped rosemary, salt, and black pepper. Mix well. This blend brings a nice taste to the potatoes. 2. Basting method with pastry brush: Use a pastry brush or spoon to cover the potatoes. Make sure to get the garlic butter in between the cuts for extra flavor. 1. Arranging on a baking sheet: Place the prepared potatoes on a baking sheet lined with parchment paper. Drizzle any extra garlic butter over them. 2. Baking time and temperature guidance: Bake your potatoes for 45-55 minutes. They should be tender and crispy on the edges. 3. Basting instructions halfway through cooking: Halfway through, baste the potatoes with more garlic butter. This step helps boost the taste and keeps them moist. To get crispy edges on your garlic butter Hasselback potatoes, follow these steps: - Cut the potatoes into thin slices, about 1/4 inch apart. Don’t cut all the way through. - Brush the garlic butter mixture between the cuts. This helps crisp up the edges. - Bake at 425°F (220°C) for 45-55 minutes. Basting halfway through adds more flavor. For even cooking, use potatoes of similar size. This helps them bake at the same rate. To boost the flavor, consider adding more herbs and spices. Here are a few ideas: - Thyme pairs well with garlic and butter. - A pinch of smoked paprika gives a nice depth. - Fresh chives add a mild onion flavor. You can use different cheeses for a twist. Parmesan melts nicely and adds a rich taste. Try crumbled feta or sharp cheddar for more variety. Garnish your potatoes for a beautiful finish. Here are some suggestions: - Sprinkle fresh parsley on top before serving. It adds color and freshness. - Add a drizzle of balsamic glaze for a gourmet touch. Serve these potatoes with grilled meats or a fresh salad. They pair well with any dish and make an impressive side. Pro Tips Choose the Right Potatoes: Opt for medium-sized russet potatoes for the best texture and flavor. They hold up well during baking and create a fluffy interior. Make Even Cuts: To ensure even cooking and flavor absorption, make sure your cuts are consistent and spaced about 1/4 inch apart. Baste Often: For maximum flavor, baste the potatoes with garlic butter halfway through baking. This enhances the taste and helps achieve a crispy exterior. Experiment with Herbs: Feel free to customize the herbs used. Thyme or oregano can be great alternatives to rosemary, adding different flavor profiles. {{image_2}} You can use many types of potatoes for this dish. Russet potatoes give a fluffy inside and crispy skin. Yukon Gold potatoes add a buttery flavor. Red potatoes stay firm, giving you a nice texture. For a sweeter twist, try sweet potatoes. They pair well with garlic and butter. Just follow the same steps, and enjoy a new flavor! If you want a vegan option, you can use plant-based butter. Coconut oil works well too. It adds a subtle sweetness. You can skip the cheese or use a dairy-free cheese. Nutritional yeast also gives a cheesy taste without dairy. This keeps your dish tasty and vegan-friendly. Want to add some heat? Sprinkle chili flakes over the potatoes before baking. They will give a nice kick! You can also add lemon zest to brighten the flavors. The zest adds a fresh taste that balances the richness of the butter. Mix and match these flavors to create your own twist on this dish! To store leftover Garlic Butter Hasselback Potatoes, place them in an airtight container. Make sure they cool down first. This helps to keep them fresh. Store them in the fridge for up to 3 days. If you plan to eat them later, try to keep them as whole as possible. This will help maintain their texture and flavor. When you are ready to eat your leftovers, the best way to reheat them is in the oven. Preheat your oven to 350°F (175°C). Place the potatoes on a baking sheet. Cover them with foil to keep moisture in. Heat for about 15-20 minutes, or until warm. To avoid sogginess, do not use the microwave. Microwaving can make the potatoes mushy. If you want a crispy top, uncover the potatoes for the last few minutes of heating. This will help restore that delicious crunch. Yes, you can prepare Hasselback potatoes ahead of time. To do this, slice the potatoes and store them in cold water. This keeps them fresh and prevents browning. When you're ready to cook, simply drain and dry the potatoes, then baste with garlic butter. This method saves time and lets you enjoy your meal stress-free. For this recipe, I recommend using medium-sized russet potatoes. They have a great texture and hold their shape well. You can also try Yukon Gold potatoes for a creamier taste. Both types have a nice balance of starch and moisture, making them perfect for Hasselback potatoes. To make this dish ahead of time, follow the slicing and basting steps. Bake the potatoes, then let them cool completely. Store them in the fridge for up to two days. When it’s party time, reheat them in the oven at 350°F (175°C) for about 20 minutes. This keeps them crispy and warm for your guests. You now have a full guide to making delicious Hasselback potatoes. From gathering fresh ingredients to perfecting your baking technique, each step counts. I shared tips for texture, flavor, and storage to help you enjoy these potatoes anytime. Experiment with variations to make this dish your own. Whether you try other potatoes or add spices, the possibilities are endless. Enjoy your cooking journey, and don't forget to impress your family and friends!

Garlic Butter Hasselback Potatoes Flavorful Side Dish

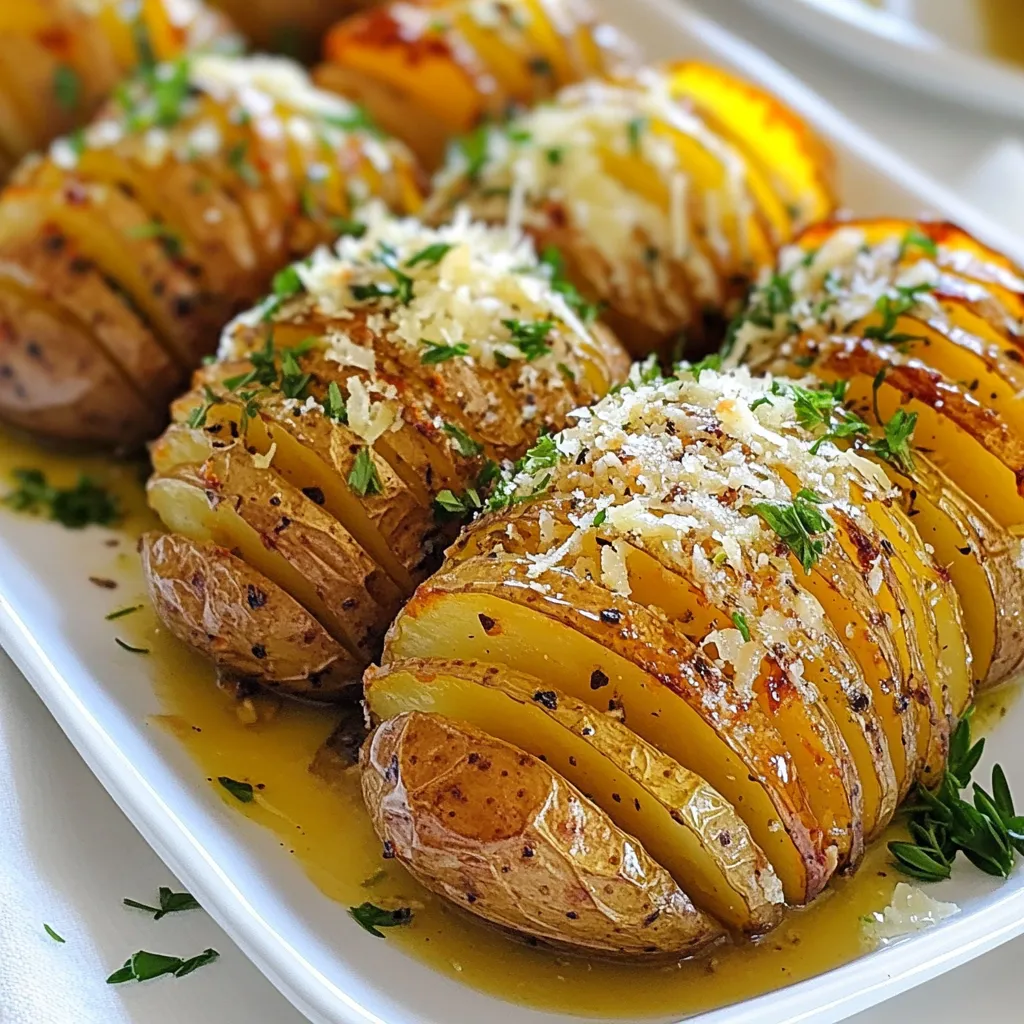
Are you ready to take your potato game to the next level? Garlic Butter Hasselback Potatoes are a delightfully crispy

- 1 lb ground beef - 1 cup breadcrumbs - 2 large eggs - 1/2 cup cream cheese, softened - 1 cup shredded cheddar cheese - 1/2 cup jalapeños, chopped (fresh or pickled) - 1 small onion, finely chopped - 2 cloves garlic, minced - 1 tablespoon Worcestershire sauce - 1 teaspoon salt - 1/2 teaspoon black pepper - 1/2 teaspoon smoked paprika - 1/2 cup ketchup (for topping) Gather these ingredients to create a spicy and cheesy meatloaf. The ground beef forms the base. Breadcrumbs give it texture, while eggs hold it all together. Cream cheese adds creaminess, making every bite rich. To enhance flavor, mix in shredded cheddar cheese and chopped jalapeños. Use fresh or pickled jalapeños based on your taste. Finely chopped onion and minced garlic add depth. They bring out savory flavors and aromas as they cook. For seasonings, Worcestershire sauce, salt, black pepper, and smoked paprika bring the dish together. Worcestershire sauce adds umami, while smoked paprika gives a hint of smokiness. Ketchup tops off the meatloaf, creating a sweet and tangy glaze. This combination of ingredients creates a flavorful dinner delight. Enjoy the burst of flavors with every slice! {{ingredient_image_1}} - Preheat the oven to 350°F (175°C). - Grease a loaf pan with butter or cooking spray. - In a large bowl, combine 1 lb ground beef, 1 cup breadcrumbs, 2 large eggs, and 1/2 cup cream cheese. - Add half of the 1 cup shredded cheddar cheese and the chopped jalapeños, onion, garlic, Worcestershire sauce, salt, pepper, and smoked paprika. - Mix until just combined. This step is key to a good texture, so avoid overmixing. - Transfer the meatloaf mixture to the greased loaf pan. - Shape it into a loaf with your hands. - Spread 1/2 cup ketchup evenly over the top. - Sprinkle the remaining cheddar cheese over the ketchup layer for a cheesy crust. - Bake in the preheated oven for 55 to 65 minutes. Use a meat thermometer to check for a safe internal temperature of 160°F (70°C). - Let the meatloaf rest for 10 minutes before slicing. This helps keep it moist and flavorful. Mixing the meatloaf just until combined is key. Overmixing makes the meatloaf dense and tough. Use your hands or a spatula to mix gently. You want a good blend of flavors without breaking down the meat too much. Letting the meatloaf rest before slicing is vital. This step keeps the juices inside, making each bite tender. After baking, allow it to sit for about 10 minutes. This wait is worth it. You will enjoy a moist and flavorful meatloaf. Serve the meatloaf slices on a nice platter. Drizzle with extra ketchup or a spicy sauce for a fun touch. Add fresh parsley or sliced jalapeños for color. This simple garnish makes the dish look inviting and appetizing. Pro Tips Use Lean Meat: Choose lean ground beef to reduce excess grease in your meatloaf, ensuring a healthier dish. Add Extra Flavor: For added depth, consider mixing in some diced bell peppers or spices like cayenne pepper to your meat mixture. Rest Before Slicing: Allow the meatloaf to rest after baking. This helps retain moisture and makes slicing easier. Customize Your Toppings: Experiment with different toppings, like barbecue sauce or a cheese blend, for unique flavor variations. {{image_2}} You can switch up the meat in this dish. Turkey or chicken work great. They keep the loaf light and tasty. If you want a meat-free meal, use plant-based ground meat. It gives a nice texture. Adjust the cook time slightly, as these meats can cook faster. Want more heat? Add more jalapeños or a dash of hot sauce. Fresh jalapeños give a fresh kick. Pickled jalapeños add tang and flavor. Use your taste buds to find the right level. Start with a little, then add more if needed. Cheese makes this dish creamy and rich. You can try different cheeses for fun. Pepper jack adds spice, while mozzarella gives a mild taste. Gouda or feta can also work well. Each cheese changes the flavor profile. Experiment to find your favorite mix! To keep your jalapeño popper meatloaf fresh, refrigerate leftovers. Allow the meatloaf to cool first. Wrap it tightly in plastic wrap or aluminum foil. Place it in an airtight container. It will stay good in the fridge for about 3 to 4 days. When ready to eat, you can slice and enjoy it cold or warm. If you want to save your meatloaf for a longer time, try freezing it. First, let the meatloaf cool completely. Wrap it tightly in plastic wrap. Then, place it in a heavy-duty freezer bag. Squeeze out as much air as you can. You can freeze it for up to 3 months. When you’re ready to eat, just thaw it in the fridge overnight. To reheat your meatloaf, you have a few options for the best taste. The oven is great for even heating. Preheat your oven to 350°F (175°C). Place the meatloaf in a baking dish and cover it with foil. Heat for about 25-30 minutes until warm. You can also use a microwave. Slice the meatloaf and place it on a microwave-safe plate. Heat for 1 to 2 minutes, checking often. Enjoy your delicious meatloaf just like the first time! Jalapeño Popper Meatloaf is a tasty twist on classic meatloaf. This dish combines ground beef with creamy cheese and spicy jalapeños. The main ingredients include: - 1 lb ground beef - 1 cup breadcrumbs - 2 large eggs - 1/2 cup cream cheese, softened - 1 cup shredded cheddar cheese - 1/2 cup chopped jalapeños (fresh or pickled) - 1 small onion, finely chopped - 2 cloves garlic, minced - 1 tablespoon Worcestershire sauce - 1 teaspoon salt - 1/2 teaspoon black pepper - 1/2 teaspoon smoked paprika - 1/2 cup ketchup (for topping) The blend of flavors makes each bite exciting. The jalapeños add heat, while the cheeses give it a creamy texture. This dish is sure to impress your family and friends. Yes, you can make Jalapeño Popper Meatloaf ahead of time. This dish is great for meal prep. You can mix the ingredients and shape the meatloaf. Then, cover it and store it in the fridge for up to 24 hours. When you’re ready to cook, just pop it in the oven. You can also freeze it. Wrap the uncooked meatloaf tightly in plastic wrap or foil. It can last in the freezer for about three months. Just thaw it in the fridge overnight before baking. Jalapeño Popper Meatloaf pairs well with many sides. Here are some great options: - Mashed potatoes - Roasted vegetables - Green salad - Corn on the cob - Baked beans These sides complement the meatloaf's flavors and textures. They make your meal more balanced and satisfying. Enjoy mixing and matching your favorites! This article covered how to make a flavorful Jalapeño Popper Meatloaf. First, we looked at the main ingredients like beef, cheese, and jalapeños. Then, I shared step-by-step instructions for mixing, shaping, and baking. You learned tips to keep the meatloaf moist and ideas for storage. Finally, we explored variations to suit your taste. Now you can enjoy a tasty dish that's sure to impress. Try it out, and enjoy each bite!

Jalapeño Popper Meatloaf Flavorful Dinner Delight

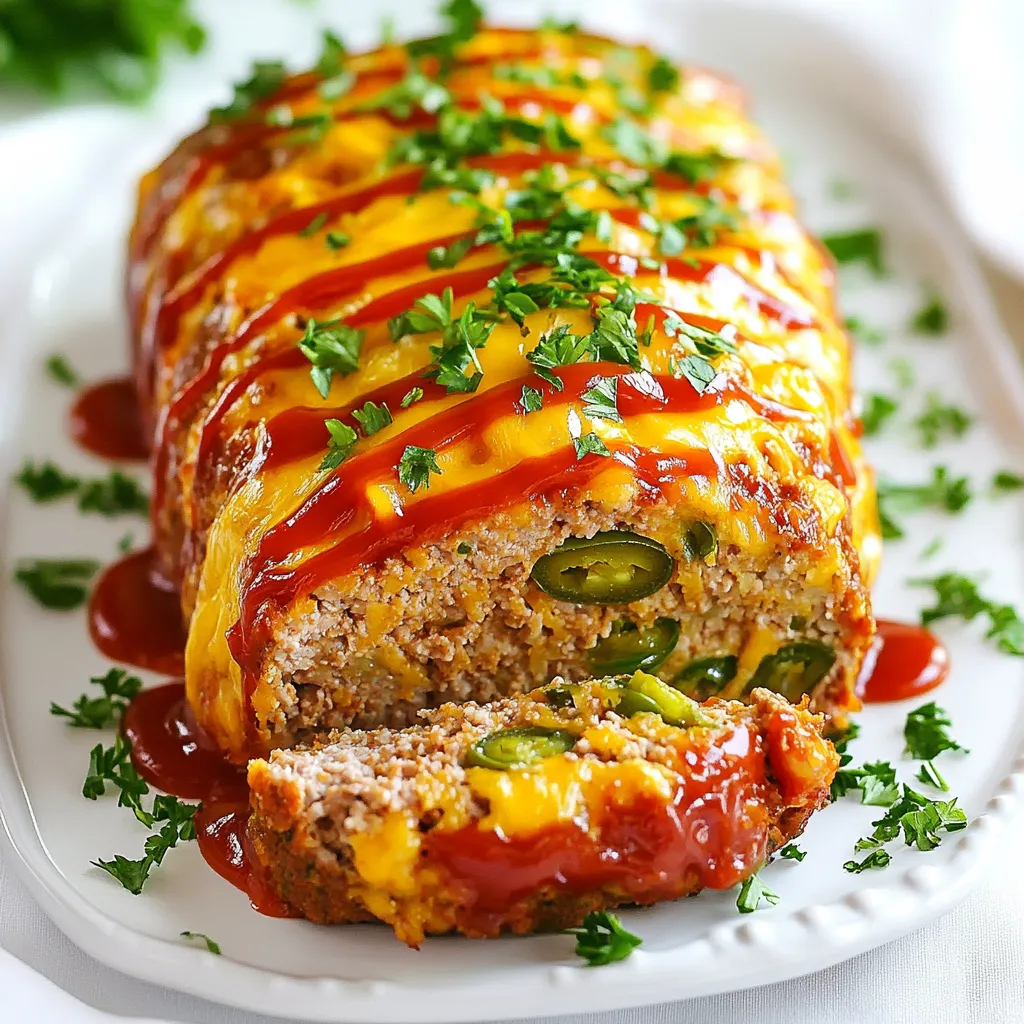
Are you ready to spice up your dinner routine? This Jalapeño Popper Meatloaf combines familiar comfort with bold flavors, making

To make a delicious chocolate peanut butter mug cake, gather these simple ingredients: - 4 tablespoons all-purpose flour - 2 tablespoons cocoa powder - 2 tablespoons granulated sugar - 1/8 teaspoon baking powder - 1/8 teaspoon salt - 3 tablespoons milk (dairy or non-dairy) - 2 tablespoons peanut butter - 1 tablespoon vegetable oil - 1/4 teaspoon vanilla extract - Optional: chocolate chips for garnish These ingredients come together to create a rich and fluffy cake in just minutes. Each one plays a key role in flavor and texture. The flour gives structure, while cocoa powder adds deep chocolate flavor. Sugar sweetens every bite, and baking powder helps the cake rise. The pinch of salt enhances the taste. The milk helps to moisten the batter. Peanut butter brings a creamy texture and nutty taste that pairs perfectly with chocolate. Vegetable oil adds moisture, and vanilla extract rounds out the flavors. If you want an extra treat, chocolate chips add a delightful surprise. With just these few items, you can whip up a fantastic dessert. It’s a quick and easy way to satisfy your sweet tooth! {{ingredient_image_1}} - First, grab a microwave-safe mug. - Add 4 tablespoons of all-purpose flour. - Next, mix in 2 tablespoons of cocoa powder. - Then, add 2 tablespoons of granulated sugar. - Sprinkle in 1/8 teaspoon of baking powder. - Add 1/8 teaspoon of salt. - Mix these dry ingredients well to avoid lumps. - Now, pour in 3 tablespoons of milk. - Add 2 tablespoons of peanut butter. - Include 1 tablespoon of vegetable oil. - Finally, stir in 1/4 teaspoon of vanilla extract. - Mix until smooth and creamy. - Place the mug in the microwave. - Cook on high for about 1 minute and 30 seconds. - Cooking times may change depending on your microwave's wattage. - Watch carefully to prevent overflow. - Once done, take out the mug. It will be hot! - Let it cool for about a minute. - The cake should be fluffy and pull away from the mug's sides. - Top your cake with a dollop of extra peanut butter. - Drizzle some chocolate sauce on top. - You can also sprinkle chocolate chips for more flavor. - Serve warm for the best taste. To make a great mug cake, avoid overflow in the microwave. Use a large mug to give the batter space to rise. Watch it closely while it cooks. If the cake starts to rise too much, stop the microwave for a few seconds. This helps prevent a messy spill. For a fluffy texture, make sure to mix the batter well. Combine all dry ingredients first, then add wet ones. Stir until smooth. This ensures even mixing and no lumps. One common mistake is overmixing the batter. If you stir too long, the cake can become tough. Mix just until you don't see dry flour anymore. Also, check your microwave wattage. Different microwaves cook at different speeds. If yours is lower than average, you may need to cook longer. Always keep an eye on it to prevent overcooking. You can add extra ingredients for richness. Try adding chocolate chips or nuts to the batter before cooking. This gives your cake an extra treat. You can also use different nut butters. Almond butter or cashew butter can change the flavor profile. This keeps things interesting and lets you explore new tastes. Pro Tips Use a Larger Mug: To prevent overflow while cooking, opt for a mug that holds at least 12 ounces. Mix Thoroughly: Ensure all ingredients are well blended to avoid dry pockets and achieve a smooth texture. Watch Cooking Time: Microwaves vary in power; start with 1 minute and add additional time in 10-second increments if needed. Customize Your Toppings: Get creative with toppings like whipped cream, sliced bananas, or crushed nuts for added flavor and texture. {{image_2}} If you need to change this recipe, you can make it gluten-free. Use a gluten-free flour blend instead of all-purpose flour. This swap works well and keeps the cake tasty. For a dairy-free option, choose almond milk or oat milk. These alternatives blend nicely with the other ingredients. You can easily switch up the flavor of your mug cake. Instead of cocoa powder, try using carob powder or even matcha for a unique twist. If you want to add some texture, fold in fruits like mashed bananas or blueberries. Chopped nuts, such as walnuts or pecans, can also add a delicious crunch. You can turn your mug cake into a fun layered dessert. Slice the cake in half and add whipped cream or yogurt between the layers. For a parfait, alternate layers of cake, yogurt, and fruits in a clear glass. This makes a beautiful presentation and tastes great! To store your chocolate peanut butter mug cake, let it cool first. Cover the mug with plastic wrap or transfer the cake to an airtight container. You can keep it in the fridge for up to two days. If you want to save it longer, you can freeze it. Wrap the mug cake tightly in plastic wrap, then place it in a freezer bag. It will last for about a month in the freezer. When you're ready to enjoy your mug cake again, use the microwave. Heat it for about 15 to 30 seconds. Check to see if it is warm throughout. If it feels dry, add a splash of milk before heating. This helps keep the cake moist. Make sure to keep an eye on it to avoid overheating. Your mug cake will last in the fridge for about two days. In the freezer, it can last for up to one month. Signs of spoilage include an off smell, dry texture, or mold. If you notice any of these signs, it’s best to toss it out. Always trust your senses when it comes to food safety. It takes just 5 minutes to prep. Cooking takes about 1 minute and 30 seconds. The total time is around 7 minutes. Yes, you can! You can swap peanut butter for almond butter or sunflower seed butter. You could also use a chocolate spread like Nutella. Each choice offers a unique flavor twist. Yes, it is safe. Just remember to use a microwave-safe mug. Keep an eye on your cake while it cooks to prevent overflow. Always let it cool a bit before eating to avoid burns. You now have all the steps to make a tasty chocolate peanut butter mug cake. From gathering your ingredients to cooking and serving, it’s simple. Remember to watch your mixing and microwave settings. With some easy tweaks, you can enjoy fun flavors or meet any diet needs. Store your leftovers properly to keep enjoying this treat. Follow these tips, and you’ll impress anyone who tries it. Enjoy baking and savoring your delicious creation!

Chocolate Peanut Butter Mug Cake Easy and Quick Treat

If you’re craving something sweet and quick, I’ve got just the treat for you! This Chocolate Peanut Butter Mug Cake

To make Mini Phyllo Brie Cranberry Cups, gather these key items: - mini phyllo pastry cups - 8 oz Brie cheese, cut into small cubes - 1/2 cup cranberry sauce (store-bought or homemade) - optional: - 1/4 cup walnuts, chopped - fresh rosemary leaves for garnish - honey for drizzling You can swap out Brie cheese for several options. Cream cheese or goat cheese works well too. If you want to make it even creamier, try using mascarpone cheese. For cranberry sauce, you can make your own easily. Just cook fresh or frozen cranberries with sugar and a splash of water on medium heat until the berries burst. Adjust the sweetness to your taste. If you're looking for nut-free options, skip the walnuts. Instead, consider using seeds like sunflower seeds for crunch. This keeps the dish safe for those with nut allergies. {{ingredient_image_1}} 1. First, preheat your oven to 350°F (175°C). This step warms up your oven for even baking. 2. Next, arrange the mini phyllo pastry cups on a baking sheet. Keep them spaced out. This helps each cup cook well. 1. For each pastry cup, place a small cube of Brie cheese at the bottom. This creamy cheese melts wonderfully. 2. Spoon about 1 teaspoon of cranberry sauce over the Brie in each cup. The tart sauce pairs well with the cheese. 3. If you like, sprinkle chopped walnuts on top of the cranberry sauce. This adds a nice crunch and extra flavor. 1. Bake in your preheated oven for about 12-15 minutes. Watch closely as they cook. 2. Check for doneness by looking for melted cheese and golden brown phyllo. This shows they are ready. To get that perfect melt, keep an eye on your phyllo cups. Bake them at 350°F for about 12-15 minutes. Watch closely as they turn golden brown. If you leave them too long, the phyllo may burn. You want the cheese gooey, not charred. If you need more time, check after every couple of minutes. You can add other toppings to boost the taste. Consider sliced almonds or even a sprinkle of cinnamon. They can add depth and crunch. Balance is key here. The sweetness of cranberry sauce pairs well with salty Brie. If you want more sweetness, drizzle honey on top. Just remember to keep it balanced. Pair these cups with a light salad or some fresh fruit. They work great alongside a crisp white wine too. For presentation, use a nice serving platter. Arrange the cups in a circle with fresh rosemary sprigs for color. This will make your dish look fancy and inviting! Pro Tips Use Room Temperature Brie: Allow the Brie to sit at room temperature for about 30 minutes before using. This will make it easier to melt and create a creamier texture in your cups. Experiment with Flavors: Feel free to add other ingredients like caramelized onions or sliced apples to customize the flavor profile of your cups. Keep an Eye on Baking Time: Ovens can vary, so start checking your cups around the 10-minute mark to avoid over-baking and ensure that the phyllo stays crisp. Make Ahead: You can prepare the cups ahead of time by filling them with Brie and cranberry sauce, then refrigerate until you're ready to bake. Just add a few extra minutes to the baking time if baking from cold. {{image_2}} You can try different fruit sauces with Brie. Raspberry sauce adds a nice tartness. Apple butter offers a sweet twist. You can also use fig jam for a rich flavor. For nuts, walnuts are great but try pecans or almonds too. They add crunch and taste. If you need gluten-free options, use gluten-free phyllo cups. They work well and taste great. For a vegan twist, replace Brie with a creamy vegan cheese. You can also use a fruit sauce made from dates or apples for extra sweetness. For holiday cheer, sprinkle in spices like cinnamon or nutmeg. These spices enhance the flavors and give warmth. In summer, fresh berries like blueberries or strawberries make a bright topping. They add a refreshing taste and look beautiful on the plate. To keep your Mini Phyllo Brie Cranberry Cups fresh, store them in the fridge. Place them in an airtight container. This method helps keep them from drying out. You can store them for up to three days. If you want to save some for later, you can freeze them. Place the cups in a single layer on a baking sheet. Once frozen, move them to a freezer-safe bag. They can stay in the freezer for up to a month. When you're ready to enjoy leftovers, reheat them to keep the taste. The best way is to use an oven. Preheat the oven to 350°F (175°C). Place the cups on a baking sheet. Bake for about 10 minutes or until warm. This method helps the phyllo stay crisp. Avoid using the microwave, as it can make the phyllo soggy. These cups last well when stored properly. In the fridge, they stay good for about three days. In the freezer, they can last up to a month. Check for signs of spoilage. If they smell off or have a strange texture, it's best to toss them. Enjoy your tasty treats while they are fresh! Can I make Mini Phyllo Brie Cranberry Cups ahead of time? Yes, you can prepare the cups ahead. Make them up to a day before. Store them in the fridge after baking. Just reheat them briefly before serving. What can I substitute for Brie cheese? You can use camembert or cream cheese. Both melt nicely and have a rich taste. Goat cheese is another option for a tangy twist. How do I know when the cups are done baking? Look for golden brown phyllo cups. The cheese should be melted and bubbly. This usually takes about 12 to 15 minutes. How to prevent the phyllo from becoming soggy? Avoid adding too much cranberry sauce. Use just a teaspoon in each cup. This keeps the phyllo crisp during baking. Baking them right away also helps. Can I use different fruit sauces? Absolutely! You can try apple, cherry, or even fig sauce. Each will give a unique flavor that pairs well with Brie. How many cups per person should I prepare? Plan for 2 to 3 cups per person. This amount is perfect for a tasty appetizer. Adjust based on your guest list and event type. What's the best way to adjust for larger gatherings? Simply multiply the number of cups by your guest count. If you expect 20 guests, prepare 40 to 60 cups. This way, everyone gets enough to enjoy. In this guide, we explored how to make Mini Phyllo Brie Cranberry Cups. You learned the key ingredients, like mini phyllo cups and Brie cheese. We discussed alternatives and substitutions for dietary needs. Step-by-step, we walked through preparation, assembly, and baking. These tasty cups can wow your guests. Try different flavors or serve them during holidays. Remember to store leftovers properly. With these tips, you can enjoy these appetizers anytime. Happy cooking!

Mini Phyllo Brie Cranberry Cups Flavorful Appetizer

Looking for a delectable appetizer that wows every guest? Mini Phyllo Brie Cranberry Cups are just the thing! With crispy

- 1 cup orzo pasta - 2 cups chicken broth - 1 cup broccoli florets - 1 cup cooked chicken, diced - 1 cup shredded sharp cheddar cheese - 1/2 cup cream cheese, softened - 1/2 teaspoon garlic powder - 1/2 teaspoon onion powder - 1/4 teaspoon red pepper flakes (optional) - Salt and pepper to taste - 2 tablespoons olive oil - Fresh parsley for garnish Gathering the right ingredients is key for this dish. Start with orzo pasta, a small rice-shaped pasta. Next, you need chicken broth. It adds flavor and moisture to the dish. Fresh broccoli florets bring color and nutrition. Use cooked chicken for quick prep. Shredded sharp cheddar cheese gives that creamy, cheesy taste. Cream cheese adds richness and smoothness. Spices like garlic powder and onion powder enhance the flavor. Red pepper flakes add a hint of heat, but this is optional. Don’t forget salt and pepper to season the dish. Finally, olive oil adds a touch of healthy fat. Fresh parsley makes for a nice garnish. With this list, you're ready to create a comforting meal that warms the heart. {{ingredient_image_1}} 1. Start by bringing two cups of chicken broth to a boil in a medium saucepan. This adds great flavor to your orzo. 2. Once boiling, add one cup of orzo pasta. Cook it according to the package instructions, which usually takes about 8-10 minutes. Stir it occasionally to keep it from sticking. 3. In the last 3-4 minutes of cooking, add one cup of broccoli florets to the pot. This makes the broccoli tender and bright green. 1. After cooking, drain any extra liquid from the pot. Return the orzo and broccoli back to the pot. 2. Now, add one cup of diced cooked chicken, one cup of shredded sharp cheddar cheese, and half a cup of softened cream cheese. 3. Also, mix in two tablespoons of olive oil, half a teaspoon of garlic powder, half a teaspoon of onion powder, and a quarter teaspoon of red pepper flakes, if you want some heat. Stir all the ingredients well to combine. 1. Heat the mixture over low heat for about 3-5 minutes. This allows the cheese to melt and everything to warm up nicely. 2. Stir frequently during this time to make sure the cheese melts evenly. 3. Taste and season with salt and pepper to your liking before serving. To keep orzo from sticking, stir it often while cooking. This helps it stay separate and fluffy. Use a large pot with plenty of water. For broccoli, add it in the last few minutes of cooking. This keeps it bright and tender. It should still have a nice crunch. Adjust seasonings to suit your taste. Start with salt and pepper, then add garlic powder and onion powder. If you like heat, sprinkle in some red pepper flakes. Fresh herbs, like parsley, brighten the dish. They add a pop of color and flavor. For a nice presentation, serve the orzo in bowls. Top with extra cheese and chopped parsley. A dash of chili flakes adds color and spice. Pair this dish with a light salad or crusty bread. If you enjoy wine, a crisp white complements the flavors well. Pro Tips Use Fresh Broccoli: Fresh broccoli will provide better flavor and texture compared to frozen. Make sure to cut it into small, even florets for quicker cooking. Cook Orzo Al Dente: Be careful not to overcook the orzo; it should be al dente to maintain its texture and prevent it from becoming mushy when mixed with the other ingredients. Experiment with Cheese: While sharp cheddar is delicious, feel free to mix in other types of cheese like mozzarella or gouda for a different flavor profile. Add Protein Variations: This recipe is versatile; you can substitute chicken with cooked shrimp or turkey for a different twist, or even add beans for a vegetarian option. {{image_2}} You can easily switch up the orzo pasta. Try using other small pasta shapes like ditalini or even rice. These substitutes work well and still hold the creamy sauce. For cheese, sharp cheddar is great, but feel free to mix it up. Colby jack or mozzarella add a nice twist. You can even blend different cheeses for a unique flavor profile. To boost nutrition, add more veggies! Spinach and bell peppers bring color and taste. Just toss them in when you add the broccoli, and let them cook until tender. This dish can be a one-pot meal. It saves time and makes cleanup easy. You can add any vegetables you like, and it will still taste fantastic. If you need gluten-free options, look for gluten-free orzo or use rice. These options give you the same creamy comfort without the gluten. For a dairy-free version, use plant-based cheese and cream. Coconut cream can replace the cream cheese. It keeps the dish rich and tasty. Adjust seasonings to match your taste, and enjoy! Store your Cheesy Chicken Broccoli Orzo in airtight containers. Glass or plastic containers work well. This dish lasts about 3 to 4 days in the fridge. Make sure it cools down before sealing it tightly. This helps keep it fresh and tasty. The best way to reheat this dish is on the stove. Place it in a skillet over low heat. Add a splash of chicken broth or water to keep it creamy. Stir often until heated through. You can also use a microwave. Heat in short bursts, stirring in between. To refresh the flavors, sprinkle some extra cheese on top while reheating. You can also add a pinch of salt or pepper if needed. This will enhance the taste and make it feel fresh again. Enjoy your warm and cheesy comfort food! Yes, you can make Cheesy Chicken Broccoli Orzo ahead of time. Cook the dish and let it cool. Store it in an airtight container in the fridge for up to three days. When you’re ready to eat, reheat it on the stove or in the microwave. Add a splash of chicken broth while reheating to keep it creamy. Yes, this dish freezes well! After cooking, let it cool completely. Place it in a freezer-safe container. It can be stored in the freezer for up to three months. To reheat, thaw it overnight in the fridge. Warm it on the stove with a little chicken broth, stirring often. If you don't have orzo, you can use other small pasta types. Good options include ditalini, acini di pepe, or even small shells. Adjust the cooking time according to the package instructions. Most small pasta cooks in about 8 to 12 minutes. This blog post covered a delicious Cheesy Chicken Broccoli Orzo recipe, from ingredients to storage tips. You learned to cook orzo and combine it with chicken, cheese, and broccoli for great flavor. The blog also shared ways to adapt the recipe, enhance the taste, and store leftovers properly. Enjoy making this creamy dish with your own twist. Happy cooking!

Cheesy Chicken Broccoli Orzo Creamy Comfort Food

Craving a dish that warms your soul and fills your belly? Look no further than Cheesy Chicken Broccoli Orzo! This

Older posts
Newer posts
← Previous Page1 … Page139 Page140 Page141 … Page150 Next →

dsad

© 2025 Emmas Dish • Built with GeneratePress

Our Policies

  • Copyright Policy
  • Cookie Policy
  • GDPR Policy
  • Privacy Policy
  • Disclaimer
  • Terms Of Use

More Information

  • Home
  • About
  • Contact
  • Appetizers
  • Dessert
  • Dinner
  • Drinks
©2025, Emmas Dish About Back To Top