Skip to content
DisclaimerTerms Of UseGDPR PolicyCookie Policy

Emmas Dish

  • Home
  • Drinks
  • Appetizers
  • Dinner
  • Dessert
  • About
  • Contact
  • Privacy Policy
DisclaimerTerms Of UseGDPR PolicyCookie Policy

Emma

- 1 lb ground beef - 4 large potatoes, thinly sliced - 1 cup sharp cheddar cheese, shredded - 1 cup mozzarella cheese, shredded - 1 medium onion, chopped - 3 cloves garlic, minced - 1 teaspoon dried thyme - 1 teaspoon paprika - 1 cup beef broth - 1 cup heavy cream - Salt and pepper to taste - 2 tablespoons olive oil For this cheesy ground beef potato casserole, I focus on fresh and simple ingredients. The ground beef forms a hearty base, while the potatoes create a soft layer that absorbs all the flavors. I use sharp cheddar and mozzarella for the perfect cheese blend. Onions and garlic add depth to the dish. They bring warmth and a bit of sweetness. I also love adding dried thyme and paprika. These spices give the casserole a nice kick. The liquid components are just as vital. Beef broth adds richness, while heavy cream gives it a creamy texture. Always taste and adjust with salt and pepper. The olive oil helps sauté the onion and garlic, making them extra tasty. Gather these ingredients, and you're set for a delightful meal that everyone will love! {{ingredient_image_1}} - Preheat your oven to 375°F (190°C). - In a large skillet, heat 2 tablespoons of olive oil over medium heat. - Add 1 medium chopped onion and 3 minced garlic cloves. Sauté until fragrant, about 3-4 minutes. - Add 1 pound of ground beef to the skillet. - Use a spoon to break it apart. - Cook until it is browned and no longer pink, about 5-7 minutes. - Season with salt, pepper, 1 teaspoon of dried thyme, and 1 teaspoon of paprika. - Grease a 9x13 inch baking dish. - Layer half of the 4 large thinly sliced potatoes at the bottom. - Lightly season the potatoes with salt and pepper. - Spread the browned ground beef mixture evenly over the potatoes. - In a separate bowl, mix 1 cup of beef broth and 1 cup of heavy cream. - Pour half of this mixture over the beef. - Layer the remaining sliced potatoes on top. - Pour the rest of the beef broth and cream mixture over the potatoes. - Top with 1 cup each of shredded sharp cheddar cheese and mozzarella cheese. - Cover the dish with aluminum foil. - Bake in the preheated oven for 30 minutes. - Remove the foil and bake for an additional 15-20 minutes until the cheese is bubbly and golden brown. - Let it sit for about 10 minutes before serving. - Use a mandoline for even potato slicing. This tool helps you cut potatoes quickly and uniformly. Even slices cook better and ensure a nice texture. - Let the casserole sit before serving for better slicing. This resting time allows the layers to set, making it easier to cut. You’ll get neat servings that look great on a plate. - Fresh parsley adds color and freshness to your dish. Just chop some and sprinkle it on top before serving. It brightens the whole meal. - Serve with a side salad for a balanced meal. A light salad with your favorite dressing complements the rich casserole perfectly. - Avoid overcooking the beef before layering. If you cook it too long, it will dry out and lose flavor. - Be sure to season the potatoes properly. They can taste bland without enough salt and pepper. Season each layer for the best flavor. Pro Tips Use Fresh Potatoes: Fresh potatoes will yield the best texture and flavor in your casserole. Avoid using potatoes that have started to sprout or have blemishes. Layer for Even Cooking: Ensure that you layer the potatoes and beef evenly to promote even cooking and prevent any parts from becoming too dry or soggy. Cheese Variations: Feel free to experiment with different cheese blends for unique flavors. Gouda or pepper jack can add a delicious twist to your casserole. Rest Before Serving: Letting the casserole sit for about 10 minutes after baking allows it to set, making it easier to cut and serve without falling apart. {{image_2}} - You can use pepper jack for a spicy kick. This cheese adds heat and flavor. - A blend of Italian cheeses also works well. Try mozzarella, provolone, and parmesan together. - You can incorporate bell peppers or mushrooms for extra taste. These veggies add crunch and color. - Adding spinach boosts nutrition and gives a fresh flavor. Just toss it in with the meat. - Swap ground beef for ground turkey for a leaner option. This keeps the dish lighter. - Use dairy-free cream for a vegan version. This keeps the richness without dairy. Store any leftovers in an airtight container. This helps keep the dish fresh. You should eat it within 3-4 days for the best taste and quality. To freeze, let the casserole cool completely. Then, wrap it tightly in plastic wrap and foil. This prevents freezer burn. For best texture, freeze it in individual portions. When you're ready, thaw it in the fridge overnight before reheating. For reheating, the oven works best. Preheat it to 350°F (175°C). Place the casserole in a baking dish, cover it with foil, and heat for about 20-25 minutes. This keeps it cheesy and creamy. If you use the microwave, heat in short bursts. Stir in between each burst to warm it evenly. Yes, you can make this casserole a day ahead. Simply follow these steps: - Prepare the casserole as directed. - Cover it tightly with foil or plastic wrap. - Store it in the fridge. When you are ready to bake, remove it from the fridge. Let it sit for about 30 minutes. This helps it bake evenly. Then, bake it as usual. You may need to add a few extra minutes for baking time. This casserole goes well with many sides. Here are some tasty options: - A crisp garden salad - Steamed green beans - Roasted broccoli - Garlic bread These sides balance the rich flavors of the casserole and bring freshness to your meal. Yes, you can easily make this casserole vegetarian. Here are some swaps: - Replace ground beef with lentils or black beans. - Use vegetable broth instead of beef broth. - Add more veggies like bell peppers, mushrooms, or zucchini. These changes keep the dish hearty and delicious while making it meat-free. In this blog post, we explored the tasty Cheesy Ground Beef Potato Casserole. You learned about the ingredients, step-by-step instructions, and tips for the best results. We also covered variations, storage info, and answered some common questions. This dish is easy to make and packed with flavor. With a few simple tricks, you can create a meal everyone will enjoy. Trust me, your family and friends will love it. Enjoy your cooking adventure!

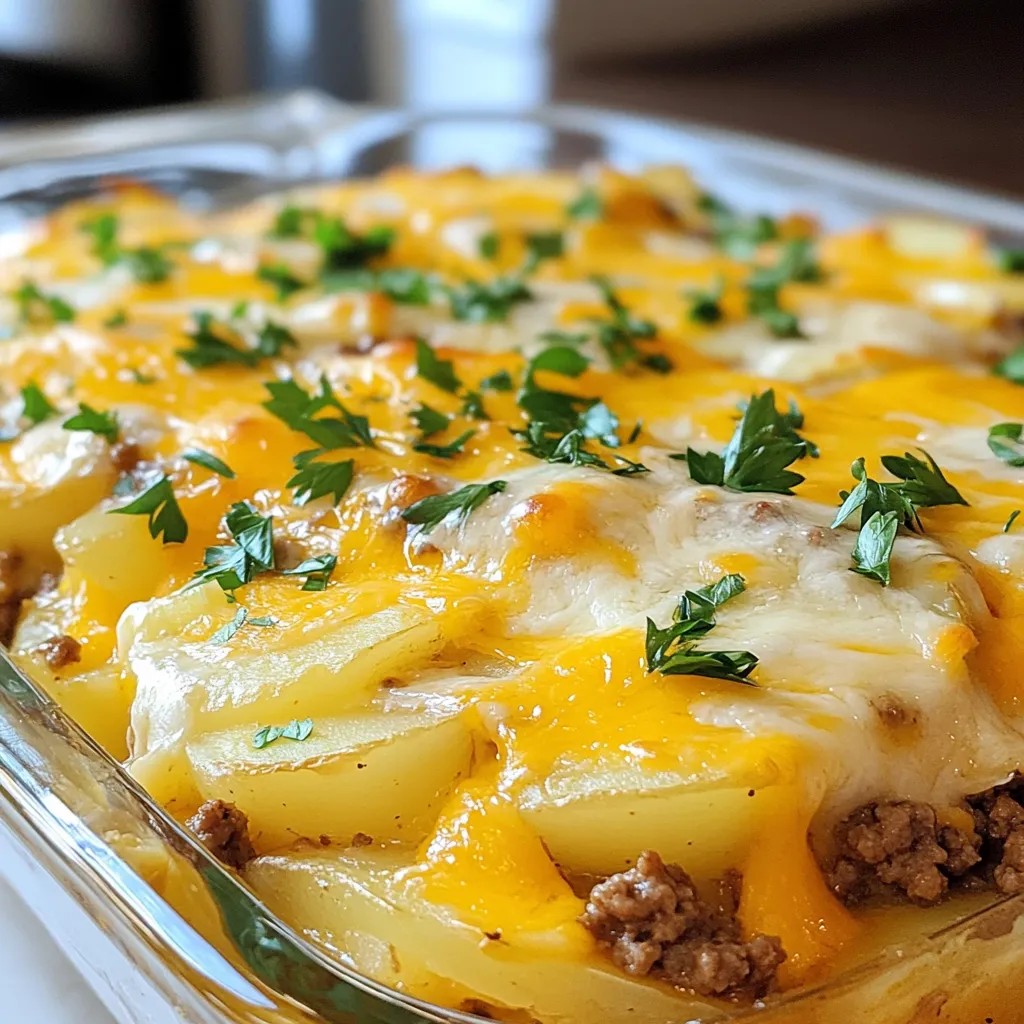
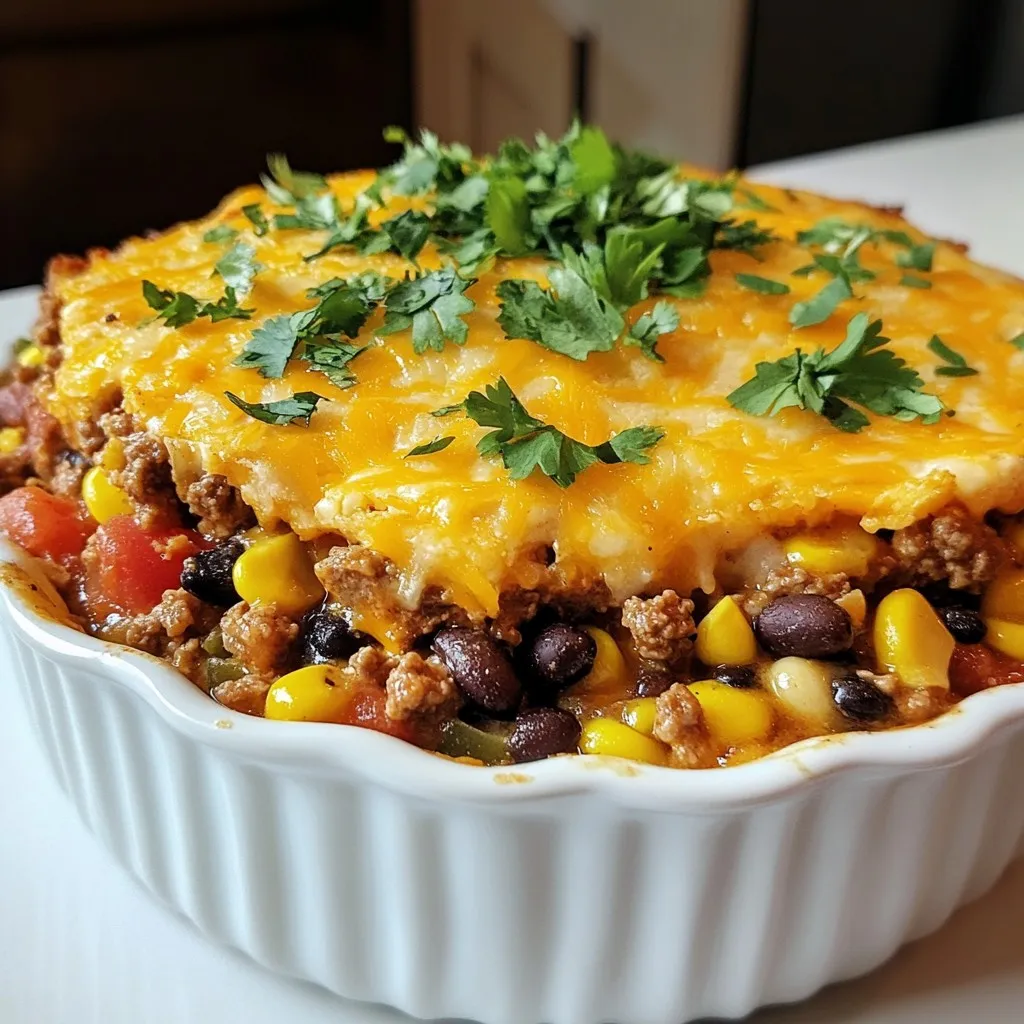
Cheesy Ground Beef Potato Casserole Easy and Tasty Dish

Are you looking for a delicious dish that brings comfort and satisfaction? My Cheesy Ground Beef Potato Casserole combines savory

To make Cajun Chicken Pasta, you need a few key ingredients. Here’s what you will need: - 2 boneless, skinless chicken breasts - 2 tablespoons Cajun seasoning - 2 tablespoons olive oil - 1 bell pepper (red or yellow) - 1 small onion - 3 cloves garlic - 8 ounces fettuccine or penne pasta - 1 cup heavy cream - 1 cup chicken broth - 1 cup cherry tomatoes - 1 teaspoon smoked paprika - Salt and pepper - Fresh parsley - Grated Parmesan cheese (optional) These ingredients create a rich and tasty dish. The Cajun seasoning adds a nice kick. The cream makes the sauce smooth and creamy. You can choose your favorite pasta type. I love using fettuccine, but penne works great too. Fresh parsley adds color and flavor. If you like cheese, sprinkle some Parmesan on top for extra taste. Each ingredient plays a role in making this dish special. {{ingredient_image_1}} To start, fill a large pot with water and add a pinch of salt. Bring the water to a rolling boil. This should take about 5-7 minutes. Once boiling, gently add the fettuccine or penne pasta. Cook it according to the package instructions until it is al dente. This usually takes around 8-10 minutes. When done, drain the pasta. Remember to save half a cup of pasta water. This water helps make the sauce smooth later. Next, take your chicken breasts and slice them into strips. In a mixing bowl, add the chicken strips. Sprinkle on the Cajun seasoning and mix well. Make sure every piece is coated evenly. This seasoning brings the bold flavors of Cajun cooking to your dish. Now, heat 2 tablespoons of olive oil in a large skillet over medium-high heat. Once the oil is hot, add the seasoned chicken strips. Cook them for about 5-7 minutes. You want them golden brown and fully cooked. After that, remove the chicken and set it aside. In the same skillet, add the chopped onion, sliced bell pepper, and minced garlic. Sauté these for 4-5 minutes until they become tender and fragrant. To make the sauce, pour in 1 cup of chicken broth and 1 cup of heavy cream into the skillet. Stir the mixture well. Add 1 teaspoon of smoked paprika, along with salt and pepper to taste. Allow the sauce to simmer gently for about 3-4 minutes. This helps it thicken and develop flavor. Now, return the cooked chicken to the skillet. Add in the halved cherry tomatoes and stir everything together. If the sauce seems too thick, add a bit of the reserved pasta water until you like the texture. Once combined, toss in the cooked pasta. Let it heat for 2 minutes so all the flavors can blend. When serving, divide the pasta onto plates. For a fresh touch, sprinkle chopped parsley on top. If you like, add grated Parmesan cheese for extra flavor. This adds a nice finish to your dish. Enjoy your Cajun Chicken Pasta! The best types of pasta for Cajun Chicken Pasta are fettuccine or penne. Fettuccine holds the creamy sauce well. Penne, with its tube shape, captures the sauce inside. You can experiment with other shapes too. Just ensure the pasta is hearty enough to stand up to the bold flavors. To modify the heat, you can adjust the Cajun seasoning. For less spice, use one tablespoon instead of two. You can also add dairy, like cream or cheese, to cool it down. If you want more heat, add a pinch of cayenne pepper or red pepper flakes. Taste as you go to find your perfect balance. To lighten the dish, swap out heavy cream for Greek yogurt or coconut milk. You can also use whole wheat pasta instead of regular pasta. For a low-carb option, try zucchini noodles or spaghetti squash. These swaps can keep the dish tasty while lowering calories and fat. Pro Tips Choose Your Pasta Wisely: Opt for fettuccine for a creamy texture that clings to the sauce, or use penne for a delightful bite that captures the flavors in every tube. Homemade Cajun Seasoning: For a personalized kick, consider making your own Cajun seasoning using paprika, cayenne pepper, garlic powder, and oregano for a fresh and vibrant flavor. Don't Skip the Resting: Allow the cooked chicken to rest for a few minutes before slicing to retain its juices, ensuring each bite is tender and flavorful. Garnish for Extra Flavor: Fresh parsley not only adds color but also enhances the dish's flavor. A sprinkle of lemon zest can brighten the meal further. {{image_2}} To make Cajun Chicken Pasta vegetarian, swap the chicken for veggies. You can use mushrooms, zucchini, or even eggplant. These add great texture and flavor. For protein, try using tofu or tempeh. Just season them with Cajun spice before cooking. This keeps the dish hearty and satisfying. You can change the sauce to fit your taste. For a tomato-based version, use crushed tomatoes or marinara instead of cream. This makes a lighter dish with a fresh taste. If you prefer a pesto twist, add basil pesto to the cream sauce. This gives a bright, herby flavor that pairs well with the Cajun spices. If you want more protein, shrimp or sausage are great choices. For shrimp, sauté them in olive oil until they turn pink. Add them to the pasta at the end. If you like sausage, use smoked or andouille sausage. Slice it and cook with the chicken for a flavorful kick. Both options add depth to your dish. Store your Cajun Chicken Pasta in an airtight container. Make sure to cool it first. Place it in the fridge. It can last up to three days. Keep the chicken and pasta mixed well with the sauce. This will help maintain flavor and moisture. To reheat, use a skillet on low heat. Add a splash of chicken broth or cream. Stir gently to avoid burning. Heat until warm, but not too hot. If you use a microwave, cover it with a lid. This keeps moisture in and prevents drying out. You can freeze Cajun Chicken Pasta for up to three months. Make sure it’s in a freezer-safe container. Allow it to cool before sealing. When you’re ready to eat, thaw it overnight in the fridge. Reheat as needed, adding a bit more cream or broth for a creamy texture. Cajun Chicken Pasta is a creamy pasta dish. It features juicy chicken strips and Cajun spices. The sauce combines chicken broth and heavy cream. Fresh vegetables add color and flavor. It’s a hearty meal that’s easy to make. To add more heat, use extra Cajun seasoning. You can also add crushed red pepper flakes. Chopped jalapeños bring a nice kick too. If you like it really hot, try a spicy hot sauce. Just add a little at a time to control the heat. Yes, you can use shrimp, sausage, or turkey. Shrimp cooks quickly and pairs well with the sauce. Chicken sausage offers a leaner option with great flavor. For a twist, try smoked sausage for a smoky taste. Each meat gives a unique flavor to the dish. This dish goes well with garlic bread or a fresh salad. A simple Caesar salad complements the creamy pasta nicely. You can also serve it with steamed vegetables for added nutrition. A glass of white wine pairs well with the flavors too. Cajun Chicken Pasta lasts about 3-4 days in the fridge. Store it in an airtight container. Make sure it cools down before putting it away. Reheat it on low heat to keep it creamy. Add a splash of broth or cream if it seems dry. Cajun Chicken Pasta combines flavors and textures for a delightful meal. We covered ingredients, step-by-step cooking, and tips for success. Remember, you can tweak spice levels and make it your own. Whether you prefer it creamy or light, this dish is versatile. Feel proud of your creation! Share it with friends or keep it for yourself. Enjoy every bite and explore different variations as you go. Happy cooking!

Cajun Chicken Pasta Flavorful and Simple Recipe

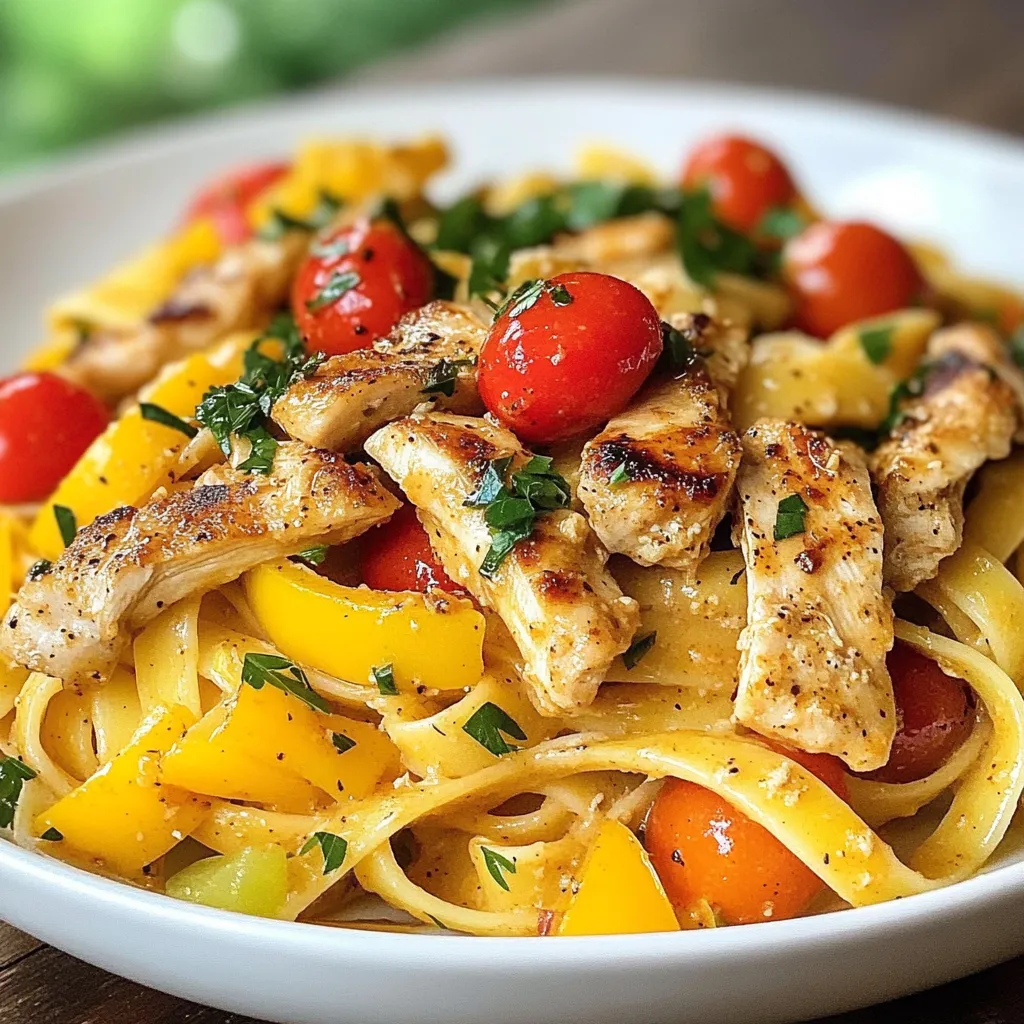
Are you ready to spice up your dinner routine? This Cajun Chicken Pasta recipe is not just tasty; it’s quick

- 1 lb ground chicken - 1 tablespoon olive oil - 1 small onion, finely chopped - 2 cloves garlic, minced - 1 tablespoon taco seasoning - 1/2 cup tomato sauce - 1/2 cup corn kernels (canned or frozen) - 1 cup black beans, rinsed and drained - Salt and pepper to taste - 8 small taco shells or tortillas - Toppings: shredded lettuce, diced tomatoes, shredded cheese, sour cream, avocado slices Gathering the right ingredients is key for these tacos. Start with ground chicken. It’s lean and cooks quickly. Olive oil helps to sauté the onion and garlic, adding a rich flavor. Next, chop a small onion finely. This adds sweetness when you cook it. Minced garlic gives a nice punch. For flavor, you need taco seasoning. It mixes with tomato sauce, corn, and black beans to create a tasty filling. Finally, don’t forget the taco shells or tortillas. They hold all the goodness together. Top your tacos with lettuce, tomatoes, cheese, and more. Kids love to customize their own! {{ingredient_image_1}} 1. Heat 1 tablespoon of olive oil in a large skillet over medium heat. 2. Add 1 small, finely chopped onion. Sauté for about 3-4 minutes until it softens. 3. Stir in 2 minced garlic cloves and cook for another minute. You want to smell that garlic! 4. Now, add 1 pound of ground chicken to the skillet. Break it apart with a spatula. 5. Cook the chicken until it turns brown and is fully cooked. This should take about 6-8 minutes. 1. Once the chicken is cooked, mix in 1 tablespoon of taco seasoning and 1/2 cup of tomato sauce. 2. Next, add 1/2 cup of corn kernels and 1 cup of rinsed black beans. 3. Stir everything well to combine. Season with salt and pepper to taste. 4. Reduce the heat to low and let it simmer for about 5 minutes. This helps the flavors blend together nicely. 1. While the chicken mixture simmers, warm 8 small taco shells or tortillas in an oven or microwave. 2. To assemble, spoon the chicken mix into each taco shell. 3. Add your favorite toppings like shredded lettuce, diced tomatoes, shredded cheese, sour cream, and avocado slices. Enjoy your tasty, kid-approved ground chicken tacos! Customizing toppings Let your kids choose their toppings. This makes them feel involved. Some great options are: - Shredded lettuce - Diced tomatoes - Shredded cheese - Sour cream - Avocado slices These toppings add color and taste. Kids often love to create their own taco. Let them pick what they want! Adjusting spice levels Keep spices mild for the kids. You can skip hot sauce or spicy seasonings. Try a mild taco seasoning instead. You can always add heat later for adults. This way, everyone enjoys their meal. Ensuring chicken is cooked through Cook the ground chicken well. Use a spatula to break it apart. It should be brown and no longer pink inside. This usually takes about 6 to 8 minutes. Use a meat thermometer if you are unsure. The chicken should reach 165°F. Tips for sautéing vegetables Sauté the onions and garlic first. This makes them soft and sweet. Cook them for about 3 to 4 minutes until they are clear. Stir often to avoid burning. Add the minced garlic for just one minute more. This way, you’ll get a great base flavor. Fun ways to serve tacos Set up a taco bar! Place all the toppings in small bowls. Let everyone build their own tacos. This makes the meal fun and interactive. Kids love to pick what goes on their food. Creative garnishing ideas Add a sprinkle of chopped cilantro on top. This adds color and a fresh taste. You can also use lime wedges on the side. A squeeze of lime can make tacos even tastier. Pro Tips Use Fresh Ingredients: Always opt for fresh vegetables and high-quality spices to enhance the flavor of your tacos. Customize Taco Seasoning: Feel free to adjust the taco seasoning to your taste. Adding a pinch of cayenne can give it a spicy kick! Warm Taco Shells Properly: Ensure taco shells are warmed properly to prevent them from breaking. A quick bake in the oven can do wonders. Add More Protein: Consider adding extra protein like shredded chicken or turkey for a heartier filling that kids will love. {{image_2}} You can swap ground chicken for other meats. Ground turkey works well and has a light taste. Ground beef is another option for a heartier flavor. If you want a meatless meal, try a veggie mix. Black beans or lentils can replace meat. You can also use crumbled tofu for texture. Changing the seasoning can bring new life to your tacos. Try a taco blend with cumin and paprika for a bolder taste. You can also mix in some chili powder for extra heat. Adding salsa or hot sauce can spice things up, too. A mild salsa is good for kids. If they like heat, choose a hotter sauce. Tacos pair well with many side dishes. Serve them with rice or beans for a filling meal. You can also add a fresh salad to your spread. For a fun twist, create a taco night theme. Set up a taco bar with toppings. Let each person build their own taco. This makes dinner fun and interactive! To store leftover taco mixture, let it cool first. Then, place it in an airtight container. This helps keep it fresh for up to three days. For taco shells, seal them tightly in their original packaging or use a zip-top bag. This keeps them crisp and prevents them from getting stale. You can freeze portions for later meals. Divide the taco mixture into small containers. This makes it easy to thaw only what you need. Wrap taco shells in foil or place them in a freezer bag. They can last in the freezer for about two months. For best practices when thawing, move the containers to the fridge a day before you plan to use them. This helps the mixture thaw evenly. If you’re in a hurry, you can use the microwave on defrost setting. To reheat tacos, the oven works best. Preheat it to 350°F (175°C). Place the taco mixture in an oven-safe dish and cover it with foil. Heat for about 15 minutes. This keeps the tacos moist and tasty. You can also microwave the mixture in short bursts. Start with 30 seconds, then stir. Repeat until it's warm. To keep the taco shells crispy, warm them separately in the oven or microwave for a few seconds. Enjoy your tacos just as they were! No, these tacos are not spicy. You can adjust the spice levels for kids easily. If your child prefers milder flavors, skip any extra seasoning. Use just a pinch of taco seasoning. You can also serve the tacos with yogurt or sour cream. These toppings can cool down any heat from the dish. Yes, you can make this dish in advance. It’s great for meal prep! Cook the chicken mixture and let it cool. Store it in an airtight container in the fridge. It will keep well for up to three days. You can also warm it up when ready to eat. Just heat on low in a skillet. Don’t forget to warm the taco shells right before serving! Kids love fun toppings! Here are some great options: - Shredded lettuce - Diced tomatoes - Shredded cheese - Sour cream - Avocado slices Let kids build their own tacos. This makes it more fun for them! They can pick their favorite toppings and be creative. This way, every taco can be just the way they like it. These delicious tacos start with ground chicken and fresh ingredients. You can customize the flavor with different spices and toppings. The assembly is easy, making it perfect for a fun meal. Store any leftovers properly, so nothing goes to waste. Whether you stick to the basics or try new protein options, these tacos bring joy to every dinner table. Enjoy making these tacos your own and share them with family and friends. Tacos are not just food; they are a celebration!

Kid-Approved Ground Chicken Tacos Simple and Tasty

Looking for a quick, delicious dinner that your kids will love? These kid-approved ground chicken tacos are simple to make

For Chicken Street Tacos, you will need: - 2 cups cooked chicken, shredded - 1 tablespoon olive oil - 1 teaspoon ground cumin - 1 teaspoon smoked paprika - ½ teaspoon chili powder - ¼ teaspoon garlic powder - Salt and pepper to taste - 8 small corn tortillas - 1 cup fresh cilantro, chopped - 1 cup diced pineapple - 1 avocado, sliced - ½ cup diced red onion - Lime wedges, for serving When picking ingredients, freshness matters. Here are some tips: - Chicken: Use cooked chicken. Rotisserie chicken works great. Look for moist, tender meat. - Cilantro: Choose bright green leaves without brown spots. Smell for a fresh scent. - Pineapple: Pick a pineapple that smells sweet at the base. It should feel heavy for its size. - Avocado: Look for avocados that yield slightly when pressed. This means they are ripe. - Tortillas: Choose soft corn tortillas. They should be pliable but not brittle. If you have dietary needs, you can easily swap some ingredients. Here are a few ideas: - Chicken: Replace with shredded beef, pork, or tofu for a vegetarian option. - Tortillas: Use flour tortillas or lettuce wraps for a gluten-free choice. - Pineapple: If you dislike pineapple, try mango or diced bell peppers. - Cilantro: If you’re not a fan, use parsley or omit it altogether. These tips will help you make delicious Chicken Street Tacos that fit your taste! {{ingredient_image_1}} Start by shredding the cooked chicken. I like to use leftover chicken for this recipe. In a medium bowl, combine the shredded chicken with olive oil, ground cumin, smoked paprika, chili powder, garlic powder, salt, and pepper. Mix it well so the chicken gets a nice coat of spices. This step is key; it makes the chicken full of flavor. Heat a skillet over medium heat. Pour in the seasoned chicken mix and sauté it for about 5-7 minutes. Stir it often to make sure it heats evenly. The goal is to blend the spices into the chicken. You want to warm it through until it’s hot and fragrant. This step makes the chicken really tasty. While the chicken cooks, grab another skillet. Warm the corn tortillas over low heat for about 1 minute on each side. This makes them soft and easy to fold. Don’t rush this step. Warm tortillas will hold all the yummy fillings without breaking. Now it’s time to build your tacos! Place a generous amount of the spiced chicken on each tortilla. Top it with chopped cilantro, diced pineapple, avocado slices, and red onion. Each topping adds a burst of flavor and texture. Serve your tacos right away with lime wedges on the side for extra zest. Enjoy every bite! To keep your tacos warm, wrap them in a clean kitchen towel. This helps keep the heat in. You can also place them in a low oven, set at 200°F. Cover them with foil to trap steam. This method keeps them soft and warm until serving. When chopping ingredients, use a sharp knife for clean cuts. It makes the task easier and faster. Start with the onion, as its strong smell may make you cry. After the onion, dice the pineapple and avocado. Slice the avocado just before serving to avoid browning. Keep your cutting board stable by placing a damp cloth under it. To boost the flavor of your chicken, add more spices. Consider using fresh herbs like cilantro or parsley. These add freshness and vibrant taste. A squeeze of lime juice brightens the flavors too. If you like heat, add some diced jalapeños or a pinch of cayenne. These small changes can make your tacos stand out! Pro Tips Use Leftover Chicken: This recipe is perfect for using up leftover rotisserie chicken, saving you time and enhancing flavor. Customize Your Toppings: Feel free to add your favorite toppings like jalapeños, cheese, or a drizzle of hot sauce for an extra kick. Warm Tortillas Effectively: To achieve the best texture, wrap the warmed tortillas in a clean kitchen towel to keep them warm and pliable until serving. Make It a Meal Prep: Prepare the chicken mixture and toppings ahead of time for quick assembly during busy weeknights. {{image_2}} You can switch up the protein in your tacos. If you prefer beef, use ground beef. Just season it with the same spices. Brown the beef in a skillet until it's cooked. For a plant-based option, try tofu. Press the tofu to remove moisture, then cube and sauté it in olive oil. Add the same spices for flavor. Both options keep it tasty and fun. Toppings can change your taco game. Besides cilantro, pineapple, avocado, and red onion, you can add more. Try fresh jalapeños for a crunchy bite. Crumbled feta or queso fresco add a creamy touch. Sliced radishes give a peppery flavor. You can even add salsa or guacamole for extra zest. Mix and match to find your favorite combo! If you like it hot, there are many ways to add spice. Fresh sliced jalapeños can bring heat. You can also use a spicy salsa or hot sauce. Try adding diced chipotle peppers for a smoky flavor. For a unique twist, sprinkle some cayenne pepper into the chicken mix. Adjust the spice to suit your taste. Enjoy your fiery creation! To keep your chicken street tacos fresh, store them in an airtight container. Place the tacos in the fridge within two hours of cooking. If you have leftover chicken and toppings, store them separately. This helps keep the tortillas from getting soggy. To reheat your tacos, start by removing the toppings. Heat the chicken in a skillet over medium heat. This takes about five minutes. Warm the tortillas in a separate pan for about one minute on each side. Reassemble the tacos with fresh toppings and enjoy! If you want to freeze chicken street taco ingredients, it’s easy! Place the cooked chicken in a freezer-safe bag. Remove as much air as possible before sealing. You can also freeze chopped veggies like onions and cilantro. Simply chop them, place in a bag, and freeze. When you're ready to enjoy, thaw the ingredients in the fridge overnight. Then, heat and assemble your tacos! Chicken Street Tacos are tasty, handheld delights. They feature shredded chicken, seasoned with spices, served in soft corn tortillas. You top them with fresh ingredients like cilantro, pineapple, avocado, and red onion. The mix of flavors and textures makes each bite exciting. These tacos are popular for their vibrant taste and fun presentation. Yes, you can prepare parts of Chicken Street Tacos ahead. Cook the chicken and store it in the fridge for up to three days. You can also chop your toppings in advance. Just keep them in separate containers to stay fresh. When you're ready to eat, warm the chicken and tortillas, then assemble. This saves time and lets you enjoy your meal with ease. Serve Chicken Street Tacos warm and fresh. Place them on a platter and let everyone build their own. Add a bowl of lime wedges for squeezing. This adds a zesty touch. Consider serving with sides like chips and salsa or a fresh salad. It creates a fun and interactive dining experience. You can find Chicken Street Tacos at many Mexican restaurants and food trucks. They are often a signature dish due to their popularity. Look for places that focus on street food or casual dining. Many restaurants also offer their own twists on the recipe, so try different spots to find your favorite version. In this article, we explored how to make delicious Chicken Street Tacos. We covered fresh ingredients, cooking steps, and tips to enhance flavor. You learned how to store leftovers and the best ways to serve these tasty tacos. Remember, tacos are fun to customize with different proteins and toppings. Enjoy the process and get creative with your tacos at home. These simple meals can bring joy to any table. Happy cooking!

Chicken Street Tacos Flavorful and Easy Recipe Guide

Are you ready to spice up your dinner with some mouthwatering Chicken Street Tacos? In this guide, I’ll share a

- 1 lb ground beef - 1 tablespoon olive oil - 1 medium onion, thinly sliced - 1 green bell pepper, thinly sliced - 1 red bell pepper, thinly sliced - 2 cloves garlic, minced - 1 teaspoon Worcestershire sauce - 1 teaspoon onion powder - 1 teaspoon garlic powder - Salt and pepper to taste - 4 slices provolone cheese (or cheese of your choice) - Fresh parsley, chopped (for garnish) When I make my Ground Beef Philly Cheesesteak Skillet, I love to gather all my ingredients first. This way, I can enjoy the cooking process without rushing. Here’s what you need: 1. Ground Beef: This is the star of the dish. I use one pound for a great base. 2. Olive Oil: Just one tablespoon helps to cook the beef and veggies. 3. Onion: A medium onion, thinly sliced, adds flavor and sweetness. 4. Bell Peppers: I use a green and a red bell pepper, both sliced thin. They add color and crunch. 5. Garlic: Two cloves, minced, bring a lovely aroma and taste. 6. Worcestershire Sauce: Just one teaspoon gives depth to the dish. 7. Onion Powder and Garlic Powder: Each one teaspoon helps boost the flavors. 8. Salt and Pepper: I adjust these to taste for the perfect balance. 9. Provolone Cheese: Four slices melt beautifully over the meat and veggies, but feel free to use your favorite cheese. 10. Fresh Parsley: Chopped parsley adds a pop of color and freshness. With these ingredients on hand, you’re ready to create a savory delight that will impress everyone. {{ingredient_image_1}} Step 1: Heating olive oil and browning ground beef First, take a large skillet. Heat 1 tablespoon of olive oil over medium heat. Once the oil is hot, add 1 pound of ground beef. Use a spatula to break it apart. Cook it for about 5 to 7 minutes. You want it to brown evenly. If there is excess fat, drain it off. Step 2: Adding vegetables and cooking until soft Next, slice 1 medium onion, 1 green bell pepper, and 1 red bell pepper. Add these to the skillet along with 2 minced cloves of garlic. Stir them in well. Cook everything together for about 5 minutes. The goal is to make the vegetables soft and tasty. Step 3: Seasoning and melting cheese Now it is time to add flavor. Stir in 1 teaspoon of Worcestershire sauce, 1 teaspoon of onion powder, and 1 teaspoon of garlic powder. Add salt and pepper to taste. Mix everything well. Reduce the heat to low. Lay 4 slices of provolone cheese over the mixture. Cover the skillet. Let it cook for 2 to 3 minutes, so the cheese melts. Once melted, you can sprinkle some fresh chopped parsley on top. Serve hot from the skillet or scoop it into toasted hoagie rolls. Enjoy this savory delight! - Draining excess fat from ground beef: After cooking the ground beef, look for any extra grease. This fat can make your dish oily. Simply tilt the skillet and use a spoon to remove the fat. A leaner mix makes your dish taste better. - Adjusting seasoning to taste: Taste your dish before serving. You may want more salt or pepper. Each person has their own taste, so feel free to change the flavors. You can also add a splash of Worcestershire sauce if you want more depth. - Ensuring cheese melts perfectly: To get that melt-in-your-mouth cheese, cover the skillet after adding the cheese. This keeps the heat in and helps it melt nicely. Wait just a few minutes, and you'll have gooey cheese on top of your beef and veggies. - Presentation tips: You can serve the dish right in the skillet. This looks rustic and inviting. If you prefer a classic cheesesteak feel, spoon the mixture into toasted hoagie rolls. Both ways taste great and look appealing. - Garnishing for extra flavor and appearance: Sprinkle fresh parsley on top for a pop of color. It also adds a nice flavor. You can also serve with pickles on the side. They add crunch and a tangy taste that pairs well with the savory beef. Pro Tips Choose the Right Cheese: Provolone is traditional, but you can experiment with Cheez Whiz or mozzarella for different flavors. Add Heat: For a spicy kick, consider adding sliced jalapeños or a dash of hot sauce to the skillet. Make it a Meal: Serve with a side salad or sweet potato fries to round out your meal. Meal Prep Friendly: This dish can be made ahead of time and reheated for an easy weeknight dinner. {{image_2}} You can change the cheese in this recipe to suit your taste. Provolone is great, but mozzarella or cheddar works too. Each cheese adds a unique flavor. For a little kick, try using pepper jack cheese. It melts well and adds spice. You can also add more vegetables. Mushrooms add a nice texture and flavor. Slice them thin and cook them with the other veggies. Jalapeños are perfect for heat. Slice them up and stir them in when you add the bell peppers. If you need a gluten-free meal, use gluten-free hoagie rolls. Just check the label to be sure. You can also skip the rolls and serve it straight from the skillet. It makes a tasty low-carb option. For a vegetarian version, swap the ground beef for plant-based ground meat. Many brands make great substitutes that taste just like beef. Follow the same cooking steps, and you'll have a delicious meal for everyone. To keep your Ground Beef Philly Cheesesteak Skillet fresh, cool it down first. Place it in a shallow dish to speed up cooling. Once cool, cover it tightly with plastic wrap or aluminum foil. You can also use airtight containers for better storage. This will help keep the flavors intact and avoid spoilage. Store it in the fridge for up to three days. When you're ready to enjoy the leftovers, use a skillet for best results. Heat it on medium-low. Add a splash of water or broth to avoid drying out the meat. Stir occasionally until heated through. If you want to melt the cheese again, cover the skillet for a minute. You can also use a microwave, but be sure to heat it in short bursts. This method helps keep the meal moist. Can I use a different type of meat? Yes, you can use other meats. Ground turkey or chicken works well. You can also try thinly sliced steak for a classic touch. Adjust the cooking time based on the meat you choose. How do I make this recipe in advance? Making this dish ahead is simple. Cook the ground beef and veggies as directed. Let them cool, then store in the fridge. When ready to eat, reheat in a skillet and melt the cheese on top. What can I serve with Ground Beef Philly Cheesesteak Skillet? This dish goes great with sides like fries or a salad. You can also serve it in toasted hoagie rolls for a fun twist. Add pickles or coleslaw for extra crunch and flavor. This article covered how to make a tasty Ground Beef Philly Cheesesteak Skillet. We explored the key ingredients, detailed cooking steps, and helpful tips for a perfect dish. You learned about variations like different cheeses and dietary swaps. Remember to store leftovers properly and enjoy reheating them later. Cooking can be fun and easy, and this skillet recipe fits right in. Try it out, and you may create a new favorite dish that impresses everyone!

Ground Beef Philly Cheesesteak Skillet Savory Delight

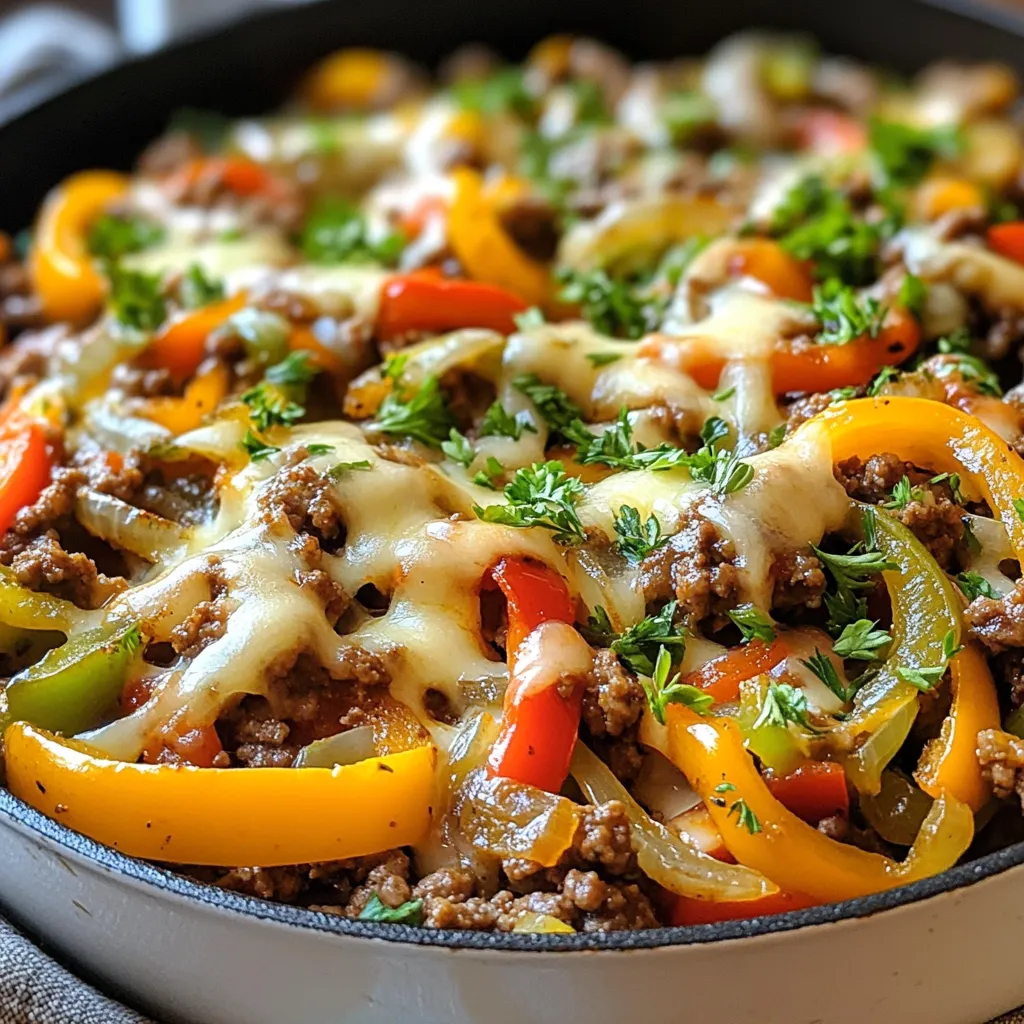
If you’re craving a quick and tasty meal, I’ve got you covered with my Ground Beef Philly Cheesesteak Skillet! This

- Chicken Breast Specifications You need 2 boneless, skinless chicken breasts. They should be fresh for the best taste. - Green Beans as a Key Component Use 1 pound of fresh green beans. Trim them to keep them tender and bright. - Additional Flavoring Ingredients Gather these items for extra flavor: - 3 cloves garlic, minced - 2 tablespoons olive oil - Zest of 1 lemon - Juice of 1 lemon - 1 teaspoon dried oregano - Salt and pepper to taste - ¼ teaspoon red pepper flakes (optional for heat) - Fresh parsley, chopped (for garnish) Each ingredient adds a unique taste. The chicken brings protein. The green beans add crunch and color. Garlic and lemon give depth. Oregano adds freshness. Together, they create a dish that feels complete and satisfying. {{ingredient_image_1}} How to Prepare Marinade To make the marinade, mix olive oil, minced garlic, lemon zest, lemon juice, oregano, salt, pepper, and red pepper flakes in a bowl. This mix adds great flavor to the chicken. Make sure to coat the chicken breasts well in this marinade. Importance of Marinating Time Marinating the chicken for at least 30 minutes is key. It helps the chicken absorb all those tasty flavors. If you have more time, try marinating for a few hours. This will make your chicken even tastier. Blanching Process Explained While the chicken marinates, bring a pot of salted water to a boil. Add the trimmed green beans and cook for 3-4 minutes. This will make them bright green and slightly tender. Do not overcook them. Ice Bath Technique After blanching, quickly place the green beans in a bowl of ice water. This stops the cooking right away, keeping them crisp and bright. After a few minutes, drain the beans and set them aside. Skillet Cooking Method Heat a large skillet over medium heat. Add the marinated chicken breasts and cook for about 6-7 minutes on each side. You want them to be golden-brown and cooked through. Tips for Checking Doneness To check if the chicken is done, use a meat thermometer. The internal temperature should reach 165°F. If you don’t have a thermometer, cut into the thickest part; it should be white with no pink. Incorporating Leftover Juices In the same skillet with the leftover juices, add the blanched green beans. This adds extra flavor to the beans. Sauté them for 2-3 minutes until they are hot and coated in the oils. Flavor Enhancements During Sautéing While sautéing, taste and adjust seasoning. You can add more salt, pepper, or lemon juice if you want. This step helps keep the green beans flavorful. How to Plate Professionally Slice the cooked chicken and arrange it on a nice platter with the sautéed green beans. Place the beans next to the chicken for a vibrant look. Garnishing with Fresh Ingredients For a fresh touch, sprinkle chopped parsley over the chicken and beans. You can also add a lemon wedge on the side. This not only looks good but adds a pop of flavor. Avoiding Dry Chicken Breasts To keep chicken breasts moist, marinate them well. Use olive oil, lemon juice, and spices. Marinating helps the chicken absorb flavor and moisture. Cook the chicken over medium heat. This helps prevent drying out. Always let it rest after cooking. This allows the juices to settle. Optimal Cooking Temperatures The best cooking temperature for chicken is 165°F. Use a meat thermometer to check. Cook the chicken until it is golden brown outside. This usually takes about 6-7 minutes per side. Don’t rush; let it cook evenly. Alternative Seasonings and Herbs You can switch up the spices for new flavors. Try using thyme, rosemary, or basil. These herbs add a unique touch to the dish. You can also add garlic powder or onion powder for extra depth. Experiment to find what you love. Adding Heat with Red Pepper Flakes If you like heat, sprinkle red pepper flakes on the chicken. This adds a nice kick without overwhelming the dish. Start with a small amount. You can always add more if you want it spicier. Best Side Dishes to Accompany Chicken and Green Beans A fresh salad goes well with this meal. You can also serve it with rice or mashed potatoes. These sides balance the meal and add texture. For a light option, try a quinoa salad. Wine Pairing Recommendations A crisp white wine pairs nicely with chicken. Look for a Sauvignon Blanc or a Pinot Grigio. These wines enhance the lemon flavor in the dish. If you prefer red, opt for a light-bodied wine like Pinot Noir. Pro Tips Marination Matters: Allow the chicken to marinate for longer than 30 minutes if possible, even up to overnight, to enhance the flavor and tenderness. Perfectly Blanched Beans: Ensure you plunge the green beans into ice water immediately after blanching to keep their vibrant color and crisp texture. Check Chicken Doneness: Use a meat thermometer to ensure the chicken reaches an internal temperature of 165°F (75°C) for safe consumption. Garnish for Flavor: Fresh herbs like parsley not only add a pop of color but also enhance the dish's overall flavor profile; consider adding fresh basil or thyme for variation. {{image_2}} You can swap chicken for other proteins. Turkey works well, too. It has a similar taste and texture. For a richer flavor, try duck. If you prefer seafood, shrimp is a fantastic choice. Just remember to adjust cooking times. You can use different beans for variety. Instead of green beans, try asparagus or snap peas. Both add crunch and color. You can also use canned beans like kidney or black beans. Just rinse them before cooking. If you need gluten-free options, you’re in luck! This recipe is naturally gluten-free. Just check your chicken and seasoning for hidden gluten. Use fresh herbs to add flavor without gluten. For vegetarian options, replace chicken with tofu or tempeh. Both soak up flavors well. You can marinate them just like chicken. Use vegetable broth instead of chicken juices for extra taste. Explore international flavors by changing your spices. Try adding curry powder for an Indian twist. For a Mexican flair, include cumin and lime. Both will transform your dish into something exciting. Don’t forget about citrus zest! Aside from lemon, use lime or orange zest. Each gives a unique taste. You can mix zests for a bright, fresh flavor. This adds an extra layer to your meal. To keep your chicken and green beans fresh, follow these tips: - Use Airtight Containers: Store leftovers in airtight containers. This helps keep moisture in and prevents odors from mixing. - Cool Before Storing: Allow the food to cool to room temperature before sealing. This prevents condensation inside the container. How long do the ingredients last? - Cooked Chicken: Store for up to 3-4 days in the fridge. - Green Beans: They can last for about 3 days after cooking. To enjoy your leftovers without drying them out, use these methods: - Microwave: Place chicken and green beans on a microwave-safe plate. Add a splash of water, cover with a damp paper towel, and heat for 1-2 minutes. - Stovetop: Heat a skillet over low heat. Add a bit of olive oil or broth. Cook for a few minutes until warmed through. Safety is key when reheating food: - Check Temperature: Ensure the internal temperature reaches 165°F (74°C) before eating. - Avoid Reheating More Than Once: Reheat only what you plan to eat. This helps prevent bacteria growth. The ideal internal temperature for chicken is 165°F (75°C). This ensures the chicken is safe to eat and juicy. Use a meat thermometer to check the temperature. Insert it into the thickest part of the chicken breast. If it reads 165°F, your chicken is done. If not, cook it a few more minutes and check again. Yes, you can make this recipe ahead of time. For best results, marinate the chicken the night before. This allows flavors to soak in well. You can also blanch the green beans in advance. Store them in the fridge until you're ready to sauté them. This makes cooking easy and quick when you are ready to eat. Fresh green beans work best for sautéing. They stay crisp and bright. You can also use haricot verts, which are thinner and more tender. Make sure to trim the ends before cooking. This simple prep keeps the beans looking nice on your plate. This blog post covered everything you need to make a tasty chicken and green bean dish. We explored the key ingredients, like juicy chicken and fresh green beans. I gave step-by-step instructions to make it easy for you. The tips shared help you cook perfectly and enhance flavors. Remember, you can modify the recipe to suit your taste. Enjoy experimenting with different proteins and spices. Proper storage keeps your leftovers fresh. Follow these steps, and you'll impress everyone with your cooking skills. Happy cooking!

Satisfying Chicken and Green Beans Dinner Recipe

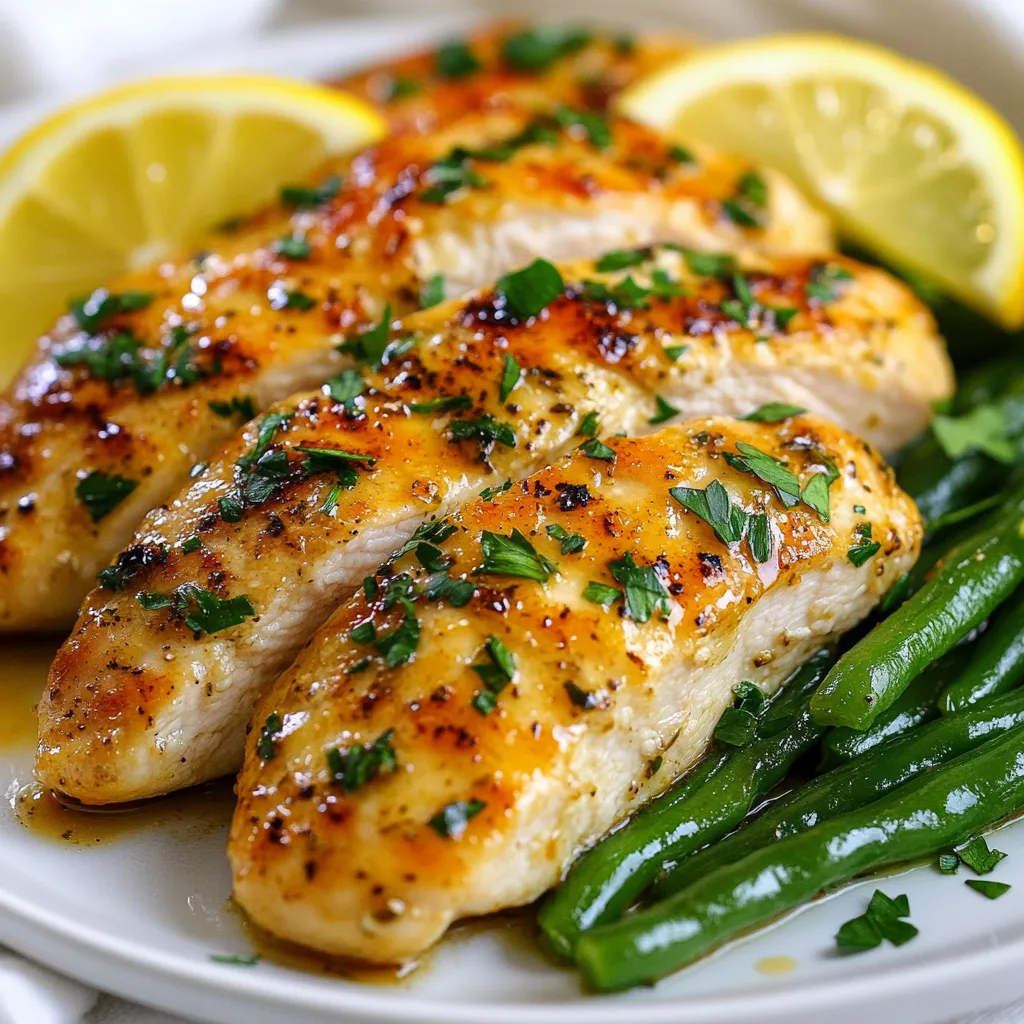
Looking for a simple, tasty dinner idea? You’ll love this Satisfying Chicken and Green Beans Dinner Recipe. It’s quick, healthy,

To make a true Cajun jambalaya, you need fresh and bold ingredients. Here are the key items: - 1 lb chicken thighs, boneless and skinless, diced - 1 lb shrimp, peeled and deveined - 1 and 1/2 cups andouille sausage, sliced - 1 large onion, chopped - 1 green bell pepper, chopped - 1 red bell pepper, chopped - 3 cloves garlic, minced - 1 can (14 oz) diced tomatoes with juice - 3 cups chicken broth - 2 cups long-grain rice - 2 tablespoons Cajun seasoning - 1 teaspoon dried thyme - 1 teaspoon smoked paprika - 2 bay leaves - Salt and pepper to taste - 3 tablespoons vegetable oil - 1/4 cup green onions, sliced (for garnish) - Fresh parsley, chopped (for garnish) These ingredients work together to create the rich, flavorful dish we love. For the best flavor, I recommend using high-quality andouille sausage. Some great brands include: - Aidells - Johnsonville - Andouille from local butchers These options offer a nice balance of spice and smokiness. They will enhance your jambalaya's flavor. Sometimes you may not find certain ingredients. Here are some easy swaps: - Chicken: Use turkey or pork instead. - Shrimp: Try crawfish or diced fish for seafood swaps. - Andouille sausage: Use kielbasa or smoked sausage if needed. - Long-grain rice: Substitute with jasmine or basmati rice. These substitutes help you stay on track without losing the spirit of the dish. {{ingredient_image_1}} Start by heating 3 tablespoons of vegetable oil in a large skillet or Dutch oven. Use medium heat for best results. Add 1 pound of diced chicken thighs to the skillet. Cook them for about 6 to 8 minutes. You want the chicken to turn golden brown. Once browned, remove the chicken and set it aside. In the same skillet, add 1 and 1/2 cups of sliced andouille sausage. Cook this for 3 to 4 minutes until it begins to brown. This step brings out great flavor. Next, add the chopped onion, green bell pepper, and red bell pepper to the skillet. You should sauté these for about 5 minutes. They need to soften up nicely. After that, stir in 3 cloves of minced garlic. Cook for another minute. This step fills your kitchen with a wonderful aroma. Now it's time to bring everything together. Return the browned chicken to the skillet. Add in 1 can of diced tomatoes with juice, 3 cups of chicken broth, and 2 cups of long-grain rice. Then, sprinkle in 2 tablespoons of Cajun seasoning, 1 teaspoon of dried thyme, 1 teaspoon of smoked paprika, and 2 bay leaves. Stir well to mix everything. Bring the mixture to a boil. Once boiling, reduce the heat to low. Cover the skillet and let it simmer for about 20 minutes. This allows the rice to cook nearly through. After that, add 1 pound of peeled and deveined shrimp. Stir gently and cover again. Cook for an additional 5 to 7 minutes until the shrimp are pink and done. After cooking, remove the bay leaves and season with salt and pepper to taste. Let the jambalaya sit for 5 minutes before serving. To get real Cajun flavor, use fresh ingredients. Choose high-quality Cajun seasoning. It should have a good mix of spices. Don't skip the andouille sausage; it adds depth. Consider adding some cayenne pepper for heat. Cooking over medium heat helps build flavor. Let the ingredients mingle during cooking. The longer they cook, the better the taste. Cooking rice in jambalaya is key. Use long-grain rice for the best texture. Rinse the rice to remove excess starch. This keeps the grains separate and fluffy. When you add the rice, make sure to stir. This helps it absorb the flavors. Cover the pot tightly while simmering to trap steam. Let it sit after cooking; this helps finish the rice. One common mistake is overcooking the shrimp. Shrimp cook quickly, so watch them closely. Another mistake is using too much liquid. Follow the recipe for the right amount of broth. If you add too much, the dish becomes soupy. Don't rush the browning of the meats; it adds flavor. Lastly, avoid skipping the resting time; it allows flavors to blend. Pro Tips Use Fresh Ingredients: Fresh vegetables and herbs enhance the flavor significantly, making your jambalaya more vibrant and delicious. Customize the Spice Level: Adjust the amount of Cajun seasoning to suit your taste. For a milder dish, start with less and add more as needed. Let it Rest: Allowing the jambalaya to sit for a few minutes before serving helps the flavors meld together and makes for a better presentation. Experiment with Proteins: Feel free to swap the shrimp and chicken with other proteins like crawfish or tofu to create your unique version of jambalaya. {{image_2}} You can use many types of seafood in jambalaya. Shrimp is classic, but try adding crab or crawfish. Both bring a sweet taste that pairs well with spices. You can also mix in scallops or clams. Just be careful not to overcook them. They need only a few minutes to cook through. You can make a tasty vegetarian jambalaya too. Use hearty veggies like zucchini, mushrooms, and carrots. Swap chicken broth for vegetable broth. For protein, add chickpeas or black beans. Tofu is another great choice. It soaks up flavors well. Don't forget to add your favorite Cajun spices to keep it bold and flavorful. Jambalaya can be as spicy as you want. To make it spicy, add more Cajun seasoning or diced jalapeños. If you prefer mild, use less seasoning and skip spicy peppers. You can still enjoy rich flavors without the heat. Adjust according to your taste, and everyone can enjoy their bowl of jambalaya! After you make jambalaya, let it cool down. Place it in an airtight container. Store it in the fridge. Leftovers will stay fresh for about 3 to 4 days. When you want to eat it again, check for any off smells or changes in color. You can freeze jambalaya for up to 3 months. Use a freezer-safe container or a heavy-duty freezer bag. Make sure to leave some space at the top. The rice expands when frozen. Label the container with the date. This way, you’ll know when to use it. To reheat, you can use the stove or microwave. If using the stove, add a splash of broth or water. This helps keep it moist. Heat on low, stirring often until hot. If using a microwave, cover the dish. Heat in short bursts, stirring in between. Enjoy it just like the first time! Jambalaya is a rice dish from Louisiana. It mixes meat, seafood, and vegetables. This dish has roots in Creole and Cajun cultures. It shows the blend of French, Spanish, and African cuisines. Jambalaya is often cooked at gatherings and celebrations. It symbolizes community and sharing. Yes, you can prepare jambalaya ahead of time. It tastes even better the next day. Just cook it, let it cool, and store it in a fridge. To reheat, warm it on the stove or in the microwave. Add a splash of broth if it seems dry. Authentic Cajun jambalaya has a good kick. It uses Cajun seasoning, which varies in heat. Some people find it very spicy, while others enjoy the flavor without too much heat. Adjust the seasoning to your taste. You can start with less and add more if needed. Many side dishes go well with jambalaya. Here are some tasty options: - Crusty French bread - Green salad with vinaigrette - Coleslaw for a crunchy contrast - Cornbread for a sweet touch - Fried okra as a classic Southern side This blog post covered how to make a great Cajun Jambalaya. We looked at key ingredients, like authentic sausage and useful substitutes. I shared steps to prepare your dish, from cooking the meats to blending in vegetables. You learned tips for great flavor and cooking rice just right. We explored fun variations too, including seafood and vegetarian options. Proper storage and reheating tips will keep your jambalaya tasting fresh. Make your next Cajun meal yummy and stress-free with these insights. Enjoy cooking!

Authentic Cajun Jambalaya Flavor-Packed Recipe Guide

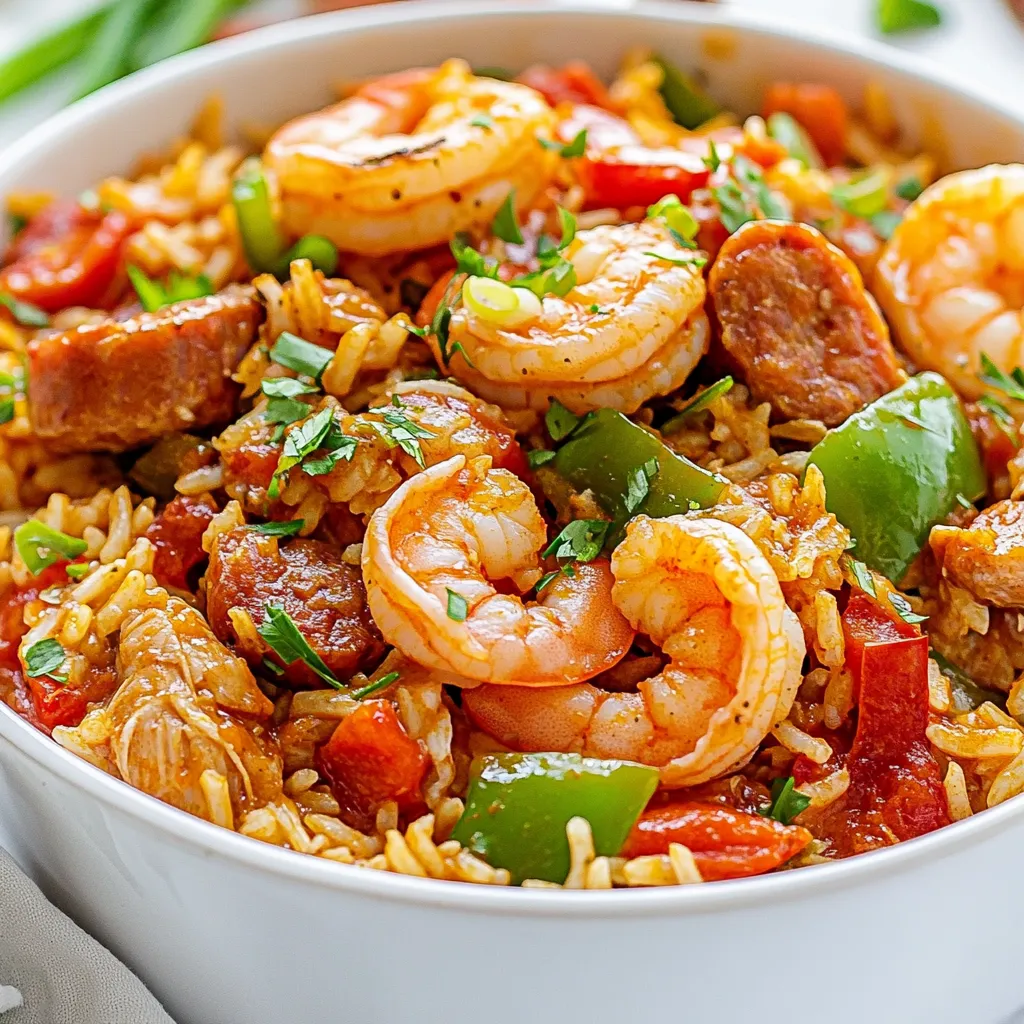
Welcome to your ultimate guide for cooking authentic Cajun jambalaya! If you want a dish that bursts with flavor, you’re

To make Garlic Butter Beef Tortellini, you need the following ingredients: - 12 oz beef tortellini (fresh or frozen) - 4 tablespoons unsalted butter - 4 cloves garlic, minced - 1 teaspoon red pepper flakes - 1 cup cherry tomatoes, halved - 1 cup spinach leaves, packed - Salt and pepper to taste - 1/4 cup grated Parmesan cheese - Fresh basil leaves for garnish Having the right ingredients is key to a great dish. Start with fresh beef tortellini for the best taste. If you can’t find fresh, frozen works just fine. Unsalted butter gives a rich flavor without added salt. Garlic adds depth, while red pepper flakes bring a little heat. Cherry tomatoes add sweetness and color. Spinach gives a healthy boost and brightens the dish. Seasoning with salt and pepper allows you to tailor the flavor to your liking. Finally, Parmesan cheese adds creaminess and umami. Fresh basil leaves not only look nice but add a fresh aroma. Gather all these ingredients before starting. It makes cooking easier and more fun. You can even prep some items in advance, like chopping garlic and halving tomatoes. This dish is simple, but using fresh, quality ingredients makes it shine. {{ingredient_image_1}} How to boil beef tortellini First, fill a large pot with water. Add a pinch of salt. Bring the water to a rolling boil. Once boiling, add the beef tortellini. Cook them according to the package instructions. Usually, it takes about 3-5 minutes for fresh tortellini. If using frozen, it may take a few extra minutes. Test one tortellini to see if it is tender. Timing your cooking Timing is key. Start boiling the water while you gather your ingredients. Once the water boils, add the tortellini. This way, everything stays hot and fresh. While the tortellini cooks, you can prepare your garlic butter sauce. Melting the butter In a large skillet, add four tablespoons of unsalted butter. Heat the skillet on medium heat. Wait for the butter to melt completely. You will see it bubbling. This means it’s ready for the next step. Sautéing garlic and red pepper flakes Add four minced garlic cloves and one teaspoon of red pepper flakes to the melted butter. Stir the mixture gently for about 1-2 minutes. You want the garlic to become fragrant but not browned. A light golden color is perfect. Incorporating tomatoes and spinach Next, add one cup of halved cherry tomatoes to the skillet. Stir them in for 3-4 minutes. You want the tomatoes to soften slightly. After that, add one cup of packed spinach leaves. Stir until the spinach wilts, which takes about one minute. Mixing everything together Now, it’s time to combine everything. Drain the tortellini and add it to the skillet. Gently toss the tortellini with the garlic butter sauce and veggies. Season with salt and pepper to taste. Finally, sprinkle 1/4 cup of grated Parmesan cheese on top. Stir gently one last time to mix everything. Your dish is now ready to serve! To make the best garlic butter beef tortellini, you need to adjust spice levels. If you like heat, add more red pepper flakes. If not, use less or skip them. Taste as you cook. That way, you find the right balance. The texture of the tortellini is key. You want it al dente, which means firm but not hard. Follow the package instructions for cooking time. Check it a minute or two before the time is up. This way, you avoid overcooking. Not a fan of beef tortellini? No problem! You can use cheese or vegetable tortellini instead. These options still work well with the garlic butter sauce. If you want to change up your greens or tomatoes, try kale or arugula. They add a unique taste. For tomatoes, use diced or canned ones if fresh is not available. Just remember to adjust the cooking time for softer tomatoes. For sides, a simple green salad or garlic bread pairs well with this dish. You can also serve it with a glass of white wine for added flavor. When plating, keep it simple yet elegant. Use a large bowl and add a swirl of tortellini in the center. Top it with fresh basil and a sprinkle of Parmesan. This not only looks great but also makes the dish more inviting. Pro Tips Perfect Tortellini Texture: Ensure you cook the tortellini until al dente for the best texture. This prevents them from becoming mushy when mixed with the sauce. Garlic Sautéing: Be careful not to overcook the garlic; it should be fragrant but not browned to avoid a bitter taste in the dish. Fresh Ingredients: Using fresh spinach and ripe cherry tomatoes enhances the flavor and overall presentation of the dish. Cheese Variation: Try different types of cheese like Pecorino Romano or a sprinkle of feta for a unique twist on the classic dish. {{image_2}} You can easily make this dish vegetarian by swapping beef tortellini for vegetable tortellini. This change keeps the dish lively and tasty. You will still enjoy the rich garlic butter flavor paired with fresh veggies. The cherry tomatoes and spinach provide great texture and color. For a vegan version, simply use plant-based butter and cheese alternatives. There are many good brands of vegan butter and cheese. They melt well and add creaminess. Make sure to check labels for hidden dairy. This adaptation allows everyone to enjoy the dish without animal products. If you want more protein, add chicken, shrimp, or sausage. Cook the protein separately and then mix it in with the tortellini. Chicken breast works well when grilled or sautéed. Shrimp cooks quickly and adds a seafood twist. Sausage can bring bold flavors to the dish. Choose your favorite to customize your meal! To keep your garlic butter beef tortellini fresh, follow these steps: - Refrigeration: Place leftovers in an airtight container. They will stay good for about 3 to 4 days in the fridge. Make sure to let it cool down before sealing. - Freezing: For longer storage, freeze the tortellini. Use a freezer-safe container or bag. It can last up to 3 months. Just remember to label it with the date. When it’s time to enjoy your leftovers, reheating correctly is key. Here are the best methods: - Stovetop: Heat a pan over medium heat. Add a splash of water or broth to prevent sticking. Stir frequently until heated through. - Microwave: Place the tortellini in a microwave-safe dish. Add a little water to keep it moist. Cover with a lid or a microwave-safe wrap. Heat in short bursts, stirring in between, until hot. These methods help maintain the flavor and texture of your delicious meal. Enjoy every bite again! Yes, you can use frozen tortellini. Just follow these tips: - Cooking Time: Frozen tortellini needs a bit more time than fresh. Boil it for about 2-3 minutes longer. - Boiling Water: Make sure the water is at a rolling boil before adding the frozen tortellini. - Stirring: Stir gently to prevent sticking. This helps them cook evenly. Using frozen tortellini is easy and quick. It adds convenience to your meal prep! You can easily spice up the dish. Here are some ideas: - Red Pepper Flakes: Add more flakes for extra heat. Start with an extra half teaspoon. - Chili Powder: Try a small amount of chili powder in the garlic butter for warmth. - Hot Sauce: Drizzle your favorite hot sauce over the finished dish for a kick. Adjust the spices to fit your taste. Enjoy your spicy garlic butter beef tortellini! Absolutely! This dish works great for meal prep. Here are some tips: - Cook in Batches: Make a large batch to save time. Store portions in airtight containers. - Keep Sauces Separate: If you want the best texture, store the tortellini and sauce separately. - Refrigerate or Freeze: You can keep the meal in the fridge for up to three days or freeze it for longer. Meal prepping garlic butter beef tortellini makes for easy, tasty meals throughout the week! This post covered a tasty tortellini dish, from ingredients to serving ideas. With fresh beef tortellini, garlic butter, and colorful veggies, you can create a delightful meal. Remember, you can easily tweak spice levels and substitute ingredients to fit your tastes. This recipe is also versatile; try vegetarian or vegan options. Storing leftovers properly allows you to enjoy this meal later. Cook, enjoy, and share this dish with friends or family. You now have all the tools to impress anyone at your table.

Garlic Butter Beef Tortellini Flavorful Dinner Delight

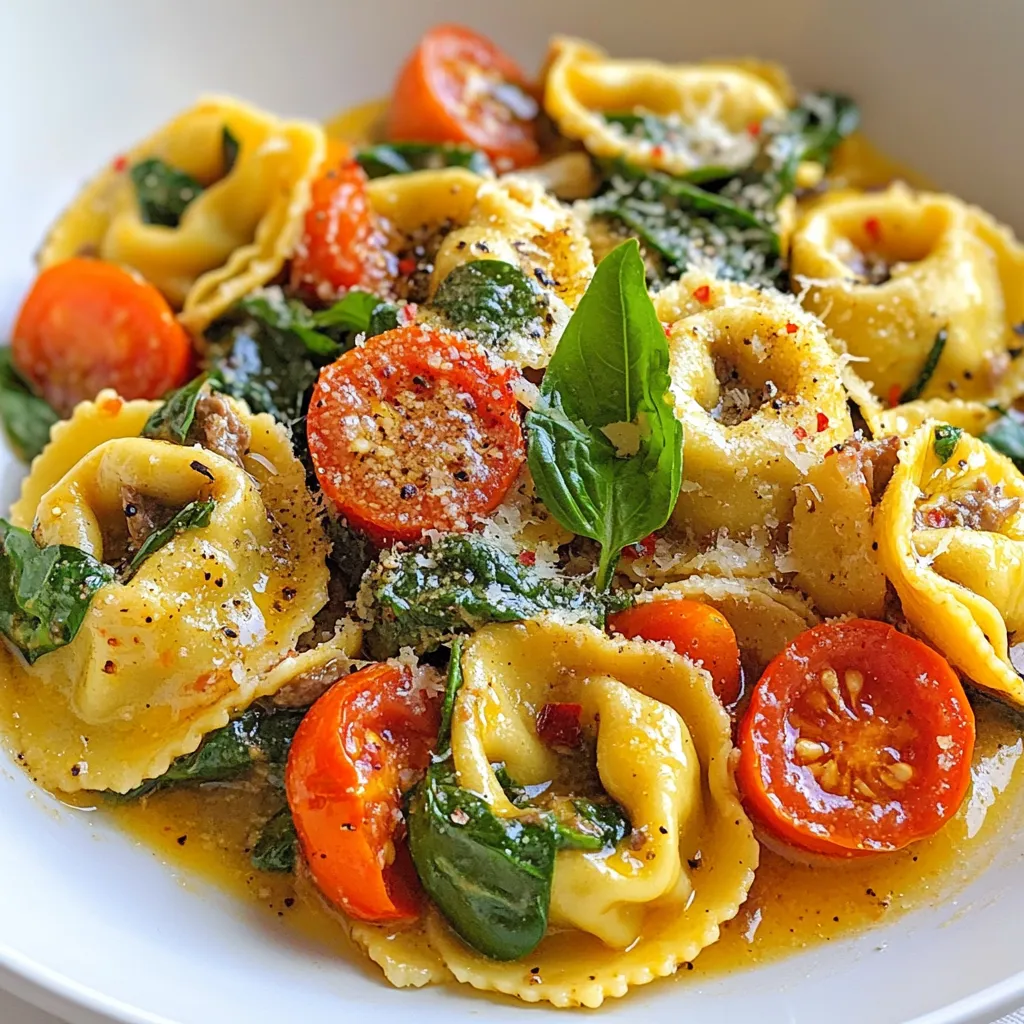
Are you craving a dinner that’s quick, tasty, and packed with flavor? Look no further! This Garlic Butter Beef Tortellini

To make Lemon Butter Chicken Breasts, you need some simple ingredients. Here’s what you will need: - 4 boneless, skinless chicken breasts - 1/2 cup unsalted butter, divided - 1 lemon (zest and juice) - 3 cloves garlic, minced - 1 teaspoon dried thyme - 1 teaspoon dried oregano - Salt and pepper to taste - Fresh parsley, chopped (for garnish) These ingredients come together to create a bright and buttery dish. The lemon adds a fresh zing, while the garlic and herbs give it depth. You can find these items at your local grocery store. Make sure to choose fresh chicken for the best flavor. Using unsalted butter lets you control the salt in your meal. {{ingredient_image_1}} - Preheat oven to 375°F (190°C). - In a large oven-safe skillet, melt 1/4 cup of butter over medium heat. - Season the chicken breasts with salt, pepper, dried thyme, and oregano on both sides. - Once the butter bubbles, add the seasoned chicken breasts to the skillet. Sear for about 4-5 minutes on each side until golden brown. - Remove the chicken from the skillet and set it aside on a plate. - In the same skillet, add 3 cloves of minced garlic and sauté for about 30 seconds until fragrant. - Pour in the lemon juice and add lemon zest. Scrape the bottom of the skillet to deglaze it. - Stir in the remaining 1/4 cup of butter until it melts and combines with the sauce. - Return the chicken breasts to the skillet, spooning some lemon butter sauce over them. - Transfer the skillet to the preheated oven and bake for 15-20 minutes. Ensure the chicken reaches an internal temperature of 165°F (75°C). - Once cooked, remove from the oven and let the chicken rest for 5 minutes in the sauce. - Garnish with fresh parsley before serving. To ensure chicken cooks evenly, start with chicken at room temperature. This helps it cook through. Sear both sides in hot butter for a nice crust. Use a meat thermometer to check the internal temperature. Chicken should reach 165°F (75°C). This guarantees it's safe to eat. Deglazing the skillet is key for flavor. After searing the chicken, remove it and add garlic. Let it cook briefly, then pour in lemon juice. Scrape the bottom of the skillet to release tasty bits. This adds depth to your sauce. For extra flavor, consider adding herbs like rosemary or fresh basil. You can also mix in spices like paprika or cumin for a twist. If you want a lighter dish, swap butter for olive oil or ghee. These alternatives can add unique flavors while keeping it healthy. Garnish your dish with fresh parsley or lemon slices. This adds color and freshness. For a nice touch, sprinkle some black pepper on top. Serve your chicken with sides like rice, quinoa, or steamed veggies. This makes a balanced meal and brightens up your plate. Pro Tips Use Fresh Herbs: For an even more vibrant flavor, opt for fresh thyme and oregano instead of dried. Add them towards the end of cooking for a bright finish. Perfectly Sear Chicken: Ensure the skillet is hot enough before adding the chicken. This helps achieve a nice golden crust while keeping the inside juicy. Rest the Chicken: Let the chicken rest in the sauce after cooking. This allows the flavors to meld and keeps the chicken moist. Adjust Lemon Zest: Depending on your preference for tartness, feel free to increase or decrease the amount of lemon zest used in the sauce. {{image_2}} For those on a low-carb diet, you can skip the butter and use olive oil. This change keeps the flavors rich while cutting carbs. You can also try coconut oil for a different flavor. If you need a dairy-free option, replace the butter with a plant-based alternative. Look for options like vegan butter or olive oil for a smooth texture. To shake things up, you can add other citrus fruits. Lime or orange can bring a fresh twist to the dish. Simply use their zest and juice like you do with lemon. Adding other herbs can also change the taste. Rosemary and basil are great choices. They can give the chicken a new layer of flavor that you might find exciting. You can grill or bake this chicken. Grilling adds a smoky taste and nice grill marks. Bake it for a hands-off approach, letting the oven do the work. If you prefer a slow cooker, it’s a perfect way to keep the chicken juicy. Just cook it on low for 6-8 hours for a tender result. Each method brings its own unique flair to the dish. To store leftovers, let the chicken cool first. Place the chicken in an airtight container. You can keep it in the fridge for up to three days. This helps keep the flavor fresh. I recommend using glass containers for storage. They do not absorb odors and are easy to clean. When reheating, avoid losing moisture. The best method is to use the skillet. Heat a little olive oil or butter over low heat. Add the chicken and cover it. Cook for a few minutes until warm. The microwave can dry out chicken, so I suggest using it only if you're in a rush. If you do use the microwave, heat in short bursts. Check often to avoid overcooking. To freeze cooked chicken, let it cool completely. Wrap each piece tightly in plastic wrap. Place the wrapped chicken in a freezer bag. You can freeze it for up to three months. For thawing, the best method is to leave it in the fridge overnight. You can also use the microwave to quickly thaw the chicken. Just remember to cook it right after thawing to keep it safe. How long do you cook lemon butter chicken breasts? You cook lemon butter chicken breasts for about 15 to 20 minutes in the oven. Aim for an internal temperature of 165°F (75°C) to ensure they are safe to eat. This keeps the chicken juicy and flavorful. Can I use chicken thighs instead of breasts? Yes, you can use chicken thighs instead of breasts. Thighs have more fat, which adds flavor and moisture. Adjust the cooking time slightly, as thighs may take a bit longer to cook through. What can I substitute for butter? You can use olive oil or ghee as a substitute for butter. Both options add rich flavor. Coconut oil also works well, giving a hint of sweetness. Alternatives for fresh herbs? If you don’t have fresh herbs, dried herbs are a great option. Use half the amount of dried thyme and oregano. You can also try Italian seasoning for a mix of flavors. Is this recipe healthy? Yes, this recipe can be part of a healthy diet. It features lean chicken and healthy fats from butter. You can switch to olive oil for a lighter option. Nutritional facts per serving? Each serving contains approximately: - Calories: 380 - Protein: 30g - Fat: 28g - Carbohydrates: 2g - Fiber: 0g This recipe offers a good balance of protein and healthy fats, making it a satisfying meal option. This blog post shared how to make lemon butter chicken with simple steps. We covered essential ingredients like chicken, butter, and fresh herbs. I provided tips for even cooking and added flavor enhancements. You learned about variations, including dietary adjustments and different cooking methods. Finally, I included storage tips for leftovers. This recipe is easy and tasty, making it great for any meal. Enjoy cooking and experimenting with this dish!

Lemon Butter Chicken Breasts Perfectly Cooked Every Time

Do you dream of juicy, flavorful chicken every time you cook? You’re in the right place! In this post, I’ll

- 1 pound ground beef - 1 medium onion, chopped - 2 cloves garlic, minced - 1 can (15 oz) black beans, rinsed and drained - 1 can (15 oz) diced tomatoes with green chilies - 2 cups frozen corn kernels - 1 tablespoon chili powder - 1 teaspoon cumin - 1 teaspoon smoked paprika - Salt and pepper to taste - 1 cup cornmeal - 2 cups chicken broth - 1 cup shredded cheddar cheese - 1/4 cup chopped fresh cilantro for garnish - Sour cream for serving (optional) Texas Tamale Pie is all about bold flavors and comfort. Each ingredient plays a key role. Ground beef gives it a hearty base. The chopped onion and minced garlic add warmth and depth. Black beans and diced tomatoes bring color and nutrition. The frozen corn adds sweetness and texture. Spices like chili powder, cumin, and smoked paprika kick things up a notch. They give the dish a rich, savory taste that warms your soul. Salt and pepper round out the flavor. Cornmeal is the magic for the crust. It thickens nicely when mixed with hot chicken broth. This creates a solid layer that holds everything together. Shredded cheddar cheese on top melts beautifully, making it ooey-gooey. Finally, fresh cilantro adds a bright touch. If you like, serve the pie with sour cream. This adds a cool contrast to the spiciness. With these ingredients, you can craft a Texas Tamale Pie that’s both delicious and satisfying. {{ingredient_image_1}} - Preheat your oven to 375°F (190°C). - Chop one medium onion and mince two cloves of garlic. - In a large skillet, brown one pound of ground beef over medium heat. - Drain any excess fat after the beef is cooked. - Add the chopped onion and minced garlic to the skillet. Sauté until the onion turns clear, about five minutes. - Stir in one can of black beans, one can of diced tomatoes with green chilies, and two cups of frozen corn. - Season your mixture with one tablespoon of chili powder, one teaspoon of cumin, one teaspoon of smoked paprika, salt, and pepper. - Mix everything well and let it simmer for ten minutes. - In a separate pot, bring two cups of chicken broth to a boil. - Gradually whisk in one cup of cornmeal while stirring constantly. Keep stirring until it thickens, about three to five minutes. - In a greased 9x13-inch baking dish, spread the beef and bean mixture evenly on the bottom. - Pour the thickened cornmeal mixture over the beef layer, spreading it out evenly. - Finally, sprinkle one cup of shredded cheddar cheese on top of the cornmeal layer. - Place the dish in the preheated oven. Bake for 25 to 30 minutes. - Look for bubbly and golden brown cheese on top. - Once done, take it out and let it cool for five minutes before slicing. To make your Texas Tamale Pie truly shine, adjust the spice level to your taste. Start with one tablespoon of chili powder. If you like heat, add more. You can also mix in fresh jalapeños or hot sauce for an extra kick. For a smoky flavor, try adding more smoked paprika. Taste as you go, and don’t be afraid to experiment. Getting the cornmeal layer just right is key. Use fine cornmeal for a smoother texture. When you cook the cornmeal, stir constantly to avoid lumps. The mixture should be thick but pourable. Bake it until golden and bubbly for the best finish. Pair your Texas Tamale Pie with a fresh side salad or some rice. Cornbread also makes a great side! For garnishes, fresh cilantro adds color and flavor. A dollop of sour cream on top makes it creamy and delicious. Enjoy your meal with friends and family for a cozy gathering. Pro Tips Use Lean Ground Beef: Opt for lean ground beef to reduce excess fat in the dish, making it healthier and allowing the flavors of the spices and vegetables to shine. Customize Your Spices: Feel free to adjust the amount of chili powder and cumin to suit your taste preferences. If you like it spicy, add more chili powder or a dash of hot sauce! Make It Vegetarian: Substitute the ground beef with a plant-based meat alternative or additional beans and vegetables for a delicious vegetarian version of this tamale pie. Let It Rest: Allow the tamale pie to rest for a few minutes after baking. This helps it set and makes slicing easier, resulting in a neater presentation. {{image_2}} You can switch up the proteins in your Texas Tamale Pie. Ground turkey works well if you want a leaner option. For a plant-based dish, use lentils or crumbled tofu. These swaps keep the dish tasty and can cater to different diets. You can also change the beans. Try pinto beans or kidney beans for a different flavor. Adding fresh or frozen vegetables like bell peppers or zucchini can boost nutrition too. Spice is key in Texas Tamale Pie. Consider adding Southwestern spices like oregano or coriander. These spices enhance the pie's flavor. If you like heat, add jalapeños or a splash of hot sauce. You can mix in fresh herbs like cilantro for a fresh twist. Experimenting with flavors can make your pie unique and exciting. If you need gluten-free options, use cornmeal that is certified gluten-free. This keeps the dish safe for those with gluten sensitivities. For a vegetarian version, simply skip the beef and add more beans and veggies. Using vegetable broth instead of chicken broth adds depth to the flavor. These changes make the pie accessible to various diets while keeping it delicious. After you enjoy your Texas Tamale Pie, store any leftovers properly. Here are some best practices: - Cool down: Let the pie cool to room temperature before storing. - Containers: Use airtight containers to keep it fresh. Glass or plastic containers work well. - Label: Write the date on the container, so you know when you stored it. To enjoy your leftover pie, reheating is key. Here are some methods to keep it tasty: - Oven method: Preheat the oven to 350°F (175°C). Place slices on a baking sheet. Cover with foil to prevent drying. Heat for about 15-20 minutes. - Microwave method: Place a slice on a microwave-safe plate. Heat for 1-2 minutes. Add a splash of water to keep it moist. For longer storage, you can freeze your pie: - Freezing: Wrap it tightly in plastic wrap, then foil. This helps prevent freezer burn. - Shelf life: It can last up to three months in the freezer. Texas Tamale Pie is a hearty dish made with layers of meat, beans, cornmeal, and cheese. Its roots trace back to Texas, where cooks blended Mexican and American flavors. This dish is comforting and perfect for family meals. You get a warm, savory bite with every forkful. Yes, you can make Texas Tamale Pie ahead of time. Prepare the beef and bean mixture and the cornmeal layer separately. Store each in the fridge for up to two days. When ready to bake, layer them in a dish and bake as directed. This saves time and lets flavors meld. Look for bubbly, golden cheese on top. The edges should be slightly crispy. You can also check the center with a knife. If it comes out clean, your pie is ready. Let it cool for a few minutes before slicing. This helps keep the layers intact. Yes, Texas Tamale Pie freezes well. After baking, let it cool completely. Wrap it tightly in plastic wrap and foil. Store it in the freezer for up to three months. To reheat, thaw overnight in the fridge and bake until hot. Enjoy your tasty comfort food anytime! To sum it up, Texas Tamale Pie combines ground beef, beans, cornmeal, and cheese. We prepped, cooked, and baked a tasty dish that can please anyone. You can even adjust spices or swap ingredients. Remember, don’t hesitate to get creative with the flavors. Follow these tips, and you'll impress your family or friends. This dish is great for leftovers too, so make more! Enjoy your cooking adventure with this delicious pie!

Scrumptious Texas Tamale Pie Easy Comfort Food

Welcome to my kitchen, where comfort food gets a Texas twist! Today, I’m excited to share my easy recipe for

Older posts
Newer posts
← Previous Page1 … Page141 Page142 Page143 … Page150 Next →

dsad

© 2025 Emmas Dish • Built with GeneratePress

Our Policies

  • Copyright Policy
  • Cookie Policy
  • GDPR Policy
  • Privacy Policy
  • Disclaimer
  • Terms Of Use

More Information

  • Home
  • About
  • Contact
  • Appetizers
  • Dessert
  • Dinner
  • Drinks
©2025, Emmas Dish About Back To Top