Skip to content
DisclaimerTerms Of UseGDPR PolicyCookie Policy

Emmas Dish

  • Home
  • Drinks
  • Appetizers
  • Dinner
  • Dessert
  • About
  • Contact
  • Privacy Policy
DisclaimerTerms Of UseGDPR PolicyCookie Policy

Emma

To make crispy air fryer chicken tenders, you need fresh and simple ingredients. Here’s what you will use: - 1 pound chicken tenderloins - 1 cup buttermilk - 1 teaspoon garlic powder - 1 teaspoon onion powder - 1 teaspoon paprika - 1 teaspoon salt - 1/2 teaspoon black pepper The marinade brings great taste. The buttermilk makes the chicken juicy and tender. The spices add flavor. Here’s what you mix: - Buttermilk - Garlic powder - Onion powder - Paprika - Salt - Black pepper The breading gives the chicken that crispy outside. You will need: - 1 cup all-purpose flour - 1 cup breadcrumbs (panko works best for crunch) - Cooking spray or olive oil spray These ingredients make tasty chicken tenders. Feel free to get creative with spices! You can add your favorites to the marinade or breading for extra flavor. {{ingredient_image_1}} Preparing the Buttermilk Mixture To make the buttermilk mixture, I use a large bowl. I combine 1 cup of buttermilk with 1 teaspoon of garlic powder, 1 teaspoon of onion powder, 1 teaspoon of paprika, 1 teaspoon of salt, and 1/2 teaspoon of black pepper. I mix these until smooth. This blend adds flavor and helps keep the chicken juicy. Time and Temperature Recommendations I let the chicken tenderloins sit in the buttermilk for at least 1 hour. For even more flavor, marinating overnight works great too. I always store it in the fridge. This keeps the chicken safe and allows the flavors to soak in. Creating a Breading Station Next, I set up my breading station. I get two shallow dishes. In one, I put 1 cup of all-purpose flour. In the other, I add 1 cup of breadcrumbs, preferably panko. Panko gives the chicken a nice crunch. Proper Technique for Coating Once marinated, I take the chicken out, letting excess buttermilk drip off. I dredge each tender in flour, shaking off the extra. Then, I dip it back into the buttermilk before coating it with breadcrumbs. I press the crumbs into the chicken to make sure they stick well. Preheating the Air Fryer I preheat my air fryer to 400°F (200°C) for about 5 minutes. This step is key for a crispy finish. Cooking Time and Temperature I spray the air fryer basket lightly with cooking spray. I place the chicken tenders in a single layer, ensuring they do not overlap. After that, I spray the tops of the chicken tenders with more cooking spray. I air fry them for 10-12 minutes. I flip them halfway through the cooking time. Achieving the Perfect Crisp I check that the chicken reaches an internal temperature of 165°F (75°C). The tenders should look golden brown and crispy. After cooking, I let them rest for a few minutes. This helps keep them juicy when I serve them. How Long to Marinate for Best Flavor For the best taste, marinate your chicken tenders for at least one hour. This allows the buttermilk to soak in. If you have the time, marinating overnight gives deeper flavor. Optional Seasonings to Enhance Taste You can add a pinch of cayenne pepper for heat or some dried herbs for extra flavor. Try thyme or oregano in the buttermilk mix. These small changes can make a big difference. Avoiding Soggy Tenders To keep your chicken tenders crispy, do not overcrowd the air fryer. Cook in batches if needed. This allows hot air to circulate properly and makes everything crisp. Cooking in Batches If you have many tenders, cook them in two or three rounds. Keep the first batch warm in the oven on low heat. This way, all your tenders stay hot and crispy. Ideal Dipping Sauces Serve your crispy chicken tenders with tasty sauces. Honey mustard, ranch, and BBQ sauce are all great choices. They add flavor and make eating fun. Garnishing for an Appealing Plate To make your dish look great, add fresh parsley. A sprinkle of parsley adds color and freshness. Serve the tenders on a nice platter for a beautiful meal. Pro Tips Marinate Longer for Flavor: For the best flavor, marinate the chicken tenders overnight. This allows the spices to penetrate deeply into the meat, resulting in a more flavorful bite. Use Panko Breadcrumbs: For extra crunch, opt for panko breadcrumbs instead of regular breadcrumbs. They create a light and crispy texture that elevates the chicken tenders. Don't Overcrowd the Basket: Make sure to place the chicken tenders in a single layer in the air fryer. Overcrowding can lead to uneven cooking and less crispy results. Check for Doneness: Use a meat thermometer to ensure the chicken reaches an internal temperature of 165°F (75°C). This guarantees that your tenders are both safe to eat and juicy. {{image_2}} You can switch up the spice blends for fun. Try using Cajun seasoning for a kick. Or go for Italian herbs like oregano and basil for a fresh taste. You can also mix in some lemon zest for a bright flavor. For the marinade, you can infuse different flavors. Add a splash of hot sauce for a spicy twist. You could also use honey for a sweet touch. Try adding some mustard for a tangy zing. If you want a gluten-free option, use almond flour instead of regular flour. It gives a nice nutty flavor. You can also try crushed cornflakes for a crunchy coating. Adding Parmesan cheese to your breadcrumbs makes a rich taste. Mix it with the breadcrumbs before coating the chicken. This adds a savory layer to the tenders. You can also use whole wheat breadcrumbs for a healthier choice. To keep your crispy chicken tenders fresh, follow these tips: - Best Practices for Refrigeration: Place the cooled chicken tenders in an airtight container. This helps prevent moisture loss. Store them in the fridge for up to 3 days. Make sure they are completely cool before sealing. - Reheating Tips for Maintaining Crispiness: When you're ready to enjoy leftovers, reheat them in the air fryer. Set the temperature to 350°F (175°C) for about 5-7 minutes. This method keeps them crispy and delicious. Avoid the microwave, as it can make them soggy. If you want to save some for later, freezing is a great option: - How to Freeze for Future Meals: Allow the chicken tenders to cool completely. Place them in a single layer on a baking sheet and freeze for about 1-2 hours. Once frozen, transfer them to a freezer-safe bag. Squeeze out any air before sealing. They can last for up to 3 months. - Thawing Methods: To thaw, place the frozen tenders in the fridge overnight. For a quicker method, you can use the microwave. Just be careful not to cook them. Once thawed, reheat them in the air fryer for best results. To check if your chicken tenders are done, use a meat thermometer. Insert it into the thickest part of the tender. The internal temperature should reach 165°F (75°C) for safety. If you don't have a thermometer, look for a golden brown color. The juices should run clear, not pink, when you cut into them. Yes, you can use frozen chicken tenders. However, you will need to adjust your cooking time. Frozen tenders may take 5 to 10 minutes longer to cook. Make sure they still reach the safe temperature of 165°F (75°C). You might need to check them a bit more often to avoid overcooking. To reheat leftover chicken tenders, use the air fryer or an oven. Preheat your air fryer to 350°F (175°C) and cook for about 5 to 7 minutes. This helps keep them crispy. If using an oven, set it to 375°F (190°C). Bake for 10 to 15 minutes. Always check that they heat evenly. In this blog post, I covered how to make delicious chicken tenders. We explored the key ingredients, marinating techniques, and step-by-step cooking in an air fryer. I shared tips to enhance flavor and presented ideas for serving. By following these guidelines, you can achieve crispy, tasty tenders that impress. Remember, experimenting with spices or coatings can make your dish unique. Enjoy your cooking and savor each bite.

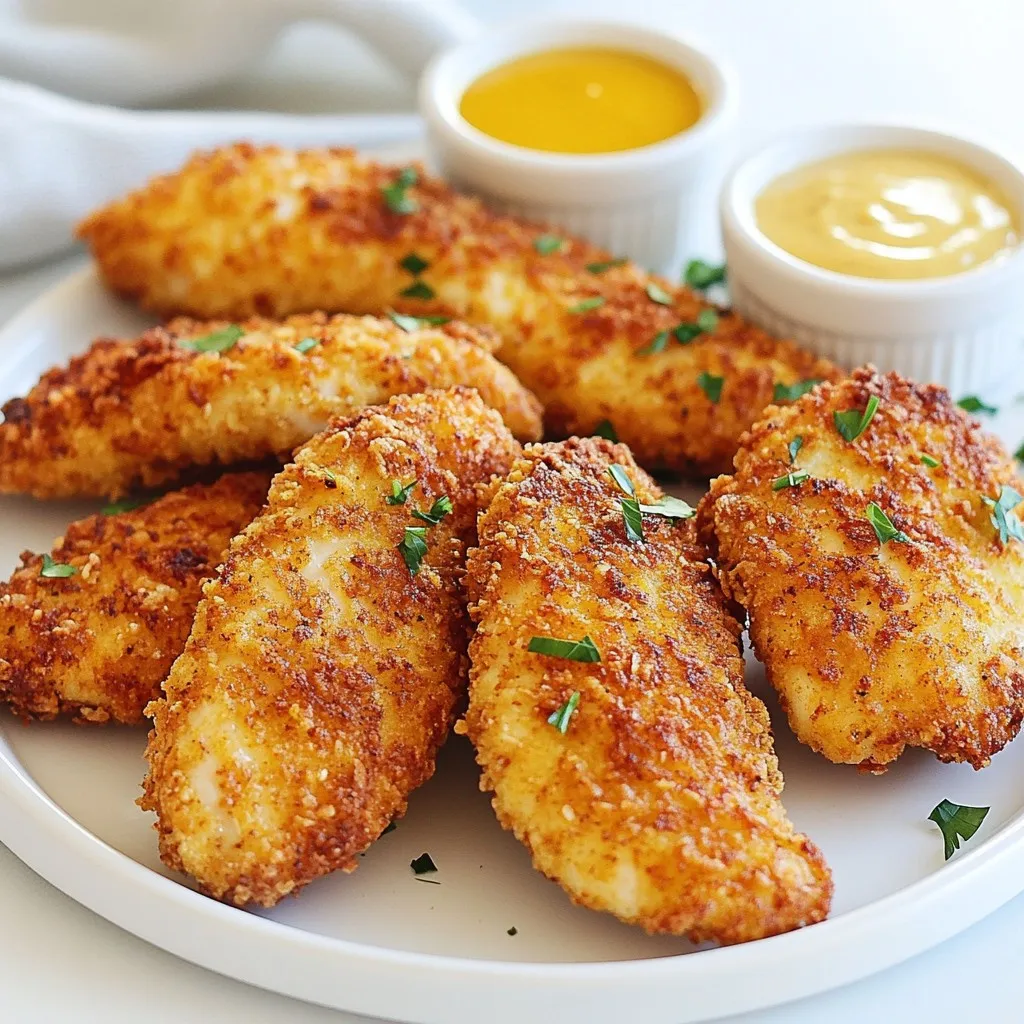
Crispy Air Fryer Chicken Tenders Flavorful and Easy

Are you ready for crispy, juicy chicken tenders that are easy to make? In this blog post, I’ll walk you

- 2 cans chickpeas, drained and rinsed - 1 medium onion, finely chopped - 2 cloves garlic, minced - 2 medium carrots, diced - 2 celery stalks, diced - 1 can (14 oz) diced tomatoes - 4 cups vegetable broth - 1 teaspoon dried oregano - 1 teaspoon dried thyme - 1 teaspoon smoked paprika - 2 cups kale, shredded - 2 tablespoons olive oil - Salt and pepper to taste Chickpeas are the star of this soup. They add protein and texture. I love using canned chickpeas for quick meals. Just rinse them before adding to the pot. Next, the vegetables bring a lot of flavor. Onions and garlic create a rich base. Carrots and celery add sweetness and crunch. The shredded kale gives a fresh, vibrant touch. For seasoning, dried oregano and thyme infuse the soup with herbal notes. Smoked paprika adds a warm, smoky flavor that is so inviting. The vegetable broth is your liquid gold. It ties all the flavors together. - Fresh parsley, chopped (for garnish) - Olive oil Garnishing is key for a beautiful soup. Fresh parsley not only looks great but adds a fresh kick. A drizzle of olive oil on top enhances the taste and makes it shine. - Large pot - Cutting board - Knife You need a few basic tools. A large pot helps cook everything evenly. A cutting board and knife are essential for chopping. Keep your workspace organized to make cooking easy and fun. {{ingredient_image_1}} To start, you want a big pot. Heat two tablespoons of olive oil over medium heat. Add one finely chopped onion to the pot. Sauté the onion for about 3-4 minutes. You want it to be soft and translucent. Next, add two minced garlic cloves. Cook the garlic for one minute until it smells nice. Now it's time to add the veggies. Chop two medium carrots and two celery stalks. Add these to the pot. Cook the carrots and celery for about 5-6 minutes. Stir them often, so they soften up nicely. After the veggies are soft, it’s time to add the fun stuff! Open a can of diced tomatoes (14 oz) and pour it in. Next, add two cans of chickpeas that you drained and rinsed. This gives your soup texture and protein. Now, pour in four cups of vegetable broth. Don’t forget the seasonings! Stir in one teaspoon of dried oregano, one teaspoon of dried thyme, and one teaspoon of smoked paprika. This mix adds a great flavor. Bring the soup to a gentle boil. Once it bubbles, reduce the heat to simmer. Let it cook for about 20-25 minutes. This helps all the flavors mix well. After that time, add two cups of shredded kale. Cook for another five minutes until the kale is tender. Finally, season with salt and pepper to taste. Your Tuscan Chickpea Soup is now ready to serve. Enjoy the warmth and flavors in every spoonful! - Best sautéing methods for flavor enhancement: Start with medium heat. Heat olive oil in a large pot. Add chopped onion and sauté for 3-4 minutes. This softens the onion and brings out its sweetness. Next, add minced garlic and cook for one more minute. This step adds a wonderful aroma to your soup. - Tips for achieving the perfect soup consistency: To get a thick soup, let it simmer longer. The longer it simmers, the more the flavors mix. If you prefer a thinner soup, add extra vegetable broth as you cook. Adjust the liquid until it feels just right. - Optional ingredients for added depth: You can add diced bell peppers or zucchini to the mix for extra texture. A splash of lemon juice brightens the flavors too. If you like heat, add a pinch of red pepper flakes. - How to adjust spices according to preference: Start with the recommended spices, then taste your soup. If you want more flavor, add a bit more oregano or thyme. If you love smoky flavors, increase the smoked paprika just a little. - Serving suggestions for a restaurant-style look: Ladle the soup into rustic bowls. Drizzle a little extra olive oil on top. Add a sprig of fresh parsley for color. This simple touch makes your dish look elegant. - Pairing with sides like crusty bread: Serve your soup with a slice of warm, crusty bread. The bread is perfect for dipping. It adds a satisfying crunch to each bite. You can even offer a side salad for a complete meal. Pro Tips Fresh Ingredients: Using fresh vegetables and herbs can significantly enhance the flavor of your soup. Opt for seasonal produce whenever possible. Texture Variation: For a creamier consistency, consider blending half of the soup and then mixing it back in with the whole chickpeas and vegetables. Customize Your Spices: Feel free to adjust the spices according to your taste. A pinch of red pepper flakes can add a nice heat if desired. Storage Tips: This soup keeps well in the fridge for up to 3 days. Reheat gently on the stove and add a splash of water or broth if it thickens too much. {{image_2}} If you want to switch things up, feel free to use other legumes instead of chickpeas. White beans or lentils can add a new twist. They cook well and blend nicely with the soup's texture. You can also swap in different vegetables based on what’s in season. Try using zucchini in summer or sweet potatoes in fall. Seasonal veggies add a fresh taste and keep your soup exciting. This soup is already vegan and gluten-free, making it great for various diets. To make it low-sodium, use low-sodium vegetable broth. You can also cut back on salt while cooking. Taste as you go, and adjust to your liking. Incorporating traditional Italian ingredients can elevate your soup. Add a splash of balsamic vinegar for depth. You could also sprinkle in some grated Parmesan cheese for creaminess. To give it a Mediterranean twist, consider adding olives or artichokes. These ingredients will add a burst of flavor and make the soup unique. Enjoy exploring these options! To store your leftover Tuscan chickpea soup, let it cool first. Place it in an airtight container and refrigerate. This soup lasts in the fridge for about 3 to 5 days. Make sure to check for any off smells before eating. For long-term storage, you can freeze the soup. Use a freezer-safe container or bag. Leave some space at the top, as soup expands when frozen. It can stay fresh in the freezer for up to 3 months. When you are ready to eat, thaw it in the fridge overnight. Reheat it on the stove over low heat, stirring often to keep the flavor intact. You can get creative with leftover soup. Try adding cooked pasta or grains for a heartier meal. You can also blend it into a smooth puree for a different texture. Another idea is to serve it as a sauce over roasted vegetables or grilled chicken. Each option adds a twist to your original recipe! To make Tuscan Chickpea Soup vegetarian, choose vegetable broth instead of chicken broth. Most canned chickpeas are already vegetarian. The other veggies, like onion, garlic, carrots, and celery, are also plant-based. You can add more vegetables if you like. Spinach, zucchini, or bell peppers work well. Just chop them up and toss them in. This soup is tasty and filling, making it great for a meatless meal. Yes, you can use dried chickpeas! Start by soaking them overnight in water. This step helps them cook faster. The next day, drain the chickpeas and rinse them. Then, cook them in a pot of boiling water for about 1 to 1.5 hours until they are tender. Once done, you can follow the recipe as usual. Just add the cooked chickpeas in place of canned ones. They will add a lovely texture and flavor to the soup. Absolutely! Tuscan Chickpea Soup is simple to prepare. It takes about 15 minutes to prep and 45 minutes to cook. You will spend most of the time letting the soup simmer. The steps are clear and easy to follow. You sauté veggies, mix in the broth, and let it simmer. If you can chop and stir, you can make this soup! Enjoy it with crusty bread for a full meal. This blog post explored making Tuscan Chickpea Soup, covering ingredients, tips, variations, and storage. You learned about key components like chickpeas, fresh veggies, and tasty seasonings. I shared methods to enhance flavors and serve soup beautifully. Remember, you can customize recipes to suit your preferences and dietary needs. Try different ingredients or unique garnishes for a personal touch. Enjoy this hearty soup that warms you up and delights your taste buds!

Tuscan Chickpea Soup Flavorful and Hearty Meal

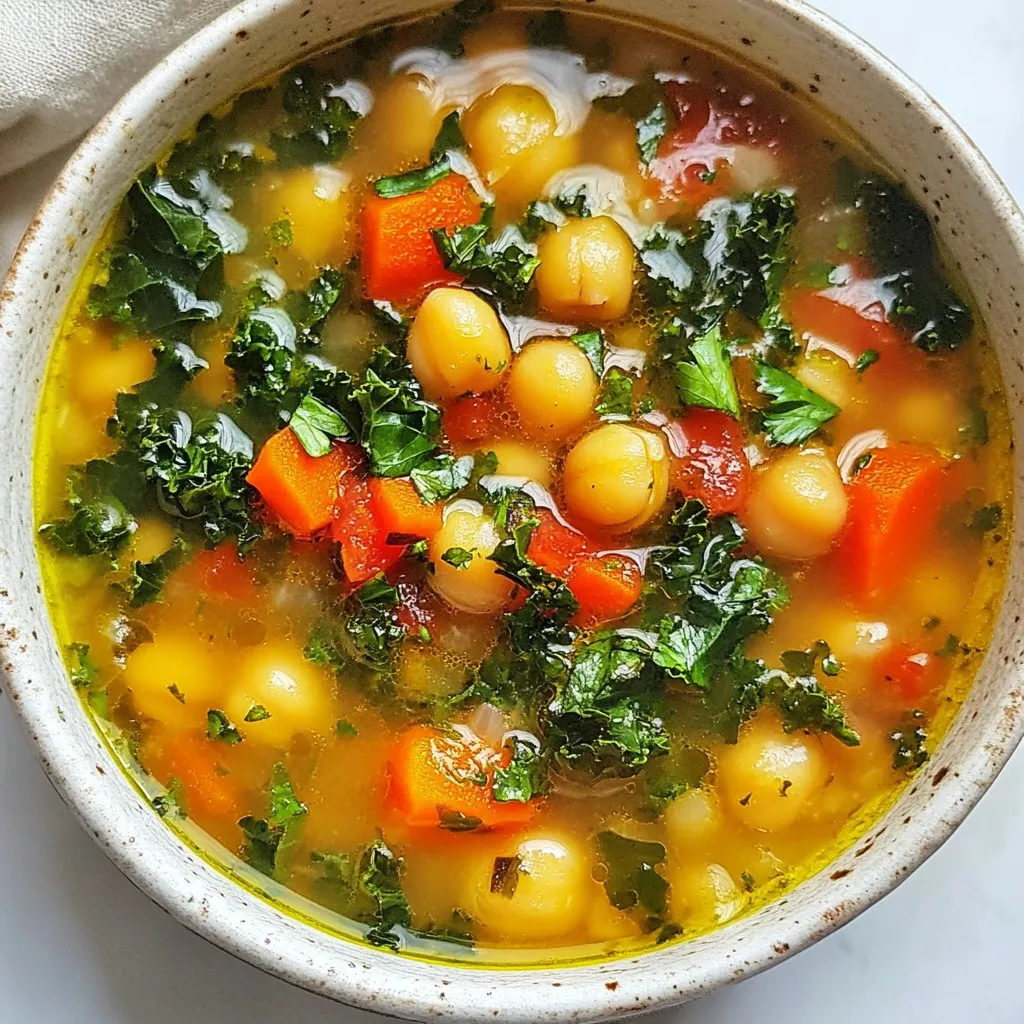
Looking for a warm, hearty meal that’s easy to make? Tuscan Chickpea Soup is packed with flavor from fresh veggies

- 8 oz cream cheese, softened - 1 cup sour cream - 1 cup shredded cheddar cheese - 1 cup shredded pepper jack cheese - 4-5 fresh jalapeños, seeded and finely diced - 1/2 cup green onions, sliced - 1 teaspoon garlic powder - 1 teaspoon onion powder - 1/2 teaspoon smoked paprika - Salt and pepper to taste - 1/2 cup panko breadcrumbs (optional for topping) - 2 tablespoons olive oil (if using panko) Gather these ingredients before you start. Each one plays a key role in the flavor. The cream cheese and sour cream create a rich base. The cheddar and pepper jack add a creamy, cheesy goodness. Fresh jalapeños bring the heat, while green onions provide a fresh crunch. Spices like garlic powder, onion powder, and smoked paprika enhance the taste. Adjust the salt and pepper to make it just right for you. If you want a crispy top, use panko breadcrumbs with olive oil. This dip is easy to make and perfect for sharing. {{ingredient_image_1}} - Preheating the oven: Set your oven to 350°F (175°C). This is the perfect temperature for our dip. - Mixing the Base: In a large bowl, blend 8 oz of softened cream cheese with 1 cup of sour cream until it's smooth. This creamy base is key to the dip's texture. - Adding Ingredients: Now, stir in 1 cup each of shredded cheddar and pepper jack cheese. Then add 4-5 finely diced jalapeños and 1/2 cup of sliced green onions. For flavor, mix in 1 teaspoon each of garlic powder and onion powder, along with 1/2 teaspoon of smoked paprika. Season with salt and pepper to taste. Mix all these ingredients well until they are fully combined. - Transferring to baking dish: Pour the dip mixture into a baking dish. Spread it evenly with a spatula so it bakes nicely. - Optional topping: If you want a crunchy top, take 1/2 cup of panko breadcrumbs. Toss them with 2 tablespoons of olive oil until coated. Sprinkle this over the dip in the baking dish. - Baking time: Place the dish in the oven. Bake for 25-30 minutes. The dip is ready when it bubbles and the top is golden brown. This step-by-step guide makes it easy to create a tasty Game Day Jalapeño Popper Dip that everyone will love! To adjust the spice level, use fresh jalapeños. For less heat, remove seeds and membranes. If you like it hot, leave them in. You can also mix in a bit of hot sauce for extra kick. Fresh herbs can add a nice touch too. Consider adding cilantro or parsley for more flavor. These herbs brighten the dip and make it more colorful. The best dippers are tortilla chips, crackers, and fresh veggies. Tortilla chips bring crunch and flavor. Crackers add a nice texture too. Sliced bell peppers or cucumbers are great for a fresh bite. For a pretty finish, garnish the dip with chopped green onions. This adds color and a mild onion taste. Serve the dip hot for the best experience! Pro Tips Use Fresh Jalapeños: For the best flavor and heat, opt for fresh jalapeños instead of canned. Adjust the number according to your spice preference. Mix Cheeses: Experiment with different cheese blends to customize the flavor. Adding mozzarella can give a nice stretchy texture to the dip. Make Ahead: Prepare the dip a day in advance and store it in the refrigerator. Just bake it before serving for a quick and easy game day snack. Garnish for Presentation: Adding a sprinkle of fresh cilantro or a drizzle of hot sauce on top before serving can elevate the dish visually and flavor-wise. {{image_2}} If you want a dairy-free dip, use vegan cream cheese. It works well in this recipe. You can also replace shredded cheese with dairy-free cheese. This keeps the dip creamy and tasty without dairy. For extra heat, add diced chorizo or a splash of hot sauce. Chorizo adds a nice, smoky flavor. Hot sauce gives a kick that many love. Both options make the dip even more exciting. Try adding black beans or corn to the dip. Black beans bring protein and fiber, making it hearty. Corn adds sweetness and crunch, giving the dip great texture. These additions make your dip unique and fun. To keep your dip fresh, store it in an airtight container. This helps keep moisture in and air out. Place it in the fridge right after serving. It can stay fresh for about 3 to 4 days. If you want to keep it longer, consider freezing it. In the freezer, it can last for up to 2 months. Just make sure to let it cool completely before freezing. When you’re ready to eat your leftovers, you can reheat them in a few ways. The microwave is quick and easy. Use a microwave-safe dish and heat in 30-second bursts. Stir in between to warm it evenly. If you want a crisp top, use the oven. Preheat your oven to 350°F (175°C). Place the dip in an oven-safe dish and heat for about 15 minutes. This will help maintain that gooey, delicious texture. Enjoy your tasty dip just like the first time! Can I make this dip ahead of time? Yes, you can make this dip ahead. Prepare it, and keep it in the fridge. Just bake it right before serving. This saves time on game day. What can I use instead of panko breadcrumbs? You can use crushed tortilla chips or regular breadcrumbs. Both will add crunch. They will work well on top of the dip. Is this dip gluten-free? Yes, the dip can be gluten-free. Just skip the panko breadcrumbs or use gluten-free ones. The rest of the ingredients are naturally gluten-free. How spicy is this dip with fresh jalapeños? The dip has a mild to medium heat. If you want it spicier, use more jalapeños. You can also leave some seeds in for extra kick. Can I freeze this dip for later use? Yes, you can freeze the dip. Just make sure to seal it well. Thaw it in the fridge overnight before baking. It will still taste great! This blog post shared how to make a tasty jalapeño popper dip. We covered key ingredients, simple steps, and helpful tips for flavor. You learned about storage, reheating, and variations for different diets. With these easy steps and ideas, you can create a delicious dip for any gathering. I hope you enjoy making it as much as I do!

Game Day Jalapeño Popper Dip Crowd-Pleasing Treat

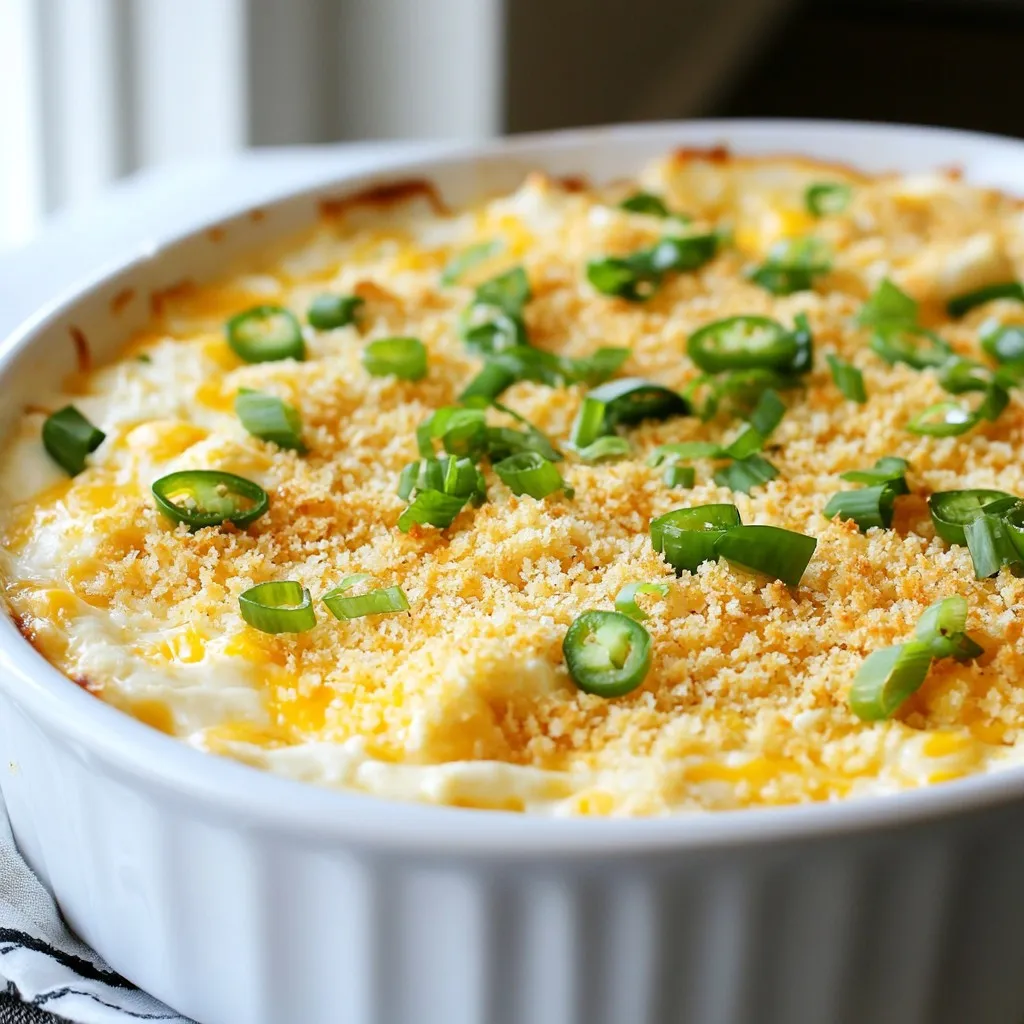
Are you ready to score big with your next game day snack? My Game Day Jalapeño Popper Dip is the

- Linguine Pasta: You will need 400g of this long, thin pasta. It holds the sauce well. - Chicken and Butter: Use 2 boneless, skinless chicken breasts. Cut them into bite-sized pieces. The key is 1 cup of melted unsalted butter for rich flavor. - Seasonings and Flavorings: - 4 cloves of minced garlic - 1 tablespoon of Worcestershire sauce - 1 teaspoon of smoked paprika - 1/2 teaspoon of cayenne pepper (adjust for your spice level) - 1 tablespoon of fresh lemon juice - 1/2 cup of chicken broth - Optional Garnishes: - 1 cup of halved cherry tomatoes - 1/4 cup of chopped fresh parsley - Grated Parmesan cheese (for serving, optional) Each ingredient adds unique flavors. The butter and spices create a rich sauce. The chicken adds protein, and the tomatoes provide freshness. You can adjust the spice level to suit your taste. Enjoy the balance of flavors in this dish! {{ingredient_image_1}} - Boiling Water Method: Start by filling a large pot with water. Add a good amount of salt. Bring the water to a rolling boil. - Timing for Perfect Al Dente: Add the linguine to the boiling water. Cook it according to the package instructions, usually about 8-10 minutes. The pasta should be firm yet tender. - Setting Aside Reserved Pasta Water: Before draining the pasta, save about a cup of the starchy water. This will help adjust the sauce later. - Seasoning Tips: Take the chicken breasts and cut them into bite-sized pieces. Sprinkle salt and pepper on them. This will enhance the flavor. - Cooking Method and Timing: Heat 2 tablespoons of butter in a large skillet over medium-high heat. Add the chicken pieces. Cook for about 5-7 minutes, until golden brown and cooked through. Remove and set aside. - Combining Ingredients in the Skillet: In the same skillet, pour in the remaining melted butter. Add minced garlic, Worcestershire sauce, smoked paprika, cayenne pepper, lemon juice, and chicken broth. - Simmering for Flavor Development: Stir well and let the sauce simmer for 2-3 minutes. This step allows all the flavors to mix together. - Proper Tossing Techniques: Add the cooked linguine and chicken back to the skillet. Use tongs to toss everything together. Ensure the pasta is coated well with the sauce. - Adjusting Consistency with Pasta Water: If the mixture feels dry, add a splash of the reserved pasta water. This will help create a smooth, creamy sauce. - How to Incorporate Cherry Tomatoes: Gently fold in the halved cherry tomatoes. They bring a burst of freshness. - Importance of Fresh Parsley: Add the chopped parsley for color and flavor. It makes the dish more vibrant and tasty. - Plating Tips: Serve the Cowboy Butter Chicken Linguine hot. Use a large spoon to twirl the pasta on the plate. - Best Practices for Garnishing: Top with more fresh parsley and a sprinkle of grated Parmesan cheese if you like. This adds a nice touch to your dish. - Recommended Spice Adjustments: If you like heat, add more cayenne. For a smoky taste, increase the smoked paprika. - Alternative Ingredients for Variety: Swap chicken for shrimp or use zucchini noodles for a veggie twist. Fresh herbs like basil can brighten the dish. - Skillet vs. Oven Baking Options: Skillet cooking gives great flavor. Oven baking works if you want less hands-on time. - Tips for Perfectly Cooked Chicken: Cut chicken into even pieces for uniform cooking. Cook until golden brown, about 5-7 minutes. - Plating Styles: Twirl the linguine in the center of the plate for a nice look. Use a large spoon or fork to help. - Garnishing with Cheese: Sprinkle grated Parmesan on top just before serving. Fresh parsley adds a pop of color and flavor. Pro Tips Perfectly Cooked Pasta: Always cook your linguine just until al dente, which means it should still have a slight bite to it. This helps it hold up better when tossed with the sauce and prevents it from becoming mushy. Butter Quality Matters: Use high-quality unsalted butter for the Cowboy Butter Sauce. The flavor of the butter is prominent, so a good-quality butter can elevate the overall taste of the dish. Adjusting Spice Levels: Feel free to adjust the cayenne pepper to your taste preference. If you're unsure about spice levels, start with less and add more as needed to avoid overwhelming the dish. Fresh Ingredients: Opt for fresh parsley and ripe cherry tomatoes for the best flavor. Fresh herbs brighten the dish, while fresh tomatoes add a juicy sweetness that complements the richness of the sauce. {{image_2}} - Substituting Chicken: Swap chicken for firm tofu or chickpeas. Both options soak up the sauce well and add protein. - Alternative Sauces: Use a rich mushroom sauce or a creamy cashew sauce. These can bring depth to your dish without meat. - Increasing Heat with Peppers: Add jalapeños or crushed red pepper flakes. Adjust the amount based on your heat preference. - Adding Different Spices: Consider using chili powder, cumin, or cayenne. This can create a bold flavor and kick. - Incorporating Cream or Cheese: Stir in heavy cream or cream cheese. This will add a luscious texture to your sauce. - Balancing Creaminess with Other Flavors: Add lemon juice or more garlic for freshness. This helps cut through the richness and keeps the dish vibrant. - Refrigeration Tips: Store leftover Cowboy Butter Chicken Linguine in an airtight container. Keep it in the fridge for up to three days. Make sure it cools before sealing. This helps maintain flavor and texture. - Freezing Guide: You can freeze the dish, but it's best to freeze the pasta and sauce separately. Use freezer-safe bags or containers. It can last up to three months. Thaw in the fridge before reheating. - Best Methods for Leftovers: The best way to reheat is on the stove. Add a splash of chicken broth or water to the pan. Heat over medium heat, stirring often. This keeps the pasta moist. - Avoiding Dryness: To avoid dry pasta, don’t rush the reheating. Slow and steady keeps the flavors intact. You can also cover the pan to trap steam, which helps keep the dish juicy. Cowboy butter is a rich sauce made from melted butter, garlic, and spices. It gives dishes a bold flavor. Think of it as a buttery sauce with a kick! It includes Worcestershire sauce, smoked paprika, and cayenne pepper. You will love how it makes everything taste better. Yes, you can! While linguine is the star here, other pasta shapes work too. Some great options include fettuccine, penne, or spaghetti. Just remember to cook them according to the package instructions. Each type brings its own texture and taste to the dish. Not exactly. You use a pot for the pasta and a skillet for the chicken and sauce. However, it's easy to clean up. You can cook the chicken in the same skillet after the pasta. This keeps the flavors in one place, saving you time and effort. The total time for Cowboy Butter Chicken Linguine is about 30 minutes. You need around 10 minutes to prep and 20 minutes to cook. This makes it a quick option for dinner. It’s perfect for busy nights when you want something tasty! Yes, you can prepare some parts in advance. You can cook the chicken and make the cowboy butter sauce ahead. Just store them in the fridge. When you're ready to eat, cook the pasta and mix everything together. This way, dinner is ready in no time! This dish pairs well with a simple salad or garlic bread. A crisp green salad adds freshness. Garlic bread brings a nice crunch and extra flavor. You could also serve it with steamed veggies for a healthy touch. These sides complement the rich flavors of the linguine perfectly. This blog post covered all you need to make Cowboy Butter Chicken Linguine. We discussed the ingredients, from the linguine to the chicken and flavorful sauce. You learned step-by-step instructions for cooking and combining these elements. We explored tips, variations, and storage options too. In the end, you can create a tasty dish that fits your style. Enjoy experimenting with flavors and sharing it with loved ones. Happy cooking!

Cowboy Butter Chicken Linguine Flavorful Dinner Idea

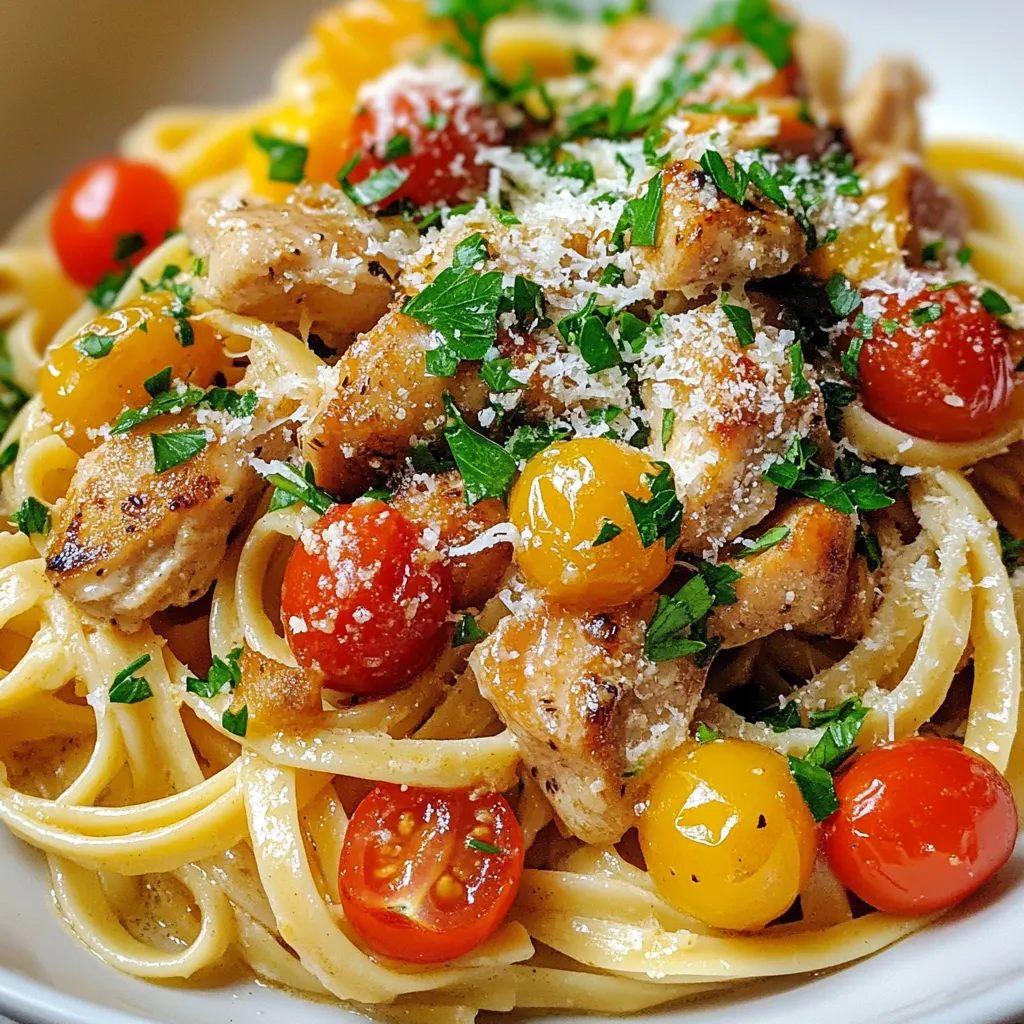
Are you ready to spice up your dinner routine? Cowboy Butter Chicken Linguine is a flavor-packed delight that brings comfort

Here are the ingredients you will need for Flavorful Potsticker Soup. Each one adds taste and texture. - 20 frozen potstickers (choose chicken or vegetable) - 6 cups chicken or vegetable broth - 1 tablespoon sesame oil - 2 cloves garlic, minced - 1 inch ginger, grated - 2 green onions, chopped (whites and greens separated) - 2 cups bok choy, chopped - 1 cup mushrooms, sliced - 1 carrot, julienned - 2 tablespoons soy sauce - 1 tablespoon rice vinegar - 1 teaspoon chili paste (optional) - Salt and pepper to taste - Fresh cilantro for garnish Using quality ingredients makes a big difference. Frozen potstickers are quick and easy. Broth can be chicken or vegetable, depending on your taste. Fresh garlic and ginger create a warm flavor base. Green onions, bok choy, mushrooms, and carrots add crunch and color. The sesame oil gives a lovely nuttiness. Soy sauce and rice vinegar balance the soup with savory and tangy notes. Chili paste can add heat if you like spice. Finally, fresh cilantro on top brightens the dish and adds freshness. Gather these ingredients, and you’re ready to make a cozy meal that warms the soul. {{ingredient_image_1}} How to prep garlic and ginger To start, take two cloves of garlic. Peel them and mince them finely. This will give your soup a strong flavor. Next, grab a one-inch piece of ginger. Peel it and grate it. You want small bits that will mix well in the soup. Chopping and julienning vegetables Now, let's chop some green onions. Use the white parts for cooking and the green parts for garnish. Chop them thinly. For the bok choy, rinse it well. Cut it into small pieces. Then, take the mushrooms and slice them. Lastly, peel a carrot and cut it into thin strips. This is called julienning. Sautéing aromatics In a large pot, pour in one tablespoon of sesame oil. Heat it over medium heat. Add the minced garlic and grated ginger. Sauté for about one minute. You want to smell those fragrant flavors filling the air. Then, add the chopped white parts of the green onions. Cook for another two minutes. This step builds a great flavor base. Simmering broth and adding potstickers Next, pour in six cups of chicken or vegetable broth. Bring this to a gentle simmer. Once it simmers, gently add 20 frozen potstickers to the pot. Let them cook for about five to seven minutes, following the package instructions. This is when the potstickers become soft and warm. Incorporating vegetables and seasonings With three minutes left, add the chopped bok choy, sliced mushrooms, and julienned carrot to the pot. Stir everything together. Now, season with two tablespoons of soy sauce, one tablespoon of rice vinegar, and chili paste if you want some heat. Taste and adjust salt and pepper. Serving suggestions and garnishing Once everything is warm and the veggies are tender, turn off the heat. Ladle the soup into bowls. For a nice finish, sprinkle the chopped green onion greens and fresh cilantro on top. This adds color and flavor to your cozy meal. Enjoy! - To cook potstickers in soup, add them gently. - Don't overcrowd the pot; this helps them cook evenly. - Stir carefully to avoid breaking the potstickers. - For even vegetable tenderness, cut them in similar sizes. - Add heartier veggies first, like carrots and mushrooms. - Add softer greens, like bok choy, later to keep them vibrant. - Homemade broth adds rich flavor. It takes time but is worth it. - Store-bought broth is quick and still gives great taste. - To adjust spice levels, start with less chili paste. - Add more heat slowly, tasting as you go. - A splash of rice vinegar can brighten flavors without heat. - Always taste before serving to ensure a balanced flavor. Pro Tips Use Fresh Ingredients: Using fresh vegetables like bok choy and mushrooms enhances the flavor and nutritional value of the soup. Customize Your Spice Level: Adjust the amount of chili paste according to your spice preference. Start with a small amount and add more as needed. Make It a Meal: Add extra protein, such as shredded chicken or tofu, to make the soup heartier and more filling. Garnish for Flavor: Don’t skip the cilantro and green onion greens; they add a fresh, aromatic finish that elevates the soup. {{image_2}} You can switch up proteins in this soup. Tofu works great for a veggie option. Shrimp adds a nice seafood twist too. Feel free to change the veggies you use. Bok choy is tasty, but you can add spinach or kale. You can also try bell peppers or snap peas. For toppings, think about adding sliced radishes or bean sprouts. These add crunch and color. Making this soup vegan is easy! Just use vegetable broth and tofu instead of chicken. For gluten-free needs, choose gluten-free soy sauce. You can find low-sodium broth options at most stores. This keeps the soup healthy and tasty. It also helps control salt levels while cooking. Enjoy customizing this soup to fit your diet! Store your potsticker soup in an airtight container. Make sure it cools down first. Place it in the fridge if you plan to eat it within three days. For longer storage, freeze the soup in a freezer-safe bag or container. This keeps it fresh for up to three months. To reheat your soup, use a pot on the stove over medium heat. Stir gently until hot. This method keeps all the flavors intact. You can also use a microwave, but be careful not to overheat it. To keep the potstickers from getting soggy, add them fresh to the bowl when serving. This way, they stay crispy. You can pour hot soup over them right before you eat. This keeps all the textures just right. Enjoy your warm, cozy meal! Can I use fresh potstickers instead of frozen? Yes, you can use fresh potstickers. Just reduce the cooking time by a few minutes. Fresh potstickers cook faster than frozen ones. This change keeps them tender without overcooking. How long does potsticker soup last? Potsticker soup lasts about three to four days in the fridge. Make sure to store it in an airtight container. This keeps it fresh and safe to eat. You can also freeze it for about three months. Can I make this soup ahead of time? Yes, you can prepare the soup ahead of time. Just make sure to add the potstickers and vegetables when you're ready to serve. This way, they stay fresh and don't get mushy. What can I serve with potsticker soup? You can serve the soup with rice or a side salad. Steamed or stir-fried vegetables also pair nicely. For a fun twist, try some crispy wontons for added crunch! This blog post covered everything you need for potsticker soup. We explored ingredients, prep steps, and cooking techniques. I shared tips for flavor and ways to adjust the recipe. You can make it your own by swapping ingredients or altering for dietary needs. Don't forget storage tips and reheating methods to enjoy leftovers later. Make this soup for a comforting meal that everyone will love. Dive in and create your warm, delicious potsticker soup today!

Flavorful Potsticker Soup Simple and Cozy Meal

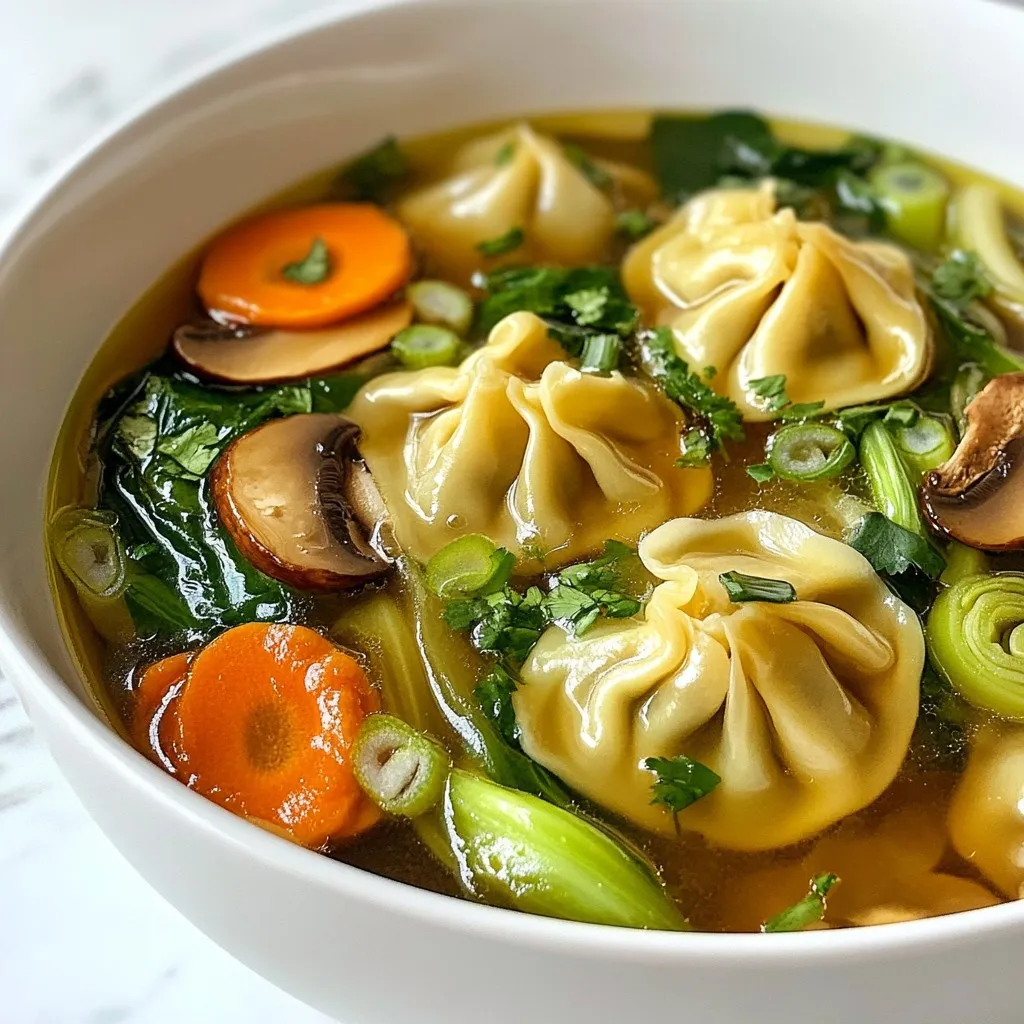
Warm up your kitchen with my Flavorful Potsticker Soup, a simple and cozy meal that’s fun to make! Whether you

- 1 ½ cups graham cracker crumbs - ½ cup unsalted butter, melted - 2 tablespoons sugar - 16 oz cream cheese, softened - 1 cup sugar - 1 teaspoon vanilla extract - 3 large eggs - Zest of 1 orange - ½ cup fresh orange juice - 1 cup fresh cranberries, roughly chopped - ¼ cup sugar (for cranberry topping) - 1 cup water Gathering the right ingredients is key to making a great cranberry orange cheesecake. First, you'll need graham cracker crumbs for a tasty crust. Use 1 ½ cups of these crumbs. They provide a nice crunch and flavor. Next, you'll want to add unsalted butter. Melt ½ cup of it to bind the crumbs together. A touch of sugar, just 2 tablespoons, will sweeten the crust. For the cheesecake filling, cream cheese is essential. Use 16 oz of softened cream cheese for a rich texture. You'll also need 1 cup of sugar to sweeten the filling and 1 teaspoon of vanilla extract for flavor. Three large eggs will help hold everything together. The zest and juice of 1 orange add a bright, fresh taste. Don't forget the cranberries! Use 1 cup of fresh cranberries, chopped roughly. They add a lovely tartness. Lastly, for the cranberry topping, combine ¼ cup of sugar with 1 cup of water and the remaining cranberries. This will create a sweet and tangy sauce to finish your cheesecake. Having these ingredients ready makes the process easy and fun. You’ll be on your way to a delightful dessert in no time! {{ingredient_image_1}} First, preheat your oven to 325°F (165°C). This step helps bake the cheesecake evenly. Next, take a 9-inch springform pan and grease it with non-stick spray. This way, the cheesecake will come out easily after baking. In a medium bowl, mix together 1 ½ cups of graham cracker crumbs, ½ cup of melted unsalted butter, and 2 tablespoons of sugar. Stir until well combined. Then, press this mixture firmly into the bottom of your springform pan. Bake the crust in the preheated oven for 10 minutes. Once done, remove it and let it cool. In a large mixing bowl, beat 16 oz of softened cream cheese with 1 cup of sugar and 1 teaspoon of vanilla extract. Mix until smooth and creamy. Then, add in 3 large eggs, one at a time, mixing well after each. Finally, stir in the zest of 1 orange and ½ cup of fresh orange juice until everything is well blended. Now it’s time to add the cranberries. Gently fold in 1 cup of roughly chopped fresh cranberries. This adds a nice tartness to the filling. Pour the cheesecake mixture over the cooled crust. Smooth the top with a spatula. Bake in the oven for about 55 to 60 minutes. The center should be set but still slightly jiggly. After baking, turn off the oven and crack the door slightly. Let the cheesecake cool in the oven for 1 hour. This helps prevent cracks. While it cools, prepare the cranberry topping. In a small saucepan, combine 1 cup of cranberries, ¼ cup of sugar, and 1 cup of water. Bring it to a simmer over medium heat. Stir occasionally for about 10 to 15 minutes until the cranberries break down and thicken. Remove it from heat and let it cool. Once the cheesecake has cooled, carefully remove it from the springform pan. Spread the cranberry topping evenly over the cheesecake. Cover it with plastic wrap and chill in the fridge for at least 4 hours, or overnight if you have time. When you are ready to serve, take it out of the fridge and let it sit at room temperature for about 10 minutes. Slice and enjoy your delightful cheesecake! To make a smooth cheesecake, mix the cream cheese well. Beat it until creamy and free of lumps. When adding eggs, do it one at a time. This helps keep the filling smooth. If you overmix the batter, it can create cracks. Bake the cheesecake gently at 325°F. A water bath can help keep the moisture in, too. For a beautiful presentation, slice the cheesecake neatly. Use a sharp knife and wipe it clean between cuts. Top it with fresh cranberries and orange slices. This adds color and makes it look festive. You can also add dollops of whipped cream for extra flair. Serve each slice on a pretty plate to impress your guests. If your cheesecake is undercooked, return it to the oven. Bake it for a few more minutes until set. For overcooked cheesecake, the texture may be dry. To fix this, serve it chilled with a drizzle of cream or sauce. Remember, the center should be slightly jiggly when you take it out. This ensures a creamy texture. Pro Tips Crust Consistency: Ensure the graham cracker mixture is pressed firmly into the pan for a sturdy base that holds together well. Room Temperature Ingredients: Allow cream cheese and eggs to come to room temperature before mixing; this helps achieve a smoother filling. Check for Doneness: The cheesecake should be slightly jiggly in the center when done; it will continue to set while cooling. Cranberry Topping Tip: For a sweeter topping, adjust the sugar in the cranberry mixture to your taste, balancing the tartness of the cranberries. {{image_2}} You can change the flavors of your cheesecake easily. Try adding chocolate. Mix in some melted chocolate or chocolate chips. Nuts also work well. Chopped pecans or walnuts add a nice crunch. If you love citrus, consider lemon or lime zest. These can add a fresh twist. You can even swirl in fruit purees for a fun look. For a gluten-free version, use gluten-free graham crackers. You can also use almond flour for the crust. If you want a dairy-free cheesecake, try coconut cream instead of cream cheese. Silken tofu is another good choice. It makes a creamy filling. Replace eggs with flaxseed meal and water for binding. These swaps will keep your cheesecake tasty. You can switch up the fruits based on the season. In summer, add fresh berries like strawberries or blueberries. Fall brings apples and pears, which can be great. For winter, try using pomegranates or citrus fruits. These changes keep the cheesecake fresh and fun. Using seasonal fruits makes your dessert even more special. Store your cranberry orange cheesecake in the fridge. Place it in an airtight container. If you want to freeze it, wrap it tightly in plastic wrap. Then, put it in a freezer-safe bag. This helps keep it fresh and prevents freezer burn. In the fridge, your cheesecake lasts about 5 days. If you freeze it, it can last up to 3 months. Just remember to label the container with the date. This way, you will know how long it has been stored. To serve after storage, take the cheesecake out of the fridge. Let it sit at room temperature for about 10 minutes before slicing. This helps the flavors come alive. If frozen, thaw it overnight in the fridge before serving. Enjoy the delightful taste! To avoid cracks in cheesecake, follow these tips: - Mix ingredients slowly. - Use room temperature cream cheese. - Don't overbeat the mixture. - Bake at a low temperature. - Cool gradually in the oven. These steps help keep the texture smooth. You want your cheesecake to look perfect. Yes, you can use frozen cranberries. They work well in this recipe. Just rinse them and add them directly to the batter. Frozen cranberries may be a bit softer when baked but will still taste great. Fresh cranberries add a nice crunch, but frozen ones offer convenience. To check if your cheesecake is done, look for these signs: - The sides should be firm. - The center should jiggle slightly but not be liquid. - A toothpick inserted should come out clean or with a few moist crumbs. These tips help ensure a perfect bake every time. Trust your senses; they guide you well! This blog outlined a simple cheesecake recipe using fresh cranberries and orange juice. We covered key ingredients, step-by-step instructions, and helpful tips for success. Remember, smooth filling and patience are key for a perfect cheesecake. Don't forget to explore flavor variations and storage tips. Enjoy your cheesecake adventure, and feel free to experiment with different toppings. Always aim for freshness and have fun in the kitchen. You have the tools to create a delicious dessert!

Cranberry Orange Cheesecake Delightful and Creamy Treat

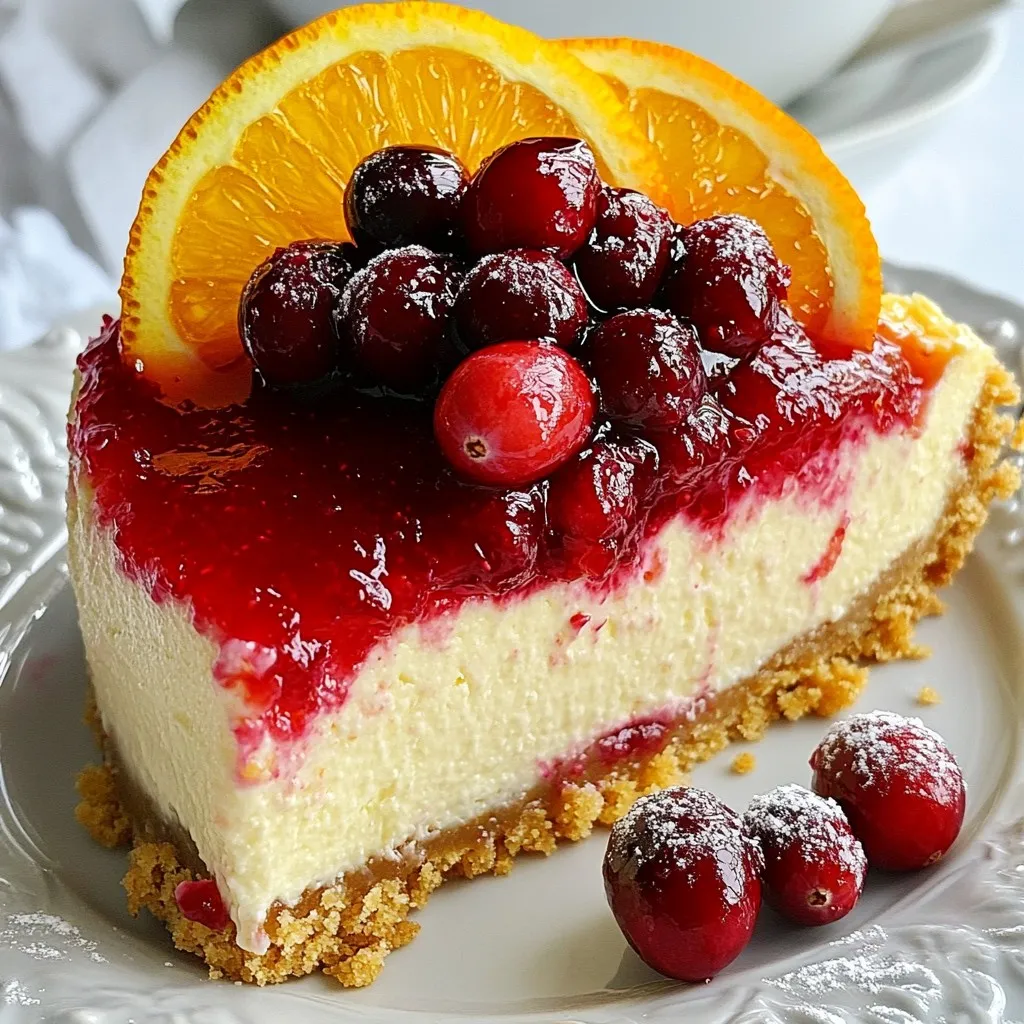
Are you ready to impress your friends and family with a sweet and tangy dessert? This Cranberry Orange Cheesecake is

- 4 boneless, skinless chicken breasts - 1 cup bell peppers (red, yellow, and green), sliced - 1 onion, sliced - 1 cup corn kernels (fresh or canned) - 1 cup black beans, rinsed and drained The chicken breasts are the star of this dish. They soak up all the flavors. I love using fresh bell peppers and onion for a burst of color and taste. Corn adds a sweet crunch while black beans give a hearty texture. - 1 tablespoon olive oil - 1 teaspoon cumin - 1 teaspoon chili powder - 1 teaspoon garlic powder - Salt and pepper to taste - 1 cup shredded Monterey Jack cheese - 1 cup diced tomatoes with green chilies - Fresh cilantro, chopped, for garnish Olive oil helps with cooking and adds a nice flavor. Cumin, chili powder, and garlic powder give warmth and depth. I always use salt and pepper to enhance the dish. For a cheesy finish, Monterey Jack melts beautifully over the top. The diced tomatoes with green chilies add a zesty kick. Finally, fresh cilantro brightens everything up! {{ingredient_image_1}} 1. Preheat the oven to 375°F (190°C). This helps cook the chicken evenly. 2. Prepare the skillet by adding 1 tablespoon of olive oil over medium heat. This ensures the chicken won’t stick. 3. Season the chicken breasts with 1 teaspoon each of cumin, chili powder, and garlic powder. Add salt and pepper to taste. This mix brings out great flavors. 4. Sear the chicken in the hot skillet. Cook each side for about 4-5 minutes until golden brown. This locks in moisture. 5. Remove the chicken and set it aside. In the same skillet, add sliced bell peppers and onion. 6. Sauté the vegetables for about 4-5 minutes until they soften. This step builds a delicious base. 7. Stir in the corn and black beans for 2 more minutes. Mixing adds flavor and texture. 8. Assemble the dish by placing the seared chicken in a baking dish. Top each piece with the vegetable mix. 9. Pour diced tomatoes with green chilies over the chicken and veggies. Make sure everything is covered well. 10. Sprinkle shredded Monterey Jack cheese evenly over the top. This will melt beautifully in the oven. 11. Cover the baking dish with foil. Bake for 25 minutes. This helps steam the chicken. 12. Remove the foil and bake for an additional 10 minutes. Look for bubbly cheese that is slightly golden. 13. Let it rest for a few minutes after baking. This allows flavors to settle. 14. Garnish with fresh cilantro before serving. It adds a nice touch of freshness. - How to achieve the best sear on chicken: Start with a hot skillet. Heat olive oil over medium-high heat. Make sure the chicken is dry before adding it. This helps it brown better. Sear each side for 4-5 minutes until golden. Don't overcrowd the pan, or the chicken will steam instead of sear. - Ensuring the cheese melts perfectly: Use shredded Monterey Jack cheese for a great melt. Sprinkle it evenly over the chicken. Cover the dish with foil for the first part of baking. This keeps the moisture in. Remove the foil towards the end. This allows the cheese to get bubbly and golden. - Ideal side dishes to accompany the chicken: Serve this dish with a side of rice or warm tortillas. A fresh salad with avocado and lime adds great flavor. You can also pair it with sautéed zucchini or grilled corn on the cob for a tasty touch. - Recommended beverages to pair: A light beer or a fruity margarita pairs well with this dish. If you prefer non-alcoholic options, try a refreshing limeade or iced tea. The zest from these drinks enhances the flavors of the chicken. Pro Tips Use Fresh Ingredients: Fresh bell peppers and corn can elevate the dish's flavor and texture, making your Mexican Chicken Delight even more delicious. Marinate for Extra Flavor: For a more flavorful chicken, consider marinating the chicken breasts in the spices and olive oil for at least 30 minutes before cooking. Experiment with Cheeses: Feel free to swap out Monterey Jack cheese with other varieties like Pepper Jack or Cheddar for a different flavor profile. Customize Veggies: Add other vegetables such as zucchini or mushrooms to the vegetable mix for added nutrition and flavor. {{image_2}} You can change proteins easily. Turkey works well if you want a lighter option. Tofu is great for a vegetarian twist. Both give a tasty base for the cheese sauce. You can also swap cheeses. Monterey Jack is creamy, but cheddar adds sharpness. Try pepper jack for a spicy kick. Want more heat? Add jalapeños or cayenne pepper. Just a pinch can make a big difference. You can also mix in new veggies. Spinach, zucchini, or mushrooms can add great flavors. These swaps keep the dish fresh and fun. To keep your Mexican chicken with cheese sauce fresh, store it in the fridge. Place the leftovers in an airtight container. This method helps maintain flavor and texture. You can keep it in the fridge for up to three days. If you want to save it for longer, freezing is a great option. First, let the dish cool completely. Then, transfer it to a freezer-safe container. Make sure to label it with the date. It will be good for up to three months in the freezer. When you're ready to eat, simply thaw it in the fridge overnight. Reheating can make or break your dish. The oven is the best choice for reheating. Preheat it to 350°F (175°C). Place the chicken in a baking dish and cover it with foil. This keeps the moisture in, so the chicken doesn't dry out. Heat for about 20 minutes. If you’re in a hurry, use the microwave. Place a portion on a microwave-safe plate. Cover it with a damp paper towel. Heat on medium power for about 2-3 minutes. Check to make sure it’s heated evenly. Both methods help keep the flavors intact. Enjoy your delicious leftovers just as much as the first time! How can I make this dish spicier? To add heat, you can use more chili powder. Try adding jalapeños for extra spice. You could also mix in hot sauce. Taste as you go to get the right heat. Can I use frozen chicken breasts? Yes, you can use frozen chicken breasts. Just make sure to thaw them safely first. This helps them cook evenly and get that nice sear. What are the calorie counts per serving? Each serving has about 400 calories. This may vary based on the cheese and toppings you use. Always check your specific brands for details. Are there low-carb options available? Yes! You can skip the corn and black beans. Add more vegetables like zucchini or mushrooms instead. This keeps the dish tasty and lower in carbs. Gluten-free options This recipe is naturally gluten-free. Just ensure all your ingredients, like spices and canned goods, are certified gluten-free. Vegetarian or vegan adaptations For a vegetarian version, replace chicken with grilled portobello mushrooms. To make it vegan, use plant-based cheese and omit any animal products. You’ll still enjoy great flavor! This article covered how to make a tasty chicken dish using simple ingredients. You learned about the key items needed, how to cook them step by step, and tips for perfect results. We explored variations and ways to store and serve this dish, too. Remember to mix up the flavors and find options that fit your taste. Follow these ideas to create a meal you and your family will enjoy. Happy cooking!

Mexican Chicken with Cheese Sauce Flavorful Delight

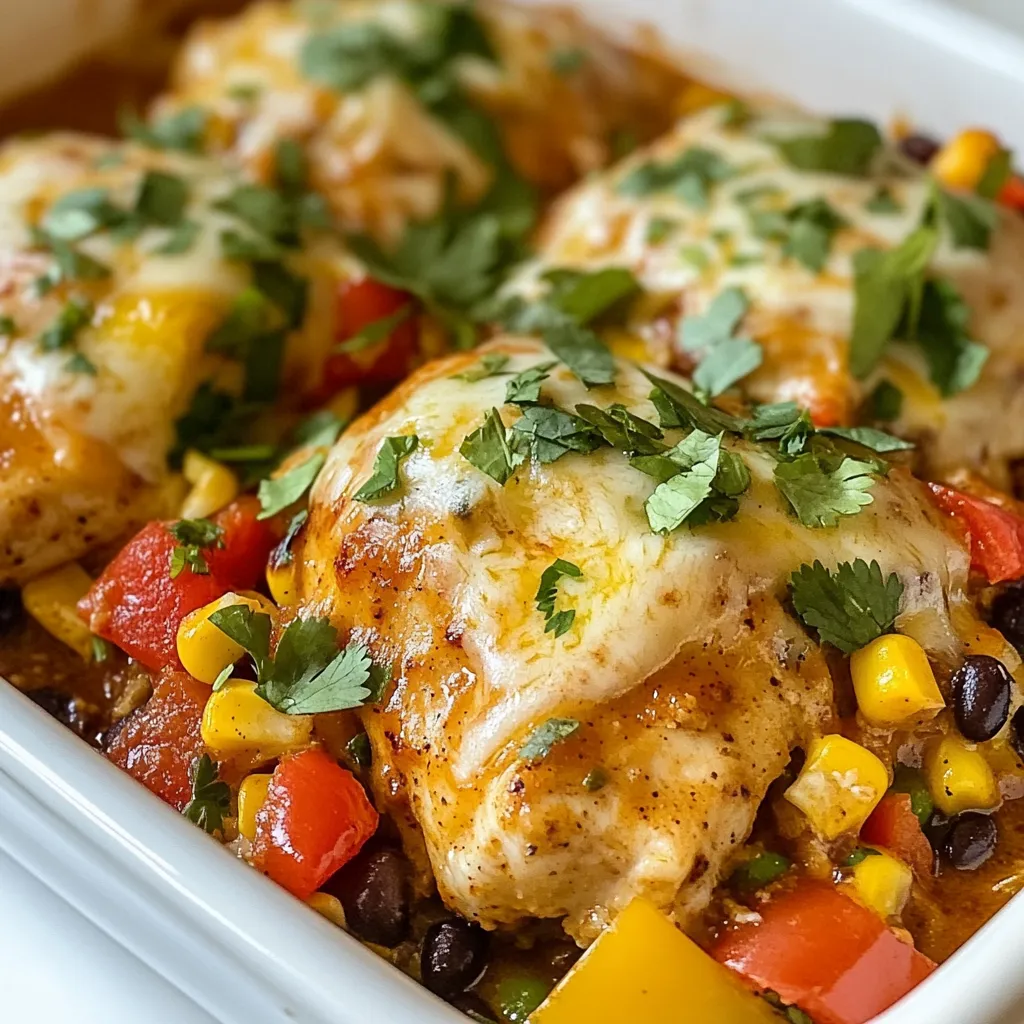
Are you ready to spice up dinner? This Mexican Chicken with Cheese Sauce is a flavorful delight that will wow

To make this easy keto casserole, gather these simple ingredients: - 1 pound ground beef - 1 cup cauliflower rice - 2 cups fresh spinach, chopped - 1 cup heavy cream - 1 cup shredded cheddar cheese - 1/2 cup diced onions - 1 teaspoon garlic powder - 1 teaspoon Italian seasoning - Salt and pepper to taste - 2 tablespoons olive oil You can add a few optional ingredients to boost the taste: - 1/2 cup diced bell peppers - 1/2 cup sliced mushrooms - 1/4 teaspoon red pepper flakes for heat - Fresh herbs, like basil or parsley, for garnish If you have dietary needs or preferences, try these substitutions: - Swap ground beef for ground turkey or chicken. - Use riced broccoli instead of cauliflower rice. - Replace heavy cream with coconut cream for a dairy-free option. - Use nutritional yeast instead of cheddar cheese for a vegan twist. {{ingredient_image_1}} Start by preheating your oven to 375°F (190°C). This sets the stage for baking. Next, grab a large skillet and add 2 tablespoons of olive oil. Turn the heat to medium. Once hot, toss in 1/2 cup of diced onions. Sauté them until they turn translucent, which takes about 3 to 4 minutes. Now, add in 1 pound of ground beef. Cook it for about 5 to 7 minutes until it’s browned. If there's excess fat, drain it off. After that, stir in 1 cup of cauliflower rice and 2 cups of fresh spinach, chopped. Continue cooking for another 3 to 4 minutes until the spinach wilts. In a separate bowl, mix together 1 cup of heavy cream, 1 teaspoon of garlic powder, and 1 teaspoon of Italian seasoning. Add salt and pepper to taste. Make sure to stir this well. Pour the cream mixture into your skillet with the beef and veggies. Stir everything together until well mixed. This step makes sure every bite is full of flavor. Now, transfer your mixture into a greased 9x13 inch casserole dish. Spread it out evenly. Next, sprinkle 1 cup of shredded cheddar cheese on top. This will melt and create a delicious crust. Place the dish in your preheated oven. Bake it for 25 to 30 minutes. You want the cheese to be bubbly and slightly golden. Once it's done, remove it from the oven and let it sit for about 5 minutes. This helps the casserole set, making it easier to serve. To get the best results, timing is key. Bake the casserole for 25 to 30 minutes. Check for bubbly cheese and a light golden color. If your oven runs hot, start checking at 20 minutes. Letting it rest for 5 minutes helps set the dish. Flavor is what makes this dish shine. Use fresh garlic instead of garlic powder for a punch. You can also add red pepper flakes for heat. Try herbs like thyme or basil for a fresh taste. A splash of lemon juice before serving can brighten the flavors. Avoid overcooking the beef. Cook it just until browned. If you skip the resting time, the casserole may fall apart. Don’t forget to grease the dish. Skipping this step can make serving harder. Lastly, taste your mixture before baking to adjust seasoning. Pro Tips Use Fresh Spinach: Fresh spinach wilts beautifully and adds vibrant color to the dish; avoid using frozen spinach as it may make the casserole watery. Variations on Cheese: Experiment with different types of cheese such as mozzarella or pepper jack for a unique flavor twist. Make Ahead: This casserole can be assembled ahead of time and stored in the refrigerator. Just bake it when you're ready to serve! Check for Doneness: Ensure the casserole is cooked through by checking that the cheese is bubbly and the edges are slightly browned for the best texture. {{image_2}} You can make a tasty vegetarian casserole. Simply swap the ground beef for a mix of mushrooms and zucchini. Mushrooms add a nice, meaty texture. Zucchini keeps it light and fresh. You can still use cauliflower rice for bulk. For creaminess, stick with the heavy cream. Add your favorite spices to boost flavor. This way, you keep it keto while enjoying great veggies. Want to change things up? You can use chicken or turkey instead of beef. Ground chicken cooks fast and is lean. Turkey is another great choice for a lighter meal. Cook it the same way as the beef. You can even mix in some bacon for a smoky taste. Just be sure to adjust your seasoning based on your protein choice. You can switch out the spinach for kale or Swiss chard. Both are low in carbs and full of nutrients. If you want more crunch, try bell peppers or broccoli. They add color and flavor too. Cauliflower rice can be replaced with shredded cabbage for a fun twist. Just remember to chop everything small to blend well in the casserole. After you enjoy your Easy Keto Casserole, let it cool. Place leftovers in an airtight container. Store them in the fridge for up to four days. This keeps the flavors fresh and tasty. To reheat your casserole, preheat your oven to 350°F (175°C). Place the casserole in an oven-safe dish. Cover it with foil to keep it moist. Heat for about 15-20 minutes. You can also use a microwave. Just heat in short bursts until warm. Stir in between to heat evenly. If you want to save some for later, freezing works great. First, let the casserole cool completely. Then, cut it into serving sizes. Wrap each piece in plastic wrap and place in a freezer-safe bag. It will stay good for up to three months. When you’re ready to eat, thaw it in the fridge overnight before reheating. Yes, you can make this casserole ahead of time. Prepare the dish and layer it in the casserole dish. Cover it tightly with plastic wrap or foil. Store it in the fridge for up to 24 hours. When ready to bake, remove the cover and bake it as directed. This saves time and makes dinner easy. Here are some great keto-friendly side dishes: - Zucchini noodles with pesto - Roasted Brussels sprouts - Garlic butter asparagus - Cauliflower mash - Keto coleslaw These sides pair well with the casserole and keep your meal low-carb. To make this recipe dairy-free, swap the heavy cream for coconut cream or almond milk. Use dairy-free cheese instead of cheddar. These swaps keep the dish creamy without dairy. Just check the labels to ensure they fit your diet. Enjoy the same great flavor without the dairy! We covered key ingredients for your casserole, optional add-ins, and substitutions. I shared step-by-step cooking instructions and tips for perfecting your dish. We even explored variations, including vegetarian options and protein swaps. Lastly, I explained how to store and reheat leftovers. Now, you have the tools to create a delicious meal your way. Enjoy the process and make it your own!

Easy Keto Casserole Night Simple and Tasty Meal

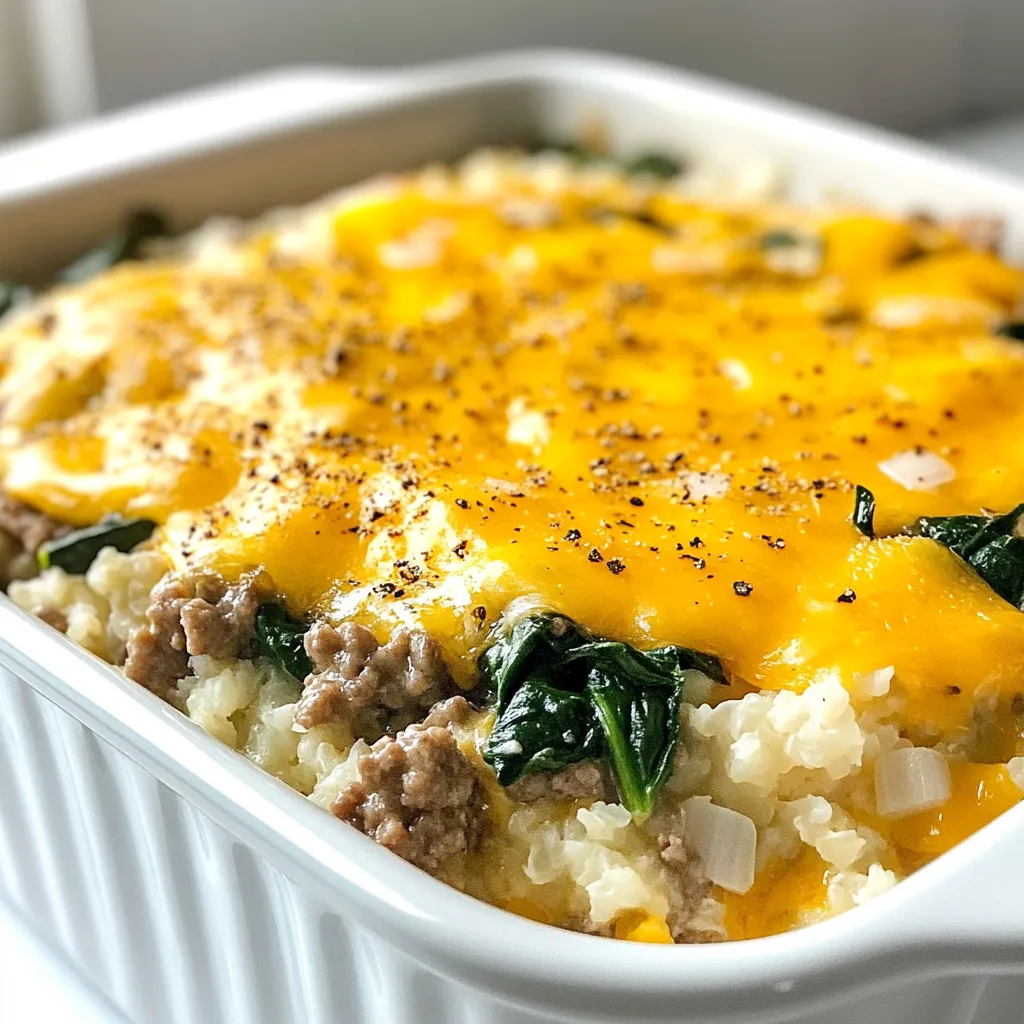
Are you looking for a simple and tasty meal that fits your keto diet? Join me for Easy Keto Casserole

- 1 lb chicken thighs, boneless and skinless - 1 cup fresh pineapple, diced - 1/2 cup brown sugar For this dish, chicken thighs are the star. They are juicy and tender, making them perfect for this sweet and savory meal. Pineapple adds a bright, tropical flavor. Brown sugar gives the sauce its rich sweetness. - 1/4 cup soy sauce - 2 tablespoons apple cider vinegar - 3 cloves garlic, minced - 1 teaspoon fresh ginger, grated Soy sauce adds a salty depth. Apple cider vinegar brings a tangy kick. Garlic and ginger give the dish a warm, aromatic flavor. Together, these ingredients create a tasty marinade that makes the chicken shine. - 2 tablespoons green onions, sliced for garnish - 1 tablespoon sesame seeds for garnish - 1 tablespoon cornstarch - 2 tablespoons water Green onions add a fresh crunch. Sesame seeds provide a nice nutty flavor. You can use cornstarch to thicken the sauce, making it rich and glossy. Adjust these garnishes based on your taste and what you have at home! {{ingredient_image_1}} - In a bowl, mix the brown sugar, soy sauce, apple cider vinegar, minced garlic, and grated ginger. - Stir until the sugar dissolves. - Add the chicken thighs to the marinade. - Make sure the chicken is well-coated. - Cover and place it in the fridge. - Let it marinate for at least 30 minutes. For best taste, aim for 1-2 hours. - Heat a large skillet over medium heat. - Add the marinated chicken thighs to the skillet. - Reserve the marinade for later. - Sear the chicken for 5-7 minutes on each side. - Cook until the chicken turns golden brown and is fully cooked. - Remove the chicken and set it aside. - In the same skillet, pour in the reserved marinade. - Bring it to a simmer over medium heat. - Let it cook for 3-4 minutes. - In a small bowl, mix cornstarch with water to make a slurry. - Slowly stir this slurry into the sauce. - Keep simmering until the sauce thickens. - Stir in the diced pineapple. - Let it cook in the sauce for 2-3 minutes. - Cook until the pineapple is warmed through and slightly caramelized. - Return the cooked chicken to the skillet. - Coat it well with the thickened sauce and pineapple. - Cook for one more minute to blend the flavors. - Plate the chicken and spoon the delicious sauce and pineapple on top. - Garnish with sliced green onions and sesame seeds for color. - For a great meal, serve it on a bed of steamed jasmine rice or quinoa. - Add extra pineapple pieces around for a tropical touch. For the best flavor, marinate your chicken for at least 30 minutes. If you have time, aim for 1-2 hours. This longer time helps the chicken soak up all the sweet and savory goodness. You can adjust sweetness by adding more brown sugar or saltiness with extra soy sauce. Taste the marinade before adding the chicken. Make it just right for your palate. Use a large, non-stick skillet for cooking. This helps the chicken sear nicely without sticking. Cook the chicken over medium heat for about 5-7 minutes per side. Ensure the chicken reaches an internal temperature of 165°F. This way, you know it’s safe to eat and tender too. For a stunning plate, serve the chicken over a bed of jasmine rice or quinoa. This adds a nice base and absorbs the sauce. Arrange extra pineapple pieces around the chicken for a tropical look. Garnish with green onions and sesame seeds for color and crunch. A vibrant plate makes the meal even more exciting! Pro Tips Marinating Time: Allow the chicken to marinate for at least 1-2 hours for enhanced flavor. The longer it sits, the more the flavors will infuse into the meat. Cooking Temperature: Ensure your skillet is hot enough before adding the chicken to achieve a nice sear. This helps to lock in juices and gives a beautiful color. Pineapple Selection: Use fresh pineapple for the best flavor and texture. Canned pineapple may become mushy and less vibrant in taste. Serving Suggestions: Pair this dish with jasmine rice or quinoa and garnish with additional pineapple pieces for a refreshing touch and visual appeal. {{image_2}} You can swap chicken for other proteins. Pork works well, too. Choose pork chops or tenderloin. Tofu is a great option for a plant-based meal. It soaks up flavors nicely. Adjust cooking times for each protein. Pork usually needs about 10-12 minutes of cooking. Tofu should be cooked until golden, about 6-8 minutes on each side. Want to spice things up? Try adding cayenne or paprika. A little heat makes the dish exciting. You can also play with vinegar types. Rice vinegar or balsamic can give different flavors. Each option adds its unique twist to the dish. You can cook this dish in different ways. Oven baking works well if you want less hands-on time. Set your oven to 375°F and bake for about 25-30 minutes. Stovetop cooking gives you a nice sear. It keeps the chicken juicy and flavorful. Slow cookers are another option. Just combine all the ingredients in the pot. Cook on low for 6-8 hours or high for 3-4 hours. You’ll have tender chicken and a rich sauce waiting for you. Leftover Brown Sugar Pineapple Chicken can stay fresh for up to 3 days in the fridge. Store it in an airtight container. Glass or plastic containers with tight lids work best. Make sure to let the chicken cool before sealing it. You can freeze this dish for later use. Divide it into portions before freezing. Use freezer-safe bags or containers. Remove as much air as possible to prevent freezer burn. To thaw, place it in the fridge overnight before reheating. To keep the chicken moist, reheat it in a skillet over low heat. Add a splash of water or broth to keep it juicy. Avoid microwaving it, as this can make the chicken tough. To prevent sogginess in the sauce, reheat it separately. Once warm, combine the chicken and sauce just before serving. Yes, you can use canned pineapple. Canned pineapple is sweet and easy to use. It saves time, as it’s ready to go. However, it often has added sugar and syrup, which can change the taste. Fresh pineapple has a bright, tangy flavor. It also has more nutrients. If you want a fresher taste, use fresh pineapple. If you are short on time, go for canned. Many sides pair well with this dish. Here are a few ideas: - Steamed jasmine rice: This is a classic choice that soaks up the sauce well. - Quinoa: A healthy option that adds protein and fiber. - Stir-fried vegetables: Bright veggies add color and crunch. - Coleslaw: A cool, crunchy side balances the sweetness of the chicken. - Sweet potato fries: Their sweetness matches the dish nicely. These sides enhance the flavors and make the meal more filling. Yes, this recipe is great for meal prep. Here’s how to do it: - Cook the chicken and sauce: Prepare the dish as directed. Let it cool. - Portion it out: Divide the chicken into meal-sized containers with sides. - Store: Keep in the fridge for up to four days. Use airtight containers to keep it fresh. - Reheat: When ready to eat, simply microwave or heat on the stove until warm. Meal prepping makes it easy to enjoy this dish throughout the week! This blog post explored a tasty recipe for Brown Sugar Pineapple Chicken, including key ingredients, step-by-step instructions, and helpful tips. You learned about marinating chicken thighs with a sweet and savory sauce, cooking techniques, and garnishing your dish for a beautiful presentation. Remember, you can easily adapt this recipe with different proteins or cooking methods. Whether you’re cooking for yourself or meal prepping, enjoy the delicious results. Try this recipe to impress your friends and family at your next dinner!

Brown Sugar Pineapple Chicken Delicious and Easy Recipe

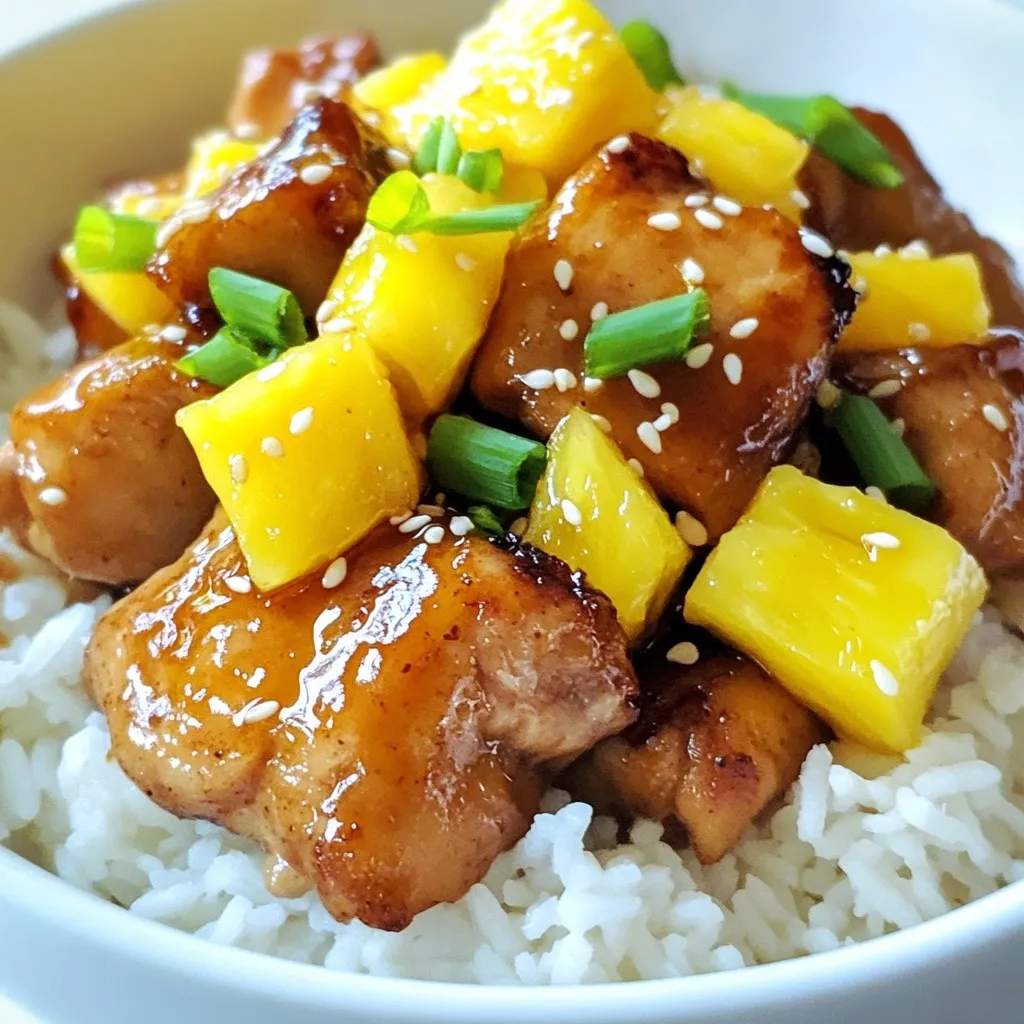
Are you looking for a simple yet delicious chicken dish? Brown Sugar Pineapple Chicken is here to save dinner! This

To create a delicious Creamy Chicken Tortellini with Broccoli, gather the following ingredients: - 2 cups cheese tortellini, fresh or frozen - 1 cup cooked chicken, shredded or diced - 2 cups broccoli florets - 1 cup heavy cream - 1 cup chicken broth - 1 tablespoon olive oil - 1 teaspoon garlic powder - 1 teaspoon onion powder - Salt and pepper to taste - 1/2 cup grated Parmesan cheese - Fresh basil leaves for garnish These ingredients blend together to create a rich and creamy dish. The cheese tortellini adds a soft texture, while the broccoli provides a fresh crunch. Using cooked chicken speeds up prep time and keeps it simple. Heavy cream and chicken broth form the base of the creamy sauce, giving it a rich flavor. Garlic and onion powder enhance the taste without overpowering the dish. Salt and pepper are crucial for balancing the flavors. Finally, the grated Parmesan cheese melts in beautifully, adding depth to the sauce. Garnishing with fresh basil leaves adds color and a hint of freshness. With these ingredients, you're ready to make a comforting meal that everyone will love. {{ingredient_image_1}} Start by boiling salted water in a large pot. When the water is ready, add the fresh broccoli florets. Cook them for about three minutes. They should turn bright green and feel tender-crisp. Use a slotted spoon to take the broccoli out. Set it aside on a plate for later. In the same pot, add the cheese tortellini. Follow the package instructions closely, which usually suggest cooking for three to five minutes. Once they are done, drain the tortellini. Place them next to the broccoli on the plate. Heat one tablespoon of olive oil in a large skillet over medium heat. Once the oil is warm, add one cup of heavy cream and one cup of chicken broth. Stir the mixture well and bring it to a gentle simmer. To enhance the flavor, add one teaspoon each of garlic powder and onion powder. Sprinkle in some salt and pepper to taste. Stir the sauce well and let it cook for two to three minutes. This helps the flavors meld together nicely. Now, it’s time to bring everything together. Add the cooked chicken, tortellini, and broccoli into the skillet. Gently toss all the ingredients together. Make sure every piece is coated with the creamy sauce. To finish, take the skillet off the heat. Stir in half a cup of grated Parmesan cheese. This will make the sauce creamy and smooth. Taste the dish and adjust the seasoning if needed. Now you’re ready to serve! To get the right creamy sauce, focus on the thickness. Start with equal parts heavy cream and chicken broth. This mix gives a wonderful base. Stir slowly and let it simmer to thicken. If the sauce seems too thick, add a splash of broth. If it’s too thin, cook it a bit longer. To keep your sauce smooth, avoid high heat. High heat can cause the cream to curdle. Instead, use medium heat and stir often. If you notice curdling, reduce the heat immediately. You can also whisk in a little more broth to save it. If you want a change from chicken, try turkey or cooked shrimp. Both add a nice twist. For a vegetarian option, use chickpeas or tofu. These alternatives are tasty and healthy. You might want to switch up the pasta too. While tortellini is great, other pastas work well too. Try penne or farfalle for a different texture. Just make sure to cook them according to the package. This dish pairs nicely with a simple side salad. A fresh green salad with lemon vinaigrette complements the creaminess. You can also serve it with crusty bread. The bread helps soak up the sauce. For presentation, use a large bowl and spoon the dish in carefully. Garnish with fresh basil leaves for a pop of color. You could add extra Parmesan on top for a rich look. Pro Tips Fresh vs. Frozen Tortellini: Using fresh tortellini will give you a more delicate texture and flavor, but frozen is convenient and works well if you're short on time. Broccoli Cooking Time: Be careful not to overcook the broccoli; blanching it for just 3 minutes ensures it stays vibrant and crunchy in your dish. Customize the Sauce: You can add a splash of white wine or a pinch of red pepper flakes to the sauce for an extra layer of flavor that complements the creaminess. Perfect Parmesan: For the best melting quality, use freshly grated Parmesan cheese, as pre-grated versions often contain anti-caking agents that can affect the texture. {{image_2}} You can make your creamy chicken tortellini even better by adding more veggies. Try adding spinach, bell peppers, or peas. These add color and nutrients. When adding veggies, adjust the cooking time. For example, add spinach at the same time as the chicken. For bell peppers or peas, add them during the last minute of cooking. This keeps them crisp and bright. To make this dish vegetarian, swap the chicken for a plant-based protein. You can use tofu, chickpeas, or lentils. Tofu works well when cubed and sautéed. Chickpeas can add a nice texture. Lentils will give a hearty feel to the meal. You can keep the rest of the recipe the same. This way, you still enjoy the creamy sauce and tortellini. If you like heat, make a spicy version of this dish! Add red pepper flakes or diced jalapeños to the sauce. Start with a little and taste as you go. You can also use spicy chicken broth instead of regular broth. This adds flavor and heat. Adjust the cooking method by simmering the sauce a bit longer. This helps the spices blend well. Enjoy your spicy twist on this classic dish! To keep your creamy chicken tortellini fresh, store leftovers in the fridge. Place it in airtight containers. This helps keep the flavors intact. Use glass or plastic containers, as they are great for storage. When you reheat, use a skillet. This method helps keep the creaminess. Heat it on low and stir often. You can also add a splash of chicken broth to prevent it from drying out. This keeps your dish smooth and tasty. If you want to freeze it, let the dish cool completely first. Use freezer-safe containers or bags. When you’re ready to eat, thaw it in the fridge overnight. Reheat in a skillet, adding a little broth to restore creaminess. Enjoy your meal later! Yes, you can use frozen tortellini. Just cook it according to the package instructions. Usually, it takes about 3-5 minutes in boiling water. Make sure to add the frozen tortellini to boiling, salted water to keep it firm. Stir gently to prevent sticking. After cooking, drain and set it aside with the broccoli. This dish lasts about 3-4 days in the fridge. Store it in an airtight container to keep it fresh. Check for signs of spoilage, like an off smell or mold. If it smells sour or looks strange, it's best to throw it away. Yes, you can prepare this dish in advance. Cook the tortellini and broccoli, then store them separately. Make the creamy sauce and keep it in the fridge. When you are ready to eat, combine everything in a skillet and heat until warm. This saves time on busy nights. Absolutely! Kids love cheesy pasta dishes. To make it even more appealing, cut the broccoli into smaller pieces. You can also let them help mix the ingredients. The creamy sauce and cheese make it tasty and fun. Add extra cheese on top for a special touch! This dish combines easy steps and delicious ingredients to make a creamy chicken tortellini. You can cook the broccoli and tortellini quickly, then create a rich sauce with simple spices. Don’t hesitate to try variations, like adding more veggies or making it spicy. Remember, leftovers store well, and you can reheat them so they taste great. Enjoy this tasty meal with your family, and make it your own!

Creamy Chicken Tortellini with Broccoli Delight

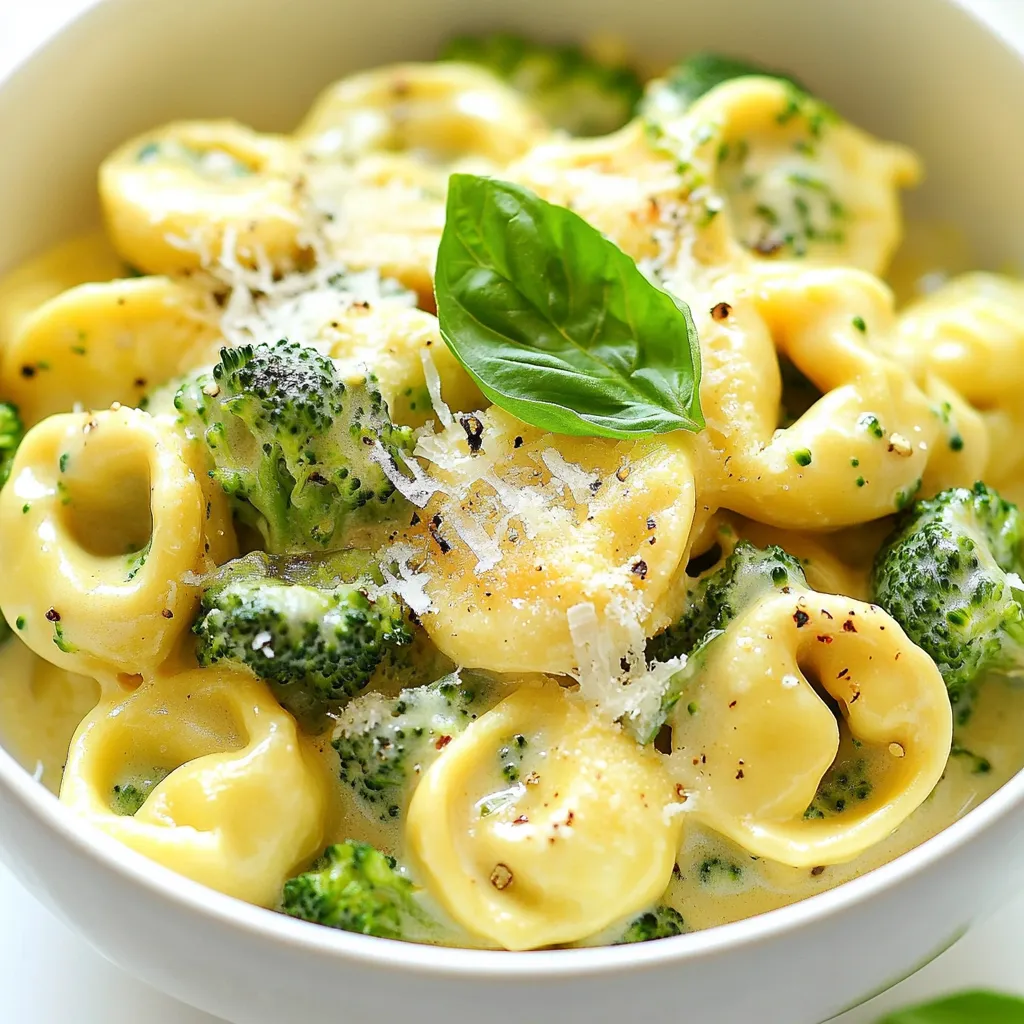
Welcome to Creamy Chicken Tortellini with Broccoli Delight! If you’re craving a comforting meal that balances creamy goodness with healthy

Older posts
Newer posts
← Previous Page1 … Page142 Page143 Page144 … Page150 Next →

dsad

© 2025 Emmas Dish • Built with GeneratePress

Our Policies

  • Copyright Policy
  • Cookie Policy
  • GDPR Policy
  • Privacy Policy
  • Disclaimer
  • Terms Of Use

More Information

  • Home
  • About
  • Contact
  • Appetizers
  • Dessert
  • Dinner
  • Drinks
©2025, Emmas Dish About Back To Top