Skip to content
DisclaimerTerms Of UseGDPR PolicyCookie Policy

Emmas Dish

  • Home
  • Drinks
  • Appetizers
  • Dinner
  • Dessert
  • About
  • Contact
  • Privacy Policy
DisclaimerTerms Of UseGDPR PolicyCookie Policy

Emma

- 4 boneless, skinless chicken breasts - 1 cup pepperoncini peppers, sliced (jarred) - 1 medium onion, sliced - 3 cloves garlic, minced - 1 cup heavy cream - 1 cup chicken broth - 1 teaspoon Italian seasoning - 1 tablespoon olive oil - Salt and pepper to taste - Fresh parsley, chopped (for garnish) - Optional: ½ cup grated Parmesan cheese Gathering the right ingredients is key to making this creamy pepperoncini chicken skillet. The chicken breasts are the star of the dish. They need to be boneless and skinless for easy cooking and eating. Next, the pepperoncini peppers bring a nice kick. They are sliced from a jar, making them easy to use. You will also need a medium onion and garlic. These add depth and flavor to the dish. For the creamy sauce, you need heavy cream and chicken broth. The cream makes it rich and velvety. The broth adds more chicken flavor. Don’t forget Italian seasoning! It ties the flavors together. You will also need olive oil for cooking the chicken. Season with salt and pepper to enhance all the tastes. Finally, fresh parsley adds a pop of color and freshness. If you want an extra layer of flavor, consider using grated Parmesan cheese. This will make the sauce even richer. With these ingredients, you can create a tasty meal that everyone will love. {{ingredient_image_1}} Seasoning and Searing Start by seasoning the chicken breasts with salt and pepper. Make sure you cover both sides well. This step adds flavor. Next, heat the olive oil in a large skillet over medium-high heat. Once the oil is hot, carefully place the chicken in the skillet. Sear each side for about 5-6 minutes. You'll want them golden brown and cooked through. When done, remove the chicken and set it aside on a plate. Cooking Time and Techniques Cooking the chicken takes about 12 minutes total. Using a meat thermometer helps ensure the chicken reaches 165°F. This way, you know it is safe to eat. Cooking the Onion and Garlic In the same skillet, add the sliced onion. Sauté it for about 3-4 minutes. You want it to become soft and translucent. Then, add the minced garlic and cook for an additional minute. Stir it well until fragrant. This step adds depth to the dish. Deglazing the Skillet Pour in the chicken broth, making sure to scrape the bottom of the skillet. This process is called deglazing. It helps lift flavorful bits stuck to the pan. Let it simmer for about 2-3 minutes. The broth will mix with the onion and garlic flavors, creating a tasty base. Adding Broth and Pepperoncini Now, stir in the sliced pepperoncini and Italian seasoning. This adds a zesty flavor to your dish. Allow the mixture to simmer for a few minutes so the flavors meld together. Incorporating Heavy Cream and Parmesan Reduce the heat to low. Slowly pour in the heavy cream, stirring as you go. If you want, add the grated Parmesan cheese for a richer taste. Mix everything until well combined. Returning Chicken to Skillet Place the seared chicken breasts back into the skillet. Make sure they are covered with the creamy sauce. This will allow the chicken to soak up all the flavors. Simmering for Flavor Let everything simmer together for another 5 minutes. This helps to heat the chicken through and blend the flavors. Taste and adjust the seasoning if needed. Add more salt or pepper according to your preference. Before serving, garnish with chopped fresh parsley for a pop of color. - Ensuring Perfectly Cooked Chicken Start with fresh chicken breasts. Season them well with salt and pepper. Sear them in hot olive oil. Cook for about 5-6 minutes per side. Use a meat thermometer; aim for 165°F (75°C). This keeps the chicken juicy and tender. - Adjusting Sauce Consistency If your sauce is too thick, add a splash of chicken broth. Stir it in gently until it reaches the desired consistency. For a thicker sauce, let it simmer longer or add more heavy cream. - Alternative Seasonings Try adding smoked paprika for a smoky taste. A pinch of red pepper flakes adds heat. Fresh herbs like thyme or basil can brighten the dish. Experiment to find what you love. - Optional Add-ins You can add fresh spinach or mushrooms for extra nutrition. They add color and flavor. If you enjoy cheese, stir in grated Parmesan for a richer taste. - Plating Ideas Serve the creamy chicken over mashed potatoes or pasta. This makes a comforting base. Spoon the pepperoncini sauce over the top for a nice finish. - Garnishing Tips Add chopped fresh parsley for a burst of color. A sprinkle of chili flakes can make it pop. This not only looks good but also adds extra flavor. Pro Tips Use Fresh Ingredients: Fresh pepperoncini and high-quality chicken can elevate the flavor of your dish significantly. Adjust Spice Level: If you prefer a milder dish, reduce the amount of pepperoncini or remove the seeds before adding them to the skillet. Perfect Cream Consistency: For a thicker sauce, let the creamy mixture simmer for a few extra minutes before adding the chicken back. Make it Ahead: This dish can be prepared in advance and reheated, making it perfect for meal prep or entertaining. {{image_2}} You can switch the chicken breasts for thighs. Thighs stay moist and add rich flavor. If you want a plant-based option, try using tofu. Just press it to remove excess water and cube it before cooking. This makes a great vegetarian version of the dish. For the peppers, feel free to explore different kinds. Banana peppers or jalapeños can add your desired heat. The flavor will change slightly, but it will still be tasty. If you need a gluten-free version, this recipe is easy. Just make sure your chicken broth is gluten-free. Most brands offer this option. For dairy-free, swap the heavy cream with coconut cream. It gives a nice richness and flavor. You can also leave out the Parmesan to keep it dairy-free. This creamy pepperoncini chicken pairs well with several side dishes. Serve it over mashed potatoes for comfort. Pasta is another great option; it soaks up the sauce well. For meal prep, this dish stores well. Cook a big batch, divide it into containers, and enjoy it throughout the week. You can add a side salad or steamed veggies for a complete meal. - How Long It Lasts You can keep Creamy Pepperoncini Chicken in the fridge for up to four days. Make sure it cools before you store it. - Proper Storage Containers Use an airtight container to keep your chicken fresh. Glass containers work well, but plastic ones are fine too. - How to Freeze and Thaw To freeze, place the chicken in a freezer-safe bag or container. Squeeze out extra air. For thawing, move it to the fridge overnight before reheating. - Best Practices for Reheating Reheat in a skillet over medium heat. Add a splash of chicken broth to keep it moist. You can also use the microwave, but stir often. - Recipes to Use Leftovers Shred leftover chicken for a creamy pasta dish or on top of a salad. You can mix it into a warm quesadilla for a tasty twist. - Creative Serving Suggestions Serve the chicken over rice or in a wrap with fresh veggies. You can also top baked potatoes with the creamy sauce for a hearty meal. What can I serve with Creamy Pepperoncini Chicken? You can pair this dish with many sides. Some popular options include: - Mashed potatoes - Cooked pasta - Rice or quinoa - Steamed vegetables - Crusty bread These sides soak up the creamy sauce well and add to the meal. Can I make this recipe in advance? Yes, you can prepare this dish ahead of time. Cook the chicken and sauce, then store in the fridge. When ready to eat, just reheat it on the stove. This makes weeknight dinners easier! How can I make the sauce thicker? To thicken the sauce, try these methods: - Add more Parmesan cheese - Stir in a cornstarch slurry (mix cornstarch with water) - Simmer it longer to reduce the liquid Each method works well to achieve a creamier sauce. Caloric Content Each serving of Creamy Pepperoncini Chicken has about 450 calories. This can vary based on sides and portions. Macronutrients Per Serving - Protein: 35g - Carbohydrates: 8g - Fat: 30g This meal balances protein and healthy fats with low carbs. Can I use different types of peppers? Yes, you can use other peppers. Try banana peppers, jalapeños, or even bell peppers. Each type gives a unique flavor. What to do if I don’t have heavy cream? If you lack heavy cream, use these alternatives: - Half-and-half - Coconut cream - Greek yogurt (for a tangy twist) Each substitute will change the texture and flavor a bit, but they still work great! This blog covered how to make a tasty creamy pepperoncini chicken dish. We explored ingredients, preparation steps, and tips to boost flavor. I shared ways to modify the recipe for dietary needs and meal prep. You can store leftovers and even use them in new recipes. Remember, cooking is about joy and creativity. Experiment with your own flavors and have fun in the kitchen. The more you try, the better you'll get! Enjoy your meal!

Creamy Pepperoncini Chicken Skillet Easy Weeknight Meal

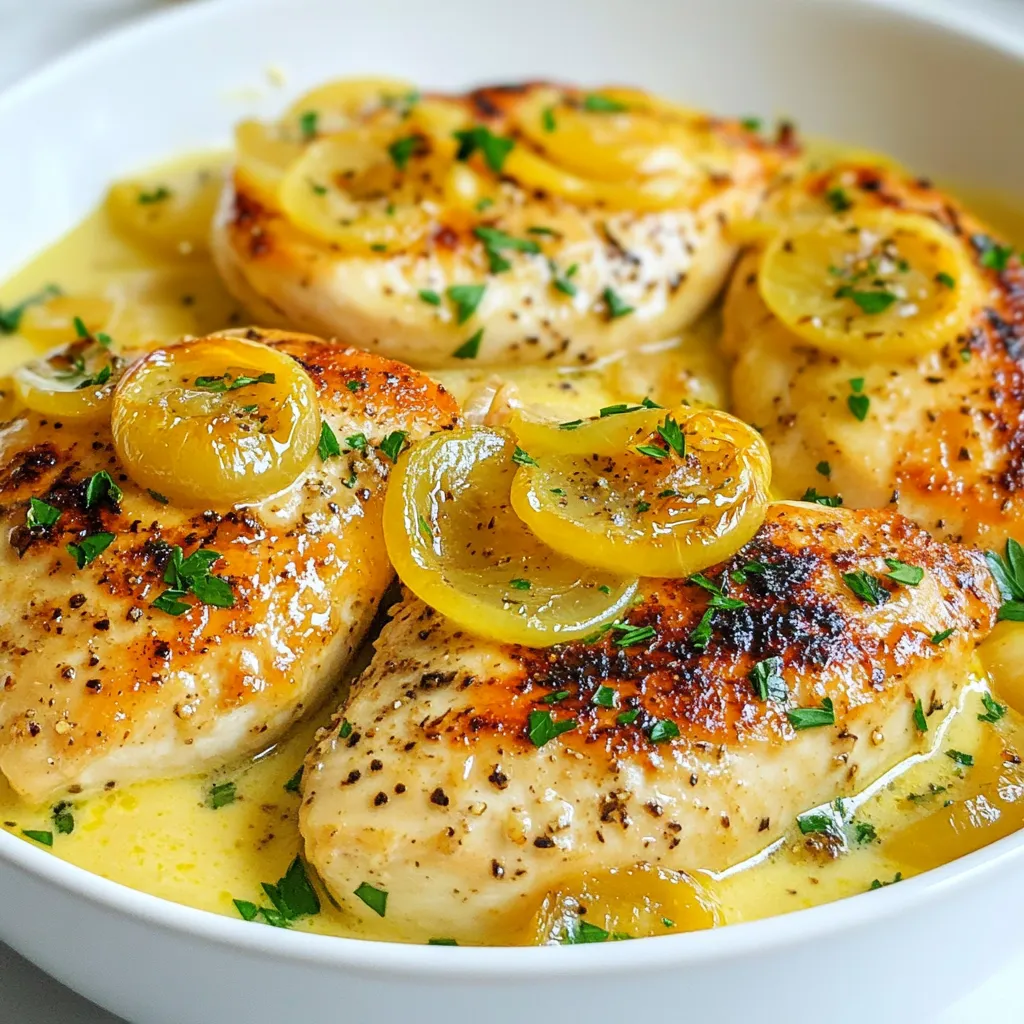
Looking for an easy weeknight meal? Let me introduce you to my Creamy Pepperoncini Chicken Skillet. This dish packs a

- 4 cups ripe tomatoes, chopped (or 2 cans of whole peeled tomatoes) - 1 medium onion, diced - 4 cloves garlic, minced - 1 cup vegetable broth - 1 cup coconut cream (or cashew cream for a lighter option) - 1 teaspoon dried oregano - Salt and pepper to taste - 1/4 cup fresh basil leaves, chopped (plus extra for garnish) - 2 tablespoons olive oil The main ingredients create a rich, vibrant flavor. Ripe tomatoes give the soup its fresh taste. If you use canned tomatoes, they're easy and still delicious. Diced onion and minced garlic add depth. Vegetable broth brings warmth, while coconut or cashew cream adds creaminess. Fresh basil brings a bright kick, making this soup special. - 1 teaspoon sugar (optional, to balance acidity) - 1 tablespoon balsamic vinegar (optional for depth) Sugar helps reduce the acidity of the tomatoes. If your soup tastes too sharp, add a little sugar to balance it. Balsamic vinegar adds a tangy depth. You can skip these options, but they can enhance the flavor nicely. When measuring ingredients, be precise. Use a dry measuring cup for solids and a liquid measuring cup for liquids. For items like tomatoes, you can adjust based on your taste. If you can’t find coconut cream, cashew cream works well. You can also blend soaked cashews with water to make your own. This substitutes well in recipes for a creamy texture. {{ingredient_image_1}} First, we need a good base for our soup. Start by heating 2 tablespoons of olive oil in a large pot over medium heat. Once the oil is hot, add 1 diced onion. Sauté it for about 4-5 minutes. You want it to turn soft and translucent. Next, stir in 4 cloves of minced garlic. Cook this for just 1 minute. You will smell the garlic and onion mix, and it will be amazing! Now, add your tomatoes. You can use 4 cups of fresh, chopped tomatoes or 2 cans of whole peeled tomatoes. Also, pour in 1 cup of vegetable broth. Sprinkle in 1 teaspoon of dried oregano. If you want, add 1 teaspoon of sugar. This will help balance the acidity of the tomatoes. Bring the mixture to a boil, then lower the heat. Let it simmer for 15-20 minutes. Stir occasionally, so nothing sticks to the bottom. When the tomatoes are soft, it's time to blend. You can use an immersion blender right in the pot. This is the easiest way. Just blend until the soup is smooth. If you don't have an immersion blender, pour the soup in batches into a regular blender. Be careful, as the soup is hot! After blending, return the smooth soup to low heat. Now we will add cream. Stir in 1 cup of coconut cream or cashew cream until it's fully mixed. This gives the soup its creamy texture. Taste the soup and add salt and pepper to your liking. If you want more depth, add a tablespoon of balsamic vinegar. Let it simmer for another 5 minutes. Finally, mix in 1/4 cup of chopped fresh basil right before serving. This adds a fresh burst of flavor. Serve the soup warm in bowls, and top with a bit more basil for garnish. Enjoy! To boost the taste of your soup, use fresh herbs. Basil is a must, but you can try oregano too. Dried herbs work well if fresh ones aren't available. For a richer taste, add a pinch of red pepper flakes. This gives a nice kick without overpowering the soup. Sometimes, tomatoes can be too acidic. If that happens, add a teaspoon of sugar. This little trick balances the tartness. You won’t taste the sugar; it just makes the flavors shine. Creaminess makes the soup comforting. You can use coconut cream for a rich flavor. If you want a lighter option, try cashew cream instead. Both options give a lovely texture. Want a chunky soup? After blending, set aside some of the cooked tomatoes. Add them back into the soup for bites of texture. You can also chop veggies like carrots or zucchini. This adds a nice crunch and extra nutrients. Sautéing is key to building flavor. Heat olive oil over medium heat. Add onions first and cook until soft. This should take about four to five minutes. Then, add garlic. Cook for just a minute to avoid burning. To prevent burning, keep the heat steady. Stir often, especially as you add tomatoes and broth. If you notice sticking, lower the heat. If you do burn something, don’t worry! Just add a splash of water to deglaze the pot. This lifts the burnt bits and adds flavor. Pro Tips Use Fresh Tomatoes: For the best flavor, use ripe, in-season tomatoes. They will enhance the richness of your soup. Texture Matters: If you prefer a chunkier soup, reserve some diced tomatoes before blending and stir them back in after. Herb Variations: Experiment with other herbs like thyme or parsley for a unique twist on the classic basil flavor. Storing Leftovers: This soup can be stored in the refrigerator for up to 3 days. Reheat gently on the stove for the best texture. {{image_2}} To make this soup gluten-free, be sure to check all labels. Some vegetable broths may have gluten. I suggest using brands that are certified gluten-free. Pair this soup with gluten-free bread. Look for crusty options that hold up well for dipping. If you need a nut-free option, use coconut cream. It gives a rich, creamy taste. You can also try using oat milk as a lighter cream alternative. For a low-sodium version, simply reduce the salt. You can also use low-sodium broth to keep the flavor strong without the extra salt. Want to change up the flavor? Try adding roasted red peppers. They give a nice sweetness. If you like spice, sprinkle in some chili flakes for heat. You can also use different herbs. Thyme or parsley can add a fresh touch to the soup. Each of these twists can make your soup new and exciting. You can keep your Vegan Creamy Tomato Basil Soup in the fridge for about 4 to 5 days. Use an airtight container to store the soup. This helps keep it fresh and tasty. Make sure the soup is cool before you seal it. Label the container with the date you made it. This way, you will know when to use it. To freeze the soup, let it cool completely. Then, pour it into freezer-safe bags or containers. Leave some space at the top for expansion. You can freeze it for up to 3 months. When you’re ready to eat, take the soup out of the freezer and put it in the fridge overnight to thaw. You can reheat the soup in two ways: the microwave or on the stovetop. For the microwave, pour the soup into a bowl and heat in short bursts. Stir it in between to avoid hot spots. For stovetop, heat the soup in a pot over low heat. Stir often to keep the texture smooth. Always check the temperature before serving to ensure it’s hot throughout. Enjoy your soup without losing its creamy charm! To make your soup creamier, you can add extra cream-based ingredients. Here are some suggestions: - Use more coconut cream or cashew cream. This will enhance the richness. - Blend in silken tofu for a protein boost and smooth texture. - Add a splash of almond milk or soy milk for a lighter touch. - Stir in some nutritional yeast for a cheesy flavor and creaminess. These options will help you reach the perfect creamy texture. Yes, you can use canned tomatoes in this recipe. Here are the pros and cons: Pros: - Canned tomatoes are often picked at peak ripeness, so they taste great. - They save time since you don’t need to chop or peel them. - Canned tomatoes have a longer shelf life, so they’re easy to keep on hand. Cons: - Fresh tomatoes may have a brighter flavor and better texture. - Canned tomatoes can be higher in sodium, so check the label. Both options work, but choose what fits your needs best. This soup pairs well with many sides. Here are some ideas: - Serve with crusty bread for dipping. A baguette or sourdough works well. - Grilled cheese sandwiches are a classic match. Try using vegan cheese! - A fresh salad can add a nice crunch. Consider a simple green salad. - Serve with garlic bread for a tasty twist. These sides will make your meal even more delightful! This blog post covered how to make a delicious creamy tomato basil soup. We explored the key ingredients, like ripe tomatoes, onions, and broth. You learned kitchen tips for preparing, blending, and finishing the soup to get the best flavor and texture. We also discussed variations for different diets and proper storage methods. Remember, cooking is fun! Don’t hesitate to experiment with ingredients and flavors. Each batch will help you improve your skills and taste. Enjoy making your perfect soup!

Vegan Creamy Tomato Basil Soup Comforting and Easy Recipe

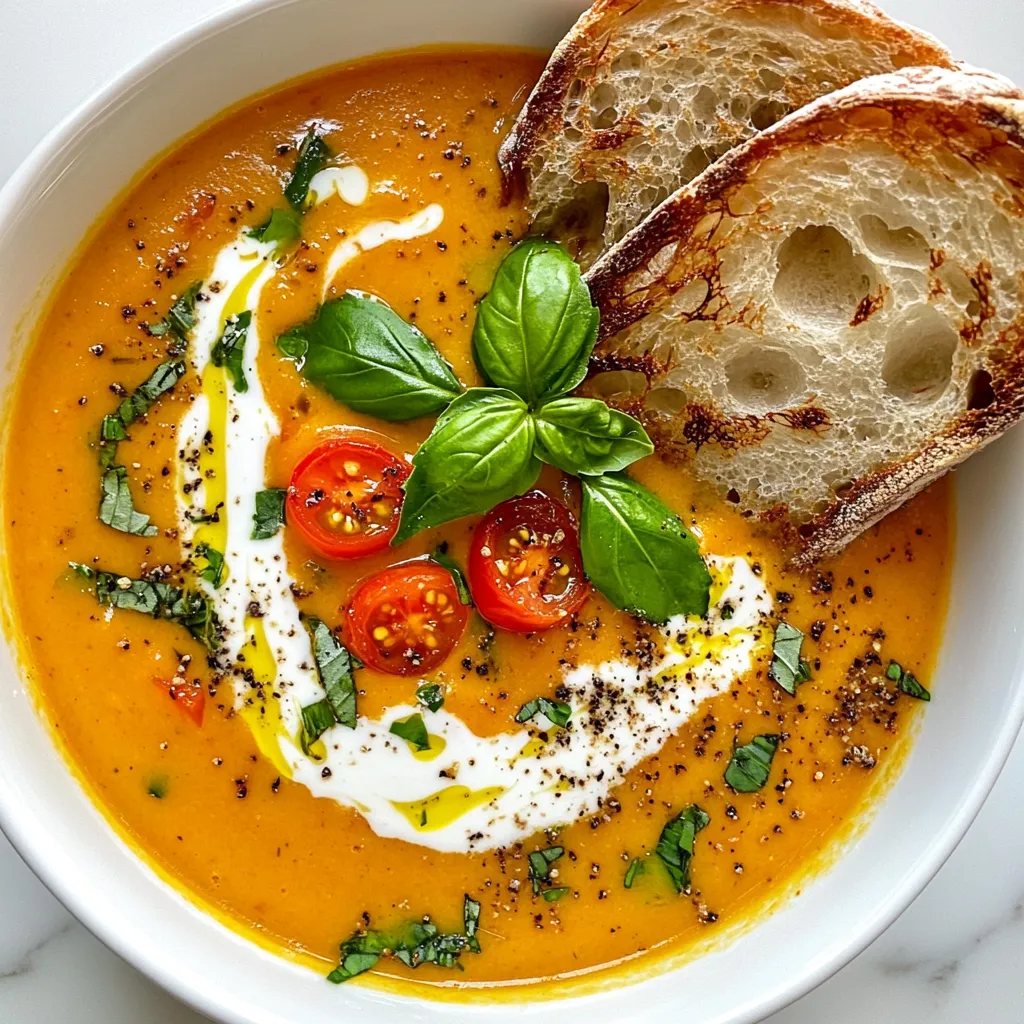
Are you craving a warm, soothing bowl of soup that’s both vegan and creamy? Look no further! My Vegan Creamy

Here is what you need to make this creamy veggie soup: - 1 tablespoon olive oil - 1 medium onion, diced - 3 cloves garlic, minced - 2 medium carrots, diced - 1 medium zucchini, diced - 1 red bell pepper, diced - 2 cups fresh spinach - 4 cups vegetable broth - 1 cup coconut milk - 1 teaspoon dried thyme - 1 teaspoon dried basil - Salt and pepper to taste - 2 tablespoons nutritional yeast (optional for cheesy flavor) - Fresh parsley, chopped (for garnish) These ingredients create a rich and creamy texture. The olive oil adds a nice base flavor. Onions and garlic give the soup aromatic warmth. Carrots, zucchini, and bell peppers add color and crunch. Spinach gives it a fresh pop, while coconut milk adds creaminess. Nutritional yeast gives a cheesy taste if you want that extra boost. You can adjust salt and pepper to your liking. Make sure to get fresh veggies for the best flavor. This soup is easy to make and packed with nutrients. You can even customize it with your favorite herbs or add in any veggies you have on hand. Enjoy the bright colors and the comforting aroma as you cook! {{ingredient_image_1}} Heating the Olive Oil and Sautéing Onion Start by heating 1 tablespoon of olive oil in a large pot over medium heat. Add the diced onion. Sauté the onion until it turns translucent, which takes about 3-4 minutes. This step builds a great base flavor for your soup. Adding Garlic and Other Vegetables Next, stir in 3 cloves of minced garlic. Cook for 1 minute until it smells wonderful. Now, add 2 diced carrots, 1 diced zucchini, and 1 diced red bell pepper to the pot. Cook these veggies for about 5-7 minutes, stirring often. You want them to soften but not mush. Incorporating Broth and Seasonings Pour in 4 cups of vegetable broth and 1 cup of coconut milk. Mix everything well. Now, add 1 teaspoon each of dried thyme and dried basil. Don’t forget to season with salt and pepper to taste. Bring the soup to a gentle boil. Then reduce the heat and let it simmer for 10-15 minutes. Blending to Desired Consistency Once the veggies are tender, stir in 2 cups of fresh spinach and 2 tablespoons of nutritional yeast if you want a cheesy taste. Let it simmer for an extra 2-3 minutes until the spinach wilts. If your soup is too chunky, use an immersion blender to blend it to your liking. Final Touches and Serving Suggestions Taste the soup and adjust the seasonings as needed. Serve it hot and garnish with freshly chopped parsley. This simple step adds a nice touch of color and flavor. Enjoy your creamy veggie soup! - Suggested Seasonings and Herbs: Use dried thyme and basil for depth. You can also add a pinch of red pepper flakes for a touch of warmth. - Adding More Veggies: Toss in some diced potatoes or sweet corn. These add sweetness and texture. - Using Different Cream Alternatives: Try almond or cashew milk for a nutty flavor. These options keep it light and tasty. - Importance of Simmering: Simmering helps flavors blend well. It makes your soup richer and more delicious. - How to Use an Immersion Blender: Simply place the blender into the pot. Blend until you reach your desired smoothness. For a chunkier soup, blend just half. - Creative Serving Suggestions: Serve in a large bowl with a slice of crusty bread on the side. This adds a nice touch to your meal. - Garnishing Options: Sprinkle chopped parsley on top for a fresh look. You can also add a drizzle of olive oil for extra richness. Pro Tips Use Fresh Ingredients: Always opt for fresh vegetables and herbs to enhance the flavor and nutritional value of your soup. Adjust Consistency: If you prefer a thicker soup, blend more of the mixture; for a thinner soup, add extra broth or coconut milk. Enhance Flavor: Experiment with different herbs and spices, like smoked paprika or cumin, to give your soup a unique twist. Make It Ahead: This soup can be made in advance and stored in the fridge for up to 3 days, making it perfect for meal prep. {{image_2}} Substituting Coconut Milk If you want a different flavor, you can swap coconut milk with almond milk or cashew cream. These options add a nutty taste that pairs well with the veggies. For a lighter soup, use low-fat milk or oat milk. Each choice gives a unique twist to your creamy veggie soup. Using Different Broths You can change the broth to fit your taste. Use chicken broth for a richer flavor or mushroom broth for an earthy touch. If you want a lighter option, vegetable broth is great. Each broth brings its flavor, making your soup fun and diverse. Adding Heat with Peppers If you like heat, add diced jalapeños or red pepper flakes. These will kick up the spice level. Start with a small amount, and taste as you go. You can always add more, but it’s hard to take it out once added. Incorporating Spices for More Depth For deeper flavor, mix in spices like cumin or curry powder. These add warmth and richness. Try adding smoked paprika for a hint of smokiness. These spices can transform your soup into something exciting. Making It Gluten-Free This soup is naturally gluten-free, so you can enjoy it without worry. Just check your broth and any added ingredients like nutritional yeast to ensure they are gluten-free. Vegan and Vegetarian Options The soup is already vegetarian, and using coconut milk keeps it vegan. If you want more protein, add beans or lentils. They will make the soup heartier without losing the creamy goodness. After making this creamy veggie soup, you will want to store any leftovers. The best containers for storage are airtight glass or plastic containers. These containers keep the soup fresh and prevent spills. Always let the soup cool down before sealing it tight. The ideal refrigerator storage time for this soup is about 3 to 5 days. Make sure to label your container with the date. This way, you can enjoy your soup within the best time frame. If you want to save this soup for later, freezing is a great option. To freeze, first let the soup cool completely. Then, pour it into freezer-safe bags or containers. Leave some space at the top, as the soup will expand when frozen. Seal the bags tightly, removing as much air as possible. To reheat, thaw the soup in the fridge overnight or use the microwave. When ready to eat, warm it on the stove over low heat. Stir well to maintain the texture. To maintain flavor and texture, consider adding a splash of coconut milk when reheating. This brings back the creamy goodness. Enjoy your creamy veggie soup anytime! Yes, you can make this soup ahead of time. It tastes even better the next day. Just let it cool and store it in an airtight container. Keep it in the fridge for up to three days. When you're ready to eat, just reheat it on the stove or in the microwave. You can add or replace many vegetables in this soup. Some great options are: - Broccoli - Cauliflower - Peas - Potatoes - Green beans Feel free to mix and match based on what you have. Just keep the cooking times in mind. If your soup is too thin, you have a few options. You can: - Simmer it longer to reduce liquid. - Add a slurry of cornstarch and water. - Mix in some mashed potatoes or cooked rice. These will help give your soup a nice, creamy texture. Yes, you can make this soup in a slow cooker. Start by sautéing the onion and garlic in a pan. Then, add all the other ingredients to the slow cooker. Cook on low for 6-8 hours or high for 3-4 hours. Blend before serving for that creamy texture. This blog post walked you through making a delicious vegetable soup, from selecting fresh ingredients to easy preparation steps. I shared tips to enhance flavors, adjust spice levels, and even offered ideas for storage. Remember, cooking is about fun and creativity. Feel free to swap ingredients and make this soup your own. Enjoy your cooking adventure, and savor the warmth of a homemade meal.

Creamy Veggie Soup One-Pot Delightful Recipe

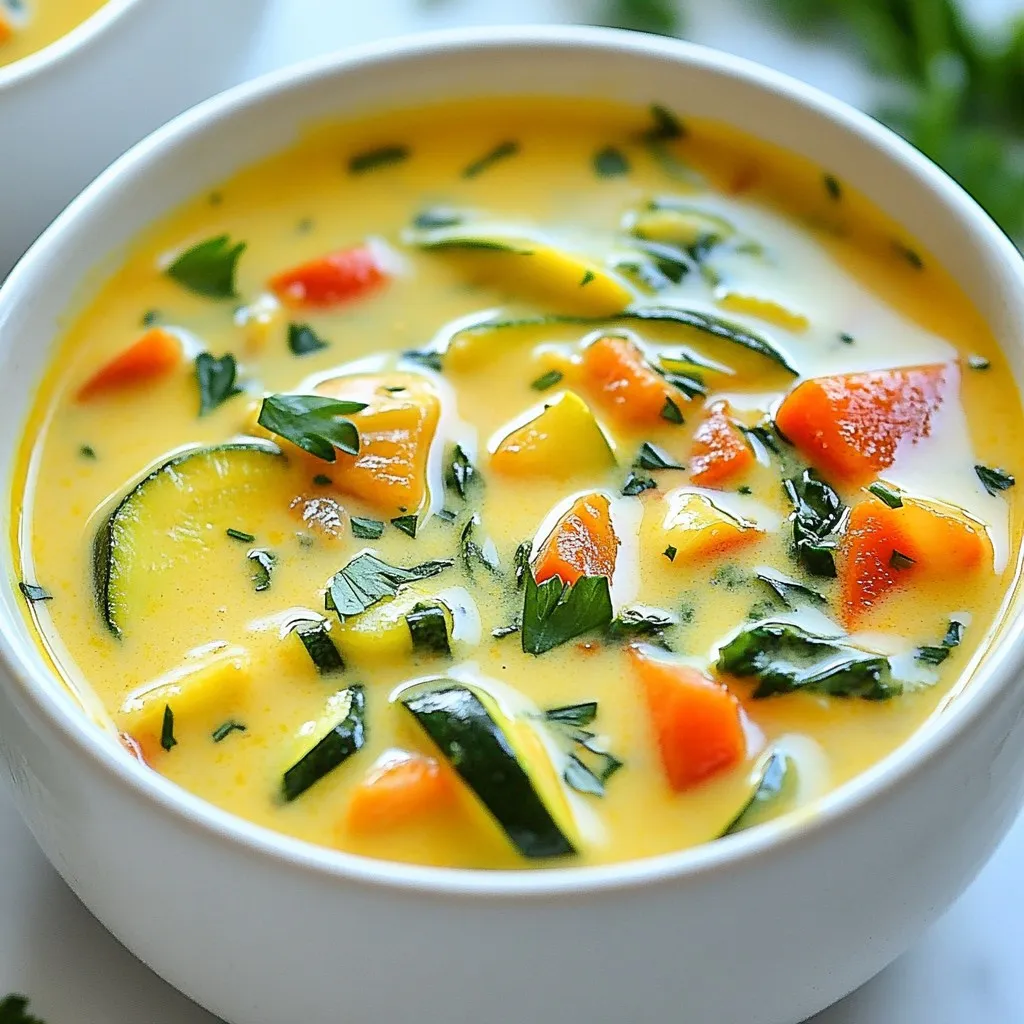
Looking for a warm, hearty meal that’s easy to make? This Creamy Veggie Soup is your perfect one-pot solution! Packed

- 2 cups all-purpose flour - 1/4 cup granulated sugar - 1/2 teaspoon salt - 1 packet (2 1/4 tsp) instant yeast - 1/2 cup warm milk (about 110°F) - 1/4 cup unsalted butter, melted - 1 large egg - 1 teaspoon vanilla extract - 1/2 cup brown sugar, packed - 1/2 cup chopped pecans - 1/4 cup maple syrup - 1/2 teaspoon ground cinnamon - 1/4 teaspoon nutmeg - 1/4 cup raisins (optional for added sweetness) For Maple Pecan Sticky Buns, these ingredients work together to create soft, sweet rolls. Each one plays a big role in the final flavor and texture. - Gluten-free flour alternatives: Use a blend of gluten-free flour and xanthan gum. - Dairy-free milk options: Swap warm milk with almond or soy milk. - Sweetener substitutions: Replace brown sugar with coconut sugar or maple sugar for a different taste. These substitutes can help you enjoy sticky buns, even if you have dietary needs. Each option offers a unique twist while keeping the spirit of this treat alive. {{ingredient_image_1}} - Mixing dry ingredients: Start by adding 2 cups of all-purpose flour, 1/4 cup granulated sugar, 1/2 teaspoon salt, and 1 packet of instant yeast into a bowl. Stir them well together to blend. This mix gives your sticky buns a sweet base. - Combining wet ingredients: In another bowl, whisk together 1/2 cup warm milk, 1/4 cup melted unsalted butter, 1 large egg, and 1 teaspoon vanilla extract. Make sure everything is mixed nicely. The warm milk helps activate the yeast. - Kneading the dough: Gradually add the wet mix to the dry ingredients. Use your hands to combine, kneading until a soft dough forms. This will take about 5-7 minutes. The dough should feel smooth and elastic when ready. - First rise process: Place the dough in a greased bowl. Cover it with a clean towel and let it rise in a warm area. It will double in size in about 1 hour. This step is key for soft buns. - Rolling out the dough: Once the dough has risen, punch it down to release air. Roll it out into a rectangle, about 12x8 inches. Use a floured surface to keep it from sticking. - Filling and cutting the buns: In a small bowl, mix 1/2 cup brown sugar, 1/2 teaspoon ground cinnamon, 1/4 teaspoon nutmeg, and 1/2 cup chopped pecans. Spread this mix evenly over the rolled-out dough. Roll the dough tightly from the longer side to form a log. Cut the log into 12 equal pieces. - Preparing the baking dish: Grease your baking dish. Place the cut buns in the dish, making sure they are close but not touching. - Second rise guidance: In a saucepan, heat 1/4 cup maple syrup and the remaining butter over medium heat until melted and slightly thickened. Pour this mixture over the buns in the dish. Let the buns rise again for about 30 minutes as you preheat the oven to 350°F (175°C). - Baking temperature and time: Bake the sticky buns for 25-30 minutes or until they turn golden brown. Keep an eye on them to avoid overbaking. Once done, allow them to cool for a few minutes before flipping onto a plate. - Tips for dough consistency: Start with the right flour. Use all-purpose flour for the best results. When you mix the wet and dry ingredients, the dough should be soft but not sticky. If it feels too sticky, add a little more flour, one tablespoon at a time. Knead the dough for 5-7 minutes until it’s smooth. - Timing the rises properly: Let the dough rise in a warm place. Cover it with a clean towel to keep it warm. The first rise should take about 1 hour or until it doubles in size. The second rise is important too. After you shape the buns, let them rise again for about 30 minutes. This makes them soft and fluffy. - Avoiding overbaking: Keep an eye on your buns while they bake. They should be golden brown after 25-30 minutes. Use a toothpick to check. If it comes out clean, they are done. If you bake them too long, they can dry out. - Best accompaniments: Maple pecan sticky buns pair well with coffee or tea. The warm flavors enhance each other. A glass of milk also works nicely for a sweet treat. - Plating techniques for presentation: To make your sticky buns look great, drizzle extra maple syrup on top before serving. Adding whole pecans as a garnish gives a nice touch. Arrange the buns on a pretty plate to make them inviting. - Storing leftovers: If you have any buns left, store them in an airtight container. They can last for a few days at room temperature. To keep them fresh longer, refrigerate them. When you are ready to eat, heat them in the microwave for a few seconds. This will bring back their soft texture. Pro Tips Perfect Dough Consistency: Ensure your dough is soft but not sticky. If it's too sticky, add a little more flour, and if it's too dry, add a splash of milk. Rising in a Warm Place: If your kitchen is cool, place the dough in an oven that’s turned off, with the light on. This will create a warm environment for the dough to rise. Cutting Even Rolls: Use a sharp knife or dental floss to cut the log into equal pieces. This will help maintain the shape and ensure even baking. Storing Leftovers: Keep any leftover sticky buns in an airtight container at room temperature for up to 2 days. Reheat in the microwave for a few seconds before serving. {{image_2}} You can change up the flavors of your maple pecan sticky buns to keep things fun. Adding chocolate chips gives a sweet twist. You can also mix in dried fruit, like cranberries or cherries, for a burst of flavor. If you want something different, try spices like cardamom or ginger instead of cinnamon. Each spice adds its own unique taste. You can also use other nuts, like walnuts or almonds, to bring new texture and flavor to your buns. If you're looking for vegan options, use a flax egg instead of a real egg. Mix one tablespoon of ground flaxseed with three tablespoons of water. Let it sit until it thickens. For butter, use coconut oil or vegan butter. You can also lower the sugar by using maple syrup or agave instead of granulated sugar. If you want a healthier option, try whole grain flour instead of all-purpose flour. This gives your sticky buns more fiber and nutrients. These swaps make delicious treats that fit your diet. To keep your maple pecan sticky buns fresh, store them in the fridge. Place them in an airtight container. This keeps them soft and tasty for up to five days. If you don't have an airtight container, wrap them tightly in plastic wrap. This will help prevent them from drying out. If you want to save the sticky buns for later, you can freeze them. First, let the buns cool completely. Then, wrap each bun in plastic wrap, and place them in a freezer bag. They will stay good in the freezer for up to three months. When you are ready to eat them, take them out and reheat. To reheat, place the buns in a preheated oven at 350°F (175°C) for about 10-15 minutes. You can also use a microwave for quicker heating. If using the microwave, heat for 20-30 seconds. This will help keep them soft and warm. Enjoy your sticky buns fresh, even after freezing! How long do sticky buns last? Sticky buns stay fresh for about 2 to 3 days at room temperature. Keep them in a sealed container to avoid drying out. Can I make the dough in advance? Yes! You can make the dough a day ahead. Just cover it well and store it in the fridge. This will give the flavors more time to develop. What's the best way to reheat sticky buns? To reheat, place sticky buns in a warm oven at 350°F for about 10 minutes. This keeps them soft and gooey. Why did my sticky buns not rise? If your buns did not rise, the yeast may be old or inactive. Always check the expiration date on your yeast before using it. How to fix overly sticky dough? If the dough is too sticky, add a little flour, one tablespoon at a time, while kneading. This will help you get the right texture. What to do if the buns turned out dry? If the buns are dry, they may have baked too long. Next time, check them a few minutes earlier for perfect softness. This blog covered everything you need to make great maple pecan sticky buns. We discussed key ingredients, like yeast and warm milk, and explored substitutes for different diets. You learned step-by-step instructions for preparing the dough, shaping the buns, and baking them perfectly. Don't forget the tips for achieving the best results and the various flavor options you can try. Now, you have all the tools to create delicious sticky buns at home. Enjoy your baking and share your tasty results!

Maple Pecan Sticky Buns Irresistible and Soft Treat

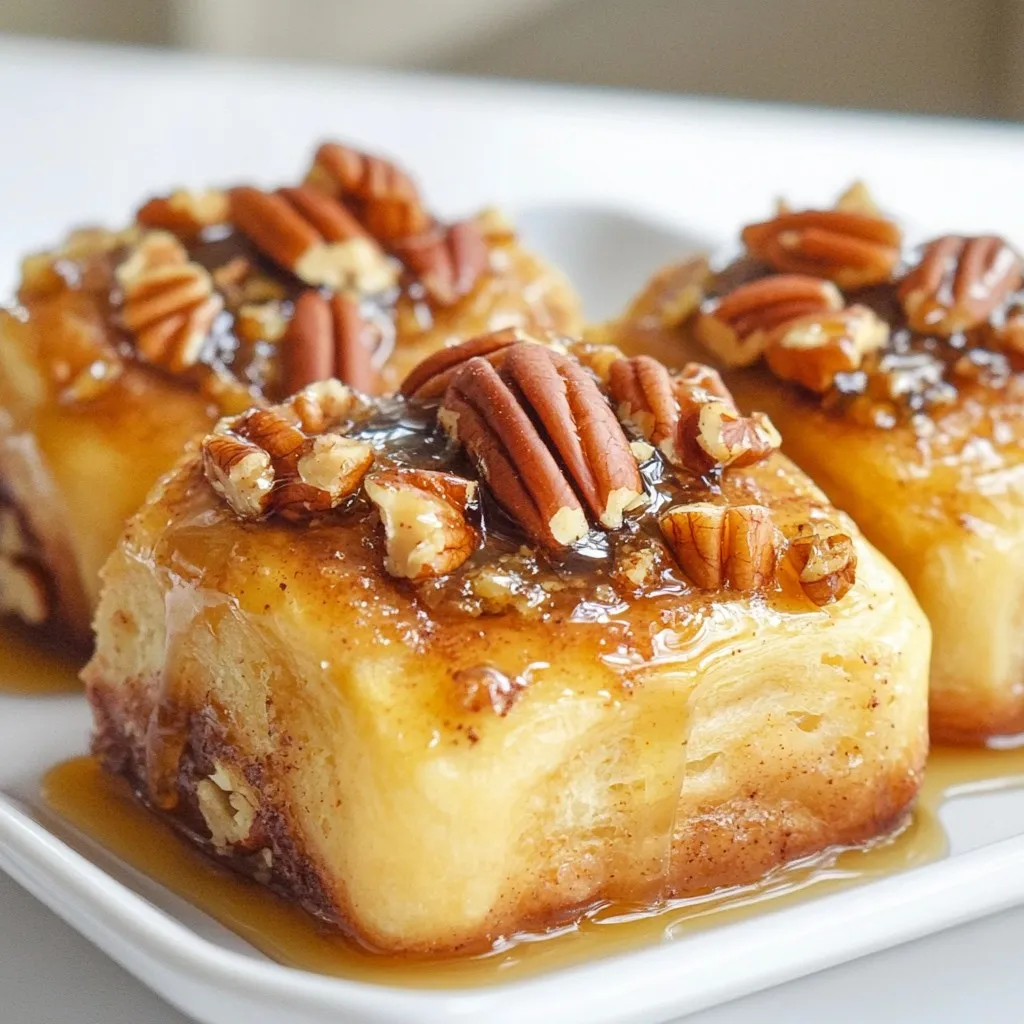
If you crave a sweet treat that melts in your mouth, these Maple Pecan Sticky Buns are for you! With

To make One Pot Sausage and Rice, you need a handful of tasty ingredients. Here’s the list to get you started: - 1 lb (450g) spicy Italian sausage, sliced - 1 cup long-grain white rice - 1 medium onion, chopped - 1 bell pepper (any color), diced - 1 can (14.5 oz) diced tomatoes, drained - 2 cups chicken broth - 1 teaspoon smoked paprika - 1 teaspoon dried oregano - ½ teaspoon red pepper flakes (adjust to taste) - 1 cup frozen peas - 2 tablespoons olive oil - Salt and pepper to taste - Fresh parsley, chopped (for garnish) These ingredients make for a hearty and satisfying meal. Each one brings its own flavor to the dish. The spicy Italian sausage adds a nice kick. The rice absorbs all the rich flavors, making each bite delicious. The vegetables provide color and crunch. Plus, the seasonings enhance the taste, making it a dish you will love. Don't forget the peas for a pop of sweetness and the parsley for a fresh finish! {{ingredient_image_1}} - Heat 2 tablespoons of olive oil in a large pot over medium heat. - Add 1 pound of sliced spicy Italian sausage. Cook for 5-7 minutes until browned on all sides. Remove the sausage and set it aside. - In the same pot, add 1 chopped onion and 1 diced bell pepper. Sauté for 3-4 minutes. The veggies should start to soften. - Stir in 2 minced garlic cloves, 1 teaspoon smoked paprika, 1 teaspoon dried oregano, and ½ teaspoon red pepper flakes. Cook for 1 minute until fragrant. - Add 1 cup of long-grain white rice to the pot. Stir well to coat the rice with the veggies and spices. - Pour in 2 cups of chicken broth and add 1 can of drained diced tomatoes. Stir until combined. - Bring the mixture to a boil. Then, lower the heat and cover the pot. Let it simmer for 15-20 minutes. The rice will absorb most of the liquid and be tender. - After 15 minutes, add back the cooked sausage and 1 cup of frozen peas. Cover the pot again and let it sit for 5 more minutes. Season with salt and pepper to taste before serving. Enjoy your meal! To make this dish pop, adjust the spices to your taste. Start with the red pepper flakes. If you like heat, add more. If you prefer mild, cut back. You can also try other spices like cayenne for a different kick. Here are some cooking tips to enhance flavor: - Use high-quality sausage for the best taste. - Sear the sausage until it's golden brown. This adds depth. - Don't skip the garlic; it brings a lot of flavor. - Stir in the peas at the end for a fresh bite. Presentation matters! Serve the dish in deep bowls. This keeps the rice and sausage warm. Garnish with fresh parsley for a pop of color. A sprinkle of red pepper flakes also adds a nice touch. For serving, use a large platter for family-style meals. It makes sharing easy and fun. You can also add lemon wedges on the side. They brighten the flavors and add a zesty twist. Pro Tips Use Fresh Ingredients: Always opt for fresh vegetables and herbs to enhance the flavor of your dish. Fresh ingredients make a significant difference in taste. Adjust Spice Levels: If you're sensitive to heat, start with less red pepper flakes and gradually add more to reach your preferred spice level. Rest Before Serving: Letting the dish rest for a few minutes after cooking allows the flavors to meld together, resulting in a more delicious meal. Experiment with Proteins: Feel free to substitute the spicy Italian sausage with other proteins like chicken or turkey for a different flavor profile. {{image_2}} You can swap the spicy Italian sausage for other meats. Turkey sausage works well too. Chicken sausage is a leaner option. If you prefer beef, it can add a nice flavor. Just remember to adjust cooking times for different proteins. If you want a meatless dish, try using plant-based sausage. There are many good brands available that mimic the taste. You can also use beans, like black beans or chickpeas. They add protein and texture without meat. Adding spices can change the dish's flavor. Try adding cumin for a warm, earthy taste. A dash of cayenne pepper can give a nice kick. You might enjoy adding fresh herbs like thyme or basil. They brighten the meal and add freshness. You can also switch out the vegetables. Zucchini or mushrooms can replace the bell pepper. Spinach is a great green option too. Just add it towards the end so it stays bright and fresh. Mixing in corn adds a sweet note. Play with flavors to find what you love! - Refrigeration tips: Store any leftover One Pot Sausage and Rice in an airtight container. Keep it in the fridge for up to four days. This keeps the dish fresh and safe to eat. - Freezing guidelines: To freeze, place the cooled dish in a freezer-safe container. It can last for up to three months. When you're ready to eat, thaw it overnight in the fridge before reheating. - Methods for optimal texture: To reheat, use the stovetop or microwave. If using the stovetop, add a splash of broth or water. Stir occasionally to heat evenly. If using the microwave, cover the dish to keep moisture in. - Time and temperature recommendations: Heat on medium for about 5-10 minutes on the stove. In the microwave, heat for 2-3 minutes on high. Always check that it's hot throughout before serving. You can serve One Pot Sausage and Rice with many sides. A fresh green salad pairs well. You can also add crusty bread to soak up the flavors. For a heartier meal, try some roasted vegetables. If you like spice, serve with pickled jalapeños. Yes, you can make One Pot Sausage and Rice ahead of time. Cook it fully and let it cool. Then, store in an airtight container in the fridge. It stays fresh for 3-4 days. You can also freeze it for up to 3 months. Just reheat on the stove or in the microwave. To check if the rice is done, take a look at the texture. The rice should be soft and fluffy. If it is still hard or crunchy, it needs more time. You can also taste a small spoonful. If it is tender, then it is ready. This blog post walks you through making a delicious one-pot sausage and rice dish. We covered the key ingredients, easy cooking steps, and handy tips to enhance flavors. You can even try different proteins or vegetables for a unique twist. Remember, proper storage and reheating help keep your meal fresh and tasty. Experiment with this recipe and make it your own. I hope you enjoy cooking and sharing this meal with others!

One Pot Sausage and Rice Easy Flavorful Meal

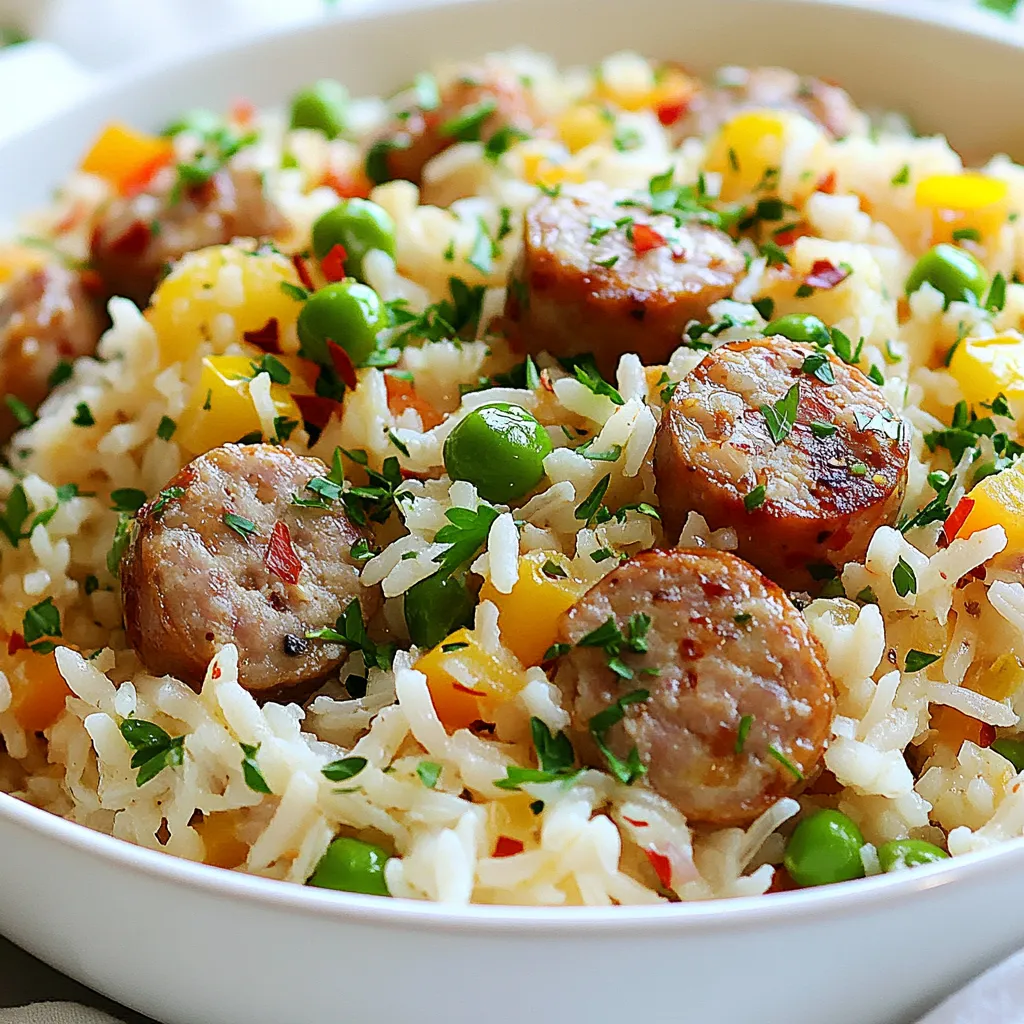
Looking for an easy and delicious meal? One Pot Sausage and Rice is the answer! This dish packs a punch

- Large shrimp (1 lb, peeled and deveined) - Linguine or spaghetti (8 oz) - Unsalted butter (4 tablespoons) - Minced garlic (4 cloves) - Red pepper flakes (1 teaspoon) - Lemon (1 for juicing and zesting) - Chicken broth (1/2 cup) - Fresh parsley (1/4 cup, chopped) - Salt and pepper (to taste) - Optional: Grated Parmesan cheese for serving To make Garlic Butter Shrimp Scampi, gather these fresh and tasty ingredients. Each one plays a key role in building flavor. The large shrimp are the star. They give the dish its protein and juicy bite. For the pasta, I suggest linguine or spaghetti. Their shapes hold the sauce well. Unsalted butter adds richness and creaminess. The minced garlic brings a punch of flavor. I love using four cloves, but you can adjust it to your taste. Red pepper flakes add a touch of heat. Squeeze in the juice of one lemon for brightness. The lemon zest gives even more flavor. Chicken broth helps create a savory sauce. Fresh parsley adds color and freshness. You can season with salt and pepper as needed. Lastly, if you want to elevate your dish, sprinkle some grated Parmesan cheese on top! {{ingredient_image_1}} To start, boil a large pot of salted water. This adds flavor to the pasta. Once the water is bubbling, add 8 ounces of linguine or spaghetti. Cook it according to the package directions. Aim for al dente, which means it should be firm but not hard. Check the pasta a minute or two before the time ends. This helps you avoid overcooking. When done, save 1 cup of pasta water. Drain the pasta and set it aside. Next, grab a large skillet. Set it over medium heat and add 2 tablespoons of unsalted butter. Let the butter melt. Then, add 4 cloves of minced garlic and 1 teaspoon of red pepper flakes. Sauté for about 1 minute. This time is crucial. You want the garlic to be fragrant but not burnt. If it burns, it will taste bitter. Now, add 1 pound of peeled and deveined shrimp to the skillet. Cook for 2 to 3 minutes. Watch for the shrimp to turn pink. Toss them often to cook evenly. Season with salt and pepper to taste. Next, pour in ½ cup of chicken broth, the juice of 1 lemon, and the zest from the lemon. Bring it to a gentle simmer. Let it cook for 2 to 3 minutes. This helps develop the flavors. Once the shrimp are ready, add the cooked pasta directly into the skillet. Toss everything together well. If the mixture feels dry, add some of that reserved pasta water. This helps adjust the consistency. Add it slowly until you reach your desired creaminess. Finally, take the skillet off the heat. Stir in the remaining 2 tablespoons of butter and ¼ cup of chopped parsley. This adds richness and freshness. For serving, plate the shrimp scampi in warmed bowls. Top each with extra parsley and, if you like, sprinkle some grated Parmesan cheese on top. This dish looks great and tastes even better! When making garlic butter shrimp scampi, the shrimp choice matters a lot. You can use fresh or frozen shrimp. Fresh shrimp has a sweet taste and firm texture. Frozen shrimp can be just as good if thawed properly. For the best results, choose large shrimp. They cook evenly and stay juicy. Look for shrimp that are 16/20 count per pound. This means there are 16 to 20 shrimp in one pound. They will give you the perfect bite in each forkful. Cooking pasta right makes a big difference. Start by using a large pot. Fill it with water and add a good amount of salt. The water should taste like the sea. This helps the pasta absorb flavor as it cooks. Cook the linguine or spaghetti until it is al dente. This means it should be firm but not hard. Follow the package instructions for timing. Remember, you will finish cooking it with the shrimp, so don’t overdo it! To boost the flavor of your dish, consider adding herbs and spices. Fresh basil or thyme can add depth. A bit of lemon zest will brighten the dish even more. For garnishing, sprinkle fresh parsley on top when serving. This adds color and freshness. You can also add grated Parmesan cheese. It melts slightly and gives a nice creamy touch to the dish. Pro Tips Perfectly Cooked Shrimp: Ensure your shrimp are cooked until they just turn pink and opaque. Overcooking can make them rubbery. Adjusting Spice Levels: Feel free to modify the amount of red pepper flakes based on your spice tolerance. Start with less and add more if desired. Fresh Ingredients: Use fresh garlic and parsley for the best flavor. Fresh herbs can elevate the dish significantly. Pasta Water Magic: The reserved pasta water contains starch that helps bind the sauce to the pasta. Add it gradually until you reach the desired consistency. {{image_2}} You can brighten up your garlic butter shrimp scampi with fresh veggies. Some great options include: - Cherry tomatoes - Spinach - Zucchini - Bell peppers To add them, slice your chosen vegetables into small pieces. Sauté them in the skillet for a few minutes before adding the shrimp. This way, they cook well and keep their flavor. While linguine is classic, you can switch up your pasta. Try these types for a new twist: - Fettuccine - Penne - Farfalle If you need gluten-free options, look for rice or quinoa pasta. They work well and absorb the flavors nicely. Want to kick up the taste? You can add some extra ingredients. Consider using: - A splash of white wine - Low-sodium chicken stock Add the wine after sautéing the garlic. Let it reduce for a minute before adding the broth. This step deepens the flavor and makes your dish even more delicious. To keep your garlic butter shrimp scampi fresh, store it right. Place the leftovers in an airtight container. This helps lock in the flavors and moisture. Make sure to cool the dish first before sealing it. Refrigerate the container within two hours of serving. It will last for about three days in the fridge. When it's time to enjoy the leftovers, reheat them gently. Use a skillet over low heat. Add a splash of chicken broth or water to keep the shrimp moist. Stir often to prevent overcooking. Shrimp cooks fast, and you don't want them rubbery. For serving, you can sprinkle some fresh parsley on top. A squeeze of lemon juice adds brightness to the dish. Enjoy your reheated garlic butter shrimp scampi just as much as the first time! Yes, you can make Garlic Butter Shrimp Scampi ahead of time. First, cook the pasta and shrimp as directed. Let them cool, then store them in separate airtight containers. You can refrigerate them for up to two days. To reheat, warm the shrimp in a skillet over low heat. Add a splash of chicken broth to keep them moist. Reheat the pasta gently in hot water or a microwave. Combine both before serving. Garlic Butter Shrimp Scampi pairs well with many sides. Here are some great options: - Garlic bread for a crunchy bite - A fresh green salad for crunch - Steamed veggies like broccoli or asparagus - Rice or quinoa to soak up the sauce These sides enhance the meal and add balance to the dish. To avoid overcooking shrimp, watch for color changes. Perfectly cooked shrimp turn bright pink. They should curl into a C shape. Cook them for about 2-3 minutes in the skillet. If you see them starting to curl tightly, they’re likely done. Remove them from heat right away. Monitoring them closely will help you get it just right. Yes, you can substitute some ingredients for Garlic Butter Shrimp Scampi. Here are some common swaps: - Use olive oil instead of butter for a lighter taste. - Swap chicken broth for vegetable broth for a veggie version. - Use lemon juice from a bottle if fresh lemon isn’t available. - You can replace parsley with basil for a different flavor. These swaps can change the taste but keep the dish tasty. This blog post covered a delicious garlic butter shrimp scampi recipe. We explored the essential ingredients, step-by-step cooking instructions, and tips for success. We also discussed variations, storage tips, and answered common questions. Cooking can be simple and enjoyable. Try this recipe for a quick, tasty meal. You can impress your family or friends without stress. Enjoy your shrimp scampi and get creative with flavors!

Garlic Butter Shrimp Scampi Flavorful Dinner Delight

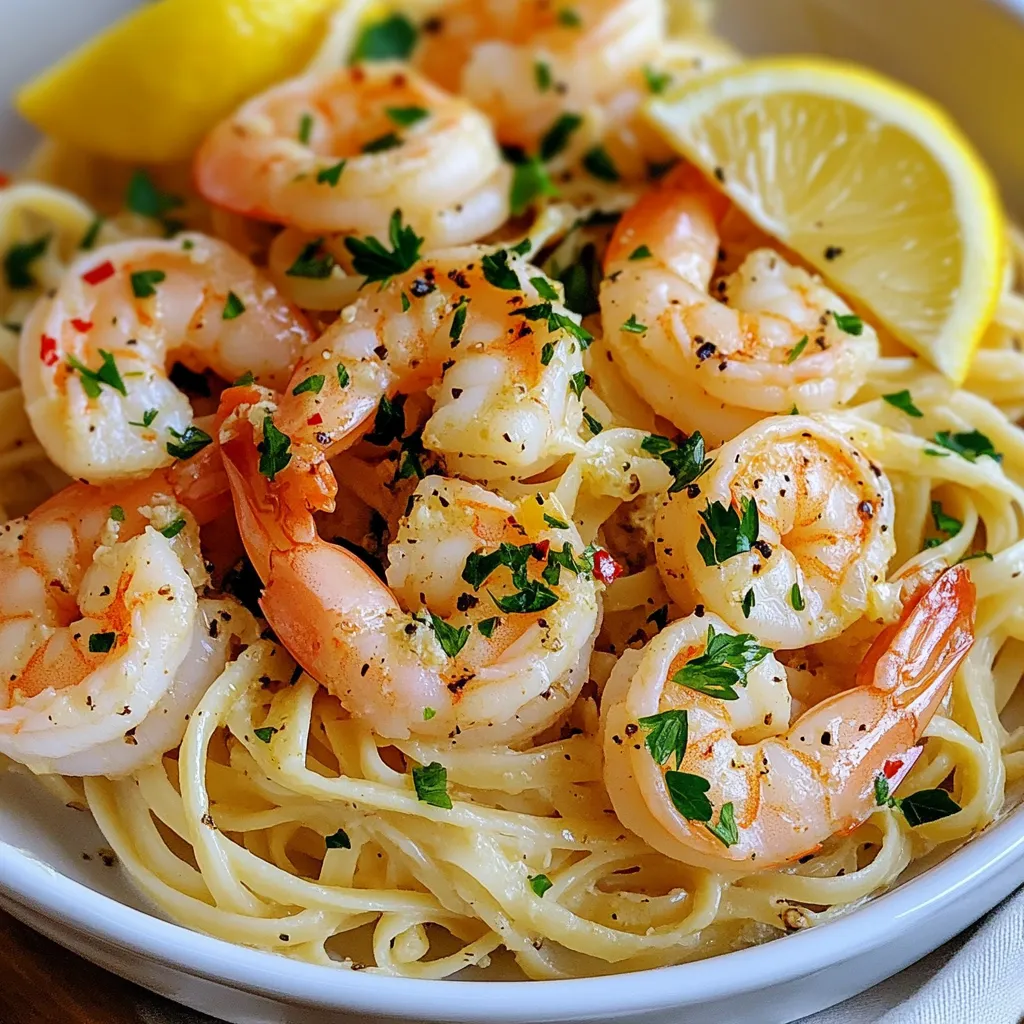
Do you want a dinner that’s both quick and packed with flavor? Garlic Butter Shrimp Scampi is your answer! With

- 4 boneless, skinless chicken breasts - 2 cups fresh spinach, chopped - 4 oz cream cheese, softened - 1/2 cup feta cheese, crumbled - 1/2 cup shredded mozzarella cheese - 2 cloves garlic, minced - 1/2 teaspoon onion powder - 1/4 teaspoon black pepper - 1/4 teaspoon salt - 1 tablespoon olive oil - 1 lemon, juiced - Fresh parsley, for garnish This dish needs fresh and creamy flavors. You want to use fresh spinach to keep it bright. The cream cheese will add richness, while feta gives a tangy kick. The mozzarella melts beautifully, making the filling gooey and delicious. Garlic and onion powder add depth to the taste. You’ll also need chicken breasts that are boneless and skinless. They hold the filling well and cook evenly. A splash of lemon juice adds a zesty touch that brightens the whole dish. Fresh parsley makes for a lovely garnish and adds color. Each serving is packed with protein and healthy fats. The cheese provides calcium, while spinach offers iron and vitamins. This dish is balanced and satisfying, making it great for dinner. - Sharp knife for slicing - Mixing bowl for the filling - Skillet for cooking spinach - Baking dish for roasting - Toothpicks or kitchen twine to secure chicken Having the right tools makes cooking easier. A sharp knife helps you create pockets in the chicken easily. Mixing bowls let you combine the filling well. A skillet is perfect for sautéing the spinach. Lastly, a baking dish will hold everything as it cooks in the oven. {{ingredient_image_1}} Start by preheating your oven to 375°F (190°C). This step warms up the oven, so the chicken cooks well. Gather all your ingredients. You will need chicken breasts, spinach, cream cheese, feta cheese, mozzarella cheese, garlic, and spices. Make sure to chop the spinach and mince the garlic before you begin. In a skillet, heat 1 tablespoon of olive oil over medium heat. Add the minced garlic and sauté for about 1 minute. The garlic should smell nice. Next, add the chopped spinach. Cook it until it wilts, which will take about 2-3 minutes. Once done, remove the skillet from heat and let it cool for a bit. Take each chicken breast and use a sharp knife. Slice it horizontally to create a pocket. Be careful not to cut all the way through. In a bowl, mix the cooked spinach with cream cheese, feta cheese, mozzarella cheese, onion powder, black pepper, and salt. Make sure everything blends well. Now, fill each chicken breast pocket with this tasty mixture. If needed, use toothpicks to hold the filling inside. Place the stuffed chicken in a baking dish. Squeeze fresh lemon juice over the tops of each breast. This adds flavor and keeps the chicken moist. Bake the chicken in your preheated oven for 25-30 minutes. Check that the chicken reaches an internal temperature of 165°F (75°C). Once done, let it rest for 5 minutes. Finally, remove the toothpicks and slice the chicken for serving. To keep chicken moist, start with good quality meat. Choose fresh, boneless, skinless chicken breasts. Use a meat thermometer to check the temperature. Cook to an internal temp of 165°F (75°C). This ensures safe eating while keeping it juicy. Also, let the chicken rest after cooking. This helps the juices spread evenly. For the best filling, use fresh spinach. Cook it until wilted but not mushy. Mix it well with cream cheese, feta, and mozzarella. Each cheese adds its own flavor. Garlic gives a nice aroma. Don’t forget to season with onion powder, salt, and pepper. Taste the filling before stuffing to ensure it’s just right. When securing the stuffed chicken, both toothpicks and kitchen twine work well. Toothpicks are easy to use but can be hard to spot. Make sure to remove them before serving. Kitchen twine can hold the filling better and looks nice for presentation. If you use twine, tie it gently to avoid tearing the chicken. Pro Tips Choose Fresh Spinach: Opt for fresh, vibrant spinach for the best flavor and texture in your stuffed chicken. Avoid wilted or yellowing leaves. Proper Stuffing Technique: Ensure you create a deep pocket in the chicken breasts for ample stuffing. This helps avoid any spillage during cooking. Temperature Check: Always use a meat thermometer to check that the chicken has reached an internal temperature of 165°F (75°C) for safe consumption. Let It Rest: Allow the stuffed chicken to rest for a few minutes before slicing. This helps retain juices, ensuring a moist and flavorful dish. {{image_2}} You can change the cheese for new flavors. Instead of cream cheese, try ricotta or goat cheese. These cheeses add a creamy texture. They also give a unique taste to your chicken. Feta cheese brings a nice salty touch. You can mix in some cheddar for a sharp flavor. Just make sure the cheese melts well. This keeps your stuffing moist and tasty. Want to make it heartier? Add proteins or extra veggies! You can include cooked chicken or turkey in the filling. This adds protein and makes it filling. For veggies, try sun-dried tomatoes or artichokes. They give a nice burst of flavor. You can also add bell peppers for sweetness. The spinach is great, but feel free to swap it for kale or Swiss chard. These changes keep your dish fresh and exciting. You don't have to bake your chicken. Grilling is a tasty option. It adds a smoky flavor that pairs well with the filling. Just be careful not to overcook the chicken. You can also pan-sear it for a golden crust. This method seals in the juices. Cook the chicken on medium heat until it’s done. Both methods give you different textures and flavors. Try them out for a fun twist on the classic dish! After cooking, let the chicken cool. Place it in an airtight container. Store in the fridge for up to three days. Make sure it is sealed well to keep it fresh. When you're ready to eat, simply take it out. If you want to save some for later, freezing works great. Wrap each chicken breast in plastic wrap. Then, place them in a freezer-safe bag. They can last up to three months in the freezer. Don’t forget to label the bag with the date! To reheat, you have a few options. The oven is best for even warmth. Preheat it to 350°F (175°C). Place the chicken in a baking dish and cover with foil. Heat for about 15-20 minutes. You can also use a microwave. Just place the chicken on a microwave-safe plate. Heat it in short bursts, checking often to avoid drying it out. Enjoy your tasty leftovers! You can tell the chicken is done by checking the internal temperature. Use a meat thermometer and make sure it reads 165°F (75°C). The chicken will also look golden brown on the outside. If the juices run clear when you cut into it, that means it's cooked well. Yes, you can prepare the stuffed chicken a day in advance. After stuffing the chicken, cover it and store it in the fridge. This way, it will blend the flavors better. Just remember to bake it right before serving for a fresh taste. This dish pairs well with many sides. Try serving it with roasted vegetables, like carrots, broccoli, or zucchini. A fresh salad with a light dressing also works great. You can even add some rice or quinoa for a heartier meal. To stop the filling from leaking, make sure to seal the chicken well. Use toothpicks to close the openings after stuffing. You can also not cut the chicken pocket too deep, as this helps keep the filling inside. If you bake the chicken at the right temperature, it helps seal the edges too. This recipe for spinach stuffed chicken breast is simple and tasty. It features chicken, spinach, cream cheese, and feta. You learned how to prepare, stuff, and bake the chicken perfectly. With tips for moisture and storage, your dish will stay fresh. Feel free to change up the ingredients for new flavors. Whether you serve it with sides or enjoy it alone, this meal is sure to please. Enjoy cooking and sharing this delicious dish!

Spinach Stuffed Chicken Breast Flavorful and Easy Dish

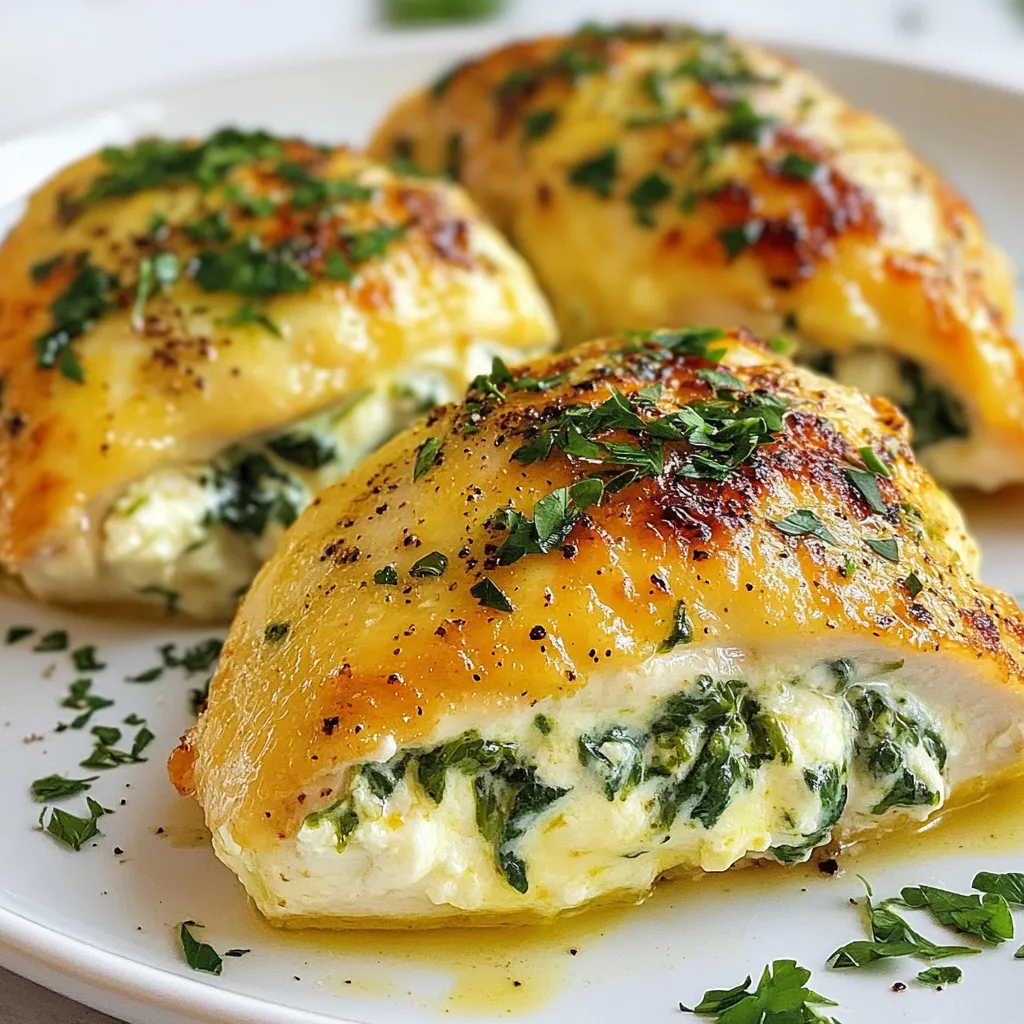
Looking for a simple yet tasty meal? Spinach Stuffed Chicken Breast is packed with flavor and nutrients. This dish is

- Pappardelle pasta (12 oz) - Olive oil (1 tablespoon) - Onion (1 medium, finely chopped) - Garlic (3 cloves, minced) - Red pepper flakes (1 teaspoon, adjust to taste) - Heavy cream (1 cup) - Cherry tomatoes (1 cup, halved) - Pecorino Romano cheese (1/2 cup, grated) - Salt and pepper (to taste) - Fresh basil leaves (for garnish) - Lemon zest (from 1 lemon) The ingredients for spicy creamy pappardelle create a rich and flavorful dish. First, pappardelle is the star here. This wide pasta holds sauce well. Use good quality pasta for the best texture. Next, olive oil adds a lovely base. It helps cook the onion and garlic while adding depth. A finely chopped onion gives sweetness and texture. Garlic adds a punch of flavor. Red pepper flakes bring the heat. Adjust this to your liking. If you prefer a milder dish, use less or skip it. Heavy cream adds richness and creaminess. It balances the spice and makes the sauce luscious. Cherry tomatoes add freshness and color. They burst while cooking, adding sweetness. Pecorino Romano cheese brings a salty, nutty flavor. It melts beautifully into the sauce. Salt and pepper are essential for seasoning. Use them to enhance all the flavors. Fresh basil leaves offer a bright finish, while lemon zest adds a zesty kick. This combination of ingredients creates a dish that is both spicy and creamy, perfect for any pasta lover! {{ingredient_image_1}} - In a large pot, bring salted water to a boil. - Add 12 oz of pappardelle pasta and cook it according to package instructions. - Check the pasta a minute or two before the time is up. You want it al dente, which means it should be firm but not hard. - When ready, drain the pasta, but save 1 cup of pasta water for later. - Heat 1 tablespoon of olive oil in a large skillet over medium heat. - Add 1 medium onion, finely chopped. Sauté it for about 5 minutes until it turns translucent. - Next, add 3 cloves of minced garlic and 1 teaspoon of red pepper flakes. - Cook these together for 1-2 minutes. This helps to release their flavors into the oil. - Pour in 1 cup of heavy cream and stir it well. - Add 1 cup of halved cherry tomatoes and let the mixture simmer for about 5 minutes. - This simmering time helps the sauce thicken up nicely. - Add the drained pappardelle to the skillet. Mix it well with the sauce. - Sprinkle in 1/2 cup of grated Pecorino Romano cheese and stir until it melts. - If the sauce feels too thick, slowly add some of the reserved pasta water until it reaches your desired creaminess. - For a bright flavor, stir in the zest of 1 lemon. - Taste the dish and adjust the seasoning with salt and pepper if needed. - Plate the spicy creamy pappardelle in bowls. - Garnish with fresh basil leaves for a nice touch. - You can also add a sprinkle of Pecorino Romano on top for extra flavor. To make the cream sauce just right, aim for a thick but pourable texture. You want it to coat the pappardelle without being too runny. Start by adding the heavy cream to the sautéed onions and garlic. As it cooks, it will thicken a bit. If it gets too thick, slowly add reserved pasta water until it reaches the perfect consistency. Balancing flavors is key. Start with salt and pepper, but don’t stop there. Taste as you go! Add more red pepper flakes for heat or a bit more lemon zest for brightness. Each adjustment makes a difference in your dish. When cooking for more people, simply double or triple the recipe. Ensure you have enough pots and pans to handle the extra volume. You can also cook the pappardelle in batches, so it stays fresh. To maintain quality, stir gently as you combine the pasta and sauce. This keeps the noodles from breaking apart. If the sauce gets too thick, always have some pasta water on hand to adjust it. Adding proteins makes this dish heartier. Chicken, shrimp, or sausage all work well. If you choose chicken, grill or sauté it separately, then mix it in with the pasta. For shrimp, cook them in the same pan after the garlic. The best cooking method is to sauté or grill until they are just cooked through. This keeps them juicy and flavorful. Adding a protein can turn your Spicy Creamy Pappardelle into a full meal that everyone will love. Pro Tips Use Fresh Ingredients: Fresh cherry tomatoes and basil can enhance the flavor profile significantly, making the dish more vibrant and delicious. Adjust Spice Level: Feel free to modify the amount of red pepper flakes according to your preferred spice level. Start with less and add more to taste. Reserve Pasta Water: Always reserve some pasta water before draining; it’s perfect for adjusting the sauce consistency without diluting the flavor. Let It Rest: Allow the dish to sit for a minute or two before serving; this helps the flavors meld together beautifully. {{image_2}} For a tasty vegetarian version of Spicy Creamy Pappardelle, you can swap out meat. Here are some ideas: - Use mushrooms for a meaty texture. - Try lentils or chickpeas for protein. - Add spinach or kale for extra greens. You can also toss in bell peppers, zucchini, or asparagus for more color and flavor. These veggies mix well with the sauce and add great nutrition. Do you like it mild or spicy? You can easily change the heat level. - Use less red pepper flakes for a milder taste. - Add a sprinkle of smoked paprika for a different flavor. For a touch of sweetness, consider adding a pinch of sugar or a splash of balsamic vinegar. This balances out the spice and gives depth to your dish. If you need gluten-free pasta, there are many good choices. - Look for gluten-free pappardelle made from rice or corn. - Quinoa pasta is also a hearty option. When making the sauce, ensure your heavy cream is gluten-free. Most brands are safe, but it's always smart to check the label. To store leftovers, let the pappardelle cool to room temperature. Place it in an airtight container. This keeps the pasta fresh and prevents it from drying out. You can store it in the fridge for up to three days. After that, the flavors may fade, and the texture can change. If you want to keep pappardelle longer, freezing is a great option. First, let it cool completely. Then, divide it into portions and place them in freezer-safe bags or containers. Make sure to remove excess air to avoid freezer burn. The dish can last for up to three months in the freezer. For reheating, you want to keep the dish creamy and tasty. The stovetop works best. Heat a pan over low heat and add a splash of water or cream. Stir in the pasta until warmed through. If you prefer the microwave, place it in a bowl and cover it with a damp paper towel. Heat in short intervals, stirring in between. This will help to keep the texture nice and smooth. For creamy sauces, I suggest using longer pasta shapes. Pappardelle works well because it holds the sauce nicely. Fettuccine and tagliatelle are also great options. They have flat surfaces that catch the cream, making every bite rich and tasty. Avoid small pasta shapes like penne or macaroni, as they won’t hold as much sauce. Yes, you can make this dish ahead of time. Cook the pasta and sauce separately. Store them in the fridge. When you are ready to eat, just heat them together. Add a splash of pasta water to help the sauce blend. This will keep it creamy and smooth. If you need a substitute for Pecorino Romano cheese, try using Parmesan cheese. It has a similar flavor and texture. Grana Padano is another good option. If you want a non-dairy choice, look for vegan Parmesan. These options will still give you a nice, cheesy taste in your dish. Spicy Creamy Pappardelle can be part of a balanced diet. It contains pasta, cream, and fresh ingredients. To make it healthier, use whole wheat pasta or reduce the amount of cream. You can add more vegetables like spinach or zucchini for extra nutrients. This way, you keep flavor while boosting health. To reduce the spice in this dish, cut back on red pepper flakes. Start with half a teaspoon and adjust to your liking. You can also add more cream to tone down the heat. Serve with a side of bread to balance the spice. Enjoy your meal without overwhelming heat! This blog post covered a delicious creamy pappardelle recipe, from ingredients to serving. You learned how to cook perfect pasta, sauté aromatics, and create a rich sauce. I shared tips on storage and variations, plus answers to common questions. Cooking doesn't have to be hard. With these steps, you can create a tasty dish. Enjoy experimenting with flavors and textures. Remember, it's all about having fun in the kitchen!

Spicy Creamy Pappardelle Tasty and Flavorful Dish

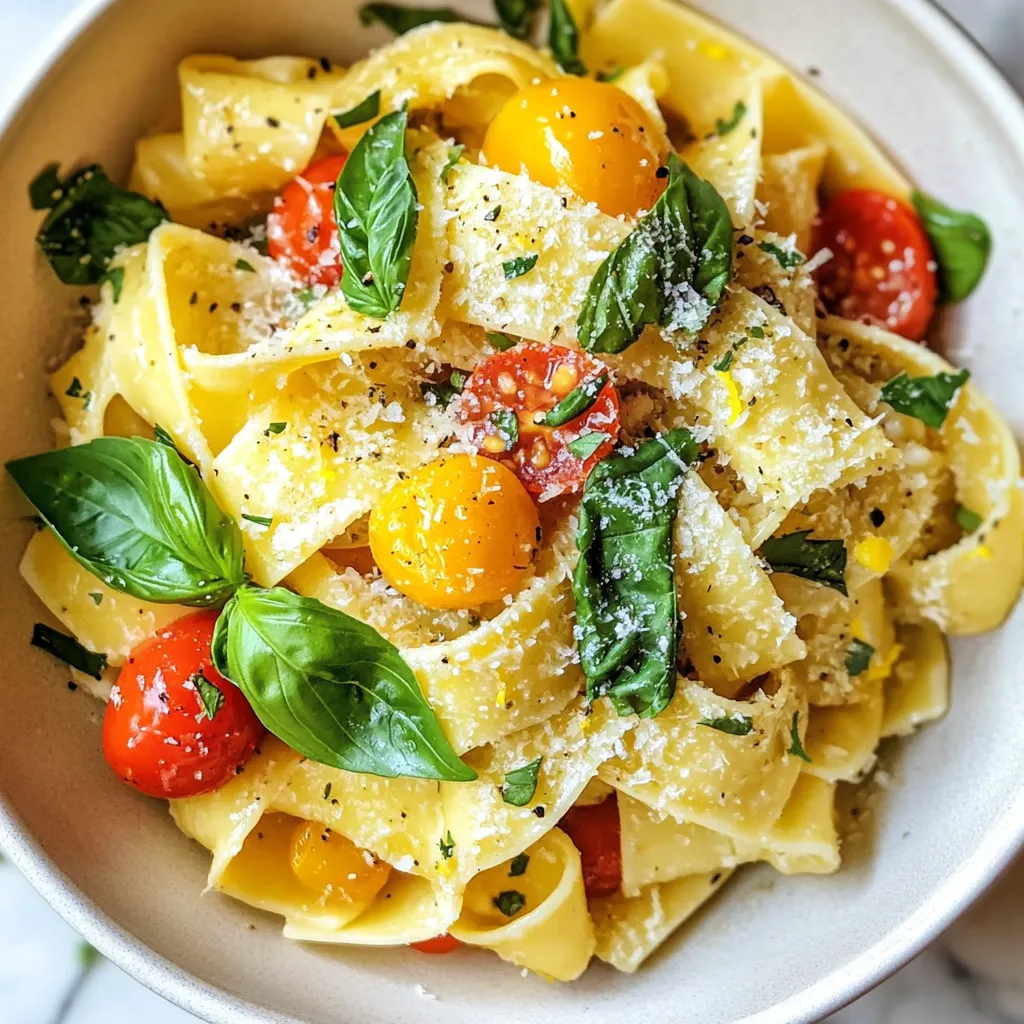
Looking for a rich, bold dish that will wow your taste buds? Try my Spicy Creamy Pappardelle! This pasta is

- 4 salmon fillets (about 6 oz each) - 1/4 cup honey - 4 cloves garlic, minced - 3 tablespoons soy sauce (or tamari for gluten-free) - 1 tablespoon fresh ginger, grated - 1 tablespoon olive oil - 2 cups broccoli florets - 1 red bell pepper, sliced - 1 tablespoon sesame seeds (optional) - Salt and pepper to taste - Fresh parsley or cilantro for garnish I love using fresh, vibrant ingredients for this dish. The salmon is the star here. Each fillet is tender and flaky. The honey gives a sweet touch, while garlic adds a punch of flavor. Soy sauce brings a nice umami taste, and ginger adds warmth. Next, we have our veggies. Broccoli florets are a great choice. They cook well and add a nice crunch. The red bell pepper brings color and sweetness, making your meal pop. For seasoning, sesame seeds add a fun crunch and nutty flavor. Fresh herbs like parsley or cilantro brighten the dish. Salt and pepper are must-haves to enhance all those great flavors. This simple list makes it easy to gather everything you need for a quick and tasty meal! {{ingredient_image_1}} - Preheat your oven to 400°F (200°C). - Line a large sheet pan with parchment paper for easy cleanup. - In a small bowl, whisk together: - 1/4 cup honey - 4 cloves garlic, minced - 3 tablespoons soy sauce - 1 tablespoon fresh ginger, grated - 1 tablespoon olive oil - Salt and pepper This honey garlic sauce will add flavor to your salmon and veggies. - Place 4 salmon fillets on one side of the prepared sheet pan. - Brush each fillet generously with the honey garlic sauce. Save some sauce for later. - On the other side of the sheet pan, arrange: - 2 cups broccoli florets - 1 red bell pepper, sliced - Drizzle the veggies with olive oil. Season with salt and pepper. Toss to coat. This sets up a colorful and tasty meal. - Bake the salmon and vegetables in the preheated oven for 15-18 minutes. - The salmon should reach an internal temperature of 145°F (63°C). - Halfway through baking, brush the salmon with more honey garlic sauce. This adds extra flavor and keeps the fish moist. How do I ensure the correct internal temperature? The salmon should reach 145°F (63°C). Use a meat thermometer for accuracy. Insert it into the thickest part of the fillet. This way, you’ll avoid overcooking and keep it juicy. What type of salmon should I choose? I prefer wild-caught salmon for flavor and health. However, farmed salmon can work too. Just look for bright color and firm texture. How do I choose and prep the vegetables? Pick fresh vegetables like broccoli and red bell pepper. They add great color and taste. Rinse them well and cut them into bite-sized pieces. This ensures even cooking. What are tips for even cooking and caramelization? Spread the veggies in a single layer on the pan. This allows hot air to circulate and cook them evenly. Drizzle with olive oil and season well. Toss them to coat before baking. How can I adjust the sweetness and spice level? Want it sweeter? Add more honey. For spice, add a pinch of red pepper flakes. Taste the sauce as you mix to find your perfect balance. What are some alternative sauce ingredients? You can swap soy sauce for coconut aminos for a lighter flavor. Also, try using maple syrup instead of honey for a different sweetness. Pro Tips Use Fresh Ingredients: Fresh salmon and vegetables will enhance the flavor and texture of your dish. Look for vibrant broccoli and firm salmon fillets for the best results. Customize Your Sauce: Feel free to adjust the sweetness or saltiness of the honey garlic sauce by adding more honey or soy sauce according to your taste preference. Watch Cooking Time: Salmon can overcook quickly, so keep an eye on it, especially if your fillets are thinner or thicker than average. Use a meat thermometer for accuracy. Serve with Rice: This dish pairs wonderfully with steamed rice or quinoa to soak up the delicious honey garlic sauce and create a more filling meal. {{image_2}} You can change up the veggies in this dish. Seasonal vegetables work great. Try asparagus or zucchini in spring. In fall, use carrots or Brussels sprouts. You can also mix in sweet potatoes for a tasty twist. When it comes to frozen vegetables, they are a good option too. They save time and are often just as nutritious. If using frozen, add them to the pan halfway through cooking. This way, they won’t become too mushy. If you want to switch proteins, chicken or tofu are great choices. For chicken, use boneless breasts or thighs. Cook them for about 20-25 minutes at 400°F. For tofu, press it first to remove water. Then cut it into cubes and bake for about 25-30 minutes. Both options soak up the honey garlic sauce well. This keeps the flavors rich and satisfying. For a gluten-free meal, swap the soy sauce with tamari. Tamari has a similar taste but with no gluten. You can also use coconut aminos as a tasty alternative. To complete your meal, add gluten-free sides. Quinoa or brown rice pairs nicely with salmon. You can also serve it with a fresh salad for crunch. To store leftover salmon and vegetables, place them in an airtight container. Make sure to keep the honey garlic sauce separate if possible. This helps the salmon stay moist. You can store leftovers in the fridge for up to three days. After that, the flavor and texture might change. The best way to reheat salmon is in the oven. Preheat your oven to 350°F (175°C). Place the salmon on a baking sheet and cover it with foil. Heat for about 10 minutes. This method keeps the fish juicy. You can also use a microwave, but it may dry out the salmon. For creative leftovers, try making salmon tacos or adding it to a salad. Yes, you can freeze honey garlic salmon! Wrap the salmon tightly in plastic wrap or foil. Place it in a freezer-safe bag. Be sure to remove as much air as possible. You can freeze it for up to three months. When ready to eat, thaw it in the fridge overnight. Then, reheat it as mentioned above. This keeps the flavor fresh and tasty. You should bake salmon at 400°F for about 15 to 18 minutes. The salmon is done when it flakes easily with a fork. You want the internal temperature to reach 145°F. To check doneness, use a meat thermometer. Insert it into the thickest part of the fillet. If it reads 145°F, your salmon is ready. Yes, you can use a different sauce. Try teriyaki sauce for a sweet twist. A lemon butter sauce adds a fresh taste. You can also mix soy sauce with chili paste for spice. Experimenting keeps the dish exciting. Great side dishes include steamed rice or quinoa. Roasted sweet potatoes pair well too. For veggies, serve with green beans or asparagus. A fresh salad adds crunch and freshness. These sides balance the sweet flavors of the salmon. This recipe offers a delicious honey garlic salmon that is easy to make. You learned about the main ingredients, preparation, and cooking steps. I shared tips for perfect salmon and veg, plus fun sauce variations. You can even try different proteins or veggies. Proper storage and reheating methods keep your leftovers tasty. Now, you can enjoy this dish anytime you want. Cooking should be fun and simple, and this recipe makes it just that. Enjoy your next meal!

Sheet Pan Honey Garlic Salmon Quick and Tasty Meal

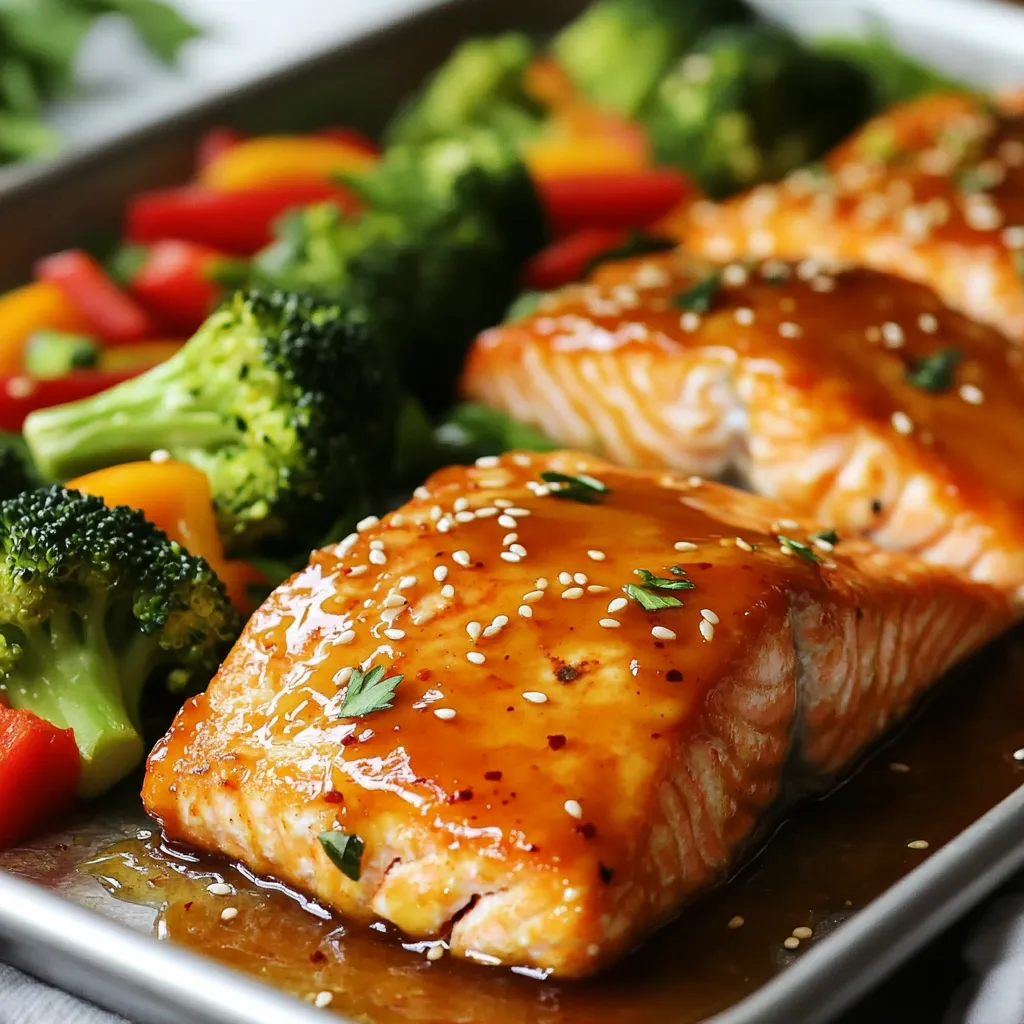
Looking for a quick and delicious meal? This Sheet Pan Honey Garlic Salmon is your answer! With just a few

- 1 can (15 oz) chickpeas, drained and rinsed - 2 tablespoons olive oil - Zest of 1 lemon - 1 tablespoon fresh lemon juice - 2 teaspoons fresh rosemary, chopped (or 1 teaspoon dried rosemary) - 1 teaspoon garlic powder - 1/2 teaspoon smoked paprika - Salt and pepper to taste These main ingredients bring a bright and savory flavor to the roasted chickpeas. The lemon zest and juice add a fresh tang. The rosemary gives it a lovely herb taste. Garlic powder and smoked paprika add depth and warmth. - A pinch of cayenne pepper for heat - 1 tablespoon nutritional yeast for a cheesy flavor - A drizzle of balsamic glaze for sweetness - Other herbs, like thyme or oregano, for a twist These optional ingredients can elevate your chickpeas. Adding cayenne gives it a kick. Nutritional yeast brings a cheesy taste without dairy. Balsamic glaze adds a nice sweet touch. - Baking sheet - Parchment paper - Mixing bowl - Clean kitchen towel - Measuring spoons - Wooden spoon or spatula Having the right tools makes cooking easier. A baking sheet lined with parchment helps with cleanup. A mixing bowl is perfect for mixing flavors and coating chickpeas. Always keep a clean kitchen towel handy for drying chickpeas. {{ingredient_image_1}} First, you need to preheat your oven to 400°F (200°C). This step is key for getting those chickpeas nice and crispy. While the oven heats up, grab a baking sheet and line it with parchment paper. This makes cleanup easy and helps the chickpeas roast evenly. Next, take one can of chickpeas, which is about 15 ounces. Drain and rinse them well under cold water. This helps wash away any canning liquid. Spread the rinsed chickpeas on the baking sheet. Use a clean kitchen towel to pat them dry. Removing excess moisture is crucial for crispiness. In a large bowl, combine 2 tablespoons of olive oil, the zest of one lemon, and 1 tablespoon of fresh lemon juice. Add 2 teaspoons of chopped fresh rosemary, 1 teaspoon of garlic powder, and 1/2 teaspoon of smoked paprika. Season with salt and pepper to taste. Mix everything well to create a tasty marinade. Now, add the dried chickpeas to this bowl. Toss them around until every chickpea is coated in the marinade. Now it’s time to roast! Spread the chickpeas in a single layer on the baking sheet. Place them in the preheated oven and roast for 25-30 minutes. Make sure to stir them halfway through for even cooking. When they turn golden brown and crispy, they are done. Remove the baking sheet from the oven and let them cool slightly. They will get even crispier as they cool. Taste them and adjust the seasoning if needed. Enjoy your flavorful Lemon Rosemary Roasted Chickpeas! To get super crispy chickpeas, start with dry ones. After rinsing, pat them well with a towel. This helps remove extra moisture. The less moisture, the crispier your chickpeas will be. Spread them out in a single layer on your baking sheet. If they overlap, they will steam instead of roast. Stir them halfway through cooking to ensure even crisping. Use fresh herbs for the best taste. Fresh rosemary and lemon zest pack a punch. Garlic powder and smoked paprika add depth to the flavor. Adjust salt and pepper to your liking. You can also try adding a pinch of cayenne for heat. Mix your spices well before tossing them with the chickpeas. This ensures every bite is flavorful. Serve these roasted chickpeas as a snack, or add them to salads. They make a great crunchy topping. You can also pair them with hummus or yogurt dips. For a fun treat, try them in a wrap with fresh veggies. They are perfect for sharing at parties or for movie nights. Enjoy them warm or at room temperature for the best taste! Pro Tips Pat Them Dry: Ensuring that your chickpeas are completely dry before roasting will help them achieve that perfect crispy texture. Season Generously: Don't be shy with the seasoning! Adjust the salt, lemon juice, and spices to suit your taste for maximum flavor. Halfway Stir: Stirring the chickpeas halfway through cooking ensures they roast evenly and get crispy on all sides. Cool for Crunch: Let the chickpeas cool slightly after roasting; they will continue to crisp up as they cool down. {{image_2}} If you want to change up the flavor, try adding heat. For a spicy kick, mix in cayenne pepper or chili powder. Start with just a pinch, then adjust to your taste. If you prefer sweet flavors, add a touch of maple syrup or honey. This gives a nice caramelized finish when roasting. You can play with herbs and spices for new tastes. Instead of rosemary, try thyme or oregano for a different twist. For a Mediterranean vibe, add some cumin and coriander. Mixing in nutritional yeast can also give a cheesy flavor without dairy. Experiment with what you love! These roasted chickpeas are already vegan and gluten-free. This makes them a great snack choice for many diets. Ensure you use gluten-free spices to keep it safe for gluten-sensitive folks. You can also serve them over a salad or grain bowl for a complete meal that meets various dietary needs. After enjoying your Lemon Rosemary Roasted Chickpeas, store any leftovers in an airtight container. This keeps them fresh and tasty. Let them cool completely before sealing. If you do not have an airtight container, a resealable bag works fine too. Just squeeze out as much air as possible. To reheat roasted chickpeas, use an oven or an air fryer. Preheat your oven to 350°F (175°C). Spread the chickpeas on a baking sheet. Heat them for about 10 minutes, or until they feel warm and crispy. If using an air fryer, set it to 350°F (175°C) and cook for about 5 minutes. This way, they regain their crunch. Properly stored roasted chickpeas last about 3 to 5 days. Check for signs of spoilage before eating. Look for soft texture or off smells. If they feel chewy instead of crispy, toss them out. To keep them longer, consider freezing them. This can extend their shelf life up to 3 months. Just remember to thaw and reheat before enjoying again! Roast your chickpeas for 25-30 minutes at 400°F (200°C). Stir them halfway through. This ensures they cook evenly. Look for a golden brown color. The longer you roast, the crunchier they get. Just keep an eye on them to avoid burning. Yes, you can use dried chickpeas. Soak them overnight and cook until tender. This may take longer than using canned ones. After cooking, make sure to dry them well. If they are too wet, they won’t get crispy. These roasted chickpeas make a great snack on their own. You can add them to salads for crunch. They also work well as a topping for soups. Try them in grain bowls or as a side dish. Their lemony flavor brightens up many meals. Roasting chickpeas is simple and rewarding. We covered key ingredients, handy tools, and easy steps. With tips for extra crispiness and flavor, you'll impress anyone. There are many ways to customize your roasted chickpeas, too. Just remember to store them right for the best taste. Enjoy your new snack and be bold in trying new flavors. Happy roasting!

Lemon Rosemary Roasted Chickpeas Flavorful Snack Treat

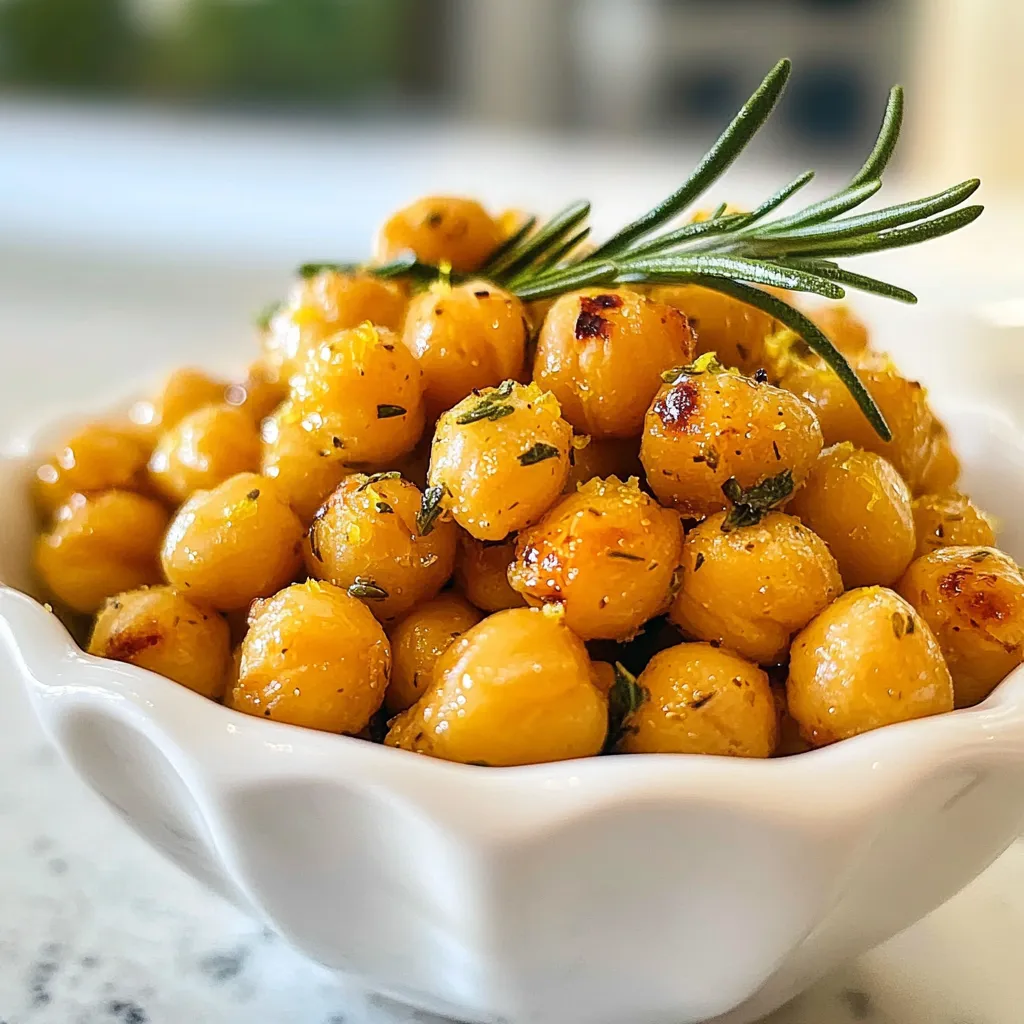
Are you ready for a snack that’s both tasty and healthy? Lemon Rosemary Roasted Chickpeas hit the spot! They are

Older posts
Newer posts
← Previous Page1 … Page143 Page144 Page145 … Page147 Next →

dsad

© 2025 Emmas Dish • Built with GeneratePress

Our Policies

  • Copyright Policy
  • Cookie Policy
  • GDPR Policy
  • Privacy Policy
  • Disclaimer
  • Terms Of Use

More Information

  • Home
  • About
  • Contact
  • Appetizers
  • Dessert
  • Dinner
  • Drinks
©2025, Emmas Dish About Back To Top