Skip to content
DisclaimerTerms Of UseGDPR PolicyCookie Policy

Emmas Dish

  • Home
  • Drinks
  • Appetizers
  • Dinner
  • Dessert
  • About
  • Contact
  • Privacy Policy
DisclaimerTerms Of UseGDPR PolicyCookie Policy

Emma

- 1 pound large shrimp, peeled and deveined - 1 cup shredded unsweetened coconut - 1/2 cup panko breadcrumbs - 1/2 cup flour - 2 large eggs - 1 tablespoon lime juice - 1 teaspoon garlic powder - 1 teaspoon paprika - Salt and pepper to taste - Cooking spray For the best coconut shrimp, use fresh shrimp. They have a nice texture and flavor. You can also use frozen shrimp, but make sure they are fully thawed. The coconut adds crunch, while the panko breadcrumbs keep it light. Use unsweetened coconut to avoid extra sugar in your dish. - 1/2 cup sweet chili sauce - 1 tablespoon lime juice - 1 tablespoon chopped fresh cilantro The sweet chili sauce gives a nice balance to the shrimp. It pairs well with lime juice for a zesty kick. Fresh cilantro adds a hint of herb flavor. You can adjust the amount of lime juice based on your taste. Using high-quality shrimp makes a big difference. Look for shrimp that are firm and smell fresh. Avoid shrimp with a strong fishy odor. For the coconut, choose finely shredded unsweetened coconut. This will help it stick better to the shrimp. Fresh lime juice is always best, as it’s brighter than bottled juice. Start by rinsing the shrimp under cold water. Use a paper towel to pat them dry. This step helps the breading stick better. Next, season the shrimp with salt and pepper to taste. This simple seasoning adds flavor to your shrimp. Now you need a breading station. Grab three bowls. In the first bowl, add the flour. In the second bowl, whisk the eggs with lime juice, garlic powder, and paprika. This mixture helps the coating stick. In the third bowl, combine shredded coconut and panko breadcrumbs. This mix gives the shrimp a crispy finish. Before cooking, preheat your air fryer to 400°F (200°C) for about five minutes. While it heats, spray the air fryer basket with cooking spray. Arrange the breaded shrimp in a single layer. Make sure they do not touch each other. Lightly spray the tops of the shrimp with more cooking spray. This helps them brown nicely. Air fry the shrimp for six to eight minutes. Flip them halfway through the cooking time. They should turn golden brown and crispy. While the shrimp cook, you can make the dipping sauce. In a small bowl, mix together the sweet chili sauce, lime juice, and chopped cilantro. This sauce adds a fresh kick to your dish. When the shrimp are ready, serve them with this tangy sauce. Enjoy your crispy coconut shrimp! To get that perfect crunch, start with dry shrimp. Rinse them and pat them dry. This helps the coating stick well. Use panko breadcrumbs for extra crunch. They create a light and crispy texture. Don’t skip the cooking spray; it promotes browning. Lightly spray the tops of the shrimp before cooking. Flip them halfway through for even crispiness. For this recipe, set your air fryer to 400°F (200°C). Preheat it for about 5 minutes. This helps the shrimp cook evenly. Cook the shrimp for 6 to 8 minutes. Keep an eye on them. You want them golden brown and crispy. If your air fryer has a basket, arrange the shrimp in a single layer. Avoid overcrowding to ensure they cook well. If you're out of flour, use cornstarch instead. It works great for coating! You can swap sweet chili sauce with sriracha for heat. Prefer a different flavor? Try using coconut flour for a coconut boost. Fresh shrimp are best, but frozen shrimp work too. Just make sure they are thawed and dried well before using. If you don’t have fresh cilantro, parsley is a good substitute. {{image_2}} You can add fun flavors to your shrimp. Try using different spices. For a kick, add cayenne pepper to the egg mix. This gives a nice heat that pairs well with coconut. You can also try adding lime zest to the coconut mixture for a fresh twist. Another option is to use curry powder for a unique taste. Each of these changes gives a new flair to your coconut shrimp. While sweet chili sauce is great, you can mix it up. A creamy coconut yogurt dip is a tasty choice. Just mix plain yogurt with lime juice and a bit of garlic. You could also try a spicy mango salsa. Combine diced mango, red onion, and jalapeño for a fruity kick. For a tangy option, mix ketchup with sriracha. Each sauce brings a different vibe to your shrimp. Coconut shrimp pairs well with many sides. Serve it with a light salad for a fresh meal. A mango avocado salad adds color and flavor. You can also serve it with rice or quinoa for a heartier dish. If you want a fun appetizer, try it with tortilla chips. Don’t forget to garnish with lime wedges for extra zest. These pairings enhance the dish and make it even more delicious. To keep your leftover coconut shrimp fresh, place them in an airtight container. Make sure to let them cool to room temperature first. Store them in the fridge for up to three days. For best taste, enjoy them within a day. When you're ready to enjoy the shrimp again, reheating is key. Preheat your air fryer to 350°F (175°C). Place the shrimp in a single layer. Heat for about 3 to 5 minutes. This keeps them crispy and warm without drying them out. If you want to freeze your coconut shrimp, first let them cool down completely. Wrap them tightly in plastic wrap or aluminum foil. Then, put them in a freezer-safe bag. They will last for about two months. When ready to eat, thaw them in the fridge overnight before reheating. Yes, you can use frozen shrimp. Just make sure to thaw them first. Rinse them under cold water and pat them dry. This step is key to getting crispy shrimp. You can serve coconut shrimp with many tasty sides. Here are some great ideas: - Rice or quinoa for a filling meal - Fresh salad for a light option - Sweet potato fries for a fun twist - A tropical fruit salad for a refreshing side Yes, you can make it gluten-free! Just replace regular flour and panko with gluten-free options. Look for gluten-free breadcrumbs and flour at your store. This way, everyone can enjoy the dish. Shrimp are fully cooked when they turn a pink color and curl slightly. They should also look opaque. If you’re not sure, you can check the internal temperature. It should reach 120°F (49°C). Cooking them just right makes them juicy and delicious! This blog post covered all you need for perfect coconut shrimp. We explored main ingredients, step-by-step cooking, and tips for getting crispy shrimp. I shared fun variations and how to store leftovers too. Coconut shrimp can be a tasty treat. With the right steps, you can impress your friends and family. Enjoy your cooking and happy eating!

Air Fryer Coconut Shrimp With Dip Simple Recipe

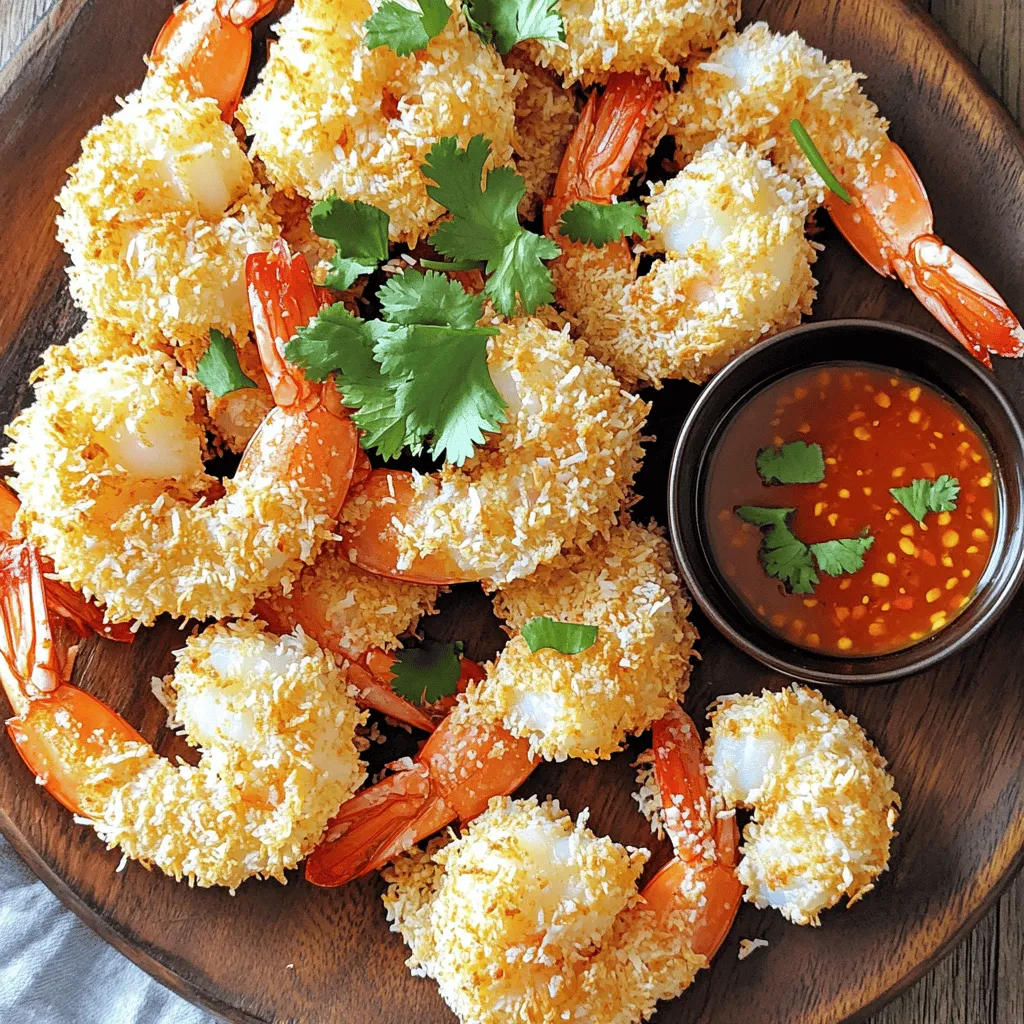
Looking to impress at your next gathering? My Air Fryer Coconut Shrimp With Dip is a game-changer! This simple recipe

To make the perfect Greek Lemon Chicken Soup Avgolemono, you need a few key items. Here’s what to gather: - 1 lb chicken breast, boneless and skinless, diced - 6 cups chicken broth - 1 cup orzo pasta - 3 large eggs - 1/4 cup fresh lemon juice (about 2 lemons) - Zest of 1 lemon - 1 cup baby spinach, loosely packed - 1 medium onion, diced - 2 cloves garlic, minced - 2 tablespoons olive oil - Salt and pepper to taste - Fresh dill or parsley for garnish These ingredients blend together to create a warm and comforting soup. To elevate your Avgolemono, you can add some optional garnishes and seasonings. Consider using: - Fresh dill or parsley for a pop of color and flavor - A lemon wedge on the side for an extra zing - Cracked black pepper for added warmth These extras can enhance the soup's look and taste. If you have dietary needs, you can easily modify this recipe. Here are some substitutions: - Use turkey or tofu instead of chicken for a different protein. - Swap orzo for rice or quinoa if you prefer. - For a vegan version, replace eggs with silken tofu blended until smooth. These changes let everyone enjoy this delicious soup while fitting their diets. Start by gathering your ingredients. You will need: - 1 lb chicken breast, diced - 6 cups chicken broth - 1 cup orzo pasta - 3 large eggs - 1/4 cup fresh lemon juice - Zest of 1 lemon - 1 cup baby spinach - 1 medium onion, diced - 2 cloves garlic, minced - 2 tablespoons olive oil - Salt and pepper to taste - Fresh dill or parsley for garnish Heat the olive oil in a large pot over medium heat. Add the diced onion and sauté for about 5 minutes. The onion should look clear. Next, add the minced garlic and cook for 1 more minute. You want the garlic to smell great. Now, add the diced chicken to your pot. Season it with salt and pepper. Cook the chicken for about 5 to 7 minutes. It should not be pink anymore. Pour in the chicken broth and bring it to a simmer. Stir in the orzo pasta. Cook this for about 8 to 10 minutes until the orzo is al dente. Reduce the heat to low. In a mixing bowl, whisk together the eggs, lemon juice, and lemon zest. This mixture should be well combined. To avoid curdling, add a ladle of the hot soup to the egg mixture while whisking. This is called tempering. Now, slowly pour the egg mixture back into the soup. Stir gently to combine. Add the baby spinach and let it wilt for 1 to 2 minutes. Finally, taste and adjust the seasoning with salt and pepper if needed. Remove the pot from heat. Serve hot, garnished with fresh dill or parsley. Enjoy! To get that smooth, creamy texture in your Avgolemono, you must temper the eggs. Start by whisking the eggs, lemon juice, and zest together in a bowl. Then, take a ladle of hot soup and slowly add it to the egg mix while whisking. This helps warm the eggs without cooking them. After that, stir the egg mixture back into the pot. This method gives you a silky soup that feels rich and comforting. You can boost the flavor of your Avgolemono with a few simple tricks. Add fresh herbs like dill or parsley at the end. These herbs brighten the soup and add a lovely aroma. You might also consider using homemade chicken broth for a deeper taste. A pinch of paprika can give a nice warmth without overpowering the lemon. Feel free to adjust the lemon juice to suit your taste. More lemon gives a tangy kick, while less keeps it mild. One big mistake is not tempering the eggs properly. Skipping this step can lead to scrambled eggs in your soup. Another common error is cooking the orzo too long. This can make it mushy. Always check the pasta for that perfect al dente bite. Lastly, don’t forget to taste and adjust the seasoning at the end. A little salt and pepper can make all the difference. {{image_2}} If you want a vegetarian or vegan avgolemono, you can swap the chicken for tofu or chickpeas. Use vegetable broth instead of chicken broth. To create a creamy texture, blend some silken tofu with lemon juice for the avgolemono base. This keeps the tangy flavor while making it plant-based. You can still enjoy the zest and warmth of this dish! Orzo is traditional, but you can use other small pasta shapes. Try ditalini, acini di pepe, or even rice if you prefer. Each type gives a unique texture and flavor. You can also use gluten-free pasta if needed. Just adjust cooking times according to the pasta you choose. This way, you can make it fit your taste and dietary needs. Boost the soup's nutrition by adding more vegetables. Carrots, celery, and peas add flavor and color. You can sauté them with onions at the start. Leafy greens like kale or Swiss chard are also great choices. Just toss them in towards the end, letting them wilt slightly. This not only enhances the taste but also packs in more vitamins! To store leftover Avgolemono, let it cool first. Pour the soup into an airtight container. Keep it in the fridge for up to three days. Always label the container with the date. This way, you will know when to eat it. When you want to reheat the soup, do it gently. Pour the soup into a pot on low heat. Stir it often to avoid burning. You can also use the microwave. Heat it in short bursts, stirring in between. This keeps the soup smooth and tasty. You can freeze Avgolemono for later use. First, cool the soup completely. Then, pour it into freezer-safe bags. Remove as much air as possible before sealing. Freeze for up to three months. When you’re ready, thaw it in the fridge overnight before reheating. Avgolemono is a Greek soup made with chicken, lemon, and eggs. This dish has a creamy texture without using cream. The eggs thicken the soup and add richness. The fresh lemon juice gives it a bright, zesty flavor. It is both comforting and refreshing. You can enjoy it hot or warm. Yes, you can make Avgolemono ahead of time. Cook the soup fully and cool it down. Store it in the fridge for up to three days. When ready to eat, simply reheat it gently on the stove. Avoid boiling, as this can curdle the eggs. You can easily customize Avgolemono to fit your taste. Adding herbs like dill or parsley gives it a fresh note. You can also stir in extra veggies like carrots or celery for more texture. If you want a richer flavor, use homemade chicken broth. Adjust the lemon juice to make it more or less tangy. Avgolemono soup is a rich blend of chicken, orzo, and lemon. We explored its main ingredients and shared tips for the best consistency. I offered ways to customize the dish for different diets. You can also store leftovers or freeze the soup with ease. In the end, Avgolemono is simple to make and full of flavor. You can enjoy this dish your way, and it’s perfect for sharing. Dive in and savor every spoonful!

Greek Lemon Chicken Soup Avgolemono Nourishing Dish

Looking for a warm, comforting dish that’s packed with flavor? Greek Lemon Chicken Soup, or Avgolemono, is a go-to option.

- 2 ½ cups all-purpose flour - ¼ cup granulated sugar - ½ cup pumpkin puree - 1 large egg For these delightful rolls, the main ingredients create the base. Flour gives the rolls structure, while sugar adds sweetness. Pumpkin puree brings flavor and moisture. The egg helps bind everything together, making the rolls fluffy and tender. - ½ cup brown sugar - 1 tablespoon ground cinnamon - ½ cup cream cheese, softened The filling adds a sweet and spicy burst. Brown sugar gives a rich, caramel-like taste. Ground cinnamon adds warmth and depth, perfect for fall. Cream cheese adds a creamy texture that balances the sweetness. - 1 cup powdered sugar - 2 tablespoons milk - 1 teaspoon vanilla extract The frosting is the finishing touch. Powdered sugar makes it sweet and easy to drizzle. Milk helps achieve a smooth consistency. Vanilla extract gives a lovely aroma and flavor that complements the rolls. Using these ingredients, you can create a delicious treat. Each part works together to make the rolls a true delight. First, mix 2 ½ cups of all-purpose flour, ¼ cup granulated sugar, and 1 packet of active dry yeast in a large bowl. Next, warm ½ cup of milk to about 110°F. Pour the warm milk into the bowl with the dry mix. This step helps activate the yeast. Let the mixture sit for about 5-10 minutes until it becomes frothy. Now, add ¼ cup melted butter, 1 large egg, ½ cup pumpkin puree, and 1 teaspoon vanilla extract. Sprinkle in ½ teaspoon ground cinnamon and ½ teaspoon ground nutmeg. Mix everything well until smooth. Gradually add more flour if the dough is too sticky. Knead the dough for about 5-7 minutes until it feels smooth and elastic. Once your dough is ready, place it in a greased bowl. Cover it with a damp cloth. Let it sit in a warm place for about 1 hour. The dough should double in size. This first rise is very important for soft rolls. While the dough rises, mix ½ cup brown sugar and 1 tablespoon ground cinnamon in a small bowl. This will be your filling. After the dough has risen, punch it down on a floured surface. Roll it out into a rectangle about 12x18 inches. Spread ½ cup softened cream cheese evenly over the dough. Then, sprinkle the cinnamon-sugar mix on top. Roll the dough tightly from the long edge, and pinch the edge to seal. Slice the rolled dough into 12 equal pieces. Place them in a greased 9x13 inch baking pan. Make sure there’s space between the rolls. Cover them with a cloth and let them rise again for 30 minutes. Preheat your oven to 350°F. Now, bake the rolls for about 25 to 30 minutes. You want them golden brown. While they bake, make your frosting. Mix 1 cup powdered sugar, 2 tablespoons milk, and 1 teaspoon vanilla extract until smooth. Once the rolls cool slightly, drizzle the frosting on top. Enjoy your delicious Pumpkin Spice Cream Cheese Cinnamon Rolls! To make the best dough, focus on its texture. The dough should feel soft and smooth. If it's too dry, add a bit of milk. If it’s sticky, sprinkle in more flour, one tablespoon at a time. Kneading is key. Knead the dough for 5 to 7 minutes until it feels elastic. This step helps develop gluten, giving your rolls a nice rise. For a richer taste, consider adding spices. You can mix in a bit of nutmeg with the cinnamon. This adds depth to the flavor. If you want a twist, try adding chocolate chips or nuts to the filling. These add texture and make the rolls even more exciting. Getting the frosting right is important. Mix the powdered sugar, milk, and vanilla until smooth. If your frosting is too thick, add a little more milk. If it’s too thin, add more sugar. Drizzle the frosting over the rolls while they are still warm. This helps it melt into the rolls, creating a delicious treat. Use a fork or a whisk for a fun drizzle effect. {{image_2}} You can change the frosting to make it even more fun. Here are two ideas: - Maple cream cheese frosting: Use maple syrup instead of milk. This gives a sweet and rich flavor. - Classic vanilla glaze: Mix powdered sugar with milk and vanilla. This makes a smooth, simple topping. Feel free to experiment. Both frostings pair well with the pumpkin spice flavor. Want to mix it up? Try these filling ideas: - Nut options: Add chopped pecans or walnuts for a nice crunch. They bring a great texture. - Chocolate chips: Sprinkle some chocolate chips in the filling. This adds a sweet twist that many will love. These variations can change the whole vibe of your cinnamon rolls. If you have special diets, you can still enjoy these rolls. Here’s how: - Gluten-free flour substitutes: Use a gluten-free all-purpose flour blend. This helps keep the texture light. - Vegan alternatives: Swap the egg for a flax egg and use vegan butter. This lets everyone enjoy these treats. These adjustments make the recipe more inclusive. You can share this delight with all your friends! To keep your cinnamon rolls fresh, store them in an airtight container. Wrap them well to lock in moisture. This method works best to maintain their soft texture. You can keep them at room temperature for up to two days. For longer storage, refrigerate them for up to a week. To reheat your cinnamon rolls, use your oven or microwave. For the oven, preheat it to 350°F (175°C). Place the rolls on a baking sheet and cover with foil. Heat for about 10-15 minutes. This method warms them evenly without drying. If using the microwave, heat one roll for 15-20 seconds. Check to ensure it’s warm but not hot. You can freeze your cinnamon rolls both before and after baking. To freeze them raw, slice the rolls and place them in a single layer on a baking sheet. Freeze until solid, then transfer to a freezer bag. For baked rolls, let them cool completely before wrapping tightly. Store them in a freezer-safe container. They can last for up to three months. To thaw, remove them from the freezer and place in the fridge overnight. Reheat as mentioned above. This way, you can enjoy these tasty treats anytime! Yes, you can! The best ways to prep in advance are simple. First, make the dough and let it rise. Then, roll it out and add the filling. Instead of baking, cover the rolls and place them in the fridge overnight. In the morning, let them rise for about 30 minutes before baking. This way, you can enjoy warm rolls with less morning stress. Look for a few signs! Your dough should double in size. You can poke it gently with a finger. If the dough springs back slowly, it is ready. If it does not spring back, let it rise a bit more. A good rise means your rolls will be fluffy and soft. Absolutely! Canned pumpkin works great in this recipe. Just make sure to choose pure pumpkin puree, not pumpkin pie filling. It saves time and still gives great flavor. If you prefer fresh pumpkin, roast and puree it beforehand. Both options will lead to delicious rolls. This blog covered all you need to make delicious cinnamon rolls. We explored the key ingredients like flour, pumpkin puree, and cream cheese. I shared simple step-by-step instructions for mixing, rising, and baking. You learned tips to perfect the dough and variations to make unique rolls. Making cinnamon rolls is fun and rewarding. Enjoy sharing them with friends and family. Your kitchen will smell amazing, and everyone will love the treat! Baking these rolls will bring joy to your home. Now, grab your ingredients and start baking!

Pumpkin Spice Cream Cheese Cinnamon Rolls Delightful Treat

Are you ready for a fall treat that’ll spark joy? Pumpkin Spice Cream Cheese Cinnamon Rolls are the perfect way

To make creamy sun-dried tomato gnocchi, gather these items: - 1 pound potato gnocchi - 1 cup sun-dried tomatoes, packed in oil, drained and chopped - 1 cup heavy cream - 1 cup vegetable broth - 2 cloves garlic, minced - 1 cup fresh spinach - 1/2 cup grated Parmesan cheese - 2 tablespoons olive oil - 1 teaspoon dried oregano - Salt and black pepper to taste - Fresh basil for garnish You can swap some items for different flavors: - Gnocchi: Use any pasta shape you prefer. - Heavy cream: Substitute with coconut milk for a lighter sauce. - Vegetable broth: Chicken broth works well if you want more flavor. - Parmesan cheese: Try nutritional yeast for a vegan option. - Spinach: Kale or arugula can be a great choice too. Choosing the best ingredients makes a big difference in taste. Here’s what to look for: - Gnocchi: Look for fresh or frozen gnocchi, not shelf-stable types. - Sun-dried tomatoes: Pick those packed in oil for richer flavor. - Heavy cream: Opt for a brand with no additives for creaminess. - Spinach: Fresh spinach should be bright green and crisp. - Parmesan cheese: Choose block cheese and grate it fresh for the best taste. Selecting the right ingredients helps your dish shine. Enjoy cooking! First, fill a large pot with salted water. Bring it to a boil. Once the water boils, add 1 pound of potato gnocchi. Cook them according to the package instructions. Gnocchi will float to the top when they are ready. This means they are done! Drain the gnocchi and set them aside. In a large skillet, heat 2 tablespoons of olive oil over medium heat. Add 2 minced garlic cloves and sauté them for about 1 minute. You want the garlic to smell nice but not burn. Next, add 1 cup of chopped sun-dried tomatoes. Cook them for 2-3 minutes. This helps the flavors mix well. Pour in 1 cup of vegetable broth and bring it to a simmer. Let it cook for 3-4 minutes. Now, reduce the heat to low. Stir in 1 cup of heavy cream. Mix it well until the sauce looks creamy. Now it’s time to bring everything together. Add the cooked gnocchi to the skillet. Toss in 1 cup of fresh spinach too. Stir everything gently for about 2-3 minutes. You want the spinach to wilt down. Finally, add 1/2 cup of grated Parmesan cheese and 1 teaspoon of dried oregano. Season with salt and black pepper to taste. Mix until the cheese melts and the gnocchi is coated in the sauce. Remove from heat and let it sit for a minute. This helps the sauce thicken a bit. Serve hot, garnished with fresh basil leaves for a pop of color. To cook gnocchi just right, start with a large pot of salted water. Bring it to a boil. Once boiling, add the gnocchi. They will sink to the bottom at first. When they float, they are ready. This usually takes about 2-3 minutes. Drain them well and set aside. Avoid overcooking, as they can become mushy. If you have leftover gnocchi, let it cool first. Place it in an airtight container. It can stay in the fridge for up to three days. To reheat, warm it in a pan with a bit of olive oil. This keeps the gnocchi soft and tasty. You can also add a splash of broth if needed. To boost flavor, try adding fresh herbs. Basil adds a nice touch. You can also use thyme or parsley. For a hint of heat, sprinkle in some red pepper flakes. A squeeze of lemon juice can brighten the dish. Experiment with different cheeses, too. Feta or goat cheese can change the taste in a fun way. {{image_2}} You can boost the dish by adding proteins. Chicken or shrimp works well. For chicken, use cooked, diced pieces. Sauté them with the garlic before adding sun-dried tomatoes. For shrimp, cook them until they turn pink. Then add them to the creamy sauce. This adds flavor and makes the meal more filling. Feel free to mix in other vegetables. Zucchini, bell peppers, or mushrooms are great choices. Dice them small to cook evenly. Add them after the garlic and before the sun-dried tomatoes. You can also use frozen peas or asparagus for a quick option. This makes the dish colorful and healthy. You can easily make this dish vegan. Replace the heavy cream with coconut milk or cashew cream. Use nutritional yeast for a cheesy flavor instead of Parmesan. Also, choose vegetable broth that is free from animal products. This way, everyone can enjoy a creamy sun-dried tomato gnocchi, no matter their diet! To keep your creamy sun-dried tomato gnocchi fresh, store it in an airtight container. Let the dish cool to room temperature first. This helps prevent steam from making it soggy. Place the container in the fridge. It will stay good for 3 to 4 days. Make sure to label the container with the date. This way, you know when to eat it. If you want to freeze the gnocchi, follow these steps. First, let the dish cool completely. Then, portion it into freezer-safe bags or containers. Remove as much air as you can to prevent freezer burn. You can freeze it for up to 3 months. When you're ready to eat it, thaw it overnight in the fridge before reheating. To reheat the gnocchi, you have a few options. You can use the stove, microwave, or oven. For the stove, place it in a skillet over low heat. Add a splash of vegetable broth or cream to keep it moist. Stir gently until heated through. In the microwave, heat in 30-second bursts, stirring in between. If using the oven, cover it with foil and bake at 350°F until warm. Enjoy every bite! To make gnocchi from scratch, you need potatoes, flour, and eggs. Start by boiling potatoes until soft. Mash them and let them cool. Add flour and a beaten egg. Knead until smooth. Roll into logs and cut into small pieces. Use a fork to shape them. Boil until they float. Now you have homemade gnocchi! Yes, you can use other types of pasta. Penne or farfalle work well too. Just remember to adjust the cooking time. Follow the package instructions for cooking. The creamy sauce will still taste great with these pasta shapes. Creamy sun-dried tomato gnocchi pairs well with a fresh salad. Try a simple arugula salad with lemon vinaigrette. Garlic bread also makes a tasty side. For a heartier meal, grilled chicken or shrimp adds protein. You can also serve it with roasted veggies for extra color and flavor. In this article, we explored the key ingredients for making creamy sun-dried tomato gnocchi and discussed substitutions. You learned step-by-step cooking instructions and tips for perfecting the dish. We also covered variations to add proteins and different veggies, plus how to store leftovers. My final thought is to enjoy the process of cooking and keep things simple. With these tips, you can create a tasty meal that fits your needs. Happy cooking!

Min Creamy Sun Dried Tomato Gnocchi Delightful Dish

Creamy Sun Dried Tomato Gnocchi captures so much flavor in one dish! I’ll show you how to whip up this

- 4 boneless, skinless chicken breasts - 1 packet (1 oz) ranch seasoning mix - 2 tablespoons olive oil - 1 teaspoon garlic powder - 1 teaspoon onion powder - 1 teaspoon smoked paprika - 1 red bell pepper, chopped - 1 zucchini, sliced - 1 cup cherry tomatoes, halved - 1 cup baby carrots - Salt and pepper to taste For this dish, the chicken is the star. I use four boneless, skinless chicken breasts. These cook evenly and stay juicy. The ranch seasoning mix adds a rich flavor that everyone loves. I also mix in garlic powder, onion powder, and smoked paprika for depth. Next, the veggies add color and nutrition. I choose a red bell pepper for sweetness, zucchini for crunch, and cherry tomatoes for juiciness. Baby carrots round out the mix with their bright orange hue. - Fresh parsley - Extra ranch dressing Garnishing is easy yet fun. I like to sprinkle fresh parsley on top. It adds a pop of green and freshness. If you want more flavor, drizzle on extra ranch dressing. This makes the dish even more delicious. 1. Preheat the oven and prepare the sheet pan First, set your oven to 400°F (200°C). Line a large sheet pan with parchment paper. This makes for easy cleanup later. 2. Mix the marinade In a small bowl, take the ranch seasoning mix, garlic powder, onion powder, and smoked paprika. Add the olive oil too. Mix them well. This will be your tasty marinade. 1. Marinate chicken and prepare vegetables Place the chicken breasts in a large bowl. Pour the marinade over the chicken. Toss it well to coat every piece. Let the chicken sit for at least 15 minutes. While it marinates, chop your red bell pepper, slice the zucchini, and halve the cherry tomatoes. Get your baby carrots ready too. 2. Arrange on the sheet pan On the prepared pan, spread the chopped bell pepper, zucchini, cherry tomatoes, and baby carrots. Drizzle with olive oil, then sprinkle with salt and pepper. Toss the veggies lightly to mix. Next, place the marinated chicken on top. Make sure the chicken and veggies are spread out. This helps them cook evenly. 3. Bake and check for doneness Put the sheet pan in your preheated oven. Bake for 25-30 minutes. Check that the chicken reaches 165°F (75°C) inside. It should be golden brown. The veggies will be tender and slightly caramelized. When done, take the pan out and let it rest for 5 minutes. Garnish with fresh parsley before serving. To ensure even cooking of chicken and veggies, spread them out on the sheet pan. If they are too close, they can steam instead of roast. This means no crispy edges! Use a large pan if you have one. Marinating the chicken is key. Let it sit for at least 15 minutes. This helps the flavors soak in well. You can marinate longer if you want a stronger taste. Just remember to keep it in the fridge! For a nice presentation, serve right from the sheet pan. This gives a rustic look. You can also use a large platter. Arrange the chicken and veggies in a fun way. Drizzle a bit of extra ranch dressing on top. This adds flavor and looks great! Pair this dish with a simple salad or warm bread. The fresh tastes balance well with the meal. Enjoy it with your favorite drink, like iced tea or lemonade. This makes for a complete and delightful meal! {{image_2}} You can change the veggies in this dish to suit your taste. Here are some great options: - Broccoli florets - Cauliflower florets - Asparagus spears - Sweet potatoes, diced Feel free to mix and match! You can also use different ranch seasonings. Try a spicy ranch or a herb blend. These changes can make the dish exciting. If you want a low-carb meal, swap the veggies for low-carb choices. Use: - Zucchini noodles - Cauliflower rice - Spinach These swaps keep it tasty and healthy. For a gluten-free option, check your ranch seasoning. Some brands add gluten. Always choose certified gluten-free products to stay safe. To store leftovers, let the dish cool first. Place the chicken and veggies in an airtight container. Keep it in the fridge for up to four days. If you like, divide the meal into single servings. This makes it easy to grab when you're hungry. Always use clean utensils to avoid germs. To reheat chicken and veggies, use the oven for best results. Preheat the oven to 350°F (175°C). Place the leftovers on a baking sheet. Cover with foil to keep moisture in. Heat for about 15-20 minutes, or until warm. You can also use a microwave. Heat in short bursts, stirring in between. This helps warm it evenly. Enjoy your meal just like it was fresh! How long to cook chicken on a sheet pan? Cook chicken on a sheet pan for 25 to 30 minutes. The chicken should reach 165°F. This ensures it is safe to eat and stays juicy. What can I substitute for ranch seasoning? You can use Italian seasoning or a mix of garlic powder, onion powder, and herbs. These options bring a nice flavor to your chicken and veggies, too. Feel free to mix and match spices that you like. Can I use frozen vegetables in this recipe? Yes, you can use frozen vegetables. However, they might need a few extra minutes to cook fully. Just keep an eye on them to make sure they get tender. Frozen veggies are a great time-saver and still taste good. This blog post walked through making a tasty chicken sheet pan meal. We covered key ingredients like chicken, veggies, and seasonings. I shared steps to prep and cook the dish. Tips for even cooking and serving ideas help you shine. You can even customize this meal to fit your needs. Remember, cooking should be fun and easy. With these steps, anyone can enjoy a great meal. Try this recipe, and make it your own!

Sheet Pan Ranch Chicken And Veggies Delightful Meal

If you’re seeking a simple yet delicious dinner idea, look no further than Sheet Pan Ranch Chicken and Veggies. This

- 4 boneless, skinless chicken thighs - 1 lb baby potatoes, halved - 1/2 cup unsalted butter, melted - 6 cloves garlic, minced - 2 tablespoons fresh rosemary, chopped - 1 tablespoon fresh thyme, chopped - 1 tablespoon lemon juice - Salt and pepper to taste - 1 teaspoon paprika - 1 tablespoon olive oil - Fresh parsley, for garnish - Large mixing bowl - Sheet pan - Measuring cups and spoons - Knife and cutting board You need a few key ingredients for this Garlic Butter Chicken and Potatoes dish. First, the chicken thighs are juicy and tender. I love using boneless, skinless thighs because they cook evenly and soak up flavor well. Next, let's talk about the potatoes. Baby potatoes are perfect for this recipe. Their small size means they cook quickly and get crispy edges. The garlic butter sauce is the star here. You need unsalted butter, which you will melt. The garlic adds a rich, deep flavor. Don't forget the fresh herbs! Rosemary and thyme bring a nice aroma. Lemon juice adds a fresh zing, balancing the richness of the butter. Salt and pepper, along with paprika, enhance all the flavors. Lastly, you’ll want fresh parsley for a pop of color. It brightens the dish and makes it look nice on the table. Gather these ingredients, and you’ll be ready to create a delicious meal! - In a large bowl, combine: - 1/2 cup unsalted butter, melted - 6 cloves garlic, minced - 2 tablespoons fresh rosemary, chopped - 1 tablespoon fresh thyme, chopped - 1 tablespoon lemon juice - 1 teaspoon paprika - Salt and pepper to taste Mix well to create a rich garlic butter marinade. Next, add 4 boneless, skinless chicken thighs to the bowl. Make sure they are well coated. Let them marinate for about 15 minutes. This step is key for flavor. - While the chicken marinates, take 1 lb of baby potatoes, halved. - In another bowl, drizzle with 1 tablespoon olive oil. - Season with salt and pepper. Toss the potatoes until they are evenly coated. This simple step adds flavor and helps them roast nicely. - Grab a large sheet pan. - Arrange the marinated chicken in the center. - Spread the seasoned potatoes around the chicken. Don't forget to pour any remaining marinade over both the potatoes and chicken. This adds extra flavor and moisture during cooking. - Preheat your oven to 400°F (200°C). - Roast everything in the oven for 30-35 minutes. Check for doneness by ensuring the chicken reaches an internal temperature of 165°F (74°C). The potatoes should be golden and tender. This dish cooks quickly and fills your kitchen with amazing smells. For the best flavor, marinate the chicken for at least 15 minutes. This allows the garlic and herbs to soak into the meat. If you're short on time, even a quick 5-minute soak works. You can try other marinades too! Use olive oil, lemon juice, and herbs like basil or oregano if garlic butter isn't available. To get crispy potatoes, cut them in half and toss them in olive oil. Spread them out on the pan. This helps them brown evenly. Also, roast them at 400°F. This high heat gives them that nice crunch. For juicy chicken, make sure it’s not overcooked. Use a meat thermometer to check when it hits 165°F. Let it rest for a few minutes before serving. For a rustic look, serve right from the sheet pan. It adds charm to your dinner. You can also plate individual servings. Add steamed green beans for color. Drizzle some leftover garlic butter over the chicken and potatoes for extra taste. It makes every bite rich and flavorful. {{image_2}} You can change the protein in this dish easily. Instead of chicken thighs, try chicken breast or even turkey. Each option will give you a different flavor and texture. For veggies, switch to sweet potatoes or carrots. Both add a nice sweetness that pairs well with garlic butter. Adding herbs and spices can make this dish your own. Try using oregano or basil for a twist. You can also add a splash of soy sauce or Worcestershire sauce to the marinade. Each will bring a new depth of flavor. Don’t be afraid to experiment with what you have at home! For meal prep, portion out the chicken and potatoes into containers. This makes it easy to grab a meal on busy days. You can keep leftovers in the fridge for up to four days. If you want to store it longer, freeze it! Just make sure to use airtight containers. When you're ready to eat, thaw it in the fridge overnight and reheat it in the oven or microwave. To store leftovers, let the dish cool down to room temperature. Place the chicken and potatoes in an airtight container. This helps keep them fresh and tasty. Use a container that fits well to avoid extra air. For best results, eat leftovers within three days. If you want to freeze the dish, first let it cool completely. Then, cut the chicken and potatoes into smaller pieces. Place them in a freezer-safe bag or container. Make sure to squeeze out the air to prevent freezer burn. You can freeze this dish for up to three months. When you want to eat it, take the bag out of the freezer. Thaw it in the fridge overnight or use the microwave. Reheat in the oven at 350°F (175°C) until heated through. Check that the chicken reaches 165°F (74°C) for safety. To check if your chicken is fully cooked, use a meat thermometer. The chicken should reach an internal temperature of 165°F (74°C). Insert the thermometer into the thickest part of the thigh. If it reads 165°F, your chicken is safe to eat. If not, return it to the oven and check again after a few minutes. Always ensure the juices run clear when you cut into the chicken. Yes, you can make this dish ahead of time. Marinate the chicken and prepare the potatoes a day before. Store them in the fridge in a sealed container. When you're ready to cook, just spread everything on the sheet pan and roast. This saves time and allows the flavors to deepen. If you prefer, you can also cook it ahead and reheat it later. This meal is great on its own, but you can add side dishes for balance. Here are some ideas: - Steamed green beans for a fresh crunch - Roasted broccoli for a nice color - Simple salad to lighten the plate - Garlic bread to soak up extra butter These sides will enhance your meal and make it even more enjoyable! You learned how to make a delicious garlic butter chicken and potatoes dish. We covered the key ingredients, kitchen tools, and steps for cooking. I shared tips for marination and cooking, giving you options to personalize your meal. You can store leftovers properly and even prep ahead of time. By following these steps, you can create a tasty meal that impresses everyone. Enjoy exploring flavors and variations that make this dish your own. Happy cooking!

Garlic Butter Chicken and Potatoes Sheet Pan Delight

Looking for a simple, tasty dinner idea? Garlic Butter Chicken and Potatoes Sheet Pan Delight checks all the boxes! This

To make a great pumpkin coffee cake, you need these key ingredients: - 2 cups all-purpose flour - 1 cup pumpkin puree (not pumpkin pie filling) - 3/4 cup granulated sugar - 1/2 cup brown sugar, packed - 1/2 cup unsalted butter, softened - 2 large eggs - 1/2 cup buttermilk - 2 teaspoons baking powder - 1 teaspoon baking soda - 1 teaspoon ground cinnamon - 1/2 teaspoon ground nutmeg - 1/4 teaspoon ground ginger - 1/4 teaspoon salt - 1 teaspoon vanilla extract Each ingredient plays a big role. The pumpkin puree adds moisture and flavor. The sugars help the cake rise and brown nicely. The spices give warmth and depth. Buttermilk makes the cake tender and adds richness. For a delicious crumble topping, gather these ingredients: - 1/2 cup all-purpose flour - 1/3 cup old-fashioned oats - 1/4 cup brown sugar, packed - 1/2 teaspoon ground cinnamon - 1/4 cup unsalted butter, melted - Pinch of salt The crumble topping adds a crunchy texture. The oats give it a hearty bite. The cinnamon adds a lovely warmth. This mix perfectly balances the soft cake below. You can customize your cake in many ways. Here are some ideas: - Swap out the buttermilk for regular milk or almond milk. - Use maple syrup instead of granulated sugar for a richer taste. - Add chopped nuts like walnuts or pecans for extra crunch. - Mix in chocolate chips for a sweet surprise. These changes keep the cake fun and fresh. You can try new flavors based on what you love. First, gather all your ingredients. You need: - 2 cups all-purpose flour - 1 cup pumpkin puree - 3/4 cup granulated sugar - 1/2 cup brown sugar - 1/2 cup unsalted butter - 2 large eggs - 1/2 cup buttermilk - 2 teaspoons baking powder - 1 teaspoon baking soda - 1 teaspoon ground cinnamon - 1/2 teaspoon ground nutmeg - 1/4 teaspoon ground ginger - 1/4 teaspoon salt - 1 teaspoon vanilla extract For the crumble topping, you will need: - 1/2 cup all-purpose flour - 1/3 cup old-fashioned oats - 1/4 cup brown sugar - 1/2 teaspoon ground cinnamon - 1/4 cup unsalted butter Make sure the butter is soft. This helps it mix well. Preheat your oven to 350°F (175°C). Grease a 9-inch pan to prevent sticking. In a large bowl, beat the softened butter, granulated sugar, and brown sugar. Mix until light and fluffy. Add the eggs one at a time. Beat well after each one. Then mix in the pumpkin puree and vanilla. Stir until smooth. In another bowl, whisk together the flour, baking powder, baking soda, spices, and salt. Gradually combine this with the pumpkin mixture. Alternate with adding the buttermilk. Start and end with the flour mix. Mix just until combined. Pour the batter into your prepared pan and spread it evenly. In a different bowl, combine flour, oats, brown sugar, and cinnamon. Add a pinch of salt. Pour in the melted butter. Mix until it looks crumbly. Sprinkle this topping evenly over the cake batter. This adds a nice crunch. Bake the cake in the preheated oven for 30 to 35 minutes. To check if it’s done, insert a toothpick in the center. If it comes out clean, it’s ready. Once it's done, let the cake cool in the pan for about 10 minutes. After that, transfer it to a wire rack. Let it cool completely before you slice it. Enjoy your delicious Pumpkin Coffee Cake with Crumble! To get the best texture, use room temperature ingredients. This helps the batter mix well. Make sure to beat the butter and sugars until fluffy. This adds air, which gives the cake a light feel. Don't overmix when adding flour. Mix just until combined to keep it moist. I love serving this cake warm. A dusting of powdered sugar adds a nice touch. Pair it with whipped cream or a scoop of vanilla ice cream. You can also enjoy it with coffee or tea. It makes a great snack any time of day! For an extra kick, try adding chocolate chips. They melt nicely and add sweetness. You can also fold in chopped nuts for crunch. A dash of maple syrup in the batter gives a rich flavor. Don’t forget to adjust spices to your taste. Adding more cinnamon or nutmeg can enhance the warm flavors. {{image_2}} You can change the spices to give your pumpkin coffee cake a new twist. Try adding cardamom for a floral note. You can also use allspice to deepen the flavor. For a spicy kick, add a bit of cayenne pepper. Mix and match spices to find what you like best. To make this cake gluten-free, swap the all-purpose flour for a gluten-free blend. Look for blends that have xanthan gum, which helps with texture. You can also use almond flour for a nutty flavor. Just be aware that the texture may change slightly. To make this cake vegan, replace the eggs with flaxseed meal. Mix one tablespoon of flaxseed meal with three tablespoons of water. Let it sit for a few minutes to thicken. Use almond milk instead of buttermilk. Coconut oil can replace the butter for a dairy-free option. Your cake will still be moist and delicious! To keep your pumpkin coffee cake fresh, let it cool completely. Wrap it in plastic wrap or foil. You can also place it in an airtight container. This will help retain moisture and flavor. Store it at room temperature for up to three days. If you want it to last longer, consider refrigerating it. In the fridge, it stays good for about a week. When you're ready to enjoy your leftovers, preheat your oven to 350°F (175°C). Place a slice of cake on a baking sheet. Cover it with foil to keep it moist. Heat for about 10-15 minutes. You can also use the microwave for a quick option. Heat a slice for about 20-30 seconds. Check that it’s warm inside before serving. To freeze your pumpkin coffee cake, slice it first. Wrap each piece in plastic wrap, then foil. This prevents freezer burn. You can store it in the freezer for up to three months. When you want to eat it, take out a slice. Let it thaw in the fridge overnight. If you need it fast, you can thaw it at room temperature for a few hours. Enjoy your delicious cake anytime! Yes, you can use canned pumpkin. Just make sure it is pure pumpkin puree. Do not use pumpkin pie filling. The pumpkin adds moisture and flavor to the cake. If you lack buttermilk, you can make a quick substitute. Mix one cup of milk with one tablespoon of vinegar or lemon juice. Let it sit for five minutes. This will give you a similar tangy flavor. To check if the cake is done, insert a toothpick into the center. If it comes out clean, the cake is ready. If you see wet batter, bake it a few more minutes. Yes, you can use a different pan size. If you use a larger pan, the cake may bake faster. If you use a smaller pan, it may take longer to bake. Keep an eye on it. Pumpkin coffee cake lasts for about three days at room temperature. Store it in an airtight container. You can also refrigerate it to make it last longer. In this post, we explored how to make delicious Pumpkin Coffee Cake. You learned about key ingredients, crumble topping, and helpful tips for baking. We covered variations to suit different diets and tastes, plus smart storage methods. Remember to try different flavors and keep leftovers fresh. This cake is perfect for sharing and brightening your day. Enjoy the baking process, and don't forget to savor each bite!

Pumpkin Coffee Cake with Crumble Perfectly Moist Recipe

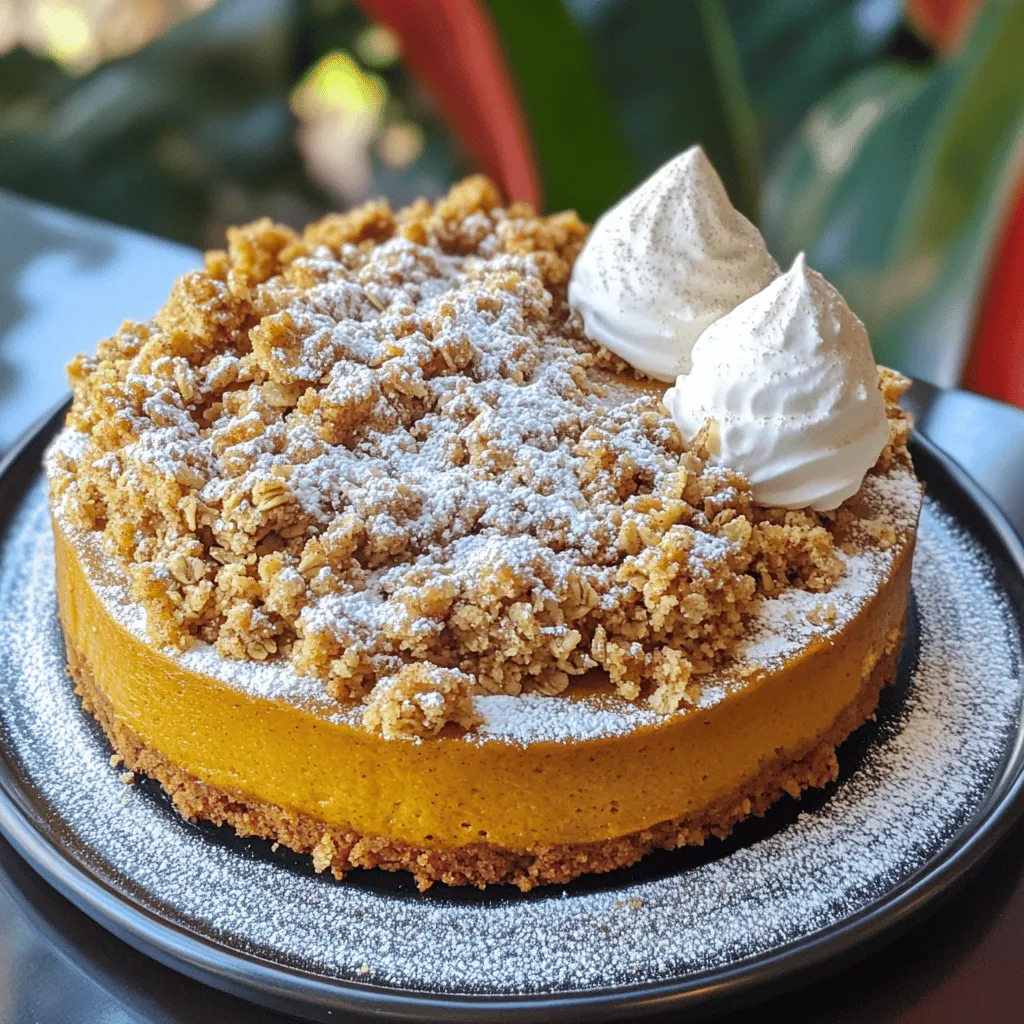
If you love fall flavors, you’ll adore this Pumpkin Coffee Cake with Crumble. This recipe gives you a moist, spiced

For crispy air fryer onion rings, you need: - 2 large onions, sliced into 1/4-inch thick rings - 1 cup all-purpose flour - 1 teaspoon garlic powder - 1 teaspoon paprika - 1 teaspoon salt - 1/2 teaspoon black pepper - 2 large eggs, beaten - 1 cup breadcrumbs (preferably panko for extra crunch) - 1/2 teaspoon cayenne pepper (optional, for a kick) - Cooking spray These ingredients work together to create a crunchy and tasty treat. The onions should be thick enough to hold the coating but thin enough to cook well. Panko breadcrumbs give the rings an extra crunch that is hard to resist. To make a simple ranch dip, gather these items: - 1/2 cup ranch dressing - A splash of lemon juice Mixing lemon juice into ranch dressing adds a fresh flavor. It brightens the dip and makes it even more delicious. You can change the flavor of your onion rings with these options: - Add more cayenne pepper for heat. - Try Italian seasoning for a unique twist. - Use smoked paprika for a deeper flavor. Experimenting with different spices can create a new favorite dish. Feel free to mix and match to suit your taste! Start by slicing two large onions into 1/4-inch thick rings. Make sure to separate the rings carefully. This step is key for even cooking and crispiness. The thicker the rings, the longer they may take to cook. You want them thick enough for a good bite but not so thick that they won’t crisp up. Once you have your rings ready, set them aside. Now, let’s coat those onion rings. In a bowl, mix one cup of all-purpose flour with one teaspoon each of garlic powder, paprika, salt, and black pepper. This is your dry coating. In a second bowl, beat two large eggs. This will be your wet coating. In a third bowl, combine one cup of breadcrumbs with 1/2 teaspoon of cayenne pepper, if you want some heat. Take each onion ring and dip it first into the flour mixture. Shake off any extra flour. Then, dip it into the beaten eggs. Finally, coat it with the breadcrumb mix. Make sure each ring is well covered. This three-step coating gives them that crunchy texture we love. Preheat your air fryer to 375°F (190°C) before you start cooking. Once ready, place the coated onion rings in the air fryer basket. Make sure they sit in a single layer; this helps them cook evenly. Lightly spray them with cooking spray to help them turn golden brown. Air fry the onion rings for 10-12 minutes. Flip them halfway through to ensure they crisp up on both sides. Keep an eye on them; you want them golden brown and crispy. While they cook, you can mix a quick ranch dip. Just combine 1/2 cup of ranch dressing with a splash of lemon juice. Once the onion rings are done, let them cool slightly before serving with your ranch dip. Enjoy this tasty treat! To get onion rings that are crispy, choose the right breadcrumbs. Panko breadcrumbs work best. They provide a light and crunchy coating. Coat each onion ring well. Start with the flour mix, then dip in egg, and finish with breadcrumbs. This three-step process builds layers of crunch. Lightly spray the coated rings with cooking spray. This helps them crisp up in the air fryer. Don't overcrowd the basket. Keep the rings in a single layer. Preheat your air fryer to 375°F (190°C). This step is key. It ensures even cooking. Cook onion rings for 10-12 minutes. Flip them halfway through. This allows both sides to brown evenly. Keep an eye on them toward the end. They can cook quickly. Store leftover onion rings in an airtight container. Place parchment paper between layers to keep them crispy. When you're ready to eat them again, reheat in the air fryer. Set it to 350°F (175°C) for about 5-7 minutes. This method keeps them crunchy. Avoid microwaving, as it makes them soggy. {{image_2}} If you like heat, add cayenne pepper to your onion rings. Use 1/2 teaspoon in the breadcrumb mix. This small change gives your rings a nice kick. You can adjust the amount to suit your taste. More spice makes them exciting! You can easily make these onion rings gluten-free. Replace all-purpose flour with almond or coconut flour. For breadcrumbs, try gluten-free panko. If you want a vegan option, use flax eggs instead of regular eggs. Mix 1 tablespoon of flaxseed meal with 3 tablespoons of water. Let it sit for a few minutes to thicken. This will work great as a binding agent. While ranch dip is tasty, feel free to get creative. Try serving your onion rings with BBQ sauce for a smoky flavor. Or go for a spicy sriracha mayo for some zest. You can even try honey mustard for a sweet twist. Each sauce gives a unique taste to your crispy onion rings. Enjoy mixing and matching! To store leftover onion rings, let them cool first. Place them in an airtight container. This keeps them fresh longer. Use parchment paper between layers to avoid sticking. Store them in the fridge for best results. To freeze onion rings, first prepare them as usual. After coating, place them on a baking sheet in a single layer. Freeze for about two hours until firm. Then, transfer them to a freezer bag. This method helps maintain their shape and crunch. Leftover onion rings last about 3-4 days in the fridge. Keep them in an airtight container to prevent drying out. If you notice any changes in texture or smell, it's best to toss them. Enjoy your crispy onion rings while they are fresh! Yes, you can make onion rings in a deep fryer or oven. For deep frying, heat oil to 350°F (175°C). Dip your onion rings in the same way as for the air fryer. Fry them until they are golden and crispy. For the oven, place the coated onion rings on a baking sheet. Bake at 425°F (220°C) for 20-25 minutes, flipping halfway through. Onion rings pair well with burgers, sandwiches, or hot dogs. They make a great side for salads. You can also serve them as a snack with dips like ketchup or mustard. Consider a platter with various dips for a fun twist. To add more flavor, try these tips: - Soak the onion rings in buttermilk for an hour before coating them. This adds moisture and flavor. - Mix herbs or spices into the flour coating, like Italian seasoning or chili powder. - Use flavored breadcrumbs, such as garlic or herb panko, to enhance the crunch and taste. Making onion rings in an air fryer is fun and easy. You learned about the key ingredients, how to prepare and coat the rings, and tips to get them crispy. We also shared tasty variations, like spicy options and different dips. Plus, knowing how to store leftovers can help save your yummy snacks. With these steps, your onion rings will surely impress family and friends. Enjoy making and sharing these tasty bites!

Crispy Air Fryer Onion Rings with Ranch Dip Recipe

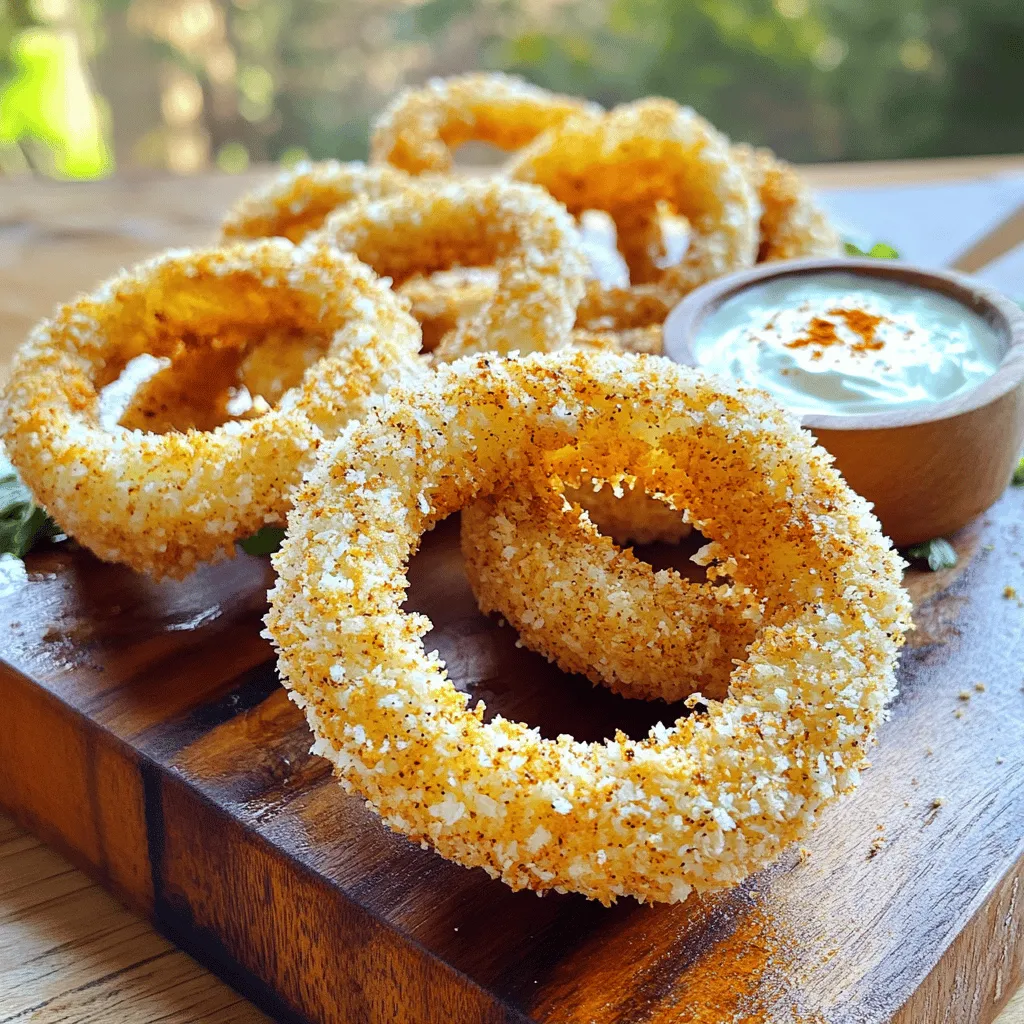
Are you ready to munch on some crispy, golden onion rings? These Air Fryer Onion Rings with Ranch Dip are

- 1 pound large shrimp, peeled and deveined - 4 cloves garlic, minced - 2 tablespoons olive oil - 1 teaspoon smoked paprika - 1 teaspoon cayenne pepper (or adjust to taste) - 1 teaspoon cumin - Juice of 1 lime - Salt and pepper to taste The main ingredients come together to create a rich and bold flavor. The shrimp gives the tacos their base. The garlic adds depth and aroma. Olive oil helps bind the flavors and keep the shrimp moist. Smoked paprika and cayenne pepper provide the heat that makes these tacos spicy. Cumin adds warmth and earthiness, while lime juice brightens everything up. Salt and pepper enhance all the tastes. - Juice of 1 lime - 4 cloves garlic, minced - 2 tablespoons olive oil - 1 teaspoon smoked paprika - 1 teaspoon cayenne pepper (or adjust to taste) - 1 teaspoon cumin - Salt and pepper to taste The marinade is key to making the shrimp flavorful. I love using lime juice for a fresh zing. Garlic brings a punch, while smoked paprika gives it a nice depth. Cayenne pepper adds heat, but you can adjust this to your taste. Cumin adds a warm note. Don't forget the salt and pepper! They balance out the flavors. - 8 small corn tortillas - 1 avocado, sliced - 1 cup cabbage, finely shredded - Fresh cilantro, for garnish - Lime wedges, for serving Toppings bring the whole dish together. Corn tortillas hold everything in a delicious package. Avocado slices add creaminess and richness. Shredded cabbage gives a crunchy texture. Fresh cilantro adds a pop of color and flavor. Lime wedges are perfect for squeezing over the tacos. They give an extra burst of freshness. First, gather your ingredients. You need one pound of large shrimp, four cloves of minced garlic, and two tablespoons of olive oil. Add one teaspoon of smoked paprika, one teaspoon of cayenne pepper, and one teaspoon of cumin. Squeeze the juice of one lime into the bowl. Sprinkle some salt and pepper to taste. Mix everything well. The shrimp should be fully coated in the marinade. Let them sit for at least 15 minutes. This helps the flavors soak in. Heat a large skillet on medium-high heat. Once it’s hot, add the marinated shrimp. Spread them out in a single layer. Cook for about 2-3 minutes on one side. Flip them over and cook for another 2-3 minutes. The shrimp will turn pink and firm up when done. Remove them from the heat. While the shrimp cook, warm up your corn tortillas. You can use another skillet or a grill. Heat them for about 30 seconds on each side until they are soft. To make the tacos, place a few shrimp in the center of each tortilla. Add slices of avocado and a handful of shredded cabbage on top. Finish by adding fresh cilantro for color and flavor. Serve with lime wedges on the side for extra zest. To cook shrimp well, start with fresh shrimp. Look for shrimp that smell clean and have a firm texture. Always thaw frozen shrimp in the fridge overnight for best results. When cooking, heat your skillet until it’s hot. This helps seal in the shrimp’s juices. Avoid overcrowding the pan; cook in batches if needed. Shrimp cook fast, so keep an eye on them. They are done when they turn pink and curl slightly. Choosing the right tortillas can make your tacos shine. Look for corn tortillas that feel soft and pliable. They should not crack when you bend them. Check for simple ingredients like corn, water, and salt. Fresh tortillas taste better, so visit a local market if possible. If you can’t find fresh ones, try heating store-bought tortillas on a skillet. This gives them a warm, toasty flavor. To boost flavor, add toppings that add freshness. Sliced avocado brings creaminess, while shredded cabbage adds crunch. Fresh cilantro gives a bright note. For extra heat, consider adding jalapeños or a drizzle of hot sauce. A squeeze of lime juice over the tacos brightens every bite. You can also try different spices in the marinade, like chili powder or garlic powder. {{image_2}} If you want to swap shrimp, try chicken or fish. Chicken thighs work well, too. For a plant-based option, use tofu or jackfruit. These alternatives still give great flavor. Make sure to adjust cooking times. You can change the spice level based on your taste. Use less cayenne pepper for mild tacos. For more heat, add jalapeños or hot sauce. To switch up flavors, try using chili powder or curry powder. Each spice brings a new twist to the dish. Toppings can truly make your tacos shine. Try adding mango salsa for a sweet touch. Pickled onions add a nice crunch and tang. You can also use shredded carrots or radishes for extra color. Don't forget cheese or a drizzle of sour cream for creaminess. Each topping creates a unique taste. To keep your leftover shrimp tacos fresh, wrap them tightly in plastic wrap or foil. Place them in an airtight container. This helps lock in moisture and flavor. Store them in the fridge for up to two days. If you have leftover shrimp without the tortillas, store them in a separate container. For the best taste, reheat shrimp tacos on the stove. Heat a skillet over medium heat. Place the tacos in the skillet for about 2-3 minutes. This warms the tortillas and keeps the shrimp tender. You can also use a microwave, but it may make the tortillas chewy. Heat for about 30 seconds, checking to avoid overcooking. If you want to freeze the shrimp, do so before cooking. Place the marinated shrimp in a freezer-safe bag. Remove as much air as possible before sealing. You can freeze them for up to three months. For tortillas, stack them and wrap in plastic. Store them in the freezer for up to two months. When ready to use, thaw them in the fridge overnight. Shrimp tacos get their spice from cayenne pepper. You can adjust the amount to your taste. Smoked paprika also adds warmth and depth. These spices mix with garlic and lime juice to create a bold flavor. Yes, you can prepare the shrimp ahead of time. Marinate them and store in the fridge for up to 2 hours. This allows the flavors to soak in. Cook the shrimp right before serving for the best taste. Many sides go well with shrimp tacos. Consider serving them with: - Mexican rice - Black beans - Grilled corn - A fresh salad - Chips and salsa These sides balance the heat and enhance your meal. Enjoy the mix of flavors and textures! You now know how to make spicy garlic shrimp tacos. We covered the key ingredients, marinade, and toppings. I shared a simple step-by-step guide to prepare and cook them. I also offered tips for cooking shrimp and choosing tortillas. You can explore variations to fit your taste and learn about storing leftovers. Enjoy your tasty tacos and be creative with your flavors. Happy cooking!

Spicy Garlic Shrimp Tacos Flavorful and Easy Recipe

Looking to spice up your taco night? I’ve got just the thing! My Spicy Garlic Shrimp Tacos are not only

- 2 ripe bananas (frozen for creaminess) - 1 tablespoon unsweetened cocoa powder - 1 cup almond milk (or any preferred milk) - 1 tablespoon honey or maple syrup (optional for sweetness) - ¼ cup Greek yogurt (optional for extra creaminess) To make a great chocolate banana smoothie bowl, you need some key ingredients. First, the ripe bananas give the bowl its sweet and creamy base. If you freeze them, you’ll get an even thicker texture. Next, unsweetened cocoa powder adds rich chocolate flavor without extra sugar. Almond milk keeps it smooth and adds a nice nutty taste. If you want more sweetness, you can add honey or maple syrup. Greek yogurt is optional but it makes the bowl extra creamy and adds protein. - Sliced bananas - Granola - Chia seeds - Cocoa nibs - Shredded coconut - Fresh berries Now, let’s talk toppings! Toppings can add fun flavors and textures. Sliced bananas look great and taste good. Granola gives a crunchy bite. Chia seeds are small but pack a big punch of nutrition. Cocoa nibs add a chocolate crunch. Shredded coconut gives a tropical twist, and fresh berries are colorful and tasty. You can mix and match these toppings to make your bowl unique! - Combining Ingredients in a Blender Start by peeling the ripe bananas. Use frozen bananas for a thick and creamy texture. Add the bananas to your blender. Next, scoop in the cocoa powder. Pour in one cup of almond milk. If you want more sweetness, add honey or maple syrup. You can also include Greek yogurt for extra creaminess. - Blending Process for Creaminess Blend all the ingredients on high speed. Watch as it transforms into a smooth mixture. If it seems too thick, add a splash more almond milk. Blend until you achieve your desired creaminess. - Pouring into a Bowl Once blended, pour the smooth mixture into a bowl. Make sure it’s a nice, deep bowl to hold all your toppings. - Arranging Toppings Now comes the fun part! Top your smoothie with sliced bananas. Sprinkle granola for some crunch. Add chia seeds for extra nutrition. You can also sprinkle cocoa nibs and shredded coconut. Finally, toss on some fresh berries for color and flavor. - Drizzling with Honey or Syrup If you like it sweeter, drizzle a little honey or syrup on top. This adds a nice shiny finish and extra flavor. - Presentation Tips for Visual Appeal Arrange your toppings in sections or rows. This makes your bowl look pretty and inviting. Use a colorful bowl to enhance your dish's visual appeal. Enjoy your smoothie bowl right away! To make a great smoothie bowl, aim for a thick and creamy texture. You can adjust the consistency with almond milk. If the smoothie is too thick, add more almond milk to reach your desired smoothness. Start with a little, then blend again. That way, you avoid making it too runny. Using frozen bananas is key to that nice creaminess. They blend well and chill the mix. Peel and slice ripe bananas before freezing. This makes blending easier. Sweetness is important for taste. You can use honey or maple syrup to add sweetness. Start with a small amount. Taste the mix and add more if you like it sweeter. Toppings can also boost flavor. Try sliced bananas, granola, chia seeds, or cocoa nibs. Fresh berries add a lovely tartness. Get creative! Mix and match your favorites for fun flavors. Bananas are packed with nutrients. They provide potassium, which helps your heart. They also offer quick energy, great for a morning boost. Greek yogurt is another healthy choice. It adds protein and creaminess. This helps keep you full longer. Plus, it has probiotics that are good for your tummy. {{image_2}} You can make your chocolate banana smoothie bowl even better. Adding nut butter gives it a rich taste. I love using almond or peanut butter. A spoonful blends well and adds protein. This makes the bowl more filling. Try adding spinach or kale for a green twist. Both add nutrients without changing the taste. Blend a small handful with the other ingredients. You get a healthier smoothie bowl that still tastes great. If you want a vegan option, skip the Greek yogurt. Use almond milk and add a plant-based yogurt instead. Many brands offer tasty dairy-free choices. They help keep your bowl creamy and delicious. For a dairy-free alternative, stick with almond milk and skip any dairy toppings. You can use coconut yogurt too. It gives a nice flavor and keeps it creamy. Make your smoothie bowl special for each season. In summer, add fresh berries. Strawberries, blueberries, and raspberries look pretty and taste great. You can also use peaches or mangoes in the warmer months. For the holidays, try adding spices like cinnamon or nutmeg. They give the bowl a festive feel. Drizzle with maple syrup for extra sweetness. It creates a warm, cozy flavor perfect for winter. If you have leftover smoothie, you can store it in the fridge. Use an airtight container to keep it fresh. It will last for 1-2 days. Stir well before drinking. If it separates, that’s normal! You can also freeze the smoothie for later. Pour it into ice cube trays or freezer-safe bags. When ready to use, blend the frozen cubes with a bit of almond milk. This gives you a quick treat. To keep your ingredients fresh, store them properly. Keep ripe bananas at room temperature until they brown. Once brown, place them in the fridge to slow ripening. This also makes them great for smoothies. Store cocoa powder in a cool, dark place. Keep almond milk in the fridge and use it before the expiration date. Greek yogurt should stay sealed until you use it. After opening, enjoy it within a week for best taste. Knowing the shelf life helps too. Ripe bananas last about 3-7 days on the counter. Almond milk can last 7-10 days after opening. Frozen bananas can last for months. Enjoy your smoothie bowl with fresh, tasty ingredients! To make this smoothie bowl vegan, skip the Greek yogurt. Use a plant-based yogurt. You can also use maple syrup instead of honey. Both swaps keep it creamy and sweet without any animal products. Yes, you can use any milk you like. Try oat milk, soy milk, or coconut milk. Each type adds its own flavor. Just use the same amount as the almond milk in the recipe. If you don’t have Greek yogurt, try coconut yogurt or silken tofu. Both give creaminess. You can also leave it out if you prefer a lighter smoothie bowl. Yes, you can prep it ahead. Blend the ingredients and store them in the fridge. Just add the toppings right before serving. This keeps them fresh and crunchy. Absolutely! Kids can help with blending and adding toppings. They love picking their favorite fruits. It makes cooking fun and teaches them about healthy foods. You can create a delicious chocolate banana smoothie bowl with simple ingredients. We covered essential items like ripe bananas, cocoa powder, and almond milk. You learned how to prepare, serve, and decorate your bowl for the best look. We also explored tips for perfect texture, flavor, and health benefits. Lastly, I shared storage tips and variations for different diets and seasons. Now, it's time to enjoy your tasty creation and make it your own!

Chocolate Banana Smoothie Bowl Recipe for Energy Boost

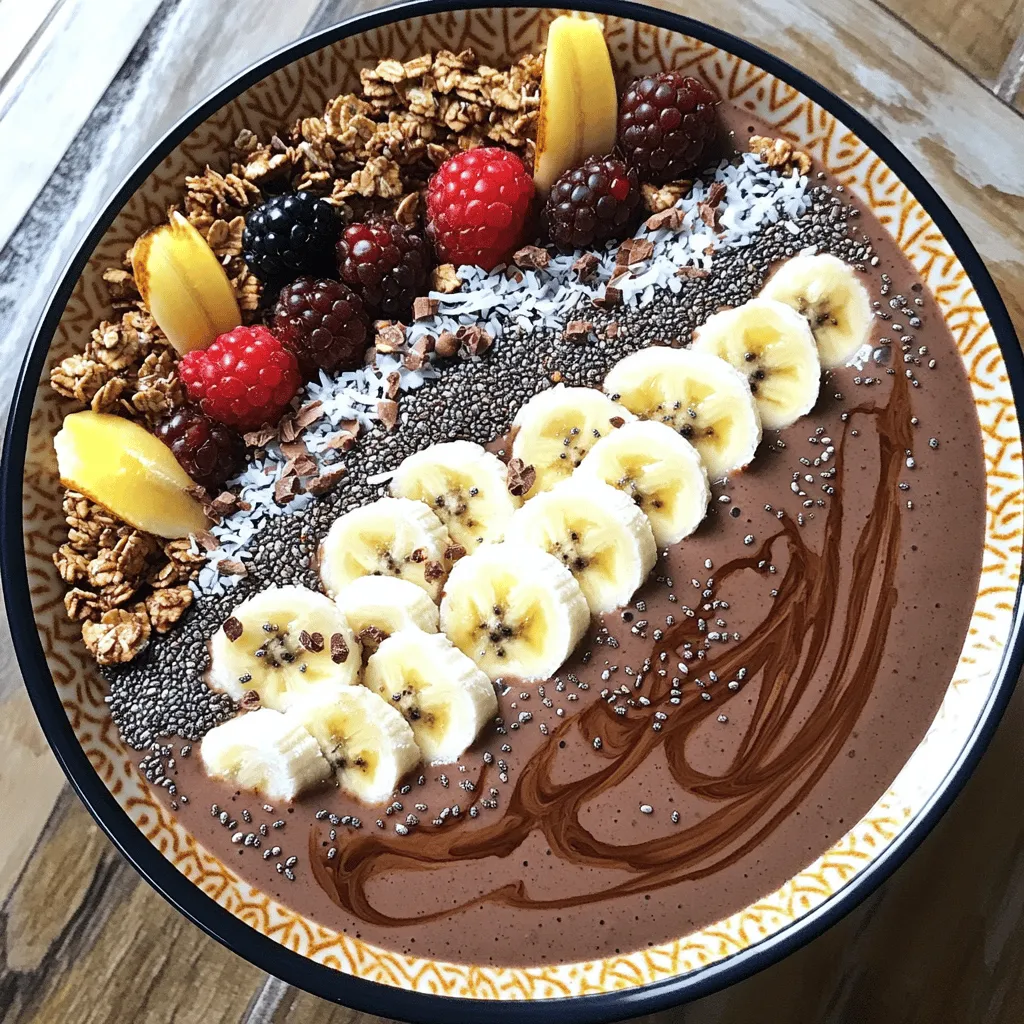
Looking for a tasty way to fuel your day? This Chocolate Banana Smoothie Bowl is your answer! Packed with ripe

Older posts
Newer posts
← Previous Page1 … Page15 Page16 Page17 … Page129 Next →

dsad

© 2025 Emmas Dish • Built with GeneratePress

Our Policies

  • Copyright Policy
  • Cookie Policy
  • GDPR Policy
  • Privacy Policy
  • Disclaimer
  • Terms Of Use

More Information

  • Home
  • About
  • Contact
  • Appetizers
  • Dessert
  • Dinner
  • Drinks
©2025, Emmas Dish About Back To Top