Skip to content
DisclaimerTerms Of UseGDPR PolicyCookie Policy

Emmas Dish

  • Home
  • Drinks
  • Appetizers
  • Dinner
  • Dessert
  • About
  • Contact
  • Privacy Policy
DisclaimerTerms Of UseGDPR PolicyCookie Policy

Emma

- 1 cup canned pumpkin puree - 1 frozen banana - 1 cup almond milk (or alternative milk) - 1/2 teaspoon pumpkin pie spice - 1 tablespoon maple syrup - 1/4 cup Greek yogurt (optional) The main ingredients in this smoothie bowl create a cozy flavor. Canned pumpkin puree gives a rich, creamy base. It packs in nutrients, like vitamin A. The frozen banana adds natural sweetness and creaminess. Almond milk keeps the smoothie light. You can choose any milk you like. Pumpkin pie spice brings warmth with cinnamon and nutmeg. Maple syrup sweetens it all up. If you want a creamier texture, Greek yogurt is a great choice, too. - Granola - Sliced bananas - Chopped pecans - Cinnamon - Honey drizzle Toppings take your smoothie bowl to the next level. Granola adds a satisfying crunch. Sliced bananas boost the banana flavor and add freshness. Chopped pecans give a nice nutty taste. A sprinkle of cinnamon enhances the cozy fall vibe. Lastly, a drizzle of honey adds a sweet finish. Feel free to mix and match toppings based on your taste! How to properly measure canned pumpkin puree To measure canned pumpkin puree, use a dry measuring cup. Scoop the puree into the cup, then level it off with a knife. This method ensures you get just the right amount. Avoid packing the pumpkin down, as this can lead to too much puree in your bowl. Tips on freezing bananas Freezing bananas is simple and fun. Peel the bananas first and cut them into chunks. Spread the chunks on a baking sheet and freeze them for about an hour. Once frozen, place the chunks in a zip-top bag. This way, you can use them anytime without worrying about browning. Step-by-step blending process Start by adding the canned pumpkin puree, frozen banana, and almond milk to your blender. Next, sprinkle in the pumpkin pie spice and drizzle in the maple syrup. If you want creaminess, add Greek yogurt. Blend on high until everything is smooth. Adjusting consistency with almond milk If the smoothie is too thick, don’t worry! Just add a little more almond milk. Blend again until you reach your desired thickness. This step is key for a bowl that’s easy to eat and enjoy. Tips for pouring into bowls Pour the smoothie into bowls gently. This helps keep the mixture from splashing. Use a ladle for better control. Make sure each bowl has an even amount for sharing. Creative ways to arrange toppings Start with a layer of granola for some crunch. Next, add sliced bananas and sprinkle chopped pecans. For a finishing touch, dust with cinnamon and drizzle honey over the top. Get creative with the layout; it makes your bowl look extra special! You can adjust the sweetness of your smoothie bowl with maple syrup. Start with one tablespoon. If you want it sweeter, add more in small amounts. You can also try different spices for a unique taste. Cinnamon and nutmeg work well with pumpkin. A hint of ginger can add a nice kick, too. Adding Greek yogurt makes your smoothie bowl creamier. It also packs in protein, which helps keep you full. If you want a dairy-free option, use avocado or silken tofu. Both add a smooth texture without dairy. For busy mornings, prep your ingredients the night before. Measure the pumpkin, banana, and spices, and store them in the fridge. This saves time when you blend. You can also store the blended mix for later. Pour it into an airtight container and keep it in the fridge for up to two days. When you’re ready to eat, just stir and enjoy! {{image_2}} You can easily change this recipe to fit your needs. If you want a dairy-free option, skip the Greek yogurt. Use coconut yogurt instead if you want some creaminess. For a vegan version, just leave out the yogurt and honey. Maple syrup adds a nice sweet touch while keeping it plant-based. To boost protein, add nut butter like almond or peanut. Just a tablespoon or two can transform your bowl. You can also mix in superfoods like chia seeds. These tiny seeds add fiber and omega-3s. They also make your smoothie bowl even more filling. In the fall, fresh pumpkin shines. You can roast and puree it for a fresh taste. Just replace the canned pumpkin with your homemade puree. You can also add seasonal fruits like apples or pears. They add sweetness and crunch for a fun twist. To keep your pumpkin pie smoothie bowl fresh, store it in the fridge. Use an airtight container to keep out air. This helps the smoothie stay tasty for up to two days. If you have extra smoothie, freezing is a great option. Pour the leftover smoothie into ice cube trays. Once frozen, transfer the cubes to a freezer bag. This way, you can enjoy a quick smoothie later. When you want to thaw your frozen smoothie, move it to the fridge overnight. If you need it fast, use the microwave on low heat. Stir it every 30 seconds to keep the texture smooth. For the best results, blend again after thawing. This helps mix any separated parts and brings back creaminess. Yes, you can use fresh pumpkin! Fresh pumpkin has a bright taste and great texture. Start by selecting a small sugar pumpkin, as it has a sweeter flavor. Cut it in half, scoop out the seeds, and roast it at 400°F for about 45 minutes. Once soft, scoop out the flesh and blend it until smooth. Fresh pumpkin gives your smoothie bowl a unique flavor and nutrients. Plus, it’s a fun way to enjoy the season! To make your smoothie bowl thicker, you can try a few methods. First, add less almond milk at the start. Blend in small amounts until you reach your desired thickness. Using a frozen banana also helps. It adds creaminess and thickness. If you want it even thicker, consider adding Greek yogurt or a bit of oats. These options give your bowl a nice, hearty feel without changing the taste much. Toppings can make your smoothie bowl exciting! Here are some great options: - Granola for crunch - Sliced bananas for sweetness - Chopped pecans for a nutty flavor - A sprinkle of cinnamon to enhance the pumpkin taste - A drizzle of honey for extra sweetness These toppings not only add flavor but also give a nice texture contrast. You can mix and match to find your favorite combo! You learned how to make a tasty pumpkin pie smoothie bowl. From selecting the right ingredients to adding your favorite toppings, this recipe is simple and fun. You can also adapt it to fit your diet or preferences. Remember to store leftovers properly for later enjoyment. With these tips, you can whip up a delightful treat any time. Enjoy your smoothie bowl adventure and get creative with flavors!

Pumpkin Pie Smoothie Bowl Delicious and Nutritious Treat

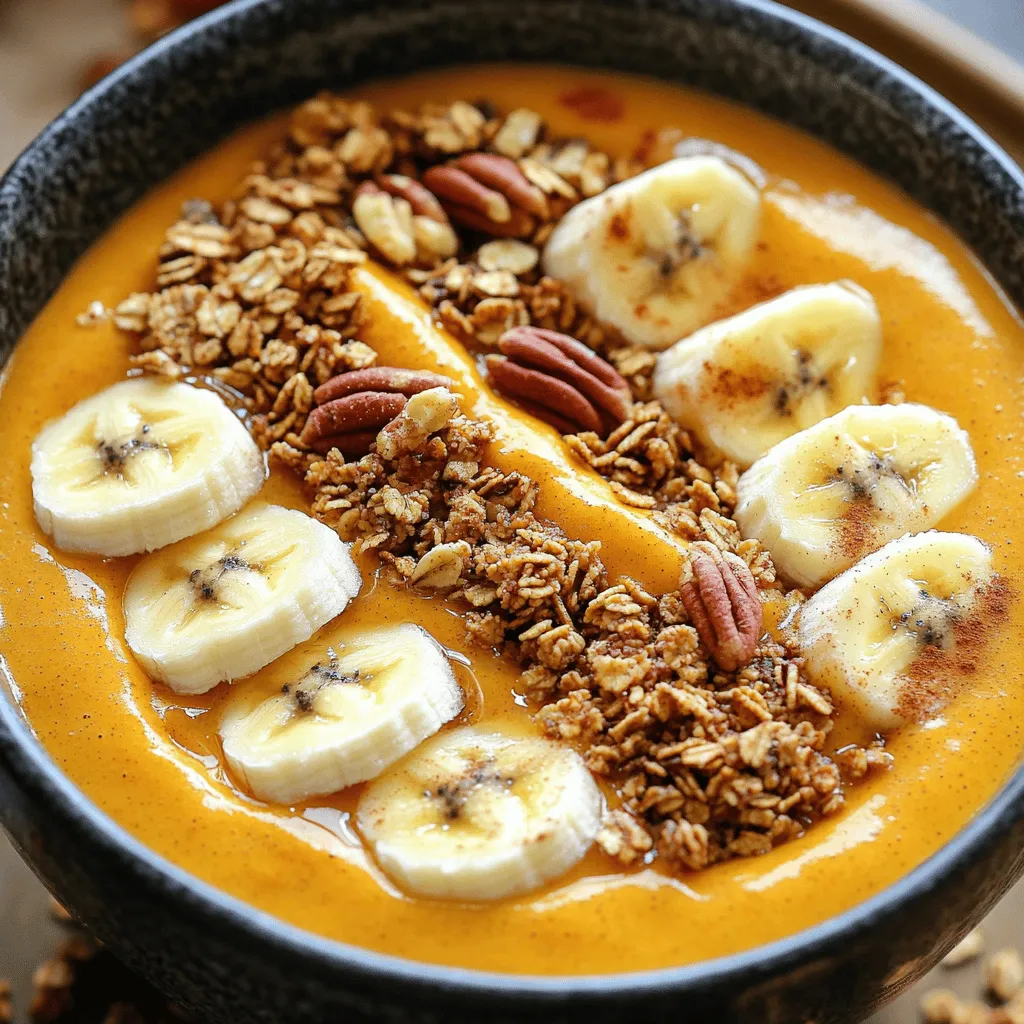
If you love pumpkin pie, you’ll adore this Pumpkin Pie Smoothie Bowl! It packs all the flavors of your favorite

To make this Cinnamon Apple Crumble Coffee Cake, you will need the following items: - 2 cups all-purpose flour - 1 cup granulated sugar - 1/2 cup unsalted butter, softened - 1/2 cup brown sugar, packed - 1 teaspoon baking powder - 1 teaspoon baking soda - 1 teaspoon ground cinnamon - 1/2 teaspoon salt - 1 cup sour cream - 2 large eggs - 2 cups peeled and diced apples (any sweet variety, like Honeycrisp or Fuji) - 1/2 cup chopped walnuts (optional) For the crumble topping: - 1/2 cup all-purpose flour - 1/4 cup brown sugar, packed - 1 teaspoon cinnamon - 1/4 cup cold unsalted butter, cubed If you need to swap some ingredients, here are a few ideas: - Granulated sugar: You can use coconut sugar or maple sugar. - Unsalted butter: Try using coconut oil for a dairy-free option. - Sour cream: Greek yogurt works well as a substitute. - Apples: If you want a tart flavor, use Granny Smith apples. These swaps can change the taste a bit but still keep the cake tasty. To get the best flavor in your coffee cake, choose sweet apples. Here are my top picks: - Honeycrisp: They are sweet and juicy, perfect for baking. - Fuji: These apples are crisp and have a good balance of sweet and tart. - Gala: They are sweet and add a nice flavor to the cake. Using these apple types will give you a delicious, flavorful treat. Start by preheating your oven to 350°F (175°C). This helps the cake cook evenly. Grease a 9x13 inch baking dish with butter or line it with parchment paper. In a large bowl, cream together the softened butter, granulated sugar, and brown sugar until you have a light and fluffy mix. This step is key to a soft cake. Next, add the eggs one at a time. Mix well after each egg. Then, stir in the sour cream. In a separate bowl, whisk together the all-purpose flour, baking powder, baking soda, ground cinnamon, and salt. Slowly add this dry mix to your wet mix. Be careful not to over-mix; just blend until combined. Now, fold in the diced apples and walnuts, if you choose to use them. Make sure the apples are spread evenly throughout the batter. Pour the batter into the prepared dish and spread it out evenly. For the crumble topping, grab a medium bowl. Mix together the flour, brown sugar, and cinnamon. Add the cold, cubed butter. Use your fingers or a pastry cutter to combine the butter into the dry mix. You want it to be crumbly. It should resemble small pebbles. Once the crumble is ready, sprinkle it evenly over the cake batter. This topping adds a delightful crunch to each bite. Place your baking dish in the preheated oven. Bake for about 30-35 minutes. To check if it's done, insert a toothpick into the center. If it comes out clean, your cake is ready. Let the cake cool in the dish for about 10 minutes. After that, transfer it to a wire rack to cool completely. This step helps keep the cake from getting soggy. Enjoy the wonderful smell that fills your kitchen! To make your coffee cake fluffy, here are some tips: - Use room temperature ingredients. This helps them mix well. - Cream the butter and sugars until light. This adds air to the batter. - Don’t over-mix. Stir just until combined for a soft texture. - Use fresh baking powder and baking soda. This gives the cake a nice rise. Avoid these common mistakes to ensure success: - Don’t skip greasing the pan. This prevents sticking. - Measure flour correctly. Too much can make the cake dense. - Check the oven temp with a thermometer. An oven that is too hot can burn the cake. - Allow the cake to cool before slicing. This keeps the texture intact. This coffee cake shines on its own, but you can enhance it: - Serve warm with a sprinkle of powdered sugar. - Add a dollop of whipped cream for richness. - Pair with coffee or spiced tea for a cozy treat. - Try it with vanilla ice cream for a dessert twist. Enjoy these tips to make your Cinnamon Apple Crumble Coffee Cake truly irresistible! {{image_2}} To make this cake gluten-free, swap all-purpose flour with a gluten-free blend. Make sure the blend contains xanthan gum for the best texture. Your cake will still be soft and moist. You can enjoy the same great flavors and the warm spice of cinnamon. Always check that your other ingredients, like baking powder and sugar, are also gluten-free. You can change this cake based on what's in season. For fall, add chopped walnuts for a nice crunch. In summer, try using fresh berries like blueberries or raspberries. Each fruit adds its own flavor. You can also mix apples with pears for a unique twist. This keeps the cake fresh and fun all year round. To make a vegan version, replace eggs with flax eggs. Mix one tablespoon of ground flaxseed with three tablespoons of water and let it sit for five minutes. Use a vegan sour cream or unsweetened applesauce instead of regular sour cream. Replace the butter with coconut oil or vegan margarine. This way, you can enjoy a tasty cake that fits a plant-based diet. Storing your leftover Cinnamon Apple Crumble Coffee Cake is simple. First, let the cake cool completely. Then, cover it tightly with plastic wrap or foil. This helps keep the moisture in and stops the cake from drying out. You can also store it in an airtight container. It will stay fresh for up to three days at room temperature. If you want to keep it longer, consider freezing it. Freezing this cake is a great option if you want to save some for later. Start by cutting the cake into slices. Wrap each slice tightly in plastic wrap. Then, place them in a freezer-safe bag or container. Make sure to label the bag with the date. The cake can stay frozen for up to three months. When you’re ready to enjoy it, just take out the slices you need. To reheat your cake, you can use the oven or microwave. If using the oven, preheat it to 350°F (175°C). Place the slice on a baking sheet and heat for about 10 minutes. This method helps keep the cake moist. If you’re in a hurry, the microwave works too. Heat each slice for about 15-20 seconds. Just be careful not to overheat, or the cake may become tough. Enjoy your warm cake with a sprinkle of powdered sugar! Yes, you can use many types of apples. I recommend sweet varieties like Honeycrisp or Fuji. They add great flavor and sweetness. You can mix different apples for a unique taste. Tart apples, like Granny Smith, can work too. Just balance them with more sugar to keep it sweet. To make the cake moist, use more sour cream. You can add an extra 1/4 cup. This keeps the cake soft and tender. Also, don't overmix the batter. Mix just until combined. Overmixing can make the cake dry. Lastly, avoid baking it too long. Check for doneness a few minutes early. I love to serve this cake warm. A sprinkle of powdered sugar adds a nice touch. Pair it with whipped cream for extra flavor. You can also serve it with a scoop of vanilla ice cream. This makes it extra special. Enjoy it with coffee or tea for a perfect treat! In this post, I shared how to make a delicious cinnamon apple crumble coffee cake. You learned about the ingredients, step-by-step instructions, and helpful tips. I also covered variations and storage ideas. This cake tastes great any time you serve it. With simple swaps and tips, you can make it yours. Enjoy baking, and remember to share it with friends and family!

Cinnamon Apple Crumble Coffee Cake Irresistible Treat

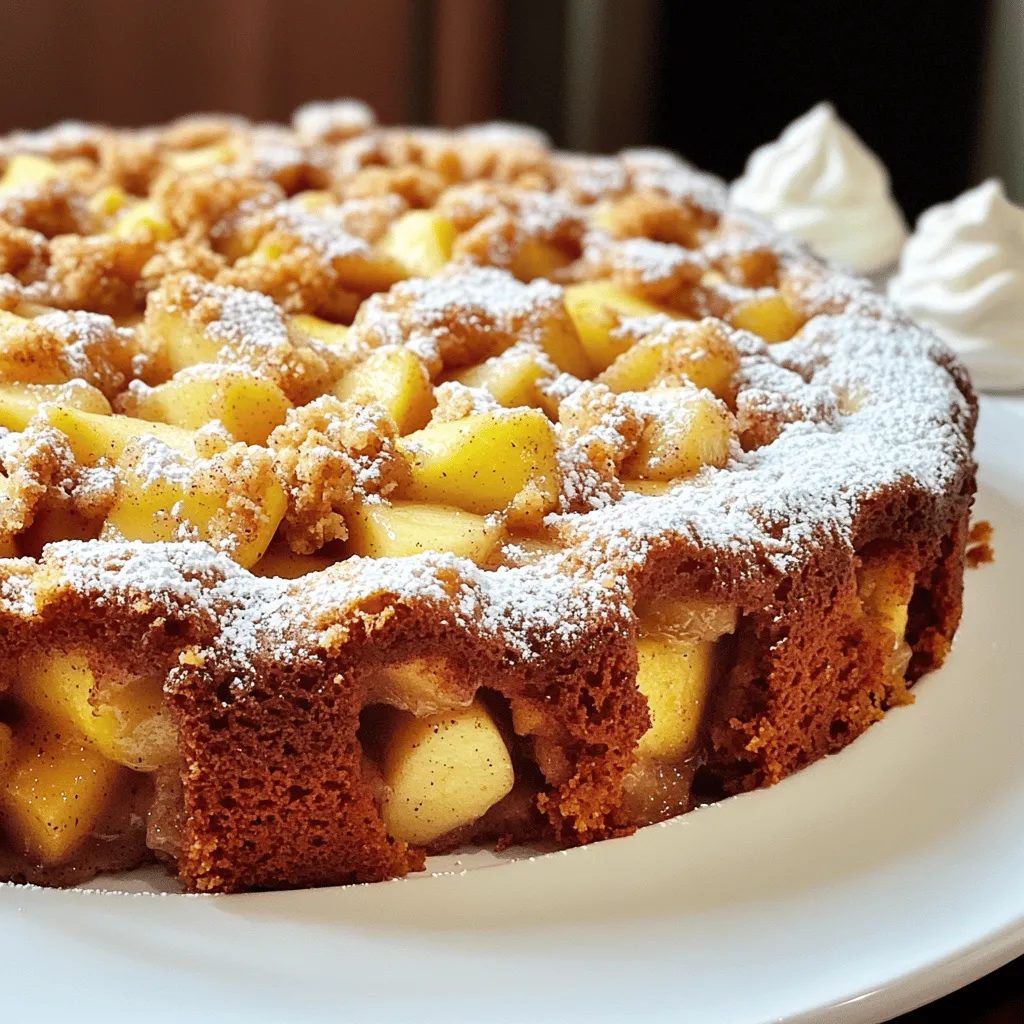
If you’re craving a sweet and cozy dessert, you’ve found it! This Cinnamon Apple Crumble Coffee Cake is the perfect

- 1 lb shrimp, peeled and deveined - 1 cup long-grain white rice - 1 medium onion, diced - 2 cloves garlic, minced - 1 red bell pepper, diced - 1 green bell pepper, diced - 1 cup corn kernels (fresh or frozen) - 2 cups chicken broth - 1 cup heavy cream - 2 tablespoons Cajun seasoning - 1 tablespoon olive oil - Salt and pepper to taste In this dish, shrimp is the star. I prefer large, juicy shrimp. They cook fast and soak up flavors well. The rice acts as a base, making the meal filling. I like using long-grain white rice for its texture. Next, we add fresh vegetables. Diced onion brings sweetness. Minced garlic adds depth. The red and green bell peppers give color and crunch. Fresh or frozen corn adds a touch of sweetness. Cajun seasoning gives this dish its bold flavor. It blends spices like paprika, cayenne, and garlic powder. Heavy cream finishes the dish, making it rich and creamy. - Fresh parsley - Extra Cajun seasoning - Crusty bread Garnishing is key for presentation. Fresh parsley adds a bright touch. A sprinkle of extra Cajun seasoning boosts the flavor. Pairing with crusty bread makes it perfect for dipping. This dish is full of flavor and easy to make. Gather the ingredients, and let’s cook! First, I heat olive oil in a large skillet over medium heat. I add the diced onion and sauté it for about 3-4 minutes. The onion should turn translucent and soft. Next, I stir in the minced garlic, red bell pepper, green bell pepper, and corn. I cook these for another 3-4 minutes until they get tender. The mix of colors and flavors is already exciting. Now, I push the veggies to one side of the skillet. On the other side, I add the peeled and deveined shrimp. I sprinkle Cajun seasoning, salt, and pepper on top of the shrimp. I cook for about 2-3 minutes on each side. When the shrimp turn pink, they are ready. I then mix everything together in the skillet. This step fills the kitchen with a lovely aroma. Next, I add the uncooked rice to the skillet. I stir it well with the shrimp and veggies. Then, I pour in the chicken broth. I bring it to a boil, cover the skillet, and reduce the heat to low. I let it simmer for about 15-20 minutes. The rice will soak up all those great flavors and become tender. Once the rice is cooked, I stir in the heavy cream. This adds a rich creaminess to the dish. I mix thoroughly to combine everything. Finally, I adjust the seasoning, adding more salt and pepper if needed. After removing it from heat, I let it sit for a couple of minutes. This helps it thicken slightly before serving. - Choosing the right Cajun seasoning: Pick a blend that suits your taste. A well-balanced mix will have herbs and spices like paprika, garlic, and cayenne. This mix gives the dish its bold flavor. - Adjusting spice level: If you like heat, add more Cajun seasoning. For less spice, use less or choose a mild blend. Remember, you can always add more later! - Timing for perfectly cooked shrimp: Cook shrimp for 2-3 minutes on each side. They should turn pink and opaque. Overcooked shrimp become tough, so keep an eye on them. - Avoiding rubbery texture: Use fresh shrimp when possible. Frozen shrimp should be thawed properly. This prevents rubbery bites. - Ensuring tender rice: Use long-grain white rice for best results. Rinse it before cooking to remove excess starch. This helps keep the rice fluffy. - Avoiding mushy rice: Follow the broth-to-rice ratio closely. Too much liquid makes the rice mushy. Keep the lid on while it simmers, and don't stir too much. {{image_2}} You can swap shrimp for chicken. Chicken thighs work well in this dish. Just cut them into bite-sized pieces. Cook them until they are golden brown. Then add your veggies and follow the same steps. Tofu is a great option for a vegetarian meal. Choose firm tofu to hold its shape. Press it to remove excess water, then cube it. Sauté it until golden, then mix it in with the veggies and seasonings. If you want to switch grains, brown rice is a good choice. It adds more fiber and has a nutty flavor. Just remember, it may take longer to cook than white rice. Quinoa is another healthy grain. It cooks faster and adds protein. Use a 1:1 ratio of quinoa to broth. For a low-carb option, try cauliflower rice. It cooks quickly and soaks up flavors well. Just add it toward the end to keep it from getting mushy. You can use different bell pepper colors to change the look and taste. Yellow or orange peppers add sweetness and a pop of color. Adding spinach or other greens boosts nutrition. Toss in a handful just before serving. They will wilt nicely without losing texture. You can also try kale or Swiss chard for extra flavor. You can keep Creamy Cajun Shrimp Rice Skillet in the fridge for up to three days. Store it in airtight containers to keep it fresh. Make sure to let it cool before sealing the container. This helps avoid soggy rice. To freeze this dish, let it cool completely first. Then, place it in a freezer-safe container. It will last up to three months in the freezer. When you’re ready to eat, thaw it in the fridge overnight. Reheat it in a skillet over low heat, adding a splash of chicken broth if needed. This keeps the rice moist. Pair this dish with a simple green salad or some crusty bread. The bread soaks up the creamy sauce well. For a wine choice, a chilled Sauvignon Blanc works great. Its crispness balances the spicy Cajun flavors perfectly. Yes, you can use frozen shrimp. Just thaw them first. Place them in cold water for 10-15 minutes. This helps them cook evenly. Frozen shrimp may also take a bit longer to cook. To add more heat, increase the Cajun seasoning. You can also add hot sauce. Red pepper flakes are another great choice. Start with a little and taste as you go. If you want a lighter option, use half-and-half or whole milk. For a dairy-free choice, try coconut cream. Silken tofu blended with a bit of water works great too. The total time for this dish is about 40 minutes. You need 10 minutes to prep and 30 minutes to cook. This makes it a quick and tasty meal for any night. This recipe blends shrimp, rice, and veggies for a tasty dish. You learned to sauté, season, and mix to get the best Cajun flavor. Stick to the tips for perfect shrimp and rice. Remember, you can swap proteins and grains to fit your taste. Store leftovers well, so you can enjoy them later. Experiment with garnishes for added flair. Enjoy making this dish at home; it’s easy and rewarding!

Creamy Cajun Shrimp Rice Skillet Flavor-Packed Dinner

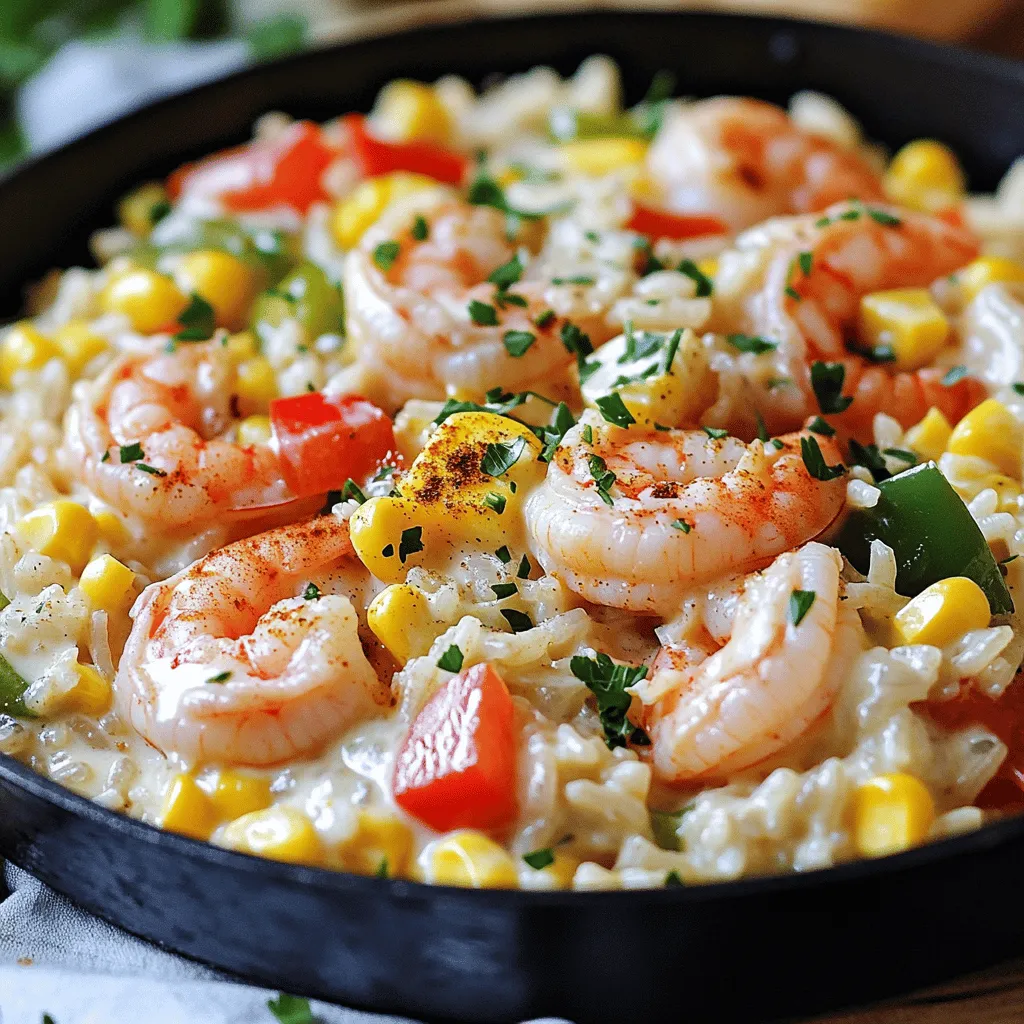
Are you ready for a flavor adventure? This Creamy Cajun Shrimp Rice Skillet will spice up your dinner routine! Packed

To make pumpkin donut holes, you need fresh and simple ingredients. Each one plays a role in making these treats soft and tasty. Here’s what you will need: - 1 cup all-purpose flour - 1/2 cup pure pumpkin puree - 1/4 cup sugar - 1/2 teaspoon baking powder - 1/2 teaspoon baking soda - 1/2 teaspoon cinnamon - 1/4 teaspoon nutmeg - 1/4 teaspoon ginger powder - 1/4 teaspoon salt - 1/2 cup plain yogurt (or buttermilk) - 1 large egg - 3 tablespoons melted butter - 1 teaspoon vanilla extract - 1/2 cup powdered sugar (for coating) - 2 tablespoons cinnamon sugar (for coating) Each ingredient adds flavor and texture. The pumpkin puree gives moisture and a lovely color. The spices, like cinnamon and nutmeg, add warmth and depth. Using yogurt or buttermilk keeps the donut holes tender. The melted butter adds richness, while the powdered sugar and cinnamon sugar create a sweet finish. Gather these items, and you’ll be ready to bake some delightful treats. 1. Preheat the oven: Start by setting your oven to 350°F (175°C). This helps the donut holes bake evenly. 2. Mix dry ingredients: In a large bowl, whisk together: - 1 cup all-purpose flour - 1/4 cup sugar - 1/2 teaspoon baking powder - 1/2 teaspoon baking soda - 1/2 teaspoon cinnamon - 1/4 teaspoon nutmeg - 1/4 teaspoon ginger powder - 1/4 teaspoon salt Make sure these are mixed well. This step is key for even flavor. 3. Mix wet ingredients: In another bowl, combine: - 1/2 cup pure pumpkin puree - 1/2 cup plain yogurt (or buttermilk) - 1 large egg - 3 tablespoons melted butter - 1 teaspoon vanilla extract Stir until the mixture is smooth and creamy. This brings moisture to the donut holes. 4. Combine wet and dry ingredients: Pour the wet mix into the dry mix. Stir gently until just combined. Avoid overmixing. This keeps the donut holes light and fluffy. 1. Fill the pan: Use a spoon or small cookie scoop to fill each section of your mini muffin or donut hole pan about 2/3 full with batter. 2. Bake in the oven: Place the pan in your preheated oven. Bake for 10-12 minutes. Check for doneness by inserting a toothpick in the center. If it comes out clean, they are ready. 3. Cool and coat the donut holes: After baking, let the donut holes cool in the pan for 5 minutes. Then, transfer them to a wire rack. While still warm, toss them in a mixture of: - 1/2 cup powdered sugar - 2 tablespoons cinnamon sugar Coat them well for a sweet finish. Enjoy these delightful bites! - Avoid overmixing the batter. When you combine wet and dry ingredients, mix just until you see no flour. This keeps the donut holes soft and fluffy. If you mix too much, they may turn out tough. - How to know when they're done baking. Use a toothpick to test doneness. Insert it into the center of a donut hole. If it comes out clean, the donut holes are ready. If it has wet batter, give them a few more minutes. - Best methods for coating. Toss the warm donut holes in a mix of powdered sugar and cinnamon sugar. This makes a sweet layer that sticks well. Make sure they are warm but not too hot, so the sugar sticks. - Alternative coatings to try. Instead of sugar, try using melted chocolate or a glaze. A maple glaze can add a nice fall twist. Just dip the tops of the donut holes in the glaze for a sweet finish. {{image_2}} You can boost the taste of pumpkin donut holes in fun ways. - Adding chocolate chips: Stir in 1/2 cup of chocolate chips for a sweet twist. The chocolate pairs well with pumpkin. Each bite will be a tasty surprise. - Using different spices: Try mixing in a dash of allspice or cloves. These spices add depth and warmth. Each spice creates a unique flavor profile. You can also adjust this recipe to fit your diet. - Gluten-free options: Use a gluten-free all-purpose flour blend. This swap keeps the texture light and fluffy. You can still enjoy the same great taste. - Vegan adaptations: Replace the egg with a flax egg. Mix 1 tablespoon of ground flaxseed with 3 tablespoons of water. Let it sit for a few minutes. Use plant-based yogurt and melted coconut oil. These swaps make the recipe vegan-friendly while keeping it delicious. To keep your pumpkin donut holes fresh, store them at room temperature. Place the donut holes in a sealed container. They will stay soft and tasty for about two days. If you want to keep them longer, refrigerate them. Use an airtight container to avoid moisture. In the fridge, they can last up to a week. You can freeze pumpkin donut holes for later enjoyment. First, let them cool completely. Next, place them in a single layer on a baking sheet. Freeze them for one hour. Once frozen, transfer them to a freezer bag. Remove as much air as possible before sealing. They will stay good for about three months. To thaw, simply leave them at room temperature for about an hour. You can also warm them in the oven for a few minutes. This will help restore their fluffy texture. You can use a flaxseed meal or applesauce as an egg substitute. For flaxseed, mix one tablespoon of ground flaxseed with three tablespoons of water. Let it sit for a few minutes until it thickens. For applesauce, use 1/4 cup in place of one egg. Both options keep the donut holes moist and tasty. Yes, you can bake these donut holes a day in advance. Store them in an airtight container at room temperature. They stay fresh and delicious. Just coat them with sugar right before serving to keep that lovely crunch. To reheat, place them in the oven at 350°F for about 5 to 7 minutes. This warms them up nicely and helps regain some crispness. You can also use the microwave, but they might get a bit soft. If you choose the microwave, heat them in short bursts of 10 seconds. This blog post shared the key ingredients and steps to make tasty pumpkin donut holes. You learned how to mix, bake, and coat them for the best flavor. Don’t forget the tips for storage and variations to explore your own styles. By following these steps, you can easily create a delicious treat to enjoy at any time. So, get baking and have fun with your donut holes!

Pumpkin Donut Holes Delightful Fall Treat Recipe

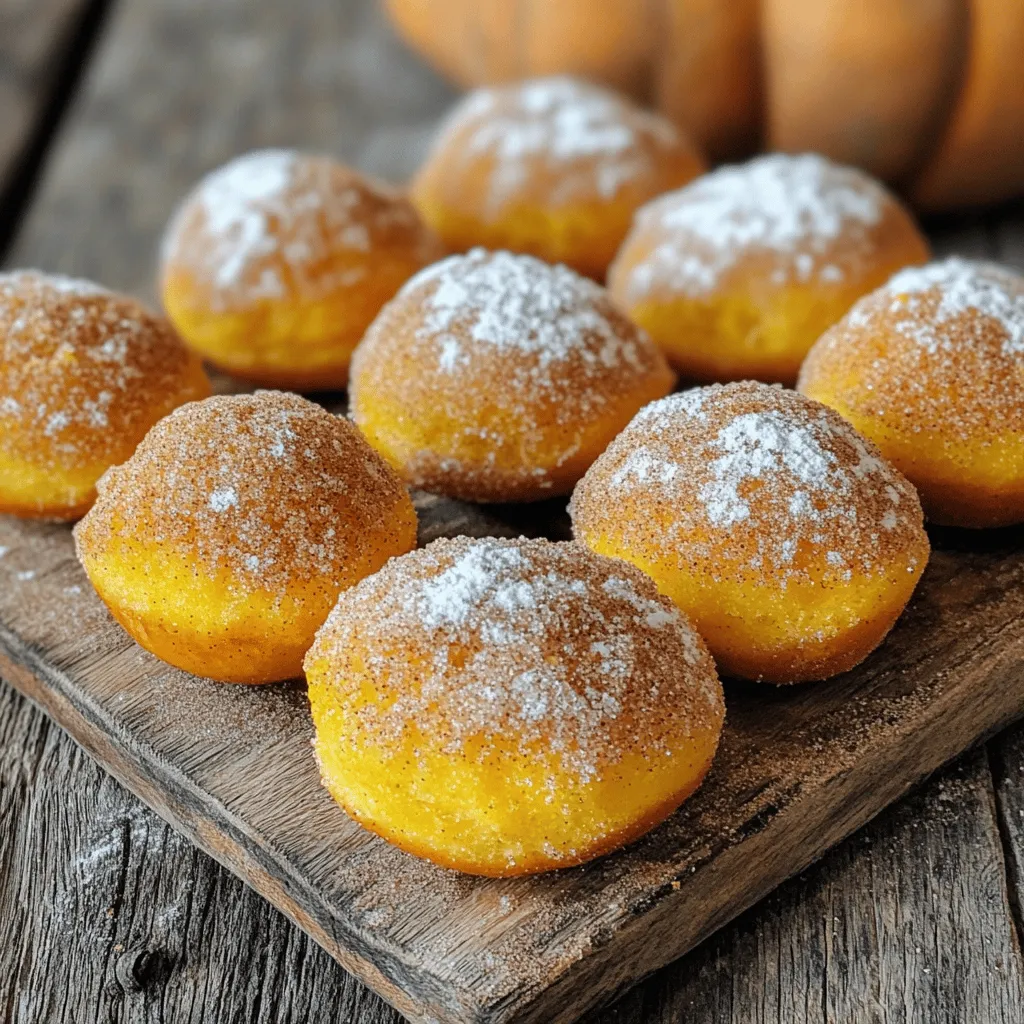
Fall is here, and it’s time to savor the flavors of the season! My Pumpkin Donut Holes recipe is a

- 1 cup graham cracker crumbs - 4 tablespoons unsalted butter, melted - 8 oz cream cheese, softened - 1 cup powdered sugar - 1 teaspoon vanilla extract - 1 cup heavy whipping cream - 2 medium apples, diced - 1/2 cup caramel sauce (plus extra for drizzling) - 1 teaspoon lemon juice - Optional: crushed nuts (e.g., pecans or walnuts) for garnish Each ingredient plays a key role in this dessert. The graham cracker crumbs create a tasty crust. Butter helps bind the crumbs together, while cream cheese gives richness and a creamy texture. Powdered sugar adds sweetness, and vanilla enhances flavor. Whipping cream makes the filling light and airy. Diced apples bring a fresh, crisp bite, and caramel sauce adds sweetness and depth. Finally, lemon juice keeps the apples bright. If you are looking for dairy-free options, you can use vegan cream cheese. Coconut cream also works well for a creamy texture. For crust alternatives, consider using crushed nuts or oats mixed with coconut oil. These options offer a tasty twist while keeping the dessert gluten-free. To start, gather your graham cracker crumbs and melted butter. In a bowl, mix them until they look crumbly and combined. This mixture will form a tasty base for your cups. Use your fingers or a spoon to press the crust firmly into the bottom of each cup. Make sure it’s even and compact. This helps the crust hold up later. Once you finish, put the cups in the fridge. This lets the crust set while you make the filling. Next, take your softened cream cheese and put it in a large bowl. Use an electric mixer to beat it until it’s smooth and creamy. Add the powdered sugar and vanilla extract, mixing until everything blends well. In a separate bowl, whip the heavy cream until stiff peaks form. This part is key for a light filling. Gently fold the whipped cream into the cream cheese mixture. Be careful not to deflate the whipped cream. This folding keeps the filling airy and lovely. Now, it’s time to layer! First, take the cups from the fridge. Spoon a layer of cheesecake filling into each cup. Follow this with a layer of diced apples tossed in lemon juice and caramel sauce. Repeat these layers until you reach the top of the cup. Finish with one last layer of cheesecake filling. Cover the cups with plastic wrap and refrigerate them for at least four hours. Chilling helps all the flavors blend well. For the best taste, chill them overnight. To get the best texture for your cheesecake filling, start with soft cream cheese. Let it sit at room temperature for about 30 minutes. This step helps it mix smoothly. When you beat it, do so until it is creamy. Add powdered sugar slowly. Mixing too fast can bring lumps. After that, whip heavy cream until stiff peaks form. Gently fold this into the cream cheese mix. Be careful not to deflate the whipped cream. This keeps the filling light and fluffy. Common mistakes can ruin your no-bake cheesecake. Avoid overmixing, as this can make the filling dense. Also, ensure your heavy cream is cold. If it’s warm, it won’t whip well. For a fun look, garnish each cup with a thin apple slice or a sprig of mint. This adds color and freshness. You can also sprinkle crushed nuts on top for a crunchy bite. Serve these cups chilled for the best flavor. The cool creaminess pairs great with the sweet caramel and tart apples. If you want to impress, drizzle extra caramel over the top just before serving. This makes each bite even more delicious. {{image_2}} You can make your No Bake Caramel Apple Cheesecake Cups even better! Adding spices is a great option. Consider mixing in some cinnamon or nutmeg. These spices give warmth and depth to the flavor. You can also play with different fruits. Try using pears or berries for a twist. If you love chocolate, mix in some mini chocolate chips. Chocolate adds richness that pairs well with the creamy cheesecake and sweet apples. If you or your guests need gluten-free options, swap out the graham crackers. Use gluten-free cookies or nuts to create a crust. This way, everyone can enjoy these tasty cups. For a vegan version, you can use plant-based cream cheese. Also, replace the heavy cream with coconut cream. This keeps the creamy texture without dairy. Use maple syrup instead of powdered sugar for sweetness. These swaps let everyone enjoy this delightful treat! After enjoying your no bake caramel apple cheesecake cups, you may have some leftovers. To keep them fresh, cover each cup with plastic wrap or place them in an airtight container. This method helps to lock in flavor and moisture. You can store them in the fridge for up to three days. If you want to keep them longer, consider freezing them. To freeze your cheesecake cups, first make sure they are completely chilled. Then, wrap each cup tightly in plastic wrap. Place the wrapped cups in a freezer-safe bag or container. They can stay frozen for up to two months. When you're ready to enjoy them, move the cups to the fridge to thaw overnight. Freezing may change the texture slightly, making them a bit denser. However, the flavors will still shine through. Drizzle extra caramel sauce on top before serving for a fresh twist! Yes, you can make these cheesecake cups ahead of time. In fact, chilling them improves the flavor. I recommend making them a day in advance. This allows the flavors to meld together. The cream cheese filling becomes richer, and the apples soak up the caramel. I suggest using Granny Smith apples. They add a nice tartness that balances the sweet caramel. Other good choices are Honeycrisp or Fuji apples. Honeycrisp offers a juicy crunch, while Fuji is sweeter. Choose apples based on your taste! To keep apples from browning, toss them with lemon juice. Just a teaspoon will do! The acid in lemon juice slows down oxidation. You can also mix the apples with caramel sauce right away. This not only prevents browning but adds flavor too. This post covered how to make delicious no-bake cheesecake cups. We explored ingredients, including their roles and substitutions for dietary needs. You learned step-by-step instructions for the crust, filling, and assembly. Tips helped ensure the perfect texture and presentation. I also shared variations and storage tips for your leftovers. Now, you can enjoy these yummy treats any time with ease and creativity. Happy baking!

No Bake Caramel Apple Cheesecake Cups Delightful Treat

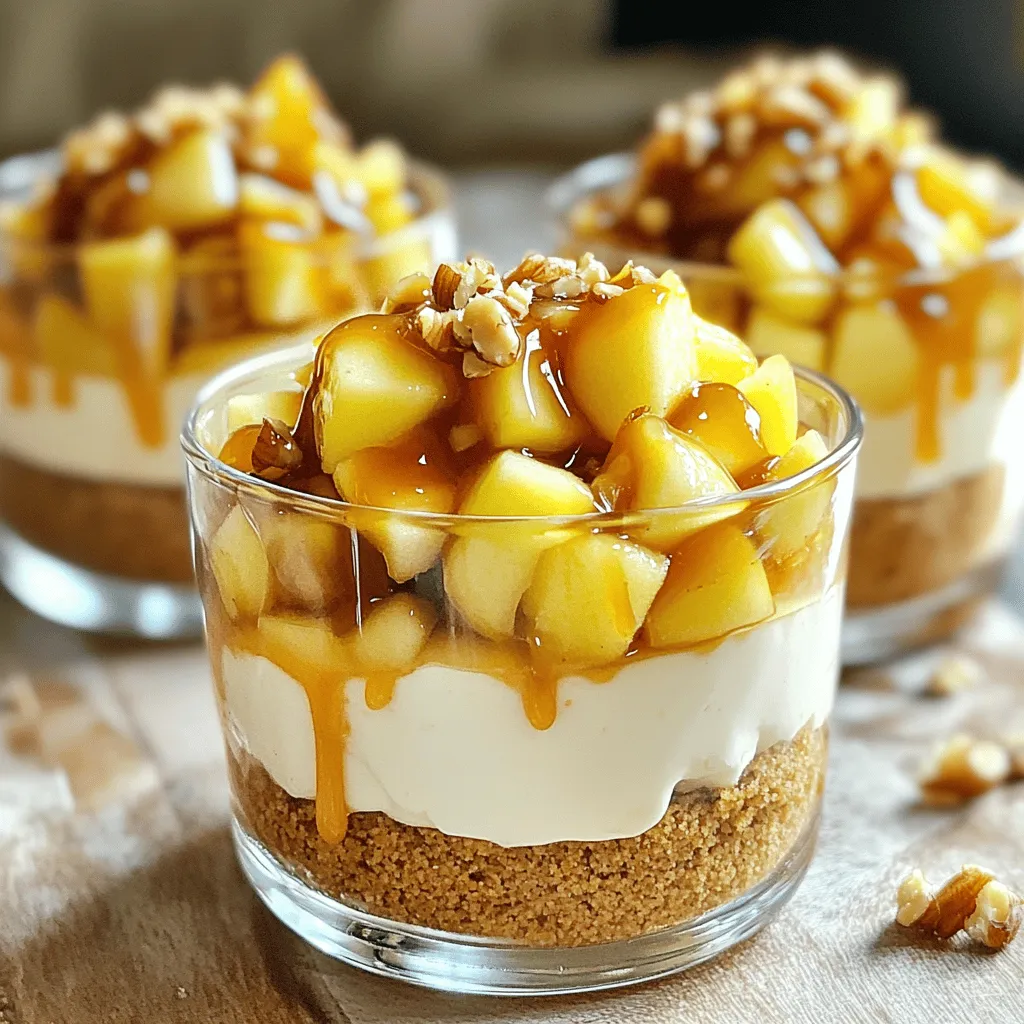
If you’re craving a sweet and creamy treat with a hint of fall, you’re in the right place! These No

- 2 large sweet potatoes - 2 tablespoons olive oil - 1 teaspoon smoked paprika - 1 teaspoon garlic powder - 1/2 teaspoon chili powder - Salt and pepper to taste - Fresh cilantro for garnish - 1/2 cup Greek yogurt - 2 tablespoons mayonnaise - 1 tablespoon chipotle in adobo sauce - 1 teaspoon lime juice - Salt to taste You need two large sweet potatoes to start. Peel them, then cut them into wedges. This shape helps them cook evenly and gives you a nice crispy outside. Next, drizzle two tablespoons of olive oil over the wedges. This oil helps the seasoning stick and adds flavor. For seasoning, add one teaspoon of smoked paprika and one teaspoon of garlic powder. These spices bring a warm, smoky flavor to the wedges. Then, add half a teaspoon of chili powder for some heat. Don’t forget to sprinkle salt and pepper to taste. Toss everything well until the wedges are coated. For the chipotle dip, you will mix half a cup of Greek yogurt and two tablespoons of mayonnaise in a bowl. This base makes the dip creamy and rich. Then, add one tablespoon of chipotle in adobo sauce. This sauce gives the dip a smoky kick. Finally, add one teaspoon of lime juice and a pinch of salt for balance. Whisk until smooth. Chop some fresh cilantro to sprinkle on top of the sweet potato wedges when serving. This adds a nice touch and a burst of freshness. Enjoy your cooking! - Preheat the air fryer to 400°F (200°C) for about 5 minutes. - In a large mixing bowl, combine the following ingredients: - 2 large sweet potatoes, cut into wedges - 2 tablespoons olive oil - 1 teaspoon smoked paprika - 1 teaspoon garlic powder - 1/2 teaspoon chili powder - Salt and pepper to taste Toss the wedges in the bowl until they are evenly coated. This step adds flavor and helps them crisp up nicely. - Place the seasoned wedges in the air fryer basket in a single layer. You may need to work in batches. - Cook for 15-20 minutes. Shake the basket halfway through cooking. This helps them cook evenly and get crispy all around. You want them tender inside and crisp outside. - In a small bowl, whisk together these ingredients: - 1/2 cup Greek yogurt - 2 tablespoons mayonnaise - 1 tablespoon chipotle in adobo sauce - 1 teaspoon lime juice - Salt to taste Mix until smooth and creamy. You can adjust the spice by adding more or less chipotle to fit your taste. This dip is a great complement to the sweet potato wedges. To get crispy sweet potato wedges, set your air fryer to 400°F (200°C). This high heat helps the wedges cook fast and turn golden. Toss them halfway through cooking. This step makes sure they crisp evenly. If you skip tossing, some wedges may stay soft. You can adjust the heat of your chipotle dip. If you like it spicy, add more chipotle in adobo sauce. For a milder dip, use less. You can swap ingredients too. Try using sour cream instead of Greek yogurt for a different taste. Adding herbs like cilantro or lime zest can give it a fresh twist. {{image_2}} You can change the flavor of your sweet potato wedges with different spices. Try adding cumin for a warm taste or cinnamon for a hint of sweetness. You can also mix in Italian herbs like oregano and thyme for a fresh twist. If you want heat, cayenne pepper or red pepper flakes work great too. You can also use other root vegetables. Carrots and parsnips roast well in the air fryer. Just cut them into similar-sized wedges for even cooking. This adds variety to your dish and keeps it fun. If you're looking for something different, try yogurt-based dips. You can mix Greek yogurt with herbs like dill or parsley. This makes a fresh and tasty dip. For a creamier option, blend in some avocado. For more heat, try a spicy ranch dressing. Blend sour cream with hot sauce for a zesty kick. You can also create a garlic aioli by mixing mayonnaise with minced garlic and lemon juice. These dips will add a new layer of flavor to your sweet potato wedges. To keep your sweet potato wedges fresh, store them in an airtight container. Place them in the fridge. They will stay good for about 3 days. When you want to eat them again, reheating is easy. Use the air fryer for best results. Set it to 350°F (175°C) and heat for about 5-7 minutes. This keeps them crispy. For the chipotle dip, store it in a separate airtight container. This dip stays fresh for about one week in the fridge. To keep it tasting great, make sure to use a clean spoon each time. If you notice any change in smell or color, it’s best to toss it out. Enjoy your tasty dip while it’s fresh! Air fryer sweet potato wedges take about 15 to 20 minutes to cook. Preheat your air fryer to 400°F (200°C). Place the seasoned wedges in the basket in a single layer. Shake the basket halfway through cooking to ensure they cook evenly. They will be crispy outside and tender inside. Yes, you can use other types of potatoes. Russets and Yukon Gold potatoes work well too. Just adjust the cooking time as needed. They may take a few minutes longer to cook, so check for doneness by piercing with a fork. Chipotle dip pairs well with various foods. Try serving it with fresh veggies like carrots and celery. It also goes great with tortilla chips or pita bread. For a heartier option, serve it alongside grilled chicken or fish. It’s versatile and adds a spicy kick to any dish. You learned how to make tasty air fryer sweet potato wedges and a chipotle dip. The steps are easy: prepare the ingredients, cook them in the air fryer, and mix the dip. Add your favorite flavors to the wedges or dip for fun twists. Store leftovers properly to keep them fresh. Enjoy this delicious snack that is simple and full of flavor. You’ll impress family and friends every time!

Air Fryer Sweet Potato Wedges With Chipotle Dip Delight

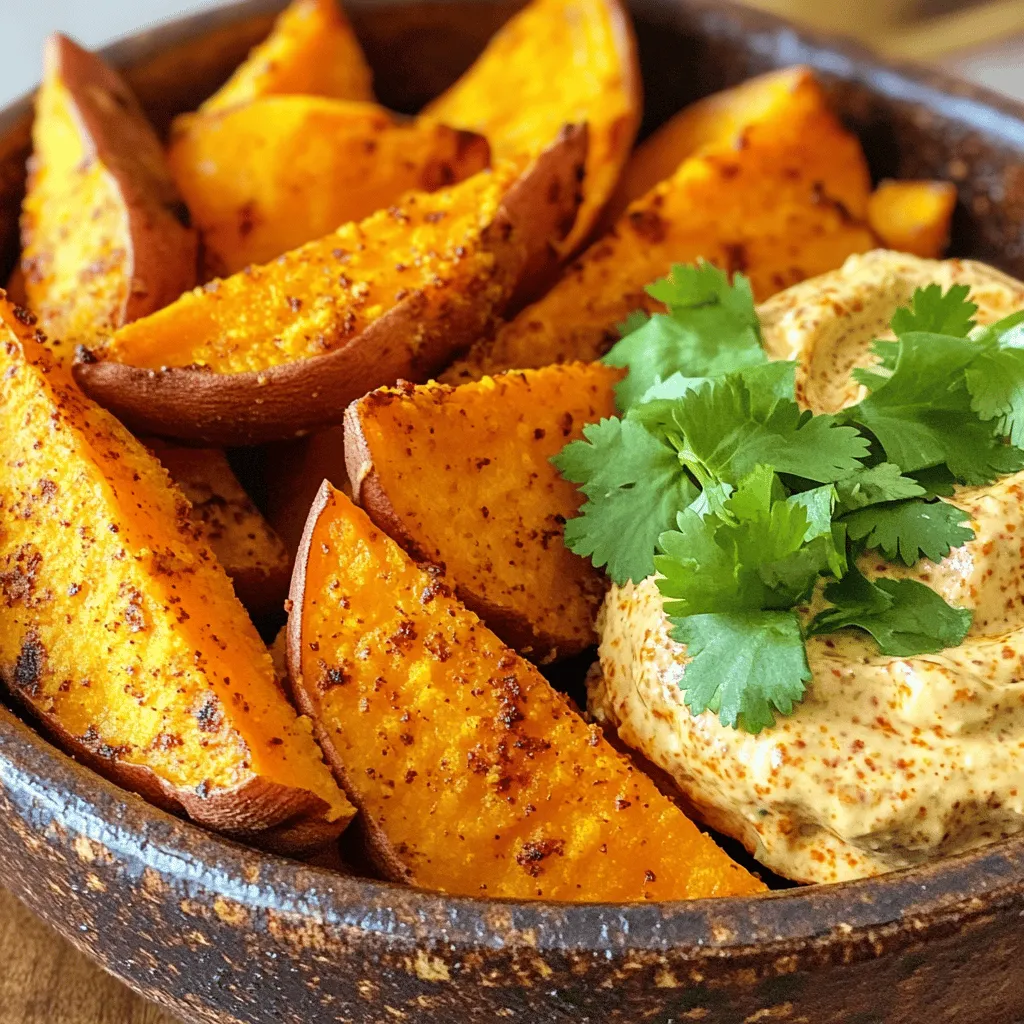
Get ready to savor a delicious snack with my Air Fryer Sweet Potato Wedges With Chipotle Dip Delight! These crispy

To make the perfect Pumpkin Oatmeal Latte, gather these simple ingredients: - 1 cup rolled oats - 2 cups water - 1 cup milk (dairy or non-dairy) - 1/2 cup pumpkin puree - 2 tablespoons maple syrup (or honey) - 1 teaspoon pumpkin pie spice (or a mix of cinnamon, nutmeg, and ginger) - 1/2 teaspoon vanilla extract - Pinch of salt - Whipped cream (optional for topping) - Cinnamon stick (optional for garnish) These ingredients blend together to create a rich and cozy drink that warms the soul. Each serving of this Pumpkin Oatmeal Latte offers you a tasty mix of nutrients. Here’s a quick breakdown of what you get: - Calories: Approximately 250 per serving - Protein: About 8 grams - Fiber: Around 5 grams - Sugars: Roughly 10 grams (if using maple syrup) The oats and pumpkin provide fiber, while milk adds protein. This drink can keep you full and energized. You can adjust this recipe based on what you have at home or your dietary needs. Here are some easy swaps: - For oats, you can use quick oats. Just adjust the cooking time. - Any milk works! Use almond, soy, or oat milk for a dairy-free option. - Maple syrup can be swapped with agave syrup or brown sugar. - If you lack pumpkin pie spice, mix equal parts cinnamon and nutmeg. These substitutions keep the recipe flexible while still being delicious! 1. Start by boiling 2 cups of water in a medium pot. 2. Once boiling, add 1 cup of rolled oats and a pinch of salt. 3. Lower the heat and simmer for 5 to 7 minutes. Stir often until the oats are creamy. 4. In another saucepan, combine 1 cup of milk, 1/2 cup of pumpkin puree, and 2 tablespoons of maple syrup. 5. Add 1 teaspoon of pumpkin pie spice and 1/2 teaspoon of vanilla extract. 6. Heat this mix over medium-low heat until warm. Don't let it boil. 7. Once your oats are done, mix them with the pumpkin milk mixture. Stir until creamy. 8. Remove from heat and pour into mugs. 9. If you like, top with whipped cream and a sprinkle of cinnamon. 10. For a fun touch, add a cinnamon stick or a little nutmeg on top. To make your latte extra creamy, use whole milk or a rich non-dairy milk like oat milk. If you want a sweeter taste, add more maple syrup or honey. Adjust the pumpkin pie spice to suit your taste. You can even add a pinch of salt to enhance the flavors. Serve your Pumpkin Oatmeal Latte warm in your favorite mugs. This drink is great for sharing, so make two servings. You can enjoy it with a slice of pumpkin bread or a cookie. Each sip will warm you up and brighten your day! To make your pumpkin oatmeal latte even creamier, use whole milk or a rich non-dairy milk, like oat or coconut. You can also add a bit of cream or half-and-half. Another great trick is to blend the mixture after heating. This adds air and makes it fluffy. Just pour the latte into a blender and pulse it a few times. Maple syrup is a great choice, but you can also try honey or agave. If you want less sugar, use a sugar substitute like stevia or monk fruit. For a fun twist, add a spoonful of brown sugar for a deeper flavor. Taste your latte as you go. Adjust the sweetness to fit your own taste. You can prepare the oatmeal ahead of time. Cook it and store it in the fridge for up to three days. When you're ready, heat it on the stove or in the microwave. Then, mix in the pumpkin milk. This saves time on busy mornings. You can enjoy a warm drink without the fuss! {{image_2}} To make a vegan pumpkin oatmeal latte, swap the milk for a plant-based option. Almond, oat, or coconut milk work great. Use maple syrup for sweetening. This version keeps all the rich pumpkin flavor without dairy. It’s creamy and satisfying. You can enjoy it just like the original recipe. On hot days, try an iced pumpkin oatmeal latte. Start by making the oatmeal as normal. After cooking, let it cool. Then, pour it over ice in a tall glass. Add cold milk and pumpkin mixture. Stir well and enjoy a refreshing twist. It’s perfect for warm afternoons. For a spicy pumpkin oatmeal latte, increase the spice! Add more pumpkin pie spice or a pinch of cayenne. This gives the latte a warm kick. You can also add a dash of black pepper for extra heat. This version warms you up from the inside out. It’s a lovely twist for spice lovers. You can keep your pumpkin oatmeal latte in the fridge. Store it in a sealed container. It stays fresh for up to three days. Just give it a good stir before you serve it again. The oats may soak up some liquid, so you might need to add a splash of milk. If you want to save some for later, freezing works too! Pour the cooled latte into an airtight container. Freeze it for up to one month. When you're ready to eat, thaw it in the fridge overnight. This way, it keeps the flavors and texture. To reheat your pumpkin oatmeal latte, pour it into a pot. Heat it gently over low to medium heat. Stir it often until it's warm. You can also use a microwave. Heat in short bursts, mixing in between. This keeps it smooth and delicious. Yes, you can use any milk you like. Almond, oat, or soy milk works well. Each adds its own flavor. If you want a creamier taste, try whole milk or coconut milk. Just make sure it’s unsweetened if you are watching your sugar. Absolutely! You can skip the maple syrup. Instead, use a sugar substitute like stevia or erythritol. These options keep the sweetness without the calories. You can also use unsweetened pumpkin puree for a lower-sugar choice. Pumpkin is packed with vitamins and nutrients. It is high in vitamin A, which helps your eyes. It has fiber, which is great for digestion. Plus, it is low in calories, making it a healthy option. The spices also add benefits, like boosting your immune system. So, this latte is not just tasty but also good for you! We covered the key ingredients for the pumpkin oatmeal latte and shared prep steps. You learned tips for creaminess and flavor, plus how to store it. Variations like a vegan or iced option add fun. You can easily adapt this drink to fit your needs. Enjoy creating new flavors while benefiting from pumpkin's health perks. Try these steps, and make your perfect latte!

Pumpkin Oatmeal Latte Rich and Cozy Delight

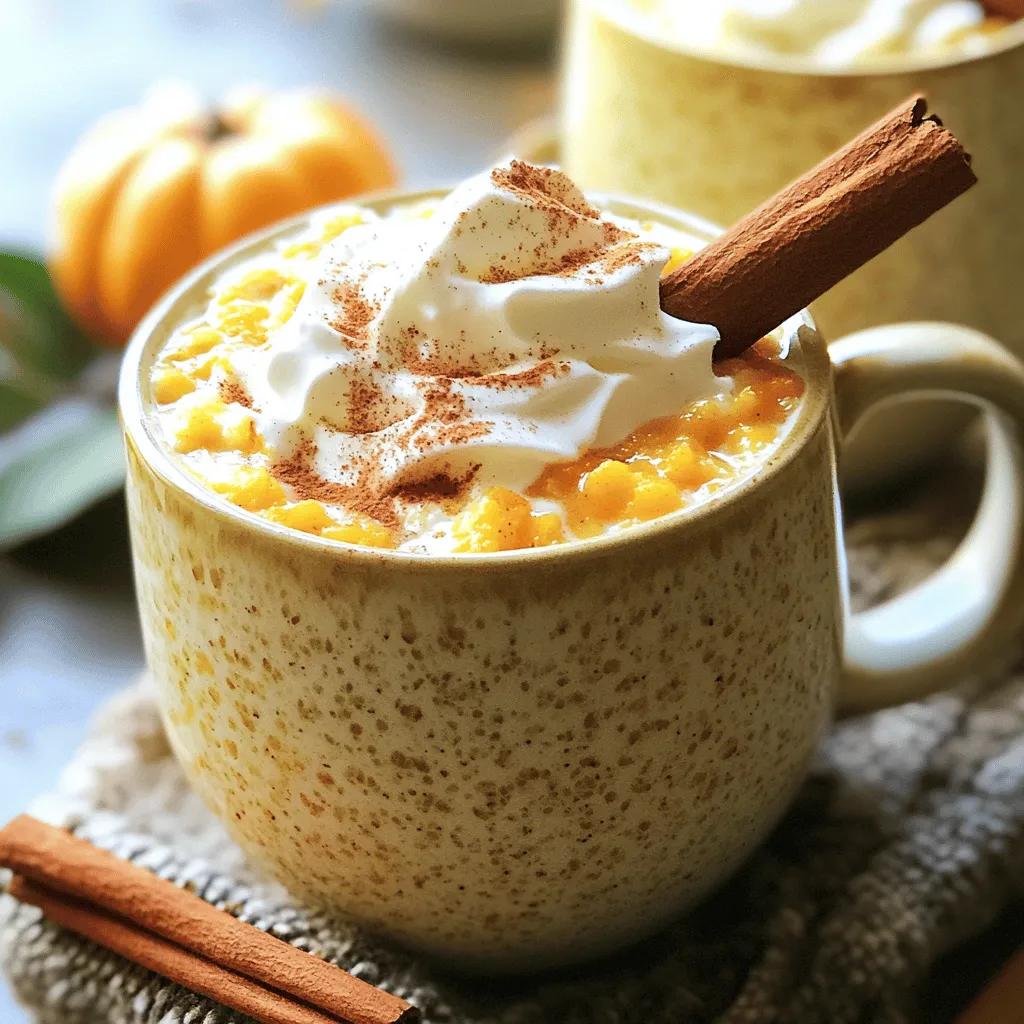
Fall brings the perfect season to enjoy a Pumpkin Oatmeal Latte, a warm and cozy drink that delights the senses.

For a rich and tasty soup, gather these fresh ingredients: - 4 cups fresh broccoli florets - 1 cup carrots, diced - 1 cup celery, diced - 1 medium onion, finely chopped - 3 cloves garlic, minced These veggies bring color and crunch to the dish. Broccoli is the star, while carrots and celery add sweetness. Onion and garlic provide a strong base for flavor. Next, we need broth and dairy to create creaminess: - 4 cups vegetable broth - 1 cup heavy cream - 2 cups sharp cheddar cheese, shredded Vegetable broth gives depth without adding meat. Heavy cream makes the soup smooth. Sharp cheddar cheese melts in beautifully, giving that classic cheesy flavor. Finally, add these seasonings and oils for taste: - 1 teaspoon dried thyme - Salt and pepper to taste - 2 tablespoons olive oil Dried thyme adds an earthy note. Salt and pepper enhance all the flavors. Olive oil is great for sautéing the veggies, making them extra tasty. Start with a skillet over medium heat. Pour in the olive oil. Add the chopped onion, garlic, diced carrots, and diced celery. Sauté these aromatics for about 5 minutes. You want them soft but not browned. This step builds a rich base for your soup. Next, transfer these cooked veggies to your slow cooker. Now, add the fresh broccoli florets and pour in the vegetable broth. This broth gives the soup its flavor. Stir in dried thyme, salt, and pepper to taste. These seasonings enhance the soup’s warmth and depth. Cover the slow cooker with its lid. Now it’s time to choose your cooking setting. For a low setting, cook the soup for 6 to 8 hours. If you’re short on time, use the high setting for 3 to 4 hours. The goal is tender vegetables, so check them after the cooking time. After cooking, I like to use an immersion blender to puree the soup. Blend it until you reach your desired texture. You can make it smooth or keep it a bit chunky—it's up to you. Now, stir in the heavy cream and shredded cheddar cheese. This makes the soup rich and creamy. Mix until the cheese melts and blends in. Taste your soup and adjust the salt and pepper if needed. Serve your soup hot. If you like, add croutons and chopped chives on top for a nice finish. Enjoy your homemade broccoli cheddar soup! Using homemade vegetable broth boosts the taste of your soup. It adds depth and freshness. You can make it easily with scraps and water. Just simmer them for a few hours. If you’re short on time, store-bought broth is fine, too. You can add other seasonings for extra flavor. A pinch of paprika or a dash of cayenne gives a nice kick. Fresh herbs like parsley or dill can brighten up the soup. Don’t be afraid to experiment with spices you love! Decide if you want a smooth or chunky soup. For a smooth texture, blend it well with an immersion blender. If you like some bits, blend less. This choice makes the soup your own. The best tools for blending are immersion blenders. They are easy to use and clean. If you want, you can use a regular blender. Just let the soup cool a bit before blending it in batches. Garnishing your soup makes it look special. Croutons add crunch, while chopped chives bring color. You can also use a drizzle of cream for a fancy touch. Pair the soup with sides like a simple salad or crusty bread. A grilled cheese sandwich is also a great match. These add texture and make the meal complete. {{image_2}} You can make this soup even better! Add more vegetables for extra nutrition. Try spinach, peas, or even cauliflower. These vegetables blend well and boost the flavor. Want some protein? You can add cooked chicken or beans. Shredded rotisserie chicken works great. For a plant-based option, mix in black beans or chickpeas. These add protein and make the soup heartier. Not a fan of sharp cheddar? No problem! You can use mild cheddar or gouda. Both melt well and add creamy goodness. If you want a dairy-free option, try vegan cheese. Look for brands that melt nicely. Nutritional yeast is another option. It gives a cheesy flavor without dairy. For a different taste, use chicken broth instead of vegetable broth. This adds a richer flavor to the soup. If you need a gluten-free version, check your broth label. Some broths have gluten, but many do not. Always choose gluten-free options to stay safe. To store leftovers, let the soup cool first. Then, pour it into an airtight container. Make sure to seal it well. Place it in your fridge. The soup will stay fresh for up to four days. If you want to enjoy it later, consider freezing it. For freezing, choose a freezer-safe container. Leave some space at the top. Soup expands when frozen. It can last in the freezer for up to three months. When you're ready to eat, simply thaw it in the fridge overnight. To reheat, use a pot on low heat. Stir often to prevent sticking. You can also microwave it in a bowl. Cover it loosely to avoid splatters. For best taste and texture, add a splash of cream or broth while reheating. This keeps the soup creamy and delicious. Yes, you can make this soup ahead of time. To prep, chop your veggies and store them in the fridge. You can sauté the onions, garlic, carrots, and celery a day before. Store them in an airtight container. When you are ready, just add everything to the slow cooker. This method saves time and keeps your flavors fresh. To make this soup vegan, swap the heavy cream with coconut milk or cashew cream. Use vegan cheese instead of cheddar. For broth, choose a plant-based vegetable broth. These swaps keep the soup creamy and delicious without any dairy. This soup pairs well with crusty bread or a fresh salad. You can also serve it with grilled cheese sandwiches for a classic combo. Add croutons on top for crunch, or sprinkle with chopped chives for a pop of color. These sides enhance the meal and make it even more enjoyable. In this post, we explored how to make a delicious Slow Cooker Broccoli Cheddar Soup. We discussed fresh ingredients, like broccoli and carrots, and important components, including broth and cheese. I shared step-by-step instructions for preparing, slow cooking, and finishing the soup. Remember to enhance flavors and adjust the texture to your liking. You can make variations with different cheeses or proteins. This soup is easy to store and reheat, making it perfect for meal prep. Enjoy making your own tasty soup that warms both your heart and stomach.

Savory Slow Cooker Broccoli Cheddar Soup Recipe

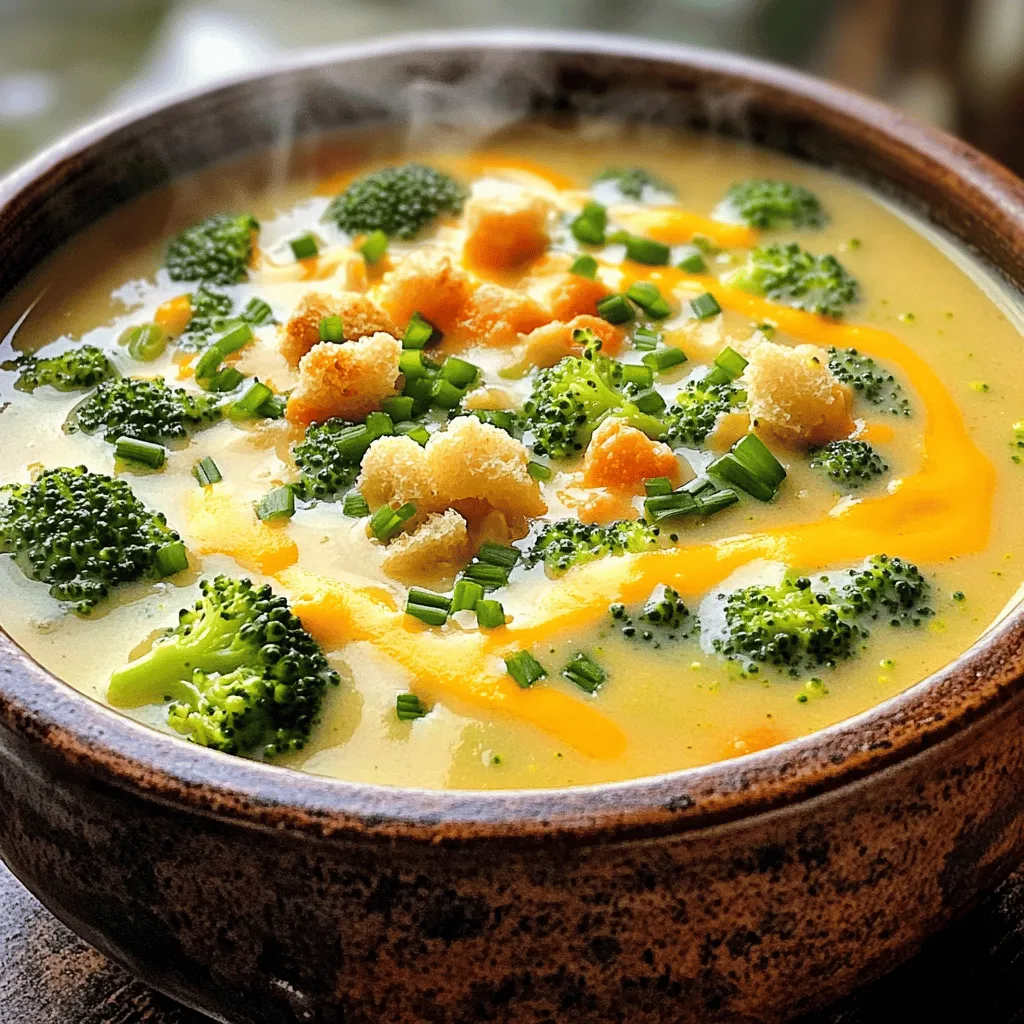
Craving a warm and cheesy bowl of soup? This Savory Slow Cooker Broccoli Cheddar Soup is your answer. I’ll show

- 4 salmon fillets - 1/4 cup pure maple syrup - 2 tablespoons soy sauce (or tamari for gluten-free) - 1 tablespoon Dijon mustard - 1 teaspoon garlic powder - 1 teaspoon onion powder - 1/2 teaspoon black pepper - 1 medium zucchini, sliced - 1 red bell pepper, chopped - 1 cup baby carrots - 1 tablespoon olive oil - 1 tablespoon fresh parsley, chopped (for garnish) This recipe shines with fresh ingredients. The salmon fillets are the star of the show. They provide a rich flavor and healthy fats. Pure maple syrup adds sweetness and depth. It pairs perfectly with soy sauce and Dijon mustard. These sauces balance out the dish with savory notes. The veggies bring color and crunch. Zucchini, red bell pepper, and baby carrots are great choices. Each adds its own unique texture and taste. Olive oil helps to crisp them up while baking. The fresh parsley at the end adds a burst of freshness and color. Using quality ingredients makes a big difference. Choose wild-caught salmon for better taste and health. Fresh veggies will provide the best texture. This mix of flavors and textures creates a delightful meal. Enjoy the process of preparing this dish! - Preheat the Oven: Start by preheating your oven to 400°F (200°C). This step is key to cooking the salmon and veggies evenly. - Making the Maple Glaze: In a small bowl, mix together 1/4 cup of pure maple syrup, 2 tablespoons of soy sauce (or tamari), 1 tablespoon of Dijon mustard, 1 teaspoon of garlic powder, 1 teaspoon of onion powder, and 1/2 teaspoon of black pepper. Whisk until everything is well blended. This glaze adds a sweet and savory kick to the dish. - Arranging the Vegetables: Grab a large sheet pan and lay out 1 medium zucchini (sliced), 1 chopped red bell pepper, and 1 cup of baby carrots. Drizzle them with 1 tablespoon of olive oil. Toss the vegetables to coat them evenly and spread them out in a single layer. This helps them cook well and get nice and tender. - Adding the Salmon Fillets: Now, place 4 salmon fillets on the sheet pan among the veggies. Pour half of the maple glaze over the salmon. Make sure to coat each fillet well, as this will enhance the flavor during baking. - Baking the Dish: Slide the sheet pan into the preheated oven and bake everything for 15 minutes. The salmon will cook through, and the veggies will soften nicely. - Glazing and Broiling the Salmon: After 15 minutes, take the pan out of the oven. Brush on the remaining maple glaze over the salmon and veggies. Switch your oven to broil and put the pan back in for another 2-3 minutes. This step caramelizes the glaze and gives the salmon a beautiful finish. Keep an eye on it to avoid burning. Flavor Enhancements To boost the maple glaze, consider adding a splash of lemon juice. This brightens the flavor and balances the sweetness. You can also mix in fresh ginger for a spicy kick. For those who love heat, try adding a pinch of cayenne pepper. Each of these additions can transform your glaze into something special. Common Mistakes to Avoid A common mistake is pouring all the glaze at once. Save half for later. This step helps keep the salmon moist and adds a nice finish. Another mistake is not whisking the glaze enough. Ensure all ingredients blend well. Skipping this step can lead to uneven flavor. How to Check Doneness To check if your salmon is done, look for the color change. The flesh should be opaque and easily flake with a fork. If you have a food thermometer, aim for 145°F (63°C) in the thickest part. Don't overcook it; salmon can dry out quickly. Ensuring Crispy Vegetables For crispy veggies, cut them into even pieces. This helps them cook uniformly. Make sure they are in a single layer on the sheet pan. Overcrowding can steam them instead of roasting. Toss them with olive oil, but don’t soak them. This keeps them crisp and tasty. {{image_2}} You can change the veggies in this dish to suit your taste. Seasonal options bring fresh flavors. Try asparagus in spring or sweet potatoes in fall. Both add different textures and tastes. Nutritional considerations are also key. Broccoli is high in vitamins. Cauliflower offers fiber and can absorb flavors well. Brussels sprouts give a nice crunch and are super healthy. Choose what you like best for a fun mix. Sweet and spicy variations can make this dish exciting. Add a touch of chili flakes for heat. You could also mix in some sriracha with the glaze. This adds a kick but keeps the sweetness from the maple. Diet-friendly substitutions help too. For a lower-carb option, swap out maple syrup for a sugar-free version. You can also use coconut aminos instead of soy sauce for a gluten-free twist. These changes keep the meal tasty while fitting your diet needs. To keep your sheet pan maple glazed salmon and veggies fresh, follow these tips: - Best Practices for Refrigeration: Allow the dish to cool for about 30 minutes. Place leftovers in airtight containers. Store in the fridge for up to 3 days. This helps keep the flavors strong and the salmon moist. - Freezing Instructions: If you want to freeze, make sure to cool the dish first. Use freezer-safe bags or containers. This dish can last up to 2 months in the freezer. When ready to eat, thaw it overnight in the fridge before reheating. Reheating the salmon and veggies right can keep them tasty. - Best Methods for Reheating: The oven is the best way. Preheat it to 350°F (175°C). Place the salmon and veggies on a baking sheet. Heat for about 10-15 minutes. You can also use a microwave for quick reheating. Just cover it to keep moisture in. - Maintaining Flavor and Texture: To keep the salmon from drying out, add a splash of water or broth when reheating. This will help keep the glaze nice and sticky. Always check the temperature to ensure it's heated through. Enjoy your leftovers just as much as the first meal! Can I use frozen salmon? Yes, you can use frozen salmon. First, thaw it completely in the fridge. Once thawed, pat it dry with paper towels. This helps the glaze stick better. Using frozen salmon may change the cooking time slightly, so check for doneness. How can I make this recipe gluten-free? To make this recipe gluten-free, substitute soy sauce with tamari. Tamari is a gluten-free soy sauce. All other ingredients in the recipe are already gluten-free, so you can enjoy this dish worry-free. What to serve with sheet pan salmon? I recommend serving the salmon with rice or quinoa. These grains soak up the glaze well. You can also pair it with a fresh salad or steamed broccoli for a balanced meal. Can I prepare the glaze in advance? Yes, you can prepare the glaze ahead of time. Store it in the fridge for up to three days. Just give it a quick stir before using, as the ingredients may settle. This saves time and makes meal prep easier. This post covered how to cook delicious sheet pan salmon. We discussed key ingredients, simple steps, and helpful tips. You learned about making a tasty maple glaze and how to check if the salmon is done. I shared variations to keep meals exciting and storage tips for leftovers. Remember, this dish is easy to adapt and perfect for any table. Enjoy your cooking adventures!

Sheet Pan Maple Glazed Salmon Veggies Delight

Are you ready to enjoy a delicious and easy meal? In this blog, I will show you how to make

- 1 cup unsweetened shredded coconut - 1 cup almond flour - 1/4 cup maple syrup - 1/4 cup coconut cream - 1 teaspoon vanilla extract - A pinch of salt - 1/2 cup dark chocolate chips (dairy-free option) - Extra shredded coconut for rolling To make No-Bake Coconut Cream Balls, gather these ingredients first. Unsweetened shredded coconut gives the balls a rich coconut flavor. Almond flour adds a nice texture. Maple syrup provides sweetness, while coconut cream keeps them moist and creamy. Vanilla extract boosts the taste. A pinch of salt helps balance the flavors. You can use dark chocolate chips to coat the balls, and there's a dairy-free option if needed. The extra shredded coconut is for rolling the finished balls. Having everything ready makes the process smooth and fun. This recipe is quick and easy. You only need a mixing bowl and a tray. Once you have your ingredients, you can create a tasty treat in no time! {{ingredient_image_1}} First, gather your bowl and all your ingredients. Add the shredded coconut and almond flour. Next, pour in the maple syrup, coconut cream, and vanilla extract. Don’t forget the pinch of salt! Mix everything well until you have a sticky dough. This dough should hold together but not be too wet. If it feels too dry, you can add a tiny bit more coconut cream. Now it’s time to shape the dough. Take small portions, about the size of a golf ball. Roll each piece into a nice 1-inch ball. Place the balls on a tray lined with parchment paper. This helps prevent sticking and makes cleanup easy. Once all the balls are shaped, place the tray in the refrigerator. Let them chill for about 30 minutes. This will help them firm up. While your coconut balls chill, melt the dark chocolate chips. Use a microwave-safe bowl and microwave in 20-second bursts, stirring well each time. Once smooth, remove the balls from the fridge. Dip each ball in the melted chocolate, making sure they are fully coated. Roll them in extra shredded coconut for a nice touch. Put them back on the tray and chill for another 15 minutes to set the chocolate. Enjoy your tasty treat! Using coconut cream is key for a rich flavor. It helps the balls stay moist. If you want to adjust sweetness, maple syrup is your best friend. Start with 1/4 cup, then taste. Add a bit more if you like it sweeter. To melt chocolate, break it into small pieces. Use a microwave-safe bowl. Heat in 20-second bursts, stirring in between. This keeps the chocolate from burning. If you're out of dark chocolate, try using white chocolate or yogurt. Both work well for coating. For a fun touch, roll the balls in extra shredded coconut. It adds texture and looks pretty. You can serve these at parties on a nice plate. They make a great treat for guests of all ages! Pro Tips Use Fresh Ingredients: Always opt for fresh and high-quality coconut and almond flour to enhance the flavor and texture of your coconut cream balls. Chill for Better Coating: Chilling the coconut balls before dipping in chocolate helps the chocolate adhere better and gives a smoother finish. Experiment with Flavors: Feel free to add other extracts like almond or coconut for a unique twist on your coconut cream balls. Storage Tips: Store the finished coconut cream balls in an airtight container in the refrigerator to keep them fresh and delicious for up to a week. {{image_2}} You can boost the flavor of your No-Bake Coconut Cream Balls in fun ways. Try adding cocoa powder to create a chocolate version. Just mix in a few tablespoons with the other dry ingredients. You can also add spices like cinnamon or nutmeg for a warm twist. Another great idea is to incorporate nuts or seeds. Chopped almonds or walnuts add a nice crunch. You can also try chia seeds or pumpkin seeds for extra nutrition. If you prefer natural sweeteners, honey or agave nectar work well. They can replace maple syrup in equal amounts. Just remember, honey adds its own unique flavor. Adjust the sweetness to your taste. This works great for different diets too. If you need it vegan, stick with maple syrup or agave. Each sweetener brings its own charm to these treats. Coating your coconut balls can change their look and texture. Rolling them in chopped nuts gives a nice crunch and flavor. It also adds a pretty finish. You can also use white chocolate or a yogurt coating. Melt them like you do with dark chocolate. Dip your coconut balls in them for a creamy outer layer. It’s a sweet treat that pops with flavor! To keep your No-Bake Coconut Cream Balls fresh, store them in the fridge. Use an airtight container. They can last up to a week when stored this way. If you want to keep them longer, freezing works well too. Just place them in a freezer-safe bag. They can stay good for a month in the freezer. These coconut balls taste best when cold. Serve them straight from the fridge for a refreshing bite. They also pair nicely with other desserts. Try them with fresh fruit or a scoop of dairy-free ice cream. You can even serve them at parties as a sweet treat. No-Bake Coconut Cream Balls can last about one week in the fridge. Make sure to store them in an airtight container. This keeps them fresh and tasty for longer. If you want to keep them longer, you can freeze them. They can stay in the freezer for up to three months. Just remember to let them thaw in the fridge before enjoying them again. Yes, you can use other types of flour. Coconut flour works well, but you will need less. Start with 1/3 cup and adjust as needed. You can also use oats ground into flour for a different texture. Just make sure the flour you choose suits your taste and diet. If you don't have maple syrup, honey is a great substitute. You can also use agave nectar or brown rice syrup. Each option adds a unique flavor. Just remember that honey is not vegan, while agave is a good choice for vegans. Yes, these coconut balls are gluten-free! The main ingredients like almond flour and shredded coconut contain no gluten. This makes them safe for those with gluten sensitivities. Always check your labels to ensure the ingredients are labeled gluten-free, just to be safe. To make these coconut balls vegan, simply use maple syrup instead of honey. Also, choose dairy-free chocolate chips for coating. Most dark chocolate chips are naturally dairy-free, but it’s good to check the label. With these swaps, you have a tasty vegan treat! You’ve learned how to make delicious No-Bake Coconut Cream Balls. We covered key ingredients like coconut cream and maple syrup, and I shared step-by-step instructions for mixing, shaping, and chilling. Remember to adjust sweetness and try different coatings for fun variations. Proper storage helps keep them fresh for longer. With these tips, you can enjoy tasty treats anytime. Try making them for your next party or snack!

No-Bake Coconut Cream Balls Easy and Tasty Treat

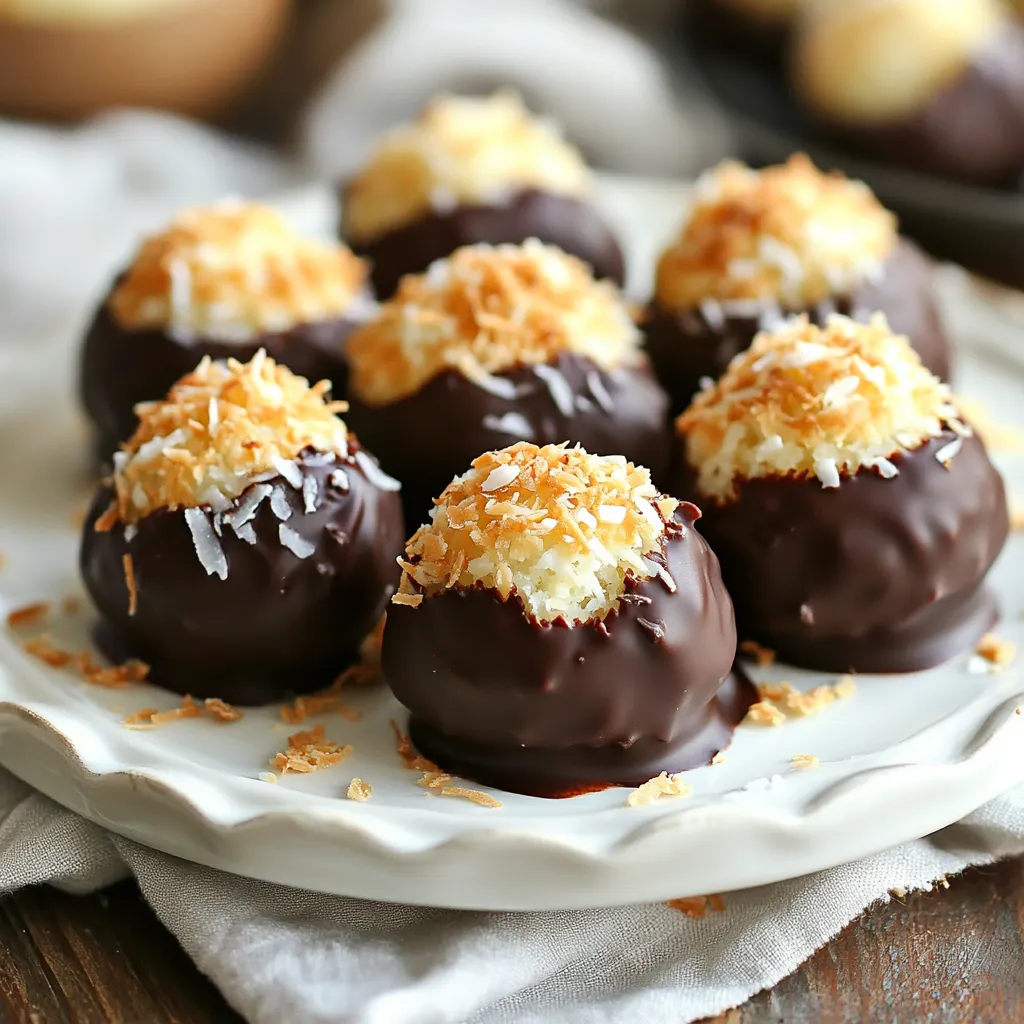
If you’re craving a sweet treat without turning on the oven, you’re in luck! These No-Bake Coconut Cream Balls are

Older posts
Newer posts
← Previous Page1 … Page18 Page19 Page20 … Page130 Next →

dsad

© 2025 Emmas Dish • Built with GeneratePress

Our Policies

  • Copyright Policy
  • Cookie Policy
  • GDPR Policy
  • Privacy Policy
  • Disclaimer
  • Terms Of Use

More Information

  • Home
  • About
  • Contact
  • Appetizers
  • Dessert
  • Dinner
  • Drinks
©2025, Emmas Dish About Back To Top