Skip to content
DisclaimerTerms Of UseGDPR PolicyCookie Policy

Emmas Dish

  • Home
  • Drinks
  • Appetizers
  • Dinner
  • Dessert
  • About
  • Contact
  • Privacy Policy
DisclaimerTerms Of UseGDPR PolicyCookie Policy

Emma

- 1 cup all-purpose flour - 1/2 cup unsalted butter, cold and cubed - 1/4 cup powdered sugar - 1/4 teaspoon salt - 1 egg yolk - 2 tablespoons cold water - 1/2 cup granulated sugar - 1/4 cup cornstarch - 1 cup water - 3 large egg yolks, lightly beaten - 1/2 cup freshly squeezed lemon juice - 1 teaspoon lemon zest - 1 tablespoon unsalted butter - 3 egg whites - 1/4 teaspoon cream of tartar - 1/2 cup granulated sugar (for meringue) In this recipe, each layer has its own unique role. The crust is buttery and crisp. The lemon filling is bright and tangy. The meringue adds that sweet, fluffy touch. The crust uses simple ingredients. The flour gives it structure. Cold butter adds flakiness. Powdered sugar sweetens it just right. The salt enhances the flavors, while the egg yolk and cold water bring it all together. The lemon filling is where the magic happens. Sugar and cornstarch thicken the mixture. Water helps dissolve everything smoothly. The egg yolks add richness. Lemon juice and zest bring in zing. A bit of butter adds creaminess to the filling. Meringue is all about that perfect fluff. Egg whites must be clean and free of yolk. Cream of tartar helps stabilize them. Gradually adding sugar makes it glossy and holds stiff peaks. Gather these ingredients to create a balanced, delightful treat. Each bite offers a perfect mix of flavors and textures. Enjoy crafting these mini pies! {{ingredient_image_1}} To start, gather your ingredients. You need: - 1 cup all-purpose flour - 1/2 cup unsalted butter, cold and cubed - 1/4 cup powdered sugar - 1/4 teaspoon salt - 1 egg yolk - 2 tablespoons cold water In a food processor, mix the flour, cold butter, powdered sugar, and salt. Pulse until it looks like coarse crumbs. Now, add the egg yolk and cold water. Pulse again until the dough forms. Roll the dough into small balls, about 1 inch wide. Press these balls into the bottom and sides of a mini muffin pan. Preheat your oven to 350°F (175°C). Bake the crusts for 12-15 minutes until they turn light golden. Once baked, take them out and let them cool. Next, let’s make the lemon filling. You will need: - 1/2 cup granulated sugar - 1/4 cup cornstarch - 1 cup water - 3 large egg yolks, lightly beaten - 1/2 cup freshly squeezed lemon juice - 1 teaspoon lemon zest - 1 tablespoon unsalted butter In a saucepan over medium heat, mix the granulated sugar, cornstarch, and water. Stir until it is smooth. Cook this mixture until it thickens and bubbles. Keep stirring to avoid lumps. Now, to temper the egg yolks, add a bit of the hot mixture to them. This step is key to avoid scrambling your yolks. After mixing, pour all the yolks back into the saucepan and whisk for 2-3 minutes. Add the lemon juice, lemon zest, and butter to the mixture. Stir until everything is combined and smooth. Remove from the heat and let it cool slightly. Now it's time to fill the crusts! Spoon the lemon filling into each mini crust. Fill them all the way to the top for a delightful burst of flavor. For the meringue, gather these ingredients: - 3 egg whites - 1/4 teaspoon cream of tartar - 1/2 cup granulated sugar (for meringue) In a clean mixing bowl, use an electric mixer to beat the egg whites and cream of tartar. Keep mixing until soft peaks form. Gradually add the granulated sugar, continuing to beat until stiff peaks form. The meringue should look glossy and thick. Now, spoon or pipe the meringue over the lemon filling in each mini pie. You can create fun swirls or peaks. Return the mini pies to the oven at 350°F (175°C) for 10-12 minutes. Bake until the meringue turns a light golden color. After baking, let them cool completely before you serve. Enjoy your tasty mini lemon meringue pies! To get a great crust, start with cold butter. This keeps the crust flaky. Mix the flour, butter, sugar, and salt until it looks like crumbs. When adding the egg yolk and cold water, pulse just until it forms a dough. Do not over-mix. Roll small balls of dough and press them into the muffin pan. This ensures even baking. Bake until golden for a perfect base. Using room-temperature egg whites helps the meringue whip up well. First, beat them with cream of tartar until soft peaks form. Then, slowly add sugar while mixing. Keep beating until you see stiff peaks and a glossy finish. This means your meringue is ready. Spoon or pipe it over the lemon filling for a lovely presentation. Serve these mini pies on a pretty platter. They look great with lemon slices and mint leaves. This adds color and a fresh touch. Consider pairing them with a cup of tea or coffee for a delightful treat. Enjoying these pies chilled can also enhance their flavor! Pro Tips Chill Your Ingredients: For a flakier crust, ensure your butter and water are very cold. This helps create a crisp texture when baked. Tempering the Eggs: Always temper your egg yolks when adding them to hot mixtures to prevent scrambling. Mix a small amount of the hot mixture with the yolks before combining them back into the pan. Avoid Weeping Meringue: To reduce the chance of weeping, ensure your meringue is glossy and has stiff peaks before applying it to the pies. Cooling Time: Let the mini pies cool completely at room temperature before serving. This helps set the filling and meringue for the best texture. {{image_2}} Mini lemon meringue tarts offer a fun twist. Use the same filling and meringue. Instead of a crust, use tart shells. You can find these in stores or make them from scratch. The bite-sized tarts are perfect for parties. They are also easy to serve and eat. Each tart holds just the right amount of sweet and tangy filling. Try using different citrus fruits for a unique flavor. Lime, orange, or grapefruit work great. For lime meringue tarts, replace lemon juice with lime juice. The result is a zesty treat. Each fruit brings its own taste, making the pies special. You can even mix citrus for a fun flavor combo. Just remember to adjust the sugar if needed. You can make these mini pies gluten-free too. Use a gluten-free flour blend in place of all-purpose flour. This keeps the crust light and tasty. There are many blends available, or you can make your own. Look for one that has a good mix of starches and flours. This way, everyone can enjoy these delicious mini lemon meringue pies. To store leftover mini lemon meringue pies, let them cool completely. Place them in an airtight container. Keep the container in the fridge. The pies will stay fresh for up to three days. Make sure you do not cover the meringue tightly. This can make it soggy. You can freeze these mini pies too! To freeze, first, cool them fully. Wrap each pie in plastic wrap. Then, place them in a freezer-safe bag or container. They can last up to two months in the freezer. When you want to eat them, let them thaw in the fridge overnight. Meringue can be tricky to keep fresh. To keep it from getting soggy, do not cover it tightly. Store pies uncovered in a cool place if you plan to eat them quickly. If you need to keep them longer, the fridge is best. Avoid placing them near strong odors, as meringue can absorb smells. Yes, you can make the crust ahead. Just prepare it, shape it, and chill. Wrap it in plastic wrap and store it in the fridge. You can keep it for up to three days. When ready, bake as directed. This saves time and helps with meal prep. If your meringue doesn't form peaks, check your egg whites. They should be at room temperature. Also, ensure your bowl is clean and dry. If there’s any fat or water, it can stop the meringue from whipping. If you still struggle, try adding a bit more cream of tartar. To boost flavor, try adding more lemon zest or a splash of vanilla. You can also mix in herbs like mint for a fresh twist. Another option is to use lime or orange juice for a different taste. Experiment and find what you love most! Yes, you can make vegan lemon meringue pie! Use aquafaba, the liquid from canned chickpeas, instead of egg whites. For the filling, replace eggs with silken tofu or cornstarch. This gives a creamy texture and keeps the lemon flavor strong. Enjoy the same great taste while being plant-based! This blog post shared all you need for mini lemon meringue pies. We covered crust, filling, and meringue ingredients. I outlined each step, from making the crust to baking the meringue. Tips for perfecting your pie and variations to try were shared. In the end, you can turn these pies into a delight for any meal. With simple tweaks, you can impress your family and friends. Enjoy the fun of baking and customizing these treats.

Delicious Mini Lemon Meringue Pies Easy Recipe Guide

Are you ready to whip up a treat that’s both fun and delicious? Mini lemon meringue pies are the perfect

- 200g feta cheese, block - 1 cup cherry tomatoes, halved - 1 bell pepper, diced (red or yellow) - 2 cloves garlic, minced - 1 teaspoon dried oregano - 2 tablespoons olive oil - 4 large eggs - Fresh parsley, chopped (for garnish) - Salt and black pepper to taste - Crusty bread or pita for serving Using fresh ingredients makes a big difference. Fresh feta has a better taste. Ripe tomatoes burst with flavor. Fresh bell peppers add crunch. Garlic gives a nice kick. Fresh parsley adds color and taste. Good quality olive oil enhances all flavors. When you use fresh items, your dish shines. If you can’t find feta, goat cheese works well. Cherry tomatoes can be swapped for diced regular tomatoes. Any bell pepper color works, but zucchini is a nice twist. For garlic, use garlic powder if needed. You can choose dried herbs like basil instead of oregano. If you want a vegan version, try tofu instead of eggs. These swaps keep your dish tasty and fun. {{ingredient_image_1}} Start by preheating your oven to 375°F (190°C). This step is key for a great bake. An even temperature helps the feta and veggies cook well. It only takes a few minutes, so don’t rush. In a baking dish, add the halved cherry tomatoes, diced bell pepper, and minced garlic. These veggies bring flavor and color to the dish. Drizzle two tablespoons of olive oil over them. Next, sprinkle in one teaspoon of dried oregano, salt, and black pepper. Toss everything together well. This mix will create a tasty base for the feta. Make a small well in the center of your veggie mix. Place the block of feta cheese in that well. Drizzle a bit more olive oil over the feta to add richness. Now, bake it in your preheated oven for 20 minutes. The feta should be soft and slightly golden when done. After 20 minutes, carefully remove the baking dish from the oven. Crack four large eggs over the feta and vegetables. Return the dish to the oven and bake for another 10 to 12 minutes. Check the eggs: you want the whites set and the yolks soft. Once they reach your desired doneness, take the dish out of the oven. Garnish with chopped fresh parsley for a pop of color and flavor. Serve this warm dish with crusty bread or pita. Enjoy this delightful meal! Choosing feta is easy if you know what to look for. Look for creamy, moist feta. A block of feta will give you the best texture. Feta in brine keeps it fresh and flavorful. You may also find feta made from sheep's milk or goat's milk. These types often have a richer taste. Trust your taste buds! Try different brands to find your favorite. Eggs can be cooked to your liking. If you want runny yolks, bake them for about 10 minutes. For firmer yolks, leave them in for 12 minutes. Keep an eye on them! The whites should be set and firm. You can also crack the eggs into a small bowl first. This way, you can remove any shell bits before adding them to the dish. Serve this dish warm, right from the oven. Crusty bread or pita is perfect for dipping. You can also add a side salad for freshness. For a touch of spice, sprinkle some red pepper flakes on top. Fresh herbs like basil or mint can brighten the flavors. Don't forget to drizzle more olive oil over the top for a rich finish. Pro Tips Use Fresh Ingredients: The flavor of this dish greatly depends on the quality of the tomatoes and peppers. Opt for seasonal, ripe produce for the best taste. Experiment with Cheese: While feta is traditional, try using a mix of cheeses like goat cheese or a creamy ricotta for a different flavor profile. Adjust Egg Doneness: For perfectly cooked eggs, keep an eye on them during the final baking stage. Cook them longer for firmer yolks or shorter for a runnier texture. Serving Suggestions: Pair this dish with olives, avocado, or a light salad to enhance the Mediterranean experience and add more textures to your meal. {{image_2}} You can make your Mediterranean Baked Feta even more colorful and tasty! Try adding more veggies. Zucchini or spinach work great. Slice the zucchini thinly or chop the spinach roughly. Both add nice flavors and colors. You can also use artichoke hearts or olives for more variety. They make the dish feel more Mediterranean. Changing up the herbs and spices can really change the taste! If you like a bit of heat, sprinkle in some red pepper flakes. Fresh basil or mint can add a lovely twist. You could also try thyme or rosemary for a different flavor. Mix and match to find what you like best. Each herb will give your dish a new personality. If you want to add meat, there are many tasty options. Crumbled sausage or diced ham can enhance the dish. Just cook the meat first, then mix it with the veggies before baking. You can also add cooked bacon for a smoky touch. Remember, adding meat makes this dish heartier and can turn it into a filling breakfast or brunch. After enjoying your Mediterranean Baked Feta, let it cool to room temperature. Transfer any leftovers to an airtight container. You can store it in the fridge for up to three days. If you plan to keep it longer, consider freezing it. Just remember, freezing may change the texture of the feta and eggs. To reheat, place the leftovers in the oven. Preheat your oven to 350°F (175°C). Cover the dish with aluminum foil to keep it moist. Heat for about 15 minutes or until warm. You can also use a microwave. Heat in short bursts of 30 seconds, stirring in between. Keep an eye on it to avoid overcooking. Store feta cheese in its original packaging in the fridge. It lasts about a week after opening. Cherry tomatoes should stay in a cool, dry place. They can last about a week, too. Bell peppers can sit in the fridge for about one week. Garlic bulbs can last for several weeks in a dark, cool area. Always check for any signs of spoilage before using. Yes, you can prep this dish ahead. Chop the veggies and feta. Store them in the fridge. When you're ready, just assemble and bake. It saves time and keeps the flavors fresh. This dish pairs well with crusty bread or pita. You can also add a side salad for crunch. For a hearty meal, serve it with roasted potatoes. Each option adds a nice touch to your breakfast. Yes, you can make a vegan version! Instead of feta cheese, use tofu. Marinate the tofu in olive oil and herbs for flavor. Replace eggs with chickpea flour mixed with water. This keeps the dish delicious and plant-based. This article covered the essential ingredients for making Mediterranean Baked Feta. We explored how fresh ingredients boost flavor and offered alternatives for common items. I shared step-by-step instructions, tips for the best feta, and suggestions for custom doneness of eggs. Lastly, we talked about fun variations and storage tips to keep your leftovers tasty. Remember, cooking is about joy and creativity. Enjoy experimenting with this dish!

Mediterranean Baked Feta Breakfast Delightful Meal

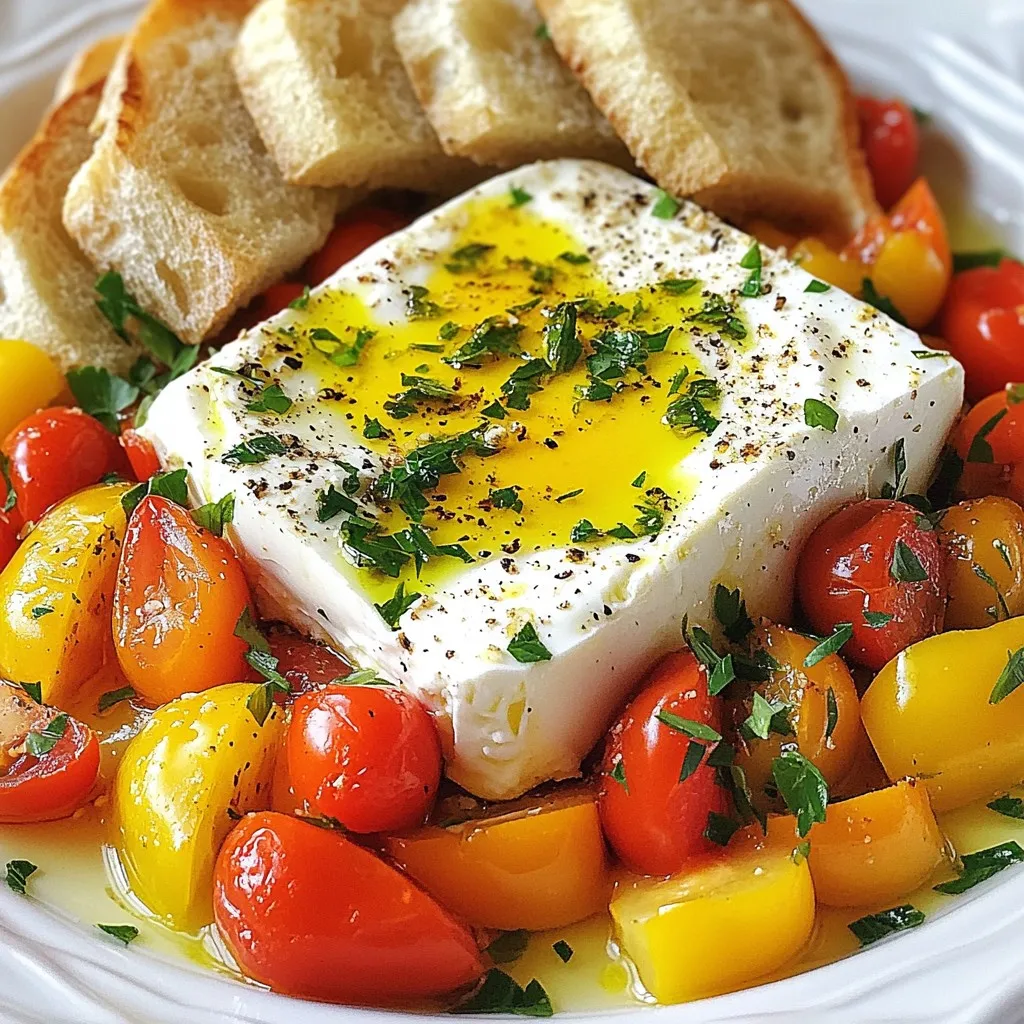
Start your day with a burst of flavor! This Mediterranean Baked Feta Breakfast is a simple, tasty meal that will

For this dish, you'll need: - 4 boneless, skinless chicken thighs - 2 tablespoons olive oil - Salt and pepper, to taste - 3 cloves garlic, minced - 1 cup cherry tomatoes, halved - 1 cup fresh spinach - 1 cup heavy cream or coconut cream for a dairy-free option - 1 teaspoon Italian seasoning - ½ cup grated Parmesan cheese (or nutritional yeast for a dairy-free option) - Fresh basil leaves for garnish Each ingredient adds a unique flavor. The chicken thighs give the dish its heartiness, while garlic and tomatoes add depth. Spinach brings a fresh touch. The cream ties everything together, creating that rich, smooth sauce. You can switch some ingredients if needed. For a lighter option, use chicken breast instead of thighs. If you want a vegan dish, swap chicken with mushrooms or tofu. Instead of heavy cream, try cashew cream for a nutty taste. Nutritional yeast can replace Parmesan for a cheesy flavor without dairy. When shopping for ingredients, look for vibrant colors. Choose chicken that feels firm and has no strange smell. Pick tomatoes that are plump and fragrant. For spinach, select bright green leaves without wilting. Fresh herbs should smell strong and look lively. Quality ingredients make a huge difference in taste! {{ingredient_image_1}} To start, gather your ingredients. You will need: - 4 boneless, skinless chicken thighs - 2 tablespoons olive oil - Salt and pepper, to taste - 3 cloves garlic, minced - 1 cup cherry tomatoes, halved - 1 cup fresh spinach - 1 cup heavy cream (or coconut cream) - 1 teaspoon Italian seasoning - ½ cup grated Parmesan cheese (or nutritional yeast) - Fresh basil leaves for garnish Make sure to measure everything out. This helps your cooking go smoothly. 1. Heat the olive oil in a large skillet over medium-high heat. 2. Season the chicken thighs with salt and pepper. Place them in the skillet. 3. Sear the chicken for about 5 minutes on each side. Look for a golden brown color. 4. Once cooked, remove the chicken from the pot and set it aside. 5. In the same pot, add the minced garlic. Sauté for about 30 seconds. You want it fragrant. 6. Add the halved cherry tomatoes. Cook for 3-4 minutes until they soften. 7. Stir in the fresh spinach. Cook until wilted, about 2 minutes. 8. Reduce the heat to low. Slowly pour in the heavy cream, stirring to mix well. 9. Sprinkle in the Italian seasoning. Add the grated Parmesan cheese (or nutritional yeast). Stir until the sauce thickens slightly. 10. Return the seared chicken to the pot. Spoon the creamy sauce over the chicken. 11. Let it simmer for an additional 5 minutes to meld the flavors together. When the dish is ready, garnish with fresh basil leaves. This adds a nice touch. Serve it warm and enjoy your creamy Tuscan chicken. The blend of flavors is sure to impress! To cook tender chicken, start with good-quality thighs. They have more fat, which keeps them juicy. Sear them in hot oil for a nice crust. Cook each side for about five minutes. Always check the internal temperature; it should reach 165°F. Let the chicken rest after cooking. This helps keep it moist. If your sauce is too thick, add a splash of chicken broth or water. Stir it well to combine. For a thicker sauce, let it simmer longer without the lid. This lets steam escape and reduces the liquid. Always taste it before serving to ensure it has the right consistency. To boost flavor, add fresh herbs like thyme or oregano while cooking. You can also mix in a splash of lemon juice for brightness. If you like some heat, sprinkle in red pepper flakes. For a different twist, try adding sun-dried tomatoes or artichokes for extra depth. These small changes make a big impact! Pro Tips Perfectly Sear the Chicken: Make sure your skillet is hot enough before adding the chicken. This will help achieve a nice golden crust while keeping the inside juicy. Customize the Creaminess: For a lighter version, you can substitute half of the heavy cream with chicken broth. This will still give you a delicious sauce without the extra calories. Fresh Herbs for Flavor: Adding fresh herbs like thyme or oregano can elevate the dish. Consider layering them in with the spinach for a more robust flavor. Let it Rest: After cooking, let the chicken rest for a few minutes before slicing. This allows the juices to redistribute, making the meat more tender. {{image_2}} You can easily make this dish dairy-free. Instead of heavy cream, use coconut cream. It adds a nice sweetness. For cheese, try nutritional yeast. It gives a cheesy flavor without dairy. You can still enjoy the creamy texture. Want to add more veggies? You can mix in bell peppers or zucchini. They add color and crunch. You can also use mushrooms for an earthy taste. Just sauté them with garlic before adding the cream. It makes the dish even better. If you prefer other meats, use chicken breast or turkey. Both work well. For a lighter option, try shrimp. Cook them quickly in the skillet. You can also use tofu for a plant-based meal. Just make sure to season it well for flavor. After enjoying your One-Pot Creamy Tuscan Chicken, store any leftovers in an airtight container. This keeps the flavors fresh. Let the dish cool down before sealing it. You can keep it in the fridge for up to three days. If you want to save it longer, freeze it for up to three months. Just remember to label the container with the date. To reheat your creamy chicken, you can use a microwave or a stovetop. For the microwave, place the chicken in a bowl and cover it. Heat on medium for about two minutes. Stir and heat more if needed. If using the stovetop, warm it in a skillet over low heat. Add a splash of cream or water to keep the sauce smooth. Stir gently until heated through. Preparing ahead can make dinner a breeze. You can marinate the chicken thighs the night before. Just season them with salt, pepper, and olive oil. Store them in the fridge. Chop the garlic and halve the cherry tomatoes in advance, too. You can even wash and dry the spinach. This way, when it’s time to cook, everything is ready to go. Enjoy a stress-free meal! You can make this dish ahead of time. First, cook the chicken and sauce as normal. Once done, let it cool. Then, store it in an airtight container in the fridge. It will stay fresh for three days. When ready to eat, just reheat it on low heat. Stir it often until it's hot. This method saves you time on busy days. Yes, you can use other meats. Chicken breasts work well instead of thighs. You can also use turkey or pork. Just make sure to adjust the cooking time. Cook until the meat reaches a safe temperature. This keeps your meal safe and delicious. This dish pairs well with many sides. Try serving it with pasta or rice. Both soak up the creamy sauce nicely. A fresh salad with greens and vinaigrette adds a nice crunch. You can also serve it with crusty bread to soak up every drop of sauce. These sides complete your meal perfectly. This guide covered everything you need for One-Pot Creamy Tuscan Chicken. We looked at key ingredients, cooking steps, and tips for great results. Remember to choose fresh ingredients for the best taste. Use my tips for making the dish tender, flavorful, and easy to store. You can customize it with dairy-free options or different proteins to fit your taste. With these steps, you'll cook a meal that's not just easy but also full of flavor. Enjoy your cooking!

One-Pot Creamy Tuscan Chicken Simple Dinner Delight

If you’re craving a quick and tasty meal, this One-Pot Creamy Tuscan Chicken is for you. In just a single

- 8 ounces rice noodles - 1 cup shredded carrots - 1 red bell pepper, thinly sliced - 1 cucumber, julienned - 1 cup red cabbage, shredded - ½ cup fresh cilantro, chopped - ¼ cup green onions, sliced - ½ cup unsalted peanuts, chopped The rice noodles serve as the base of this salad. They are soft and chewy. The fresh vegetables add crunch and color. Carrots, bell peppers, cucumbers, red cabbage, cilantro, and green onions bring flavor and nutrients. - ¼ cup creamy peanut butter - 3 tablespoons soy sauce - 2 tablespoons rice vinegar - 1 tablespoon lime juice - 1 tablespoon honey or maple syrup - 1 teaspoon sesame oil - 1 teaspoon fresh ginger, grated - ½ teaspoon garlic, minced - Water to thin (as needed) The peanut dressing brings everything together. Creamy peanut butter adds richness. Soy sauce and rice vinegar offer salty and tangy notes. Lime juice balances the sweetness from honey or maple syrup. - Additional cilantro - Lime wedges - Extra chopped peanuts Garnishes enhance the salad’s look and taste. Extra cilantro adds freshness. Lime wedges give a zesty kick. Extra chopped peanuts add a nice crunch. {{ingredient_image_1}} To start, cook 8 ounces of rice noodles according to the package instructions. This usually takes about 5-7 minutes. You want them to be tender but not mushy. Once cooked, drain the noodles in a colander. Rinse them under cold water to stop the cooking process and cool them down. This step is key to keep the noodles from sticking together. After rinsing, set them aside to let any excess water drain off. Now, let’s bring in the fresh flavors. In a large mixing bowl, combine: - 1 cup shredded carrots - 1 red bell pepper, thinly sliced - 1 cucumber, julienned - 1 cup red cabbage, shredded - ½ cup fresh cilantro, chopped - ¼ cup green onions, sliced Use your hands or a large spoon to toss the vegetables together. Make sure everything mixes well for even flavor. This is where the colors and textures come alive! Next, we’ll whip up the peanut dressing. In a separate bowl, whisk together: - ¼ cup creamy peanut butter - 3 tablespoons soy sauce - 2 tablespoons rice vinegar - 1 tablespoon lime juice - 1 tablespoon honey or maple syrup - 1 teaspoon sesame oil - 1 teaspoon fresh ginger, grated - ½ teaspoon garlic, minced As you mix, pay attention to the texture. If it’s too thick, add water a tablespoon at a time until you reach your preferred consistency. You want a smooth dressing that coats the noodles nicely. After making the dressing, add the cooled rice noodles to the bowl with the vegetables. Pour the peanut dressing over everything. Toss gently to ensure all ingredients are evenly coated. Finally, sprinkle ½ cup chopped peanuts on top for that perfect crunch. Enjoy your fresh and flavorful Thai Peanut Noodle Salad! To make great Thai peanut noodle salad, cook the rice noodles al dente. This means they should be firm but not hard. Follow the package instructions. Once cooked, drain and rinse them under cold water. This cools the noodles and stops the cooking process. For the dressing, adjust the thickness to your liking. Start with the peanut butter. Add water slowly, one tablespoon at a time, until it reaches the right consistency. It should be creamy but not too thick. To boost flavor, add lime zest to the dressing. Zest from a fresh lime brightens the dish. It adds a fragrant, citrusy note that balances the richness of the peanut butter. If you like spice, mix in some chili flakes or sriracha. This adds heat and depth to your salad. Just a pinch can make a big difference! Serve your salad in a large, shallow bowl. This makes it easy to see all the colorful ingredients. For extra visual appeal, garnish with fresh cilantro and a lime wedge. The bright colors and fresh herbs make the dish pop. You can also sprinkle chopped peanuts on top. This adds crunch and makes it look more inviting. Enjoy your beautiful creation! Pro Tips Perfectly Cooked Noodles: Make sure to follow the package instructions for cooking the rice noodles, as overcooking can lead to a mushy texture. Rinse them thoroughly under cold water to stop the cooking process. Customize Your Veggies: Feel free to add or substitute any vegetables you like in this salad, such as bell peppers, snap peas, or even edamame for extra protein and crunch. Adjusting Dressing Thickness: Start with less water when thinning out the peanut dressing. You can always add more to achieve your preferred consistency without making it too watery. Make Ahead: This salad is perfect for meal prep! You can prep all the veggies and the dressing ahead of time, storing them separately in the fridge for up to 3 days. {{image_2}} If you need gluten-free options, swap rice noodles for glass noodles. They work well with the flavors. You can also use tamari instead of soy sauce. This keeps the dish gluten-free. For a vegan version, use maple syrup instead of honey. This small change makes your salad plant-based. Also, ensure your peanut butter is vegan-friendly. Most brands are, but double-check just in case. You can add more veggies to your salad. Try bell peppers, snap peas, or broccoli. These will boost the crunch and color. You can also use spiralized zucchini for a fun twist. For protein, add cooked tofu, chicken, or shrimp. Each option brings its own flavor. Tofu is great for a vegetarian meal. Chicken adds heartiness, while shrimp gives a seafood touch. Choose based on your mood. If you want to mix it up, try a sesame dressing. It adds a nutty flavor that pairs well with the salad. You can also use a spicy chili sauce for a kick. Other sauces like hoisin or sriracha can complement the dish. They add depth and heat. Feel free to play around with these options. This is your salad, so make it your own! To keep your Thai peanut noodle salad fresh, store it in the fridge. Use an airtight container to prevent moisture loss. This salad stays fresh for about three days. After that, the veggies may lose their crunch. If you want to reheat the noodles, do it gently. Use warm water to loosen the noodles. Avoid the microwave, as it can make them mushy. For the dressing, whisk it with a bit of water to revive its texture. You can make this salad ahead of time. Prepare the noodles and veggies, then store them separately. This keeps everything fresh. Use glass containers for easy storage and reheating. You can mix the salad just before serving to keep it crisp. Thai peanut noodle salad is a vibrant dish with a mix of flavors and textures. It features rice noodles, fresh veggies, and a creamy peanut dressing. The key ingredients are: - 8 ounces rice noodles - 1 cup shredded carrots - 1 red bell pepper, thinly sliced - 1 cucumber, julienned - 1 cup red cabbage, shredded - ½ cup fresh cilantro, chopped - ¼ cup green onions, sliced - ½ cup unsalted peanuts, chopped The peanut dressing combines creamy peanut butter with soy sauce, rice vinegar, lime juice, and ginger. This salad is colorful and full of crunch, making it a hit at any table. Yes, you can make this salad ahead of time. It tastes great when chilled. You can prepare the salad up to 24 hours in advance. Just keep the dressing separate until you are ready to serve. This keeps the noodles and veggies fresh and crisp. You can easily swap ingredients in this salad. Here are some ideas for your needs: - Use zucchini noodles if you want a low-carb option. - Substitute almond butter for peanut butter if you have nut allergies. - Replace soy sauce with tamari for a gluten-free option. - Use any fresh herbs like basil or mint for a different flavor. These changes help you enjoy the salad and cater to your taste or dietary needs. This blog post covers the essentials for making a delicious Thai peanut noodle salad. We discussed key ingredients like rice noodles, fresh veggies, and a rich peanut dressing. I shared steps for preparing each part, along with tips for texture and flavor. You can easily modify the recipe to suit dietary needs or personal taste. In conclusion, this salad is not just tasty but also versatile. Enjoy making it your own!

Thai Peanut Noodle Salad Fresh and Flavorful Recipe

Craving a dish that bursts with flavor and freshness? Dive into my Thai Peanut Noodle Salad recipe! This vibrant dish

To make Italian Pastina Soup, you need a few simple ingredients. Here are the key items: - 1 cup pastina (small pasta shapes) - 4 cups vegetable broth - 1 cup diced carrots - 1 cup diced celery - 1 small onion, chopped - 2 cloves garlic, minced - 1 bay leaf - 1 teaspoon dried thyme - 1 tablespoon olive oil - 1/2 cup fresh spinach, chopped - 1/4 cup grated Parmesan cheese (optional) - Salt and pepper to taste - Fresh parsley, chopped for garnish Each ingredient plays a special role. The pastina adds a comforting texture. The fresh veggies bring flavor and color. The broth warms everything up. The herbs and spices give it depth. You can top it with cheese and parsley for extra joy. This soup is both simple and tasty. It’s perfect for lunch or dinner. {{ingredient_image_1}} 1. Sautéing the vegetables Start by heating the olive oil in a large pot over medium heat. Add the chopped onion, diced carrots, and diced celery. Sauté these veggies for about 5 to 7 minutes. You want them to soften and smell great. 2. Adding broth and herbs Next, stir in the minced garlic. Cook it for 1 minute until it becomes fragrant. Now, pour in the vegetable broth. Toss in the bay leaf and dried thyme. Bring this mixture to a boil. 3. Cooking the pastina Once it’s boiling, add the pastina. Reduce the heat to a gentle simmer. Cook the pastina according to the package instructions, usually around 5 to 6 minutes. Keep an eye on it so it doesn't get mushy. 4. Finishing touches and serving After the pastina is tender, stir in the fresh spinach. Cook for another 1 to 2 minutes until it wilts. Remove the bay leaf. Adjust the seasoning with salt and pepper. If you like, stir in Parmesan cheese until melted. Serve hot, garnished with chopped parsley and more cheese if desired. To make the best Italian Pastina Soup, pay attention to the cooking times for pastina. This small pasta cooks quickly, usually in about 5 to 6 minutes. Always check the package for exact times. To avoid mushy pasta, don't overcook the pastina. Start checking it a minute before the time is up. You want it to be tender but still have a slight bite. Enhance the flavor with some smart seasoning tips. Use fresh herbs like parsley for a bright taste. A pinch of salt and pepper can make a big difference. If you want a richer flavor, add a bit of Parmesan cheese when serving. It melts nicely and adds depth to your soup. Remember, the key to a tasty soup is balancing the flavors. Don't be afraid to adjust the seasoning as you go. This way, you can create a bowl that is just right for you. Pro Tips Use Quality Broth: A good quality vegetable broth can greatly enhance the flavor of your soup. Consider using homemade broth or a low-sodium store-bought option for more control over the saltiness. Customize Vegetables: Feel free to add or substitute other vegetables like zucchini, peas, or bell peppers based on your preference or seasonal availability. Perfectly Cooked Pastina: To prevent the pastina from becoming mushy, add it to the broth only when you're ready to serve the soup, ensuring it cooks just until al dente. Leftover Storage: If you have leftovers, store the soup without the pasta. Add freshly cooked pastina when reheating to maintain the ideal texture. {{image_2}} You can make your pastina soup even better by adding more ingredients. Here are some fun ideas: - Adding other vegetables: You can toss in peas or zucchini. These veggies add color and taste. They also boost nutrition. Just chop them small and add when you cook the carrots and celery. - Incorporating proteins: Want to make it heartier? Add chicken or beans. Cooked chicken adds protein and flavor. If you like beans, use white beans or chickpeas. They make the soup filling and tasty. - Using different herbs: Change up the taste with herbs. Try basil, oregano, or parsley. Each herb brings its own flavor. Add them in the last few minutes of cooking for the best taste. Mixing these options gives your pastina soup a unique twist. You can create a new favorite dish every time you make it! To keep your Italian Pastina Soup fresh, store it properly. First, let the soup cool to room temperature. Then, place it in an airtight container. You can store it in the fridge for up to three days. Make sure the lid is tight to avoid spills. If you want to keep the soup longer, freezing is a great option. Use freezer-safe containers or bags. Pour the soup into the container, leaving some space at the top. This space allows for expansion when it freezes. You can freeze it for up to three months. When you are ready to eat the soup, reheating is easy. If frozen, thaw it overnight in the fridge. You can also use the microwave for a quick thaw. Pour the soup into a pot and heat over low heat. Stir often until it's hot. If you need to, add a splash of broth or water to thin it. Enjoy the warmth and comfort of your Italian Pastina Soup! Yes, you can make Italian Pastina Soup in advance. It tastes great the next day. Just store it in the fridge after it cools. When ready to eat, heat it on the stove. Add a little broth if it gets too thick. If you can’t find pastina, use small pasta shapes like orzo or acini di pepe. You can also use rice or quinoa if you prefer. These options keep the soup tasty and comforting. This recipe is not gluten-free because pastina is made from wheat. However, you can use gluten-free pasta instead. Look for small gluten-free pasta shapes to keep the dish similar. To make it vegetarian or vegan, simply use vegetable broth. Skip the Parmesan cheese for a vegan option. You can add more veggies or beans for extra protein and flavor. This blog post covered making a tasty Italian Pastina Soup. We looked at key ingredients like small pasta, fresh veggies, and broth. I shared easy steps for cooking and tips to keep your soup smooth. You can even customize it with your favorite veggies or proteins. In the end, you can enjoy this soup fresh or save leftovers for later. Cooking can be fun and tasty! Now, grab your ingredients and start creating a warm bowl of comfort.

Italian Pastina Soup Nourishing and Simple Recipe

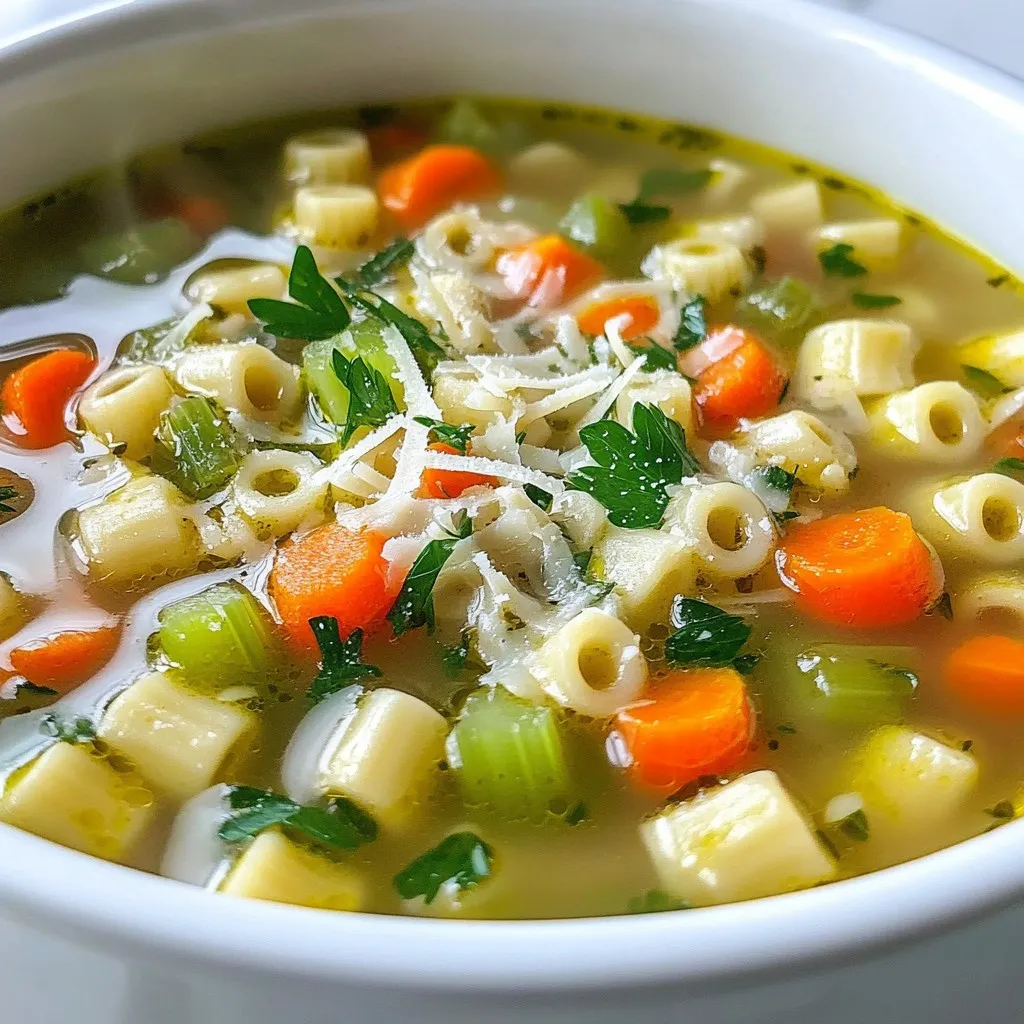
Looking for a warm, comforting dish that’s easy to make? Italian Pastina Soup is the answer! This simple recipe combines

- 1/2 cup unpopped popcorn kernels - 1 cup white chocolate chips - 1/2 teaspoon peppermint extract - 1/2 cup crushed candy canes - 1/4 teaspoon sea salt - Optional: 1 tablespoon vegetable oil for popping To make peppermint white chocolate popcorn, you need a few simple ingredients. The main star is the popcorn itself. You start with half a cup of unpopped kernels. This will give you a fluffy base for all the tasty toppings. Next, you’ll need one cup of white chocolate chips. These will melt into a sweet coating. The peppermint extract adds a refreshing flavor. Just half a teaspoon will do the trick. Crushed candy canes are a must! You need half a cup to sprinkle on top. They add a fun crunch and a festive touch. A pinch of sea salt, just a quarter teaspoon, balances the sweetness perfectly. If you want to pop your kernels, you can use one tablespoon of vegetable oil. This is optional. You can also use an air popper for a lighter option. Feel free to experiment! You can add different toppings or even swap in other flavors. Each change can create a new twist on this treat. {{ingredient_image_1}} To start, you need to pop the popcorn. You can use a pot with oil or an air popper. If you choose the pot method, heat 1 tablespoon of vegetable oil over medium heat. Add 1/2 cup of unpopped popcorn kernels. Cover the pot and shake it gently. Listen for the popping sound. When the pops slow down to about two seconds apart, remove the pot from heat. If you want a healthier option, use an air popper. Just add the kernels and turn it on. You’ll have fluffy popcorn without oil in no time! Next, let’s melt the white chocolate. Grab a microwave-safe bowl and add 1 cup of white chocolate chips. Pour in 1/2 teaspoon of peppermint extract for that festive flavor. Microwave the bowl in 30-second intervals. Stir the chocolate after each interval until it’s smooth and melted. This step is key for a nice, even texture. Now it’s time to mix everything. In a large mixing bowl, add the popped popcorn. Carefully pour the melted white chocolate over the popcorn. Use a spatula to gently toss the popcorn. Make sure every piece is coated well. This helps to avoid clumping, so you get tasty, crunchy bites. To finish, sprinkle 1/2 cup of crushed candy canes and 1/4 teaspoon of sea salt over the popcorn. Give it another gentle toss. This adds a lovely crunch and a hint of saltiness. Spread the popcorn mixture out in a single layer on a parchment-lined baking sheet. Let it cool at room temperature for about 30 minutes. This helps the chocolate set properly. Once it’s cool, break the popcorn into clusters. Enjoy your delicious peppermint white chocolate popcorn! For crunchy popcorn, make sure to pop your kernels correctly. Use fresh kernels for the best results. If you use oil, heat it before adding the kernels. This step helps them pop better. After popping, spread the popcorn on a baking sheet to cool. This cooling time keeps it crisp. To avoid sogginess, let the melted chocolate cool slightly before using it. Hot chocolate can make popcorn wet. Also, don’t skip the cooling step after mixing. Allow the popcorn to set fully. This step ensures it stays crunchy. You can add more fun flavors to your popcorn. Try drizzling caramel or dark chocolate on top. Nuts like almonds or pecans can add a nice crunch. You can also sprinkle cinnamon or nutmeg for warmth. Experiment with other extracts too! Almond or vanilla extracts can give different tastes. Just remember to use them in small amounts. A little goes a long way! When serving peppermint popcorn, use festive bowls or clear bags. This way, everyone sees the fun colors! You can also stack it in jars for an eye-catching display. For gifts, package the popcorn in decorative bags. Add a ribbon or a tag for a personal touch. It makes a lovely treat for friends and family during the holidays! Pro Tips Choose Quality Chocolate: Opt for high-quality white chocolate chips for a smoother melt and better flavor. Crush Candy Canes Easily: Place candy canes in a zip-top bag and crush them with a rolling pin for even pieces. Popcorn Storage: Store any leftovers in an airtight container to keep the popcorn crunchy longer. Customize Flavors: Experiment with different extracts, such as vanilla or almond, for unique flavor variations. {{image_2}} You can change up the flavor of your popcorn in fun ways. Try adding dark or milk chocolate drizzles for a richer taste. Simply melt your choice of chocolate like you did with the white chocolate. Drizzle it over the popcorn after coating it with white chocolate. This adds a nice contrast and extra sweetness. You can also explore different flavored popcorn. Think about adding caramel or cheese popcorn for a unique twist. Each flavor brings its own joy and surprises your taste buds. This peppermint white chocolate popcorn is perfect for the holidays. You can add festive sprinkles or colored sugar for more cheer. Red and green sprinkles look great and taste yummy. You can even swap the candy canes for seasonal candies like chocolate-covered pretzels. For year-round enjoyment, change the extract. Use vanilla or almond instead of peppermint. This way, you can enjoy this treat anytime, not just during the holidays. If you want a vegan version, swap the white chocolate with dairy-free chocolate chips. Make sure to check that your popcorn is gluten-free, as some brands may not be. To replace white chocolate, use melted coconut butter mixed with a bit of maple syrup. This will give you a creamy texture while keeping it dairy-free. These adjustments make this treat suitable for many diets while still being delicious! To keep your peppermint white chocolate popcorn fresh, use an airtight container. Glass jars or plastic bins work well. Avoid containers that let in air or moisture. Store the popcorn in a cool, dry place away from light. Keeping it sealed helps it stay crisp and tasty. You can enjoy this treat for up to two weeks. After that, it may lose its crunch. Signs of spoilage include a stale smell or a soft texture. If you notice these changes, it’s best to toss it out. You can freeze peppermint white chocolate popcorn. Use a freezer-safe bag or container. Make sure to remove as much air as possible. When you want to eat it, set it in the fridge overnight to thaw. This method keeps the flavor and texture intact. Yes, you can use regular chocolate. Dark or milk chocolate adds a rich taste. It will change the look and flavor. White chocolate is sweet and creamy, while regular chocolate has a deeper flavor. If you want a fun twist, try mixing both types. This gives a unique taste to your peppermint white chocolate popcorn. You can make popcorn without oil using an air popper. Just put the popcorn kernels in the air popper. Turn it on, and wait for the popcorn to pop. It will take a few minutes. If you don’t have an air popper, you can put the kernels in a microwave-safe bowl. Cover it with a lid and microwave for about 3-5 minutes. This way, you get a healthier snack with less fat. If your popcorn is soggy, you can fix it. First, spread it out on a baking sheet. Then, bake it at a low temperature, like 200 degrees Fahrenheit, for about 10 minutes. This helps dry it out. To prevent sogginess in the future, make sure the popcorn cools completely before adding chocolate. Avoid using too much chocolate as well. This blog post covered how to make sweet, crunchy peppermint popcorn. We went through the key ingredients, steps for popping and coating, and finishing touches. I shared tips for perfect texture and creative ways to present your popcorn. You learned about variations and how to store it well. Now, you are ready to impress your friends and family with your popcorn skills. Enjoy every bite of your tasty treat and let your creativity shine!

Peppermint White Chocolate Popcorn Irresistible Treat

Looking for a fun and tasty treat that will wow your friends? Peppermint white chocolate popcorn is the answer! It

- 1 cup jasmine rice - 1 cup coconut milk - 1 cup water - 1 tablespoon lime zest - 2 tablespoons lime juice - 1 teaspoon sugar - 1/2 teaspoon salt - Fresh cilantro, chopped (for garnish) - Lime wedges (for serving) If you can't find jasmine rice, long-grain white rice works well too. For a nutty flavor, try basmati rice. You can use light coconut milk if you want a lower-fat option. If you need a dairy-free choice, coconut milk is perfect. You can replace lime juice with lemon juice for a similar taste. You will need a medium saucepan for cooking the rice. A measuring cup helps you get the right amounts. A fork is great for fluffing the rice after cooking. Lastly, a zester or grater will help you get that fresh lime zest. {{ingredient_image_1}} Start by rinsing the jasmine rice. Use cold water and let it run until clear. This step helps to remove extra starch. Removing starch keeps the rice from getting sticky. In a medium saucepan, mix the rinsed rice with coconut milk, water, lime zest, sugar, and salt. Stir these together well. Place the pan over medium heat and bring it to a gentle boil. Once boiling, turn the heat down to low. Cover the saucepan tightly. Let it simmer for about 15 to 18 minutes. Do not lift the lid. This keeps all the steam inside, cooking the rice evenly. When the time is up, remove the pan from heat. Let it sit covered for 5 more minutes. This allows the rice to finish cooking. After resting, take off the lid. Use a fork to fluff the rice gently. Drizzle the lime juice over the rice, mixing it in softly. Taste the rice and adjust the flavor if needed. You can add more lime juice or salt to your liking. Serve the coconut lime rice warm. Garnish it with fresh cilantro and add lime wedges on the side. Enjoy this tasty side dish with your meal! To make perfect coconut lime rice, start with rinsing your jasmine rice. Rinse it under cold water until the water runs clear. This step helps remove excess starch, keeping the rice fluffy. Use equal parts coconut milk and water for cooking. This mix gives the rice a rich, creamy texture. Add lime zest and salt to enhance the flavor. After cooking, let the rice sit covered for a few minutes. This resting time helps the rice absorb any remaining moisture. One common mistake is lifting the lid during cooking. This lets steam escape and can lead to uneven rice. Another mistake is using low-quality coconut milk. Good coconut milk makes a big difference in flavor. Avoid skipping the lime juice; it adds brightness that balances the creaminess. Lastly, don’t skip the resting step after cooking. This step ensures each grain is tender and fluffy. To enhance the flavor of your coconut lime rice, try adding fresh herbs. Cilantro adds a nice touch, but you can also use mint or basil. For a spicy kick, consider adding chopped jalapeños or red pepper flakes. If you want a sweeter note, a dash of coconut sugar works well. You can also mix in toasted coconut for a crunchy texture. Experiment with these options to find your favorite twist on this dish! Pro Tips Rinsing the Rice: Rinsing the rice thoroughly helps remove excess starch, which prevents the rice from becoming gummy and ensures a fluffy texture. Simmering Perfectly: Keep the heat low while simmering to avoid boiling over; it ensures the rice cooks evenly without burning. Resting Time: Letting the rice rest after cooking is crucial as it allows for additional steam to finish cooking and enhances the flavors. Lime Adjustments: Adjust the lime juice to your taste preference; adding more can brighten the dish, while less will yield a milder flavor. {{image_2}} Coconut lime rice is already vegan, which makes it easy to enjoy. You can add more green veggies like peas or spinach for extra nutrients. You can also top the rice with sliced avocado for a creamy touch. If you want a more filling meal, mix in some black beans for added protein. You can easily add protein to your coconut lime rice. Chicken, shrimp, or tofu works well. Cook the protein separately and mix it in after the rice is done. Adding vegetables like bell peppers or carrots can also brighten the dish. Just sauté them until tender, then fold them into the rice. If you want to change the flavor, you can use different herbs and spices. Try adding fresh mint or basil for a unique twist. A pinch of chili flakes can add spice. If you want a smoky flavor, consider adding a dash of smoked paprika. These changes can make every batch of coconut lime rice a new adventure. To keep your coconut lime rice fresh, place it in an airtight container. Make sure the rice cools down first. Then, seal the container tightly to keep out air. Store it in the fridge for up to four days. Avoid leaving it out at room temperature for more than two hours. This helps prevent bacteria growth. When you're ready to enjoy the rice again, reheating is easy. You can use a microwave or stovetop. For the microwave, place the rice in a bowl. Add a splash of water to keep it moist. Heat in short bursts of 30 seconds, stirring in between, until warm. On the stovetop, add the rice to a saucepan. Add a little water and heat over low heat. Stir often until hot. You can freeze coconut lime rice for later use. First, let the rice cool completely. Then, scoop it into freezer-safe bags or containers. Make sure to remove as much air as possible. Label the bags with the date. You can freeze it for up to three months. When you are ready to eat it, thaw it overnight in the fridge and reheat it as described above. Yes, you can use brown rice. It will change the cooking time. Brown rice takes longer to cook than jasmine rice. You’ll need about 40-45 minutes for brown rice. Remember to add extra water too. Coconut lime rice pairs well with many dishes. Try it with grilled chicken or shrimp. It also goes great with stir-fried vegetables. For a lighter option, serve it with a salad. You can even use it as a base for a rice bowl. Coconut lime rice can last up to 4 days in the fridge. Store it in an airtight container. Make sure it cools down before you put it in the fridge. If you want to eat it later, just reheat it. Yes, you can make coconut lime rice in a rice cooker. Just add all the ingredients to the cooker. Use the same amounts as in the recipe. Set it to the white rice setting. Once it’s done, fluff it like normal. This guide covered all you need to make coconut lime rice. You learned about the key ingredients, tools, and detailed steps for cooking. I also shared tips to avoid common mistakes and variations to suit your taste. You can choose vegan options or add proteins as you like. Finally, proper storage methods will keep your leftovers fresh. Remember, making this dish is simple and rewarding. Enjoy your coconut lime rice and share it with friends!

Coconut Lime Rice Flavorful Side Dish Recipe Guide

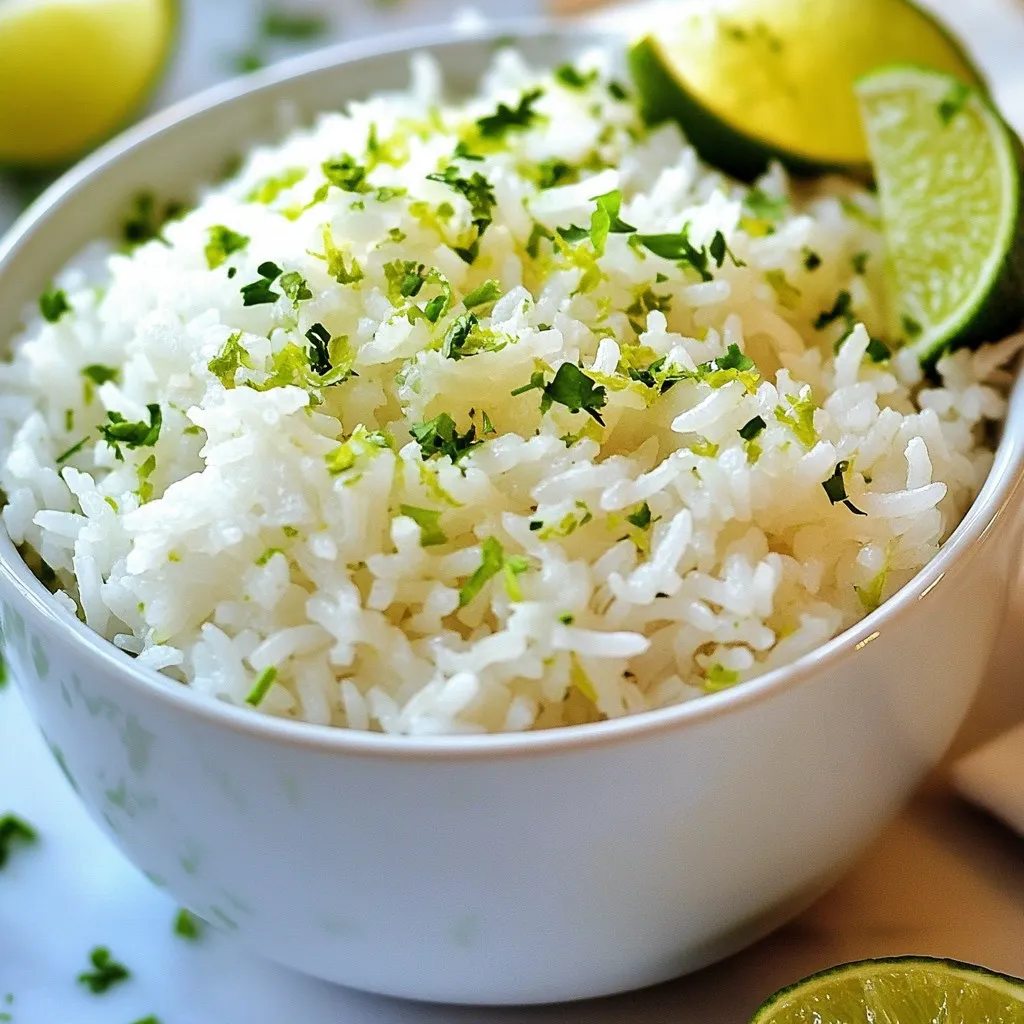
Are you ready to elevate your meal with a bright and zesty side dish? Coconut Lime Rice is deliciously easy

Here are the ingredients you need for your no-bake peanut butter bars: - 1 cup creamy peanut butter - 1 cup rolled oats - 1/2 cup honey or maple syrup - 1/4 cup coconut oil, melted - 1/2 cup dark chocolate chips - 1/4 teaspoon sea salt - 1 teaspoon vanilla extract - Optional toppings: crushed nuts or sprinkles Each ingredient plays a key role. The creamy peanut butter gives the bars their rich flavor. Rolled oats add texture and help bind everything together. Honey or maple syrup sweetens the mix and keeps it sticky. Melted coconut oil adds creaminess and helps the bars set. Dark chocolate chips provide a delicious topping that makes these bars even more tempting. Sea salt enhances the flavors, while vanilla extract rounds it all out. If you want a little crunch or color, add crushed nuts or sprinkles on top. Gather these ingredients, and you’re ready to make a treat that’s quick and easy! {{ingredient_image_1}} First, grab a big mixing bowl. Add one cup of creamy peanut butter to the bowl. Then, measure out half a cup of honey or maple syrup. Pour this in, too. Next, take a quarter cup of melted coconut oil and add it. Finally, add one teaspoon of vanilla extract. Stir everything together until the mixture is smooth and creamy. This step is key. It helps blend the flavors well. After mixing, it’s time to add more texture. Measure one cup of rolled oats and a quarter teaspoon of sea salt. Add these to the peanut butter mix. Stir until the oats are well mixed in. The mixture should feel sticky and thick. Now, line an 8x8 inch baking dish with parchment paper. Leave some paper hanging over the edges. This makes it easy to pull the bars out later. Next, press the peanut butter and oat mix into the dish. Use a spatula to make it even. Press down firmly to pack it well. Now, let’s melt the chocolate. Take half a cup of dark chocolate chips and put them in a microwave-safe bowl. Heat them in the microwave for 30 seconds. Take them out and stir. If they’re not melted, heat them again in 30-second bursts. Keep stirring until the chocolate is smooth. Once melted, pour the chocolate over the pressed peanut butter base. Use a spatula to spread the chocolate evenly. This will create a nice, smooth top. If you want, sprinkle some crushed nuts or colorful sprinkles on top. Gently press them in to help them stick. You can easily change the flavor of your bars. Try adding a dash of cinnamon for warmth. You can also swap creamy peanut butter for crunchy peanut butter. This adds a fun texture. If you want a nut-free option, use sunflower seed butter instead. This keeps the taste delicious while being safe for nut allergies. To make your bars chewier, add more rolled oats. You can also mix in some crushed nuts for a crunchier bite. If you prefer softer bars, use less oat and more peanut butter. This will give you a smooth, rich texture. Experiment with the ratios to find your perfect bar. Presentation makes a big difference. Arrange the bars on a nice platter. Drizzle melted chocolate on top for a fancy touch. You can also sprinkle crushed nuts or colorful sprinkles over the chocolate. This adds some fun and makes the bars look appealing. Pro Tips Use Natural Peanut Butter: For a healthier option, opt for natural peanut butter without added sugars or oils. It provides a richer flavor and a more wholesome bar. Chill for Perfect Texture: Allow the bars to chill longer than 2 hours for a firmer texture, making them easier to cut and handle. Experiment with Mix-Ins: Feel free to add in your favorite mix-ins like dried fruits, seeds, or protein powder to customize the bars to your liking. Store Properly: Keep the bars in an airtight container in the refrigerator for up to one week, or freeze them for longer storage. {{image_2}} You can easily make these bars nut-free. Replace peanut butter with sun butter. Sun butter tastes great and works well. You can also use almond butter if you prefer. Just make sure the butter is creamy for the best texture. Mix-ins can add fun flavors and textures to your bars. Try adding dried fruits like raisins or cranberries. You can also toss in some seeds like chia or pumpkin seeds. For a chocolate twist, use different kinds of chocolate chips. Just fold them in during the mixing stage. To keep this recipe vegan, use maple syrup instead of honey. Also, check that your chocolate chips are dairy-free. This small change keeps the bars tasty and plant-based. Enjoy a sweet treat that fits your diet! To keep your no-bake peanut butter bars fresh, store them in the fridge. Use an airtight container to avoid drying out. If you want to keep them longer, freeze the bars. Wrap each piece in plastic wrap before placing it in a freezer-safe bag. This way, they stay fresh for your next craving. These bars can last up to one week in the fridge. If you choose to freeze them, they can last up to three months. Just remember to label the bag with the date you made them. This helps you keep track of how long they’ve been stored. You can enjoy these bars cold, or warm them up a bit. To reheat, place a bar on a microwave-safe plate. Heat for about 10 to 15 seconds. This warms them but keeps the chocolate from melting too much. Enjoy them as a quick snack or dessert! Yes, you can use natural peanut butter. Natural peanut butter has no added sugars or oils. It may make the bars a bit softer. If you want a firmer texture, use creamy peanut butter with added oil. Both work well, but the choice affects texture and taste. Absolutely! You can prepare these bars up to one week in advance. Just store them in the fridge. If you want to keep them longer, freeze them. Wrap each bar in plastic wrap, then place them in a freezer bag. They will last for about three months in the freezer. You will know the bars are set when they feel firm to the touch. They should hold their shape when you press lightly. After refrigerating for at least two hours, check for a slightly hard surface. If they feel soft, give them more time in the fridge. In this blog post, we covered a simple and tasty recipe for peanut butter bars. You learned about key ingredients and step-by-step instructions. I shared tips for flavor and texture, along with fun variations. Storage advice helps keep your bars fresh and tasty. These bars are easy to make and great for snacks. Enjoy your homemade treats and feel free to get creative with your favorite mix-ins!

No-Bake Peanut Butter Bars Quick and Easy Recipe

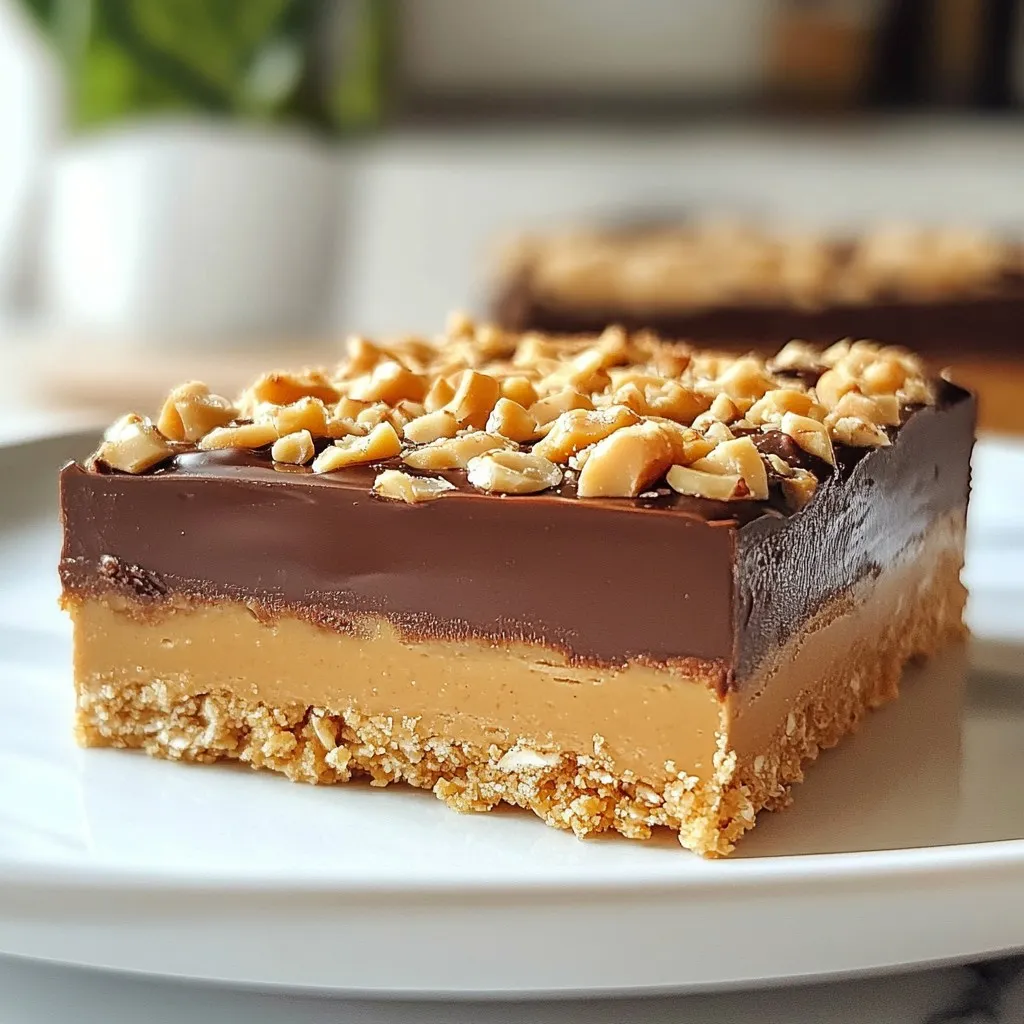
Craving a sweet treat that’s quick and easy? These no-bake peanut butter bars are your answer! With just a handful

- 2 cups butternut squash, peeled and diced - 4 cups mixed greens (arugula and spinach) - 1/2 cup feta cheese, crumbled The star of this salad is the butternut squash. I love its sweet, nutty flavor. It pairs so well with the greens. Mixed greens like arugula and spinach add a nice crunch and earthiness. Feta cheese adds creaminess and a bit of salt. You can’t go wrong with this combo. - 2 tablespoons balsamic vinegar - 1 tablespoon maple syrup The dressing is simple yet tasty. Balsamic vinegar gives a tangy kick. Adding maple syrup balances the flavors with a hint of sweetness. This dressing brings the whole salad together. - 1/4 cup dried cranberries - 1/4 cup walnuts, roughly chopped - Fresh thyme leaves (for garnish) You can add dried cranberries for a sweet touch. Walnuts add crunch and healthy fats. Fresh thyme leaves give an aromatic finish. These extras make the salad even more delicious. {{ingredient_image_1}} First, preheat your oven to 400°F (200°C). This ensures the squash cooks evenly. Next, take 2 cups of peeled and diced butternut squash and place it in a bowl. Drizzle in 1 tablespoon of olive oil. Add salt and pepper to taste. Toss everything together until the squash is well coated. Spread the squash out on a baking sheet in a single layer. Roast it in the oven for about 25-30 minutes. Stir halfway through for even cooking. The squash should turn tender and caramelized. While the squash roasts, it's time to make the dressing. In a small bowl, whisk together 2 tablespoons of balsamic vinegar and 1 tablespoon of maple syrup. Blend them well until smooth. Set this dressing aside for later use. This sweet and tangy mix adds a nice kick to the salad. In a large salad bowl, combine your roasted butternut squash with 4 cups of mixed greens, like arugula and spinach. Add 1/2 cup of crumbled feta cheese, 1/4 cup of dried cranberries, and 1/4 cup of roughly chopped walnuts. Drizzle the dressing over the salad. Toss everything gently to combine. Be careful not to break the feta too much. Finally, garnish your salad with fresh thyme leaves for a pop of flavor and a lovely presentation. Enjoy your fresh and flavorful salad! To ensure even roasting of butternut squash, cut it into similar-sized cubes. This helps it cook at the same rate. Toss the cubes with olive oil, salt, and pepper in a bowl before spreading them on a baking sheet. Stir them halfway through roasting to get that nice golden color on all sides. For the best flavor, season the squash well. Use good quality salt and fresh pepper. You can also add spices like cinnamon or nutmeg for warmth. These little touches make a big difference in taste. This salad pairs well with grilled chicken or fish. The flavors of the squash and feta balance nicely with the protein. You can also serve it next to a hearty soup for a full meal. For presentation, serve the salad in a large bowl. Spread it out so the colors shine. A sprinkle of fresh thyme on top adds a lovely touch. Aim for four servings to keep it easy for family or friends. To prep butternut squash easily, use a sharp knife and a sturdy cutting board. Cut off the ends first, then slice it in half. Scoop out the seeds, then dice the flesh. This method saves time and effort. You can make the salad ahead of time. Just store the dressing separately. Toss the salad just before serving to keep everything fresh. The roasted squash will still taste great even after a few hours in the fridge. Pro Tips Choose the Right Squash: Select a butternut squash that feels heavy for its size and has a smooth, even skin. This ensures maximum flavor and sweetness. Don’t Skip the Thyme: Fresh thyme adds a wonderful aromatic quality to the salad. If you can’t find fresh, opt for dried thyme but use it sparingly. Make Ahead: Roast the butternut squash a day in advance and store it in the fridge. This saves time and allows the flavors to meld. Customize Your Nuts: Feel free to swap walnuts for pecans or almonds based on your preference. Each nut offers a unique flavor and texture. {{image_2}} You can easily change up your salad ingredients. Try using different greens like kale, romaine, or even baby spinach. Each green brings its own taste and crunch. You can also swap feta cheese for goat cheese or even a dairy-free option. Both will add a unique flavor to your salad. Adding seasonal veggies can make your salad even better. Try roasted beets, Brussels sprouts, or sweet peppers. These add color and taste. Fruits also add freshness. Consider adding apple slices, pomegranate seeds, or orange segments for a sweet touch. You can explore other vinaigrettes for your salad. A lemon vinaigrette or honey mustard dressing can give it a new twist. If you want a dairy-free option, use a vinaigrette with olive oil and vinegar. This keeps the salad light and fresh while enhancing the flavors. To keep the salad fresh, store it in an airtight container. This helps prevent moisture loss. Place the salad in the fridge to maintain its taste and texture. It will stay good for about 3 days. If you store the dressing separately, it can last longer. You might wonder if you can reheat roasted squash. I recommend not reheating the whole salad. Roasted squash tastes best warm, but it can be enjoyed cold too. If you want to serve it warm, heat the squash in the oven at 350°F (175°C) for about 10 minutes. Get creative with leftovers! You can mix it into a grain bowl or use it as a topping for toast. Preparing the salad components ahead of time can save you effort later. You can roast the squash and chop the greens a day before. Store them in separate containers in the fridge. Assemble the salad just before serving. This keeps the greens crisp and the feta intact. Drizzle the dressing on top and enjoy your fresh butternut squash feta salad! Yes, you can prepare parts of this salad ahead of time. Here are a few tips: - Roast the squash: You can roast the butternut squash a day before. Let it cool and store it in the fridge. - Make the dressing: Whisk the balsamic and maple dressing and keep it in a jar. It will stay fresh for a week. - Assemble before serving: Mix the greens, feta, and nuts just before serving. This keeps everything crisp and fresh. If you want a different cheese, try these options: - Goat cheese: This has a similar tangy flavor and creamy texture. - Ricotta: A mild choice that adds creaminess. - Tofu: For a dairy-free option, use crumbled tofu mixed with a little lemon juice. Yes, butternut squash is very healthy! Here are some benefits: - Rich in vitamins: It has a lot of vitamin A, which is good for your eyes. - High in fiber: This helps your digestion and keeps you full. - Low in calories: It's a great choice for weight management. The mixed greens, cranberries, and walnuts also add nutrients, making this salad a balanced meal. This salad combines roasted butternut squash, mixed greens, feta, and a sweet dressing. You learned how to prepare each ingredient, assemble the salad, and make it shine on the plate. Use tips for flavor and variety to keep it fresh. Don't forget storage advice and alternative options to suit your taste. Remember, cooking should be fun and creative! Enjoy making this salad, and feel free to experiment with each step. Healthy eating is rewarding, and this salad is a great start!

Butternut Squash Feta Salad Fresh and Flavorful Delight

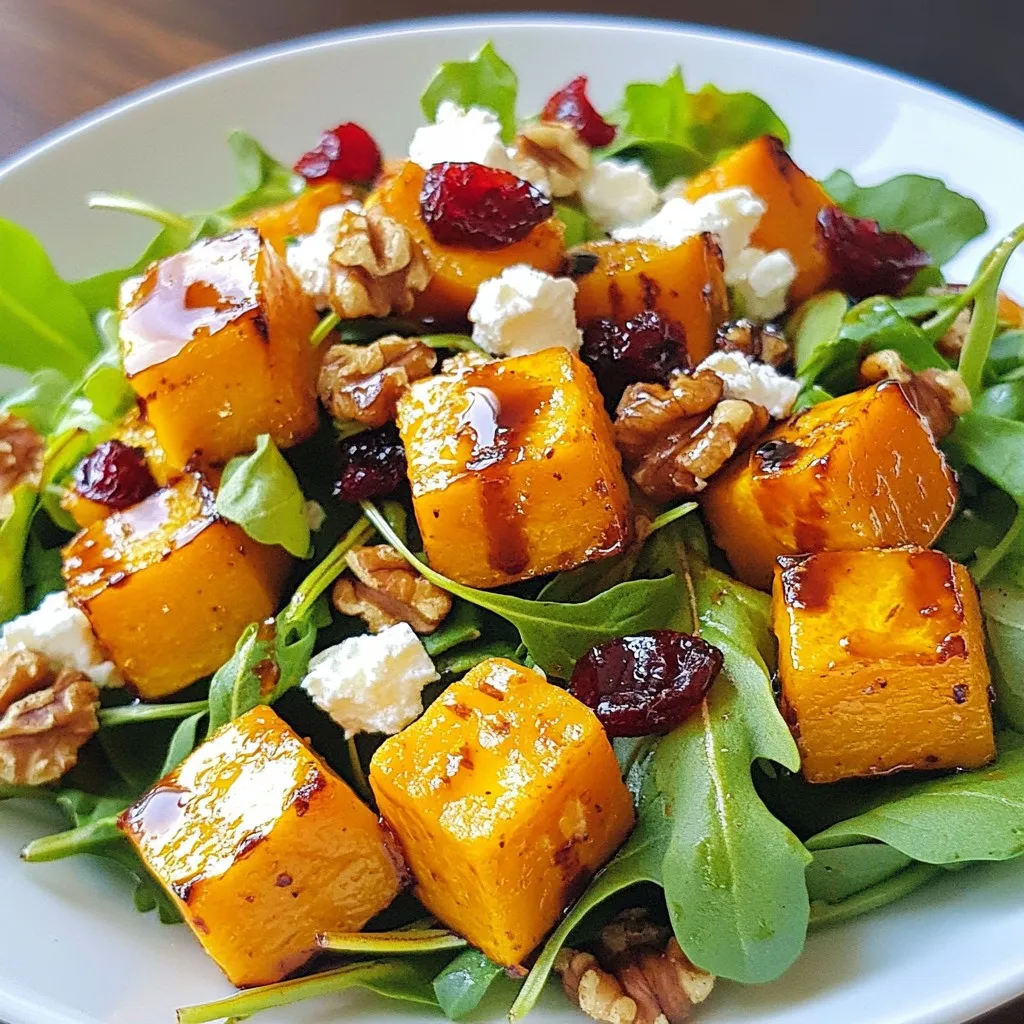
Butternut squash salad is a tasty and healthy choice for any meal! This vibrant dish combines sweet roasted squash, crunchy

- Pre-made pie crusts - Potatoes - Peas - Onion - Garlic - Ginger - Spices: cumin seeds, coriander powder, garam masala, turmeric powder, red chili powder - Vegetable oil - Salt - Fresh cilantro (optional) You need a few simple ingredients for the Easy Indian Samosa Pie. Start with pre-made pie crusts. They save you time and effort. You will need two crusts for this dish. Next, gather two cups of potatoes. Peel and dice them for the filling. Add one cup of peas. You can use fresh or frozen peas based on what you have. Then, chop one medium onion finely. You also need two cloves of garlic, minced for flavor. Grate one teaspoon of ginger for a nice kick. For spices, you will need: - One teaspoon of cumin seeds - One teaspoon of coriander powder - Half a teaspoon of garam masala - Half a teaspoon of turmeric powder - Half a teaspoon of red chili powder (adjust to taste) Next, get two tablespoons of vegetable oil and salt to taste. Fresh cilantro adds a nice touch as a garnish, but it is optional. This ingredient list is simple, yet it creates a flavorful dish. Each ingredient plays a role in the final taste, making your pie both exciting and satisfying. {{ingredient_image_1}} To prepare the potatoes, start by peeling and dicing them into small cubes. Place the diced potatoes in a pot and cover them with salted water. Bring the water to a boil over high heat. Let the potatoes cook for 10 to 15 minutes. You want them to become fork-tender. Test this by poking a piece with a fork; it should slide in easily. Once done, drain the water and set the potatoes aside. Sautéing onions, garlic, and ginger adds great flavor to your filling. Heat vegetable oil in a large skillet over medium heat. Add the cumin seeds and let them sizzle for a few seconds. Then, add the chopped onion, minced garlic, and grated ginger. Cook these until the onions turn soft and clear, about 5 minutes. Stir often to avoid burning them. Now it's time to make the filling. Add the boiled potatoes and peas to the skillet with the sautéed aromatics. Sprinkle in coriander powder, garam masala, turmeric powder, red chili powder, and salt. Mix everything together gently. Cook for another 5 minutes on low heat. This lets the spices blend well with the potatoes and peas. Once done, remove the skillet from heat and let the filling cool slightly. Preheat your oven to 400°F (200°C) while you prepare the crust. Take one pre-made pie crust and roll it out on a clean surface. Use a rolling pin to flatten it evenly. Fit this crust into a 9-inch pie dish. Make sure it covers the sides well. If there are any tears, patch them with extra dough. Spoon the cooled filling into the pie crust, spreading it evenly. Make sure to fill it all the way to the edges. Now, take the second pie crust and roll it out like the first one. Place it over the filling. Press down on the edges to seal them. Use a fork to crimp the edges for a nice look. Finally, cut a few slits in the top crust. This allows steam to escape while baking. Place the pie in the preheated oven and bake it for 30 to 35 minutes. Keep an eye on the pie as it bakes. You want the top crust to turn golden brown. This is a good sign that it's ready. Once done, remove the pie from the oven and let it cool for a few minutes. To enhance the filling, always use fresh spices. Toast the cumin seeds in oil to release their flavor. Add the spices to the onion mix for a deeper taste. If you want a milder pie, cut back on the red chili powder. You can always add more spice later if needed. For a flaky crust, keep the pie crust cold. If it warms up, it will be tough. Use a light touch when rolling it out. Before using the pie crust, chill it in the fridge for 15 minutes. This helps keep it flaky when baked. Serve your samosa pie with a side of yogurt or mint chutney. These add a nice coolness. For drinks, pair it with a light chai or lemonade. Both options balance the spices well and make the meal refreshing. Pro Tips Use Leftover Mashed Potatoes: If you have leftover mashed potatoes, they can be a quick substitute for the boiled potatoes in this recipe, saving you time and adding creaminess. Adjust Spice Levels: Customize the spiciness of the filling by adjusting the amount of red chili powder. Start with less if you're unsure and add more to taste. Try Different Fillings: Get creative with the filling! You can add carrots, corn, or even some cooked lentils for added nutrition and flavor. Let It Rest: After baking, allow the pie to rest for about 10 minutes before cutting. This helps the filling set and makes for cleaner slices. {{image_2}} You can easily switch up the filling for your samosa pie. Try adding different veggies like carrots, bell peppers, or corn. These will add great color and flavor. If you want to include paneer, that’s a tasty choice! Just crumble it into the filling. It adds creaminess and protein, making the dish even better. If you need a gluten-free pie, don’t worry! You can find pre-made gluten-free crusts at most stores. Look for options made with almond flour or rice flour. If you prefer a crustless version, simply skip the crust. Pour the filling into a greased pie dish. Bake it until golden for a yummy, gluten-free meal. You can make your samosa pie as spicy or mild as you like. To adjust the heat, simply add more or less red chili powder. If you want to try new flavors, mix in different spice blends. Garam masala, curry powder, or even smoked paprika can change the taste. Experiment and find your perfect balance! To store your samosa pie, let it cool completely. Place it in an airtight container. This keeps the pie fresh and tasty. You can store it in the fridge for up to three days. It’s best to eat it within this time for great flavor. You can freeze the pie for long-term storage. First, let the pie cool completely. Then, wrap it tightly with plastic wrap. After that, put it in a freezer-safe bag or container. The pie can last for about three months in the freezer. When you're ready to eat it, take it out and thaw it in the fridge overnight. To reheat the pie, the oven works best. Preheat the oven to 350°F (175°C). Place the pie on a baking sheet and cover it with foil. This keeps the crust from getting too brown. Bake for about 20-25 minutes or until hot inside. If you're in a hurry, you can use the microwave. Just place a slice on a microwave-safe plate. Heat it for about 1 to 2 minutes. Keep in mind, the crust might not be as crispy as when you use the oven. Enjoy your pie warm! Yes, you can use store-bought filling. It saves time and effort. However, it may lack the fresh taste of homemade filling. Store-bought options can be convenient for busy cooks. They often come with added preservatives. If you prefer fresh flavors, making your own is best. You can mix and match spices to your liking. Making the crust from scratch is easy and fun! You need flour, butter, and water. Here’s a simple way to do it: - Mix 2 cups of flour with 1 cup of cold butter. - Add a pinch of salt. - Slowly pour in ice-cold water until it forms a dough. - Chill the dough for 30 minutes before rolling it out. Homemade crust gives a fresh taste and a flaky texture. Skipping the spices is not a great idea. Spices add depth and warmth to the dish. Without them, the pie may taste bland. You can adjust the spice levels to fit your taste. If you want mild flavors, use less chili powder. However, I recommend trying at least some spices for the best results. In this blog post, I covered how to make a delicious pie using pre-made crusts and savory fillings. We talked about the best ingredients, step-by-step cooking tips, and storage options. You learned to sauté onions and spices for flavor and how to achieve a flaky crust. Remember, experimenting with spices or adding vegetables can create new flavors. Enjoy making this pie, and share it with others. Your kitchen will smell amazing, and everyone will love it!

Easy Indian Samosa Pie Simple and Flavorful Dish

If you’re craving a warm, hearty dish, this Easy Indian Samosa Pie is for you! Picture creamy potatoes, sweet peas,

Older posts
Newer posts
← Previous Page1 Page2 Page3 … Page150 Next →

dsad

© 2025 Emmas Dish • Built with GeneratePress

Our Policies

  • Copyright Policy
  • Cookie Policy
  • GDPR Policy
  • Privacy Policy
  • Disclaimer
  • Terms Of Use

More Information

  • Home
  • About
  • Contact
  • Appetizers
  • Dessert
  • Dinner
  • Drinks
©2025, Emmas Dish About Back To Top