Skip to content
DisclaimerTerms Of UseGDPR PolicyCookie Policy

Emmas Dish

  • Home
  • Drinks
  • Appetizers
  • Dinner
  • Dessert
  • About
  • Contact
  • Privacy Policy
DisclaimerTerms Of UseGDPR PolicyCookie Policy

Emma

- 1 ½ cups chocolate graham cracker crumbs - ½ cup unsweetened cocoa powder - ½ cup unsalted butter, melted - 1 cup cream cheese, softened - ½ cup powdered sugar - 1 teaspoon peppermint extract - 2 cups whipped cream (or 1 tub of store-bought whipped topping) - ½ cup semi-sweet chocolate chips - Crushed peppermint candies for garnish These ingredients will come together to create a rich and creamy dessert. The chocolate graham cracker crumbs form a sweet crust that pairs well with the smooth cheesecake filling. The cream cheese gives the bars their classic texture, while the whipped cream makes them light and fluffy. Adding cocoa powder boosts the chocolate flavor, while peppermint extract brings a fresh twist. The chocolate drizzle on top adds both flavor and visual appeal. Finally, crushed peppermint candies provide a festive look and a nice crunch. Gather these items before you start. Having everything ready makes the process easier and more fun. You can find most of these ingredients at your local grocery store. Enjoy the process of making these delightful bars! - Combine 1 ½ cups chocolate graham cracker crumbs, ½ cup unsweetened cocoa powder, and ½ cup melted unsalted butter. - Mix until it resembles wet sand. - Press the mixture into a 9x9 inch baking pan evenly. - Refrigerate to set the crust. - Beat 1 cup cream cheese until smooth. - Gradually add ½ cup powdered sugar and 1 teaspoon peppermint extract. - Gently incorporate 2 cups whipped cream into the cream cheese mixture. - Spread the cheesecake filling over the chilled crust evenly. - Smooth the top with a spatula. - Melt ½ cup semi-sweet chocolate chips in a microwave. - Drizzle over the cheesecake filling. - Refrigerate for at least 4 hours to firm up. - Sprinkle with crushed peppermint candies before serving. - Cut into squares for serving. To make a great crust, press it firmly. Use the back of a measuring cup. This helps it hold together. If you want a twist, try using crushed Oreos or vanilla wafers. Both add a fun flavor. For a creamier texture, use room-temperature cream cheese. Blend it until smooth. If you like it sweeter, add more powdered sugar. Just remember to taste as you go. Garnish the bars with crushed peppermint candies. It adds color and crunch. For a festive touch, serve on a bright platter. You could also add a mint leaf on top for extra flair. {{image_2}} You can easily change the flavor of your cheesecake bars. Try adding different extracts. Vanilla or chocolate extracts can make it richer. You can also swap in candies for the garnish. Crushed Oreos or M&M's can add fun colors and textures. If you need gluten-free options, use gluten-free chocolate graham crackers. This keeps the crust tasty and safe for all. For vegan alternatives, try using cashew cream for the cream cheese. Coconut whipped cream works well too. These swaps keep the dessert creamy and delicious. Scaling the recipe is simple. You can double it for a bigger crowd. Just use a larger pan, like a 9x13 inch. If you want fewer bars, cut the recipe in half. A smaller 8x8 inch pan is perfect for this. Adjusting the size helps fit any occasion. After you make your No Bake Chocolate Peppermint Cheesecake Bars, you want to keep them fresh. Store any leftovers in the fridge. Use an airtight container to protect them from air and moisture. This helps maintain their creamy texture and rich flavor. If you don’t have an airtight container, cover the pan tightly with plastic wrap. You can also freeze these cheesecake bars. To do this, cut them into squares first. Place the pieces in a single layer on a baking sheet. Freeze until solid. Then, transfer them to a freezer-safe container. Use wax paper between layers to prevent sticking. When you want to enjoy a square, take it out and let it thaw in the fridge for a few hours. This keeps them tasting fresh and delicious. In the fridge, these cheesecake bars last about five days. Check for any signs of spoilage. If you see any mold or notice an off smell, it’s best to discard them. Keeping an eye on your treats helps ensure you enjoy every bite! Yes, you can use different types of graham crackers. Honey, cinnamon, or even chocolate graham crackers work well. Each type brings its own flavor. Experiment with your favorites to find the best taste. You can easily make these cheesecake bars a day ahead. Just prepare the dessert and refrigerate it. This gives the flavors time to blend. Make sure to cover it well to keep it fresh. If your cheesecake doesn’t set, it often needs more time in the fridge. Ensure it stays chilled for at least four hours. If it’s still soft, try adding more whipped cream to thicken the mixture. Yes, sugar substitutes can work in this recipe. Use sweeteners like stevia or erythritol. Just remember to adjust the amount since they are often sweeter than sugar. Always check the package for the correct ratio. Definitely! You can use milk chocolate, dark chocolate, or even white chocolate. Each type will give a unique taste to the bars. Choose the one you love best for a fun twist. This cheesecake bars recipe is simple yet delicious. You blend chocolate crumbs for the crust and create a creamy filling. Add fun toppings, and you have a delightful treat. Remember to chill your bars well for the best texture. Feel free to make variations or adjust for dietary needs. Enjoy these sweet moments with friends and family. They are sure to be a hit!

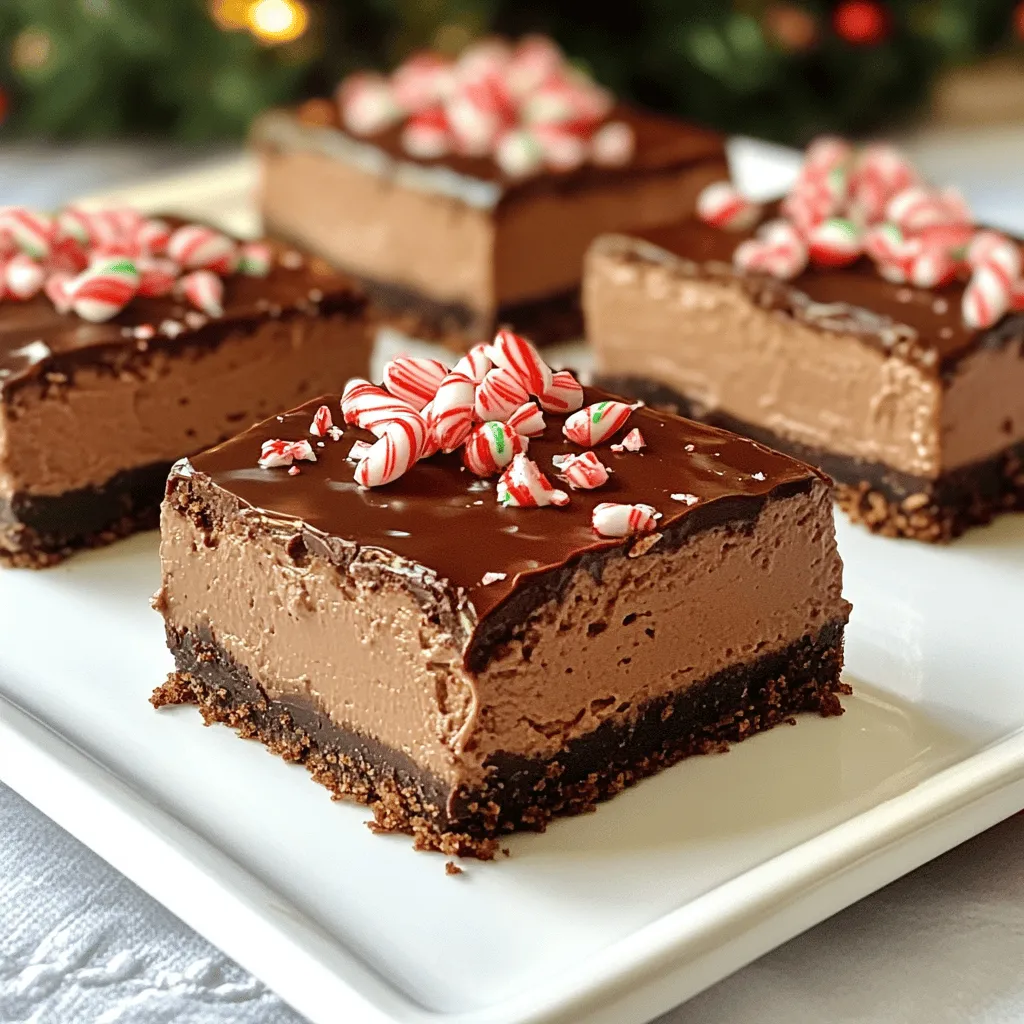
No Bake Chocolate Peppermint Cheesecake Bars Delight

Are you ready to whip up a tasty treat that requires no oven? These No Bake Chocolate Peppermint Cheesecake Bars

- 1 cup Arborio rice - 4 cups vegetable broth - 1 cup asparagus, trimmed and chopped into 1-inch pieces - 1 small onion, finely chopped - 2 cloves garlic, minced - 1 tablespoon olive oil - 1/2 cup heavy cream - 1/2 cup grated Parmesan cheese - Zest of 1 lemon - 2 tablespoons lemon juice - Salt and pepper to taste To make a creamy lemon asparagus risotto, you need simple, fresh ingredients. Arborio rice is key; it gives risotto its creamy texture. Vegetable broth adds flavor. Choose a good quality broth for the best taste. Fresh asparagus gives a nice crunch and bright color. Onion and garlic build the base flavor. Olive oil adds richness and helps cook the aromatics. Heavy cream makes the dish creamy and smooth. Parmesan cheese brings a salty, nutty taste. Lemon zest and juice add bright, fresh notes. Finally, season with salt and pepper to enhance all the flavors. - Fresh parsley Fresh parsley is a great garnish. It adds color and a fresh touch to your dish. You can sprinkle it on just before serving. It not only looks nice but also adds a bit of flavor. Each ingredient plays a role in making the risotto rich and tasty. Use fresh, high-quality items for the best results. Enjoy the process, and you will create a delicious dish! To start, you need to prepare the vegetable broth. Place it in a saucepan over low heat. Keep it warm, but do not let it boil. This step is key for smooth risotto. If the broth is too hot, it can cook the rice unevenly. Next, heat the olive oil in a large skillet over medium heat. Add the finely chopped onion. Cook it for about 3-4 minutes until it looks clear. Then add the minced garlic. Stir it in for one more minute until it smells great. These steps build the base flavor of your risotto. Now, it's time to add the Arborio rice to the skillet. Stir it in and cook for 2-3 minutes. You want the rice to look slightly clear and smell nutty. Toasting the rice helps it absorb the broth better later on. Begin adding the warm vegetable broth one ladle at a time. Stir the rice as you add broth. Wait until the rice absorbs most of the liquid before adding more. This process takes about 10 minutes. After this time, add the chopped asparagus. Keep adding broth for 5-7 more minutes. The risotto should be creamy and the rice tender but not mushy. Once the rice is cooked, take it off the heat. Stir in the heavy cream, grated Parmesan cheese, lemon zest, and lemon juice. Season with salt and pepper to taste. Mix well until everything is creamy and combined. This is where the risotto gets its rich texture. Finally, serve the risotto hot. Garnish it with fresh parsley for a bright touch. This adds color and a fresh flavor. Place it in a nice bowl for a lovely presentation. Enjoy this dish warm for the best taste. To make creamy risotto, you need to balance creaminess and al dente rice. The rice should be cooked, yet firm to bite. This is known as al dente. The key is to stir often and add broth slowly. Each time the rice absorbs most of the broth, add more. This helps the rice release its starch, making it creamy. You’ll know it’s done when the risotto is smooth but still has a slight bite. Preparing asparagus is simple. Start by washing the stalks well. Trim the ends where they feel tough. Then chop them into 1-inch pieces. This size cooks evenly and stays crisp. Add the asparagus to the risotto after about 10 minutes of cooking. This timing lets them soften while still keeping their bright green color. Fresh asparagus adds a nice crunch and flavor. When making risotto, avoid common mistakes. Don’t add all the broth at once. This can lead to uneven cooking and a gluey texture. Stirring is also key; if you don’t stir enough, the rice might stick and burn. Lastly, don’t skip the resting step after cooking. Letting risotto sit for a minute allows the flavors to meld. This makes every bite taste better. {{image_2}} You can add more veggies to your creamy lemon asparagus risotto. Consider peas, spinach, or bell peppers. They bring color and flavor. Just chop them small and add them while cooking. Cook them until tender. You can also try mushrooms for an earthy taste. They pair well with lemon and cream. Want to make your risotto heartier? Add protein! Chicken, shrimp, or tofu work great. If you choose chicken, cook it first and chop it up. For shrimp, toss them in when the rice is almost done. They will cook quickly. Tofu can be cubed and sautéed before mixing it in. This adds a nice texture and boosts protein. You can easily make a vegan risotto. Swap heavy cream for coconut milk or cashew cream. Use nutritional yeast instead of Parmesan. It adds a cheesy flavor without dairy. For broth, pick vegetable broth or mushroom broth for more depth. These swaps keep the dish tasty and creamy without animal products. To store leftovers, let the risotto cool first. Place it in an airtight container. It will last up to three days in the fridge. When ready to eat, check for any signs of spoilage. Freezing risotto is possible, but it can change the texture. If you want to freeze it, do so within a day of cooking. Divide the risotto into small portions. Use freezer-safe containers or bags. Label them with the date. It will stay fresh for about one month. To reheat risotto, avoid the microwave if possible. Instead, use a skillet over low heat. Add a splash of broth or water to help restore creaminess. Stir often to heat evenly. Keep an eye on the texture. You want it creamy, not dry. Risotto usually takes about 20 to 30 minutes to cook. You start by sautéing the onions and garlic, then add the rice. From there, you slowly add broth while stirring. This method helps the rice absorb the flavors and become creamy. Yes, you can make risotto in advance. Cook it fully, then let it cool. Store it in an airtight container in the fridge. When you're ready to eat, reheat it on the stove with a little broth to bring back its creamy texture. Arborio rice is the best choice for risotto. This short-grain rice has a high starch content, which gives risotto its creamy texture. Other types of rice won't yield the same rich, velvety result. Always stick with Arborio for a true risotto experience. This blog post covers how to make a delicious asparagus risotto. We explored the key ingredients, step-by-step cooking instructions, and useful tips. You learned about optional garnishes and variations, plus how to store leftovers. Remember, perfect risotto balances creaminess and al dente texture. Experiment with different veggies or proteins to make it your own. With practice, you can create a dish everyone will love. Enjoy your cooking journey!

Creamy Lemon Asparagus Risotto Simple and Savory Dish

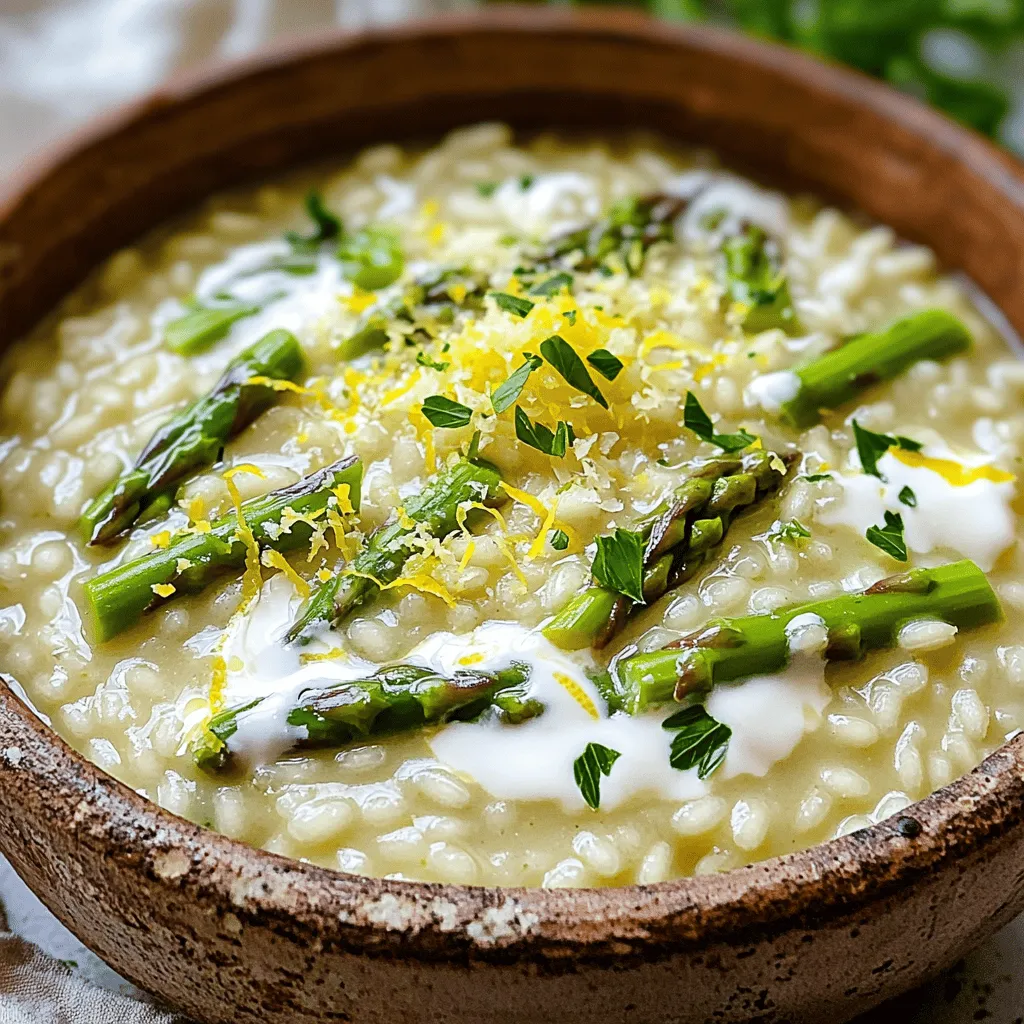
Are you craving a dish that’s both creamy and tangy? This Creamy Lemon Asparagus Risotto is your answer! With simple

To make these tasty apple chips, gather these items: - 2 large apples (preferably Honeycrisp or Fuji) - 1 teaspoon ground cinnamon - 1 tablespoon sugar (or a sugar substitute for a healthier option) - Pinch of salt - Cooking spray or a small amount of coconut oil (for greasing) You can make your apple chips even better with these choices: - Use a sugar substitute like stevia or monk fruit. - Try adding a touch of nutmeg for extra flavor. - Consider a sprinkle of cayenne for a spicy kick. Not all apples are the same. For the best taste, I suggest: - Honeycrisp: They are sweet and juicy. - Fuji: These apples are crisp and have a lovely sweetness. - Gala: They are also sweet and work well in this recipe. Choosing the right apple makes all the difference in flavor and texture! Start by washing the apples well. I love using Honeycrisp or Fuji for their sweet taste. Slice them into very thin rounds, about 1/8 inch thick. You can use a mandoline slicer or a sharp knife for this. If you want, you can remove the seeds, but keep the shape of the apples. Grab a large bowl and mix together the ground cinnamon, sugar, and a pinch of salt. Add the apple slices to the bowl. Gently toss them until they are well coated in the cinnamon sugar mix. This step brings out the sweetness in the apples. Next, preheat your air fryer to 300°F (150°C) for about 5 minutes. This helps the apple chips cook evenly. Lightly spray the air fryer basket with cooking spray or brush it with coconut oil. Arrange the apple slices in a single layer in the basket. Make sure they do not overlap. You may have to cook them in batches if your air fryer is small. Air fry the apple slices for 15 to 20 minutes. Flip them halfway through for even cooking. Check them closely after 10 minutes so they don’t burn. Once they are crisp and golden, remove them from the air fryer. Let them cool on a wire rack. They will become even crispier as they cool. Serve your cinnamon apple chips in a pretty bowl. A sprinkle of extra cinnamon adds a nice touch. Enjoy them as a healthy snack or a tasty dessert! To get the best crunch, slice your apples thin. Aim for about 1/8 inch thickness. This helps them cook evenly. Use a mandoline slicer for the best results. If you don’t have one, a sharp knife works too. Make sure to lay the slices flat in the air fryer. Avoid overlapping them; this step is key for crispiness. Always preheat your air fryer. Set it to 300°F (150°C) for five minutes. This step warms the air fryer, leading to even cooking. Lightly coat the basket with cooking spray or coconut oil. This helps prevent sticking and promotes even browning. Flip the apple slices halfway through cooking for a uniform crisp. Don’t skip the cooling step. After cooking, let the chips cool on a wire rack. This helps them finish crisping up. Keep an eye on the cooking time. Check them at the 10-minute mark to avoid burning. Cooking times can change based on your air fryer and slice thickness. If your chips are too soft, they may need a bit more time. {{image_2}} You can mix up the flavor of your apple chips. Try adding nutmeg for a warm touch. Just use about 1/4 teaspoon with your cinnamon. You can also add a splash of vanilla extract when coating the apples. This adds a sweet scent and taste that pairs well with cinnamon. Apple chips are great, but you can use other fruits too. Pears work well and have a nice sweetness. Simply slice them thin, just like the apples. You can also try peaches or bananas. Each fruit gives a unique flavor and texture. They will all crisp up nicely in the air fryer. If you have dietary needs, you can adjust this recipe. Use a sugar substitute if you want a lower-calorie snack. Options like stevia or monk fruit work well. If you are gluten-free, this recipe is safe as is. Just ensure your cooking spray is also gluten-free. You can enjoy these chips without worry! To keep your air fryer cinnamon apple chips fresh, let them cool completely. Place them in a clean, dry container. If you have any leftovers, store them in an airtight container. This helps to lock in their crispness. I suggest using glass jars or plastic containers with tight lids. These options work best for keeping moisture out. You can also use resealable bags. Just remove as much air as possible before sealing. Stored correctly, your apple chips can last for about one week. However, they are best when eaten within the first few days. After that, they may lose their crunch. If you notice any softness, it's time to enjoy them or toss them out. Yes, you can! Many fruits work well in an air fryer. Try pears, bananas, or peaches. Just slice them thinly, like apples. Each fruit brings its own flavor and sweetness. Make sure to adjust the cooking time. Softer fruits may need less time than apples. To reduce the sweetness, cut back on the sugar. You can use just half a tablespoon. Another way is to use a sugar substitute. You can also skip the sugar entirely. The cinnamon will still add great flavor. A pinch of salt can enhance the taste too. For snacks like apple chips, set your air fryer to 300°F (150°C). This temperature cooks the chips evenly. Cooking times vary, so check them often. Start with 15 minutes, flipping halfway. If they’re not crisp enough, add a few more minutes. In this blog post, we covered how to make delicious apple chips with easy steps. We discussed required and optional ingredients, along with the best apples to use. You learned how to prepare, coat, and cook the apple slices for yummy results. Tips for crispiness and storage help you keep them fresh longer. Feel free to try different flavors and fruits. Now you have the knowledge to create tasty snacks that everyone will enjoy. Let your air fryer help you make perfect apple chips today!

Air Fryer Cinnamon Apple Chips Easy to Make Snack

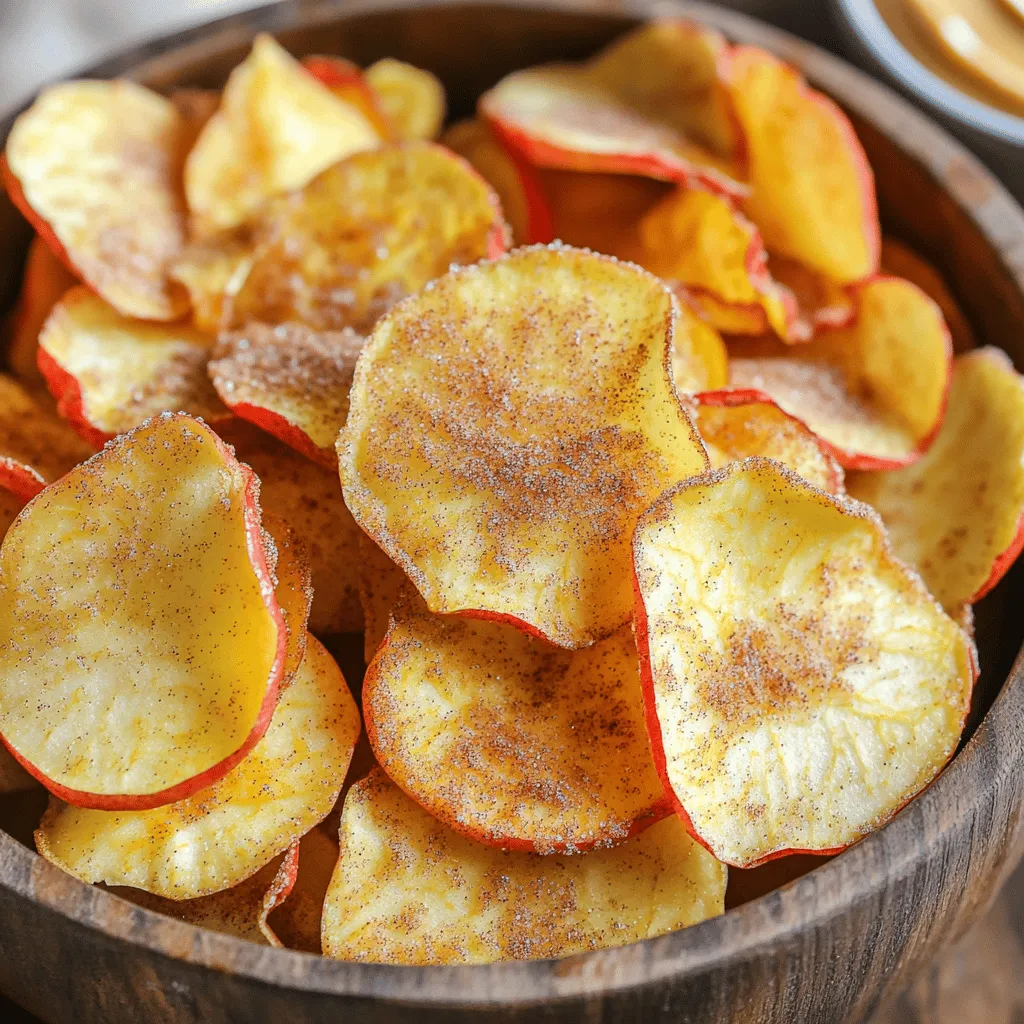
Craving a tasty snack that’s both easy to make and healthy? Air fryer cinnamon apple chips are the answer! You’ll

- 2 cups cooked chicken, shredded - 1 cup BBQ sauce - 1 bag of tortilla chips - 2 cups shredded cheddar cheese - 1 cup black beans, drained and rinsed - 1 cup corn - 1 jalapeño, sliced (optional) - 1 cup cherry tomatoes, halved - 1 avocado, diced - ¼ cup green onions, chopped - Sour cream and cilantro for garnish (optional) - Large mixing bowl - Sheet pan - Oven Gathering these ingredients is key for great nachos. You can use any BBQ sauce you love. The shredded chicken works best when it is warm. I always like to use fresh tortilla chips. They hold up well under all the toppings. For toppings, the shredded cheddar cheese brings a creamy taste. Black beans and corn add texture and color. If you want spice, add the jalapeños. The cherry tomatoes and avocado bring freshness. Finally, green onions, sour cream, and cilantro add a nice touch. You need a large mixing bowl to combine the chicken and BBQ sauce. A sheet pan will hold all your nachos as they bake. Make sure your oven is ready to go for the best results. To start, take 2 cups of cooked chicken and shred it. Place this in a large mixing bowl. Pour 1 cup of BBQ sauce over the chicken. Use a spoon to mix them well. Ensure every piece of chicken gets coated in the sauce. This makes the chicken tasty and flavorful. Grab a large baking sheet and spread out one bag of tortilla chips. Make sure they are in a single layer. This helps all the toppings sit nicely. Now, layer the BBQ chicken evenly on top of the chips. Next, sprinkle 1 cup of black beans and 1 cup of corn over the chicken. These add great texture and taste. Finally, add 2 cups of shredded cheddar cheese on top. Cover the chips and chicken completely with cheese. Set your oven to 400°F (200°C). Place the nachos in the oven for 15 to 20 minutes. You will know they are done when the cheese is melted and bubbly. The edges of the chips may turn golden too. Once ready, take them out carefully. Enjoy the wonderful smell of BBQ chicken nachos! To make the best nachos, focus on the cheese. Use a good melting cheese like cheddar. Melt it until it bubbles and gets golden. This gives a great taste and look. Layering is key for flavor. Start with a base of tortilla chips. Spread the chips evenly on your sheet pan. This helps all toppings sit nicely. Add BBQ chicken next. Then sprinkle black beans and corn. Top with cheese for a tasty melt. For serving, keep it fun and relaxed. Use the sheet pan to serve nachos right from the oven. This makes for an easy cleanup. Add a bowl of extra BBQ sauce on the side. Sour cream also makes a great dip. Garnish the nachos with colorful toppings. Use diced avocado and halved cherry tomatoes. Chopped green onions add a nice crunch. This way, everyone can enjoy a full plate of flavor. {{image_2}} You can swap the chicken for pulled pork or beef. Both meats add a rich flavor. Pulled pork works well with sweet BBQ sauce. Beef gives a hearty taste that many love. For a vegetarian twist, try black beans or grilled veggies. These options keep the dish fun and tasty for everyone. The BBQ sauce is key to flavor. Try different types like smoky or spicy. You can even mix two sauces for a unique taste. Don't stop at just BBQ sauce! Add toppings like jalapeños for heat or fresh herbs for brightness. Cherry tomatoes and avocado also add freshness and creaminess. If you need gluten-free options, choose corn tortilla chips. They hold up well and taste great. For those avoiding dairy, there are fantastic cheese substitutes. Nutritional yeast can add a cheesy flavor without dairy. These swaps ensure everyone can enjoy your nachos without worry. To keep your nachos fresh, store them in an airtight container. This helps prevent sogginess. If you have toppings like avocado or tomatoes, add them just before serving. Leftover nachos last about 2 to 3 days in the fridge. The best way to reheat nachos is in the oven. Preheat your oven to 350°F (175°C). Spread the nachos on a baking sheet. Bake for about 10 minutes. This keeps them crispy. Avoid using the microwave, as it can make them mushy. Enjoy your nachos again with great taste! Yes, you can prep some parts early. Shred the chicken and mix it with BBQ sauce. Store this in the fridge for up to two days. You can also prepare the toppings, like dicing the avocado and chopping green onions. Keep them in separate containers. When ready to bake, layer the chips and toppings on the sheet pan. Then, bake for a quick, tasty meal! For BBQ sauce, homemade is great. You can mix ketchup, brown sugar, and apple cider vinegar. But store-bought is fine too! Look for sauces that are rich and not too sweet. Brands with a smoky flavor or a kick of spice work well. Choose what makes you happy. Want more heat? Use spicy BBQ sauce. You can add sliced jalapeños on top. If you like it hotter, try adding diced serrano peppers. You can also sprinkle crushed red pepper flakes over your nachos before baking. Adjust the spice to your taste! This blog post guides you through making delicious BBQ chicken nachos. You learned the key ingredients needed, from shredded chicken to tortilla chips. We covered step-by-step instructions for prepping, assembling, and baking them to perfection. I shared tips for serving and ways to customize your nachos with different proteins and flavors. Finally, I included storage tips to keep your leftovers fresh. Enjoy experimenting, and create your ideal nachos for any occasion!

Sheet Pan BBQ Chicken Nachos Flavorful Game Day Dish

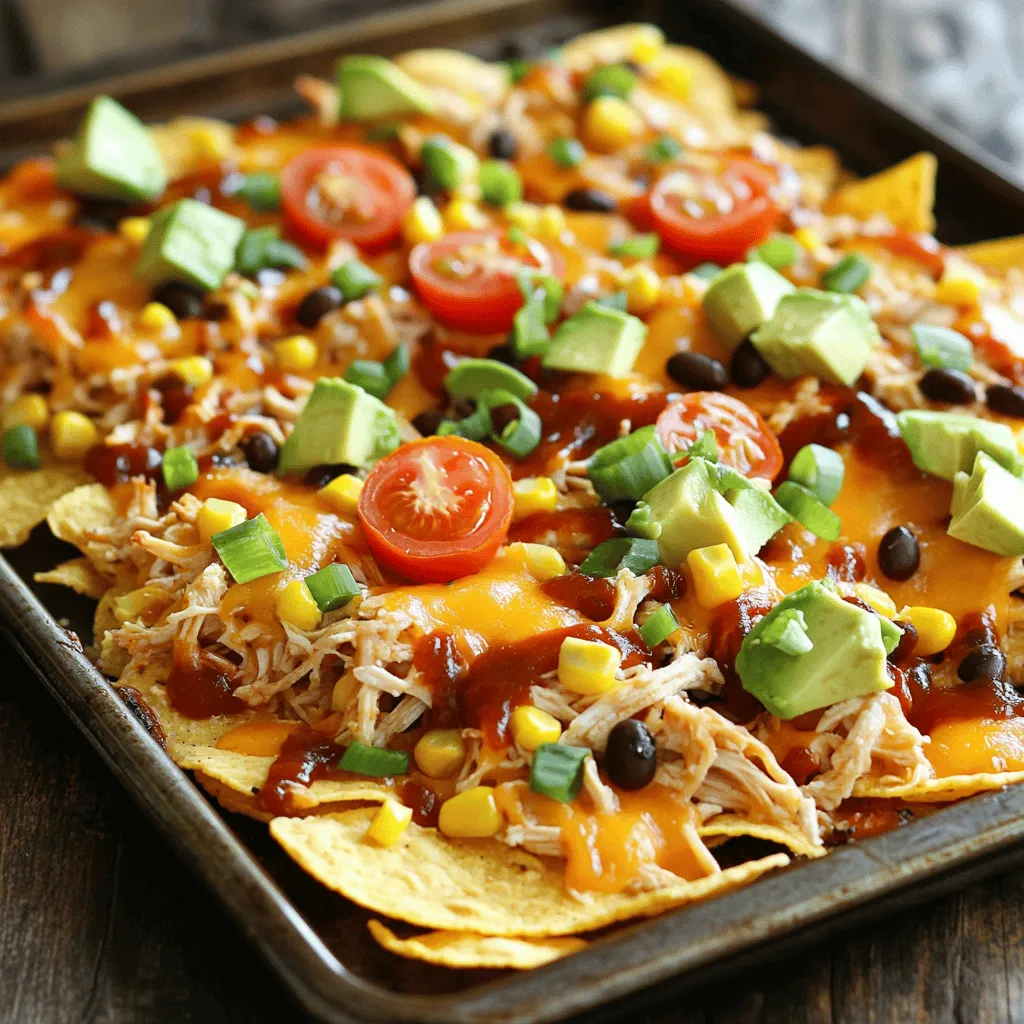
Game day just got a lot more exciting with my Sheet Pan BBQ Chicken Nachos! This dish brings bold flavors

To make Protein Banana Cream Pie Parfaits, you'll need a few simple ingredients that pack a punch. Here's the full list: - 2 ripe bananas, sliced - 1 cup Greek yogurt (vanilla or plain) - 1 cup protein powder (vanilla flavor works well) - 1/2 cup unsweetened almond milk - 1 tablespoon honey or maple syrup (optional, for sweetness) - 1/2 teaspoon vanilla extract - 1 cup granola (choose your favorite) - Whipped coconut cream, for topping - Additional banana slices and granola for garnish Each ingredient plays a role in making this treat delicious and nutritious. The ripe bananas add natural sweetness and flavor. Greek yogurt gives creaminess and boosts protein. Protein powder enhances the dish's health benefits. Almond milk keeps it light while adding moisture. You can adjust the honey or maple syrup based on your taste. Whipped coconut cream adds a fun, fluffy topping. And the granola brings a great crunch. It’s easy to see why these parfaits are a hit! To start, grab a mixing bowl. In it, combine the Greek yogurt, protein powder, almond milk, honey, and vanilla extract. Use a whisk to blend these together. You want a smooth and creamy texture. If it's too thick, add a bit more almond milk. This mixture is your base for the parfait. Now, take your serving glasses or bowls. Start with a spoonful of the protein yogurt mixture at the bottom. Next, add a layer of sliced bananas. Then, sprinkle a layer of granola on top. Repeat this layering until you fill the glasses. Make sure to finish with a layer of the yogurt mixture on top. For a special touch, add a dollop of whipped coconut cream on each parfait. This makes it look fancy and adds a nice flavor. You can also garnish with extra banana slices and a sprinkle of granola on top. This not only adds color but also gives a crunchy finish. Enjoy your beautiful parfaits! To get a creamy yogurt mixture, whisk Greek yogurt with protein powder and almond milk. This creates a smooth base. If Greek yogurt is not your thing, you can try regular yogurt or a dairy-free option like coconut yogurt. Both will still taste great! Add honey or maple syrup when you mix your yogurt. This way, you control the sweetness right from the start. You can also use natural sweeteners like agave syrup or stevia for a healthier twist. Just remember to taste as you go to find your perfect level of sweetness. For a fun presentation, use clear glasses so the layers show off. Start with the yogurt mixture, then add banana slices and granola. Repeat the layers, and top with whipped coconut cream. For portion control, use smaller glasses. This lets everyone enjoy a treat without overdoing it! {{image_2}} You can switch up the flavor of your parfaits easily. Use different protein powder flavors. Chocolate or strawberry protein powder can add new taste. You can also substitute the bananas with other fruits. Try berries, peaches, or even mangoes. Each fruit gives a unique twist to your parfait. If you want a dairy-free option, swap Greek yogurt for coconut yogurt. This keeps the creaminess while being dairy-free. You can also use almond milk instead of regular milk. For a low-sugar option, skip the honey or maple syrup. The ripe bananas add natural sweetness. This makes your parfait tasty without added sugar. Texture can change your parfait experience. Experiment with different types of granola. Use crunchy granola for a satisfying bite. You can also add nuts or seeds for extra crunch. Almonds, walnuts, or chia seeds work well. These changes can make your parfait more fun and filling. To store your parfaits in the refrigerator, keep them in an airtight container. Glass containers work well, but plastic ones are fine too. Layer the parfaits carefully to avoid mess. If you have extra toppings, store them separately. This keeps everything fresh and crunchy. If you want to keep parfait components longer, freeze them. Freeze the yogurt mixture and fruit in separate bags. Granola can also freeze well, but it may lose crunch. To thaw, place the components in the fridge overnight. Serve once everything is soft and ready to enjoy. Parfaits last about 3-4 days in the fridge. Check for signs of spoilage. If the yogurt smells sour or looks off, it's best to toss it. Sliced bananas can brown quickly, so use them fresh for the best taste. You can easily make this recipe dairy-free. Instead of Greek yogurt, use a dairy-free yogurt. Look for almond, coconut, or soy-based yogurts. They provide great flavor and texture. For the protein powder, choose plant-based options. This way, you keep the protein high without dairy. Yes, you can use a different type of protein powder. Vanilla whey protein works well, but you can also try pea or hemp protein. Each type has a unique taste. Just make sure it blends well with the other ingredients for smoothness. Prepping these parfaits in advance is a great idea. You can store them in the fridge for up to two days. Just layer them as usual, but wait to add the granola until serving. This keeps the granola crunchy and fresh. If you want to swap granola, try crushed nuts or seeds. Almonds, walnuts, or pumpkin seeds add nice crunch. You can also use puffed rice for a lighter option. Just ensure any substitute fits your taste and dietary needs. This recipe yields four servings. Each parfait is packed with flavor and nutrition. You can easily adjust the recipe for more or fewer servings by changing the ingredient amounts. Enjoy sharing them with family or friends! This parfait recipe is simple and fun. You learned about the ingredients, preparation, and layering. We shared helpful tips for creaminess and sweetness. You can modify flavors and textures easily. Store your parfaits right to keep them fresh. Now you have all you need to make tasty, healthy parfaits. Enjoy making your own delicious creations!

Protein Banana Cream Pie Parfaits Deliciously Easy Treat

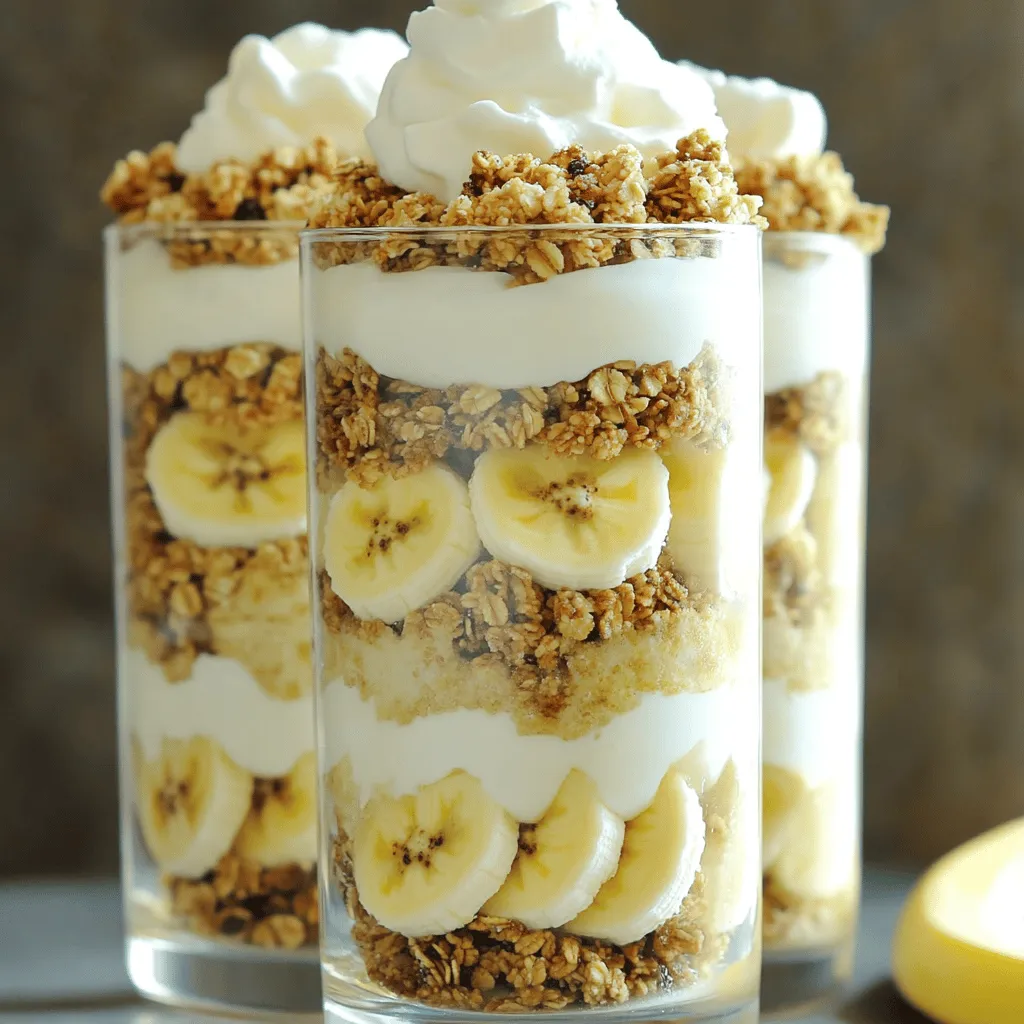
Craving a sweet treat that fuels your day? Let me introduce you to Protein Banana Cream Pie Parfaits! This easy

- 1 ½ cups all-purpose flour - 1 teaspoon baking powder - ½ teaspoon baking soda - 1 teaspoon ground cinnamon - ½ teaspoon ground ginger - ¼ teaspoon nutmeg - ½ teaspoon salt - ¾ cup granulated sugar - ¼ cup brown sugar, packed - 2 large eggs - ½ cup vegetable oil - 1 teaspoon vanilla extract - 2 cups grated carrots (about 3-4 medium carrots) - ½ cup crushed pineapple, drained - ½ cup chopped walnuts or pecans (optional) - ½ cup raisins (optional) Gathering these ingredients is a key step. You want to start with fresh carrots. Grating them gives the muffins a sweet flavor and nice texture. The crushed pineapple adds moisture and a hint of tropical taste. For the dry mix, I always use all-purpose flour. It helps create a soft muffin base. Baking powder and baking soda work together to make the muffins rise perfectly. The spices, like cinnamon and ginger, add warmth and depth. Don't skip the nutmeg; it makes a big difference! You’ll need both granulated and brown sugar. Granulated sugar sweetens, while brown sugar gives a rich flavor. The wet ingredients include eggs, vegetable oil, and vanilla extract. These keep the muffins moist and fluffy. If you want to add crunch, toss in some nuts. Walnuts or pecans work great. For a bit of sweetness, raisins are a tasty choice. They blend well with the other flavors. Make sure to have everything ready before you start. This helps the process go smoothly. Enjoy the fun of baking with these great ingredients! First, preheat your oven to 350°F (175°C). This step is key for even baking. While your oven warms up, prepare your muffin tin. You can line it with paper liners or grease it lightly. This helps the muffins pop out easily after baking. In a medium bowl, whisk together the flour, baking powder, baking soda, cinnamon, ginger, nutmeg, and salt. Make sure they mix well. This blend gives our muffins a warm, spicy flavor. In a large bowl, mix the granulated sugar, brown sugar, eggs, vegetable oil, and vanilla extract. Beat everything until smooth and creamy. Next, stir in the grated carrots and crushed pineapple. Mix until these ingredients blend in well. The carrots and pineapple add moisture and sweetness. Now, gently add the dry mixture to the wet mixture. Fold them together carefully. Be careful not to overmix; some lumps are okay. If you want, fold in the chopped nuts and raisins. This step adds a nice crunch and extra flavor. Then, divide the batter evenly among the muffin cups. Fill each cup about ¾ full to allow for rising. Place the muffin tin in the preheated oven. Bake for 18-20 minutes. To check for doneness, insert a toothpick into the center of a muffin. If it comes out clean, your muffins are ready. Let them cool in the pan for 5 minutes, then transfer them to a wire rack. Enjoy the wonderful smell that fills your kitchen! To get the best muffin texture, avoid overmixing the batter. When combining wet and dry ingredients, mix just until they come together. A few lumps are fine. Properly measuring ingredients is key. Use a spoon to fill your measuring cup with flour, then level it off with a knife. This method prevents packing, which can lead to dry muffins. After baking, dust your muffins with powdered sugar. This adds a sweet touch and makes them look fancy. For a beautiful garnish, add a small sprig of mint on top. It adds a pop of color and a hint of freshness. To avoid dry muffins, make sure not to overbake. Keep an eye on them and do the toothpick test at 18 minutes. Ensure proper rising by checking your baking powder and baking soda for freshness. Expired leavening agents can cause flat muffins. {{image_2}} You can make your carrot cake muffins even better. Try adding shredded coconut for a tropical twist. You can also add citrus zest, like orange or lemon, for a bright flavor. Experimenting with nuts is fun too. Try using chopped pecans or almonds for a different crunch. Each option adds a unique touch to your muffins. If you need a gluten-free option, use gluten-free flour instead of all-purpose flour. This swap works well and keeps the muffins tasty. For a vegan version, substitute eggs with flax eggs or applesauce. You can also switch the vegetable oil for coconut oil. These choices help everyone enjoy the muffins. You can make your muffins special by adding seasonal spices. In fall, try cinnamon and nutmeg. In spring, think about adding fresh fruits like strawberries or blueberries. Each season brings new flavors that can enhance your carrot cake muffins. Enjoy the variety and let your creativity shine! To keep your carrot cake muffins fresh, store them at room temperature. Place them in an airtight container. This helps keep the moisture in. They will stay good for about 2 days. If you want them to last longer, use refrigeration. Just make sure to wrap them well in plastic wrap or foil. They can last up to a week in the fridge. If you want to freeze your muffins, follow these steps. First, cool them completely. Then, wrap each muffin in plastic wrap. Place the wrapped muffins in a freezer bag. This keeps them fresh for up to 3 months. When you want to enjoy them again, you can thaw them easily. Just take a muffin out and leave it on the counter for a few hours. For a quicker way, use the microwave. Heat it for about 30 seconds. Enjoy your muffins whenever you like! Yes, you can use whole wheat flour. It gives muffins a denser texture and richer flavor. Start with a 1:1 ratio, but consider adding a bit more liquid. Carrot cake muffins last about 3 to 5 days at room temperature. Store them in an airtight container. If you want them to last longer, refrigerate them for up to a week. Absolutely! You can prepare the batter the night before and bake in the morning. Or, bake the muffins ahead and store them in an airtight container. To reheat muffins, place them in the microwave for 10-15 seconds. You can also warm them in an oven at 350°F for about 5 minutes. This keeps them moist and tasty! Yes! You can use honey or maple syrup instead of granulated sugar. Use about 3/4 cup of honey or syrup for each cup of sugar. Reduce the liquid in the recipe slightly to balance it out. In this post, we explored the essential ingredients and steps to bake delicious carrot cake muffins. We discussed mixing, baking, and tips for perfect texture. I shared ways to enhance flavors and variations to suit your taste. Your muffins can stay fresh or be frozen for later enjoyment. Remember, with practice, you'll master this recipe. Make these muffins your own, and enjoy every bite!

Carrot Cake Muffins Delightful and Easy Recipe

If you love the warm, sweet flavors of carrot cake, you’re in for a treat! These Carrot Cake Muffins are

To make Slow Cooker Loaded Baked Potato Soup, you will need: - 4 large russet potatoes, peeled and diced - 1 medium onion, diced - 2 cloves garlic, minced - 4 cups vegetable broth - 1 cup heavy cream (or coconut cream for a dairy-free option) - 1 teaspoon dried thyme - 1 teaspoon smoked paprika - Salt and pepper to taste - 1 cup shredded cheddar cheese - 1/2 cup cooked bacon bits (optional; use crispy tempeh for a vegetarian option) - 1/4 cup green onions, sliced for garnish - Sour cream for serving (optional) If you want a dairy-free version, swap heavy cream with coconut cream. For a vegetarian option, you can use crispy tempeh instead of bacon. To enhance the soup, consider these herbs and spices: - Fresh parsley adds a nice touch. - A pinch of cayenne pepper adds heat. - Chives can brighten the flavors. For toppings, try these alternatives: - Crumbled feta for a tangy bite. - Avocado slices for creaminess. - Extra cheddar cheese for richness. - A drizzle of olive oil for depth. These options will make your soup even more delightful! To start, gather your ingredients. You need four large russet potatoes, one medium onion, two cloves of garlic, and four cups of vegetable broth. 1. Combine Ingredients: In your slow cooker, add the diced potatoes, onion, garlic, broth, thyme, smoked paprika, salt, and pepper. Stir them well. This mix is key for a full flavor. 2. Ensure Even Cooking: Cut the potatoes into similar sizes. This helps them cook evenly. Place the slow cooker on a flat surface for best results. Cooking this soup is easy. You can choose between two settings. - Low Heat: If you cook on low, set the timer for six to eight hours. This lets the flavors meld nicely. - High Heat: For a quicker option, use high heat. Set it for four hours. Signs the Soup is Done: Check the potatoes with a fork. They should be soft and break easily. Once your soup is ready, it’s time for the final steps. 1. Mash the Potatoes: Use a potato masher directly in the slow cooker. Mash until creamy but keep some chunks for texture. 2. Add Cream and Cheese: Pour in one cup of heavy cream, or coconut cream if you want a dairy-free option. Add one cup of shredded cheddar cheese. Stir until everything is melted together. 3. Incorporate Protein: If you like bacon, mix in half a cup of cooked bacon bits. For a vegetarian twist, crispy tempeh works well too. Reserve some for topping later. 4. Serve: Ladle the soup into bowls. Top with extra bacon or tempeh, a dollop of sour cream if you wish, and a sprinkle of sliced green onions. This will make it look and taste amazing! To get just the right texture in your soup, you have two good options. For a creamy soup, mash the potatoes well. This helps blend everything smoothly. If you want some chunks, mash only half and leave the rest whole. This gives a nice mix of creamy and chunky. Adjusting seasoning is very important. Taste your soup before serving. If it needs more flavor, add a pinch of salt or a dash of pepper. A little more smoked paprika can also boost the taste. Cleaning your slow cooker is easy. After cooking, let it cool. Wash the pot with warm, soapy water. For tough spots, soak it for a bit. Always dry it well before storing. If you want to switch it up, there are other ways to cook this soup. You can use a stovetop pot or an Instant Pot. Just remember, cooking times will change. For the stovetop, cook on medium heat for about 30 minutes. In an Instant Pot, set it for 10 minutes on high pressure. {{image_2}} You can make this soup even better with fun flavors. Try adding different cheeses. A sharp cheddar adds a nice bite. For a creamy twist, use gouda or Monterey Jack. Want some heat? Mix in jalapeños or a dash of hot sauce. You can also add vegetables like spinach or carrots. These will give your soup a fresh taste and bright color. Just chop them up and toss them in the slow cooker with the other ingredients. Looking to boost your soup? You can add protein easily. Cooked chicken or sausage works great. Just chop them into small pieces and stir them in during the last hour of cooking. If you want a plant-based option, use lentils or chickpeas for protein. For a vegetarian twist, crispy tempeh is a tasty choice. It gives a nice crunch and flavor. You can also leave out meat for a vegan version. Just focus on the veggies and the rich broth. You want to store your leftover soup in the fridge. Let it cool first. Use an airtight container for the best storage. This way, it will stay fresh for up to three days. When you reheat, warm it slowly on the stove. Stir it often to keep it from sticking. You can also use the microwave if you're in a hurry. Just remember to cover it to avoid splatters. You can freeze this soup for later use. First, let it cool completely. Pour the soup into freezer-safe bags or containers. Make sure to leave some space for expansion. This soup keeps well frozen for up to three months. To thaw, move it to the fridge overnight. For a quick thaw, use a microwave on low power. Once thawed, reheat it on the stove and stir well. The flavor will be just as good! Cooking this soup takes time, but it's worth it. If you set your slow cooker on low, it will take about 6-8 hours. This slow heat helps the flavors blend well. If you're short on time, you can cook it on high for 4 hours. Just check that the potatoes are tender before serving. They should be easily mashed with a fork. Yes, you can make this soup ahead of time. It stores well in the fridge for up to three days. Just cool it completely before putting it in a container. When you’re ready to eat, reheat it on the stove or in the microwave. You might need to add a splash of broth or cream to thin it out. This soup also freezes well for up to three months. Just remember to leave some space in the container for expansion. If you want a dairy-free option, coconut cream is a great choice. It gives a nice creamy texture and a hint of coconut flavor. Another option is almond milk, but it won’t be as rich. You can also use cashew cream for a thicker, creamier result. Just blend soaked cashews with water until smooth. Each alternative will change the soup slightly, but they all taste great! This blog post covered everything you need to know to make Slow Cooker Loaded Baked Potato Soup. We detailed the ingredients, cooking methods, and tips for texture. You learned about flavor variations and protein options to suit your taste. We also discussed storage tips to keep leftovers fresh. Remember, this recipe is flexible; you can make it your own. Enjoy the warmth of homemade soup, and don't hesitate to share your own twists on this comforting classic!

Slow Cooker Loaded Baked Potato Soup Delightful and Creamy

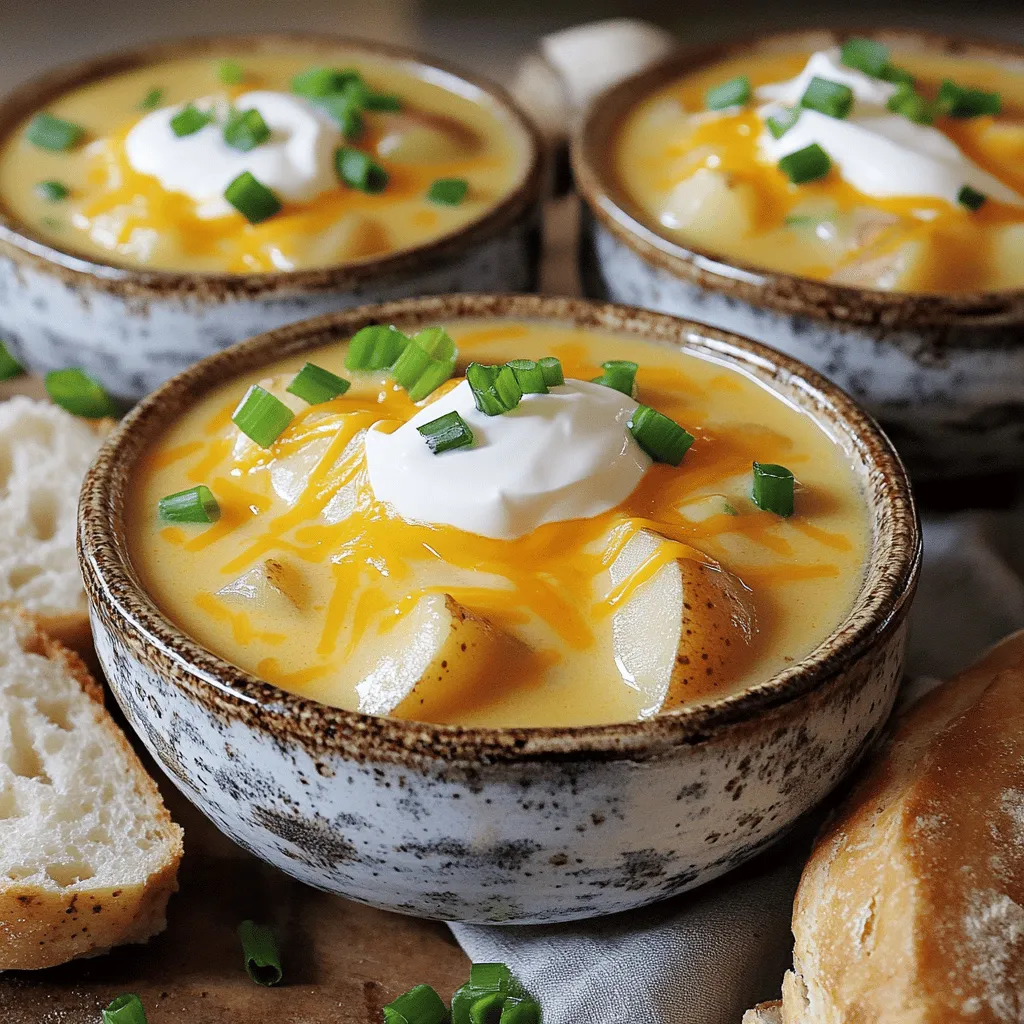
Are you ready to enjoy a warm bowl of Slow Cooker Loaded Baked Potato Soup? This creamy delight is perfect

- 2 boneless chicken breasts - 1 cup panko bread crumbs - 1/2 cup all-purpose flour - 2 large eggs, beaten - 1 teaspoon garlic powder - 1 teaspoon onion powder - 1 teaspoon paprika - Salt and pepper to taste - Cooking spray To make chicken katsu tasty, you need a good mix of flavors. I use garlic powder, onion powder, and paprika. These spices bring out the best in the chicken. Salt and pepper add the right touch. Mix these in the flour before dredging. This helps the coating stick better and makes each bite flavorful. For a nice touch, consider these garnishes: - Tonkatsu sauce for dipping - Shredded cabbage for crunch - Lemon wedges for zest These extras make the dish more fun and vibrant. The sauce adds flavor, while the cabbage and lemon provide freshness. Enjoy exploring different ways to serve your chicken katsu! Start by preparing the chicken breasts. If they are thick, slice each breast in half horizontally. This creates thinner cutlets that cook better. Next, place each cutlet between two sheets of plastic wrap or parchment paper. Use a meat mallet to pound them to an even thickness, about 1/2 inch. This step helps the chicken cook evenly and stay juicy. Now, set up your dredging station. In a shallow dish, mix 1/2 cup of all-purpose flour with 1 teaspoon of garlic powder, 1 teaspoon of onion powder, 1 teaspoon of paprika, and a pinch of salt and pepper. In another shallow dish, place 2 large beaten eggs. Finally, in a third dish, add 1 cup of panko bread crumbs and season with a bit more salt and pepper. Take each chicken cutlet and first dredge it in the seasoned flour. Shake off any excess flour. Next, dip it into the beaten eggs, ensuring it is fully coated. Lastly, press the chicken into the panko crumbs, coating both sides well. This triple-layer process gives your chicken katsu that crispy texture. Preheat your air fryer to 400°F (200°C) for about 5 minutes. Lightly spray the air fryer basket with cooking spray. Arrange the breaded chicken cutlets in a single layer in the basket. Spray the tops with a little more cooking spray to help them crisp up. Cook the chicken katsu for about 10-12 minutes. Flip them halfway through for even cooking. The chicken is ready when it is golden brown and the internal temperature reaches 165°F (74°C). Once done, remove the chicken katsu and let it rest for a minute before slicing. Serve it topped with tonkatsu sauce and a side of shredded cabbage. Add lemon wedges for a fresh touch. Enjoy your crispy, flavorful dish! To get a great crispy texture, use panko bread crumbs. They are light and airy. This helps the chicken katsu stay crispy. Make sure to press the chicken into the crumbs well. Use cooking spray on top of the chicken before cooking. This adds extra crunch. Cook at 400°F for 10-12 minutes. Flip the chicken halfway to cook evenly. If you don’t have an air fryer, you can bake or pan-fry the chicken. For baking, preheat your oven to 400°F. Place the chicken on a lined baking sheet. Spray the tops with cooking spray. Bake for about 20 minutes or until golden brown. For pan-frying, heat oil in a skillet over medium heat. Cook the chicken for 4-5 minutes on each side until crispy. For a lighter version, try using whole wheat flour instead of all-purpose flour. You can also swap out panko for crushed whole grain cereal. This keeps the crunch but adds more fiber. Use egg whites instead of whole eggs to cut down on fat. You can serve with a side salad instead of cabbage for a fresh option. {{image_2}} To add a kick to your chicken katsu, you can easily make it spicy. Start by mixing some hot sauce into the beaten eggs. You can use your favorite brand like Sriracha or go for a spicy chili oil. This will give the chicken a nice heat. You can also mix cayenne pepper into the flour. Adjust the amount based on how spicy you like it. This spicy twist brings a new level of flavor. If you want a vegetarian version, try using eggplant or tofu. For eggplant, slice it into thick cutlets. For tofu, press it to remove excess water, then slice it. Use the same coating process with flour, eggs, and panko. The cooking time may be shorter, so keep an eye on them in the air fryer. With these options, you can enjoy a tasty katsu that fits your diet. Dipping sauces can elevate your chicken katsu. Besides the classic tonkatsu sauce, you can try other options. A spicy mayo made from mayonnaise and sriracha is creamy and tangy. Soy sauce mixed with a dash of lime juice adds freshness. You can even create a sweet chili sauce for a different taste. These sauces will give your meal a fun twist. After making air fryer chicken katsu, let it cool to room temperature. Place the leftovers in an airtight container. Store it in the fridge for up to three days. This keeps the chicken fresh and tasty. When ready to eat, just reheat it. You can freeze chicken katsu for later use. Wrap each piece in plastic wrap. Then, place them in a freezer bag. This way, they won’t stick together. Chicken katsu can last up to three months in the freezer. When you want to eat it, just thaw it in the fridge overnight. To reheat chicken katsu, use your air fryer again. Preheat it to 350°F (175°C). Place the katsu in the basket and heat for about 5-7 minutes. This helps restore its crispy texture. You can also reheat it in the oven at 375°F (190°C) for about 10 minutes. Enjoy your delicious chicken katsu just like freshly made! Chicken katsu is a popular Japanese dish. It features breaded and fried chicken cutlets. The chicken is often served with a sweet and savory sauce called tonkatsu. You enjoy it with shredded cabbage and lemon wedges. The crispy coating makes it fun to eat. The dish is loved for its crunchy texture and rich flavor. Yes, you can use chicken thighs. Thighs have more fat, making them juicier. They also add extra flavor. Just make sure to pound them to an even thickness. This will help them cook well in the air fryer. The cooking time might be a bit longer, so check the internal temperature. It should reach 165°F (74°C) for safe eating. To make chicken katsu gluten-free, swap out regular flour and panko. Use gluten-free flour and gluten-free panko instead. These options work well for coating the chicken. Be sure to check the labels to confirm they are gluten-free. The taste and crunch will still be there, making your dish just as delicious. This blog post covered the main ingredients for chicken katsu, including seasonings and optional garnishes. I shared step-by-step instructions for preparation and cooking in the air fryer. You learned tips for achieving a crispy texture and alternative cooking methods. I also provided variations, including spicy options and vegetarian alternatives. Finally, I gave storage tips and answered common questions about chicken katsu. Now, you can enjoy this dish at home. With these tips, you will impress everyone with your cooking skills.

Air Fryer Chicken Katsu Crispy and Flavorful Recipe

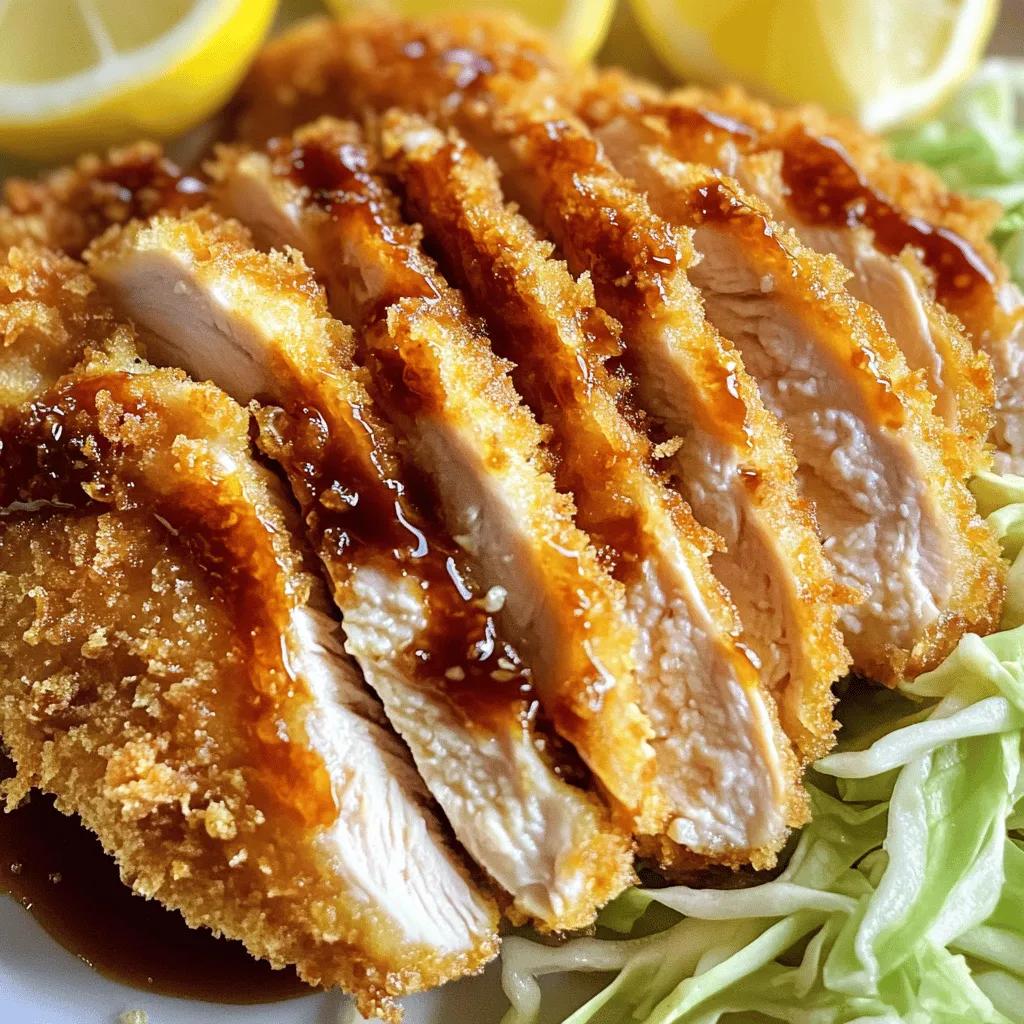
Are you ready to make a crispy and flavorful Air Fryer Chicken Katsu? This dish combines juicy chicken with a

- Medium Shrimp: Use 1 pound of medium shrimp, peeled and deveined. They cook quickly and stay juicy. - Rice Options: Choose between 1 cup of jasmine or basmati rice. Both types have great flavor and texture. - Key Seasonings: You need 1 tablespoon of olive oil, 2 cloves of minced garlic, and 1/2 teaspoon of red pepper flakes. These add depth and a little heat. - Parmesan Cheese: Use 1/2 cup of grated Parmesan cheese. Choose a good quality, aged cheese for the best flavor. The texture should be fine so it melts easily and coats the shrimp well. - Fresh Spinach: You will need 1 cup of roughly chopped fresh spinach. It adds color and nutrition. If you don’t have spinach, kale or arugula work well too. To start, rinse the rice under cold water. This step helps remove excess starch. You want the water to run clear. Next, in a medium pot, combine the rinsed rice with vegetable broth. The broth adds great flavor. Bring it to a boil over medium heat. Once it boils, cover the pot and reduce the heat to low. Let the rice cook for 15 minutes. It should become fluffy and absorb all the liquid. While the rice cooks, heat olive oil in a large skillet over medium heat. Add minced garlic and sauté it for about one minute. You want to smell that garlic aroma! Next, add the shrimp to the skillet. Season them with salt, pepper, and red pepper flakes if you like some heat. Cook the shrimp for 2-3 minutes on each side. They should turn pink and opaque when done. Once the shrimp is cooked, stir in the chopped spinach. Mix until it wilts down. This adds color and fresh flavor. Then, remove the skillet from the heat. Add the grated Parmesan cheese and toss everything together. The cheese should melt and coat the shrimp nicely. Now, when the rice is ready, fluff it up with a fork. Divide it into serving bowls. Top each bowl with the shrimp mixture. For a finishing touch, garnish with chopped parsley. This adds a pop of color and freshness. Enjoy your delightful rice bowls! Timing for optimal doneness Cook the shrimp for 2-3 minutes on each side. They turn pink and opaque when done. This shows they are cooked perfectly. How to avoid overcooking Keep an eye on the shrimp. Overcooked shrimp become tough and rubbery. Remove them from heat as soon as they are done. Cooking them fast helps keep their nice texture. Alternatives if broth is unavailable If you do not have vegetable broth, use water. You can also use chicken broth. Both add flavor to the rice. Fluffing techniques for the best texture Once the rice is done, use a fork to fluff it. This helps separate the grains. Fluffy rice makes the dish look and taste better. Additional herbs and toppings Sprinkle fresh parsley on top for color and taste. You can also add basil or chives. These herbs bring a fresh note to the dish. Recipes for serving ideas Serve the rice bowls in deep dishes. For a flavor boost, drizzle a bit of olive oil over the top. This extra touch makes your meal shine! {{image_2}} You can swap shrimp for other proteins. Chicken works well. Tofu is another great choice for a vegetarian meal. For veggies, try adding bell peppers or zucchini. These add colors and nutrients to the dish. You can use any veggies you love. Lemon zest brings a bright taste to this dish. Soy sauce adds a savory depth. These sauces can change the flavor profile nicely. You can also add nuts or seeds. Toasted pine nuts or sesame seeds add crunch. They also boost the nutrition of your meal. If you need a gluten-free dish, check your broth. Some brands contain gluten. Use gluten-free soy sauce if you add any. For a vegetarian option, skip the shrimp. Use chickpeas for protein instead. They pair well with the rice and cheese, too. To keep your shrimp rice bowls fresh, store them in airtight containers. Make sure the bowls cool down before sealing. Place them in the fridge within two hours of cooking. They are best eaten within three days. This keeps the shrimp tender and the rice fluffy. If you add any veggies, check for freshness before eating. Avoid leaving leftovers out for too long to prevent spoilage. If you want to save some for later, freezing works well. First, let the shrimp rice bowls cool completely. Divide them into single-serving portions. Use freezer-safe bags or containers for storage. Remove as much air as possible to prevent freezer burn. You can freeze these for up to two months. Just remember, the texture may change a bit after thawing. When you are ready to eat, there are safe ways to reheat your bowls. The microwave works well for quick reheating. Place the bowl in the microwave and cover it with a damp paper towel. Heat in 30-second intervals until warm. Stir in between to ensure even warming. You can also reheat in a skillet over low heat. Just add a splash of water or broth to keep it moist. Enjoy your meal hot! It takes about 25 minutes to make this dish. - Prep Time: 10 minutes - Cooking Time: 15 minutes In just a short time, you can have a tasty meal ready. The rice cooks while you prepare the shrimp. This makes it easy to manage your time in the kitchen. Yes, you can use frozen shrimp. Just make sure to thaw them first. - Place frozen shrimp in cold water for about 10-15 minutes. - Once thawed, peel and devein if needed. Using frozen shrimp can save time and still give you great flavor. Just ensure they are fully thawed before cooking. If you don’t have Parmesan, try these alternatives: - Pecorino Romano for a sharper taste. - Grana Padano for a similar texture. - Nutritional yeast for a dairy-free option. These substitutes will keep your dish rich and tasty. Choose based on what you have and your taste preference. This post covered how to make delicious Minute Parmesan Shrimp Rice Bowls. We talked about key ingredients like shrimp, rice, and vegetables. I shared step-by-step cooking instructions. You learned tips to perfect your dish and ways to change it up. Finally, we looked at storage and answered common questions. Now, with these easy steps and ideas, you can enjoy a tasty meal. Get creative and make this dish your own! Happy cooking!

Minute Parmesan Shrimp Rice Bowls Delightful Recipe

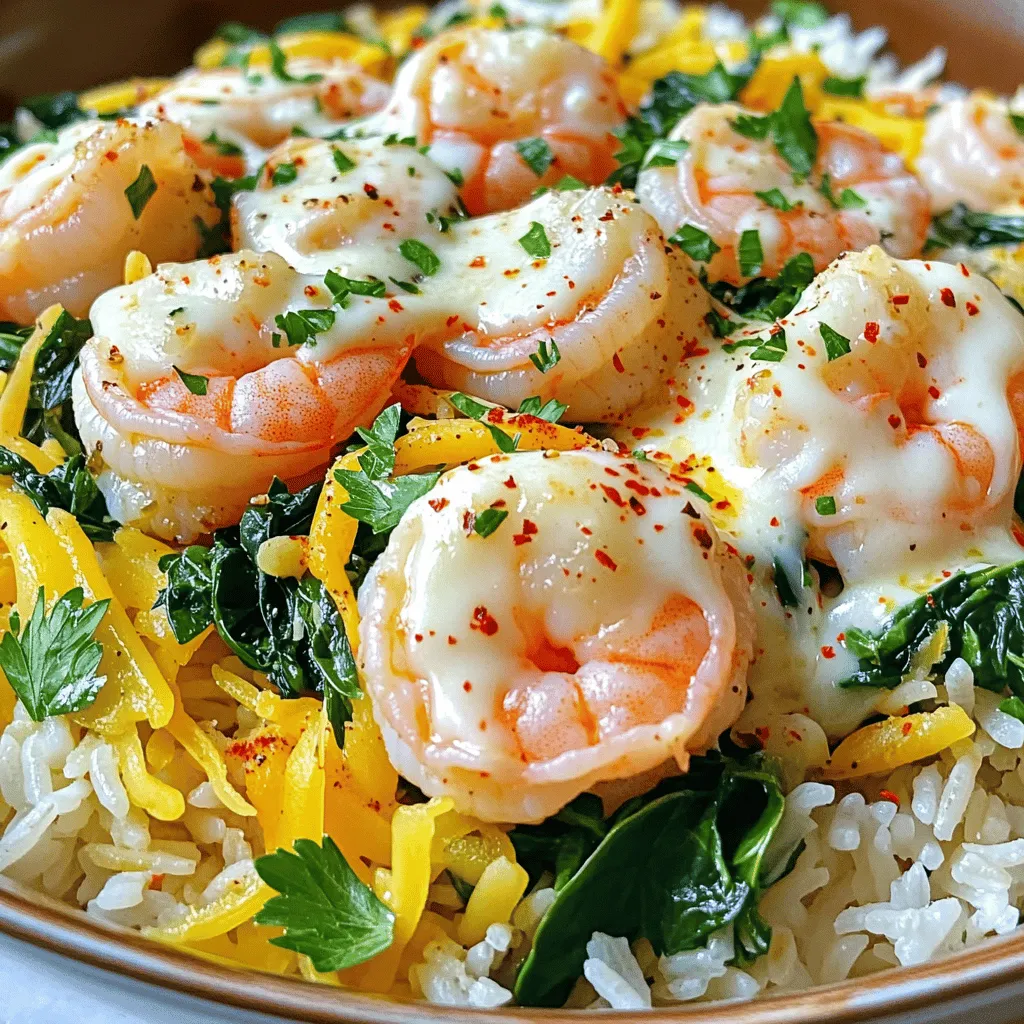
Are you ready to make a dish that’s both quick and tasty? My Minute Parmesan Shrimp Rice Bowls offer a

- 2 cups all-purpose flour - 1 teaspoon baking powder - 1 teaspoon baking soda - 1 teaspoon ground cinnamon - 1 teaspoon ground nutmeg - ½ teaspoon ground ginger - ½ teaspoon salt - 1 cup granulated sugar - ½ cup unsalted butter, softened - 2 large eggs - 1 cup canned pumpkin puree - 1 teaspoon vanilla extract - ½ cup brewed coffee, cooled - 1 cup brown sugar (for crumb topping) - 1 teaspoon ground cinnamon (for crumb topping) - 1 cup oats (for crumb topping) - ½ cup chopped walnuts (optional, for crumb topping) This list gives you all you need to make your Pumpkin Spice Latte Crumb Cake. Let’s dive into why each ingredient is important! - All-purpose flour: This forms the base of your cake. It gives structure and holds everything together. - Baking powder and baking soda: These are your leavening agents. They help the cake rise and stay light. - Spices: Ground cinnamon, nutmeg, and ginger bring warmth and flavor. They make your cake taste like fall! - Salt: Just a bit enhances the sweet flavors. It balances the cake nicely. - Granulated sugar: This sweetens the cake and helps it brown. - Unsalted butter: Softened butter adds richness and moisture. It helps create a fluffy texture. - Eggs: They bind the ingredients and add moisture. They also help the cake rise. - Pumpkin puree: This gives the cake its name! It adds flavor and keeps the cake moist. - Vanilla extract: Vanilla adds a sweet note. It enhances all the flavors in your cake. - Brewed coffee: This gives a slight boost of flavor. It complements the pumpkin and spices. - Brown sugar: Used for the crumb topping, it adds a nice caramel flavor. - Oats: They add crunch to the topping. They make it more rustic and hearty. - Chopped walnuts: These are optional but add a nice texture and nutty taste. With these ingredients, you can create a delightful treat that combines the best flavors of fall. Happy baking! First, set your oven to 350°F (175°C). This step is key for even baking. Next, grease a 9x13-inch baking dish. If you prefer, line it with parchment paper. This makes for easy removal later. In a medium bowl, whisk together the dry ingredients. Use 2 cups of all-purpose flour, 1 teaspoon of baking powder, and 1 teaspoon of baking soda. Add 1 teaspoon of ground cinnamon, 1 teaspoon of ground nutmeg, and ½ teaspoon of ground ginger. Finally, mix in ½ teaspoon of salt. Set this bowl aside for later. In a large bowl, cream together ½ cup of softened unsalted butter and 1 cup of granulated sugar. Beat until the mixture is light and fluffy. Next, add 2 large eggs one at a time. Mix well after each addition. Then, add 1 cup of canned pumpkin puree and 1 teaspoon of vanilla extract. Gradually mix the dry ingredients into the wet ingredients. Stir until just combined. Then, pour in ½ cup of cooled brewed coffee. Mix until the batter is smooth and fully blended. In a separate bowl, combine 1 cup of brown sugar, 1 cup of oats, and 1 teaspoon of ground cinnamon. If you like, add ½ cup of chopped walnuts for extra crunch. Mix this crumb topping until well combined. Pour the batter into your prepared baking dish. Spread it out evenly. Next, sprinkle the crumb topping evenly over the batter. Bake in the oven for 35 to 40 minutes. To check if it’s done, insert a toothpick into the center. It should come out clean. After baking, let the cake cool in the pan for about 10 minutes. This helps it set up nicely. Once cooled, slice the cake and serve. For a fun touch, drizzle a simple glaze made from powdered sugar and a bit of coffee over each slice. Enjoy! To keep your crumb cake moist, use quality ingredients. Fresh eggs and real butter add richness. Canned pumpkin puree is key, as it brings moisture and flavor. When mixing, don't overdo it. Mix until just combined for a soft texture. If you want more flavor, add a bit of brewed coffee. It enhances the pumpkin and spice notes. Sweetness can vary based on personal taste. Start with the recipe's sugar amounts. If you want less sweetness, cut back on the granulated sugar. For the spices, feel free to adjust. If you love cinnamon, add more! Try using different spices like allspice or cardamom for a unique twist. Just remember, start small and taste as you go. The crumb topping is what makes this cake special. Use cold butter for a crumbly texture. Combine brown sugar, oats, and cinnamon well. If you add walnuts, chop them finely. This gives a nice crunch. Don't skip the topping; it balances the cake's moistness. Spread it evenly over the batter for even baking. {{image_2}} You can make this crumb cake gluten-free. Use a 1:1 gluten-free flour blend. This swap keeps the texture light and fluffy. Always check that the blend contains xanthan gum. This helps mimic the stretch of gluten. Follow the same steps in the recipe. You will still get that warm pumpkin and spice flavor. To make a vegan pumpkin spice latte crumb cake, swap the eggs for flax eggs. Mix one tablespoon of ground flaxseed with three tablespoons of water for each egg. Let it sit for five minutes to thicken. Use plant-based butter instead of regular butter. Replace the milk coffee with a non-dairy option. Almond or oat milk works great here. The cake will still taste amazing and moist. You can add fun mix-ins to your crumb cake. Chocolate chips are a tasty option. Use semi-sweet or dark chocolate for a rich flavor. Nuts like pecans or almonds add a nice crunch. Dried fruits like cranberries or raisins can also work well. Just fold in your mix-ins when combining the wet and dry ingredients. This makes every bite even more delightful! To keep your cake fresh, store it in an airtight container. This keeps moisture in and prevents it from drying out. If you do not have a container, wrap it tightly with plastic wrap. Store the cake at room temperature for up to three days. If you want it to last longer, consider refrigerating it. Just remember to let it sit at room temperature for a bit before serving. You can freeze leftovers to enjoy later. First, slice the cake into pieces. Wrap each slice in plastic wrap. Then, place the wrapped slices in a freezer bag or container. This method helps to keep the cake fresh. You can freeze the cake for up to three months. When you are ready to eat, thaw it overnight in the fridge. After thawing, warm it in the oven at 350°F for about 10 minutes. This step brings back the fresh-baked taste. For the best taste, serve the cake warm. If you stored it in the fridge, let it sit out for about 30 minutes before serving. A drizzle of glaze made from powdered sugar and coffee can add a nice touch. You might also add whipped cream or a sprinkle of pumpkin spice on top. These additions enhance the flavors even more, making each slice a delight! Yes, you can use fresh pumpkin. Just cook and mash it first. This gives a richer taste. Fresh pumpkin has more moisture, so you may need to adjust the flour. Use about 1.5 cups of fresh pumpkin for this recipe. To get a crispy crumb topping, use cold butter. Cut it into the dry mix, so it stays chunky. Adding oats and nuts also helps with crunch. Bake it longer if needed, but watch it closely. This cake goes well with coffee or tea. It also pairs nicely with whipped cream or ice cream. A drizzle of caramel sauce adds sweetness and flavor. You can serve it with fresh fruit for a bright touch. Yes, you can make this cake a day early. Just store it in an airtight container. If you want, you can freeze it too. Wrap it well and keep it for up to three months. Thaw overnight in the fridge before serving. This blog post covered how to make a delicious Pumpkin Spice Latte Crumb Cake. We talked about the key ingredients, step-by-step baking instructions, and tips to ensure your cake turns out moist and full of flavor. We also explored variations for dietary needs and how to store leftovers properly. Remember, this cake is great for gatherings or cozy evenings at home. Enjoying your creation will be a treat for you and those you share it with. Happy baking!

Pumpkin Spice Latte Crumb Cake Delightful Treat

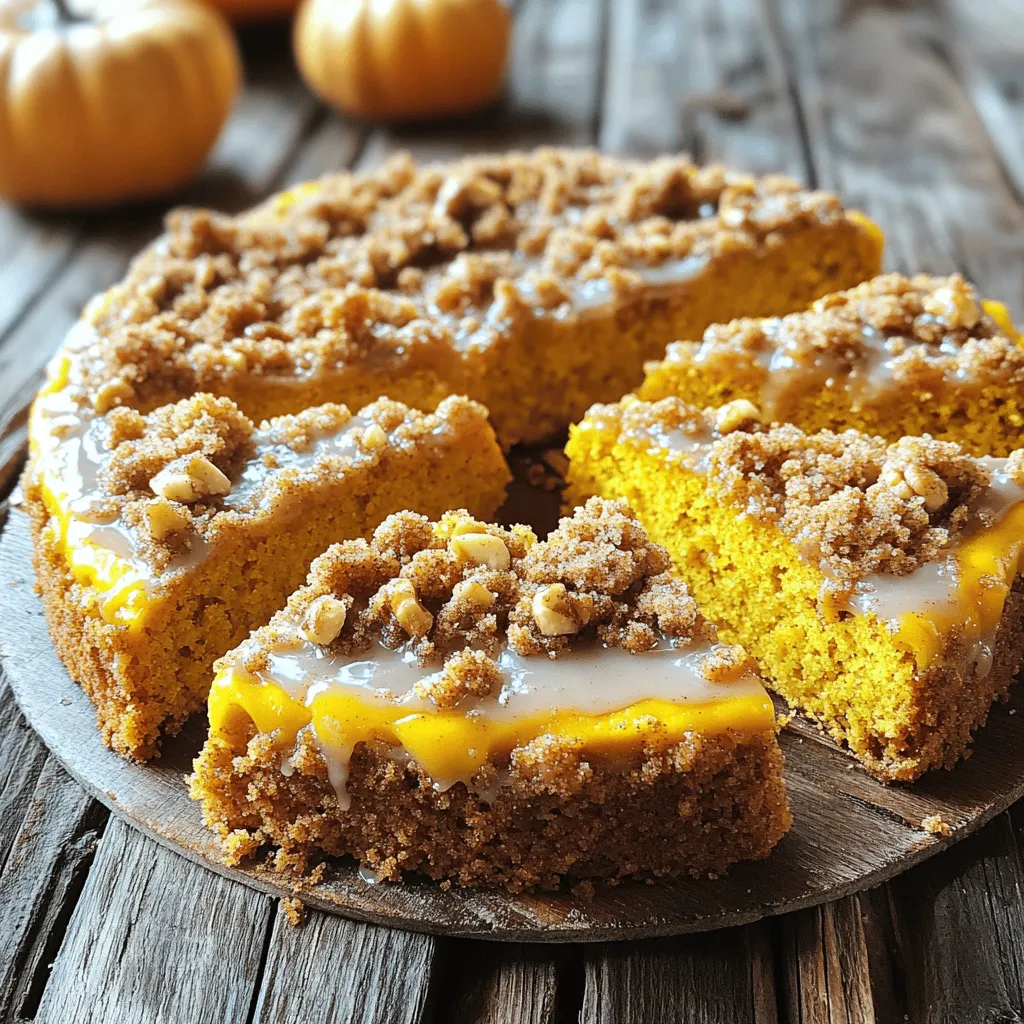
Are you ready for a cozy, fall-inspired treat that pairs perfectly with your morning brew? This Pumpkin Spice Latte Crumb

Older posts
Newer posts
← Previous Page1 … Page20 Page21 Page22 … Page130 Next →

dsad

© 2025 Emmas Dish • Built with GeneratePress

Our Policies

  • Copyright Policy
  • Cookie Policy
  • GDPR Policy
  • Privacy Policy
  • Disclaimer
  • Terms Of Use

More Information

  • Home
  • About
  • Contact
  • Appetizers
  • Dessert
  • Dinner
  • Drinks
©2025, Emmas Dish About Back To Top