Skip to content
DisclaimerTerms Of UseGDPR PolicyCookie Policy

Emmas Dish

  • Home
  • Drinks
  • Appetizers
  • Dinner
  • Dessert
  • About
  • Contact
  • Privacy Policy
DisclaimerTerms Of UseGDPR PolicyCookie Policy

Emma

- 500g boneless chicken breast, sliced into thin strips - 2 tablespoons honey - 3 tablespoons low sodium soy sauce - 2 tablespoons rice vinegar - 1 tablespoon sesame oil - 1 tablespoon vegetable oil - 2 cloves garlic, minced - 1 teaspoon ginger, grated - 1 bell pepper (any color), sliced - 1 cup broccoli florets - 1 carrot, julienned - 2 green onions, chopped (for garnish) - Sesame seeds (for garnish) - Salt and pepper to taste These ingredients come together to create a sweet, savory dish. The chicken gives protein, while the veggies add crunch and color. Honey and soy sauce bring a rich flavor that ties everything together. - Chopped green onions - Sesame seeds These garnishes add a nice touch. They offer a fresh taste and make your dish look pretty. You can skip them if you wish, but I recommend using them. - Chicken: Use tofu or shrimp for a different protein. - Honey: Maple syrup works as a sweet alternative. - Soy sauce: Tamari can replace soy sauce for a gluten-free option. - Rice vinegar: Apple cider vinegar is a good substitute. - Vegetables: Feel free to swap in whatever you have, like snap peas or zucchini. Substitutions keep the dish flexible. You can use what you have on hand and still enjoy a great meal. To start, gather a bowl. In this bowl, mix two tablespoons of honey. Next, add three tablespoons of low-sodium soy sauce. Then, pour in two tablespoons of rice vinegar. Add one tablespoon of sesame oil, two cloves of minced garlic, and one teaspoon of grated ginger. Stir this mix well. You want a smooth sauce that balances sweet and savory. Now, heat a large skillet or wok over medium-high heat. Pour in one tablespoon of vegetable oil. Once hot, add 500g of thinly sliced boneless chicken breast. Season it with salt and pepper. Cook the chicken for about 5 to 7 minutes. It should turn golden and cook all the way through. After cooking the chicken, push it to one side of the skillet. On the other side, add a sliced bell pepper, one cup of broccoli florets, and one julienned carrot. Stir-fry these vegetables for 3 to 4 minutes. You want them to be tender but still crisp. Now, pour your honey garlic sauce over the chicken and veggies. Toss everything together so each piece gets coated. Cook for another 2 to 3 minutes. This helps the sauce thicken a bit. Once it’s done, remove it from heat. Garnish with chopped green onions and sesame seeds before serving. Enjoy your meal! To get tender chicken in your stir fry, start with thin strips. I always slice the chicken breast against the grain. This helps keep it soft. Cook the chicken over medium-high heat for about 5-7 minutes. Don’t overcrowd the pan; cook in batches if needed. This way, you get a nice sear. Season with a pinch of salt and pepper while cooking. This small step adds great flavor. The sauce is the heart of the dish. I mix honey, soy sauce, rice vinegar, sesame oil, garlic, and ginger in a bowl. Balance is key; the sweet honey pairs well with salty soy sauce. For added depth, let the sauce sit for a few minutes. This lets the flavors mingle. When you pour it over the chicken and veggies, it should coat them well. Cook for a few extra minutes to thicken the sauce. Honey garlic chicken stir fry is great on its own, but serving it with rice or noodles makes it even better. I love using jasmine rice, as it soaks up the sauce nicely. For a fresh twist, add a side salad with sesame dressing. You can also sprinkle extra sesame seeds on top for crunch. Lastly, don’t forget the green onions. They add a nice touch and color. {{image_2}} You can add more veggies to your stir fry. Some great options are snap peas, zucchini, or mushrooms. These ingredients bring color and extra flavor to your dish. Just slice them thin, so they cook quickly. Toss them in with the bell pepper, broccoli, and carrot. This adds crunch and nutrition to your meal. If you want to switch up the protein, try tofu or shrimp. Both options cook fast and soak up the honey garlic sauce well. For tofu, use firm or extra-firm. Press it to remove excess water, then cube it. For shrimp, just peel and devein them. Add them to the skillet after cooking the vegetables for a quick and delightful change. You can easily make this dish gluten-free by using tamari instead of soy sauce. This keeps the same great taste without gluten. If you want a low-carb option, skip the rice and serve the stir fry over cauliflower rice. This keeps it light and healthy while still being delicious. Enjoy your cooking and get creative with these variations! To store your Honey Garlic Chicken Stir Fry, let it cool down first. Place it in an airtight container. It can stay fresh in the fridge for up to 3 days. Make sure to cover the container tightly to keep out air. When you’re ready to eat, reheat it on the stove or in the microwave. If using the stove, heat a skillet over medium heat. Add a splash of water or broth to keep it moist. Stir it often until it's hot. If you use the microwave, cover the dish and heat in short bursts, stirring in between. You can freeze this stir fry for up to 2 months. Place it in a freezer-safe bag or container. Remove as much air as you can to prevent freezer burn. When you're ready to eat, let it thaw in the fridge overnight. Then, reheat it as mentioned above. This way, you can enjoy a quick meal anytime! Yes, you can use any vegetables you like. Broccoli, bell peppers, and carrots work great. You can also add snap peas, zucchini, or mushrooms. Just remember to cut them into small pieces so they cook evenly. Stir-frying also brightens up the colors and flavors. Check the chicken’s color and texture. The meat should be white, not pink. It should feel firm to the touch. If you have a meat thermometer, the inside should reach 165°F (75°C). This ensures it is safe to eat. Serve this dish with rice or noodles for a complete meal. Steamed rice or fried rice pairs well with the sweet sauce. You could also try it with quinoa for a healthy twist. Add a side of spring rolls or a simple salad for extra crunch. Yes, you can prepare the chicken and sauce ahead. Store them in the fridge for up to 2 days. When you're ready to eat, just stir-fry the chicken and veggies. This keeps the meal fresh and quick. In this blog post, we explored how to make Honey Garlic Chicken Stir Fry. I shared the essential ingredients, step-by-step instructions, and helpful tips. You learned about variations, storage tips, and answered common questions. This dish is easy to make and offers great taste. You can customize it to fit your needs. Enjoy your stir fry and have fun cooking!

Honey Garlic Chicken Stir Fry Flavorful and Easy Meal

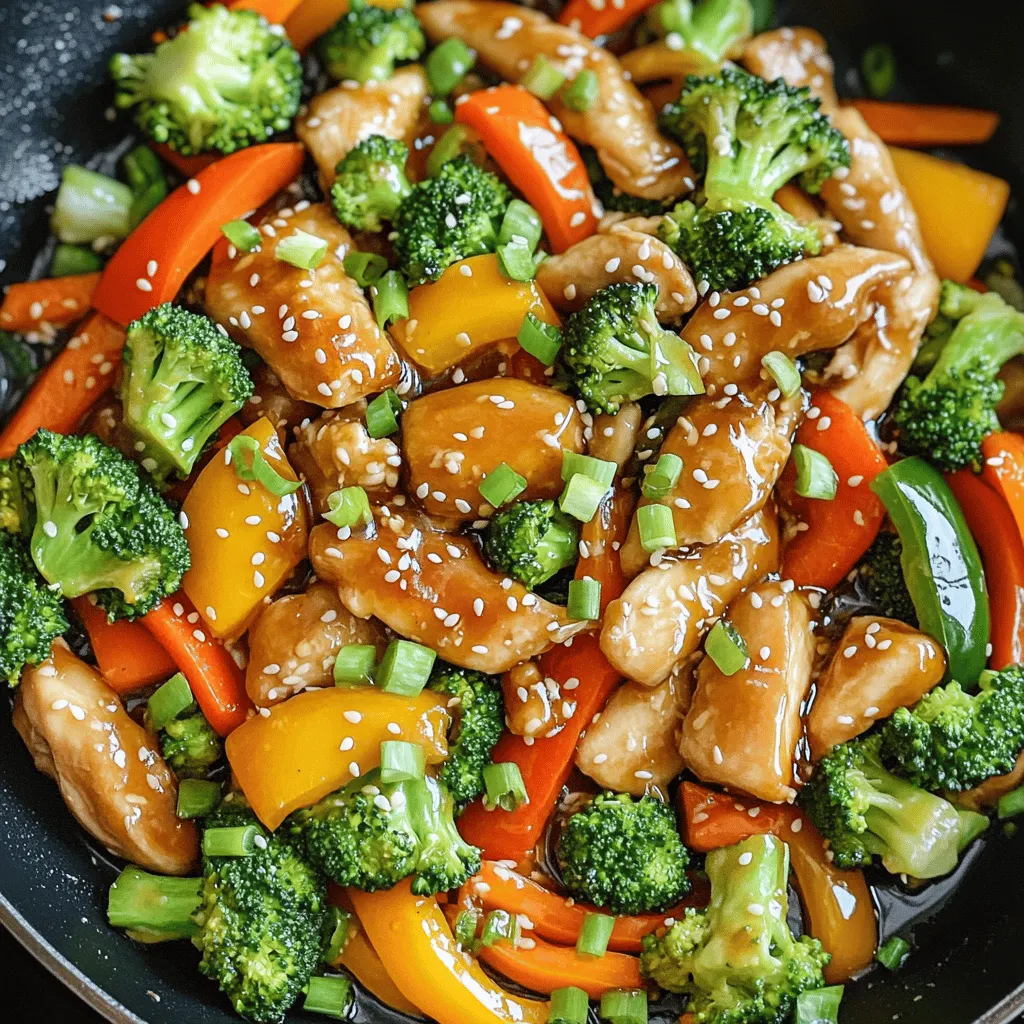
Get ready to spice up your dinner routine with my easy Honey Garlic Chicken Stir Fry! This dish is packed

To make Garlic Chili Noodles Stir Fry, gather these simple ingredients: - 200g egg noodles - 3 tablespoons vegetable oil - 5 cloves garlic, minced - 2 red chilies, sliced - 1 bell pepper, sliced - 1 carrot, julienned - 100g sugar snap peas, trimmed - 3 green onions, chopped - 3 tablespoons soy sauce - 1 tablespoon oyster sauce (optional) - 1 teaspoon sesame oil - Salt and pepper to taste - Sesame seeds for garnish Each ingredient plays a key role in this dish. The egg noodles provide a soft base. Garlic adds a strong, savory punch. The chilies bring heat, while the bell pepper and carrot add color and crunch. Sugar snap peas give a fresh bite. Green onions finish with a mild onion flavor. Soy sauce and oyster sauce infuse saltiness and depth. The sesame oil adds a nutty aroma. Lastly, sesame seeds give a lovely finish. Having everything ready before you start is important. It makes the cooking process smooth and quick. This dish not only tastes great but also looks vibrant. Enjoy the cooking adventure! First, boil water in a large pot. Add 200g of egg noodles to the pot. Cook according to the package instructions. I usually check the noodles after about 4 minutes. They should be tender but still firm. Once cooked, drain them well. Set them aside to cool. Next, grab a large wok or skillet. Heat 3 tablespoons of vegetable oil over medium-high heat. Add 5 cloves of minced garlic and 2 sliced red chilies. Stir them quickly for about 30 seconds. You want the garlic to be fragrant, not burnt. Now, toss in 1 sliced bell pepper, 1 julienned carrot, and 100g of trimmed sugar snap peas. Stir-fry these for about 3 to 4 minutes. The veggies should be bright and tender-crisp. Now it’s time to mix in the noodles. Add the cooked egg noodles to the wok. Gently toss them with the vegetables. Pour in 3 tablespoons of soy sauce, 1 tablespoon of oyster sauce (if you want), and 1 teaspoon of sesame oil. Ensure the noodles are well-coated. Stir-fry everything together for another 2 to 3 minutes. Taste and add salt and pepper as needed. Finally, fold in 3 chopped green onions. Serve hot and sprinkle sesame seeds on top for a nice crunch. To get that perfect stir-fry, you need high heat. Start with a hot wok or skillet. This helps the food cook fast and stay crisp. Always have your ingredients ready. This way, you won’t lose heat while cooking. Stir quickly to keep everything moving. You want all the flavors to blend well. If you like spice, add more red chilies. You can also use chili flakes for extra heat. If it’s too spicy, try adding more noodles or veggies. This helps balance the heat. Always taste as you go. This way, you can adjust the flavors to your liking. Don’t have egg noodles? You can use rice noodles or even spaghetti. If you want more veggies, add broccoli or zucchini. For a vegan option, skip the oyster sauce. You can replace it with more soy sauce or a dash of vinegar. Be creative and use what you have! {{image_2}} To make your dish vegan, swap the egg noodles for rice noodles or vegetable noodles. You can also replace the oyster sauce with a splash of soy sauce or a vegan alternative. This keeps the flavor bold and tasty. Add more veggies like broccoli or mushrooms for extra nutrients. Want to add protein? You can toss in tofu, chicken, or shrimp. Cook the protein first, then set it aside. Add it back in when you mix in the noodles. This adds heartiness to your meal. Be sure to season the protein well for great taste. If you want a twist, try different noodles. Soba or udon noodles work great too. They offer unique textures and flavors. Rice noodles are another option, especially for a gluten-free meal. Make sure to adjust cooking times based on the noodle type you choose. After cooking, let your Garlic Chili Noodles cool down. Place the noodles in an airtight container. Store them in the fridge. They stay fresh for up to three days. Always check for any signs of spoilage before eating. To reheat, use a skillet or wok. Heat a bit of oil over medium heat. Add the noodles and stir well. You can also add a splash of soy sauce for extra flavor. Stir-fry until heated through, about 5 minutes. If using a microwave, cover the noodles and heat for one to two minutes. Stir halfway for even warming. If you want to freeze your noodles, pack them tightly in a freezer-safe container. They can last up to three months in the freezer. When you’re ready to eat, thaw them in the fridge overnight. Reheat as mentioned before. Note that some veggies may lose their crunch after freezing. Egg noodles work great for stir fry. They have a nice chew and hold sauce well. You can also use rice noodles or soba noodles. Each type offers a unique taste. Choose what you like best for your dish. Yes, you can make this dish ahead of time. Cook the noodles and veggies, then store them separately. Keep them in the fridge for up to three days. When you’re ready to eat, just stir-fry them again. Add fresh green onions before serving for extra flavor. To boost flavor, add more garlic and chilies. You can also mix in ginger for a zesty kick. Don't forget about soy sauce and sesame oil; they add depth. Experiment with different vegetables and proteins too. Try adding a splash of lime juice for brightness. In this article, we explored the key ingredients and steps to make a tasty Garlic Chili Noodle Stir Fry. You learned how to cook the noodles and stir-fry vegetables, while also picking up helpful tips. Remember to adjust spice levels as needed and try different variations. This dish can fit many diets and tastes great fresh or reheated. I hope you feel ready to create your own delicious stir fry at home. Enjoy every bite!

Garlic Chili Noodles Stir Fry Flavorful and Quick Meal

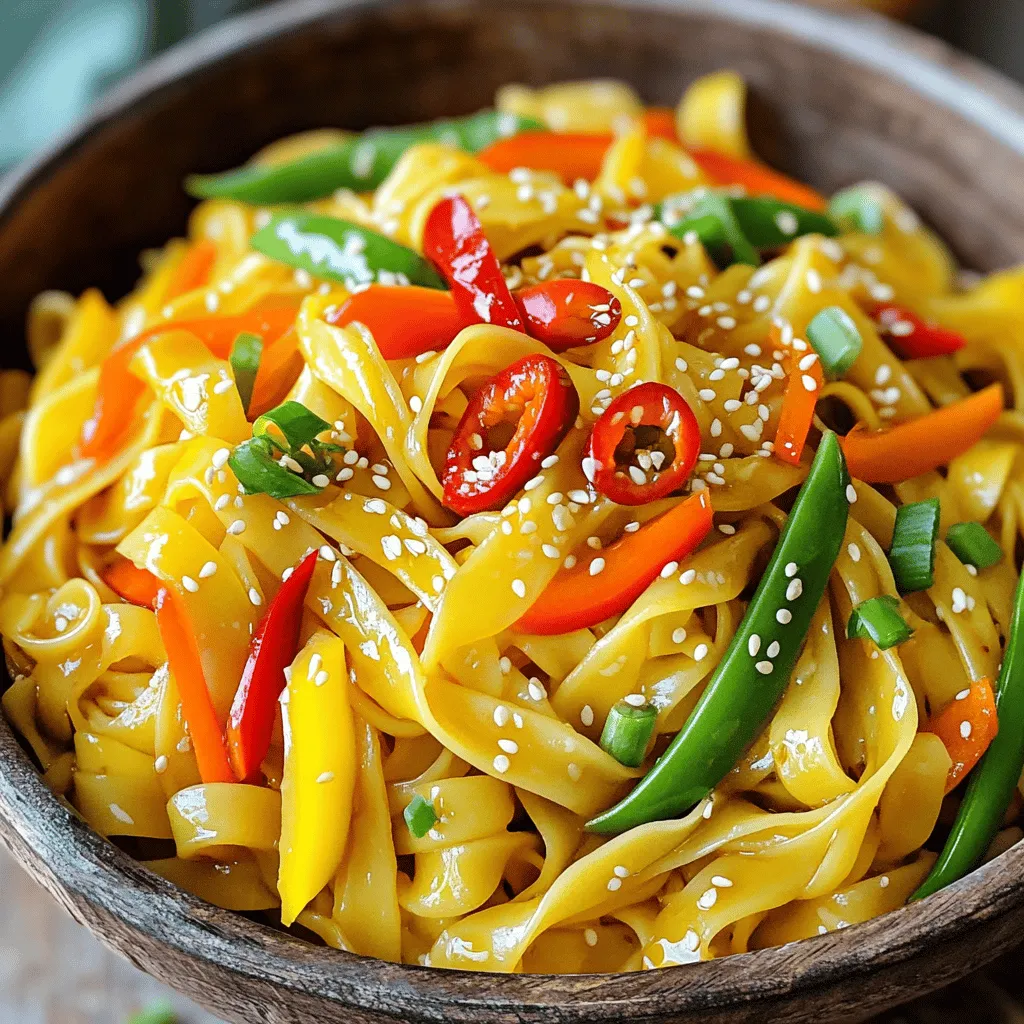
Looking for a meal that’s quick, flavorful, and will satisfy your cravings? Garlic Chili Noodles Stir Fry is the perfect

To make these tasty fries, gather these key items: - 2 large sweet potatoes, cut into thin fries - 2 tablespoons olive oil - 1 tablespoon granulated sugar - 1 teaspoon ground cinnamon - 1/2 teaspoon salt These basic ingredients create a sweet and savory flavor that you will love. Olive oil helps the fries crisp up in the oven. It adds a nice flavor too. Granulated sugar, mixed with ground cinnamon, gives the fries their sweet touch. The sugar caramelizes during baking, making the fries golden brown and crunchy. For a little kick, add a pinch of cayenne pepper. This spice adds heat and balances the sweetness. You can also try adding nutmeg or vanilla for a new twist. Experiment to find your favorite combination! First, wash the sweet potatoes well. Scrub off any dirt. Next, cut the sweet potatoes into thin fries. Aim for even sizes so they cook well. Place the fries in a large bowl. Drizzle 2 tablespoons of olive oil over them. Toss the fries gently to coat them with oil. In a small bowl, mix 1 tablespoon of granulated sugar, 1 teaspoon of ground cinnamon, and 1/2 teaspoon of salt. If you like heat, add a pinch of cayenne pepper. This mix gives the fries a sweet and spicy kick. Sprinkle this mixture over your sweet potato fries evenly. Toss again until every fry is fully coated. Now, preheat your oven to 425°F (220°C). Line a baking sheet with parchment paper for easy cleanup. Spread the fries in a single layer on the sheet. Make sure they are not crowded. Bake the fries for 25-30 minutes. Flip them halfway through for even cooking. When they turn golden brown, they are ready! Let them cool for a few minutes before serving. To make sure your fries stay crispy, follow these steps: - Cut sweet potatoes into thin, even strips. Thin fries cook better. - Toss fries in olive oil well. This helps them to crisp up. - Spread the fries in a single layer on your baking sheet. Avoid crowding them, as this traps steam. - Flip the fries halfway through baking. This promotes even cooking and browning. You can easily tweak the sweetness and spice in your fries: - For more sweetness, add extra sugar to the mix. Start with one more teaspoon. - If you want a bit of heat, add more cayenne pepper. Just a pinch can elevate flavor. - Taste the cinnamon-sugar mix before adding it to the fries. Adjust to match your preference. How you serve these fries can make them more fun: - Use a stylish cone or a rustic basket for a fun look. - Dust them with extra cinnamon sugar right before serving. - Pair with a small bowl of Greek yogurt or honey for dipping. This adds creaminess and flavor contrast. {{image_2}} You can get creative with seasonings. Try adding a pinch of nutmeg for warmth. If you like heat, cayenne pepper works great. You can also mix in cocoa powder for a chocolate twist. For a tropical vibe, try some coconut sugar instead of regular sugar. Each option gives your sweet potato fries a unique flavor. While sweet potatoes are tasty, you can try other veggies. Carrots work well when cut into thin strips. Butternut squash is another great choice. You can even use zucchini for a lighter fry. Each of these vegetables brings its own taste and texture, making your snack more diverse. Pair your sweet potato fries with delicious dips. Greek yogurt mixed with honey is creamy and sweet. You can also serve them with a spicy yogurt dip for a kick. If you want something savory, try a garlic aioli. These pairings make your snack both fun and satisfying. To keep leftover sweet potato fries fresh, let them cool down first. Place them in an airtight container. You can store them in the fridge for up to 3 days. Make sure to separate layers with parchment paper to prevent sticking. When you want to enjoy your fries again, the oven is your best friend. Set it to 400°F (200°C). Spread the fries on a baking sheet in a single layer. Bake for about 10-15 minutes, or until they're hot and crispy. This keeps the fries tasty, just like when they were fresh! If you want to save fries for a longer time, freezing works well. First, let the fries cool completely. Then, spread them out on a baking sheet and freeze for 1-2 hours. Once frozen, transfer the fries to a freezer bag. They can last up to 3 months. When ready to eat, bake them straight from the freezer for a quick snack! Yes, you can! Air fryers work great for sweet potato fries. Just set your air fryer to 400°F (200°C). Cook the fries for about 15-20 minutes. Shake the basket halfway through. This method keeps your fries crispy and golden. To prevent sogginess, cut your fries thin. Thin fries cook better and get crispier. Toss them well in olive oil. Avoid overcrowding the baking sheet. Use a single layer. You can also soak the fries in cold water for 30 minutes before baking. This helps remove excess starch. Yes, sweet potato fries are often healthier. They have more vitamins and fiber. Sweet potatoes are rich in Vitamin A, which is good for your eyes. They also have a lower glycemic index than regular potatoes. This means they won't spike your blood sugar as much. You have many tasty options! Greek yogurt is a great dip. It brings a creamy balance to the sweetness. Honey adds an extra sweet touch. You can also try a spicy dip, like chipotle mayo, for a fun twist. Cinnamon sugar sweet potato fries are a delicious treat. We explored essential ingredients and how to prepare them. You learned about tips for crispiness and serving ideas. We even discussed variations and storage options. Remember that these fries can be seasoned in many ways. Explore your flavor preferences! Enjoy making and sharing this snack. It is easy to make and even more fun to eat.

Cinnamon Sugar Sweet Potato Fries Quick and Tasty Snack

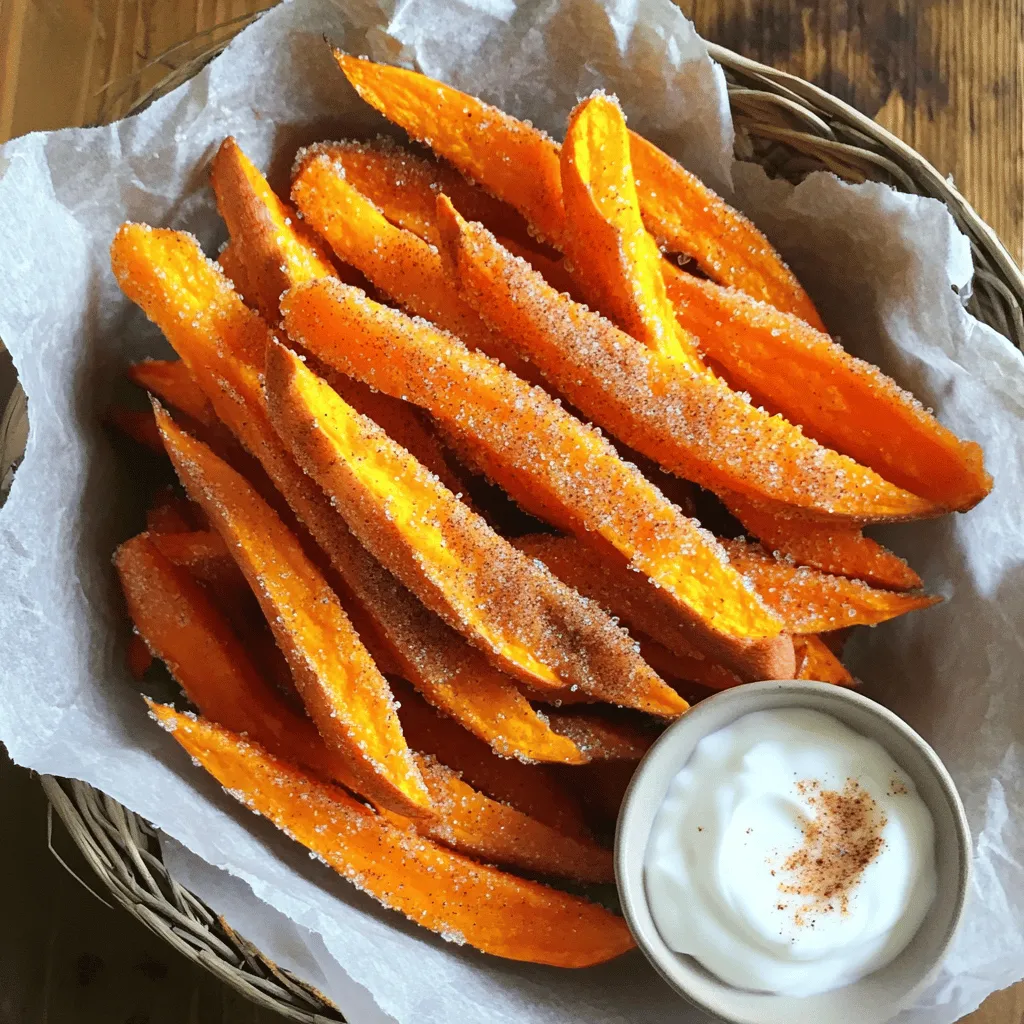
Are you ready to elevate your snacking game with a sweet twist? In this post, I’ll show you how to

To make Creamy Cajun Shrimp Pasta, gather these ingredients: - 12 oz fettuccine or linguine - 1 lb shrimp, peeled and deveined - 1 tablespoon Cajun seasoning - 2 tablespoons olive oil - 1 onion, diced - 3 cloves garlic, minced - 1 bell pepper (red or yellow), diced - 1 cup cherry tomatoes, halved - 2 cups chicken broth - 1 cup heavy cream - 1 cup Parmesan cheese, grated - Salt and pepper to taste - Fresh parsley, for garnish When cooking, use fresh shrimp for the best taste. You can swap the pasta for gluten-free options like rice noodles. If you don’t have Cajun seasoning, mix paprika, cayenne, and garlic powder as a substitute. For creaminess, you can use half-and-half instead of heavy cream. If you want a lighter dish, try using chicken broth only, skipping the cream. Fresh ingredients make a big difference in flavor. Fresh shrimp taste better and have a firmer texture than frozen. Fresh herbs, like parsley, brighten the dish. Fresh tomatoes add sweetness and juiciness, balancing the spice of the Cajun seasoning. When possible, always choose fresh over dried or canned. It enhances the meal and makes it feel special. To make creamy Cajun shrimp pasta, you need a few tools. Grab a large pot for cooking. Gather your ingredients and chop the onion, bell pepper, and garlic. Measure out the shrimp and spices. This way, you will stay organized while cooking. 1. Heat 2 tablespoons of olive oil in your pot over medium heat. 2. Add the diced onion and bell pepper. Sauté for 4-5 minutes until they soften. 3. Mix in 3 cloves of minced garlic and cook for 1 more minute until it smells good. 4. Sprinkle 1 tablespoon of Cajun seasoning on 1 pound of shrimp. Toss them to coat well. 5. Add the shrimp to the pot and cook for 2-3 minutes. They turn pink when they are done. Then, take them out and set aside. 6. Toss in 1 cup of halved cherry tomatoes. Cook for about 2 minutes until they soften a bit. 7. Pour in 2 cups of chicken broth. Add 12 oz of fettuccine or linguine too. Stir to cover the pasta with the broth. 8. Bring everything to a boil, then turn down the heat and cover. Cook for 10-12 minutes, or until the pasta is tender. 9. Once the pasta is ready and most of the broth is gone, lower the heat. Stir in 1 cup of heavy cream. Let it simmer for 2-3 minutes until creamy. 10. Add 1 cup of grated Parmesan cheese. Stir until it melts and blends in. Season with salt and pepper to your taste. 11. Gently fold the cooked shrimp back into the pot. Mix until everything is heated through. 12. Turn off the heat. Let it sit for a few minutes before serving. - Prep Time: 10 minutes - Cooking Time: 20 minutes - Total Time: 30 minutes This dish serves 4 and comes together quickly, making it perfect for busy nights. Enjoy your tasty meal! To boost the flavors in your creamy Cajun shrimp pasta, try these tips: - Use fresh shrimp for the best taste. - Sauté the onion and bell pepper until they are soft. - Don't skip the Cajun seasoning; it adds a nice kick. - Add a squeeze of lemon juice for brightness. Mixing in fresh herbs like parsley at the end brings a fresh touch. It also makes the dish look vibrant. Here are some common mistakes that can ruin your dish: - Overcooking the shrimp makes them rubbery. Cook just until they turn pink. - Not stirring the pasta enough can lead to clumping. Make sure to mix well. - Adding cream too early can cause separation. Wait until the pasta is almost done. Avoid these errors, and you will have a great meal! To make your pasta even creamier, consider these tips: - Use full-fat heavy cream for the richest flavor. - Mixing in more cheese enhances both flavor and creaminess. - Stir in some pasta water before serving. This will help bind the sauce to the pasta. These small changes can elevate your dish to a new level of deliciousness. Enjoy! {{image_2}} If shrimp isn’t your thing, try chicken or tofu. Chicken thighs work well and add a rich taste. Dice the chicken into small pieces and cook it just like the shrimp. For a plant-based dish, use firm tofu. Press it to remove moisture, then cube it. Sauté the tofu until golden for added flavor. Each protein brings its own flair to the dish. You can add more veggies for color and nutrition. Spinach is a great choice. It wilts nicely and adds a fresh taste. Zucchini or mushrooms can also work. Slice them thin and toss them in during the last few minutes of cooking. This adds texture and makes the meal more filling. Want more heat? Increase the Cajun seasoning or add red pepper flakes. You can also use fresh jalapeños for a kick. Start with a little, then taste as you go. If you prefer it mild, cut back on the seasoning or skip it altogether. Adjusting the spice lets you control the flavor to suit your taste. After enjoying your creamy Cajun shrimp pasta, store leftovers in an airtight container. Make sure to let the pasta cool down first. Place it in the fridge if you plan to eat it in the next few days. It should stay fresh for about 3 days. If you want to keep it longer, consider freezing it. To reheat your pasta, you have a couple of options. The best way is to use the stove. Put the pasta in a pan over low heat. Add a splash of chicken broth or cream to help with moisture. Stir often until warm. You can also microwave it. Use a microwave-safe dish and cover it. Heat in short bursts, stirring in between until hot. If you want to freeze your creamy Cajun shrimp pasta, do it right after it cools. Place it in a freezer-safe container. Make sure to leave some space for expansion. When frozen, it can last for up to 2 months. To enjoy later, thaw it in the fridge overnight. Then, follow the reheating instructions to warm it up. Yes, you can use frozen shrimp. Just make sure to thaw them first. You can do this by placing them in cold water for 15-20 minutes. Once thawed, peel and devein if needed. This saves time and still gives you great taste. If you want a lighter option, you can use half-and-half. Another choice is coconut milk, which adds a nice flavor. You could also try Greek yogurt mixed with a little milk to get a creamy texture. To make this dish gluten-free, simply swap the fettuccine for gluten-free pasta. There are many brands available now that taste great. Just check the package for cooking times, as they may vary. This blog post covered all you need for a great recipe. We explored key ingredients, cooking steps, and tips to enhance flavor. You learned about storage methods and answers to common questions. Using fresh ingredients makes a big difference in taste. Keep experimenting with variations to suit your taste buds. Follow the tips to avoid mistakes. With practice, you’ll master this dish and impress everyone. Enjoy your cooking journey and the delicious results that follow!

Creamy Cajun Shrimp Pasta One Pot Delicious Dinner

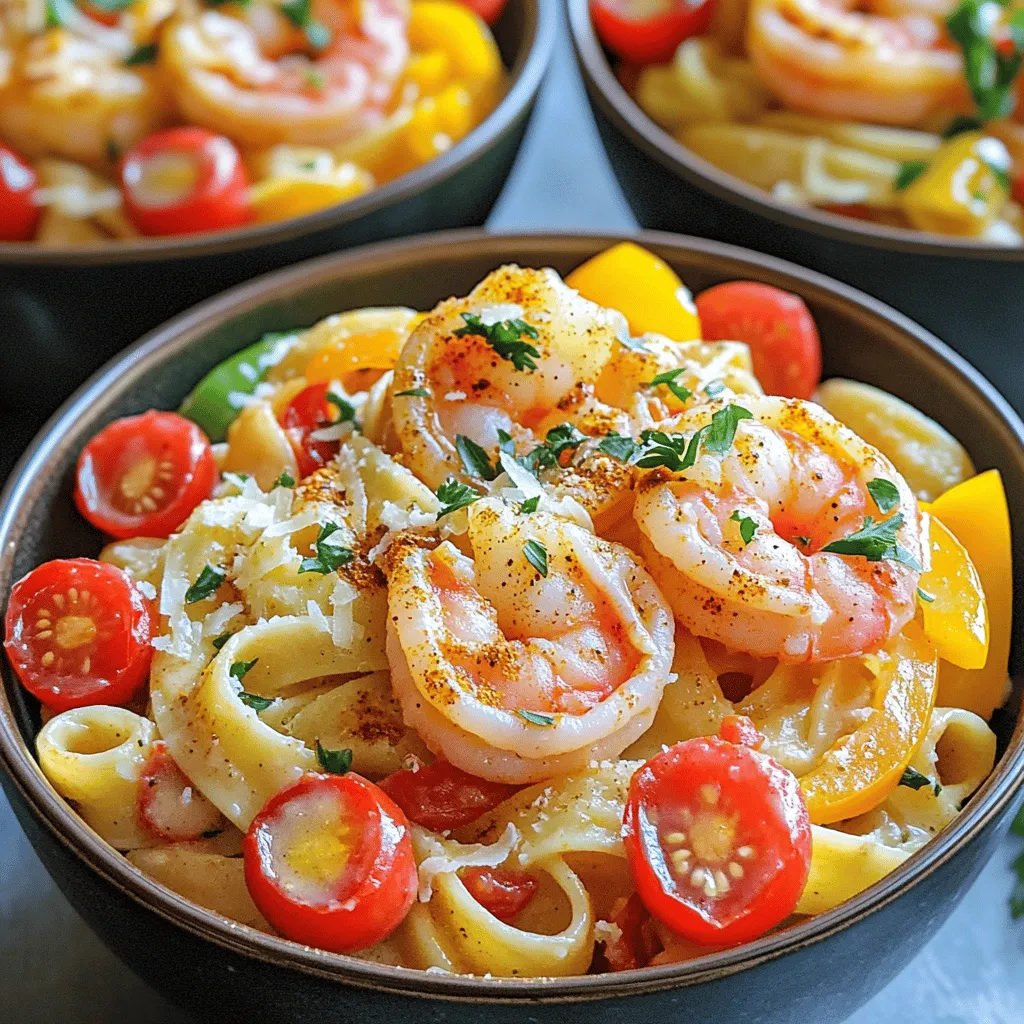
Are you ready for a tasty meal that takes just one pot? This Creamy Cajun Shrimp Pasta is not only

- 1 cup rolled oats - 1 cup creamy peanut butter - 1/2 cup honey or maple syrup - 1/2 cup unsweetened cocoa powder - 1/2 teaspoon vanilla extract - 1/4 teaspoon salt - 1/2 cup chocolate chips - 1/4 cup chopped nuts (optional) - You can use almond or cashew butter instead of peanut butter. - Agave or stevia works well as sweetener. - To make it gluten-free, choose certified gluten-free oats. These ingredients come together to create a tasty treat. The rolled oats add a chewy texture, while peanut butter provides creaminess. Honey or maple syrup adds sweetness, and cocoa powder gives a rich chocolate flavor. The vanilla extract enhances all the tastes, and a pinch of salt balances the sweetness. If you want to change things up, try different nut butters. Almond butter will give it a nutty twist, and cashew butter adds a smooth flavor. For sweeteners, agave syrup is a great choice. It has a mild taste and is easy to mix in. Stevia is another option if you want to cut down on sugar. For a gluten-free version, use oats marked as gluten-free. This way, everyone can enjoy these bars, regardless of dietary needs. You can even add some chopped nuts for an extra crunch. Nuts like almonds or walnuts work great. These substitutions keep the bars delicious while allowing you to customize them to your liking. Mixing dry ingredients Start by taking a large mixing bowl. Add 1 cup of rolled oats, 1/2 cup of cocoa powder, and 1/4 teaspoon of salt. Stir until all the dry ingredients mix well. This step is key for flavor balance. Preparing the peanut butter mixture In a separate bowl, combine 1 cup of creamy peanut butter and 1/2 cup of honey or maple syrup. Microwave this mixture for about 30 to 40 seconds. Stir until it's smooth. This step helps the peanut butter blend easier with the other ingredients. Mixing wet ingredients with dry Add the warm peanut butter mixture to your dry ingredients. Also, add 1/2 teaspoon of vanilla extract. Mix everything together until it’s thick and well combined. You want a nice, even texture. Incorporating chocolate chips and nuts Now, fold in 1/2 cup of chocolate chips and 1/4 cup of chopped nuts, if you're using them. Make sure these extras are evenly spread throughout the mixture. They add great flavor and texture. Preparing the baking pan Line an 8x8-inch square baking pan with parchment paper. Leave some paper hanging over the sides. This will help you lift the bars out later. Pressing and shaping the mixture Transfer your mixture into the lined pan. Use a spatula or your hands to press it down firmly. Make sure it’s even and flat. This step ensures that your bars hold together well when set. Now, you can refrigerate them for at least 1 to 2 hours until they are firm. Enjoy your homemade bars! To get the best texture in your no-bake bars, press the mixture firmly into the pan. This step is key. If you don’t press hard enough, the bars may fall apart later. If you want thicker bars, add more oats or peanut butter. For thinner bars, spread the mixture over a larger pan. Store your bars in an airtight container in the fridge. They stay fresh and tasty for about one week. When serving, cut the bars into squares. You can pair them with a glass of milk or a scoop of ice cream for a fun treat. One common mistake is overheating the peanut butter. Heat it just enough to mix well; too much heat can change the texture. Also, don’t skip the chilling step. If you don’t chill long enough, the bars won’t hold their shape. Aim for at least 1-2 hours in the fridge. {{image_2}} You can spice up your bars in fun ways. Try adding a sprinkle of cinnamon for warmth. A pinch of sea salt can enhance the sweet taste. You can also mix in dried fruits like raisins or cranberries. These fruits add chewiness and extra flavor. Plus, they boost nutrients in your bars. Want to make these bars vegan? Swap honey for maple syrup. This keeps the sweet taste without animal products. If you are following a keto diet, use a sugar substitute like erythritol. You can also replace oats with crushed nuts or seeds. This keeps the texture while lowering carbs. Love chocolate and peanut? You can double the chocolate chips for a richer taste. If you prefer a nut-free option, use sunflower seed butter instead of peanut butter. This keeps the creamy texture while being safe for those with nut allergies. Mix and match flavors to find what you love! To keep your No-Bake Chocolate Peanut Butter Oat Bars fresh, use an airtight container. This prevents air and moisture from ruining the bars. You can store them in the fridge for best results. If you prefer, you can keep them at room temperature for a short time. Just make sure they stay cool and away from heat. These tasty bars will last about one week in the fridge. Keep an eye on them. If they start to smell off or look dry, it’s time to toss them. Signs of spoilage include mold or a change in color. Always check before you enjoy. To freeze your bars, cut them into squares first. Wrap each piece in plastic wrap. Then place them in a freezer-safe bag. This helps keep them fresh for up to three months. When you're ready to eat one, take it out and let it thaw in the fridge. This keeps the texture nice and chewy. Yes, you can use old-fashioned oats. They have a different texture. Old-fashioned oats are thicker and chewier. They may need a bit more time to soak up moisture. If you use them, the bars might be heartier and take longer to set. Absolutely! You can try sun butter or almond butter. These options work well for nut-free bars. You can even use a seed butter like pumpkin seed butter. Each choice gives a unique flavor. Just keep the same amount as peanut butter in the recipe. Check the firmness by pressing on the bars. If they feel solid and not sticky, they are set. You can also look for a slight sheen. This shows the chocolate has cooled and firmed up. If they still feel soft, give them more time in the fridge. You learned how to make tasty, no-bake bars. We covered ingredients, preparation, and even storage tips. You can customize them with different nuts or sweeteners. Remember to press the mixture well for the best texture. These bars last long in the fridge and freeze well too. Now you’re ready to create your own delicious treats. Enjoy your time in the kitchen and share your favorite variations!

No-Bake Chocolate Peanut Butter Oat Bars Recipe

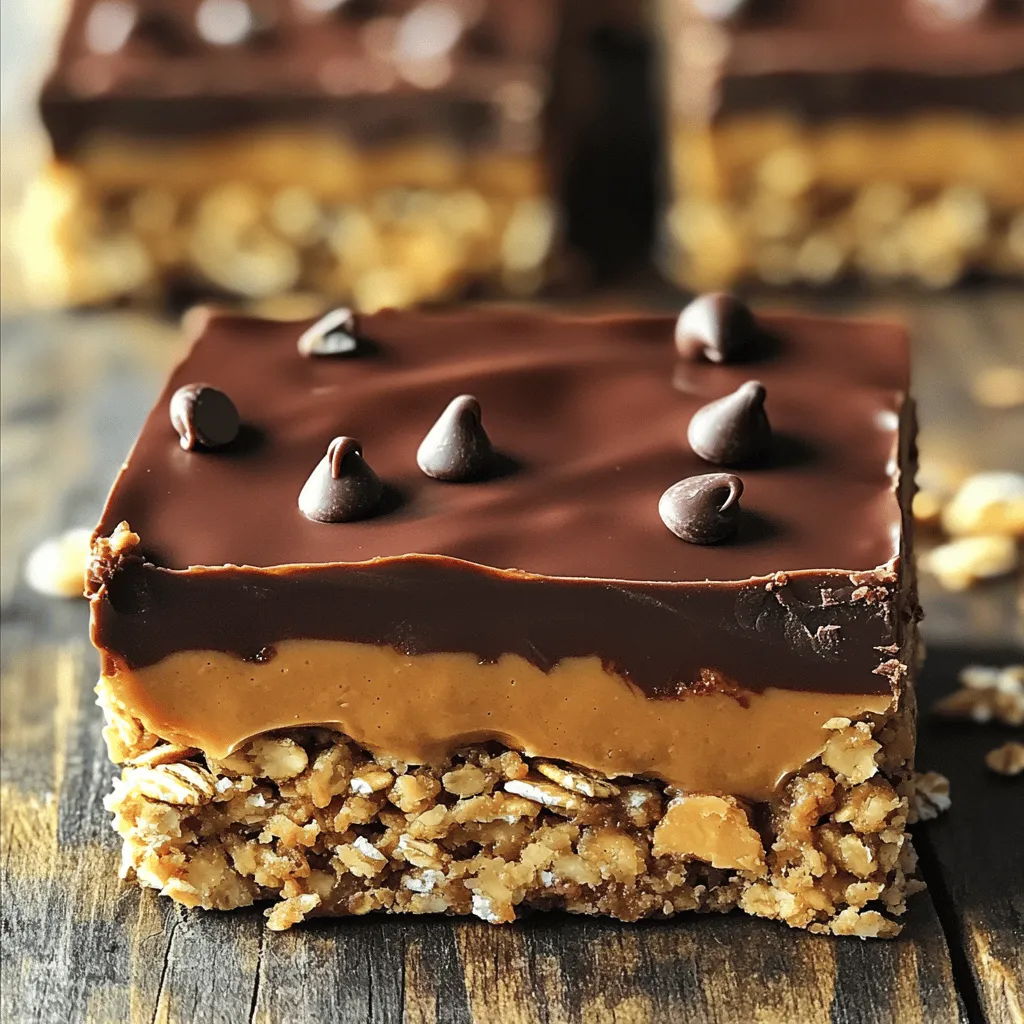
Are you ready to whip up a sweet, no-bake treat? This No-Bake Chocolate Peanut Butter Oat Bars Recipe brings together

- 1 sheet of puff pastry, thawed - 3 large onions, thinly sliced - 2 tablespoons olive oil - 1 tablespoon butter - 1 teaspoon sugar - 1 teaspoon salt - 1 teaspoon fresh thyme leaves (or ½ teaspoon dried thyme) - 1 cup Gruyère cheese, grated - 2 large eggs - 1 cup heavy cream - Freshly ground black pepper to taste - Puff pastry: 1 sheet - Onions: 3 large - Olive oil: 2 tablespoons - Butter: 1 tablespoon - Sugar: 1 teaspoon - Salt: 1 teaspoon - Thyme: 1 teaspoon fresh (or ½ teaspoon dried) - Gruyère cheese: 1 cup grated - Eggs: 2 large - Heavy cream: 1 cup - Black pepper: to taste - You can add a pinch of nutmeg for warmth. - Consider using a mix of cheeses like cheddar or feta for a twist. - A splash of white wine during onion cooking adds depth. - Fresh herbs like parsley or chives can brighten the dish. These ingredients will help you create a rich and tasty tart. You can mix and match according to your taste. Enjoy the process of making it! First, set your oven to 400°F (200°C). This step warms your oven for even baking. A hot oven helps the pastry rise and become crispy. Next, grab a large skillet and add two tablespoons of olive oil and one tablespoon of butter. Heat this over medium heat. Once hot, add three thinly sliced onions. Stir them well, then sprinkle with one teaspoon of salt and one teaspoon of sugar. Cook the onions for about 20-25 minutes. Stir often. You want them soft and golden brown. In the last few minutes, add one teaspoon of fresh thyme leaves. This adds great flavor. Once done, remove from heat and set aside. Now, take your thawed puff pastry sheet. Place it on a lightly floured surface. Roll it out until it fits your tart pan, about 10 inches wide. Carefully transfer the pastry to the pan. Press it into the edges to avoid leaks. Trim any extra pastry from the edges. Spread one cup of grated Gruyère cheese evenly over the bottom of the pastry shell. In a bowl, whisk together two large eggs and one cup of heavy cream. Add a pinch of freshly ground black pepper for taste. Pour this mixture over the cheese in the tart shell. Finally, gently layer the caramelized onions on top. Place the tart in your preheated oven. Bake for 25-30 minutes. Look for a golden brown crust and set custard. The smell will be amazing! After baking, let the tart cool slightly. This makes slicing easier. You can serve it warm or at room temperature. It pairs well with a simple salad for a delicious meal. Enjoy your tasty creation! To get the best caramelized onions, start with the right heat. Use medium heat to cook them slowly. This helps develop their sweet flavor. Add olive oil and butter to your skillet first. The butter adds richness, while the oil prevents burning. Slice your onions thinly. This helps them cook evenly. Sprinkle salt and sugar over the onions to help them caramelize. Stir often. The goal is to reach a golden brown color, which takes about 20 to 25 minutes. Add thyme in the last few minutes for an extra flavor boost. When working with puff pastry, keep it cold. Cold pastry puffs up better when baking. Thaw it in the fridge until you are ready to use it. Roll it out on a lightly floured surface. Aim for about a 10-inch circle to fit your tart pan. Transfer the pastry carefully to the pan. Press it into the edges and trim any excess. This helps keep the filling from spilling over. If the pastry tears, don’t worry! Just patch it up with a little extra dough. Seasoning is key to a great tart. Use fresh thyme for a fragrant touch. If you only have dried thyme, that works too. A pinch of freshly ground black pepper adds depth. You can also try adding a pinch of nutmeg or a dash of garlic powder for extra flavor. Remember to taste as you go. Adjusting the seasonings will make your tart truly shine. {{image_2}} You can switch out Gruyère for other cheeses. Try sharp cheddar for a stronger flavor. Fontina brings a creamy richness, while feta adds a tangy twist. Each cheese gives a unique taste. Mix and match to find your favorite combo. Feel free to add extra veggies or proteins. Spinach or mushrooms work well in this tart. You can also add cooked bacon or ham for a hearty touch. Just sauté them before adding to the tart. This way, you pack in more flavor and texture. If you need a gluten-free option, use gluten-free puff pastry. Many brands offer tasty choices that work well. Just follow the package instructions for baking. Your tart will still have that flaky goodness everyone loves. To keep your tart fresh, let it cool completely. Place it in an airtight container. You can also cover it tightly with plastic wrap. Store it in the fridge for up to three days. The tart tastes best when eaten fresh, but proper storage helps. When you're ready to enjoy your leftovers, preheat your oven to 350°F (175°C). Place the tart on a baking sheet. Warm it in the oven for about 15-20 minutes. This method keeps the crust crispy and the filling creamy. You can also use a microwave, but the crust may become soft. If you want to freeze the tart, slice it first. Wrap each slice in plastic wrap tightly. Then, place them in a freezer-safe bag. Label the bag with the date. You can freeze it for up to three months. To enjoy, thaw slices in the fridge overnight and reheat as mentioned above. Yes, you can make this tart ahead of time. Prepare the tart fully, but do not bake it. Cover it well and store it in the fridge for up to 24 hours. When you are ready to bake, just pop it in the oven. It will taste fresh and delicious. This tart pairs great with many sides. A simple green salad adds a nice crunch. You can also serve it with a light soup, like tomato or butternut squash. For a more filling meal, add some roasted vegetables or a charcuterie board. These options will make your meal feel complete. You know the tart is done when the pastry looks golden brown. The custard should be set, not jiggly. If you press gently on the top, it should feel firm. If it’s still soft, give it a few more minutes in the oven. Always trust your eyes and touch! In this blog post, we explored how to make a Caramelized Onion Gruyère Tart. We covered the ingredients, from basic to optional enhancements, and provided step-by-step instructions. I shared tips for perfect onions and pastry handling, along with delicious variations and storage info. Now, you have the tools to create a tasty dish that impresses. Enjoy your cooking journey, and remember: the best ingredient is your personal touch. Happy baking!

Savory Caramelized Onion Gruyere Tart Recipe Guide

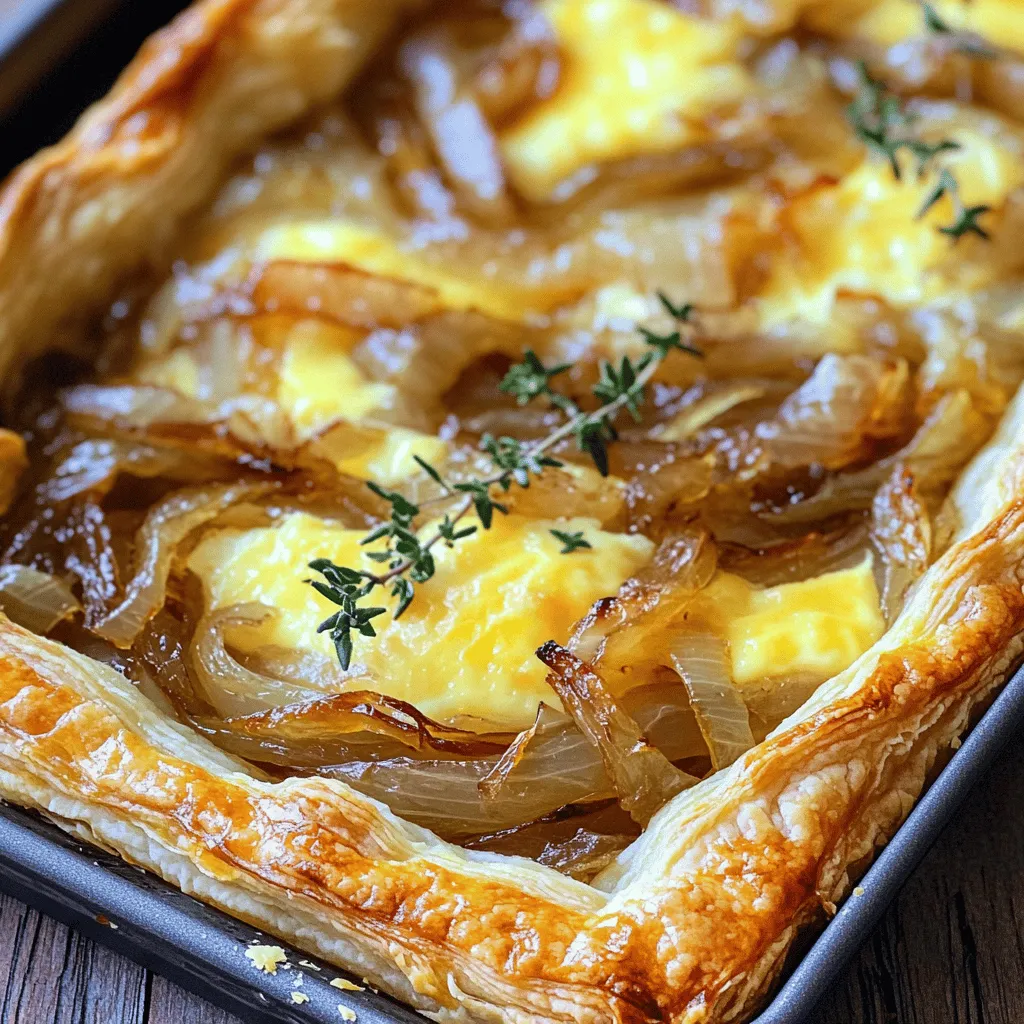
Looking to impress at your next gathering? This Savory Caramelized Onion Gruyere Tart will do just that! With sweet, rich

To make One-Pot Spinach Tortellini Soup, you need fresh and simple ingredients. Here’s what you will need: - 1 tablespoon olive oil - 1 small onion, diced - 2 garlic cloves, minced - 4 cups vegetable broth - 1 cup heavy cream (or coconut milk for a lighter option) - 9 ounces fresh cheese tortellini - 2 cups fresh spinach, rinsed and chopped - 1 teaspoon Italian seasoning - Salt and pepper to taste - Grated Parmesan cheese for serving (optional) Each ingredient plays a role in creating a rich flavor. The olive oil adds a nice base, while the onion and garlic provide a sweet and savory taste. The vegetable broth makes the soup hearty. Heavy cream or coconut milk gives it a creamy texture. Fresh cheese tortellini adds bite and substance, and spinach brings a pop of color and nutrition. Italian seasoning rounds it all out with herby notes. Finally, salt and pepper enhance the flavors, while Parmesan cheese adds a salty finish. Gather these ingredients, and you are ready to make this comforting soup! To make this soup, you will need to gather all your ingredients. It takes just 10 minutes to prep everything. You should dice the onion and mince the garlic first. Rinse and chop the spinach too. This way, you will have everything ready when you start cooking. 1. Heat the oil: In a large pot, heat 1 tablespoon of olive oil over medium heat. 2. Sauté onion: Add the diced onion. Cook for 3-4 minutes until it looks clear. 3. Add garlic: Stir in the minced garlic. Cook for 30 seconds until you can smell it. 4. Pour in broth: Next, add 4 cups of vegetable broth. Bring this to a gentle boil. 5. Add cream: Pour in 1 cup of heavy cream or coconut milk. Let it simmer for 5 minutes. Stir it often. 6. Cook tortellini: Add 9 ounces of cheese tortellini to the pot. Follow the package's cooking time, about 5-7 minutes. 7. Stir in spinach: Once the tortellini is done, add 2 cups of chopped spinach and 1 teaspoon of Italian seasoning. Cook for another 2-3 minutes until the spinach wilts. 8. Season: Taste and add salt and pepper as you like. Serve the warm soup in bowls. For a tasty touch, sprinkle some grated Parmesan cheese on top if you wish. This dish is perfect for a cozy night in or a simple weeknight dinner. Pair it with crusty bread for a complete meal. Enjoy your one-pot spinach tortellini soup! To make your soup burst with flavor, use fresh ingredients. Fresh garlic and onion add depth. Sauté them well before adding broth. Let them cook until soft. This step draws out their natural sweetness. When you add the heavy cream, keep the heat low. This prevents curdling and keeps it smooth. If you want a lighter soup, swap heavy cream for coconut milk. It adds a nice hint of sweetness. For a more robust taste, try vegetable broth with herbs. You can also use frozen spinach if fresh is not available. Just make sure to thaw and drain it first. If you need a gluten-free option, choose gluten-free tortellini. Serve your soup in a large bowl for a cozy look. Add a sprinkle of grated Parmesan cheese on top. This adds a lovely finish. You can also toss in a pinch of fresh herbs for color. A slice of crusty bread on the side is perfect for dipping. Enjoy your beautiful, hearty dish! {{image_2}} This soup is already a vegetarian delight. You can make it even more vibrant by adding more veggies. Try diced carrots, bell peppers, or zucchini. These add color and nutrients. You can also use vegetable broth to keep it plant-based. For a twist, add some lentils for extra protein. If you need a gluten-free version, choose gluten-free tortellini. Many brands offer tasty options made from rice or corn. Always check the labels to be sure. You can also thicken the soup with a bit of cornstarch mixed with water if needed. This keeps the soup rich and creamy without the gluten. Feel free to get creative with your add-ins. You can toss in some cooked chicken or sausage for extra flavor. If you like spice, add crushed red pepper flakes. For a fresh touch, stir in some fresh herbs like basil or parsley just before serving. Each of these options can make your soup unique and fun. After you enjoy your one-pot spinach tortellini soup, let it cool first. Use an airtight container for storage. This soup stays fresh in the fridge for about three days. If you want to keep it longer, consider freezing. To freeze the soup, use freezer-safe containers. Leave some space at the top for expansion. It can last up to three months in the freezer. When you want to eat it, thaw it in the fridge overnight. Reheat the soup on the stove over medium heat. Stir often to avoid sticking. If it seems thick, add a splash of broth or water. You can also use a microwave if you prefer. Heat it in a bowl for about 2-3 minutes, stirring halfway. Enjoy your warm, tasty soup again! Yes, you can use frozen tortellini. They cook well in the soup. Just add them to the pot while the soup simmers. Follow the package instructions for cooking time. Frozen tortellini may take a bit longer than fresh. To make the soup less creamy, reduce the amount of heavy cream. You can replace it with more vegetable broth. Coconut milk is also a lighter option that adds flavor. Adjust to your taste as you cook. This soup pairs well with crusty bread or a fresh salad. You can also serve it with garlic bread for a tasty combo. A sprinkle of Parmesan cheese on top adds a nice touch too. The soup stays fresh in the fridge for about three days. Store it in an airtight container. If the soup thickens, add a bit of broth when reheating. Enjoy the flavors even after a few days! This blog post covered a creamy tortellini soup recipe, from ingredients to serving tips. You learned about the key ingredients, step-by-step cooking, and how to store leftovers. I shared useful tips and variations for making the soup fit your needs. Remember, cooking should be fun and flexible. Feel free to experiment with your own flavors. Whether you’re making it vegetarian or adding spice, enjoy every bite. Happy cooking!

One-Pot Spinach Tortellini Soup Hearty and Simple Dish

Looking for a quick, warm meal that fills you up? Try my One-Pot Spinach Tortellini Soup! This hearty dish blends

- 2 boneless, skinless chicken breasts, thinly sliced - 2 tablespoons soy sauce - 1 tablespoon oyster sauce - 1 tablespoon sesame oil - 2 cloves garlic, minced - 1 small onion, sliced - 1 bell pepper, thinly sliced (any color) - 2 cups shredded cabbage - 1 carrot, julienned - 3 green onions, chopped - 200g chow mein noodles (fresh or dried) - 2 tablespoons vegetable oil - Salt and pepper to taste - Sesame seeds for garnish The key to a great Chicken Chow Mein Takeout Fakeout lies in the quality and balance of your ingredients. Fresh chicken gives the dish a tender bite. I like to use boneless, skinless chicken breasts, sliced thinly for even cooking. Next, sauces add depth. Soy sauce brings saltiness, while oyster sauce adds a hint of sweetness. Sesame oil rounds it out with a nutty flavor. Garlic packs a punch and adds aroma. Vegetables are crucial for color and crunch. I choose a mix like onion, bell pepper, cabbage, and carrot. They not only taste great together but also provide texture. For noodles, chow mein noodles are ideal. You can use either fresh or dried. Fresh noodles save time, while dried ones need a quick boil. Finally, garnishing elevates the dish. Chopped green onions and sesame seeds add a nice finish. This mix of ingredients guarantees a flavorful delight you can whip up at home. Start by taking your thinly sliced chicken breasts. Mix them in a bowl with soy sauce, oyster sauce, sesame oil, and minced garlic. This blend makes the chicken tasty and juicy. Let it sit for at least 15 minutes. This time helps the chicken soak up all the flavors. If you have dried chow mein noodles, cook them as the package says. Aim for al dente texture. If you use fresh noodles, rinse them in hot water for a few minutes. Once cooked, drain the noodles and set them aside. In a large wok or skillet, heat one tablespoon of vegetable oil. Use medium-high heat. Add sliced onion, bell pepper, and carrot. Stir-fry these for about 3 to 4 minutes until they soften a bit. Then, add the shredded cabbage. Keep cooking for another 2 minutes until it wilts. Push the vegetables to one side of the pan. Add the other tablespoon of oil. Now, add the marinated chicken. Cook it for about 5 to 6 minutes. Make sure the chicken is no longer pink. Stir it with the vegetables to mix the flavors. Now it's time for the noodles! Add the cooked chow mein noodles to the pan. Use tongs to toss everything together. Ensure the noodles get coated with the chicken and vegetables. Cook for an additional 2 to 3 minutes to heat everything through. Taste your dish and add salt and pepper if needed. Stir in the chopped green onions for that fresh crunch. Serve your Chicken Chow Mein hot. Sprinkle sesame seeds on top. You can add more green onions if you like. Enjoy your tasty takeout fakeout! To get that true takeout taste, marinating is key. Use soy sauce, oyster sauce, sesame oil, and garlic. Let the chicken soak for at least 15 minutes. This step adds deep flavor. Don't rush it! For an extra kick, add a dash of chili oil or hot sauce. Cooking the chow mein noodles just right is crucial. If using dried noodles, follow the package instructions. Aim for al dente texture. This keeps them chewy and not mushy. If you pick fresh noodles, rinse them under hot water. This helps them stay light and fluffy. Toss them in the pan with the chicken and veggies quickly to mix. Taste your dish before serving. You can always add more salt and pepper. If you like it spicy, add some crushed red pepper flakes. For a fresh touch, mix in a little more chopped green onion. This makes the dish pop with flavor. Remember, balance is key! Adjusting seasonings helps you create a dish that suits your taste buds perfectly. {{image_2}} If you want to switch things up, try using tofu or shrimp. Tofu adds a nice texture and absorbs flavors well. Cut firm tofu into cubes and marinate it just like chicken. For shrimp, use peeled, deveined shrimp. Cook them until they are pink and opaque. Both options are tasty and work well in chicken chow mein. Feel free to add more veggies to your chow mein. Mushrooms bring an earthy flavor, while broccoli adds crunch. Slice up shiitake or button mushrooms and toss them in with the other veggies. For broccoli, cut it into small florets. Add them during the stir-fry step for the best texture and taste. If you need a gluten-free dish, rice noodles are a great choice. They offer a wonderful chew and soak up the sauce well. Cook the rice noodles according to the package instructions, just like chow mein noodles. Once cooked, mix them with the chicken and veggies for a delicious gluten-free meal. After you enjoy your Chicken Chow Mein, store leftovers in an airtight container. This helps keep the dish fresh. Place it in the fridge for up to three days. Make sure it cools down first before sealing it up. This prevents extra moisture that can make your noodles soggy. When reheating, use a skillet for the best results. Heat it over medium heat and add a splash of water or broth. This adds moisture and helps steam the noodles. Stir often to heat evenly. You can also use a microwave. Cover the dish with a damp paper towel. Heat in short bursts, stirring in between. If you have more than you can eat, consider freezing it. Portion the Chicken Chow Mein into freezer-safe bags. Make sure to remove as much air as possible. This helps prevent freezer burn. It can last up to three months. Thaw it overnight in the fridge before reheating. Chicken chow mein comes from China. It is a popular dish in Chinese cuisine. The name means "stir-fried noodles." It started in the Guangdong province. Many people love it in America and around the world. Each region has its own twist on the dish. You can find it in many takeout spots. Yes, you can use different noodles! If you can't find chow mein noodles, try lo mein or even rice noodles. Each type brings a unique taste and texture. Remember to adjust cooking times based on the noodle type. Fresh noodles cook quickly, while dried ones need more time. Experiment with your favorites for a fun twist! To make chicken chow mein vegetarian, swap the chicken for tofu or tempeh. Both are great protein options. Use the same marinade for flavor. Add more colorful veggies like mushrooms or snap peas. This keeps the dish vibrant and tasty. You can still enjoy that classic chow mein taste without meat! We covered all you need to know to make chicken chow mein at home. You learned about key ingredients, step-by-step cooking methods, and clever tips for flavor. I shared variations to fit your tastes, plus easy storage and reheating info. Try experimenting with your favorite veggie or protein. With practice, you'll make a dish everyone loves. Enjoy your cooking adventure!

Chicken Chow Mein Takeout Fakeout Flavorful Delight

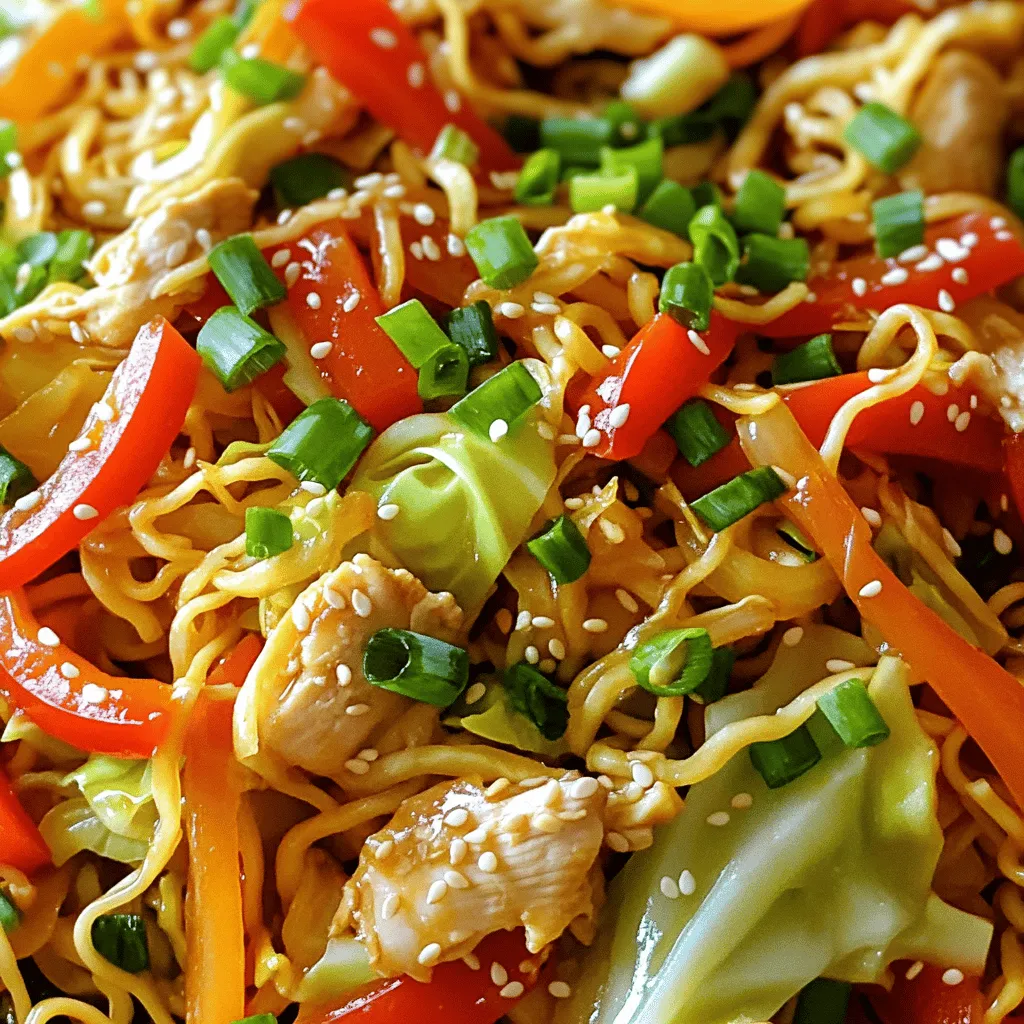
Craving a hearty Chicken Chow Mein but don’t want to order takeout? You’ve come to the right place! In this

- 1 cup oat flour - 1/2 cup almond flour - 1/2 cup protein powder (vanilla or chocolate) - 1/4 cup maple syrup - 1/4 cup coconut oil, melted - 1/2 teaspoon vanilla extract - 1/4 teaspoon salt - 1/2 cup dark chocolate chips - 2 tablespoons nut butter (peanut or almond) - Oat flour: High in fiber, it helps with digestion and gives energy. - Almond flour: Packed with vitamin E, it supports skin health and gives protein. - Protein powder: Adds protein, helps build muscles, and keeps you full longer. - Maple syrup: A natural sweetener, it has antioxidants that support your health. - Coconut oil: Provides healthy fats that boost energy and support brain health. - Vanilla extract: Offers great flavor and can enhance mood. - Salt: Balances flavors and helps with electrolyte balance. - Dark chocolate chips: Rich in antioxidants, they can improve heart health. - Nut butter: Adds healthy fats and protein, which makes snacks satisfying. - Oat flour: Bob's Red Mill offers a gluten-free option. - Almond flour: Kirkland Signature is a great choice for quality and value. - Protein powder: Optimum Nutrition provides reliable protein with good taste. - Maple syrup: Look for real maple syrup from Maple Grove Farms. - Coconut oil: Nutiva Organic Coconut Oil is a trusted brand. - Dark chocolate chips: Enjoy Life Foods has great dairy-free options. - Nut butter: Justin's makes a tasty and natural nut butter. These ingredients work together to create a tasty treat that's both nutritious and fun to eat! Start by getting your tools ready. You need one large bowl and another smaller bowl. Grab a whisk and a spatula too. First, measure out your dry ingredients. In the large bowl, add 1 cup of oat flour, 1/2 cup of almond flour, 1/2 cup of protein powder, and 1/4 teaspoon of salt. Mix these dry ingredients well. This helps them blend evenly. Now, take the smaller bowl. Whisk together the wet ingredients. Add 1/4 cup of maple syrup, 1/4 cup of melted coconut oil, and 1/2 teaspoon of vanilla extract. Keep whisking until the mixture is smooth. Once done, pour this wet mix into the dry ingredients. Stir until a dough forms. If it feels too dry, add a tablespoon of water or nut milk. This gets you the right cookie dough texture. Next, it’s time to form the bites. Use your hands to scoop small portions of dough. Aim for about 1 tablespoon for each bite. Roll them into small balls. Place these on a baking sheet lined with parchment paper. Once all are formed, pop them into the fridge for at least 30 minutes. This helps them firm up. Enjoy these tasty bites after chilling! To make great cookie dough bites, you need the right texture. Start by mixing your dry ingredients well. This helps them blend evenly. When you add the wet mix, it should come together but not be too sticky. If it feels dry, add a little water or nut milk. Aim for a soft, moldable dough that holds its shape. If you have leftover dough, store it in an airtight container. This keeps it fresh for later use. You can also place the cookie dough bites in the fridge or freezer. If freezing, use parchment paper between layers to avoid sticking. These bites can last up to a month frozen, making them great for meal prep. These cookie dough bites are perfect for snacks or a post-workout treat. Serve them on a nice plate to impress your friends. Drizzle melted chocolate on top for a fancy touch. You can also pair them with fruits or nuts for added flavor and nutrition. Enjoy! {{image_2}} You can make these bites vegan easily. Just swap out the honey for maple syrup. Use a plant-based protein powder, like pea or brown rice. Instead of nut butter, you can try sunflower seed butter. This makes the bites nut-free and just as tasty! To keep these bites gluten-free, use certified gluten-free oats. Ensure your oat flour is also gluten-free. Almond flour is naturally gluten-free, so no changes are needed there. This way, you can enjoy these bites without worry. You can make your bites even more fun by adding different flavors. Try mixing in chopped nuts, like walnuts or pecans, for extra crunch. For sweetness, you can use agave syrup or coconut sugar instead of maple syrup. You can also stir in spices, like cinnamon or nutmeg, for a warm taste. Each twist makes the bites unique! To keep your cookie dough bites fresh, store them in an airtight container. This helps to lock in moisture and flavor. Place parchment paper between layers if you stack them. This prevents them from sticking together. Keep the bites in the fridge if you will eat them within a week. If you plan to keep them longer, freezing is a better option. Freezing these bites is simple. After you form the balls, place them on a baking sheet. Make sure they do not touch each other. Freeze them for about an hour until firm. Once frozen, transfer the bites to a freezer-safe bag. Be sure to label the bag with the date. They can last in the freezer for up to three months. When you want to enjoy them, just thaw in the fridge overnight. These protein chocolate chip cookie dough bites stay fresh in the fridge for about one week. If stored properly in the freezer, they can last up to three months. For the best taste, try to eat them within the first month of freezing. If they start to lose flavor or texture, it’s time to let them go. Enjoying them sooner will ensure the best taste and texture! To make these tasty bites, start with the dry ingredients. In a large bowl, mix one cup of oat flour, half a cup of almond flour, half a cup of protein powder, and a quarter teaspoon of salt. In a separate bowl, whisk together a quarter cup of maple syrup, a quarter cup of melted coconut oil, and half a teaspoon of vanilla extract. Combine the wet and dry mixtures until a dough forms. If it's dry, add a tablespoon of water or nut milk. Finally, fold in half a cup of dark chocolate chips and two tablespoons of nut butter. Scoop the dough into small balls and chill them for at least thirty minutes. Yes, you can substitute some ingredients. For example, if you don’t have oat flour, you can use all-purpose flour. If you're not a fan of almond flour, coconut flour can work too. You can choose any protein powder you like, whether it's vanilla or chocolate. Maple syrup can be swapped with honey or agave nectar. Finally, you can change the nut butter to fit your taste, using cashew or sunflower butter instead. These bites offer several nutritional benefits. The oat flour provides fiber, which helps digestion. Almond flour adds healthy fats and protein. Protein powder boosts your protein intake, helping muscle repair. Dark chocolate chips add antioxidants and a touch of sweetness. Coconut oil supports brain health and adds flavor. Overall, these bites offer a balance of carbs, fats, and proteins, making them a great snack. The bites can last about one week in the fridge. Be sure to store them in an airtight container. This keeps them fresh and prevents them from drying out. If you want to enjoy them longer, consider freezing them instead. Yes, there are several alternatives for protein powder. You can use powdered peanut butter or hemp protein for a nutty flavor. If you prefer plant-based options, pea protein or brown rice protein are great choices. You can even use ground nuts or seeds, but keep in mind this may change the texture a bit. You now have a complete guide to making protein chocolate chip cookie dough bites. We covered the essential ingredients and their benefits. You learned step-by-step how to prepare and mix them. Useful tips were shared to help you create the perfect dough. Plus, we explored tasty variations for everyone, including vegan and gluten-free options. Remember, these bites are not just delicious; they are also nutritious. Enjoy your cooking and feel free to experiment with flavors!

Protein Chocolate Chip Cookie Dough Bites Delight

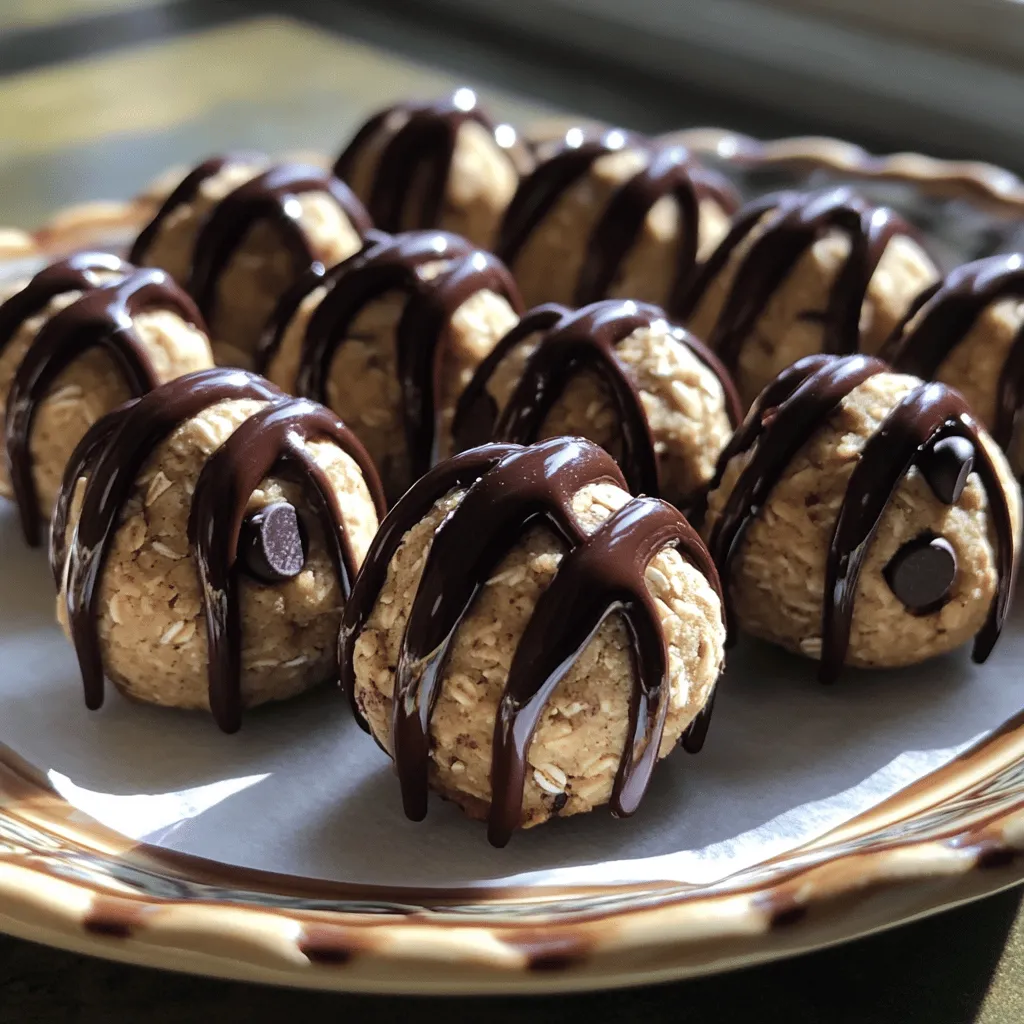
Looking for a tasty, healthy snack? These Protein Chocolate Chip Cookie Dough Bites are the answer! Packed with nutrients and

- 4 boneless, skinless chicken thighs - 2 cups broccoli florets - 1 bell pepper (red or yellow), chopped - 1 medium red onion, cut into wedges - 1 cup cherry tomatoes, halved - 1/4 cup balsamic vinegar - 2 tablespoons olive oil - 2 tablespoons honey - 2 cloves garlic, minced - 1 teaspoon dried oregano - Salt and pepper to taste The main ingredients create a balanced meal. The chicken thighs offer rich flavor and juiciness. Broccoli, bell pepper, red onion, and cherry tomatoes add crunch and color. The balsamic vinegar brings a sweet tang. This mix makes for a tasty, easy dinner. - Fresh basil You can add fresh basil at the end. It gives a pop of color and a fresh taste. You might also sprinkle extra spices. This adds more flavor and makes the dish your own. - Use chicken breast instead of thighs for a leaner option. - Swap in your favorite vegetables. Zucchini, asparagus, or green beans work well. - For a gluten-free meal, ensure your balsamic vinegar is gluten-free. These options help you customize the dish. You can find what fits your taste best. Enjoy experimenting with different flavors and ingredients. - Preheat your oven to 400°F (200°C). This temperature cooks the chicken perfectly. - Grab a large sheet pan. Line it with parchment paper for easy clean-up. - In a small bowl, whisk together the balsamic vinegar, olive oil, honey, garlic, oregano, salt, and pepper. Mix well until smooth. This marinade adds great flavor to the chicken. - Place the chicken thighs on the pan. Pour half of the balsamic mixture over them. Make sure to cover every piece well. - Let the chicken marinate for 15-20 minutes. This time allows the flavors to soak in. Even coating helps ensure a tasty bite every time. - While the chicken marinates, chop the vegetables. Use broccoli, bell pepper, red onion, and cherry tomatoes. - In a bowl, combine the veggies. Drizzle the remaining balsamic mixture over them. Toss to coat well. - Arrange the marinated chicken on the pan. Spread the vegetables around the chicken for even cooking. - Roast in the preheated oven for 25-30 minutes. Check for an internal temperature of 165°F (74°C) for the chicken. The veggies should be tender and slightly caramelized. To balance flavors in the marinade, use equal parts balsamic vinegar and olive oil. The honey adds sweetness while the garlic and oregano bring depth. Salt and pepper are key; they enhance the overall taste. Start with a pinch of salt and a few twists of pepper. You can always add more. To check the doneness, use a meat thermometer. The chicken should reach 165°F (74°C) internally. Insert the thermometer into the thickest part of the thigh. This ensures it is fully cooked. To avoid dry chicken, do not overcook it. Keep an eye on the time and check early if needed. Choose vegetables that complement the dish, like broccoli, bell peppers, and cherry tomatoes. They add color and nutrition. When it comes to timing, add quick-cooking veggies like tomatoes later. This helps them stay firm and vibrant. Aim for even cooking by spreading them out on the pan. {{image_2}} For this sheet pan meal, chicken thighs work great. They stay juicy and tender. You can also use chicken breasts if you prefer. Just remember that breasts cook faster. If you want to switch it up, try beef. Thin cuts like flank steak roast well. For a plant-based option, use tofu. Press it first to remove extra water. Then, marinate it just like the chicken. Spices and herbs can change the taste. You can add paprika for a smoky flavor. Or try rosemary for a fresh twist. Different vinegars can also make a big difference. Red wine vinegar adds richness. Apple cider vinegar gives a nice tang. Feel free to experiment and find your favorite combination. Seasonal vegetables are a perfect match. In spring, use asparagus or snap peas. In summer, zucchini or corn shines. Fall brings squash and Brussels sprouts. Winter is great for root veggies like carrots and parsnips. Using frozen vegetables is easy, too. They cook quickly and are often just as healthy. Just toss them in with the chicken and roast. Adjust the cooking time to ensure they heat through. To store leftovers, let the chicken and veggies cool first. Then, place them in an airtight container. This helps keep them fresh. I recommend using glass containers. They are sturdy and safe for the fridge. Make sure to seal them tightly to avoid any odors. For reheating, use the oven for the best results. Preheat it to 350°F (175°C). Place the chicken and veggies in a baking dish. Cover with foil to keep them moist. Heat for about 15-20 minutes. Check that the chicken reaches 165°F (74°C) again for safety. Yes, this dish can be frozen! To freeze, let it cool completely. Then, place it in a freezer-safe bag. Remove as much air as you can to avoid freezer burn. When ready to eat, thaw it in the fridge overnight. Reheat it the next day using the oven method for the best taste. Marinate the chicken for 15 to 20 minutes. This time allows the flavors to soak in well. If you have more time, you can marinate longer for an even richer taste. Just keep it in the fridge during that time. Yes, you can try different vinegars. Apple cider vinegar or red wine vinegar works great. Each type adds a unique flavor. If you want a milder taste, use rice vinegar. Make sure to adjust the sweetness so it balances well. Yes, this dish is gluten-free. The main ingredients, like chicken and veggies, do not contain gluten. Just be careful with any added products. Check labels on honey or seasoning mixes to ensure they are gluten-free. To add spice, include red pepper flakes or cayenne pepper. You can also use spicy mustard in the marinade. Another option is to add jalapeños or chili peppers with the veggies. Adjust the amount to fit your heat preference. We covered a tasty recipe using chicken thighs, veggies, and balsamic vinegar. You learned how to marinate, roast, and store your dish. Don’t be afraid to switch proteins or add spices to make it your own. Enjoy experimenting with flavors and ingredients. This dish is not only easy but also perfect for any meal. Trust the process, and enjoy every bite you create!

Sheet Pan Balsamic Chicken & Veggies Easy Dinner Delight

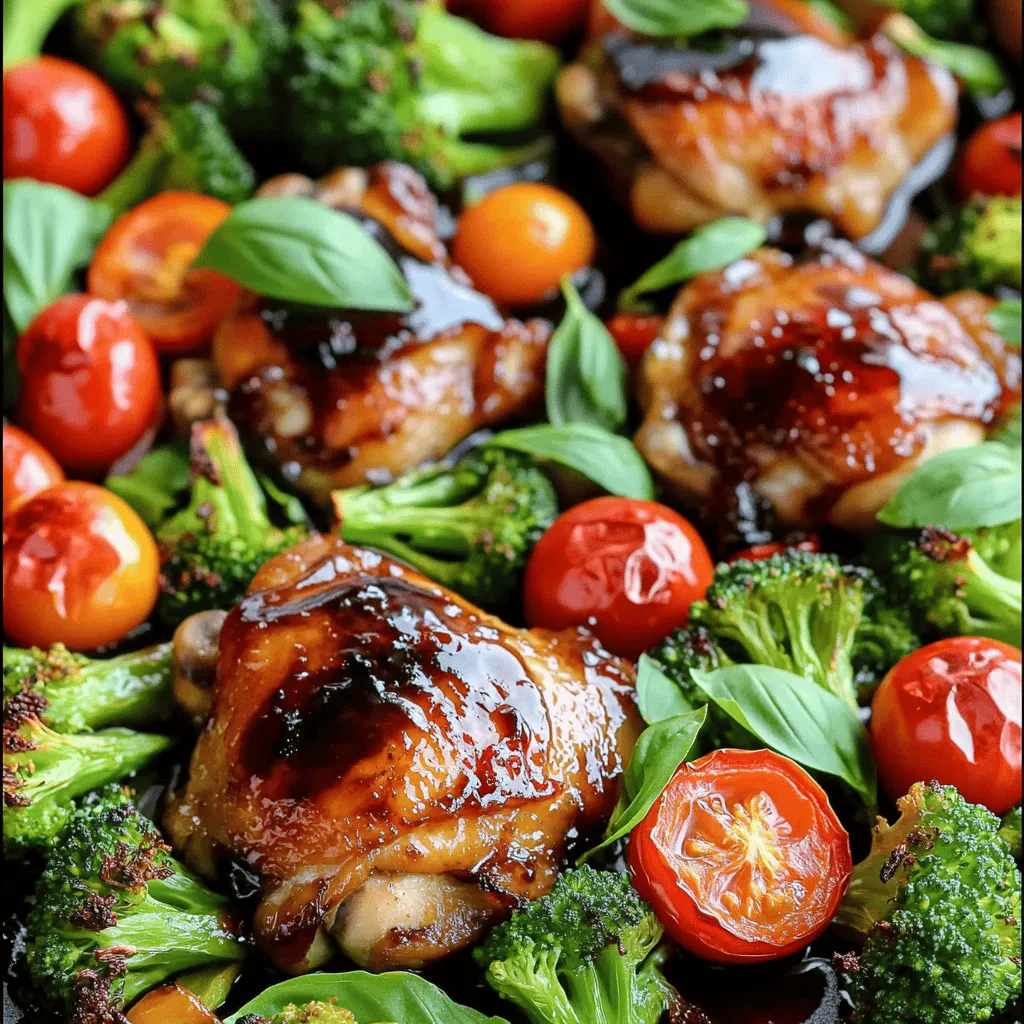
Looking for an easy dinner that packs flavor? My Sheet Pan Balsamic Chicken & Veggies offers just that! With tender

Older posts
Newer posts
← Previous Page1 … Page22 Page23 Page24 … Page132 Next →

dsad

© 2025 Emmas Dish • Built with GeneratePress

Our Policies

  • Copyright Policy
  • Cookie Policy
  • GDPR Policy
  • Privacy Policy
  • Disclaimer
  • Terms Of Use

More Information

  • Home
  • About
  • Contact
  • Appetizers
  • Dessert
  • Dinner
  • Drinks
©2025, Emmas Dish About Back To Top