Skip to content
DisclaimerTerms Of UseGDPR PolicyCookie Policy

Emmas Dish

  • Home
  • Drinks
  • Appetizers
  • Dinner
  • Dessert
  • About
  • Contact
  • Privacy Policy
DisclaimerTerms Of UseGDPR PolicyCookie Policy

Emma

- 1 lb fresh salmon, cut into bite-sized cubes - 2 tablespoons Cajun seasoning - 1 tablespoon olive oil You start with fresh salmon. Choose wild-caught if you can. It tastes better and is healthier. Cut the salmon into bite-sized cubes. This makes cooking quick and easy. Next, grab your Cajun seasoning. It adds a spicy kick that makes these bites pop. Olive oil is key for moisture and flavor too. - 1 teaspoon garlic powder - 1 teaspoon onion powder - 1 teaspoon paprika Garlic powder brings depth to the dish. It pairs well with the Cajun spice. Onion powder adds a sweet note. Paprika gives a nice color and subtle heat. Feel free to adjust these amounts to match your taste. - Lemon wedges - Fresh parsley Once cooked, serve the salmon bites with lemon wedges. The lemon juice brightens the flavors. Chopped fresh parsley adds a lovely touch. It also brings a fresh, green flavor to the bites. These simple garnishes make your dish look and taste amazing. First, grab a mixing bowl. Add the following ingredients: - 2 tablespoons Cajun seasoning - 1 tablespoon olive oil - 1 teaspoon garlic powder - 1 teaspoon onion powder - 1 teaspoon paprika - Salt and pepper to taste Mix these well. This blend of spices and oil creates a tasty marinade. You want every bite of salmon to soak up these flavors. Next, cut your fresh salmon into bite-sized cubes. Place the salmon in the bowl with the marinade. Make sure each piece gets coated well. This step is key for flavor. Let the salmon marinate for at least 15 minutes. This gives the spices time to work their magic. If you can, marinate longer for even better taste. Now it’s time to cook! Preheat your air fryer to 400°F (200°C). This takes about 5 minutes. Once preheated, place the salmon bites in the air fryer basket. Arrange them in a single layer. Avoid overcrowding for even cooking. Air fry the salmon bites for 8-10 minutes. Shake the basket halfway through. This helps them cook evenly. When done, the bites should be crispy outside and tender inside. Remove the salmon from the air fryer and let them rest for a minute before serving. Enjoy with lemon wedges and a sprinkle of fresh parsley for a pop of color! To get those salmon bites super crispy, keep a few things in mind. First, make sure each piece of salmon is well coated with the marinade. This helps create a nice crust. Second, avoid overcrowding the air fryer basket. If you stack them, they won’t cook evenly. Cook in batches if needed. This way, you’ll end up with delicious, crispy bites every time. Want to kick up the flavor a notch? Try adding a pinch of cayenne pepper or smoked paprika. These spices really enhance the Cajun taste. If you like less heat, use less Cajun seasoning. You can always start with a little and add more later. Remember, you can control how spicy your bites get! These salmon bites are great on their own, but they shine when paired with tasty sides. Serve them with a fresh salad or some crunchy veggies. They also go well with dips like garlic aioli or a zesty ranch. Don’t forget to add lemon wedges on the side. The fresh juice makes the bites pop! Garnishing with parsley adds a nice touch and bright color, making your meal look fancy. {{image_2}} You can change up the Cajun seasoning to fit your taste. Try using jerk seasoning for a Caribbean twist. Or, use lemon pepper for a bright and zesty flavor. You can also mix in some Italian herbs for a different vibe. Adjusting these spice blends lets you create a new dish each time. If you want to switch proteins, use cod or tilapia instead of salmon. Both fish cook well and absorb flavors nicely. For a vegetarian option, try firm tofu or chickpeas. These alternatives give you a tasty snack without fish. You can turn these salmon bites into a fresh salad. Just mix greens, tomatoes, and the salmon bites. Drizzle with a light dressing for a great meal. Another fun way is to serve them with different dips. Try a zesty remoulade or a creamy avocado dip. This adds variety and makes sharing more fun. To store your leftover salmon bites, let them cool first. Once cooled, place them in a container with a tight lid. This keeps them fresh. I recommend using glass or BPA-free plastic containers. They help prevent any strong smells from spreading in your fridge. Yes, you can freeze cooked salmon bites. Make sure they are fully cooled before placing them in a freezer-safe bag or container. Remove as much air as possible to prevent freezer burn. For reheating frozen bites, thaw them in the fridge overnight. Then, reheat in the air fryer at 350°F (175°C) for about 5-7 minutes. This keeps them nice and crispy. In the fridge, your salmon bites last about 3 days. Look for signs of spoilage like a sour smell or a slimy texture. If you see this, it’s best to throw them away. Always trust your senses when it comes to food safety. The best way to cook salmon in an air fryer is at 400°F (200°C). Cook for about 8 to 10 minutes. This high heat gives the salmon a nice crisp outside while keeping it tender inside. Remember to shake the basket halfway through cooking for even results. Yes, you can use frozen salmon. But you need to thaw it first. The best way is to leave it in the fridge overnight. If you’re in a rush, you can use the microwave. Just be careful not to cook it. Once thawed, follow the recipe as usual, but add a few extra minutes to the cooking time. Cajun seasoning can be spicy, but it varies by brand. It often includes ingredients like paprika, cayenne, garlic, and herbs. The heat level depends on how much cayenne is used. If you prefer less heat, look for a milder blend or use less. Enjoy the bold flavors without overwhelming your taste buds! This blog covered everything about making tasty Cajun salmon bites. We discussed the key ingredients, like fresh salmon and zesty Cajun seasoning. I shared simple steps for preparing, marinating, and air frying the salmon. You learned tips for perfect texture and flavor, along with tasty serving ideas. Try different spices and variations to suit your taste. Remember to store leftovers properly for later enjoyment. Enjoy your cooking and explore all the flavors!

Air Fryer Cajun Salmon Bites Tasty and Quick Snack

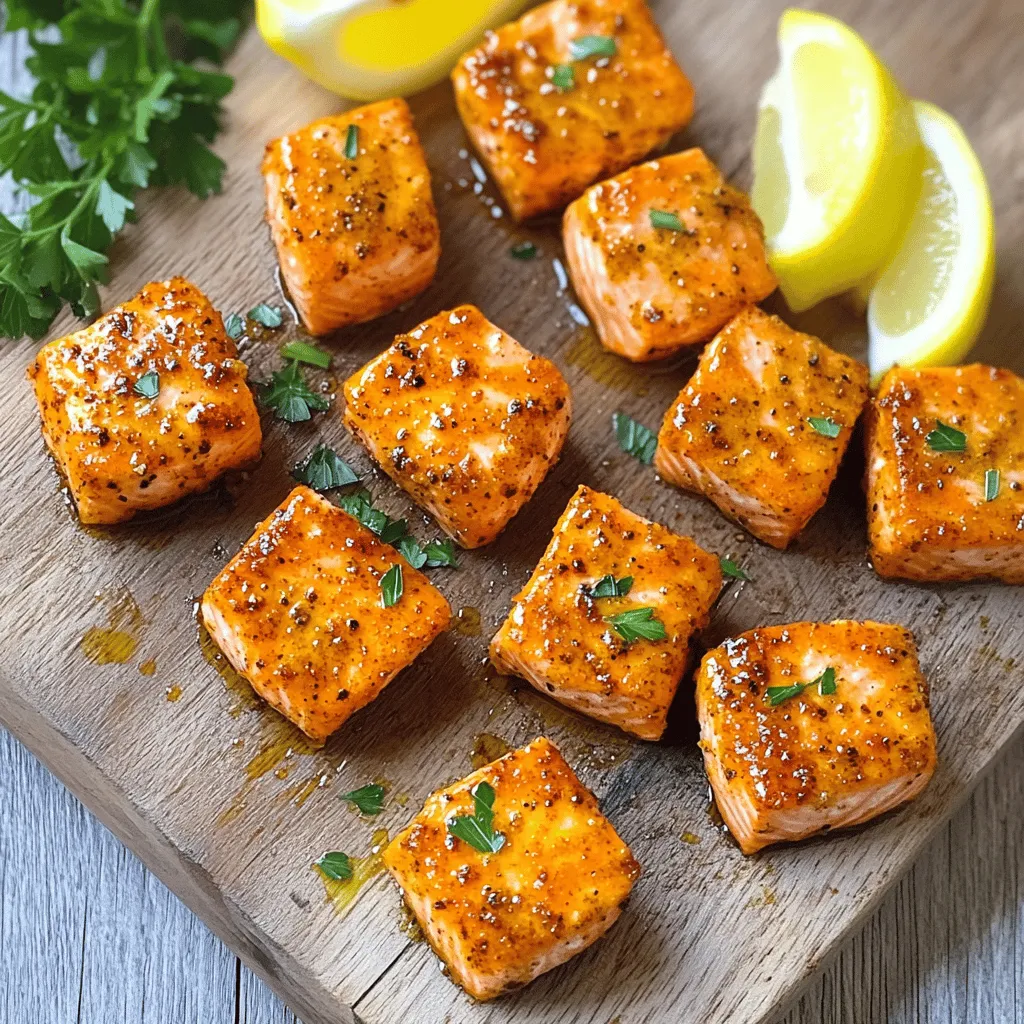
Looking for a quick and tasty snack? Air Fryer Cajun Salmon Bites are the perfect solution! With fresh salmon coated

Almond poppy seed muffins are light, fluffy, and packed with flavor. They mix sweet and nutty notes. You can enjoy them for breakfast or as a snack. This recipe makes 12 muffins and takes about 35 minutes to prepare and bake. - 1 cup all-purpose flour - 1/2 cup almond flour - 1/2 cup sugar - 2 tablespoons poppy seeds - 2 teaspoons baking powder - 1/2 teaspoon baking soda - 1/4 teaspoon salt - 1/2 cup unsalted butter, melted - 2 large eggs - 1/2 cup milk (any kind) - 1 teaspoon almond extract - 1 teaspoon vanilla extract - Zest of 1 lemon These ingredients come together to create a wonderful blend of flavors. The almond flour adds a rich, nutty taste, while the poppy seeds offer a delightful crunch. The lemon zest brightens the flavor and makes each bite fresh. Each muffin contains about 180 calories. They have 4 grams of protein and 8 grams of fat. The muffins also provide a good source of carbohydrates, with around 24 grams per muffin. These muffins contain essential vitamins and minerals. They are great for an energy boost, too. Enjoy them as part of a balanced diet. - 1 cup all-purpose flour - 1/2 cup almond flour - 1/2 cup sugar - 2 tablespoons poppy seeds - 2 teaspoons baking powder - 1/2 teaspoon baking soda - 1/4 teaspoon salt I love the mix of flours in this recipe. The all-purpose flour gives structure, while almond flour adds a rich, nutty flavor. The sugar balances the flavors, making these muffins sweet and satisfying. The poppy seeds add a lovely crunch and a unique look. - 1/2 cup unsalted butter, melted - 2 large eggs - 1/2 cup milk - 1 teaspoon almond extract - 1 teaspoon vanilla extract - Zest of 1 lemon The melted butter keeps the muffins moist and tender. Eggs help bind everything together, while milk makes the batter smooth. Almond and vanilla extracts deepen the flavor, and the lemon zest brightens it all. This mix creates a deliciously aromatic muffin. You can switch all-purpose flour for gluten-free flour if needed. For a dairy-free option, use almond milk or oat milk. These swaps keep the muffins tasty and allow everyone to enjoy them. Start by preheating your oven to 350°F (175°C). This step is key. It helps the muffins rise well. While the oven heats, prepare your muffin tin. You can use paper liners or lightly grease the tin with cooking spray. This prevents sticking and makes cleanup easier. Next, grab a large mixing bowl. Add the following dry ingredients: - 1 cup all-purpose flour - 1/2 cup almond flour - 1/2 cup sugar - 2 tablespoons poppy seeds - 2 teaspoons baking powder - 1/2 teaspoon baking soda - 1/4 teaspoon salt Whisk these together until well mixed. This mix gives your muffins a great texture and flavor. In another bowl, melt your butter. You need: - 1/2 cup unsalted butter, melted Then, add: - 2 large eggs - 1/2 cup milk (any kind) - 1 teaspoon almond extract - 1 teaspoon vanilla extract - Zest of 1 lemon Whisk these until smooth. The lemon zest adds a bright taste. Now, pour the wet mixture into the dry ingredients. Gently fold everything together. You want to mix until just combined. Don't overmix! The batter should be lumpy but evenly mixed. This ensures your muffins stay light and fluffy. Spoon the batter into your muffin tin. Fill each cup about 2/3 full. This allows space for the muffins to rise. Bake them in the preheated oven for 15-20 minutes. Check with a toothpick. If it comes out clean, the muffins are ready. Let the muffins cool in the tin for about 5 minutes. Then, transfer them to a wire rack. This helps them cool down completely. Cooling on a rack prevents sogginess. Enjoy your freshly baked almond poppy seed muffins! {{image_2}} To make great muffins, avoid overmixing the batter. Overmixing makes muffins tough. Mix just until the dry and wet ingredients combine. Another mistake is not measuring ingredients correctly. Always use measuring cups and spoons. Too much flour can lead to dry muffins, while too little can make them dense. Lastly, don’t skip the lemon zest! It adds a bright flavor that balances the almonds. For a light and fluffy texture, use room temperature eggs and milk. Cold ingredients can cause dense muffins. Also, remember to fold in the batter gently. This keeps air in the mixture, which helps the muffins rise. Baking powder and baking soda are important too. They give muffins lift. Make sure they are fresh for the best results! You can boost flavor by adding mix-ins. Try folding in chocolate chips or chopped nuts. Dried fruits like cranberries also work well. For a twist, add a dash of cinnamon or nutmeg. You can even swap the almond extract for orange extract for a fresh taste. Experiment with these options to find your favorite version! If you want a gluten-free muffin, swap the all-purpose flour. Use a gluten-free flour blend that works for baking. Almond flour can stay in your recipe for a rich taste. This change keeps the muffin moist and delicious. Just check the blend's packaging for the right amount to use. Sometimes, you may need to add a little more liquid. Adding fruits or nuts makes these muffins even better. You can mix in blueberries, raspberries, or chopped apples. About 1 cup works well to keep the texture right. For nuts, almonds or walnuts add a nice crunch. Chop them small and mix them gently into the batter. This way, you get bursts of flavor in every bite. Want a flavor twist? Try adding zest from an orange or lime. This gives your muffins a fresh and bright taste. You can also experiment with spices like cinnamon or nutmeg. Just a pinch can change the whole muffin vibe. Each time you bake, you can create a new favorite! To keep your almond poppy seed muffins fresh, store them in an airtight container. You can place them at room temperature for up to three days. If you want to keep them longer, refrigerate them for up to a week. For the best taste, I recommend letting them sit out for a bit before enjoying. These muffins are delightful warm or at room temperature. Serve them with a pat of butter or a light spread of cream cheese. For a fun twist, try pairing them with fresh fruit or a dollop of yogurt. They make a tasty snack or a great breakfast treat. To reheat your muffins, place them in the oven at 350°F (175°C) for about 5-7 minutes. You can also use the microwave for a quick fix. Heat each muffin for about 15-20 seconds. This makes them soft and warm, just like fresh out of the oven! Almond poppy seed muffins are soft, flavorful treats made with almond flour and poppy seeds. They have a light, moist texture and a sweet almond flavor. The muffins often include zesty lemon to brighten their taste. I love how the tiny poppy seeds add a bit of crunch. These muffins are perfect for breakfast or a snack. These muffins stay fresh for about three days at room temperature. Keep them in an airtight container to avoid drying out. If you want them to last longer, store them in the fridge for up to a week. Just remember, they taste best when fresh! Yes, you can freeze almond poppy seed muffins! Just let them cool completely first. Wrap each muffin tightly in plastic wrap or foil. Then place them in a freezer-safe bag. They can last for up to three months in the freezer. When you're ready to enjoy one, just thaw it at room temperature or heat it in the oven. In this article, we explored how to make almond poppy seed muffins. We covered key ingredients and provided a simple recipe. You learned about storage tips and different ways to enjoy these muffins. Baking can be fun and rewarding. With practice, you can make great muffins each time. Enjoy sharing them with friends and family!

Almond Poppy Seed Muffins Bakery Delightful Recipe

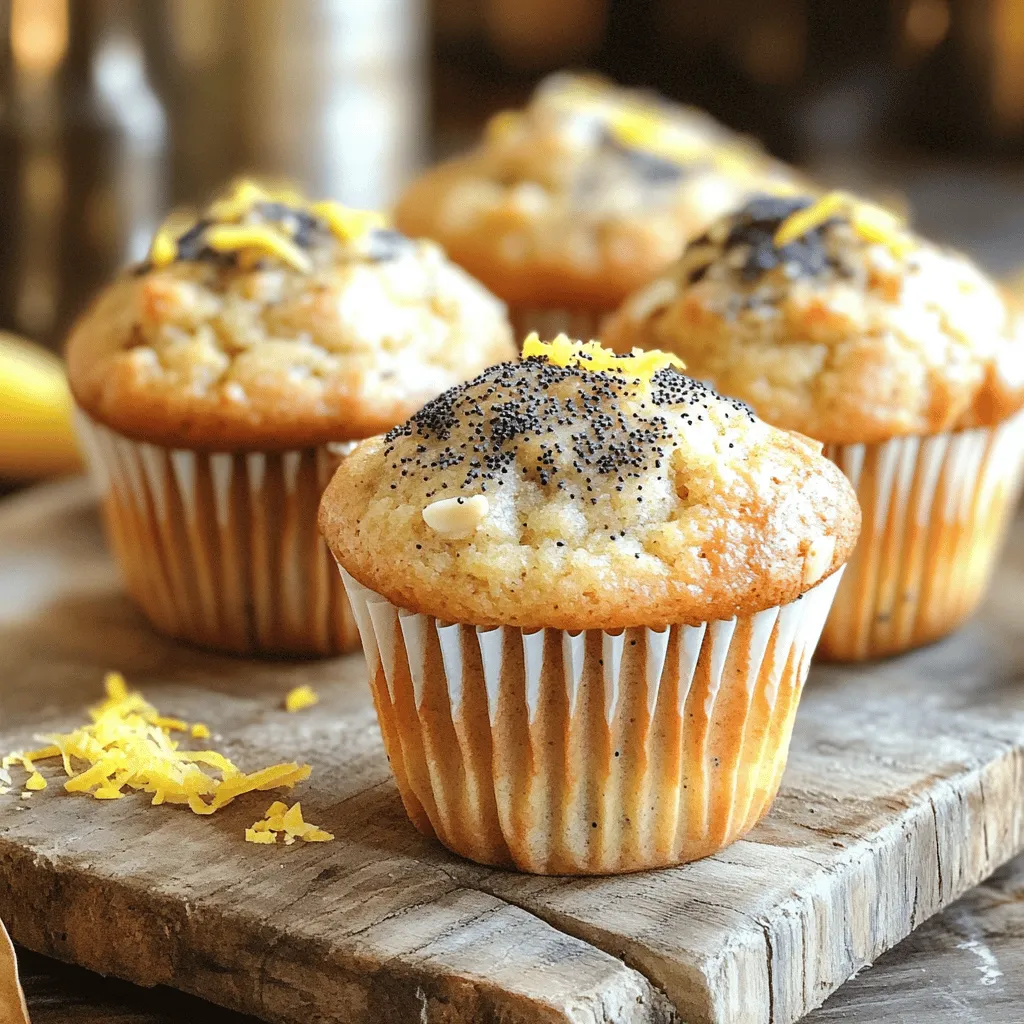
Welcome to the delightful world of Almond Poppy Seed Muffins! If you crave a tasty treat that’s easy to make,

- 1 cup rolled oats - 1/2 cup canned pumpkin puree - 1/3 cup natural almond butter - 1/3 cup honey or maple syrup - 1/4 cup unsweetened cocoa powder The main base of our treat starts with rolled oats. They give a nice chewy texture. Canned pumpkin puree adds moisture and flavor. Almond butter provides healthy fats and a creamy touch. You can use honey or maple syrup for sweetness. Cocoa powder gives that rich chocolate taste. - 1/2 teaspoon vanilla extract - 1/4 teaspoon ground cinnamon - 1/4 teaspoon ground nutmeg - A pinch of salt To boost flavor, we add vanilla extract. It brings warmth to the mix. Ground cinnamon adds a hint of spice. Nutmeg offers a cozy taste, perfect for fall. A pinch of salt balances the sweetness and enhances all flavors. - 1/4 cup chocolate chips - Shredded coconut or crushed nuts for rolling For a chocolate kick, fold in some chocolate chips. They melt slightly and add sweetness. If you want extra texture, roll the balls in shredded coconut or crushed nuts. This step makes them even tastier and fun to eat. Mixing the Base Ingredients Start by taking a large mixing bowl. Add 1 cup of rolled oats. Then, pour in 1/2 cup of canned pumpkin puree. Next, add 1/3 cup of almond butter and 1/3 cup of honey or maple syrup. Mix these ingredients well. You want a thick and sticky base. Make sure everything blends nicely. Adding Cocoa and Spices Now, sprinkle in 1/4 cup of unsweetened cocoa powder. This adds rich chocolate flavor. Next, add 1/2 teaspoon of vanilla extract, 1/4 teaspoon of ground cinnamon, and 1/4 teaspoon of ground nutmeg. Don't forget a pinch of salt! Stir everything together until the mixture is smooth and even. Incorporating Chocolate Chips After mixing the cocoa and spices, fold in 1/4 cup of chocolate chips. This step adds little bursts of sweetness. Be gentle while folding to keep the chips intact. You want them spread throughout the mixture without breaking. Refrigeration to Firm Up Once the mixture is ready, cover the bowl with plastic wrap. Place it in the refrigerator for about 15-20 minutes. Chilling helps the mixture firm up, making it easier to shape. Rolling the Mixture into Balls After chilling, take the bowl out. Use your hands to grab about a tablespoon of the mixture. Roll it into a ball about the size of a golf ball. Repeat this until you shape all the mixture into balls. Optional: Rolling in Coconut or Nuts If you like, you can add extra texture. Roll each ball in shredded coconut or crushed nuts. This step is optional but adds a nice touch. Placing on Baking Sheet Once shaped, line a baking sheet with parchment paper. Place the oat balls on the sheet. Make sure to leave space between each ball. Additional Refrigeration Time Now, return the baking sheet to the fridge. Let the oat balls chill for another 30 minutes. This final cooling will help them set firmly. Enjoy your tasty and healthy snack! To get the right texture, adjust the sweetness. If you want a sweeter treat, use more honey or maple syrup. Start with the amount in the recipe and add more if needed. This helps balance the flavors. Choosing the right nut butter matters too. I love almond butter for its smoothness. You can use peanut butter for a stronger taste. Just pick what you enjoy most! For serving, use a fun bowl or platter. Arrange the oat balls in a circle or stack them high. This makes your treat look fancy. A sprinkle of cocoa or cinnamon on top adds a nice touch. If you host a party, these oat balls are a hit! Place them next to fresh fruit for a colorful display. Guests will love the look and the taste. One mistake is overmixing the ingredients. Mix just until combined. This keeps the oat balls from being too dense. Another mistake is skipping the chilling steps. Chilling helps the mixture firm up. If you don’t chill, the balls may fall apart. Be sure to follow the steps for the best results! {{image_2}} You can change the taste of your oat balls easily. Adding peanut butter gives a rich, nutty flavor. Sunflower seed butter is a great choice too. It keeps the snack nut-free. You can also spice things up! Try adding more cinnamon or even ginger for a warm taste. Mixing in a bit of cocoa nibs adds a fun crunch. Want to lower the sugar? Use less honey or maple syrup. You can also swap in mashed bananas for sweetness. If you need gluten-free options, use certified gluten-free oats. This way, everyone can enjoy these treats without worries. Mix-ins can make these oat balls even better. Dried fruits like raisins or cranberries add a sweet bite. You can also toss in seeds like chia or flax for extra nutrition. Different nuts like walnuts or pecans add a nice crunch too. Explore your favorites and find the perfect mix! - Refrigeration Tips for Freshness: Store these oat balls in an airtight container. Keep them in the fridge for best freshness. This will maintain their texture and flavor. - Freezing for Long-Term Storage: If you want to save some for later, freeze them. Place them in a freezer-safe bag. Make sure to remove as much air as possible before sealing. - Duration in the Refrigerator: These oat balls stay good in the fridge for about one week. If they last that long, they are a hit! - Duration in the Freezer: In the freezer, they can last for about three months. Just remember to label the bag with the date you made them. - Best Practices to Restore Freshness: You don’t need to reheat these treats. Enjoy them cold or let them sit at room temperature for a few minutes. This will help them soften and bring back the fresh taste. Yes, you can use quick oats. They will create a softer texture. However, rolled oats provide a nice chew. If you prefer a heartier bite, stick to rolled oats. These oat balls last about one week in the fridge. Keep them in an airtight container. This keeps them fresh and tasty for your snacking needs. Yes, you can make these without honey or maple syrup. Try using agave nectar or date syrup instead. For a sugar-free option, use mashed bananas or unsweetened applesauce. Yes, they are vegan-friendly if you use maple syrup. Make sure to choose a plant-based nut butter. This way, you can enjoy them without any animal products. Yes, you can replace pumpkin puree. Use applesauce or mashed sweet potato for a different flavor. Both options will keep the mixture moist and tasty. These no-bake chocolate pumpkin oat balls are simple to make. You only need a few main ingredients, like oats and pumpkin puree. Mix them with cocoa and spices for flavor. Remember to chill the mixture before rolling it into balls. You can add fun extras like chocolate chips or nuts, too. Overall, these treats are tasty and healthy. They save well in the fridge and freezer, so you can enjoy them later. Feel free to change flavors and make them your own. Enjoy these easy snacks anytime you want!

No-Bake Chocolate Pumpkin Oat Balls Healthy Treat

Looking for a quick and healthy snack? You’ll love my No-Bake Chocolate Pumpkin Oat Balls! These delicious bites are packed

- Beef and Vegetables - 2 pounds beef chuck, cut into 1-inch cubes - 2 medium sweet potatoes, peeled and chopped into cubes - 1 large onion, diced - 3 cloves garlic, minced - 2 carrots, sliced - 2 celery stalks, sliced - Seasonings and Broth - 4 cups beef broth - 1 teaspoon dried thyme - 1 teaspoon smoked paprika - 1 bay leaf - Salt and pepper to taste - 2 tablespoons olive oil - Garnish - Fresh parsley for garnish Using these ingredients gives your stew rich, deep flavors. The beef chuck serves as the heart of the dish. It becomes tender and juicy after slow cooking. Sweet potatoes add a touch of sweetness and a creamy texture. Onions and garlic bring aromatic notes that uplift every bite. Carrots and celery enhance the dish's color and crunch. The seasonings are key. Dried thyme and smoked paprika add depth. They also create a warm, inviting aroma as the stew cooks. The bay leaf infuses subtle herbal notes that round out the flavors. You can adjust seasoning with salt and pepper. This lets you customize the taste to fit your preference. The beef broth is essential. It creates a savory base that brings everything together. Lastly, fresh parsley adds a splash of color when serving. It also brightens the stew's overall taste. Explore these ingredients, and you'll see why this stew is a favorite. Each one plays a role in making your dish hearty and full of flavor. Enjoy the journey of creating this delicious meal! Sautéing the Onions and Garlic Start by heating the olive oil in a large skillet over medium-high heat. Add the diced onion and cook until it turns clear, about 3-4 minutes. This step builds a base of flavor. Next, add the minced garlic and cook for 30 seconds more. The garlic will smell amazing. Remove the skillet from heat and set it aside. Layering the Vegetables In the slow cooker, place the chopped sweet potatoes, carrots, and celery at the bottom. This layer adds sweetness and texture. The sweet potatoes bring a creamy feel, while the carrots and celery add crunch and color. Adding the Beef and Seasoning Now it’s time for the beef! Place the beef cubes on top of the veggies. Sprinkle salt and pepper over the meat, then add the dried thyme and smoked paprika. These spices give the stew a rich, smoky flavor. Pour the beef broth over everything. Finally, stir in the sautéed onions and garlic. Don’t forget to add the bay leaf for extra depth. Gently mix to combine, ensuring the beef is well submerged in the broth. Setting the Cooking Time Set your slow cooker to low for 8 hours or to high for 4 hours. This slow cooking method makes the beef tender and juicy. The longer it cooks, the more the flavors meld together. Stirring and Final Adjustments About an hour before it's done, give the stew a gentle stir. This helps blend the flavors even more. When cooking time is up, remove the bay leaf. Taste the stew and adjust the seasoning if needed. A little extra salt or pepper can really enhance the dish. Garnishing with Fresh Parsley To serve, ladle the stew into bowls and garnish with fresh parsley. This step adds color and a fresh taste. The parsley brightens up the rich stew perfectly. Suggested Side Dishes Pair this stew with crusty bread or a simple salad. The bread is perfect for dipping. A salad offers a nice, crisp contrast to the warm stew. Enjoy your meal! Using Fresh Herbs Fresh herbs can lift your stew. I recommend adding fresh parsley at the end. It adds brightness. You can also try thyme or rosemary for extra depth. Chop them finely and sprinkle them on top just before serving. Alternative Seasonings You can jazz up your stew with different spices. For a kick, add a pinch of cayenne pepper. If you love garlic, add more cloves. A splash of Worcestershire sauce can deepen the flavor too. Mix and match to find your perfect taste. Choosing the Right Cut of Beef Use beef chuck for the best results. It becomes tender and flavorful as it cooks. Cuts like brisket or round can work too, but chuck shines in slow cooking. Always cut the beef into 1-inch cubes for even cooking. Importance of Cooking Time Cooking time is key for tender beef. Low and slow is the way to go. Eight hours on low ensures the beef breaks down nicely. If you’re short on time, four hours on high works too. Just keep an eye on it for tenderness. {{image_2}} You can swap sweet potatoes for regular potatoes or butternut squash. Both options add a nice texture and flavor. Regular potatoes are starchy and creamy, while butternut squash brings a subtle sweetness. Both choices cook similarly to sweet potatoes. Feel free to add or change vegetables based on your taste. Zucchini, bell peppers, or green beans work well. You can also use root vegetables like parsnips or turnips. Just chop them into similar sizes to ensure even cooking. To make this stew in an Instant Pot, layer the ingredients as usual. Sauté the onions and garlic first. Then, add the beef and broth. Set the pot to cook on high pressure for 35 minutes. This method saves time and keeps the meat tender. If you prefer the stovetop, use a large pot. Sauté the onions and garlic, then add the beef to brown. After that, add the vegetables and broth. Simmer for about 1.5 to 2 hours, stirring occasionally. This method gives a rich flavor as it cooks. - To store leftovers, let the stew cool to room temperature first. - Transfer the stew to an airtight container. - Keep it in the fridge for up to 3 days. - When reheating, add a splash of broth to keep it moist. - Heat on the stove or in the microwave until hot. - Use freezer-safe containers or heavy-duty bags for freezing. - Leave some space at the top for expansion. - Label each container with the date and contents. - To thaw, move the stew to the fridge overnight. - You can also use the microwave on the defrost setting for quick thawing. Can I use a different type of meat? Yes, you can. Try chicken, pork, or turkey. Each meat adds its own flavor. Just adjust cooking times. Chicken cooks faster than beef. Pork and turkey work well too. How long can I store leftovers? Store leftovers in the fridge for up to four days. Keep the stew in an airtight container. For longer storage, freeze it for up to three months. Thaw it overnight in the fridge before reheating. Is it possible to make this stew gluten-free? Absolutely! Use gluten-free beef broth. Check the labels for any other ingredients. Most spices are gluten-free, but always read the labels. What can I serve with beef and sweet potato stew? Serve the stew with crusty bread or rice. A fresh salad with light dressing pairs well too. You can also add a side of steamed green beans or broccoli for extra veggies. We explored how to make delicious slow cooker beef and sweet potato stew. You learned about the key ingredients, tips for great flavor, and variations you can try. Remember to choose the right cut of beef for tender meat and adjust seasoning to your taste. Store leftovers properly for later enjoyment. With these steps and tips, you can create a hearty meal that satisfies everyone at the table. Enjoy making this stew, and feel free to experiment with your own twists!

Slow Cooker Beef and Sweet Potato Stew Flavor Boost

Are you ready to dive into a warm, hearty bowl of Slow Cooker Beef and Sweet Potato Stew? This dish

To make warm spiced apple butter blondies, you need: - 1 cup apple butter - 1/2 cup unsalted butter, melted - 1 cup brown sugar - 2 large eggs - 1 teaspoon vanilla extract - 1 1/2 cups all-purpose flour - 1/2 teaspoon baking powder - 1/2 teaspoon baking soda - 1 teaspoon ground cinnamon - 1/4 teaspoon ground nutmeg - 1/4 teaspoon ground ginger - 1/4 teaspoon salt These ingredients blend well to create a rich, moist treat. The apple butter brings a sweet, fruity flavor that shines through. The spices add warmth and depth, making each bite comforting. You can enhance your blondies with these optional ingredients: - 1/2 cup chopped walnuts or pecans Adding nuts gives a nice crunch and a nutty taste. They also add a layer of texture that contrasts beautifully with the soft blondies. Using quality ingredients makes a big difference. Here are some tips: - Choose fresh apple butter for the best flavor. Look for one with minimal added sugar. - Use unsalted butter to control the salt level in your recipe. - Select fresh eggs; they should be large and free of cracks. - For spices, fresh ground is better. Old spices lose their flavor. These small choices can elevate your warm spiced apple butter blondies. Always aim for the best ingredients to ensure delicious results. Start by preheating your oven to 350°F (175°C). This makes sure the blondies bake evenly. Next, grease an 8-inch square baking pan. Line it with parchment paper, leaving some overhang. This makes it easy to lift out your blondies later. In a large bowl, combine 1 cup of apple butter and 1/2 cup of melted unsalted butter. Mix in 1 cup of brown sugar until it looks smooth. Add 2 large eggs and 1 teaspoon of vanilla extract. Whisk until the mixture is creamy and well blended. In another bowl, sift together 1 1/2 cups of all-purpose flour, 1/2 teaspoon of baking powder, and 1/2 teaspoon of baking soda. Add 1 teaspoon of ground cinnamon, 1/4 teaspoon of ground nutmeg, and 1/4 teaspoon of ground ginger. Mix in 1/4 teaspoon of salt. Sifting helps spread the spices well in the batter. Gradually add the dry mixture into the wet ingredients. Mix gently until just combined. If you want nuts, fold in 1/2 cup of chopped walnuts or pecans. Pour the batter into your prepared baking pan. Smooth the top with a spatula. Bake for 25-30 minutes. The edges should be golden, and a toothpick should come out clean from the center. Let the blondies cool in the pan for about 10-15 minutes. Use the parchment paper overhang to lift them out. Place the blondies on a wire rack to cool completely. Once cool, cut them into squares. Enjoy your warm spiced apple butter blondies! To get the best blondies, use fresh apple butter. It adds great flavor and moisture. Make sure your butter is melted but not hot. Hot butter can cook the eggs. Mix your wet and dry ingredients gently. Over-mixing can make them tough. One mistake is not measuring ingredients correctly. Use measuring cups for precision. Another common error is opening the oven too soon. This can make your blondies sink. Lastly, don’t skip cooling time. Cutting too soon can make them fall apart. Use high-quality spices for the best taste. Fresh ground cinnamon, nutmeg, and ginger make a big difference. You can also add a pinch of salt to enhance sweetness. If you like nuts, choose walnuts or pecans for a nice crunch. For a fun twist, try mixing in chocolate chips or dried fruits. {{image_2}} You can switch up the nuts in these blondies. Try using chopped pecans or walnuts. Both add great texture. If you want a nut-free option, leave them out entirely. You can also use seeds, like sunflower seeds. They add crunch without the nut allergy worries. Chocolate chips make everything better! Add half a cup of dark or white chocolate chips for extra sweetness. Dried fruits like cranberries or raisins also work well. They bring a chewy texture and fruity flavor. Mix and match to find your favorite combination! Don’t be afraid to play with flavors! Add more spices like allspice or cloves for warmth. A dash of almond or orange extract can brighten the taste. You can even try using different types of apple butter, like spiced or vanilla. Each choice will change the flavor in a fun way! To keep your warm spiced apple butter blondies fresh, store them in an airtight container. Place a piece of parchment paper between layers to prevent sticking. They will stay good for up to a week on the counter. If you want to keep them longer, consider freezing. Freezing blondies is simple. First, let them cool completely. Then, wrap each square tightly in plastic wrap. Place the wrapped blondies in a freezer-safe bag or container. They can last for up to three months in the freezer. When you're ready to enjoy, just thaw them in the fridge overnight. For the best taste, reheat blondies in the oven. Preheat your oven to 350°F (175°C). Place the blondies on a baking sheet and warm them for about 10 minutes. This method keeps them soft and brings out their flavors. You can also use a microwave. Heat each blondie for about 15-20 seconds. Enjoy them warm for a delightful treat! Yes, you can make these blondies gluten-free. Use a gluten-free flour blend instead of all-purpose flour. Look for blends that work well for baking. These blends often include ingredients like almond flour or coconut flour. This swap keeps the texture light and tasty. These blondies stay fresh for about 3 to 4 days when stored properly. Keep them in an airtight container at room temperature. If you want them to last longer, consider refrigerating them. They can stay fresh for up to a week in the fridge. If you don't have apple butter, you can use applesauce. Applesauce gives a similar flavor and moistness. You can also try pumpkin puree for a different taste. Just make sure to adjust the spices accordingly. Yes, you can substitute the eggs if needed. Use 1/4 cup of unsweetened applesauce per egg. You can also use flaxseed meal. Mix 1 tablespoon of flaxseed meal with 2.5 tablespoons of water. Let it sit for a few minutes to thicken before adding it to the mix. To check if the blondies are done, insert a toothpick into the center. If it comes out clean or with a few moist crumbs, they are ready. The edges should also be golden brown. Baking usually takes about 25 to 30 minutes. You now have all you need to make delicious blondies. We covered the key ingredients, prep steps, and baking tips. I also shared storage techniques and answered common questions. Remember, experimenting with flavors keeps it fun. You can customize recipes to fit your tastes. With these guidelines, you're ready to bake blondies that wow. Enjoy your time in the kitchen and share your tasty treats!

Warm Spiced Apple Butter Blondies Simple and Sweet Treat

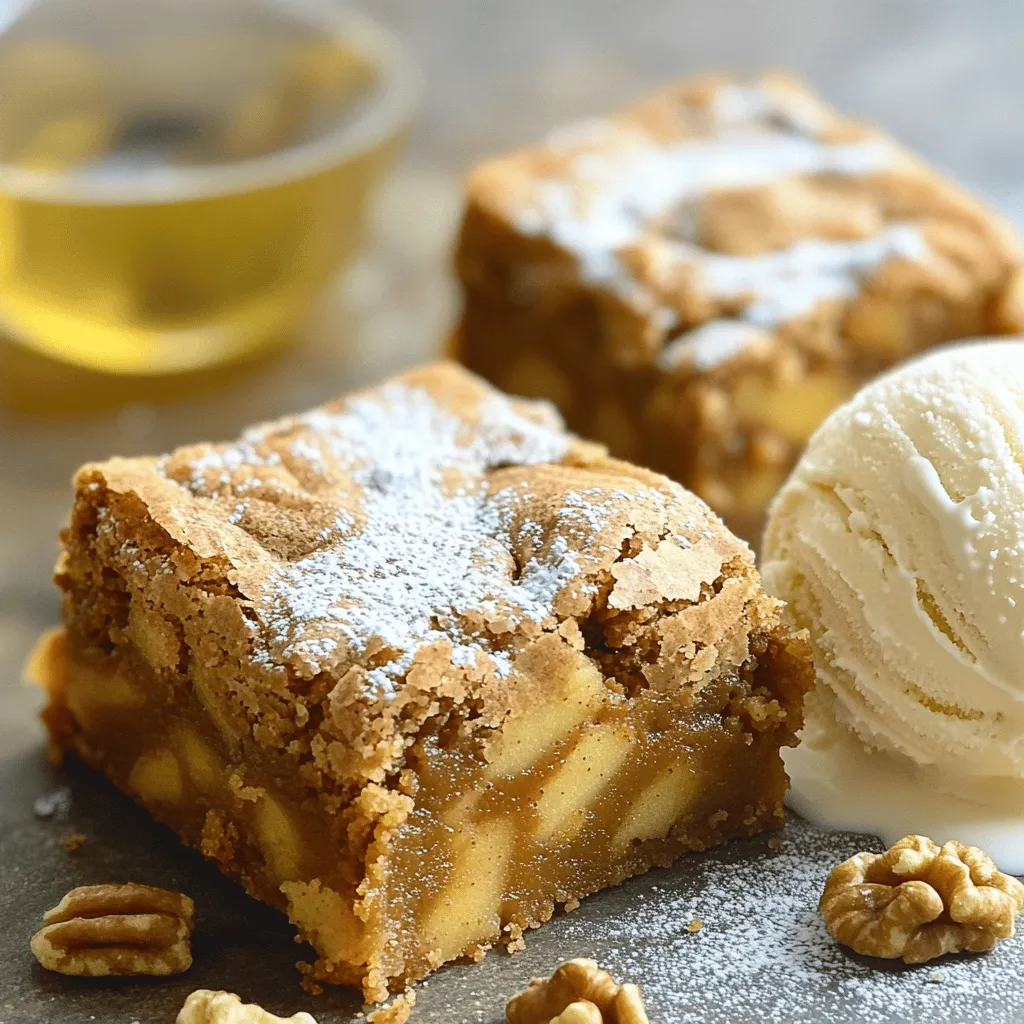
If you’re looking for a warm, sweet treat that combines cozy spices with a rich apple flavor, you’re in the

- 1 lb large shrimp, peeled and deveined - 4 medium zucchini, spiralized into zoodles - 3 tablespoons unsalted butter - 4 cloves garlic, minced - 1 teaspoon paprika - 1 teaspoon lemon zest - 1 tablespoon lemon juice - 1 teaspoon salt - ½ teaspoon black pepper - Fresh parsley, chopped - Red pepper flakes (for heat) This dish shines with its simple yet flavorful ingredients. You start with large shrimp, which give a juicy bite. Spiralized zucchini, or zoodles, add a fresh crunch, making this meal light and fun. The unsalted butter acts as a rich base, while garlic brings a warm aroma that fills your kitchen. For seasoning, minced garlic is key. It brings a punch of flavor that blends beautifully with shrimp. Paprika adds a gentle warmth, while lemon zest and juice brighten the dish. Salt and black pepper enhance all these flavors. Adding garnishes like fresh parsley gives a pop of color. If you love heat, sprinkle some red pepper flakes on top. This dish is not only tasty but also easy to prepare, making it a great choice for a weeknight meal or a special occasion. - Preheat your oven to 400°F (200°C). - Line a large baking sheet with parchment paper for easy cleanup. - In a medium saucepan, melt 3 tablespoons of butter over medium heat. - Add 4 cloves of minced garlic and sauté for about 1 minute. - Watch the garlic closely to avoid burning it. - Remove the saucepan from the heat. - Stir in 1 teaspoon of paprika, 1 teaspoon of lemon zest, and 1 tablespoon of lemon juice. - Add 1 teaspoon of salt and ½ teaspoon of black pepper. Mix everything well. - In a large bowl, add 1 pound of peeled and deveined shrimp. - Pour the garlic butter mixture over the shrimp and toss to coat. - Spread the coated shrimp on one half of the prepared baking sheet. - On the other half, add 4 medium spiralized zucchini (zoodles). - Drizzle the zoodles with olive oil and season with salt and pepper. Toss gently. - Bake everything in the preheated oven for 10-12 minutes. - Check that the shrimp are pink and cooked through. The zoodles should be tender but firm. To avoid overcooking shrimp, keep a close eye on them. Shrimp cook fast. They turn pink and curl when done. Bake them for just 10-12 minutes. If you see them turning bright pink, they are ready. Remove them right away. For zoodles, you want them firm and not mushy. Spiralize fresh zucchini just before cooking. This helps keep them crisp. When baking, don’t overcrowd them on the sheet. Give them space to cook evenly. Drizzle with olive oil and toss gently to coat. To plate your dish like a pro, start with zoodles in a shallow bowl. Arrange shrimp on top. Use a spoon to drizzle leftover garlic butter from the baking sheet over the shrimp. This adds flavor and looks great. Garnish with fresh parsley for color. For a restaurant-like experience, serve with lemon wedges. This adds a bright touch. You can also sprinkle red pepper flakes for a pop of heat. Want to add more flavor? Try using fresh herbs like basil or cilantro. These can brighten up the dish. You can also add a pinch of cayenne for extra heat. If you want more veggies, consider bell peppers or cherry tomatoes. These can roast well with shrimp. Just add them to the baking sheet with the zoodles. They will soak up all that tasty garlic butter. {{image_2}} You can swap shrimp for chicken or tofu. Chicken should be cut into bite-sized pieces. Tofu can be cubed and pressed to remove excess water. Both options work well with garlic butter. For zoodles, try different pasta options. You can use spaghetti, penne, or whole wheat pasta. This change adds variety and caters to different tastes. To change up the flavor, use different spices. Cumin, chili powder, or Italian herbs give new twists. You could also mix in some fresh basil or dill for a fresh taste. Try creative sauces to drizzle over the dish. A squeeze of lime or a splash of soy sauce adds zing. You can use a store-bought pesto or make your own for extra flavor. If you're short on time, try stove-top cooking. Sauté shrimp and zoodles in a large skillet. Cook shrimp until pink and zoodles until tender for a quick meal. Grilling is another option for a smoky flavor. Skewer shrimp and grill them alongside zoodles. This method enhances the dish's taste and adds a fun outdoor element. To keep your Sheet-Pan Garlic Butter Shrimp and Zoodles fresh, refrigerate them right away. Place leftovers in an airtight container. This helps to lock in flavors and keep them safe. I suggest using glass containers. They do not absorb smells and are easy to clean. When you reheat your dish, aim to keep the shrimp juicy and the zoodles firm. The best way to reheat is in a skillet over low heat. This helps maintain the flavor. Stir gently to mix the shrimp and zoodles. If the zoodles seem dry, add a splash of olive oil or a bit of water. This will help them regain some moisture. You can also cover the pan with a lid for a few minutes. This adds steam and keeps the zoodles tender. Yes, you can freeze this dish! However, it’s best to freeze the shrimp and zoodles separately. This helps keep their textures nice when you thaw them. For shrimp, place them in a freezer bag. Squeeze out air and seal tightly. For zoodles, lay them flat in a container. This makes stacking easier in your freezer. When you're ready to eat, just thaw in the fridge overnight before reheating. How long should I bake the shrimp? Bake the shrimp for 10 to 12 minutes. You want them pink and cooked through. A quick check helps avoid overcooking. Can I use frozen shrimp for this recipe? Yes, you can use frozen shrimp. Just thaw them first. Place them in cold water for about 15 minutes. Pat them dry before cooking. What to do if I don’t have zoodles? If you don't have zoodles, use regular pasta or other veggies. Spiralized carrots or bell peppers work great too. Is this dish low-carb or keto-friendly? Yes, this dish is low-carb and keto-friendly. Zoodles replace traditional pasta, keeping carbs low. Plus, shrimp is high in protein. How can I make it more nutritious? Add more veggies like bell peppers or asparagus. You can also sprinkle some nuts or seeds on top for a crunch and healthy fats. What pairs well with garlic butter shrimp and zoodles? A light salad with lemon vinaigrette pairs well. Also, crusty bread is great to soak up the garlic butter. Ideas for side dishes and drinks to complement the meal Consider a fresh cucumber salad or grilled veggies. For drinks, try a crisp white wine or sparkling water with lemon. This recipe combines shrimp, zoodles, and rich garlic butter to create a tasty meal. Follow the easy steps for a healthy dish that's quick to prepare and fun to enjoy. With tips on cooking shrimp, plating, and variations, you can craft your own version. Remember, you can swap shrimp for chicken or tofu, add spices, or grill for a different touch. Now, cooking and sharing this flavorful dish at home can be both simple and satisfying. Enjoy your culinary adventure!

Savory Sheet-Pan Garlic Butter Shrimp and Zoodles Recipe

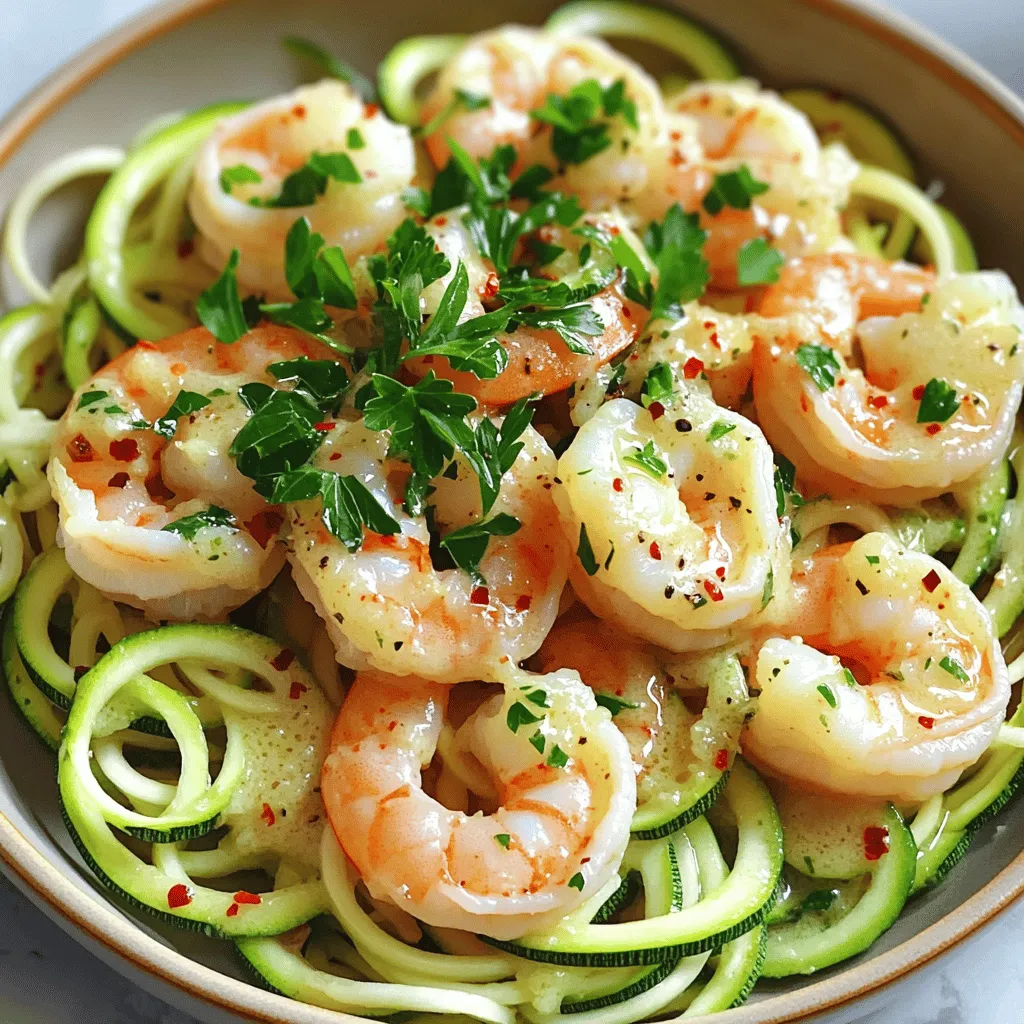
Looking for a quick, delicious dinner? This Savory Sheet-Pan Garlic Butter Shrimp and Zoodles recipe is your answer! In just

- 1 sheet of puff pastry, thawed - 1 medium apple, cored and finely diced - 1/2 cup fresh cranberries, chopped (or dried cranberries) - 4 oz Brie cheese, rind removed and cut into small pieces - 2 tablespoons honey - 1 teaspoon fresh thyme leaves These ingredients come together to create a perfect mix of sweet and savory flavors. The puff pastry forms a flaky and buttery shell. The apple adds a crisp texture, while cranberries bring a tart punch. Brie offers creamy richness, making every bite delightful. Honey adds a touch of sweetness, and thyme gives it a fresh herbal note. - Sea salt - Freshly cracked black pepper These seasonings can enhance the flavors. A little sea salt boosts sweetness, while black pepper adds a hint of spice. Both are optional but recommended for a well-rounded taste. - Baking sheet - Parchment paper - Mixing bowl - Rolling pin Having the right tools makes cooking easier. A baking sheet lined with parchment paper ensures easy cleanup. A mixing bowl helps combine your filling, and a rolling pin is needed to flatten the puff pastry. With these tools, you can make your Apple Cranberry Brie Puff Pastry Bites with ease and confidence. First, you need to thaw the puff pastry. Leave it in the fridge overnight or on the counter for about 30 minutes. Once it's soft, place it on a lightly floured surface. Roll it out gently with a rolling pin. You want to smooth out any creases and make it slightly bigger. Next, cut the pastry into 2-inch squares. Use a sharp knife or a pizza cutter for clean edges. This will give you perfect little pockets for your filling. Now it’s time to make the filling. Take one medium apple and core it. Dice the apple into small pieces. In a mixing bowl, combine the diced apple with half a cup of chopped fresh cranberries. If you don't have fresh cranberries, dried ones work too! Add two tablespoons of honey to sweeten the mix. Then, sprinkle in one teaspoon of fresh thyme leaves for flavor. Don't forget to add a pinch of sea salt and a bit of freshly cracked black pepper for balance. Stir it all together until mixed well. Lay out the puff pastry squares on your work surface. Place a small spoonful of the apple-cranberry mixture in the center of each square. Top each filling with a piece of Brie cheese. Now, fold the corners of each square toward the center. Pinch the edges tightly to seal the pockets. Make sure no filling can escape while baking! Before you bake, preheat your oven to 400°F (200°C). Line a baking sheet with parchment paper. This helps with easy cleanup! Once the oven is hot, place your filled puff pastry bites on the baking sheet. Brush the tops with the beaten egg. This will give them a nice golden color when baked. Bake the bites for 15 to 20 minutes. Keep an eye on them. They should be golden and flaky when done. Once baked, let them cool for a few minutes before serving. Enjoy! - How to avoid sogginess To keep your puff pastry crisp, avoid overfilling. Use just enough filling to keep the pastry from getting wet. Also, ensure your apple and cranberry mixture is not too juicy. You can pat the apples dry with a paper towel. - Ensuring a flaky texture For a flaky texture, work with cold puff pastry. Keep it in the fridge until you are ready to roll it out. Also, remember to roll it lightly without pressing too hard. The layers need space to puff up in the oven. - Best ways to present the bites Serve these bites warm on a rustic wooden board or a bright white platter. Garnish with fresh thyme sprigs for color and flavor. This adds an elegant touch that impresses guests. - Pairing recommendations These bites pair well with a light salad or a glass of sparkling cider. You can also serve them with a sweet dipping sauce like honey or a tangy balsamic glaze for extra flavor. - How to store leftovers Store any leftover bites in an airtight container in the fridge. They will stay fresh for about 2 days. If you want to keep them longer, consider freezing them before baking. - Reheating instructions To reheat, place them in a preheated oven at 350°F (175°C) for about 10-15 minutes. This method keeps them crispy. Microwaving can make them soggy, so avoid that if possible. {{image_2}} You can easily change some ingredients for fun. - Alternative cheeses: Try goat cheese for a tangy taste. Cream cheese adds a smooth texture. - Different fruits: Pears work well if you want something sweeter. Dried figs can add a chewy texture. Making these bites fit your diet is simple. - Vegan options: Use vegan cheese and maple syrup instead of honey. This keeps the flavor without dairy. - Gluten-free puff pastry: Look for gluten-free pastry sheets. They are widely available and work just as well. Adding new flavors makes your bites special. - Adding spices: A pinch of cinnamon or nutmeg can warm up the dish. These spices pair well with apples and cranberries. - Incorporating nuts: Chopped walnuts or pecans add crunch and depth. They also enhance the overall taste. Feel free to get creative with these options! Yes, you can prep these bites ahead of time. To store them, keep the unbaked bites in the fridge for up to a day. For longer storage, freeze the assembled bites. Place them on a baking sheet and freeze until solid. Then, transfer them to a freezer bag. They can stay frozen for up to three months. When ready to bake, just add a few extra minutes to the cooking time. This way, you can enjoy fresh bites anytime! For baking, I recommend using tart apples like Granny Smith or Honeycrisp. These apples hold their shape well and add a nice zing. If you prefer a sweeter flavor, try Fuji or Gala apples. Each type brings a unique taste to your dish. Feel free to mix different apples to create a fun flavor blend! To check if the bites are done, look for a golden brown color on the puff pastry. The pastry should be flaky and puffed up. You can also gently press on the top. If it feels firm and has a nice crunch, they are ready. If you want to be sure, use a food thermometer. The cheese should be melted and bubbly inside. Enjoy the delicious aroma as they bake! Each Apple Cranberry Brie Puff Pastry Bite is a tasty treat. A serving size is one bite. Each bite has about 120 calories. This makes them a perfect snack for parties or gatherings. Every bite gives you a balance of macronutrients: - Carbohydrates: about 11 grams - Proteins: around 3 grams - Fats: roughly 7 grams These bites provide a nice mix of energy and flavor. The ingredients in these bites offer great health perks: - Apples: Full of fiber and vitamin C, apples help keep you full. - Cranberries: These berries are high in antioxidants and support heart health. - Brie Cheese: This cheese adds protein and calcium, which are good for bones. - Thyme: This herb has anti-inflammatory properties and adds flavor. Enjoying these bites means you're treating yourself to a delicious snack, while also getting some health benefits! In this post, we covered the key steps to create delicious puff pastry bites. We discussed essential ingredients like apples, cranberries, and Brie, plus tools you need. You learned how to prepare, assemble, and bake, along with tips for serving and storing. Remember, you can swap ingredients for your taste or dietary needs. These bites are simple and fun to make. Enjoy exploring variations and impressing friends with your culinary skills!

Apple Cranberry Brie Puff Pastry Bites Delight

Get ready to impress your friends and family with these delicious Apple Cranberry Brie Puff Pastry Bites! They’re easy to

- Brown rice vs. white rice: I often use brown rice for its nutty flavor and health benefits. It takes longer to cook but adds a chewy texture. White rice cooks faster and has a softer bite. Choose what you like best. - Types of broth: vegetable vs. chicken: Vegetable broth gives a nice, light taste. It keeps the dish plant-based. Chicken broth adds a rich flavor. Both work well, so pick one that fits your diet. - Cheese selection: cheddar and cream cheese: Cheddar cheese melts beautifully and adds sharpness. Cream cheese makes the casserole creamy and smooth. Mixing both creates a great flavor and texture balance. - Breadcrumbs for topping: Adding breadcrumbs on top gives a nice crunch. They crisp up after baking and add a fun texture contrast. - Alternative vegetables to include: You can add other veggies like carrots or peas. They bring more color and taste. Feel free to experiment with what you have on hand! 1. Heat 2 tablespoons of olive oil in a large pot over medium heat. 2. Add 1 small diced onion. Sauté for about 3-4 minutes until it looks clear. 3. Stir in 2 minced garlic cloves. Cook for 1-2 more minutes until you smell the garlic. 4. Add 1 cup of brown rice to the pot. Toast the rice for 2-3 minutes. Stir often to avoid burning. 5. Pour in 3 cups of vegetable broth. Bring the mixture to a boil. 6. Lower the heat and cover the pot. Cook according to rice package instructions. - For brown rice, this takes about 40-45 minutes. - For white rice, it takes about 15-20 minutes. 7. After the rice cooks, add 2 cups of fresh broccoli florets. 8. Mix in 1/2 cup of cream cheese and half of the 1 cup of shredded cheddar cheese. 9. Add 1 teaspoon of dried thyme, 1 teaspoon of paprika, and salt and pepper to taste. 10. Stir until the broccoli turns bright green and is tender. This takes about 5-7 minutes. 11. If you like, sprinkle 1/2 cup of breadcrumbs on top. Add the rest of the shredded cheddar cheese. 12. Cover the pot and let it sit on low heat for 5 minutes. This helps the cheese melt and the breadcrumbs crisp up. To get the best broccoli in your casserole, start with fresh florets. Cut them into small, even pieces. This helps them cook well and stay bright green. Add the broccoli to the pot only after the rice is done. Cook it for about 5 to 7 minutes. This way, it stays tender but not mushy. For the cheese, mix cream cheese and shredded cheddar well. This gives your casserole a smooth and creamy texture. If you want it cheesier, add more cheddar on top. Let it melt for that gooey goodness! Want to spice things up? Try adding garlic powder or onion powder for extra flavor. A pinch of red pepper flakes can give it a nice kick. Fresh herbs like parsley or basil also add great taste. You can mix and match to find what you love. For a lighter version, swap cream cheese for Greek yogurt. You can also use low-fat cheese. These changes keep the flavor but cut down on calories. Enjoy experimenting with your own twists! {{image_2}} You can change the cheese in this casserole to fit your taste. Try mozzarella for a gooey texture. Feta adds a salty kick. For a sharp flavor, swap in gouda. Each cheese brings its own charm. Adding protein can make this dish heartier. You can mix in cooked chicken for extra protein. Shredded rotisserie chicken works well. If you prefer plant-based options, add cubed tofu. Both options fit nicely in the creamy mix. If you want a vegan version, use plant-based cheeses. Cream cheese can be replaced with cashew cream. This keeps the dish creamy without dairy. Also, use vegetable broth to keep it vegan-friendly. For gluten-free options, choose rice that fits this diet. Look for certified gluten-free rice brands. You can skip breadcrumbs or use gluten-free varieties for the top. Enjoy this dish without worry! To keep your One-Pot Cheesy Broccoli Rice Casserole fresh, store it in an airtight container. Make sure to let it cool first. Place it in the refrigerator for up to four days. If you want to enjoy it later, you can freeze it too. Just use a freezer-safe container. It can last up to three months in the freezer. When you're ready to eat leftovers, reheat them slowly. You can use the microwave or a pot on the stove. If using a microwave, place the casserole in a bowl and cover it. Heat in short bursts, stirring in between. If using the stove, add a splash of broth to keep it moist. Stir often until it's heated all the way through. This way, the texture and flavor stay nice. Enjoy your warm, cheesy goodness! Yes, you can use frozen broccoli. It saves time and is just as tasty. Just add it to the pot during the last few minutes of cooking. This will help keep the color and flavor fresh. This casserole will last about 3 to 4 days in the fridge. Make sure to store it in an airtight container. This keeps the flavors locked in. Yes, you can make it ahead of time. Just cook it as per the recipe. Let it cool completely, then store it in the fridge. When you are ready to eat, reheat it on the stove or in the oven. - How to freeze One-Pot Cheesy Broccoli Rice Casserole To freeze this casserole, let it cool first. Then, put it in a freezer-safe container. It can last up to 3 months in the freezer. When you want to eat it, thaw it overnight in the fridge before reheating. This way, it stays flavorful and delicious. This blog covered how to make a delicious One-Pot Cheesy Broccoli Rice Casserole. You learned about key ingredients like rice, broth, and cheese. We also explored optional toppings and other flavors to enhance your dish. The step-by-step guide made cooking simple, while tips helped you perfect the texture and taste. With variations for dietary needs, there’s something for everyone. Now, you can enjoy leftovers easily, too. Dive into this recipe and share it with others. You’ll love the comfort and ease of this tasty meal!

One-Pot Cheesy Broccoli Rice Casserole Delight

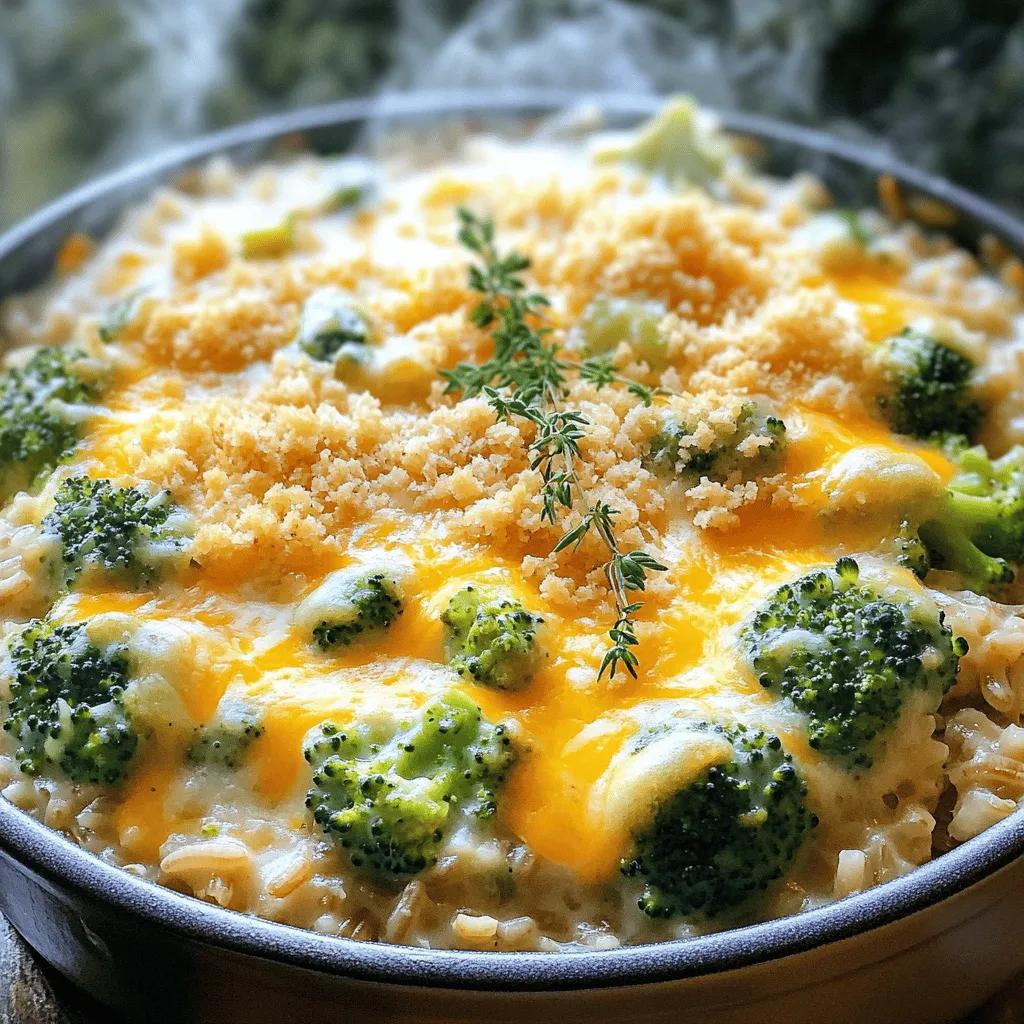
Looking for a simple and cheesy dinner idea? You’ve found it! This One-Pot Cheesy Broccoli Rice Casserole is quick to

- 1 cup all-purpose flour - 1 teaspoon baking powder - 1/4 teaspoon baking soda - 1/2 teaspoon ground cinnamon - 1/4 teaspoon nutmeg - 1/4 teaspoon salt I use all-purpose flour for a light texture. Baking powder and baking soda help the donut holes rise. Ground cinnamon and nutmeg give them a warm, fall flavor. Salt balances the sweetness in the dough. - 1/3 cup granulated sugar - 1/2 cup canned pumpkin puree - 1 large egg - 1/4 cup milk - 1 teaspoon vanilla extract Granulated sugar adds sweetness, while pumpkin puree provides moisture. The egg binds everything together. Milk makes the mixture smooth, and vanilla gives a lovely aroma. - 1/2 cup unsalted butter (for frying) - 1/4 cup granulated sugar (for coating) - 1 teaspoon ground cinnamon (for coating) Unsalted butter is best for frying, as it has a rich flavor. The cinnamon sugar coating adds a sweet crunch to the warm donut holes. Together, these ingredients create a delightful treat. 1. First, grab a medium bowl. Whisk together the dry ingredients: - 1 cup all-purpose flour - 1 teaspoon baking powder - 1/4 teaspoon baking soda - 1/2 teaspoon ground cinnamon - 1/4 teaspoon nutmeg - 1/4 teaspoon salt This mix gives flavor and structure to our dough. 2. In another bowl, combine your wet ingredients: - 1/3 cup granulated sugar - 1/2 cup canned pumpkin puree - 1 large egg - 1/4 cup milk - 1 teaspoon vanilla extract Stir them well until the mixture is smooth. 3. Next, slowly add the dry mix to the wet mix. Use a spatula to fold it in. Stop mixing once you see a few lumps. Overmixing can make your donut holes tough. 1. In a deep pan, heat 1/2 cup of unsalted butter over medium heat. You want it hot but not smoking. Aim for about 350°F (175°C). 2. While the butter heats, form the dough into small balls. I like using a small cookie scoop for this. Aim for about 1 inch in diameter. 3. Carefully drop the dough balls into the hot butter. Fry them in small batches to avoid crowding. This helps them cook evenly. Fry until golden brown, about 2-3 minutes per side. Use a slotted spoon to remove them. Let them drain on paper towels. 1. To make the cinnamon sugar coating, mix together: - 1/4 cup granulated sugar - 1 teaspoon ground cinnamon 2. While your donut holes are warm, roll them in the cinnamon sugar. Make sure they are fully coated for the best flavor. 3. Serve your donut holes warm. They taste best fresh out of the fryer. Enjoy every bite of these pumpkin churro donut holes! To make the best pumpkin churro donut holes, focus on the batter. Overmixing can lead to tough donut holes. Mix just until the dry and wet ingredients blend. A few lumps are fine. Next, frying temperature is key. Heat the butter to about 350°F. Use a thermometer or test with a small dough ball. It should sizzle when you drop it in. If the oil is too hot, the outside will burn before the inside cooks. You can make these donut holes even tastier by adding spices. Try adding ginger or cloves for a warm kick. You could also mix in some chocolate chips for a sweet twist. These small changes can elevate the flavor profile and make your treat unique. Serving matters just as much as taste. Place your donut holes in a lovely bowl. Dust them with extra cinnamon sugar for an eye-catching look. You can also add a drizzle of caramel or chocolate sauce on top. This not only makes them look appealing but adds more flavor. Enjoy your beautiful creation! {{image_2}} You can change up the flavors in pumpkin churro donut holes. Instead of just cinnamon, try adding ginger or allspice for a warmer taste. You can also swap vanilla extract with almond extract for a nutty twist. If you love chocolate, add mini chocolate chips to the dough. For a caramel touch, drizzle warm caramel sauce over the donut holes before serving. For gluten-free options, use a gluten-free flour blend. This way, you can enjoy the same great taste without the gluten. If you need a dairy-free alternative, use almond milk or oat milk instead of regular milk. For frying, use coconut oil or vegetable oil. These swaps keep the flavor while fitting your dietary needs. You can easily change the number of donut holes you make. If you want more, simply double the recipe. For fewer servings, halve the ingredients. This way, you can adjust based on your needs. Remember, the cooking time may vary with different batch sizes, so keep an eye on them while frying. To store leftover pumpkin churro donut holes, place them in an airtight container. Keep them at room temperature for up to two days. For longer storage, you can refrigerate them for up to a week. Avoid stacking them too tightly to prevent them from becoming squished. To reheat your donut holes, set your oven to 350°F (175°C). Spread them out on a baking sheet. Heat for about 5-7 minutes until warm. This method keeps them soft and fresh. You can also microwave them for about 10-15 seconds if you're in a hurry. Just be careful not to overheat, or they may get tough. You can freeze pumpkin churro donut holes before or after frying. If freezing raw, form the balls and freeze them on a baking sheet for about an hour. Once frozen, transfer them to a freezer bag. For fried donut holes, let them cool completely before freezing. They will last up to three months. To enjoy, reheat from frozen in the oven. Yes, you can prepare the dough a few hours in advance. Here are some tips for preparing in advance: - Mix the dry ingredients and the wet ingredients separately. - Combine them just before frying to keep the dough fresh. - Store the mixed dough in the fridge for up to 2 hours. - If you want to freeze, shape the dough into balls and freeze them. Fry them straight from the freezer. If you don’t have pumpkin puree, you can use other ingredients for flavor and consistency: - Use applesauce for a sweet and moist alternative. - Mashed sweet potatoes work well too. - For a spiced flavor, try butternut squash puree. - Yogurt can give a tangy twist while keeping it moist. To keep your donut holes light and not greasy, follow these tips: - Heat the butter to about 350°F (175°C) before frying. - Fry in small batches to maintain the oil's temperature. - Don’t overcrowd the pan; this cools the oil. - Drain the cooked donut holes on paper towels right after frying. You’ve learned how to make delicious donut holes with pumpkin puree and warm spices. We covered the right ingredients, step-by-step instructions, tips, variations, and storage info. Now, you can create tasty treats for any occasion. Experiment with flavors and enjoy these treats with friends and family. With practice, your donut holes will be perfect every time. Enjoy your cooking journey!

Pumpkin Churro Donut Holes with Cinnamon Sugar Delight

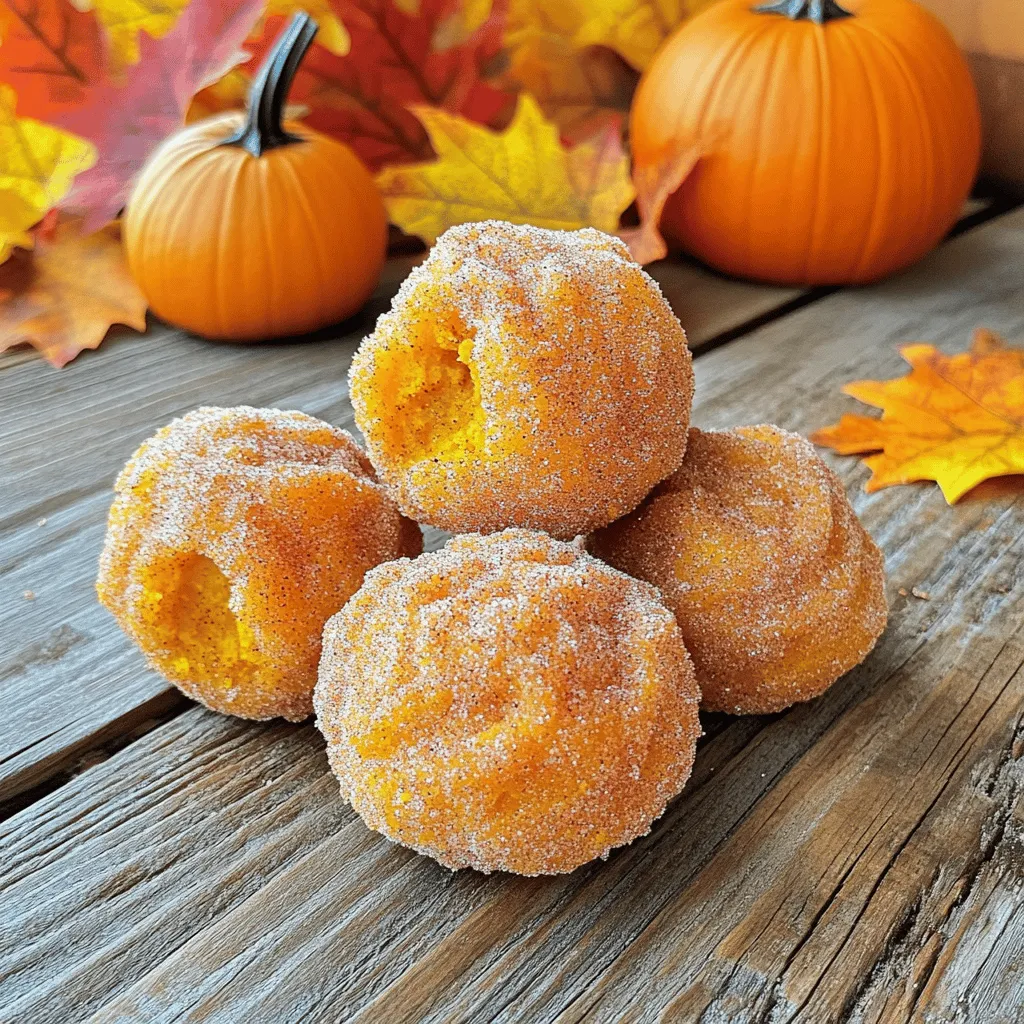
Get ready to indulge in the cozy flavors of fall with my Pumpkin Churro Donut Holes! These treats combine the

- 1 medium butternut squash, peeled and thinly sliced - 1 cup fresh goat cheese, crumbled - 1 pre-made pie crust (or homemade if preferred) - 2 tablespoons olive oil - 1 tablespoon fresh thyme leaves (plus extra for garnish) - 1 tablespoon maple syrup - Salt and pepper to taste - 1 egg (for egg wash) - 2 tablespoons Parmesan cheese, grated Butternut squash is the star here. It has a sweet flavor that shines through. Pair it with creamy goat cheese for a delightful mix. The pie crust gives it a nice crunch. You can use store-bought crust for ease or make your own for fun. Next, we have the seasonings. Olive oil keeps the squash moist while roasting. Fresh thyme adds a fragrant touch that really lifts the dish. Maple syrup brings a lovely sweetness that balances the flavors. Don't forget to add salt and pepper to taste. If you want a golden crust, using an egg wash is key. It gives the galette a nice shine. Sprinkling some grated Parmesan on top adds an extra layer of flavor. These ingredients come together to create a dish that is not just tasty but also visually stunning. 1. First, preheat your oven to 400°F (200°C). 2. In a large bowl, place the sliced butternut squash. 3. Add 2 tablespoons of olive oil, 1 tablespoon of fresh thyme, 1 tablespoon of maple syrup, salt, and pepper. 4. Toss it all together until the squash is well coated. 1. Spread the squash mixture in a single layer on a baking sheet. 2. Roast in the oven for about 25 minutes. 3. Check for tenderness and a slight caramelization. 4. Once done, remove the squash and let it cool slightly. 1. On a floured surface, roll out the pie crust to about a 12-inch circle. 2. Transfer the crust to a parchment-lined baking sheet. 3. Layer the roasted butternut squash on top of the crust. 4. Leave a 1.5-inch border around the edges. 5. Crumble the goat cheese evenly over the squash. 6. Fold the edges of the crust over the filling, making pleats as needed. 1. Brush the crust with a beaten egg for a golden finish. 2. Sprinkle 2 tablespoons of grated Parmesan cheese on top. 3. Bake the galette in the preheated oven for 30-35 minutes. 4. Look for a golden brown crust and slightly melted cheese. 5. Let it cool for a few minutes before slicing. 6. Garnish with extra thyme leaves for a fresh touch. To get a great crust, chill your pie crust. Cold dough helps it stay firm and flaky. If you make your own, wrap it in plastic and chill for at least 30 minutes. When rolling out your dough, use a lightly floured surface. This keeps it from sticking. Roll from the center outward, turning the dough often. Aim for a circle about 12 inches wide. You can change the flavors to fit your taste. Try adding herbs like rosemary or sage for a fresh twist. A pinch of nutmeg can also enhance the sweetness of the squash. For texture, add nuts like walnuts or pecans. Dried fruits like cranberries can add a nice sweetness, too. Mix and match to find your favorite blend! Pair this galette with a simple green salad. A salad with arugula and lemon vinaigrette works well. For a heartier side, consider roasted vegetables. When it comes to wine, a light white wine like Sauvignon Blanc pairs nicely. It brings out the flavors of the goat cheese and squash. Enjoy it warm for the best taste! {{image_2}} You can make this galette even better by adding greens. Spinach or kale are great choices. Just chop them and toss them with the squash. This adds color and nutrients. You can also use different cheeses. Feta or ricotta work well with goat cheese. Each cheese brings its own flavor, making the galette unique. If you need a gluten-free galette, don't worry! You can use a gluten-free pie crust instead. Many stores sell ready-made options. Just check the label to be sure. You might need to adjust the baking time a little. Keep an eye on it as it bakes to get that perfect golden crust. You can switch up the veggies in this galette based on what’s in season. In summer, try zucchini or bell peppers. In winter, look for root vegetables like carrots or parsnips. These swaps can change the flavor and keep the dish fresh. Adapting the recipe makes it fun and new each time! After you enjoy your butternut squash and goat cheese galette, store leftovers in the fridge. Place slices in an airtight container. This keeps the flavors fresh. You can also wrap the galette tightly in plastic wrap. It will stay good for about 3 days. To reheat, preheat your oven to 350°F (175°C). Place the galette on a baking sheet. Heat it for about 10 to 15 minutes. This way, the crust stays crisp and the cheese melts nicely. If you want to freeze the galette, you can do so before or after baking. If freezing before baking, wrap it tightly in plastic wrap and then foil. This keeps out air. It can last up to 3 months in the freezer. To freeze after baking, let it cool completely. Wrap it as you would before baking. When you are ready to eat, thaw it in the fridge overnight. Then, reheat in the oven at 350°F (175°C) until warm. Freezing is a great way to enjoy this dish later. Just make sure to check for any freezer burn. With these tips, your galette will taste great even after freezing! You can use several great options if you need to swap out goat cheese. - Dairy-free alternatives: Try vegan cream cheese or cashew cheese for a creamy texture without dairy. - Other cheese options: Feta cheese works well. It has a similar tangy flavor. Ricotta can also be a good choice for a softer texture. Yes, you can prepare parts of the galette in advance. - Recommended preparation steps for make-ahead: Roast the butternut squash a day before. Store it in the fridge. You can also prepare the crust ahead of time. Keep it wrapped in the fridge until you are ready to assemble. Look for clear signs to know when your galette is ready. - Signs of doneness to look for: The crust should be golden brown, and the cheese should be melted. You can also check if the filling bubbles slightly. - Tips on checking crust texture: Gently press the crust with a finger. It should feel firm and crisp, not soft or doughy. This blog post covers how to make a butternut squash galette. We discussed the main ingredients, like butternut squash, goat cheese, and pie crust. I shared tips for the perfect crust and how to customize flavors. In closing, this dish offers creativity and comfort. Whether you enjoy it fresh or as leftovers, it’s bound to impress. Keep experimenting with flavors and seasonal ingredients to make it your own. Happy baking!

Butternut Squash and Goat Cheese Galette Delight

Looking for a warm, tasty dish to impress your friends? The Butternut Squash and Goat Cheese Galette is perfect for

Older posts
Newer posts
← Previous Page1 … Page23 Page24 Page25 … Page132 Next →

dsad

© 2025 Emmas Dish • Built with GeneratePress

Our Policies

  • Copyright Policy
  • Cookie Policy
  • GDPR Policy
  • Privacy Policy
  • Disclaimer
  • Terms Of Use

More Information

  • Home
  • About
  • Contact
  • Appetizers
  • Dessert
  • Dinner
  • Drinks
©2025, Emmas Dish About Back To Top