Skip to content
DisclaimerTerms Of UseGDPR PolicyCookie Policy

Emmas Dish

  • Home
  • Drinks
  • Appetizers
  • Dinner
  • Dessert
  • About
  • Contact
  • Privacy Policy
DisclaimerTerms Of UseGDPR PolicyCookie Policy

Emma

- 6 large eggs - 1/2 cup milk - 1 cup spinach, chopped - 1/2 cup cherry tomatoes, halved - 1/2 cup bell pepper, diced - 1/4 cup red onion, finely chopped - 1/2 cup feta cheese, crumbled - 1 teaspoon garlic powder - 1 teaspoon dried oregano - Salt and pepper to taste - 2 tablespoons olive oil When I make a vegetable frittata, I focus on fresh ingredients. Fresh veggies bring out great flavors. I love using a mix of bell peppers for color and taste. Cherry tomatoes add a nice sweetness. Spinach gives it a bright green look and packs in nutrients. For the eggs, I choose large ones. They hold up well in the frittata. The milk adds creaminess but is not too heavy. Feta cheese crumbles add a salty kick. - Choose Seasonal Vegetables: This gives your frittata the best flavor. Look for local produce at farmers' markets. - Inspect for Freshness: Check for firm, bright vegetables. Avoid any that feel soft or look dull. - Store Properly: Keep eggs and veggies in the fridge. This keeps them fresh longer. - Prep Ahead: Wash and chop your veggies before cooking. This saves time and makes cooking easier. Using fresh, high-quality ingredients sets the stage for a delicious vegetable frittata. If you want to try this recipe, check out the Full Recipe for more details! Start by preheating your oven to 375°F (190°C). This step ensures the frittata cooks evenly. In a large bowl, mix together six large eggs, 1/2 cup of milk, garlic powder, oregano, and salt and pepper. Whisk these ingredients well until they blend smoothly. Next, heat two tablespoons of olive oil in an oven-safe skillet over medium heat. I prefer using a cast iron skillet for better heat retention. Add 1/4 cup of finely chopped red onion and 1/2 cup of diced bell pepper. Sauté them for about 3-4 minutes until the onions are soft. Then, toss in 1 cup of chopped spinach and 1/2 cup of halved cherry tomatoes. Cook for another 2 minutes, stirring often, until the spinach wilts. Pour the egg mixture over the sautéed vegetables. Stir gently to mix everything well. Sprinkle 1/2 cup of crumbled feta cheese on top. Cook on the stove for 2 minutes to set the edges. Then, transfer the skillet to the oven. Bake for 15-20 minutes until the frittata is puffed and the center is set. Once done, remove it from the oven and let it cool for a few minutes before slicing. For more details, refer to the Full Recipe. To make a great vegetable frittata, you need to focus on texture. A frittata should be soft but firm. Start by cooking the vegetables just enough. This way, they stay tender and keep their flavor. Sauté them on medium heat for about 5-6 minutes. This helps to release their juices without making them mushy. Using an oven-safe skillet is key. A cast iron skillet works best. It heats evenly and keeps the frittata warm. Plus, it can go straight from the stove to the oven. This makes cooking easier and helps the frittata rise nicely. Feel free to switch up the veggies. You can use zucchini, mushrooms, or even broccoli. Just remember to chop them small for even cooking. If you have leftover veggies, throw them in too! This makes the dish fun and unique each time. Cheese can change the whole taste. Feta is a great choice, but try cheddar or goat cheese for something different. You can also add spices. A pinch of paprika or red pepper flakes can give a nice kick. Herbs like basil or thyme can add freshness. Use what you love! For more ideas, check out the Full Recipe for inspiration. {{image_2}} You can easily make this vegetable frittata fit many diets. For a vegetarian version, just leave out any meat. The recipe is already vegetarian-friendly because it uses eggs and fresh veggies. If you want to make it vegan, replace the eggs with a mixture of chickpea flour and water. This mix gives a nice texture and taste. Also, skip the cheese or use a vegan cheese alternative. For gluten-free options, you don’t need to worry at all! The frittata is naturally gluten-free since it uses no flour. Just make sure all your ingredients, like cheese or any added spices, are gluten-free. This way, everyone can enjoy a hearty and healthy breakfast. To make your frittata even more special, try adding different herbs. For a fresh twist, mix in basil, thyme, or rosemary. These herbs add a burst of flavor that brightens the dish. You can also try a blend of herbs for a unique taste. If you want to include meats, think about adding cooked bacon, ham, or sausage. These meats add a savory note that pairs well with the eggs. You can also add cooked chicken for a protein boost. Just remember to cook the meat before adding it to the frittata mix. This helps ensure everything cooks evenly. For the complete recipe, check out the [Full Recipe]. To keep your vegetable frittata fresh, store it in the fridge. Place it in an airtight container. This helps prevent it from drying out. You can keep it for up to three days. If you want to save it longer, consider freezing it. For freezing, let the frittata cool completely. Then, wrap it tightly in plastic wrap and place it in a freezer-safe bag. This way, it can stay fresh for up to two months. When you're ready to eat, just thaw it in the fridge overnight. Reheating frittata requires care to maintain its texture and flavor. The best method is using the oven. Preheat your oven to 350°F (175°C). Place the frittata on a baking sheet. Heat it for about 10-15 minutes. This warms it evenly without making it rubbery. You can also use a microwave if you’re in a hurry. Cut a slice and place it on a microwave-safe plate. Heat it for 30 seconds to 1 minute. Check it often to avoid overheating. Enjoy your frittata warm and tasty, just like when you first made it! Can you make frittata ahead of time? Yes, you can make a frittata ahead of time. It keeps well in the fridge. After baking, let it cool. Store it in an airtight container. It will stay fresh for up to three days. To serve, simply reheat it in the oven or microwave. This makes it a great choice for busy mornings. What vegetables work best in a frittata? Many vegetables work well in a frittata. Spinach and bell peppers add great flavor. Tomatoes bring juiciness, while onions add depth. You can also use zucchini, mushrooms, or broccoli. The key is to sauté them first. This enhances their taste and texture. Nutritional Information Overview A vegetable frittata is a healthy meal option. It is packed with protein from eggs. Each serving offers vitamins from fresh vegetables. It is also a good source of healthy fats, especially from feta and olive oil. This dish can be low in carbs, making it suitable for various diets. Benefits of Eating Vegetables in Breakfast Dishes Eating vegetables at breakfast offers many benefits. It helps you start the day with energy. Veggies provide fiber, which aids digestion. Having them in the morning can also support weight management. Plus, they boost your immune system with essential nutrients. Enjoying a vegetable frittata gives your body a healthy kick. For a tasty frittata, check out the Full Recipe. In this article, we explored the key ingredients and steps for a delicious vegetable frittata. We covered techniques to ensure the right texture and shared customization options for various diets. You learned how to store leftovers for freshness and reheating tips. A vegetable frittata is not just tasty; it’s also packed with nutrients. Enjoy making this dish and feel great about the healthy choices you’re making. Keep experimenting with flavors and vegetables!

Vegetable Frittata Hearty and Healthy Breakfast Recipe

Are you looking for a quick, healthy breakfast? Try this Vegetable Frittata! It’s packed with fresh veggies and full of

For mango sticky rice, you need a few key items. Here’s what to gather: - 1 cup glutinous (sticky) rice - 1 ½ cups coconut milk - 1 ripe mango, peeled and sliced - ¼ cup sugar - ¼ teaspoon salt - 1 tablespoon sesame seeds (optional) - Fresh mint leaves for garnish (optional) Each ingredient plays a role in making this dessert delicious. The sticky rice gives a nice chewy texture. The coconut milk adds creaminess and sweetness. The mango brings bright flavor and color. Choosing the right mango is very important. You want to use ripe, sweet mangoes. They should feel soft but not mushy. A great mango will enhance your dish. It adds a fresh taste that balances the rich coconut milk. I always pick mangoes that have a bright yellow color. This shows they are ripe and ready to eat. You will need some basic tools to make this dessert. Here’s a quick list: - A steamer (or a pot with a steaming basket) - A mixing bowl - A saucepan - A spoon for stirring - A knife for slicing mangoes These tools help ensure the rice cooks well and the flavors mix nicely. The steamer is key for cooking the sticky rice properly. Use a mixing bowl to combine the rice with the coconut milk. Having the right tools makes cooking easier and more fun. For the full recipe, check out Mango Paradise Sticky Rice. First, you need glutinous rice. Rinse 1 cup of it under cold water. Keep rinsing until the water is clear. This step helps wash away the starch. Then, soak the rice in water for at least 4 hours. Soaking overnight works best, too. After soaking, drain the rice. Place it in a steamer lined with cheesecloth. Steam the rice for 25 to 30 minutes. You want the rice to be translucent and tender. While the rice steams, let's make the coconut milk mixture. In a saucepan, mix 1 ½ cups of coconut milk with ¼ cup of sugar and ¼ teaspoon of salt. Heat this over low to medium heat. Stir it until the sugar dissolves. Be careful not to let it boil. You want the flavors to blend without losing the creaminess. Once the sticky rice is ready, transfer it to a large bowl. Pour about 1 cup of the warm coconut milk mixture over the rice. Gently mix it until the rice is well-coated. Let it sit for 15 to 20 minutes. This allows the rice to soak up the flavors. Now, you can serve it! Place a scoop of sticky rice on a plate. Top it with sliced mango. Drizzle some extra coconut milk on top. If you like, add sesame seeds for crunch and mint leaves for color. Enjoy your Mango Sticky Rice Delight! For the complete recipe, check out the Full Recipe. To get the right sticky texture, use glutinous rice. Rinse it well to remove starch. Soaking is key; aim for at least four hours. For best results, soak overnight. After soaking, steam the rice until it turns clear. This step keeps the grains moist and sticky. To boost flavor, use coconut milk, sugar, and a pinch of salt. Heat the coconut milk gently; do not boil it. Stir until the sugar dissolves completely. Pour a cup of this mixture over the sticky rice after cooking. Let the rice absorb these flavors for 15 to 20 minutes. Presentation matters! Start with a scoop of sticky rice on a plate. Arrange fresh mango slices artfully on top. Drizzle additional coconut milk over the dish. For a crunchy touch, sprinkle sesame seeds on top. Garnish with fresh mint leaves for a pop of color. Serve it warm for the best experience. For the full recipe, check the details above. {{image_2}} You can swap mango for other fruits. Try ripe bananas, sweet papayas, or juicy berries. Each fruit brings a unique flavor. For example, bananas add creaminess, while berries add a pop of tartness. This keeps your dessert fresh and fun. You can mix fruits, too! A blend of mango and strawberries can make a colorful, tasty dish. Mango sticky rice is easy to make vegan. Use coconut milk instead of any dairy. Coconut milk gives that creamy taste you love. You could also use almond or cashew milk. Just make sure to check the labels for added sugars. Keep the recipe light and sweet without any dairy. Different regions have their own twists on mango sticky rice. In Thailand, they may top it with mung beans. In Cambodia, they might add a sprinkle of toasted peanuts. This gives the dish a nice crunch. You can also find variations that use different sweeteners, like palm sugar. Each change adds new flavors and textures. Explore these variations to find your favorite! For the full recipe, check out the details above. To keep your mango sticky rice fresh, store it in an airtight container. This method protects it from drying out. Place the container in the fridge if you plan to eat it within a couple of days. The rice may harden, but it will still taste great. For the best flavor, try to eat it within three days. When reheating, avoid the microwave if possible. Instead, use a stovetop method. Place the rice in a pan with a splash of coconut milk. Heat it gently over low heat. Stir it often to ensure it warms evenly. This method keeps the rice soft and moist. If you must use the microwave, cover the rice with a damp paper towel. This helps retain moisture during heating. You can freeze mango sticky rice for later enjoyment. First, let it cool completely. Then, scoop it into a freezer-safe container. Make sure to leave space for expansion. Label the container with the date. When you’re ready to enjoy it, thaw it in the fridge overnight. Reheat it using the stovetop method for the best results. Enjoy this delightful dessert whenever you crave it! You use glutinous rice, also called sticky rice. This rice has a high starch content. It cooks up soft and chewy. Regular rice will not work for this dish. Glutinous rice gives Mango Sticky Rice its unique texture. You can find it in Asian grocery stores or online. Always rinse the rice to remove excess starch before cooking. Yes, you can make Mango Sticky Rice ahead of time. Cook the sticky rice and store it in the fridge. Keep the coconut milk mixture separate until you are ready to serve. This will keep the rice fresh and moist. When ready to eat, warm the rice and mix in the coconut milk. Fresh mango slices should be added right before serving. Mango Sticky Rice is great on its own, but you can add more. Fresh fruits like strawberries or kiwi can add color. You can also serve it with a side of coconut ice cream. A sprinkle of sesame seeds or nuts adds crunch. For a twist, drizzle some honey or maple syrup on top. Enjoy this sweet dish in many ways! Mango sticky rice is a delightful treat. We covered the key ingredients, focusing on quality mangoes and essential tools. I showed you how to prepare sticky rice, make the coconut milk, and assemble the dish. You learned tips for texture and flavor, along with presentation ideas. We explored variations, storage tips, and answered common questions. Now you can make your own mango sticky rice with ease. Use these steps to enjoy this tasty dish anytime!

Mango Sticky Rice Delightful and Easy Dessert Recipe

Mango Sticky Rice is a simple yet delightful treat you can easily make at home. This dessert combines sweet mangoes

To make Baked Cherry Almond Oatmeal, gather these simple ingredients: - 2 cups rolled oats - 1 ¾ cups almond milk (or any milk of choice) - ½ cup pitted cherries, halved (fresh or frozen) - ⅓ cup almond butter - ¼ cup maple syrup (or honey) - 1 teaspoon vanilla extract - 1 teaspoon baking powder - ½ teaspoon cinnamon - ¼ teaspoon salt - ⅓ cup sliced almonds (for topping) - ¼ cup brown sugar (for topping) These ingredients blend well to create a tasty and filling breakfast. You can easily swap some ingredients based on what you have. Use oat milk or coconut milk instead of almond milk for a different taste. If you don’t have cherries, try blueberries or sliced bananas. Peanut butter works well if you don’t have almond butter. For sweetness, honey is a great choice in place of maple syrup. You can use vanilla extract or vanilla bean paste for a richer flavor. If you want to avoid sugar, use mashed ripe bananas for natural sweetness. This oatmeal is packed with nutrients. Each serving has about: - Calories: 210 - Protein: 6 grams - Fiber: 4 grams - Sugar: 8 grams The oats provide complex carbs for energy. Cherries add fiber and antioxidants. Almonds bring healthy fats and protein. This dish is not just tasty; it also fuels your body for the day ahead. You can find the Full Recipe in the section above. Start by preheating your oven to 375°F (190°C). Use a 9x9 inch baking dish and lightly grease it. In a large bowl, mix 2 cups of rolled oats and 1 ¾ cups of almond milk. Add ⅓ cup of almond butter and ¼ cup of maple syrup to the bowl. Pour in 1 teaspoon of vanilla extract, 1 teaspoon of baking powder, ½ teaspoon of cinnamon, and ¼ teaspoon of salt. Stir until everything blends well. Now, gently fold in ½ cup of halved cherries. Once your mixture is ready, pour it into the greased baking dish. Spread the mixture evenly across the dish. In a small bowl, combine ⅓ cup of sliced almonds and ¼ cup of brown sugar. Sprinkle this mix over the top of the oatmeal. Bake in your preheated oven for 30 to 35 minutes. The top should turn golden, and the oatmeal will set nicely. After baking, let it cool for a few minutes before slicing into squares. Serve your Baked Cherry Almond Oatmeal warm for the best flavor. For a special touch, add more almond butter or a drizzle of maple syrup on top. You can also garnish with fresh cherries and sliced almonds for color. This makes your dish look appealing and delicious! To get that perfect texture in your Baked Cherry Almond Oatmeal, start with rolled oats. They absorb liquid well and create a hearty base. Use almond milk for creaminess, but any milk works too. Mix the ingredients well to ensure even cooking. If you like it softer, add a little more milk. If you prefer it firmer, reduce the milk slightly. Bake it until the top is golden brown. This makes the edges crispy while keeping the center soft. To boost the flavor, add spices like nutmeg or cardamom. These spices will give your oatmeal a warm, cozy taste. You can also swap cherries for other fruits, like blueberries or apples. Consider adding vanilla extract for sweetness and aroma. For more richness, try different nut butters like peanut or cashew. Topping with sliced almonds and brown sugar adds a sweet crunch that you’ll love. One common mistake is not measuring the ingredients correctly. Use measuring cups for accuracy. Another mistake is overbaking. Check the oatmeal around 30 minutes; it should be set but not dry. Avoid skipping the cooling time after baking. This helps the oatmeal firm up, making it easy to cut into squares. Finally, don’t forget to let your creativity shine by adding your personal twist to the recipe. Enjoy the process and have fun! For the complete recipe, check the [Full Recipe]. {{image_2}} You can change up the fruit in your baked oatmeal. Try using blueberries, raspberries, or apples. These fruits add their own flavors and textures. You can mix in dried fruits like cranberries or apricots for added sweetness. Just remember to adjust the sugar if your fruit is sweet. If you want to change the sweetness, many options exist. You can use honey, agave syrup, or coconut sugar. Each offers a unique taste and health benefits. Try stevia or monk fruit for a low-calorie choice. Adjust the amount based on your preferred sweetness level. Nut butter adds creaminess and flavor to your oatmeal. While almond butter is tasty, peanut or cashew butter works well too. Each brings its own twist to the dish. You can also try sunflower seed butter for a nut-free option. Mix and match to find your favorite combination. For the full recipe, refer to the section above. To store leftovers, let the baked oatmeal cool completely. Then, cut it into squares. Place these squares in an airtight container. This will keep them fresh for up to five days in the fridge. If you want to enjoy them later, store them separately from any toppings. You can freeze individual squares for later use. Wrap each square tightly in plastic wrap. Then, place them in a freezer-safe bag or container. This way, they can last for up to three months. When you’re ready to eat, just take out what you need. Reheat leftovers in the microwave for about 30-60 seconds. If you prefer, you can also warm them in the oven at 350°F (175°C). Bake them for about 10-15 minutes until they are hot. Add a drizzle of almond butter or maple syrup when serving to bring back the fresh taste. For the full recipe, check the detailed instructions above. Yes, you can use regular milk. Almond milk gives a nice nutty flavor. If you prefer cow's milk, it works just as well. The texture and taste may change slightly, but it will still be delicious. To make Baked Cherry Almond Oatmeal gluten-free, choose certified gluten-free oats. Regular oats may contain gluten due to cross-contamination. Check labels for safety. You can also ensure other ingredients, like baking powder, are gluten-free. Absolutely! You can prepare it the night before. Just mix all the ingredients and place them in the baking dish. Cover it and store it in the fridge. When you’re ready, bake it in the morning. This saves time and makes breakfast easy. For the full recipe, check the previous section! In this post, we explored the essential ingredients for Baked Cherry Almond Oatmeal. We discussed preparation steps and the baking process. You also learned tips for texture and flavor. We looked at variations to make it your own and how to store leftovers. Remember, this dish is flexible and fun. Use these ideas to create something delicious and unique. Enjoy your cooking adventure!

Baked Cherry Almond Oatmeal for a Healthy Breakfast

If you’re seeking a quick, healthy breakfast, look no further than Baked Cherry Almond Oatmeal. This dish combines the sweet

To make teriyaki chicken rice bowls, you need these main ingredients: - 2 boneless, skinless chicken breasts - 1 cup jasmine rice - 1 cup water - 1 bell pepper (red or yellow), sliced - 1 cup broccoli florets The flavor comes from a simple marinade. Gather these items: - 1 tablespoon sesame oil - 2 tablespoons soy sauce (low sodium) - 2 tablespoons honey - 1 tablespoon rice vinegar - 1 teaspoon fresh ginger, grated - 2 cloves garlic, minced - Salt and pepper to taste Garnishes add a nice touch. Use these to enhance your bowls: - 2 green onions, sliced - Sesame seeds To marinate chicken, start with a bowl. Mix soy sauce, honey, rice vinegar, ginger, and garlic. This mix adds great taste. Place the chicken breasts in the bowl. Make sure they are fully coated in the marinade. Let it sit for at least 15 minutes. For stronger flavor, marinate up to 1 hour. This process helps the chicken soak up the sauce. First, rinse the jasmine rice under cold water. Keep rinsing until the water is clear. This step removes extra starch. Then, place the washed rice in a pot with 1 cup of water. Bring it to a boil. Lower the heat to a simmer and cover. Cook for 15 minutes. After cooking, turn off the heat and let it rest for 5 minutes. Fluff the rice with a fork before serving. This makes the rice light and fluffy. In a skillet, heat sesame oil over medium heat. Add the marinated chicken to the pan. Cook for about 5-6 minutes on each side. The chicken should be golden brown and fully cooked. Check the internal temperature; it should reach 165°F. After cooking, let the chicken rest for 5 minutes before slicing. In the same skillet, add sliced bell pepper and broccoli florets. Sauté the veggies for about 4-5 minutes. They should be tender but still crisp. Lastly, add the reserved marinade to the pan and cook for 2-3 minutes. This helps thicken the sauce, making it even tastier. For the full recipe, check out the ingredients and instructions above. To get tender chicken, first marinate it. The marinade helps soften the meat. Use soy sauce, honey, and vinegar. Let it soak for at least 15 minutes. For best results, marinate it for an hour. Cook the chicken over medium heat. This keeps it juicy. Always check the internal temperature. It should reach 165°F for safety. Fluffy rice starts with rinsing the jasmine rice. Rinse until the water runs clear. This removes excess starch. Use a 1:1 ratio of rice to water. Bring the water to a boil first. Once boiling, lower the heat and cover. Let it simmer for 15 minutes. After cooking, let it rest for 5 minutes. This makes it light and fluffy. You can boost flavor with simple add-ins. Try adding bell peppers and broccoli. These complement the teriyaki sauce well. You can also use sesame seeds or green onions as toppings. These add texture and freshness. For a spicy kick, add sliced jalapeños. Feel free to get creative with your choices. Check out the Full Recipe for more ideas! {{image_2}} You can easily swap chicken for tofu in teriyaki bowls. Use firm tofu for the best results. Press the tofu to remove extra water. Cut it into cubes and marinate just like the chicken. Cook it until golden brown for a tasty vegetarian option. This version is just as satisfying and packed with flavor. Feel free to mix in various vegetables. Try snap peas, carrots, or mushrooms. Each veggie adds its own taste and texture. You can use frozen or fresh produce, depending on what you have. Sauté until they are just tender for the best crunch. Experimenting keeps your bowls exciting and fun. You can create your own teriyaki sauce for a personal touch. Start with soy sauce as a base. Add honey or brown sugar for sweetness. A splash of lime juice brightens the sauce. Want a kick? Add some chili paste or sriracha. Play with flavors to find your favorite blend. Check out the Full Recipe for ideas on how to make it your own. Store any leftover teriyaki chicken rice bowls in an airtight container. This keeps the dish fresh and tasty. Make sure to separate the chicken, rice, and veggies if possible. This way, they stay crisp and flavorful longer. When ready to eat your leftovers, reheat them gently. You can use the microwave or a skillet. If using a microwave, cover the bowl to keep moisture in. Heat in short bursts, stirring in between until warm. If using a skillet, add a splash of water to help steam the rice and veggies. Leftover teriyaki chicken rice bowls stay good in the fridge for about 3-4 days. For longer storage, you can freeze them. Place the cooled dish in a freezer-safe container. It will last up to 3 months in the freezer. To enjoy, thaw overnight in the fridge and reheat as mentioned above. For the best taste, use the Full Recipe within a few days of making it. Serve Teriyaki Chicken Rice Bowls hot. Start with a bed of fluffy jasmine rice. Top it with sliced chicken and colorful veggies. Drizzle extra teriyaki sauce on top for added flavor. Garnish with sesame seeds and green onions. This adds a nice crunch and fresh taste. Enjoy it right away for the best experience. Yes, you can use different rice types. Brown rice is a healthy choice. It adds more fiber and nutrients. Sushi rice works well too, giving a sticky texture. Quinoa can be a fun swap, adding protein. Just remember to adjust the cooking times and water ratios for each rice type. To adjust the marinade, consider using low-sodium soy sauce. This helps reduce salt intake. You can replace honey with maple syrup for a vegan option. Use coconut aminos as a soy-free alternative. For gluten-free needs, choose tamari instead of soy sauce. Feel free to experiment to fit your taste! Teriyaki chicken rice bowls are tasty and easy to make. We covered key ingredients, marinating tips, and cooking steps. You learned how to make fluffy rice and tender chicken. Plus, I shared some variations for vegetarians and creative sauces. Don’t forget to store leftovers properly to keep them fresh. Enjoy experimenting with flavors and ingredients. You now have the tools to create your own delicious teriyaki bowls at home. Dive in and make this dish your own!

Teriyaki Chicken Rice Bowls Flavorful and Easy Meal

Are you ready to make a meal that’s both tasty and simple? Teriyaki Chicken Rice Bowls bring bold flavor and

- Zucchini and Tofu - 2 medium zucchinis, spiralized - 1 cup firm tofu, cubed - Sauces and Seasonings - 2 tablespoons peanut butter - 2 tablespoons soy sauce (or tamari for gluten-free) - 1 tablespoon lime juice - 1 tablespoon tamarind paste - 1 tablespoon coconut sugar (or brown sugar) - 2 cloves garlic, minced - 1 tablespoon sesame oil - Garnishes - 2 green onions, chopped - 1/4 cup bean sprouts - Crushed peanuts for garnish - Lime wedges for serving - Fresh cilantro for garnish This Zucchini Noodle Pad Thai is a fun twist on the classic dish. You get the same great taste with a lighter touch. Zucchini noodles are fresh and full of flavor. They soak up the sauce well, making each bite delicious. Tofu adds a nice protein boost and absorbs all the flavors. To start, spiralize the zucchinis into noodles. This gives you that nice, noodle-like texture. Next, cube your firm tofu. This will help it brown nicely and hold its shape while cooking. For the sauces, we mix peanut butter, soy sauce, lime juice, tamarind paste, and coconut sugar. This blend creates a sweet and tangy sauce that brings everything together. Don't forget the garnishes! Green onions and bean sprouts add a nice crunch and freshness. Crushed peanuts give a delightful crunch, while lime wedges add a tangy kick. Fresh cilantro ties it all together with its unique taste. If you want the full recipe, check it out for all the steps. Enjoy cooking and eating this healthy, tasty meal! To start, you need to prepare the tofu. Cut the firm tofu into small cubes. Heat 1 tablespoon of sesame oil in a non-stick skillet over medium heat. Once hot, add the tofu. Cook it for about 5 to 7 minutes. You want it golden brown on all sides. When done, remove the tofu from the skillet and set it aside. This step adds protein and gives a nice texture. Next, let's make the sauce. In a small bowl, combine 2 tablespoons of peanut butter, 2 tablespoons of soy sauce, 1 tablespoon of lime juice, 1 tablespoon of tamarind paste, and 1 tablespoon of coconut sugar. Whisk these ingredients together until smooth. Taste it, and adjust if needed. This sauce will bring the flavors together in your dish. Now, it's time to cook the zucchini noodles. In the same skillet, add 2 cloves of minced garlic. Sauté it for about 30 seconds until it smells great. Then, add the spiralized zucchini noodles. Cook them for 2 to 3 minutes. You want them soft but still a bit crunchy. This helps keep the nutrients intact. After the zucchini noodles are cooked, add the tofu back into the skillet. Pour the prepared sauce over everything. Toss the noodles and tofu until they are well-coated with sauce. Cook for another 1 to 2 minutes. This step ensures every bite is full of flavor. Next, stir in 2 chopped green onions and 1/4 cup of bean sprouts. Cook for one more minute. This adds a fresh crunch to your dish. It also boosts the nutrient content, making it even healthier. To serve, divide the Zucchini Noodle Pad Thai among your plates. Garnish with crushed peanuts, fresh cilantro, and lime wedges. This adds color and flavor. Enjoy your delicious meal that is both flavorful and healthy! For the full recipe, check out the details above. To get the best zucchini noodles, start by spiralizing your zucchinis. Use a spiralizer for even noodles. If you don’t have one, a vegetable peeler works too. Aim for thin, long strands to mimic traditional noodles. Once you spiralize, make sure to salt them lightly. This helps draw out excess moisture. Let them sit for about 10 minutes, then pat them dry with paper towels. This step keeps the dish from becoming watery. When cooking, sauté the noodles for just 2-3 minutes. You want them tender but still a bit crunchy. Overcooking can make them mushy. If you want to change up the flavors, there are many options. Here are a few ideas: - Add protein: Try shrimp, chicken, or tempeh for more texture. - Use different nuts: Swap crushed peanuts for cashews or almonds. - Spice it up: Add red pepper flakes or sriracha for heat. - Fresh herbs: Toss in basil or mint for a fragrant twist. The right tools make cooking easier and more fun. Here’s what I recommend: - Spiralizer: For making perfect zucchini noodles. - Non-stick skillet: Prevents sticking and makes cooking simple. - Whisk: For mixing your sauce smoothly. - Measuring spoons: To ensure you get the right amounts. These tools help you create a delicious Zucchini Noodle Pad Thai that impresses every time. For the full recipe, check out the details above. {{image_2}} You can add more protein to your Zucchini Noodle Pad Thai. Cooked chicken, shrimp, or even tempeh work well. To keep it simple, just cube the protein and cook it in the skillet. For vegan options, stick with tofu or try chickpeas. They add a nice texture and flavor. This dish can easily fit a vegan or gluten-free diet. Use tamari instead of soy sauce for a gluten-free option. For a vegan twist, swap the eggs with extra tofu or some veggies. You can also use coconut aminos for a sweet and savory touch without soy. You can change the flavors to match your taste. Want it spicy? Add red pepper flakes or sriracha to the sauce. For a sweeter taste, add more coconut sugar. If you like tang, squeeze in more lime juice. This recipe allows you to play with the flavors, making it your own. For the complete Zucchini Noodle Pad Thai recipe, check out the Full Recipe section. To keep your Zucchini Noodle Pad Thai fresh, place leftovers in an airtight container. This keeps moisture in but prevents any odors from other foods. Store it in the fridge for up to three days. Make sure the dish cools down before sealing the container. This will help avoid steam build-up, which can make the noodles soggy. Reheating Zucchini Noodle Pad Thai is easy. You can use either the microwave or the stove. If using the microwave, place the leftovers in a bowl, cover it loosely, and heat for about one to two minutes. Stir halfway through for even heating. If you prefer the stove, add a splash of water or oil in a skillet over medium heat. Heat for about three to five minutes, stirring gently. This method helps refresh the texture of the noodles. You can freeze Zucchini Noodle Pad Thai, but the texture changes when thawed. To freeze, let the dish cool completely. Then, portion it into freezer-safe bags or containers. Remove as much air as possible to prevent freezer burn. It can last for up to three months in the freezer. When you’re ready to eat, thaw it overnight in the fridge before reheating. For best results, consider cooking fresh zucchini noodles when you’re ready to serve. For the Full Recipe, check back to master this delightful dish! Zucchini noodles are low in calories and carbs. They add vitamins and minerals to your diet. Zucchini is high in fiber, which helps digestion. Using zucchini noodles instead of traditional pasta makes meals lighter. This swap also boosts your veggie intake. They are gluten-free, making them a great choice for many people. You can easily spiralize zucchini at home, which is fun and simple. Plus, they soak up flavors well, making your Zucchini Noodle Pad Thai even tastier. Yes, you can prepare Zucchini Noodle Pad Thai in advance. Cook the dish, then store it in an airtight container. Keep it in the fridge for up to three days. When you're ready to eat, just reheat it in a skillet. This method helps save time for busy days. However, the zucchini noodles may lose some crunch after reheating. To keep them fresh, consider making the sauce and tofu ahead, then add the zucchini noodles just before serving. To add heat, try using chili paste or sriracha. Mix it into the sauce for a spicy kick. You can also add red pepper flakes when cooking the zucchini. If you enjoy fresh heat, toss in sliced fresh chili peppers. Start with a little, then taste to see if you want more. Remember, you can always add spice, but it’s hard to take it away. Pad Thai pairs well with light side dishes. Try a simple cucumber salad for a refreshing crunch. A Thai-style mango salad adds sweetness and flavor. You can also serve spring rolls with a dipping sauce. These options keep the meal balanced and fun. They enhance your dining experience without overshadowing the main dish. You can find tamarind paste in many grocery stores. Look in the international aisle, especially near Asian or Indian foods. It is often near other sauces and pastes. You can also find it in health food stores. If you prefer online shopping, many websites sell tamarind paste. This ingredient adds a unique tangy flavor to your Zucchini Noodle Pad Thai. If you can't find it, consider using lime juice as a substitute, though the taste will differ. In this blog post, I covered the key ingredients for a tasty Zucchini Noodle Pad Thai. You learned how to prepare tofu, make the sauce, and cook zucchini noodles. I shared tips for achieving the right texture, along with storage and serving ideas. Consider trying variations to suit your taste, like adding proteins or enhancing flavors. Embrace the creativity in cooking this dish. Enjoy your Pad Thai adventure!

Zucchini Noodle Pad Thai Flavorful and Healthy Meal

Looking for a healthy twist on Pad Thai? You’ve found it! Zucchini Noodle Pad Thai is a delicious way to

To make creamy garlic mashed potatoes, you need a few key items. Here’s what you should gather: - 2 pounds Yukon Gold potatoes, peeled and cubed - 4 cloves garlic, peeled - 1 cup heavy cream Yukon Gold potatoes work best because they are creamy and buttery. Garlic adds a lovely flavor that makes these potatoes special. Heavy cream gives them that rich, smooth texture that you will love. You can make your mashed potatoes even better with some extras. Consider adding: - 4 tablespoons unsalted butter - 2 tablespoons sour cream - Chives, chopped, for garnish Unsalted butter enhances the creaminess. Sour cream adds a nice tang. Chives give a fresh pop of color and flavor. To finish your dish, you need a few simple seasonings: - Salt, to taste - Freshly ground black pepper, to taste These basic seasonings bring out the flavors in your creamy garlic mashed potatoes. Adjust the salt and pepper to suit your taste. If you're ready to dive into the full recipe, check out the [Full Recipe]. To start, you need to boil the potatoes and garlic. First, fill a large pot with salted water. Then, add the cubed Yukon Gold potatoes and the peeled garlic cloves. Bring the water to a boil over high heat. Cook for about 15 to 20 minutes. You want the potatoes to be fork-tender. Once they are soft, drain the potatoes and garlic well. Return them to the pot to keep them warm. Now, let’s move on to the mashing process. First, add the unsalted butter to the warm potatoes and garlic. The heat will melt the butter quickly. Next, pour in the heavy cream. Use a potato masher to mash everything together. Aim for a smooth and creamy texture. This step is key to making your mashed potatoes rich and delicious. For the final seasoning, stir in the sour cream if you want an extra tangy flavor. Then, season your mashed potatoes with salt and freshly ground black pepper. Taste and adjust the seasoning as needed. Transfer the creamy garlic mashed potatoes to a serving bowl. Top with a pat of butter and garnish with chopped chives for a lovely touch. This recipe is simple and brings a burst of flavor to any meal. For the full recipe, check out the provided link. To get the best creamy texture, use Yukon Gold potatoes. These potatoes are rich and buttery. They mash easily and give a smooth finish. Avoid starchy potatoes like Russets. They can turn your mash gluey. Warm cream and butter make a big difference too. Cold ingredients can shock the potatoes. This can make them less creamy. Heating them slightly helps blend better. Boil your potatoes and garlic together. This saves time and gives great flavor. Start with cold water and bring it to a boil. Cook until fork-tender, about 15-20 minutes. To avoid gluey mashed potatoes, don’t over-mash. Use a potato masher, not a mixer. Mixing can break down starches too much, causing gluey textures. Garlic can add lots of taste. You can use roasted garlic for a sweeter flavor. Or, try adding sautéed garlic for a bolder taste. Incorporate herbs like chives or parsley for freshness. They add color and a nice herbal touch. Mixing in herbs can take your mashed potatoes to the next level. For the full recipe, check out the previous section! {{image_2}} You can add fun twists to creamy garlic mashed potatoes. Try these: - Roasted garlic mashed potatoes: Use roasted garlic instead of raw. It gives a sweet, rich taste. Just roast whole garlic cloves until soft and mix them in while mashing. - Cheesy mashed potatoes with Parmesan: Add a half cup of grated Parmesan cheese. This gives a salty, creamy flavor. It also makes the dish even more delicious! If you have special diets, you can still enjoy this dish: - Vegan alternatives: Swap out heavy cream and butter for almond milk and vegan butter. This keeps it creamy without dairy. You can also add nutritional yeast for a cheesy taste. - Dairy-free adaptations: Use coconut milk instead of heavy cream. This adds a hint of sweetness. Make sure your butter is dairy-free as well. Think about how to serve your creamy garlic mashed potatoes: - Pairing with proteins: These mashed potatoes go well with grilled chicken, steak, or roasted veggies. They make any meal feel fancy. - Presenting as a side dish: Serve them in a nice bowl, topped with chives and a pat of butter. This adds color and looks great on any table. For more tips and a complete guide, check out the Full Recipe for heavenly creamy garlic mashed potatoes! Store your creamy garlic mashed potatoes in the fridge. Use an airtight container to keep them fresh. This step helps maintain their rich taste and smooth texture. To keep them creamy, add a little extra cream when reheating. This method restores their silky feel. You can freeze mashed potatoes for longer storage. Let them cool completely before placing them in freezer bags. Make sure to remove all air from the bags to prevent freezer burn. When you are ready to eat, thaw them overnight in the fridge. Reheat gently on the stove or in the microwave, adding cream for that creamy touch. In the fridge, creamy garlic mashed potatoes usually last about 3 to 5 days. Always check for signs of spoilage. If they smell off or have a strange texture, it's best to throw them out. Keeping your food safe is important! To make mashed potatoes creamy, you need the right ingredients and technique. Start with Yukon Gold potatoes. They have a smooth texture that makes them perfect for mashing. Use warm heavy cream and butter. This helps them mix well and stay creamy. After boiling the potatoes, drain them well. Return them to the pot while they are hot. Mash them quickly to avoid lumps. Always season with salt and pepper to taste. For extra creaminess, you can add sour cream. This gives a nice tangy flavor. Yes, you can use other types of potatoes. However, the texture and flavor will change. Russet potatoes are fluffy but can become gluey if over-mashed. Red potatoes have a waxy texture and are less creamy. They are great if you want a chunkier mash. Sweet potatoes are another option for a different flavor. They are naturally sweet and pair well with garlic. Choose Yukon Gold for the best creamy texture in mashed potatoes. Creamy garlic mashed potatoes last about 3 to 5 days in the fridge. Make sure to store them in an airtight container. This keeps them fresh and prevents drying out. If you want to keep them longer, you can freeze them. In the freezer, they last about 2 to 3 months. When ready to eat, thaw in the fridge overnight. Reheat on the stove or microwave, adding a bit of cream to restore creaminess. In this post, you learned how to make creamy garlic mashed potatoes. We covered key ingredients and step-by-step methods to achieve the perfect texture. Remember, Yukon Gold potatoes and warm cream are vital for creaminess. Don’t forget to explore fun variations and tips for storing leftovers. My final thought: mastering this dish can elevate any meal, making it a true crowd-pleaser. Enjoy your cooking journey!

Creamy Garlic Mashed Potatoes Tasty and Simple Recipe

If you’re looking to elevate your dinner table with a simple yet delicious side, creamy garlic mashed potatoes are your

- Chicken and Vegetables - 1 lb boneless, skinless chicken breasts, sliced into strips - 1 red bell pepper, sliced - 1 yellow bell pepper, sliced - 1 medium onion, sliced The chicken gives a tasty base. The peppers and onion add color and crunch. You can mix and match veggies, but these work well together. - Spices and Seasoning - 3 tablespoons olive oil - 2 teaspoons chili powder - 1 teaspoon cumin - 1 teaspoon paprika - 1 teaspoon garlic powder - 1 teaspoon onion powder - Salt and pepper to taste These spices make the dish flavorful. Each spice brings its own taste. Chili powder adds a kick, while cumin gives warmth. Don't skip the salt; it brings out all the flavors. - Tortillas and Toppings - 8 small flour or corn tortillas - Optional toppings: sour cream, guacamole, fresh cilantro, lime wedges Tortillas are key for wrapping the fajitas. You can choose flour or corn based on your taste. Toppings make each bite extra special. I love a squeeze of lime for freshness, and a bit of guacamole for creaminess. For the full recipe, check the details above. First, set your oven to 400°F (200°C) to preheat. This step is key for cooking the chicken and veggies evenly. Next, grab a large baking sheet. Line it with parchment paper. This makes cleanup easy and stops sticking. In a big bowl, combine the sliced chicken, red bell pepper, yellow bell pepper, and onion. This mix adds color and flavor. Drizzle in three tablespoons of olive oil. Then, add the spices: chili powder, cumin, paprika, garlic powder, onion powder, salt, and pepper. Toss everything well. You want the chicken and veggies fully coated in oil and spices. Spread the chicken and vegetable mix on your prepared baking sheet. Make sure it is even. Bake for 25 to 30 minutes. Stir halfway through to help everything cook. Keep an eye on the chicken. It should be fully cooked and the veggies tender. While the chicken bakes, warm the tortillas. You can use a microwave or skillet. Once warm, fill each tortilla with the chicken and vegetable mix. Add your favorite toppings from the Full Recipe. Options like sour cream, guacamole, and fresh cilantro make it special. Enjoy your flavorful meal! Importance of Seasoning Seasoning makes a big difference in your fajitas. Use a mix of spices like chili powder, cumin, and paprika. These spices bring warmth and depth to the dish. Don’t forget to add salt and pepper. They help enhance all the flavors. Marinating for Extra Flavor Marinating your chicken adds more taste. Combine olive oil and spices in a bowl, then add the chicken. Let it sit for at least 30 minutes. If you have time, marinate it overnight. This step is key for juicy and tasty chicken. Stirring During Baking Stirring the mixture halfway through baking helps cook evenly. It allows the chicken and veggies to brown nicely. This also mixes the flavors more. Set a timer for halfway, so you don’t forget! Adjusting for Different Ovens Every oven is different. Some may run hot or cool. Keep an eye on the fajitas as they cook. If they seem done early, check them with a meat thermometer. The chicken should reach 165°F (74°C). Serving Suggestions Serve your fajitas on a bright platter. Arrange the warm tortillas next to the chicken and vegetables. This makes it easy for everyone to build their own fajitas. It’s fun and interactive! Garnishing Techniques Garnishing adds color and flair. Sprinkle fresh cilantro on top of the fajitas. Add lime wedges on the side for a fresh squeeze. You can also set out bowls of toppings like sour cream and guacamole. This makes your meal look even better. For the full recipe, check out the detailed steps above. {{image_2}} You can switch proteins in this recipe. Try beef or tofu for a twist. Use 1 pound of thinly sliced beef or cubed tofu instead of chicken. Each option brings its unique flavor and texture. For vegetables, feel free to get creative. Add zucchini, mushrooms, or even corn. These veggies add color and taste to your dish. Just make sure they are sliced thinly for even cooking. To boost the flavor, consider adding spices. A pinch of cayenne pepper brings heat. You can also add oregano for an earthy touch. Don’t be afraid to mix and match spices based on your taste. Experiment with sauces too. A splash of lime juice gives freshness. You might also try a drizzle of hot sauce for extra zing. Each addition can change the flavor profile for the better. If you need gluten-free options, use corn tortillas. They taste great and hold up well with the filling. Check the packaging to ensure they are certified gluten-free. For low-carb alternatives, skip the tortillas altogether. Serve the fajitas over a bed of lettuce. This keeps the dish light but still full of flavor. Enjoy the same great taste with fewer carbs. For the full recipe, check out the main article. To keep your oven-baked chicken fajitas fresh, store them properly. First, let the fajitas cool down to room temperature. Next, place the chicken and veggies in an airtight container. You can also add the leftover tortillas in a separate container. This keeps them from getting soggy. For best results, I recommend glass or BPA-free plastic containers. They seal well and help keep flavors intact. If you plan to eat them within three days, the fridge is perfect. If longer, consider freezing them. Reheating your fajitas can be easy and tasty. The best way to reheat is using the oven. Preheat it to 350°F (175°C). Place the chicken and veggies on a baking sheet. Heat for about 10-15 minutes until warm. This method keeps them juicy. If you prefer the microwave, use it for just one minute at a time. Stir the mixture between heating. This helps it heat evenly. To avoid soggy tortillas, warm them in a dry skillet. This makes them soft and tasty again. Freezing fajitas is simple. First, let the cooked fajitas cool completely. Then, place them in a freezer-safe bag or container. Be sure to remove as much air as possible. This prevents freezer burn. When you're ready to eat, thaw your fajitas in the fridge overnight. You can also cook them straight from frozen. Just add some extra time when reheating. This makes them quick for any meal. Enjoy your delicious oven-baked chicken fajitas! For the full recipe, check out the details above. Yes, you can use frozen chicken. Thawing it properly gives the best results. Recommended Thawing Methods: - Refrigerator Thawing: Place the chicken in the fridge overnight. - Cold Water Thawing: Seal the chicken in a bag and submerge it in cold water for 1-2 hours. - Microwave Thawing: Use the defrost setting, but cook it right away after. Both flour and corn tortillas work well. It depends on your taste. Comparing Flour vs. Corn Tortillas: - Flour Tortillas: Soft, chewy, and great for holding fillings. They tend to be more flexible. - Corn Tortillas: Thinner and have a nice corn flavor. They can get crispy when heated. You can easily add some heat to your fajitas. Adding Heat with Ingredients: - Jalapeños: Chop fresh or pickled jalapeños into the mix. - Hot Sauce: Drizzle your favorite hot sauce over the finished dish. - Spicy Seasoning: Use cayenne pepper or a spicy taco seasoning for extra kick. This post covered how to make tasty fajitas. We explored essential ingredients like chicken, veggies, and spices. I shared step-by-step instructions from prepping to baking and assembling your dish. You learned tips for the best flavor, cooking techniques, and creative presentation ideas. In the end, fajitas offer great ways to customize and enjoy. Take these skills and make a meal that fits your taste and needs. Happy cooking!

Oven-Baked Chicken Fajitas Flavorful and Simple Meal

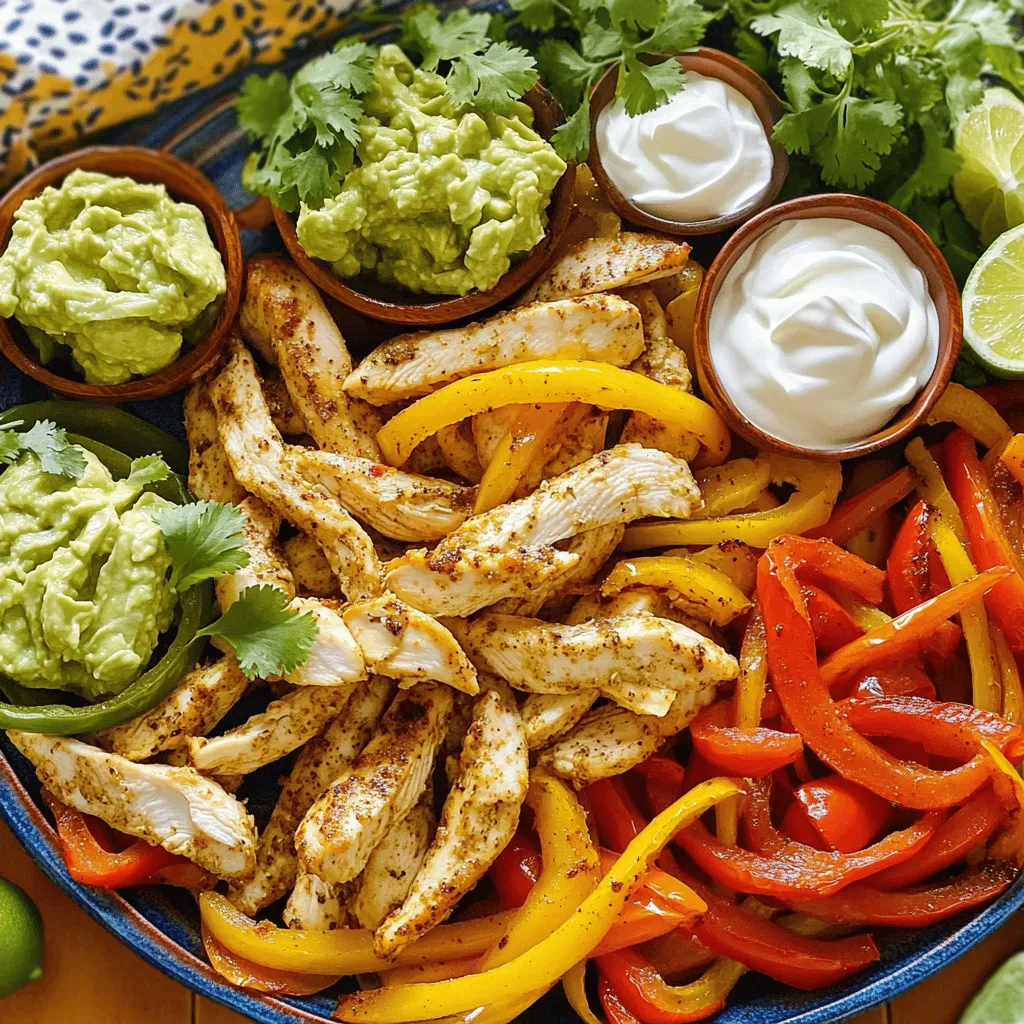
Looking for a quick, tasty meal? Oven-Baked Chicken Fajitas are your answer! This dish combines juicy chicken, vibrant veggies, and

To make Honey Balsamic Roasted Vegetables, gather these simple items: - 2 cups Brussels sprouts, halved - 1 medium sweet potato, peeled and diced - 1 red bell pepper, chopped - 1 zucchini, sliced - 1 red onion, cut into wedges - 3 tablespoons olive oil - 3 tablespoons balsamic vinegar - 2 tablespoons honey - 1 teaspoon garlic powder - Salt and pepper to taste - Fresh thyme or parsley for garnish The amounts listed fit four servings well. You can adjust them based on your needs. If you want to swap a veggie, feel free! Carrots or cauliflower work great. For a vegan-friendly option, replace honey with maple syrup. You can also use lemon juice if you prefer more tang. Fresh ingredients make a big difference in taste. Fresh veggies keep their crunch and color. Use them if you can. When you pick ripe veggies, you get the best flavor. The balsamic glaze pairs perfectly with fresh produce. This dish shines with high-quality olive oil and honey too. Trust me, fresh ingredients make every bite count! For the full recipe, check out [Full Recipe]. First, gather all your ingredients. You need Brussels sprouts, sweet potato, red bell pepper, zucchini, and red onion. Wash and chop them as needed. Halve the Brussels sprouts and dice the sweet potato. Chop the bell pepper and slice the zucchini. Cut the red onion into wedges. This gives you a colorful mix. A variety of colors means a variety of flavors. Next, grab a large bowl. Add all your chopped vegetables into this bowl. Mixing them together makes sure every bite is tasty. Now, let’s make the honey balsamic dressing. In a small bowl, whisk together olive oil, balsamic vinegar, honey, garlic powder, salt, and pepper. This dressing adds rich flavor to the veggies. Once well mixed, pour this over your vegetable bowl. Toss everything together until all the veggies are coated. After that, it’s time to roast. Line a baking sheet with parchment paper. Spread the veggies in one even layer on the sheet. This helps them roast evenly. Roast your vegetables in a preheated oven at 425°F (220°C) for 25-30 minutes. Toss them halfway through. This ensures they brown nicely. When they are tender and caramelized, take them out of the oven. Let them cool for a few minutes on the baking sheet. To get the best roast, don’t overcrowd the pan. Give each piece space. This allows hot air to flow and creates a nice caramelization. Use fresh ingredients for the best taste. Fresh veggies bring out vibrant flavors. Also, try to cut them in similar sizes. This helps them cook at the same rate. For an extra touch, garnish with fresh thyme or parsley. This adds color and a fresh flavor. Follow these steps, and you’ll have delicious Honey Balsamic Roasted Vegetables. For the complete process, check the Full Recipe. When making Honey Balsamic Roasted Vegetables, avoid these common mistakes: - Not Preheating the Oven: Always preheat your oven. This ensures even cooking. - Crowding the Pan: Give the veggies space. Crowding makes them steam instead of roast. - Skipping the Toss: Toss the veggies in the balsamic mix. This ensures even flavor. - Not Checking for Doneness: Keep an eye on them. Overcooking can lead to mushy veggies. For this recipe, use these tools: - Baking Sheet: A large, flat baking sheet is best for even roasting. - Parchment Paper: This helps prevent sticking and makes clean-up easier. - Mixing Bowl: A big bowl lets you toss the veggies easily. - Whisk: Use a whisk to mix the balsamic sauce well. To make your Honey Balsamic Roasted Vegetables even better, try these tips: - Add Spices: Experiment with cumin or paprika for a warm kick. - Fresh Herbs: Use fresh herbs like rosemary or basil to boost flavor. - Acidity Balance: Add a splash of lemon juice for a zesty finish. - Nuts and Seeds: Sprinkle toasted nuts or seeds for crunch and depth. These tips will help you create a dish that is both tasty and appealing. For the complete recipe, check the Full Recipe. {{image_2}} You can switch up the veggies to suit your taste. Carrots bring a nice sweetness. Broccoli adds great crunch and color. Cauliflower works well too, soaking up the honey balsamic flavor. Sweet potatoes are hearty and filling. Feel free to mix and match based on what you have on hand or what’s in season. Try adding herbs and spices for more depth. Rosemary or oregano pairs nicely with the balsamic. A pinch of cayenne can add a kick. If you love heat, add red pepper flakes. You might also swap honey for maple syrup for a different taste. Experimenting with flavors can make this dish unique each time. This recipe is easily vegan and gluten-free. The ingredients are already safe for both diets. Just check the balsamic vinegar to ensure it’s gluten-free. You can replace honey with agave syrup for a fully vegan option. This way, everyone can enjoy the yummy flavors of honey balsamic roasted vegetables. For the Full Recipe, check the main article. To keep your Honey Balsamic Roasted Vegetables fresh, store them in an airtight container. Make sure they cool down first. This helps keep the moisture out. Place them in the fridge if you plan to eat them within three days. If you want them to last longer, consider freezing. When you are ready to enjoy your leftovers, preheat your oven to 350°F (175°C). Spread the vegetables on a baking sheet. Heat them for about 10-15 minutes. This helps to bring back their crispness. You can also use a microwave. Heat them in a bowl for about 2-3 minutes. Stir halfway to warm evenly. If you want to freeze the vegetables, do so soon after roasting. Let them cool completely, then pack them in freezer bags. Squeeze out all the air before sealing. Label the bags with the date. They will keep well for up to three months. To use them, thaw in the fridge overnight, then reheat as mentioned above. Honey Balsamic Roasted Vegetables last about 3 to 5 days in the fridge. Store them in an airtight container. The flavors will meld together and taste even better on day two! Yes, you can make this recipe ahead of time. Prepare the vegetables and coat them in the honey-balsamic mix. Store them in the fridge for up to 24 hours. When you’re ready, just roast them as directed. It saves time and gives you more freedom on busy days. These roasted vegetables go well with many dishes. They are great with grilled chicken or fish. You can also serve them with quinoa or rice for a healthy, filling meal. They add a nice touch to a holiday feast or a family dinner. While fresh vegetables work best, you can use frozen ones. Just remember to thaw and drain them first. This helps to avoid excess moisture, which can make the dish soggy. Yes! They are packed with nutrients. The sweet potato offers fiber and vitamins. The variety of veggies adds antioxidants and minerals. Plus, using olive oil provides healthy fats. Enjoy this dish guilt-free! The vegetables are done when they are tender and golden brown. You can check by piercing them with a fork. They should have a nice caramelized look, which adds to the flavor. For the full recipe, click [here](Full Recipe). You learned how to make Honey Balsamic Roasted Vegetables using fresh ingredients. With clear steps and helpful tips, you can avoid common mistakes and create perfect dishes. Don’t forget to try different vegetables or flavor additions to suit your taste. Also, I shared ways to store and reheat leftovers, keeping your meals fresh. Enjoy experimenting and savoring this dish with friends and family! Roasted veggies can be fun and tasty for everyone.

Honey Balsamic Roasted Vegetables Flavorful and Easy

Looking to make your dinners pop with flavor? Honey Balsamic Roasted Vegetables are the answer! This simple recipe combines sweet

- 1 cup jasmine rice - 1 can (400 ml) coconut milk - 1 cup water - Zest of 1 lime - 2 tablespoons fresh lime juice - 1 tablespoon sugar (optional) - 1/2 teaspoon salt - Fresh cilantro, chopped (for garnish) - Lime wedges (for serving) To make Coconut Lime Rice, you need simple ingredients. The jasmine rice gives a nice, soft texture. The coconut milk adds a rich creaminess that pairs well with lime. You can swap jasmine rice for basmati or brown rice. These choices offer different flavors and textures. If you want to make this dish vegan, look for coconut milk made from plants. For lime juice, fresh is best, but bottled works too. Just remember that fresh lime juice has a brighter taste. These substitutions can help you customize your Coconut Lime Rice. You can enjoy this dish no matter your diet or taste. If you want to explore more, check out the Full Recipe for detailed steps and flavors. 1. Start by rinsing the jasmine rice. Place it in a fine-mesh strainer. Rinse it under cold water until the water runs clear. This takes about 2-3 minutes. Rinsing helps remove excess starch. This keeps the rice from becoming too sticky. 2. Next, combine the cooking ingredients. In a medium saucepan, add the rinsed rice. Pour in the can of coconut milk and 1 cup of water. Then, add the lime zest, salt, and sugar if you want it sweeter. Stir everything well to mix. 1. Now, it’s time to boil the mixture. Place the saucepan on the stove over medium-high heat. Bring the mixture to a boil. Keep an eye on it so it doesn’t boil over. 2. Once it boils, reduce the heat to low. Cover the saucepan tightly with a lid. Let it simmer for 15-20 minutes. This helps the rice absorb all the flavors and liquid. Check to see if the rice is tender and the liquid is gone. 1. After cooking, turn off the heat. Let the rice sit covered for an extra 5 minutes. This step steams the rice and makes it fluffy. 2. Fluff the rice with a fork. Then, mix in the fresh lime juice. Taste it and adjust the seasoning if needed. 3. Serve the warm rice on a plate. Garnish with chopped cilantro and add lime wedges on the side. This adds a fresh, zesty burst of flavor to your dish. For the full recipe, you can refer back to the details above. Enjoy your cooking! - Overcooking the rice: This can lead to mushy rice. Keep an eye on the cooking time. Use a timer to help you. - Incorrect liquid ratios: Use the right amounts of coconut milk and water. Too much liquid makes the rice soggy. - Adding spices or herbs: Try mixing in some cumin or coriander for a warm note. Fresh herbs like mint or basil can add a nice twist. - Adjusting sweetness levels: If you love sweet, add a bit more sugar. For a zesty kick, add extra lime juice. - Best pairings with Coconut Lime Rice: This rice pairs well with grilled chicken, shrimp, or fish. It also goes great with stir-fried vegetables. - Presentation tips for a beautiful dish: Serve the rice in a bowl and top with fresh cilantro. Add lime wedges on the side for a pop of color. For a fun look, use a ring mold to shape the rice. Check out the Full Recipe for all the details you need to make this tasty side dish! {{image_2}} You can make Coconut Lime Rice even more fun by adding tropical fruits. Pineapple chunks or mango pieces bring a sweet burst of flavor. Just toss in the fruit when you fluff the rice. You can also add nuts and seeds for a crunchy texture. Try toasted coconut flakes or slivered almonds. These additions make the dish fresh and exciting. If you follow a gluten-free diet, this rice works perfectly. All the ingredients are gluten-free, so enjoy without worry. For those on low-carb diets, consider using cauliflower rice instead of jasmine rice. It absorbs flavors well and gives you that coconut and lime taste without the carbs. Want to take your Coconut Lime Rice on a world tour? Try incorporating Asian flavors like ginger or garlic. A splash of soy sauce can add depth. For a Latin twist, mix in black beans or corn for a colorful, hearty dish. You can also serve it with spicy salsa for a fun fusion. This rice pairs with many cuisines, making it versatile for any meal. For the full recipe, check out the [Full Recipe] above! After you make Coconut Lime Rice, let it cool first. Once cooled, put it in an airtight container. This helps keep it fresh. Store it in the fridge for up to four days. Make sure to cover it well to avoid drying out. If you want to enjoy it later, take it out and reheat it gently. You can freeze Coconut Lime Rice for longer storage. Place the cooled rice in freezer-safe bags or containers. Try to remove as much air as you can. Label the bags with the date. The rice can last up to three months in the freezer. When you want to eat it, pull it out and let it thaw in the fridge overnight. To reheat, place it in a microwave-safe dish. Add a splash of water to keep it moist. Microwave on low heat, stirring often. You can also warm it up on the stove with a little water. This keeps the rice fluffy and tasty. For the full recipe, check out the earlier section! Coconut lime rice is a flavorful side dish made with jasmine rice, coconut milk, and lime. This dish comes from various tropical regions, where coconut and lime grow abundantly. It brings a bright and zesty flavor to any meal. The creamy coconut milk pairs perfectly with the tangy lime, making it a favorite at many tables. You can serve it with grilled seafood, spicy dishes, or fresh salads. Yes, you can make coconut lime rice ahead. It stores well and reheats nicely. To prep, cook the rice as directed in the Full Recipe. Let it cool completely before placing it in an airtight container. Store it in the fridge for up to three days. If you want to keep it longer, you can freeze it for up to a month. When ready to eat, just reheat it in a microwave or on the stove with a splash of water to bring back its moisture. To achieve a creamy texture, use full-fat coconut milk. This gives the rice a rich taste. Rinse the rice well before cooking to remove excess starch. This step prevents the rice from becoming too sticky. If you want it even creamier, add a bit more coconut milk during cooking. Once cooked, fluff it gently with a fork and mix in the lime juice. This adds brightness and helps create a silky consistency. Coconut lime rice pairs well with many dishes. Try serving it with grilled shrimp or chicken for a tasty main course. It also goes great with spicy curries or stews. For a lighter meal, serve it with a fresh salad or grilled vegetables. You can even use it as a base for a rice bowl topped with your favorite proteins and veggies. The options are endless! Coconut Lime Rice is a simple yet tasty dish. You learned about the key ingredients, cooking steps, and common mistakes. We explored fun ways to change the recipe, like adding fruits or different spices. Proper storage tips help keep your rice fresh. This dish shines as a side or main. Enjoy your cooking journey, and don't hesitate to experiment with flavors.

Coconut Lime Rice Flavorful and Easy Side Dish

Are you ready to brighten your meal with a burst of flavor? Coconut Lime Rice is a quick and tasty

When making grilled vegetable skewers, fresh ingredients make a big difference. You want a variety of colors and textures. Here’s what you need: - 1 bell pepper (red, yellow, or green), cut into chunks - 1 zucchini, sliced into thick rounds - 1 red onion, cut into wedges - 8 cherry tomatoes - 8 button mushrooms, cleaned and stemmed - 2 tablespoons olive oil - 1 teaspoon garlic powder - 1 teaspoon dried oregano - 1 teaspoon smoked paprika - Salt and pepper to taste - Fresh basil leaves for garnish (optional) With these ingredients, you can create a rainbow of flavors. The bell pepper adds sweetness, while zucchini brings a nice bite. Red onion gives a slight tang, and cherry tomatoes burst with juice. Button mushrooms soak up all the flavors and add earthiness. For the seasoning, olive oil helps everything cook nicely. Garlic powder and smoked paprika add depth. Dried oregano gives a hint of herbiness. Don’t forget to season with salt and pepper! You can also add fresh basil after grilling for a fresh touch. This list makes a great base for your skewers. For the full recipe, check the instructions to see how to combine these tasty ingredients into a beautiful dish. To prepare the vegetables, start by washing them well. Cut the bell pepper into chunks, slice the zucchini into thick rounds, and wedge the red onion. You want each piece to be big enough to stay on the skewer. Then, clean the mushrooms and leave the cherry tomatoes whole. For marinating, place all the chopped veggies in a large bowl. Drizzle with olive oil and sprinkle the garlic powder, dried oregano, smoked paprika, salt, and pepper. Toss it all together until the veggies are well coated. This step is key for flavor. Let the vegetables sit for about 15 minutes. This gives the marinade time to soak in, making them even tastier. Set your grill to medium-high heat. If you use wooden skewers, soak them in water for about 30 minutes. This helps them not burn on the grill. Cook the skewers for about 10-12 minutes on the grill. Turn them every few minutes. You want them to get tender and have nice grill marks. Watch closely to avoid overcooking. For presentation, place the skewers on a large platter. You can garnish them with fresh basil leaves for a pop of color. These skewers pair well with a simple salad or some rice. You can also serve them with dip or a sauce for added flavor. Enjoy your beautifully grilled vegetable skewers! For the complete details, check the Full Recipe. To prevent vegetables from sticking to the grill, oil the grates before cooking. Use a paper towel dipped in oil and wipe the grill. This step helps create a barrier between your veggies and the grill. You can also toss the veggies with olive oil before skewering them. To achieve the perfect char and texture, keep the grill hot. When cooking, don’t overcrowd the skewers. This allows heat to circulate and cooks the vegetables evenly. Turn the skewers every few minutes to get that nice, grilled look. For extra flavor, try different seasonings. You can use lemon juice, balsamic vinegar, or even soy sauce. Marinades with these ingredients can add depth to your skewers. Mix your favorite spices with olive oil for a great marinade. Using fresh herbs like basil or parsley can really elevate your dish. Just sprinkle them on after grilling. They add color and a burst of fresh taste. If you can’t grill, don’t worry. You can cook vegetable skewers in the oven. Preheat your oven to 400°F (200°C). Place the skewers on a baking sheet and roast for about 20 minutes. Flip them halfway through for even cooking. You can also use a stovetop grill pan. Heat the pan on medium-high, add the skewers, and cook for about 10-12 minutes. This method gives you that grilled flavor indoors. For the full recipe, check out the Rainbow Grilled Vegetable Skewers. {{image_2}} You can swap out vegetables based on what’s in season. Try asparagus in spring or butternut squash in fall. Eggplant and bell peppers work well too. Use what you love! They all add unique flavors. These skewers are easy to adapt for different diets. For vegan options, stick with veggies and use plant-based oils. They are gluten-free by nature. If you want low-carb, skip the starchy vegetables like corn and potatoes. Focus on zucchini, mushrooms, and peppers. Adding protein makes these skewers even better. You can use tofu for a vegan option. Just marinate it like the veggies! If you prefer meat, chicken or shrimp also work great. Cut them into bite-sized pieces. Thread them onto the skewers with the veggies for a balanced meal. For more details, check out the Full Recipe. To keep grilled vegetable skewers fresh, place them in an airtight container. Make sure the skewers are cool before sealing. Store them in the refrigerator. They will last about 3 to 4 days. For best taste, eat them sooner rather than later. When you’re ready to enjoy your leftovers, reheat them carefully. You can use a microwave for quick warming. Place the skewers on a plate and cover them with a damp paper towel. Heat in 30-second bursts. You can also reheat on a grill or stovetop. This keeps the flavor and texture intact. Just warm them until heated through, about 5 minutes. If you want to save skewers for later, freezing is an option. Lay the cooled skewers on a baking sheet. Make sure they are not touching each other. Freeze them for about 2 hours until solid. Then, transfer them to a freezer-safe bag. Remove as much air as possible. Frozen skewers can last up to 3 months. When ready to eat, thaw them in the fridge overnight and reheat. What vegetables are best for grilling? The best vegetables for grilling are bell peppers, zucchini, onions, cherry tomatoes, and mushrooms. These veggies hold their shape well and get a nice char. You can mix and match to create a colorful skewer. Don’t forget to choose fresh, firm vegetables for the best taste. Can I use frozen vegetables? You can use frozen vegetables, but they may not grill as well. Frozen veggies often become soft when thawed. If you use them, make sure to thaw and pat them dry before grilling. This helps to reduce excess moisture and avoids steaming. How do I know when the skewers are done? You know the skewers are done when the vegetables are tender and slightly charred. This usually takes about 10-12 minutes on medium-high heat. You can poke a fork into the veggies to check their tenderness. They should feel soft but not mushy. Can I make them ahead of time? Yes, you can make these skewers ahead of time. Just prepare the veggies and marinate them in the fridge for a few hours or overnight. When you are ready to cook, simply thread them onto the skewers. This saves time and adds flavor. For the full recipe, check the details above! This guide covered everything you need for grilled vegetable skewers. We shared key ingredients, preparation steps, and grilling techniques. I included tips to enhance flavor and suggested variations for different diets. Grilling skewers is easy and fun. You can make them as simple or fancy as you like. Enjoy cooking, and don’t forget to experiment with different flavors and vegetables. With practice, you’ll create perfect skewers every time. Happy grilling!

Grilled Vegetable Skewers Flavorful and Easy Recipe

If you love vibrant flavors and easy meals, grilled vegetable skewers are a must-try! This dish is not only simple

Older posts
Newer posts
← Previous Page1 … Page28 Page29 Page30 … Page62 Next →

dsad

© 2025 Emmas Dish • Built with GeneratePress

Our Policies

  • Copyright Policy
  • Cookie Policy
  • GDPR Policy
  • Privacy Policy
  • Disclaimer
  • Terms Of Use

More Information

  • Home
  • About
  • Contact
  • Appetizers
  • Dessert
  • Dinner
  • Drinks
©2025, Emmas Dish About Back To Top