Skip to content
DisclaimerTerms Of UseGDPR PolicyCookie Policy

Emmas Dish

  • Home
  • Drinks
  • Appetizers
  • Dinner
  • Dessert
  • About
  • Contact
  • Privacy Policy
DisclaimerTerms Of UseGDPR PolicyCookie Policy

Emma

- Pre-made pie crust (store-bought or homemade) - Fresh spinach, roughly chopped - Sliced mushrooms (cremini or button) - Finely chopped onion - 3 large eggs - 1 cup heavy cream - 1 cup shredded Swiss cheese - 1 teaspoon garlic powder - 1/2 teaspoon nutmeg - Salt and pepper to taste - 1 tablespoon olive oil When you measure your ingredients, keep these tips in mind: - Volume and weight conversions: For example, 1 cup of chopped spinach weighs about 30 grams. A cup of sliced mushrooms is roughly 70 grams. - Selecting fresh produce: Look for bright, vibrant spinach. Choose mushrooms that are firm and dry. Avoid any that feel slimy or look dark. This quiche serves six and has about 300 calories per slice. Here’s a quick breakdown of the nutrients per serving: - Fat: 22 grams - Protein: 10 grams - Carbohydrates: 15 grams Using fresh ingredients makes a big difference in taste and health. You’ll enjoy a hearty meal that satisfies without guilt. For the full recipe, check out the detailed instructions above. 1. Preheat the oven and prepare the skillet First, set your oven to 375°F (190°C). This is the perfect temperature for baking. While it heats, grab a large skillet. 2. Sautéing onions and mushrooms Pour 1 tablespoon of olive oil into the skillet over medium heat. Once hot, add the finely chopped onion. Cook it until it looks clear, about 3-4 minutes. Then, toss in 1 cup of sliced mushrooms. Stir them until they are soft and brown, taking about 5 minutes. 1. Combining the eggs and cream In a mixing bowl, crack 3 large eggs. Pour in 1 cup of heavy cream. Whisk these together until mixed well. Add a pinch of salt and pepper for flavor. 2. How to layer the quiche Spread the sautéed onion and mushroom mix evenly over the pie crust. Then, sprinkle 2 cups of roughly chopped spinach on top. Next, pour the egg and cream mix over everything. Finally, add 1 cup of shredded Swiss cheese on top for a nice finish. 1. Ideal temperature and baking time Place the quiche in your preheated oven. Bake for 30-35 minutes. 2. Signs that the quiche is done Look for a golden brown top and a set filling. You can check if it’s done by gently shaking the pan. If it jiggles a little, it needs more time. Let it cool for 10 minutes before slicing. For more detailed instructions, check the Full Recipe. To avoid a soggy bottom, use a pre-baked crust. Blind bake it for 10 minutes at 375°F before adding your filling. This step helps to firm up the crust. Remember to let the filling cool a bit before pouring it in. To ensure the filling sets properly, whisk your eggs and cream well. Mix until you see no streaks. Pour this mixture evenly over the vegetables. This helps the quiche cook evenly and hold its shape. For the best accompaniments, pair your quiche with a light salad. A simple green salad with lemon vinaigrette works best. Fresh fruit can also add a nice touch. Presentation is key! Serve slices of quiche on a colorful plate. Garnish with fresh herbs, like parsley or chives. This adds color and flavor, impressing your guests. To amplify flavor, consider adding herbs. Fresh thyme or basil can elevate the taste. You can also sprinkle in some red pepper flakes for a bit of heat. If you want cheese alternatives, try feta or goat cheese. These cheeses add a distinct taste and pair well with mushrooms and spinach. They can make your quiche unique and delicious. For the complete cooking process, check out the Full Recipe. {{image_2}} For a gluten-free quiche, you can use a gluten-free pie crust. Many stores sell these. Alternatively, you can make a crust using ground almonds or oats. Just blend the ingredients and press them into a pie dish. If you need a dairy-free option, swap heavy cream for a plant-based cream. You can also replace Swiss cheese with a vegan cheese. Nutritional yeast can add a cheesy flavor without dairy. You can get creative with your fillings. Bell peppers add a nice crunch. Zucchini brings a soft texture that blends well with spinach. Try adding different veggies based on what you love. For protein, think about crispy bacon or savory tofu. Both will add great taste and make it heartier. Bacon brings a salty kick, while tofu offers a mild flavor that soaks up other tastes. Explore different flavors to make your quiche unique. A Mediterranean twist could include olives and feta. For an Italian touch, add sun-dried tomatoes and basil. You can also play with sweet and savory options. A sweet quiche might use caramelized onions with a hint of maple syrup. Savory versions shine with herbs and spices, like thyme or rosemary. Check the Full Recipe for more tips on crafting your perfect quiche. To store leftover quiche, let it cool down first. Wrap it tightly in plastic wrap or foil. You can also place it in an airtight container. The quiche stays fresh in the fridge for up to four days. This way, you can enjoy it for breakfast, lunch, or dinner. If you want to keep your quiche longer, freezing is a great option. First, let the baked quiche cool completely. Then, wrap it tightly in plastic wrap, followed by aluminum foil. This helps prevent freezer burn. You can freeze it for up to two months. When you are ready to eat it, thaw the quiche in the fridge overnight. To reheat, bake it in a 350°F (175°C) oven for about 25 minutes. Check your quiche for signs that it has gone bad. Look for off smells, mold, or a soggy crust. If you see any of these, it’s best to throw it away. Store your quiche in glass or plastic containers with tight lids. These containers help keep it fresh and safe to eat. For best results, always label your containers with the date. Can I make this quiche ahead of time? Yes, you can make this quiche ahead of time. Prepare it up to the baking step. Cover it and store it in the fridge for up to 24 hours. When you are ready, bake it as usual. This saves time and helps flavors marry. What is the best crust for a quiche? The best crust for a quiche is a flaky pie crust. You can use a pre-made crust for ease. If you prefer, make your own for a fresh taste. A whole wheat crust adds a nice nutty flavor too. Why is my quiche too watery? A watery quiche often happens if the vegetables are not cooked enough. Make sure to sauté the mushrooms and spinach until most moisture is gone. Also, you can drain excess liquid before adding them to the crust. How to fix overcooked quiche? If your quiche is overcooked, the best fix is to add moisture. Serve it with a dollop of sour cream or yogurt. You can also pair it with a fresh salad to balance flavors. What variations can I try for a vegetarian quiche? For a vegetarian quiche, you can mix in different veggies. Try bell peppers, zucchini, or broccoli. You can also add herbs like dill or basil for a flavor boost. How can I enhance the flavor of my quiche? To enhance the flavor, add spices like cayenne or smoked paprika. Fresh herbs like thyme or rosemary work well too. A hint of cheese, like feta or goat cheese, can elevate the taste. Check the Full Recipe for more ideas. You now have all the tools to make a delicious quiche. We covered the ingredients, preparation steps, and tips to ensure success. You learned about storage methods and variations to suit your taste. Remember, only the freshest ingredients elevate your dish. Use the measurements and cooking guidance for perfect results. With practice, you can impress everyone with homemade quiche. Enjoy experimenting with flavors and share your creations. Your culinary journey is just beginning!

Savory Mushroom and Spinach Quiche Delight Recipe

Are you craving a comforting and delicious dish? Look no further! In this Savory Mushroom and Spinach Quiche Delight Recipe,

To make Apple Cinnamon Overnight Oats, you need some simple ingredients. Here's what you'll need: - 1 cup rolled oats - 1 ½ cups almond milk (or any milk of choice) - 1 medium apple, diced (preferably a sweet variety like Fuji or Honeycrisp) - 1 tablespoon chia seeds - 1 teaspoon cinnamon - 2 tablespoons maple syrup (or honey) - ¼ cup Greek yogurt (optional, for creaminess) - Nuts (like walnuts or pecans) for topping - Extra apple slices and cinnamon for garnish These ingredients come together to create a tasty and filling breakfast. You can add more flavors to make your oats even better. Here are some ideas: - A splash of vanilla extract for sweetness - A tablespoon of nut butter for creaminess - Dried fruits like raisins or cranberries for some chew - A pinch of nutmeg for extra warmth - Seeds like pumpkin or sunflower for crunch Feel free to mix and match! These add-ins help personalize your meal. If you have dietary needs, you can make some easy swaps. Here are some options: - Use gluten-free oats if you avoid gluten - Swap almond milk for coconut, soy, or oat milk - Use a plant-based yogurt instead of Greek yogurt for vegan options - Replace maple syrup with agave nectar if needed These substitutions help everyone enjoy this delicious dish! Follow the [Full Recipe] to see how to prepare it. Making apple cinnamon overnight oats is easy and fun. You need about ten minutes to prepare. You will mix everything in one bowl. Then, let it sit in the fridge overnight. This allows the oats to soak up flavors and soften. 1. Combine Ingredients: Start by taking a medium bowl. Add 1 cup of rolled oats, 1 ½ cups of almond milk, 1 tablespoon of chia seeds, and 1 teaspoon of cinnamon. Mix them well. 2. Add Sweetness and Apples: Next, add 2 tablespoons of maple syrup and 1 diced apple. If you want creaminess, stir in ¼ cup of Greek yogurt. 3. Mix Well: Stir all the ingredients together until they are fully combined. 4. Transfer to Jars: Spoon the mixture into individual jars or bowls. Leave some space at the top for the chia seeds to expand. 5. Cover and Chill: Cover the jars or bowls with a lid or plastic wrap. Place them in the fridge for at least 4 hours or overnight. 6. Stir and Serve: In the morning, take the jars out. Give the oats a good stir. If it’s too thick, add a splash of almond milk. 7. Top It Off: Finish by adding extra apple slices, a sprinkle of cinnamon, and a handful of nuts for crunch. - Right Oats: Use rolled oats for the best texture. They soak up liquid well but stay chewy. - Chia Seeds: These seeds help thicken the oats. Don’t skip them if you want a creamy mix. - Milk Adjustments: If you like your oats thicker, use less milk. For creamier oats, add more milk in the morning. Using these steps and tips, you can enjoy a tasty and healthy breakfast with apple cinnamon overnight oats. For the complete recipe, be sure to check the Full Recipe! To make great overnight oats, follow these simple tips: - Use rolled oats. They soak up liquid well and stay chewy. - Choose the right milk. Almond milk adds a nice flavor, but feel free to use any type. - Mix well. Stir all ingredients together thoroughly for even flavor. - Leave space. When you fill jars, leave room for oats to expand. - Chill overnight. Let your oats sit in the fridge for at least 4 hours. Avoid these common mistakes to ensure tasty oats: - Using instant oats. They can turn mushy and lose texture. - Skipping the sweetener. A little maple syrup or honey boosts the flavor. - Not measuring correctly. Too much or too little liquid can ruin the dish. - Forgetting to stir. If you don’t mix, the chia seeds might clump. - Ignoring toppings. Nuts, extra fruit, and spices make your oats more fun! Customize your oats to fit your taste: - Add fruits. Try berries, bananas, or even peaches for different flavors. - Try spices. Besides cinnamon, nutmeg or vanilla can add a nice twist. - Mix in nuts or seeds. Add walnuts, pecans, or pumpkin seeds for crunch. - Go dairy-free. Use coconut or oat yogurt for a creamy touch. - Experiment with sweeteners. Swap maple syrup for agave or stevia. For the full recipe, check out the complete Apple Cinnamon Overnight Oats guide! {{image_2}} You can change the taste of your Apple Cinnamon Overnight Oats by using different fruits. Here are some fun ideas: - Bananas: Use ripe bananas for a sweet, creamy texture. - Berries: Add blueberries or strawberries for a fresh and tangy kick. - Peaches: Diced peaches give a juicy and sweet flavor. - Pineapple: Chunks of pineapple add a tropical twist. Mix and match these fruits to find your favorite flavor! Adding nuts and seeds boosts the nutrition of your overnight oats. Here are some tasty swaps: - Almonds: Sliced or chopped almonds add crunch and healthy fats. - Walnuts: Chopped walnuts bring a rich and earthy taste. - Sunflower Seeds: These give a nice crunch and extra protein. - Pumpkin Seeds: Also known as pepitas, they add a fun texture and flavor. Feel free to try different combinations to suit your taste. If you want to make your Apple Cinnamon Overnight Oats dairy-free or vegan, it’s easy! Here are some tips: - Milk: Use almond milk, coconut milk, or oat milk instead of dairy milk. - Yogurt: Swap Greek yogurt for a plant-based yogurt made from nuts or soy. - Sweeteners: Use maple syrup or agave syrup instead of honey. These swaps keep your oats tasty and suitable for everyone! For the full recipe, check out the details above. After enjoying your apple cinnamon overnight oats, you may have some left. Store any leftovers in airtight jars or containers. This keeps them fresh and tasty. Make sure to seal them well to avoid any air getting in. You can keep them in the fridge for easy access. Apple cinnamon overnight oats last well in the fridge. They can stay fresh for about 3 to 5 days. If you notice any changes in smell or texture, it’s best to toss them out. Stick to this time frame to enjoy your oats at their best. You can also freeze apple cinnamon overnight oats for later use. Portion them into freezer-safe jars or bags. They freeze well for up to 3 months. When you're ready to eat, simply thaw them in the fridge overnight. This method makes meal prep easy and stress-free. For the full recipe, visit the recipe section above. Apple Cinnamon Overnight Oats last for about 3 to 5 days in the fridge. Store them in airtight containers. This keeps them fresh. You can enjoy them all week. Just check for any changes in smell or texture before eating. Yes, you can use quick oats instead of rolled oats. Quick oats cook faster and absorb liquid more quickly. This may change the texture. Your overnight oats might be creamier but less chewy. If you like a softer texture, quick oats work great. Overnight oats are packed with nutrients. They are high in fiber, which helps digestion. The oats also provide energy and keep you full longer. Adding fruits boosts vitamins and antioxidants. Chia seeds offer omega-3 fatty acids too. Overall, it's a healthy breakfast choice. Yes, you can make this recipe without dairy. Use almond milk, oat milk, or any plant-based milk. Dairy-free yogurt can replace Greek yogurt. This keeps it creamy without dairy. You can enjoy the flavors and still stick to a dairy-free diet. For the full recipe, check out the Apple Cinnamon Bliss Overnight Oats. In this article, we uncovered how to make delicious apple cinnamon overnight oats. You learned about essential ingredients, step-by-step preparation, and tips for perfect texture. We discussed variations and storage options, ensuring you can enjoy this dish long-term. Remember, customizing your oats can enhance flavors to suit your taste. With these easy steps, you can create a healthy breakfast that fits your needs. Now, enjoy your oats and experiment with new flavors!

Apple Cinnamon Overnight Oats Simple and Tasty Recipe

Are you ready to start your mornings with a delicious and healthy twist? Apple Cinnamon Overnight Oats are simple to

Churros need simple ingredients. Each one plays a key role in making them tasty. - 1 cup water - 2 tablespoons granulated sugar - 1/2 teaspoon salt - 2 tablespoons vegetable oil - 1 cup all-purpose flour - 2 large eggs - 1 cup granulated sugar (for coating) - 2 teaspoons ground cinnamon - Oil for frying These ingredients blend together to create the perfect churro. The water, sugar, and salt start the dough. The vegetable oil adds richness. The all-purpose flour gives structure. Eggs make it light and fluffy. The cinnamon-sugar coating gives that iconic flavor. You can find the full recipe above for all the steps to make these delicious treats. Each ingredient adds to the charm of churros, making them a favorite for many. 1. Boiling the mixture In a medium saucepan, start by bringing 1 cup of water, 2 tablespoons of sugar, 1/2 teaspoon of salt, and 2 tablespoons of vegetable oil to a boil over medium heat. This will create a sweet base for your churros. 2. Mixing in the flour Once the mixture boils, remove it from the heat. Now, stir in 1 cup of all-purpose flour quickly. The dough should pull away from the sides of the pan and form a ball. This step is key for the right texture. 3. Incorporating the eggs Let the dough cool for a few minutes. Then, add in 2 large eggs, one at a time. Mix well after each addition. You want the dough to be smooth and easy to pipe. This will make your churros fluffy and light. 1. Heating the oil Next, heat oil in a deep saucepan or fryer to 350°F (175°C). Use a frying thermometer for accuracy. This temperature is perfect for making churros crispy. 2. Piping the dough Fill a piping bag fitted with a star tip with your churro dough. This shape helps create the classic ridges. Pipe long strips directly into the hot oil, about 4-6 inches long. Use scissors or your fingers to cut them off. 3. Frying until golden brown Fry the churros for about 2-3 minutes on each side or until they turn golden brown. Fry in batches to avoid overcrowding. Too many churros at once can drop the oil temperature and make them soggy. 1. Rolling in cinnamon-sugar Once your churros are fried, remove them with a slotted spoon. Let them drain on paper towels to remove excess oil. While they are still warm, roll them in your cinnamon-sugar mixture. This adds a sweet crunch. 2. Dipping suggestions Serve your churros warm. They taste amazing with chocolate sauce or dulce de leche for dipping. This adds a rich flavor that pairs perfectly with the cinnamon-sugar. Enjoy your homemade treats! To get the best churro texture, focus on the dough. The dough should be thick but smooth. If it is too runny, your churros will not hold their shape. If it is too stiff, they will be dense. You want a dough that can hold a peak when piped. The frying temperature is also key. Heat your oil to 350°F (175°C). This is the perfect heat to make churros crispy outside and soft inside. If the oil is too cool, they will absorb too much oil and become greasy. If it’s too hot, they will burn on the outside before cooking through. One common mistake is overcrowding the frying pan. If you add too many churros at once, the oil temperature drops. This slows cooking and leads to soggy churros. Fry in small batches to keep the oil hot. Another mistake is using the wrong oil temperature. Always use a thermometer. If you don’t have one, test the oil by dropping in a small piece of dough. If it sizzles and rises, the oil is ready. If it sinks and doesn’t bubble, the oil is not hot enough. {{image_2}} To keep leftover churros fresh, store them at room temperature. Place them in an airtight container. This method helps maintain their crispy texture. If you want to store churros longer, refrigeration is an option. However, refrigeration can make them less crunchy. When you're ready to enjoy them again, reheating is key. Heat your oven to 350°F (175°C). Place the churros on a baking sheet for about 5-10 minutes. This warms them up and restores some crispiness. If you prefer a quicker method, use the microwave. Just be careful, as it can make them chewy. Freezing churros is a great way to save some for later. To freeze churros, let them cool completely first. Then, place them in a single layer on a baking sheet. After a few hours, once they are frozen solid, transfer them to a freezer bag. Remove as much air as possible before sealing. This helps prevent freezer burn. When you're ready to eat your frozen churros, take them out and thaw them in the fridge overnight. For reheating, you can use the oven again. Preheat it to 350°F (175°C) and bake for about 10-15 minutes. This will keep them tasty and crispy. Enjoy those delightful treats from the freezer! For the full recipe, check out the complete guide above. To make churros crispy, you can follow a few key tips. First, ensure your oil is hot enough. The ideal frying temperature is 350°F (175°C). If the oil is too cool, the churros will absorb more oil and become soggy. Second, fry the churros in small batches. Overcrowding the pan lowers the oil temperature, leading to less crispy churros. Lastly, let the churros drain on paper towels after frying. This helps remove excess oil and keeps them crunchy. Yes, you can use different oils for frying churros. While vegetable oil is common, you can also use canola oil or peanut oil. These oils have high smoke points, which makes them great for frying. If you want a unique flavor, try using coconut oil. However, avoid oils with strong flavors, as they can change the taste of your churros. Freshly fried churros taste best when eaten right away. If you have leftovers, store them at room temperature for up to two days. Place them in an airtight container to keep them fresh. If you want to keep them longer, you can freeze churros. Just make sure they cool completely before freezing. They can last up to three months in the freezer. Churros have a rich history that dates back to Spain. They were likely inspired by a similar pastry made by Chinese immigrants in Spain. Churros became popular for breakfast or as a snack, often served with hot chocolate. Today, churros are enjoyed worldwide, with many variations and flavors. Their cultural significance continues to grow, making them a beloved treat in many countries. Churros are easy to make at home, and fun to eat. You start with simple ingredients like water, sugar, and eggs. Follow the steps for making the dough and frying until golden. With some tips, you can achieve that perfect texture. Don’t forget to try different flavors and dips! Whether you store them or enjoy right away, churros bring joy to any meal. Now, go ahead and share this treat with family or friends. You’ll love every crispy bite.

Cinnamon Sugar Churros Easy Recipe for Delicious Treats

If you’ve ever craved a warm, sugary treat, then homemade Cinnamon Sugar Churros are your answer! In this easy recipe,

- 1 lb Brussels sprouts, trimmed and halved - 3 tablespoons balsamic vinegar - 2 tablespoons honey or maple syrup - 3 tablespoons olive oil - 4 cloves garlic, minced - Salt and pepper to taste - 1/4 cup grated Parmesan cheese - 1/4 cup toasted walnuts, chopped - Fresh parsley, chopped for garnish Brussels sprouts are tasty and healthy. They pack a lot of nutrients. This dish is quick and simple. You need just a few main ingredients. The balsamic vinegar adds a sweet tang. Honey or maple syrup enhances the flavor even more. Olive oil helps with roasting and gives a nice finish. The garlic adds depth to the dish. You can adjust the salt and pepper to your taste. If you like cheese, sprinkle on some grated Parmesan for creaminess. Toasted walnuts add crunch and flavor. Fresh parsley brightens the dish. I love how these ingredients come together. You can find the full recipe above and create your own version. Enjoy making this healthy side dish! - Preheat your oven to 400°F (200°C). - In a large mixing bowl, combine the Brussels sprouts, minced garlic, balsamic vinegar, honey or maple syrup, and olive oil. This combination gives the sprouts a sweet and tangy flavor. Make sure to mix well. Each sprout should get a nice coat of the glaze. - Spread the Brussels sprouts on a baking sheet lined with parchment paper. - Roast in the preheated oven for 20-25 minutes. Shake the pan halfway to ensure even cooking. The outer layers will caramelize, making them crispy. The insides will become soft and tender, creating a great texture. - Remove the baking sheet from the oven. If you chose to use it, sprinkle Parmesan cheese over the warm sprouts. - Drizzle any remaining balsamic glaze from the pan over the Brussels sprouts before serving. This adds a rich flavor. Finally, transfer the sprouts to a serving dish and garnish with chopped walnuts and fresh parsley. The nuts add crunch, while parsley offers a fresh note. For the complete recipe, refer to Balsamic Bliss Brussels Sprouts. To get the best flavor and texture, coat your Brussels sprouts evenly. Mix them well in the bowl with balsamic vinegar and olive oil. This step helps the sprouts absorb all the tasty flavors. When you place them on the baking sheet, space them out. If they are too close, they will steam instead of roast. Good spacing allows them to caramelize and get crispy. You can easily change the taste of your dish. Try using different types of vinegar, like red wine or apple cider vinegar. Each one brings a unique flavor. You can also switch up the sweeteners. Honey gives a nice touch, but maple syrup works well too. Feel free to mix and match to find your favorite taste. The size of your Brussels sprouts matters. Smaller ones will roast faster, while larger ones may need extra time. Check them after 20 minutes. If they are not tender yet, give them a few more minutes. Shake the pan halfway through cooking for even roasting. This helps all sides get that perfect golden brown color. {{image_2}} You can make your balsamic glazed Brussels sprouts even better. Adding bacon or pancetta gives a savory twist. The saltiness from the meat enhances the sprouts' natural flavors. Just cook the bacon until crispy, then mix it in with the Brussels sprouts before roasting. This mix creates a delicious harmony of tastes. If you want a vegan version, it’s easy. Simply swap honey for maple syrup. This keeps the sweetness while being plant-based. Also, skip the Parmesan cheese. You can still enjoy the rich flavors of the balsamic glaze without any dairy. It’s a tasty option for everyone. How you serve these sprouts matters too. They taste great warm as a side dish. You can also serve them cold in a salad. This adds a crunchy texture and a fresh taste. Pair them with nuts or other veggies to create a colorful salad. Balsamic glazed Brussels sprouts truly shine in any dish! Check out the Full Recipe for more ideas. You can store leftover balsamic glazed Brussels sprouts in an airtight container. They will stay fresh for up to 3 days in the fridge. Make sure the container seals well to keep moisture out. For the best texture, reheat the Brussels sprouts in the oven. Preheat your oven to 350°F (175°C). Spread the sprouts on a baking sheet and heat for about 10-15 minutes. This helps them regain their crispiness. If you want to save some for later, you can freeze cooked Brussels sprouts. Place them in a freezer-safe bag or container. They will last for several months. When ready to eat, thaw them in the fridge overnight before reheating. This keeps them tasting fresh! For the full experience of this dish, check out the Full Recipe. Yes, you can use frozen Brussels sprouts. They are convenient and save time. However, frozen sprouts often have a softer texture when cooked. Fresh Brussels sprouts give you a firmer bite and better flavor. If you choose frozen, roast them at a lower temperature. This helps reduce excess moisture. Balsamic glazed Brussels sprouts pair well with many foods. Try serving them with grilled chicken or salmon for protein. They also go great with quinoa or brown rice. These grains add texture and make a complete meal. For a cozy dinner, enjoy them with mashed potatoes. To make this recipe vegan, swap honey for maple syrup. This keeps the sweetness and is plant-based. Omit the Parmesan cheese or use a vegan cheese alternative. You can also add nuts for extra protein and crunch. Enjoy the same delicious taste while sticking to your diet! This post covered a tasty Brussels sprouts recipe with balsamic glaze. You learned about key ingredients, steps for cooking, and smart tips for great results. Remember, you can customize this dish with add-ins like bacon or cheese, and even make it vegan. Store any leftovers well for later enjoyment. This dish works perfectly as a warm side or chilled in a salad. Try it out and enjoy the flavors!

Balsamic Glazed Brussels Sprouts Healthy Side Dish

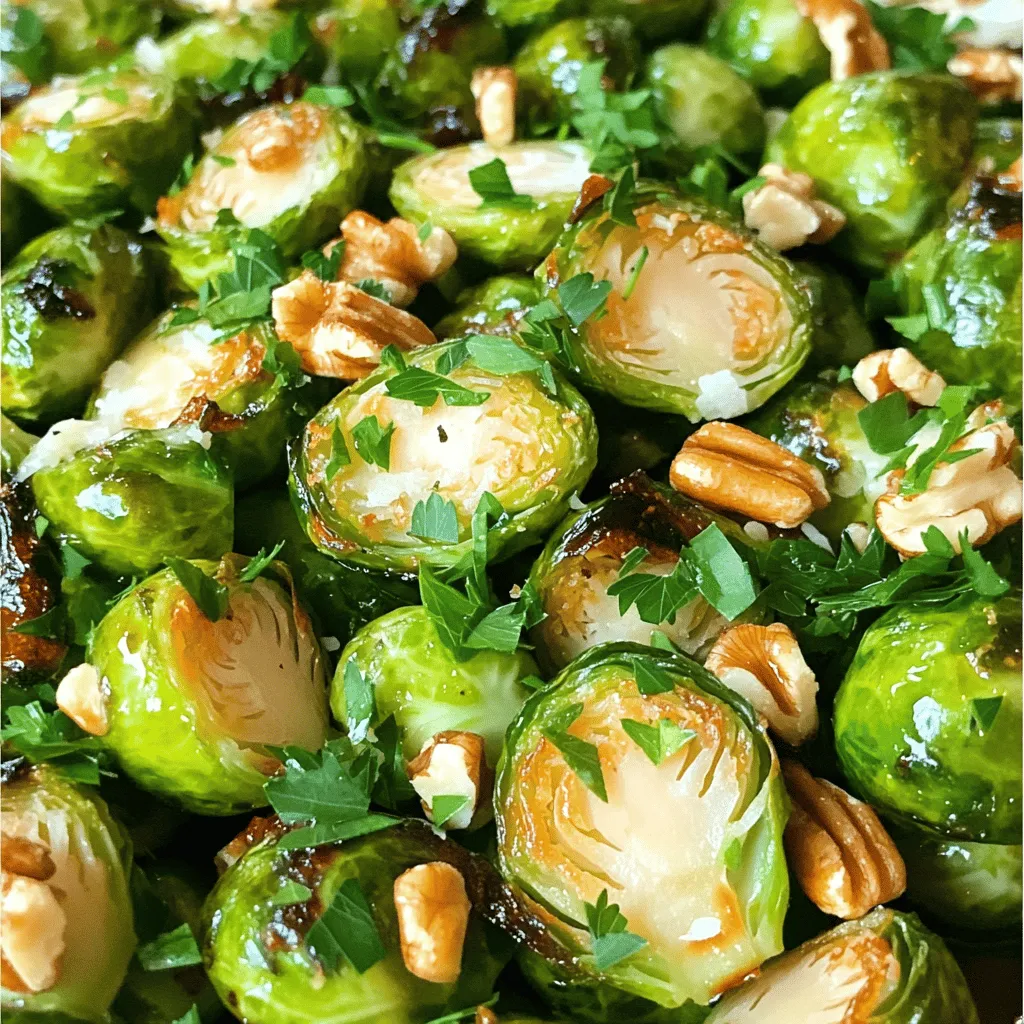
If you’re looking for a tasty, healthy side dish, look no further! Balsamic Glazed Brussels Sprouts are both simple to

- 2 cups cooked shredded chicken - 1 cup cream cheese, softened - 1/2 cup sour cream - 1/2 cup blue cheese dressing - 1/2 cup buffalo hot sauce - 1 cup shredded cheddar cheese - 1/4 cup chopped green onions - Tortilla chips or celery sticks The heart of buffalo chicken dip is its creamy base. I love starting with cooked shredded chicken. It gives the dip a hearty feel. The cream cheese adds a rich texture. Sour cream brings tanginess, while blue cheese dressing adds a nice kick. Buffalo hot sauce is a must; it gives the dip its famous heat. I always choose shredded cheddar cheese for a melty finish. Chopped green onions make a colorful garnish and add freshness. Finally, I serve this dip with crispy tortilla chips or crunchy celery sticks for dipping. - Additional spices (garlic powder, onion powder, etc.) - Diced jalapeños for extra heat - Substituting cheeses for different flavors For extra flavor, I sometimes add spices like garlic or onion powder. If you enjoy heat, diced jalapeños work great. You can also swap out cheeses to match your taste. For example, try pepper jack for a spicy twist or mozzarella for a milder flavor. These add-ins make the dip even more special and unique. They let you customize the dip to your liking. Check out the Full Recipe for more tips! - Preheat oven to 350°F (175°C). - Prepare a baking dish by lightly greasing it. - In a large bowl, combine the cream cheese, sour cream, and blue cheese dressing. - Mix until it is smooth and creamy. - Next, stir in the shredded chicken and buffalo hot sauce. - Add in half of the cheddar cheese and mix well. - Transfer the mixture into the baking dish. - Spread it evenly and top with the rest of the cheddar cheese. - Bake for 20-25 minutes until it is bubbly and golden. - Once done, let it cool slightly. Garnish with chopped green onions. This buffalo chicken dip is a true crowd-pleaser, perfect for any party. For more details, check the Full Recipe. To make the best buffalo chicken dip, start with softened cream cheese. This helps it mix well with other ingredients. If the cream cheese is cold, it clumps up and is hard to blend. Always taste as you mix. Adjust the spice level to fit your taste. If you like it hot, add more buffalo sauce. If you prefer mild, use less. You want a flavor that makes you happy! For dipping, tortilla chips are a classic choice. They add crunch and flavor. Celery sticks are also great. They give a fresh taste and nice crunch. You can even use carrot sticks or pita chips. Pair your dip with drinks like beer or soda for a fun party feel. A cold drink balances the heat of the dip. You can make the dip ahead of time. Prepare it and store it in the fridge. Just cover it well to keep it fresh. When you're ready to serve, bake it as usual. This saves time and stress before your party. You can enjoy more time with your guests and less time in the kitchen. {{image_2}} You can make buffalo chicken dip healthier with a few easy swaps. Using Greek yogurt instead of sour cream adds protein and cuts fat. Greek yogurt gives a nice creamy texture too. You can also try low-fat cream cheese. This swap keeps the dip rich while lowering calories. Making buffalo chicken dip in a slow cooker is easy. Start by mixing the cream cheese, sour cream, and blue cheese dressing in a bowl. Then, add the shredded chicken and buffalo hot sauce. Stir until smooth. Pour this mixture into the slow cooker. Cook on low for 2 hours or on high for 1 hour. Stir in the cheddar cheese just before serving. This method keeps the dip warm and gooey. You can change the flavor of your buffalo chicken dip in fun ways. For a spicy twist, add extra buffalo sauce or diced jalapeños. This gives a nice heat kick. Another option is to make a creamy ranch buffalo chicken dip. Just mix ranch dressing with the other ingredients. This adds a fresh taste that many love. To store buffalo chicken dip, let it cool to room temp. Then, place it in an airtight container. This keeps the dip fresh and tasty. You can refrigerate it for up to four days. When ready to eat, check for any changes in smell or texture before warming it up. If you want to keep buffalo chicken dip longer, you can freeze it. First, place the dip in a freezer-safe container. Seal it tightly to avoid air leaks. You can freeze it for up to three months. When it's time to enjoy, let it thaw overnight in the fridge. To reheat, bake it in the oven at 350°F (175°C) until hot and bubbly. Stir it occasionally for even heating. Enjoy this tasty dip as a fun snack or at your next party. For the full recipe, check the details above! You can prepare buffalo chicken dip a day before your event. First, follow the Full Recipe until the baking step. After mixing all the ingredients, transfer the dip to a baking dish. Cover it tightly with plastic wrap or foil. Store it in the fridge until you're ready to bake. When you want to serve it, just remove the wrap and bake at 350°F for 20-25 minutes. This saves time and lets the flavors blend. Yes, rotisserie chicken works great! Using pre-cooked chicken saves time. It adds flavor and keeps the dip moist. Simply shred the chicken and mix it with the other ingredients. This method is quick and easy, making your buffalo chicken dip a breeze to prepare. Buffalo chicken dip pairs well with many dippers. Tortilla chips are crunchy and delicious. Celery sticks add a fresh, crisp bite. You can also try carrot sticks or pita chips. These options add variety and make your party spread more fun. This blog post covered how to make buffalo chicken dip step-by-step. You learned about the main ingredients, options for variation, and tips for serving and storing. The joy of making this dip lies in its flexibility. Feel free to experiment with spices or cheese to make it your own. With the right preparation and care, you can enjoy a delicious dip for any gathering. Now, you’re ready to try out this tasty recipe and impress your friends! Enjoy your cooking adventure.

Buffalo Chicken Dip Irresistible Party Favorite Recipe

If you’re searching for an easy crowd-pleaser, look no further than buffalo chicken dip! This creamy, zesty dish combines juicy

This Mediterranean Chickpea Salad is fresh and easy to make. Here’s what you need: - 1 can (15 oz) chickpeas, drained and rinsed - 1 cup cherry tomatoes, halved - 1 cucumber, diced - 1/2 red onion, finely chopped - 1/3 cup Kalamata olives, pitted and sliced - 1/4 cup feta cheese, crumbled - 2 tablespoons fresh parsley, chopped - 2 tablespoons olive oil - 2 tablespoons lemon juice - 1 teaspoon dried oregano - Salt and pepper to taste Each serving of this salad is packed with nutrients. Here’s a quick look: - Calories: 250 - Protein: 8g - Carbohydrates: 30g - Fiber: 7g - Fat: 12g - Sodium: 400mg This salad provides a good balance of protein, healthy fats, and fiber. It's great for a light meal or a side dish. If you want to change things up, here are some substitutions: - Use canned white beans instead of chickpeas for a different taste. - Swap feta cheese with goat cheese for a creamier texture. - Replace Kalamata olives with green olives for a milder flavor. - Add bell peppers or radishes for extra crunch. Feel free to mix and match based on what you like or have on hand. Enjoy the process of making this salad your own! For the complete recipe, check out the Full Recipe. Making Mediterranean chickpea salad is fun and quick. You’ll need about 15 minutes to prep. Gather all your ingredients first. This will make your work easier. The salad tastes better if you let it chill for a while. 1. In a large mixing bowl, combine: - 1 can (15 oz) chickpeas, drained and rinsed - 1 cup cherry tomatoes, halved - 1 cucumber, diced - 1/2 red onion, finely chopped - 1/3 cup Kalamata olives, pitted and sliced 2. Next, add: - 1/4 cup feta cheese, crumbled - 2 tablespoons fresh parsley, chopped 3. In a small bowl, whisk together: - 2 tablespoons olive oil - 2 tablespoons lemon juice - 1 teaspoon dried oregano - Salt and pepper to taste 4. Pour this dressing over the chickpea mix. Toss gently to coat everything. 5. Taste your salad. Adjust salt, pepper, or lemon juice if needed. 6. Refrigerate the salad for at least 30 minutes. This lets the flavors mix well. 7. Serve chilled or at room temperature. You can garnish with extra feta and parsley if you like. This salad is great on its own. You can also pair it with grilled chicken or fish. It works well as a side dish too. For extra crunch, add some nuts or seeds. Enjoy this fresh and colorful meal with friends and family! For more details, check the Full Recipe. To make the best Mediterranean chickpea salad, use fresh ingredients. Fresh herbs like parsley add a burst of flavor. Rinse the chickpeas well to remove extra sodium. For a better taste, let the salad chill for at least 30 minutes. This helps the flavors blend nicely. Taste the salad before serving. Adjust salt and lemon juice to your liking. Serve this salad as a light lunch or side dish. It pairs well with grilled chicken or fish. You can also enjoy it with pita bread or on a bed of greens. For a fun twist, use it as a filling for wraps. Add extra feta or olives on top for a special touch. One common mistake is using canned chickpeas without rinsing them. This can make the salad too salty. Another mistake is not letting the salad sit. If you serve it right away, the flavors won’t be as strong. Also, avoid over-mixing. Gently toss the salad so the feta stays intact. Finally, don’t skip the lemon juice. It brightens the whole dish. For the full recipe, check out the detailed steps. {{image_2}} You can easily change this salad to fit your taste. Try black beans instead of chickpeas. You can also use sun-dried tomatoes instead of fresh ones. If you prefer a different cheese, go for goat cheese or omit cheese entirely for a vegan option. Fresh herbs like dill or mint can add a fresh twist. Swap out Kalamata olives for green olives if you like a milder flavor. These changes keep the salad fun and fresh! This salad shines in any season. In summer, use ripe tomatoes and sweet corn for a juicy bite. In fall, add roasted butternut squash for warmth and depth. In winter, toss in some shredded Brussels sprouts for crunch. Each season brings its own flavors, so feel free to mix what you have on hand. The Mediterranean Chickpea Salad can adapt to any time of year! You can turn this salad into a full meal. Serve it over quinoa or couscous for added texture. If you want protein, grilled chicken or shrimp works great. For a vegetarian option, add roasted chickpeas or tofu. These additions make the dish heartier while keeping it delicious. No matter how you serve it, the flavors stay bright and vibrant! Store leftover Mediterranean chickpea salad in an airtight container. Keep it in the fridge. It stays fresh for up to three days. If you want to keep it longer, consider freezing. To freeze, place the salad in a freezer-safe container. Leave some space at the top. This space allows for expansion. The salad can stay frozen for up to a month. When ready to eat, thaw it overnight in the fridge. You can enjoy this salad cold, so reheating is not necessary. If you prefer warmth, gently heat it in a pan on low. Stir often to avoid burning. Add a splash of olive oil if it seems dry. Mediterranean Chickpea Salad is a fresh and colorful dish. It combines chickpeas, tomatoes, cucumbers, and olives. This salad is full of vibrant flavors and textures. You can enjoy it as a side or a main meal. The dressing includes olive oil and lemon juice, which adds brightness. It's easy to make and perfect for warm days. You can find the full recipe at the end of this section. To make this salad vegan, simply leave out the feta cheese. You can replace it with avocado or a vegan cheese alternative. This keeps the salad creamy and rich without dairy. Also, check the olive oil and other ingredients for vegan compliance. This way, you can enjoy the same great taste while following a vegan diet. Yes, you can add many other vegetables to the salad. Bell peppers, carrots, or radishes work great. You can also include leafy greens like spinach or arugula. Try adding roasted vegetables for a warm twist. The key is to keep the flavors balanced and fresh. Feel free to experiment with your favorites! This blog post covers all you need to know about making Mediterranean Chickpea Salad. We discussed ingredients, nutritional info, and substitutions. You learned step-by-step cooking instructions and tips for perfecting the dish. We explored variations to suit your taste and gave storage tips for leftovers. Remember, this salad is versatile and healthy. Feel free to get creative with your ingredients. Enjoy making this colorful and tasty meal!

Mediterranean Chickpea Salad Fresh and Flavorful Dish

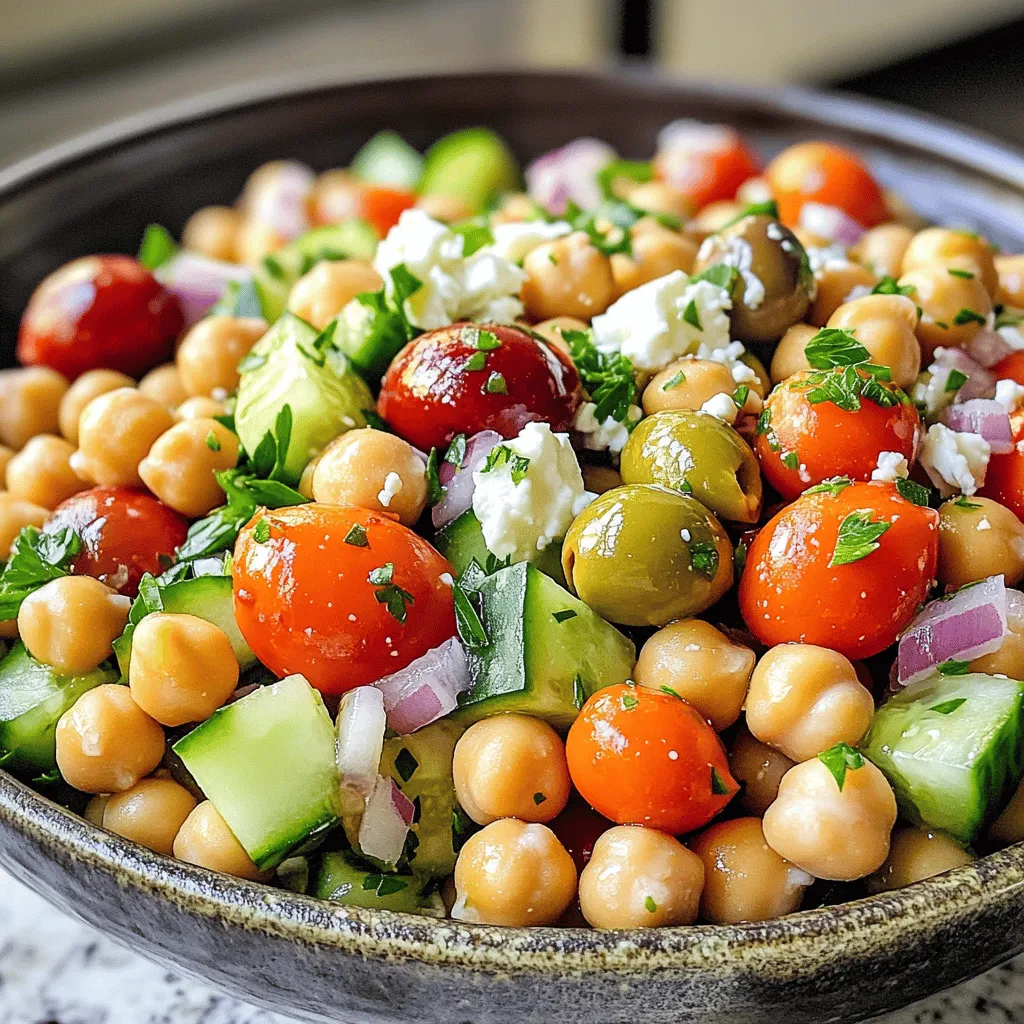
Looking for a fresh and vibrant dish? Mediterranean Chickpea Salad is your answer! Packed with hearty chickpeas and bright veggies,

To make this tasty dish, you need the following ingredients: - 4 medium zucchinis - 1 ripe avocado - 1 cup fresh basil leaves - 2 tablespoons lemon juice - 1/4 cup walnuts (or pine nuts) - 2 cloves garlic - 1/4 teaspoon salt - 1/4 teaspoon black pepper - 1/4 teaspoon red pepper flakes (optional) - 1 tablespoon olive oil - Cherry tomatoes (for garnish) - Grated Parmesan cheese (optional for garnish) Gather these items to create a simple yet flavorful meal. Each ingredient plays a key role in making the dish fresh and enjoyable. The zucchinis serve as a healthy base, while the avocado adds creaminess. Fresh basil brings aroma, and lemon juice gives a zing. The nuts add crunch, and garlic offers depth. You can adjust the spices to fit your taste. This recipe is flexible and perfect for any occasion. If you want to see the full process, check out the Full Recipe. To start, grab a spiralizer or a julienne peeler. Cut off the ends of the zucchinis first. Then, turn the zucchini into noodles using your tool of choice. This method gives you long, thin strands that mimic pasta. After you spiralize, place the noodles in a colander. Let them sit for a bit to drain excess moisture. This step helps keep your dish from becoming watery. Next, we’ll make the creamy avocado pesto. In a food processor, add the ripe avocado, fresh basil leaves, lemon juice, walnuts, garlic, salt, black pepper, and red pepper flakes if you want some heat. Pulse these ingredients together until they are finely chopped. As you blend, slowly drizzle in the olive oil. This helps achieve a smooth and creamy texture. The avocado gives a rich taste, while the basil adds freshness. Now it’s time to cook the zucchini noodles. Heat a large skillet over medium heat. Add the noodles and sauté them for about 2-3 minutes. You want them to be tender but still have a slight crunch. Be careful not to overcook them. Overcooking will lead to soggy noodles that don’t hold their shape. Once the noodles are ready, remove the skillet from heat. Add the creamy avocado pesto to the cooked zucchini noodles. Use a gentle tossing method to coat the noodles evenly with the pesto. Make sure every strand gets a nice layer of that flavorful sauce. For presentation, serve the noodles in bowls and top them with halved cherry tomatoes and a sprinkle of grated Parmesan cheese if you like. This adds a lovely touch to your dish. For the full recipe, check out the instructions above. To keep your zucchini noodles firm, avoid soggy noodles. After spiralizing, let them sit in a colander. This step drains excess moisture. You can also sprinkle salt on them to draw out water. For cooking, aim for a short time. Sauté the noodles for only 2 to 3 minutes. This way, they stay slightly crunchy and full of flavor. To boost flavor, think about adding spices. A pinch of oregano or thyme can work wonders. You might also enjoy a squeeze of lemon juice for brightness. When it comes to protein, grilled chicken or shrimp pairs well with this dish. For a veggie option, try chickpeas or tofu. They add depth and make the meal heartier. To make zucchini noodles, use a spiralizer. This tool creates long, thin strands. A julienne peeler also works well, though it takes more time. For the avocado pesto, a good food processor is key. Look for one with a strong motor. This feature helps blend the ingredients smoothly. You want a creamy texture without lumps. Explore the [Full Recipe](#) for more details on how to make this dish. {{image_2}} You can change the flavor of your pesto. Try a sun-dried tomato pesto. Blend sun-dried tomatoes, garlic, and nuts. This gives a rich taste and a pop of color. Another fun twist is using peanut butter or almond butter. Mix these with basil and garlic for a nutty flavor. It’s great for a unique twist on the classic. Want to make your meal heartier? Add grilled chicken or shrimp. Just cook them on a grill or pan. Slice and mix them with your zucchini noodles. If you prefer vegetarian options, chickpeas work well too. They add protein and a nice texture to the dish. Zucchini noodles are great for fresh, seasonal veggies. In summer, add cherry tomatoes, bell peppers, or arugula. They bring brightness and crunch. In autumn, consider roasted butternut squash or kale. These add warmth and depth to your meal. Enjoy experimenting with seasonal flavors! To keep your zucchini noodles fresh, store them in the fridge. Place them in a sealed container. This helps prevent moisture loss. Keep them for up to three days. Avoid stacking them too high to prevent squishing. For the avocado pesto, use a small jar with a lid. Make sure to press plastic wrap against the surface. This helps reduce air exposure, which can cause browning. The pesto will stay fresh for about two days. When reheating, gently warm the zucchini noodles. Use a skillet over low heat. This method helps them stay firm. Avoid the microwave as it can make them mushy. For the avocado pesto, add a bit of water when reheating. This will help keep it creamy. Stir well to combine. Both ingredients can handle gentle reheating without losing their taste. Can you freeze zucchini noodles? Yes, you can! However, they may lose some texture. To freeze, spread them on a tray first. Once frozen, transfer them to a bag. They can last up to three months in the freezer. For the avocado pesto, freezing is also possible. Pour it into ice cube trays. Once frozen, pop them out and store in a bag. This way, you can use small portions later. It’s perfect for quick meals! You can make zucchini noodles without a spiralizer! Use a knife to cut the zucchini into thin strips. Another method is to use a box grater. Grate the zucchini lengthwise. You can also use a vegetable peeler to create wide, flat noodles. Each method gives a unique shape and texture. Yes, you can use store-bought pesto. It saves time and offers great taste. However, homemade pesto can taste fresher and brighter. Store-bought options may have preservatives. Check the label for quality and ingredients. Choose a brand with fresh ingredients for the best flavor. Yes, this recipe is low-carb. Zucchini is low in carbs and calories. It is a great substitute for traditional pasta. If you're on a low-carb diet, this dish fits well. The avocado in the pesto adds healthy fats without many carbs. You can serve zucchini noodles with many things. Grilled chicken or shrimp adds protein. Roasted vegetables add color and flavor. A simple side salad pairs well too. You can also serve garlic bread for a nice crunch. Zucchini noodles last about 2 to 3 days in the fridge. Store them in an airtight container to keep them fresh. If you notice excess moisture, use a paper towel to absorb it. For the best taste, eat them within the first day after cooking. This recipe for zucchini noodles with avocado pesto is both simple and tasty. You learned how to prepare fresh ingredients, create a creamy pesto, and cook zucchini noodles for the best texture. I shared tips to enhance flavor and offered variations to keep meals exciting. Remember, you can store leftovers efficiently and even freeze them. This dish is perfect for a light meal, full of nutrients. Enjoy making it and feel great about your simple, healthy choices. Happy cooking!

Zucchini Noodles with Pesto Flavorful and Simple Meal

Looking for a quick, tasty meal? Zucchini noodles with pesto are a game-changer! This dish is colorful, fresh, and incredibly

- 2 cups rolled oats - 1 cup pecans, roughly chopped - 1/2 cup almond butter (or nut butter of choice) - 1/2 cup pure maple syrup - 1/4 cup honey or agave syrup - 1/2 teaspoon vanilla extract - 1/2 teaspoon cinnamon - 1/4 teaspoon salt - 1/2 cup dried cranberries (or other dried fruits) - 1/2 cup dark chocolate chips (optional) Gathering the right ingredients makes a big difference. I love using rolled oats for the base. They add a hearty texture and lots of fiber. Pecans bring a nice crunch and rich flavor. Almond butter is my go-to for binding. It gives a smooth, nutty taste. Maple syrup adds sweetness and a touch of warmth. I also use honey or agave syrup. This choice depends on my mood and dietary needs. Vanilla extract adds a lovely aroma, while cinnamon gives a warm spice. Salt balances the sweetness. Dried cranberries or other fruits add chewiness and color. If I want a sweet twist, I sometimes toss in dark chocolate chips. They melt slightly, making the bars extra tasty. These ingredients come together to create a healthy snack. You can enjoy them any time of day. For the full recipe, check out my detailed guide. First, preheat your oven to 350°F (175°C). This step gets the oven ready for baking. Next, line an 8-inch square baking dish with parchment paper. Leave some paper hanging over the edges. This makes it easy to lift the bars out later. In a large mixing bowl, combine 2 cups of rolled oats and 1 cup of chopped pecans. Stir them together well. This mix gives the bars a nice crunch and flavor. In a separate microwave-safe bowl, add 1/2 cup of almond butter, 1/2 cup of pure maple syrup, 1/4 cup of honey (or agave syrup), 1/2 teaspoon of vanilla extract, 1/2 teaspoon of cinnamon, and 1/4 teaspoon of salt. Microwave this mixture for about 30-45 seconds. This makes it warm and easy to mix. Stir until smooth. Pour the warm mixture over the oats and pecans. Mix everything well. Make sure the dry ingredients are evenly coated. If you want, fold in 1/2 cup of dried cranberries and 1/2 cup of dark chocolate chips. These add sweetness and extra flavor. Transfer the mixture into your prepared baking dish. Press it down firmly and evenly using a spatula or your hands. Bake in the preheated oven for 20-25 minutes. Watch for the edges to turn golden brown. This shows they are done. Let the granola bars cool in the pan for at least 10 minutes. After that, use the parchment paper to lift them out. Allow them to cool completely on a wire rack. Once cooled, cut into bars of your desired size. You can store them in an airtight container. For the full recipe, check above. To get the best texture, you must press the mixture firmly. Use your hands or a spatula to make it compact. This helps the bars stick together. If they are loose, they may crumble. Balancing sweetness and health is key. Use pure maple syrup for flavor, but don’t overdo it. Add just enough to keep it sweet without adding too much sugar. You want these granola bars to be yummy and nutritious. You can add fun mix-ins to your bars. Try adding sunflower seeds, chia seeds, or even coconut flakes. These can boost nutrition and flavor. If you have dietary needs, feel free to swap ingredients. Use sunflower butter instead of almond butter for nut-free options. You can also use agave syrup in place of honey for a vegan choice. These bars are perfect for snacks or breakfast. Pair them with yogurt or fresh fruit for a tasty meal. They also work well as a quick energy boost before a workout. If you have leftover bars, use them in trail mix or crumble them over oatmeal. They add crunch and flavor to many dishes. For the complete recipe, check out the Full Recipe section! {{image_2}} If you want a nut-free version, you can swap almond butter for sunflower seed butter. This keeps the bars creamy and delicious. For mix-ins, use seeds like pumpkin or sunflower. You can also add coconut flakes or chocolate chips. These swaps keep the flavor fun and tasty. For a gluten-free option, ensure you use certified gluten-free oats. This choice gives the same chewy texture without gluten. You can also add gluten-free puffed rice for extra crunch. When adding fruits, use dried fruits that are gluten-free. This way, everyone can enjoy these bars. To make these bars vegan, replace honey with agave syrup. This keeps it sweet and plant-based. Always check your chocolate chips, as some may contain dairy. Using dark chocolate chips that are dairy-free will make the bars fully vegan. These small swaps keep every bite enjoyable and guilt-free. For the complete recipe, check out the Full Recipe section. To keep your maple pecan granola bars fresh, use an airtight container. Glass or plastic containers work well. You can also wrap them in parchment paper. This helps maintain their texture. Avoid using containers that allow air in. If stored at room temperature, these bars last about a week. Keep them in a cool, dry place. In the fridge, they can stay fresh for up to two weeks. The cold helps keep them firm and tasty. You can freeze your granola bars for longer storage. Wrap each bar in plastic wrap or foil. Place the wrapped bars in a freezer bag. They can last for up to three months in the freezer. To enjoy, thaw them in the fridge overnight. You can easily make these bars nut-free. Use sunflower seed butter instead of almond butter. Replace pecans with pumpkin seeds or sunflower seeds. These options add crunch and flavor without nuts. Yes, you can use honey or agave syrup. Honey adds a floral taste, while agave syrup is milder. You can also try brown sugar or coconut sugar, but these may change the texture a bit. Absolutely! These bars are packed with good nutrients. They provide fiber from oats and protein from nut butter. Pecans offer healthy fats, which are great for your heart. Plus, dried fruits add natural sweetness and vitamins. You can find these bars at many grocery stores. Look for brands like Nature Valley or KIND. Health food stores often carry them too. You can also buy them online for easy access. You can get creative! Add chocolate chips for a sweet treat. Use raisins or dried apricots for a fruity twist. Spice it up with nutmeg or ginger for a warm flavor. You can even add seeds like chia or flax for extra nutrients. For the full recipe, check the earlier section. You can make tasty Maple Pecan Granola Bars with simple steps. We covered all you need: the list of ingredients, easy instructions, and tips to make them perfect. You can customize your bars and even find storage tips. Whether you want them nut-free or vegan, there are options for everyone. Try making them at home for a healthy snack. Enjoy your delicious, homemade bars anytime. Good luck with your granola-making adventures!

Maple Pecan Granola Bars Irresistible and Nutritious

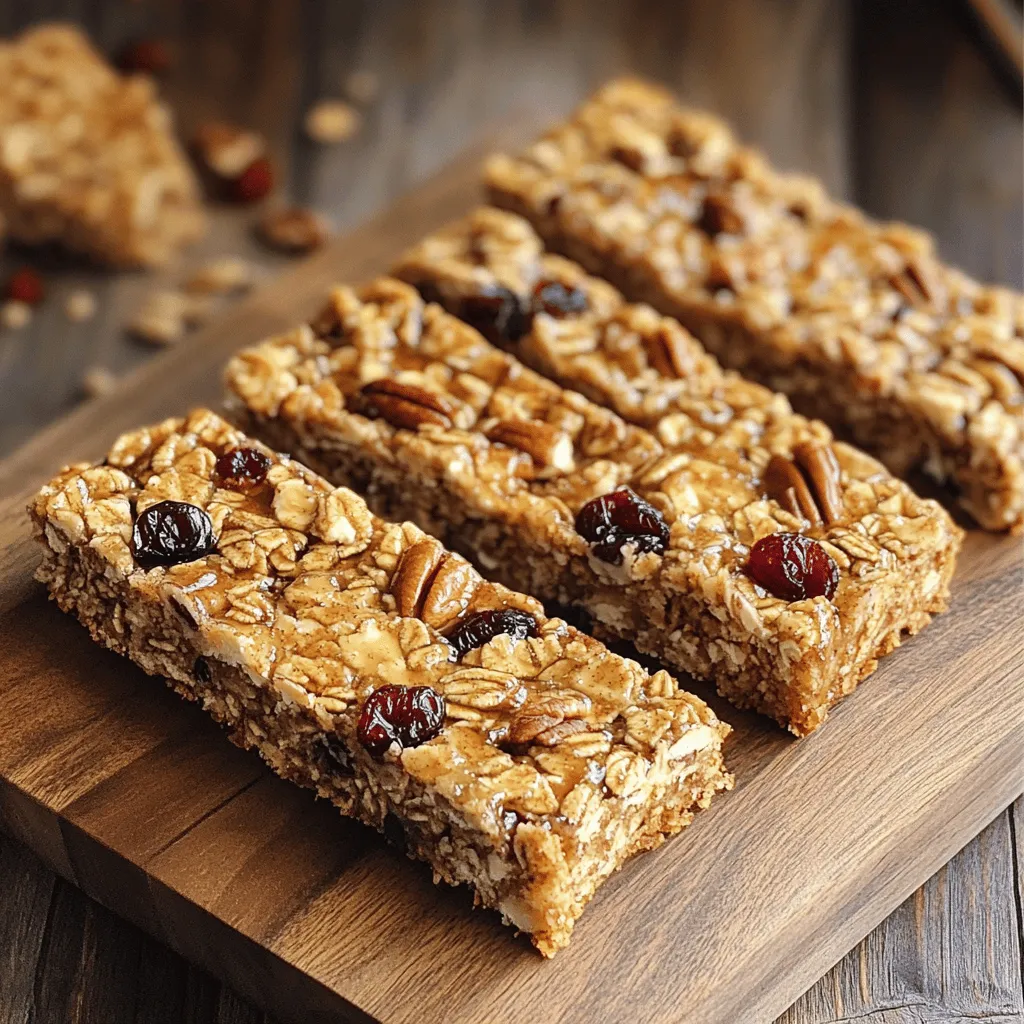
Looking for a healthy snack that’s both delicious and filling? Try my Maple Pecan Granola Bars! Packed with rolled oats,

For a tasty creamy spinach and artichoke dip, you need some fresh ingredients. Here’s what you'll need: - 1 cup fresh spinach, chopped - 1 cup artichoke hearts, drained and chopped - 2 cloves garlic, minced These fresh items bring color and flavor. The spinach adds a nice green touch, while the artichokes give a unique taste. Garlic adds a kick that makes your dip shine. Next, let’s look at the pantry staples. These are items you probably have at home: - 1 cup cream cheese, softened - ½ cup sour cream - ½ cup mayonnaise - 1 cup shredded mozzarella cheese - ½ cup grated Parmesan cheese - ½ teaspoon onion powder - Salt and pepper to taste These staples help create that rich, creamy texture. Cream cheese is the base, while sour cream and mayonnaise add depth. Mozzarella and Parmesan give it a cheesy goodness. Want to spice things up? Here are some optional add-ins: - ½ teaspoon red pepper flakes (for heat) Adding red pepper flakes gives your dip a little kick. If you like mild flavors, feel free to skip this. You can also try different cheeses or spices. Your dip, your rules! For the full recipe, check out the recipe section! Start by gathering all your ingredients. You need fresh spinach, artichoke hearts, and some cheeses. Chop the spinach and artichoke hearts if they aren’t already. Mince the garlic too. This step is key for flavor. It takes around five minutes. In a big mixing bowl, combine the cream cheese, sour cream, and mayonnaise. Mix them until smooth. Add the chopped spinach, artichokes, and minced garlic. Then, toss in the mozzarella and half of the Parmesan cheese. Don’t forget the onion powder, red pepper flakes, and season with salt and pepper. Stir everything well until it blends nicely. Now, preheat your oven to 350°F (175°C). Spread the dip mixture into an oven-safe dish. Sprinkle the rest of the Parmesan cheese on top. Bake for 25 to 30 minutes. You want the dip to bubble and turn golden. Once done, take it out and let it cool a bit before serving. Enjoy this creamy goodness with chips or veggies. For the full recipe, check the earlier section. To get a creamy dip, start with soft cream cheese. This helps mix well. Use fresh spinach for a vibrant taste. Chop it finely, so it blends into the dip. The sour cream and mayonnaise add richness. I like to mix those together first. This way, you avoid lumps. Blend in the artichoke hearts well. They should be in small pieces. This makes each bite smooth and tasty. Serve this dip warm for the best flavor. I enjoy it with crispy tortilla chips. You can also use sliced baguette or fresh veggies. These add a nice crunch. For a pop of color, sprinkle extra red pepper flakes on top. Fresh spinach leaves also make a great garnish. This dip pairs well with a variety of drinks. Try it with a chilled white wine. A light beer also complements the creamy texture. For a non-alcoholic option, serve it with sparkling water. This balances the richness of the dip. If you want a fun twist, try pairing it with a spicy salsa. It adds a nice contrast to the creaminess. For more ideas, check the Full Recipe. {{image_2}} You can make this dip healthier with a few simple swaps. Use Greek yogurt instead of sour cream and mayonnaise. This change cuts calories and adds protein. You can also use low-fat cream cheese. Fresh veggies like bell peppers or carrots can replace some of the cheese. This keeps the flavor while reducing fat. Want to change the flavors? Try adding different cheeses. Feta cheese gives a tangy taste. Cheddar adds sharpness. You can also add spices. A touch of smoked paprika adds warmth. If you like it spicy, add more red pepper flakes. You can even mix in sun-dried tomatoes or olives for a Mediterranean twist. How you serve this dip can change the experience! Instead of the usual tortilla chips, try pita chips, crackers, or veggie sticks. You can also serve it in a bread bowl for a fun twist. Just hollow out a round loaf of bread and fill it with the dip. It makes a great centerpiece for gatherings. For a classy touch, top with fresh herbs before serving. To keep your creamy spinach and artichoke dip fresh, store it in the fridge. Use an airtight container for best results. It will stay good for about 3 to 4 days. Before serving, check for any changes in smell or texture. You can freeze this dip for later use. First, let it cool completely. Then, transfer it to a freezer-safe container. Seal it tightly to prevent freezer burn. It will last for up to 2 months in the freezer. When ready to use, thaw it in the fridge overnight. To reheat the dip, place it in an oven-safe dish. Bake it at 350°F (175°C) for about 20 minutes. Stir it halfway through to ensure even heating. You can also microwave individual portions for 1-2 minutes. Just make sure to stir it well before eating. Enjoy your creamy spinach and artichoke dip warm for the best flavor! You can easily make this dip ahead of time. Just prepare the dip up to baking. Store it in a covered dish in the fridge. When you’re ready to bake, preheat your oven. Then, bake the dip as usual. It will still taste great! Yes, you can substitute some ingredients. If you don’t have fresh spinach, use frozen spinach. Thaw and drain it well first. For cream cheese, you can use Greek yogurt for a lighter option. If you want a different cheese, try cheddar or gouda. Make the recipe your own! I love serving this dip with crispy tortilla chips. Sliced baguette works well too. Fresh veggies like carrots and bell peppers are great for dipping. You can also use pita chips for a nice crunch. The options are endless! Check out the Full Recipe for more ideas. This blog post covered everything about making Creamy Spinach and Artichoke Dip. We explored fresh ingredients, pantry staples, and fun add-ins. You learned step-by-step instructions on prepping, mixing, and baking the dip. I shared tips for texture, serving ideas, and fun variations. You also found storage tips and answers to common questions. In summary, you have all the tools to create a delicious dip. Enjoy sharing it with friends and family!

Creamy Spinach and Artichoke Dip Simple and Delicious

If you love creamy, tasty dips, you’re in for a treat! This easy Creamy Spinach and Artichoke Dip recipe is

- 1 lb white fish fillets (cod or tilapia) - 1 cup all-purpose flour - 1 cup cornmeal - 2 teaspoons baking powder - 1 teaspoon garlic powder - 1 teaspoon paprika - 1 teaspoon cumin - Salt and pepper, to taste - 2 eggs, beaten - 1 cup buttermilk - Vegetable oil for frying - 8 small corn tortillas - 1 cup shredded cabbage - 1 avocado, sliced - 1 lime, cut into wedges - ½ cup fresh cilantro, chopped - Spicy mayo (1/2 cup mayonnaise mixed with 1 tablespoon sriracha) When making crispy fish tacos, first gather all the ingredients. You need fresh white fish fillets like cod or tilapia. Fresh fish gives the best taste. The batter needs flour, cornmeal, and baking powder for a crispy crunch. Next, season your batter. Garlic powder, paprika, and cumin add great flavor. Don't forget salt and pepper! For the extra toppings, grab some eggs and buttermilk. These help the batter stick. You will also need vegetable oil for frying and corn tortillas to hold the fish. Finally, prepare your toppings. Shredded cabbage adds crunch. Sliced avocado brings creaminess. Fresh lime and cilantro brighten the tacos. You can also whip up spicy mayo for a flavor kick. These ingredients come together for a tasty meal. With the full recipe, you'll create crispy fish tacos that impress everyone! First, rinse the fish fillets under cold water. This helps remove any unwanted bits. After rinsing, pat the fish dry with paper towels. Dry fish gives a better crust. Next, cut the fish into strips or small pieces. This size makes them easy to eat in tacos. In a medium bowl, mix the dry ingredients. Combine flour, cornmeal, baking powder, garlic powder, paprika, cumin, and a pinch of salt and pepper. This blend gives the fish great flavor. In another bowl, whisk the beaten eggs and buttermilk. The wet mixture keeps the batter sticky. Now, dip each piece of fish in the wet mixture. Allow the excess to drip off. Then coat it thoroughly in the dry batter. Make sure to cover every side. Set the coated fish pieces on a plate. This step prepares them for frying. Heat about 1 inch of vegetable oil in a large skillet. The oil should be hot but not smoking. Carefully add the fish pieces in batches. Fry them for 3-4 minutes on each side. Look for a golden brown color and crisp texture. Once cooked, transfer them to a paper towel-lined plate to drain excess oil. In another skillet or directly over an open flame, warm the corn tortillas. Heat them for about 30 seconds on each side. This softens the tortillas and makes them easy to fold. Warming adds flavor and makes the tacos more enjoyable. Now it’s time to put everything together. Place crispy fish on each tortilla. Top with shredded cabbage, avocado slices, and cilantro. For added taste, drizzle spicy mayo over the fish. Squeeze a lime wedge over the top for a fresh kick. Enjoy this delicious dish with the full recipe. To get that perfect crunch, use cold buttermilk. It helps the batter stick well and creates a great texture. Another important tip is to avoid overcrowding the frying pan. If you add too many pieces at once, they will steam instead of fry. Fry in small batches for the best results. I prefer shallow frying for these tacos. It uses less oil and makes it easier to control the heat. Deep frying can work but often makes the fish too oily. If you want a healthier option, try oven-baking the fish. Just coat it lightly with oil and bake it until golden. These tacos go well with fresh sides. Try serving them with a simple salad or rice. For drinks, I suggest a light beer or a fresh limeade. Both pair nicely with the flavors in the tacos. You can also serve them with some extra lime wedges for a zesty kick. For the full experience, check out the Full Recipe for more details! {{image_2}} You can use many types of fish for these tacos. Cod and tilapia are great choices. They fry up crispy and taste mild. Salmon offers a richer flavor, while mahi-mahi has a firmer texture. For each fish type, adjust cooking time. - Cod or Tilapia: Fry for 3-4 minutes on each side. - Salmon: Cook for about 5 minutes per side. - Mahi-Mahi: Fry for 4-5 minutes on each side. Adding special seasonings can make your fish pop. I suggest using a mix of cumin, garlic powder, and paprika. You can also try lime zest for a fresh kick. If you like heat, add jalapeños or hot sauce. - Seasoning Mixes: - Cumin - Garlic powder - Paprika - Spicy Additions: - Jalapeños - Hot sauce While corn tortillas are classic, you can switch it up. Flour tortillas are soft and tasty. If you need gluten-free options, look for corn or rice tortillas. They work well and are easy to find. - Flour Tortillas: Soft and chewy. - Gluten-Free Options: Corn or rice tortillas. For the full recipe, check the section above. To store leftover fish tacos, place them in an airtight container. This keeps them fresh and prevents odors. Make sure to separate the fish from the tortillas and toppings. Fish tacos taste best if eaten within two days. Store them in the refrigerator for no longer than this. You can freeze cooked fish and tortillas. Wrap the fish in plastic wrap, then place it in a freezer bag. For tortillas, stack them with parchment paper in between. This helps them stay separate. They can last up to three months in the freezer. To reheat frozen tacos, let them thaw in the fridge overnight. Then, warm them in a skillet over medium heat. This helps maintain their flavor. To reheat crispy fish, use the oven or a skillet. Preheat the oven to 375°F (190°C). Place the fish on a baking sheet and heat for 10-15 minutes. For the skillet, add a little oil and warm the fish on medium heat. This method keeps the fish crispy. Avoid using the microwave, as it makes them soggy. Enjoy your crispy fish tacos fresh and flavorful! For the full recipe, check out the details above. You can add heat in several ways. First, sprinkle cayenne pepper into the batter. This gives the fish a nice kick. You can also use hot sauce in the spicy mayo. Mix in more sriracha to make it hotter. Another option is to add diced jalapeños on top. Fresh cilantro and lime juice can also brighten the flavors without losing heat. Yes, you can use frozen fish for your tacos. Just make sure to thaw it first. You can do this overnight in the fridge. If you’re short on time, use the microwave to defrost. Be careful not to cook the fish in the microwave. After thawing, follow the same steps as with fresh fish. The tacos will still turn out great! Here are some tasty toppings to try: - Shredded cabbage - Sliced avocado - Fresh cilantro - Diced tomatoes - Pickled red onions - Jalapeños - Spicy mayo - Lime wedges These toppings add crunch and flavor to your tacos. Mix and match to find your favorite combo! Making fish tacos in an air fryer is easy. Start by preparing the fish just like in the full recipe. Coat the fish pieces in the batter. Preheat the air fryer to 400°F (200°C). Place the fish in a single layer in the basket. Cook for about 10-12 minutes, flipping halfway through. Check for a crispy texture. Serve in warm tortillas with your favorite toppings! This blog post covered how to make delicious fish tacos from scratch. We discussed key ingredients like white fish, cornmeal, and tasty seasonings. The step-by-step guide helps you easily prepare and fry the fish. I shared tips for crispiness and variations to try with different fish types. Remember to store leftovers properly to enjoy later. Fish tacos are fun to make and are sure to please everyone. Dive into this recipe, and enjoy a tasty meal today!

Crispy Fish Tacos Flavorful and Easy to Make

If you crave a meal that’s both delicious and simple, crispy fish tacos are a must-try! I’ll guide you through

Older posts
Newer posts
← Previous Page1 … Page32 Page33 Page34 … Page62 Next →

dsad

© 2025 Emmas Dish • Built with GeneratePress

Our Policies

  • Copyright Policy
  • Cookie Policy
  • GDPR Policy
  • Privacy Policy
  • Disclaimer
  • Terms Of Use

More Information

  • Home
  • About
  • Contact
  • Appetizers
  • Dessert
  • Dinner
  • Drinks
©2025, Emmas Dish About Back To Top