Skip to content
DisclaimerTerms Of UseGDPR PolicyCookie Policy

Emmas Dish

  • Home
  • Drinks
  • Appetizers
  • Dinner
  • Dessert
  • About
  • Contact
  • Privacy Policy
DisclaimerTerms Of UseGDPR PolicyCookie Policy

Emma

- Bomba rice: 1 ½ cups of this short-grain rice holds flavor well. - Vegetable broth: 3 cups add depth and richness. - Common vegetables: Use 1 medium onion, 2 cloves garlic, 1 red bell pepper, 1 yellow bell pepper, 1 medium zucchini, 1 cup green beans, and 1 cup cherry tomatoes. - Spices and seasonings needed: You will need 1 teaspoon smoked paprika and ½ teaspoon saffron threads (optional). - Olive oil: 1 tablespoon for sautéing. - Salt and pepper: To taste for flavor. - Optional garnishes: Fresh parsley, chopped, and lemon wedges for serving. These ingredients come together to create a colorful, flavorful Vegetable Paella. The variety of veggies not only adds color but also makes it nourishing. Using Bomba rice is key, as it absorbs the broth well and gives a great texture. The spices bring warmth and depth, making each bite a delight. For the best taste, always use fresh vegetables. You can check the Full Recipe to see the cooking steps and get the most out of these ingredients. Start by preparing your onion and garlic. Dice one medium onion and mince two cloves of garlic. Heat one tablespoon of olive oil in a large skillet or paella pan over medium heat. Add the onion and sauté for about three to four minutes until it is translucent. Next, stir in the minced garlic and cook for another minute until it smells great. Now, it’s time to sauté the peppers and zucchini. Dice one red bell pepper and one yellow bell pepper. Chop one medium zucchini into bite-sized pieces. Add these to the pan and cook for five more minutes. You want them to soften but still keep some crunch. Now, we add spices and rice. Sprinkle in one teaspoon of smoked paprika and, if you like, half a teaspoon of saffron threads for color and flavor. Stir well to coat the veggies with the spices. Pour in one and a half cups of Bomba rice, stirring for about two minutes. This helps the rice soak up the flavors. Next, pour in three cups of vegetable broth and bring the mix to a gentle boil. Don’t forget to season with salt and pepper. Once it boils, reduce the heat to low. Cover your pan with a lid or aluminum foil, letting it simmer for 15 to 20 minutes. This cooks the rice and absorbs the broth. In the last five minutes of cooking, it’s time for final touches. Add one cup of green beans, trimmed and cut into one-inch pieces, and one cup of halved cherry tomatoes on top of the rice. This steams the veggies lightly. Once the rice is tender and most of the liquid is gone, remove the pan from heat. Let it sit covered for five more minutes. Then, fluff the paella gently with a fork. Garnish with fresh chopped parsley and serve with lemon wedges on the side for a bright finish. For a complete guide, refer to the Full Recipe. To make great paella, choose the right rice. Bomba rice is best. It absorbs liquid well and stays firm. Other short-grain rice also works but may not give the same result. The cooking time and heat are key too. Keep the heat steady, so the rice cooks evenly. Too high, and the rice may burn. Too low, and it may turn mushy. Saffron and smoked paprika are a must. Saffron gives a rich color and unique taste. Use it sparingly, as a little goes a long way. Smoked paprika adds depth and warmth. Mix it in while cooking the veggies. You can also add garlic powder or a splash of lemon juice. These boost flavor and make your dish pop. Serve paella straight from the pan for a rustic feel. Use a large spoon for easy serving. For garnishes, fresh parsley is a great choice. It adds color and freshness. Lemon wedges on the side are also nice. They give a zesty kick when squeezed over the dish. Your paella will look as good as it tastes! For the full recipe, check the details above. {{image_2}} You can play with the vegetables in your paella. The best ones to use are vibrant and fresh. I love using: - Bell peppers - Zucchini - Green beans - Cherry tomatoes For seasonal alternatives, think about what’s fresh near you. In summer, add corn or peas. In fall, try squash or kale. Each choice brings a new taste and color to your dish. Want to add protein while keeping it vegetarian? Here are some ideas: - Chickpeas - Tofu - Tempeh You can use homemade options for a fresh touch. If you're in a rush, store-bought tofu or tempeh works great. Just make sure to season them well before adding them to the paella. Paella has many styles across Spain. For example, seafood paella includes shrimp and mussels. Meat paella often has chicken or rabbit. Each type tells a story of its region. Traditional Spanish flavors include saffron and smoked paprika. They add warmth and depth to your dish. Exploring these flavors can inspire your own unique vegetable paella. For a complete guide on making it, check out the Full Recipe. To keep your vegetable paella fresh, let it cool first. Place it in an airtight container. This helps to lock in flavor and prevent drying. You can store it in the fridge for up to three days. If you want to keep it longer, consider freezing it. When reheating, use a skillet for the best texture. Heat it over medium-low, adding a splash of broth or water. Stir gently until warmed through. You can also use the microwave. Just be sure to cover it to keep moisture in. If you freeze it, thaw overnight in the fridge before reheating. You can get creative with leftovers. Try making a paella-stuffed bell pepper. Just hollow out a bell pepper, fill it with paella, and bake. Pair it with a fresh salad or crusty bread for a complete meal. Enjoy your delicious vegetable paella in new ways! For the full recipe, check out the detailed instructions above. Vegetable paella is made with a mix of fresh veggies and rice. The main ingredients are: - 1 ½ cups Bomba rice (or any short-grain rice) - 3 cups vegetable broth - 1 medium onion, diced - 2 cloves garlic, minced - 1 red bell pepper, diced - 1 yellow bell pepper, diced - 1 medium zucchini, chopped - 1 cup green beans, trimmed and cut into 1-inch pieces - 1 cup cherry tomatoes, halved - 1 teaspoon smoked paprika - ½ teaspoon saffron threads (optional) - 1 tablespoon olive oil - Salt and pepper to taste - Fresh parsley, chopped (for garnish) - Lemon wedges (for serving) This dish brings together colors and flavors for a hearty meal. Yes, you can make paella in advance. Just cook it and let it cool. Then, store it in an airtight container in the fridge. It tastes great for up to three days. When you are ready to eat, reheat it gently. Add a splash of broth to keep it moist. Saffron adds a unique flavor and bright color to paella. However, it is not necessary. You can skip it if you want. You can also use turmeric as a substitute for color. Your paella will still taste delicious without saffron. Bomba rice is the best choice for paella. It absorbs flavors well and stays firm. If you can't find it, use any short-grain rice. This helps keep the dish tasty and fluffy. Avoid long-grain rice, as it doesn’t give the right texture. To make paella spicier, add some chili powder or red pepper flakes. You can also include diced jalapeños or hot sauce. Start with a little, then taste and adjust. This way, you can find the right heat level for you. For more recipes, check the Full Recipe for ideas! In this post, we explored how to make delicious vegetable paella. We covered key ingredients, step-by-step cooking instructions, and tips for perfect texture and flavor. We also discussed ideas for variations and storage options. Now, you can create a tasty, colorful dish that brings joy. Enjoy experimenting with flavors and ingredients. With practice, you’ll master the art of paella!

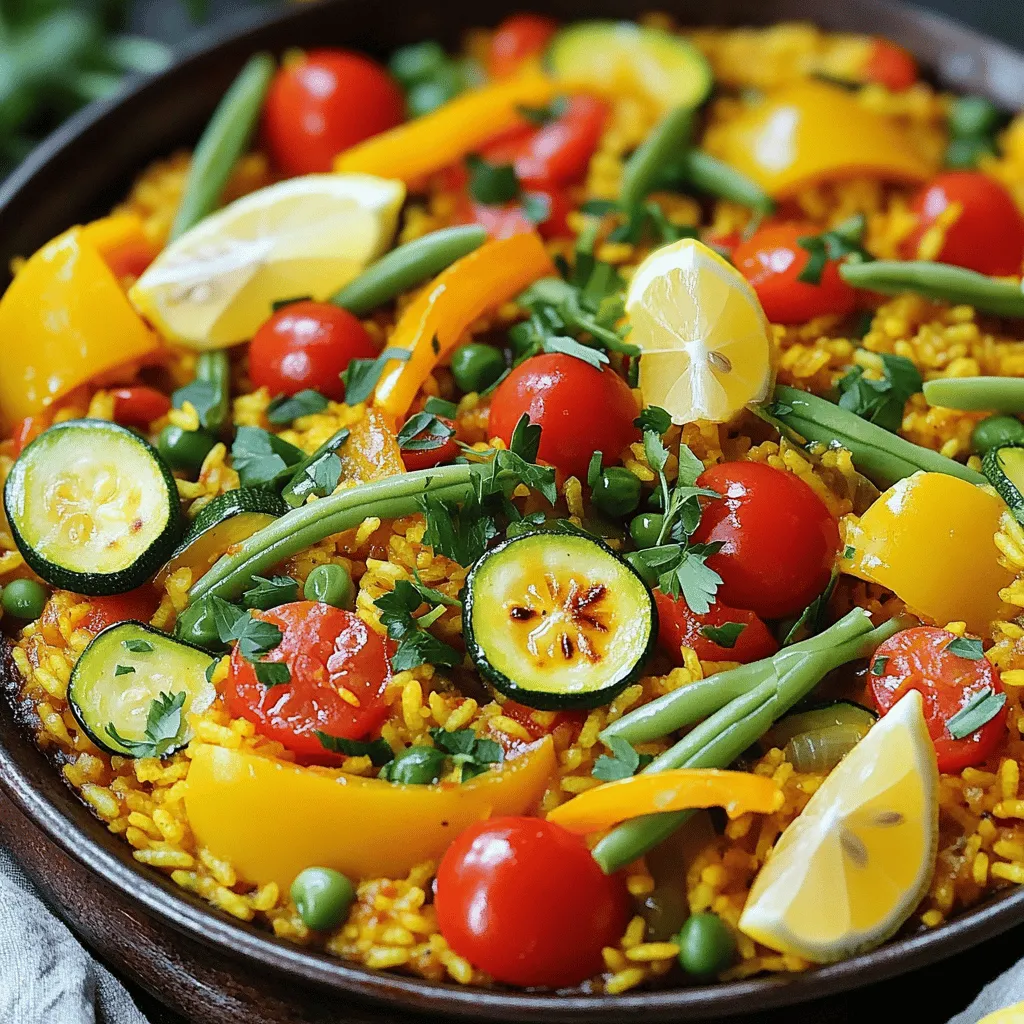
Vegetable Paella Flavorful and Nourishing Delight

Are you ready to dive into a bowl of colorful flavors? In this blog post, we’ll explore the vibrant world

To make classic coleslaw, gather these main ingredients: - 4 cups green cabbage, thinly sliced - 1 cup red cabbage, thinly sliced - 2 large carrots, grated - 1 cup mayonnaise - 2 tablespoons apple cider vinegar - 1 tablespoon Dijon mustard - 1 tablespoon honey - Salt and black pepper to taste These ingredients create a great base for your coleslaw. The mix of green and red cabbage gives the dish color and crunch. The carrots add sweetness, making every bite tasty. You can make your coleslaw special by adding some optional ingredients: - 1/4 cup green onions, chopped (for garnish) - 1/4 cup sunflower seeds or chopped nuts (for crunch) These add-ins bring extra flavor and texture. Green onions give a mild onion taste. Sunflower seeds or nuts add a nice crunch that makes your coleslaw stand out. When picking cabbage, choose wisely. The best types for coleslaw are: - Green cabbage: Crunchy and slightly sweet. - Red cabbage: Adds color and a bit of peppery taste. - Napa cabbage: A bit milder and more tender. Using a mix of these cabbages makes your dish exciting. Each type adds its unique taste, making every bite a delight. For the full recipe, check out the detailed instructions above. Start by gathering your vegetables. You need four cups of green cabbage and one cup of red cabbage. Thinly slice both cabbages. Use a sharp knife or a mandoline for even cuts. Next, take two large carrots and grate them. Mix the sliced cabbage and grated carrots in a large bowl. The colors should be bright and inviting. In a separate bowl, combine one cup of mayonnaise with two tablespoons of apple cider vinegar. Add one tablespoon of Dijon mustard and one tablespoon of honey. Season the mixture with salt and black pepper. Whisk it all together until smooth. This dressing gives your coleslaw a tangy kick. Pour the dressing over the cabbage and carrot mix. Use tongs or a spoon to toss everything well. Make sure each piece of veggie is coated with the dressing. If you want extra crunch, add 1/4 cup of sunflower seeds or chopped nuts. Gently mix them in. Cover the bowl and refrigerate for at least 30 minutes. This lets the flavors blend and makes the dish refreshing. Before serving, give your coleslaw a good toss and adjust the seasoning. Garnish with 1/4 cup of chopped green onions for that pop of color. Enjoy your crunchy and tasty coleslaw! For the full recipe, check out the section above. Cutting cabbage well makes a big difference. Use a sharp knife. Start with the green cabbage. Cut it in half, then remove the core. Slice it thinly to get nice, crunchy pieces. Do the same with the red cabbage. Mixing both colors makes it pretty! Make sure your cuts are even for the best texture. Your dressing should be creamy but not too thick. Start by mixing mayonnaise with apple cider vinegar. Add Dijon mustard and honey next. Whisk until smooth. If it seems too thick, add a splash of water or vinegar. This helps it coat the veggies better. Taste the dressing before mixing it in. Adjust the salt and pepper to your liking. Want to boost flavor? Try adding a squeeze of lemon juice for zing. Fresh herbs like parsley or dill can add a nice touch. You can also mix in some chopped apples or raisins for sweetness. For crunch, toss in sunflower seeds or nuts. These little additions make your coleslaw stand out. Don’t forget to chill it before serving. This helps all the flavors blend beautifully. For the full recipe, check out the detailed instructions above. {{image_2}} You can change the main veggies in coleslaw. Try adding broccoli slaw or kale. You can also use colorful bell peppers for a sweet twist. If you love fruits, mix in diced apples or pineapple for a fresh taste. These swaps add fun and flavor to the classic dish. The dressing is key to coleslaw. While the classic mayo dressing is great, try yogurt for a lighter option. For a kick, add sriracha or hot sauce. You can also use a vinegar-based dressing for a tangy punch. Each dressing gives a new spin on flavor. Coleslaw pairs well with many dishes. Serve it next to barbecue meats, like pulled pork or ribs. It’s also great on tacos or sandwiches. You can even serve it as a salad on its own. For a complete meal, pair it with grilled chicken and corn on the side. Enjoy your crunchy creation! For the full recipe, check out the main article. To keep coleslaw fresh, store it in an airtight container. This helps retain its crunch. If you plan to eat it later, avoid adding dressing until you're ready. The dressing can make the cabbage soggy. If the coleslaw is already dressed, store it in the fridge. Use a tight lid to keep out air. Coleslaw lasts about three to five days in the fridge. After that, it may lose its crispness. Always check for off smells or discoloration before eating. If you see any, it’s best to toss it. The fresher the coleslaw, the better it tastes. Freezing coleslaw is not recommended. The texture changes when thawed. The cabbage can become mushy, and that’s not pleasant. If you want to freeze the veggies, do it before adding the dressing. This way, you can make a fresh batch later. For best flavor, enjoy your coleslaw fresh. For the full recipe, check out the Tangy Crunchy Coleslaw section. To make coleslaw creamy, focus on the dressing. Use good mayonnaise as the base. Mix it with apple cider vinegar and Dijon mustard for tang. Add honey for a hint of sweetness. Adjust the amount of mayonnaise to your liking. For a twist, you can add sour cream or Greek yogurt. Yes, you can make coleslaw ahead of time. Prepare the veggies and dressing separately. Mix them just before serving. This keeps the coleslaw crunchy and fresh. You can store the dressing in the fridge for up to a week. The veggies can last a few days if kept dry. Homemade coleslaw lasts about 3 to 5 days in the fridge. Keep it in an airtight container. If it starts to get watery, drain the excess liquid. If the veggies lose their crunch, it’s time to toss it out. Always check for freshness before eating. Coleslaw usually includes cabbage and a creamy dressing. Slaw can have other veggies, like carrots or radishes. Slaw may not always be creamy. It can also use vinegar or oil-based dressings. Both are tasty but serve different flavor profiles. To spice up your coleslaw, add diced jalapeños or hot sauce. You can also try a pinch of cayenne pepper in the dressing. Another option is to mix in some spicy mustard. Experiment to find your perfect heat level. Enjoy the kick it brings to the crunch! Coleslaw is easy to make and so versatile. You can adjust the flavors with different dressings and add-ins. Remember to pick the right cabbage and mix it perfectly. Store it well to enjoy later. Homemade coleslaw will not only taste great but also impress your friends and family. Explore the tips and tricks shared to elevate your dish. Now you have the tools to create a coleslaw that is tasty and satisfying!

Classic Coleslaw Crunchy and Refreshing Side Dish

Are you ready to serve up a classic coleslaw that’s crunchy and refreshing? This beloved side dish is perfect for

The right ingredients make Mango Coconut Chia Pudding special. Here’s what you need: - 1 cup coconut milk (canned or carton) - 1/4 cup chia seeds - 2 tablespoons honey or maple syrup - 1 ripe mango, diced - 1/2 teaspoon vanilla extract - Pinch of salt - Toasted coconut flakes for garnish - Fresh mint leaves for garnish Using fresh, ripe mango gives the pudding a sweet and juicy kick. Coconut milk adds creaminess and a tropical vibe. Chia seeds are the magic ingredient. They swell and create a pudding-like texture. You can use honey or maple syrup to sweeten it. The vanilla extract adds warmth, while a pinch of salt balances the flavors. To make it pretty, top with toasted coconut flakes and fresh mint leaves. These garnishes are not just for looks; they add taste and aroma too. You can find the full recipe for more details on making this delicious dessert. Remember, using quality ingredients makes a big difference in the final dish. First, grab a mixing bowl. Combine 1 cup of coconut milk, 1/4 cup of chia seeds, and 2 tablespoons of honey or maple syrup. This mix will give your pudding a sweet touch. Then, add 1/2 teaspoon of vanilla extract and a pinch of salt. Whisk everything together until it blends well. The coconut milk makes it rich and creamy. Now, let the mixture rest for about 10 minutes. This step helps the chia seeds absorb the milk. After resting, whisk again to break up any clumps. Cover the bowl with plastic wrap or a lid. It’s time to refrigerate! Let it chill for at least 4 hours. For the best texture, leave it overnight. The chia seeds will expand and turn the liquid into pudding. When you are ready to serve, stir the chia pudding well. This ensures it's smooth. If it’s too thick, add a splash of coconut milk to adjust the consistency. Now, layer the pudding in serving glasses or bowls. Top with diced mango for a burst of sweetness. Finally, garnish with toasted coconut flakes and fresh mint leaves for a lovely look. Enjoy your delicious Mango Coconut Chia Pudding! For the full recipe, check the detailed instructions above. To get the right thickness, check how the pudding holds its shape. It should be creamy, not runny. If it's too thick, add more coconut milk. Stir well to mix it in. You can also add extra chia seeds if it's too watery. Let it sit for a few minutes to thicken up again. If you want different sweeteners, try using agave syrup or coconut sugar. These can change the flavor a bit. You can also add a pinch of cinnamon or nutmeg. These spices boost the taste and make it more exciting. Just a little can go a long way in brightening the dish. For a beautiful look, serve the pudding in clear glasses. This shows off the layers of mango and chia. You can also use small bowls for a cozy feel. Top with toasted coconut flakes and fresh mint leaves. This adds color and makes it extra special. Consider using different glassware for fun shapes and sizes. Each serving can look unique and inviting. {{image_2}} You can use many fruits with chia pudding. Try strawberries, blueberries, or peaches. Each fruit gives a new taste and color. You can mix fruits too. How about mango and pineapple together? That mix brings a tropical vibe. You can also add bananas for creaminess. Get creative and try seasonal fruits for the best flavors. This recipe is easy to modify for different diets. For a vegan option, use maple syrup instead of honey. Chia seeds are naturally gluten-free, so you can enjoy this dessert without worry. If you want a low-sugar version, skip the sweetener or use a sugar substitute. This way, you can make a tasty treat that fits your needs. Add unique flavors to your pudding. Try a pinch of cinnamon or nutmeg for warmth. Almond or coconut extract can give a deeper taste. You can also mix in cocoa powder for a chocolate twist. Toppings can enhance your pudding too. Consider adding nuts, seeds, or granola for crunch. Fresh fruit or a dollop of yogurt can also add freshness. You can make this dessert your own with these easy changes. To keep your Mango Coconut Chia Pudding fresh, store it in an airtight container. This helps prevent any unwanted odors or flavors. You can place the pudding in the fridge for up to five days. The chia pudding will stay thick and tasty during that time. If you notice any separation, just stir it before eating. Chia pudding tastes best cold, so you don't need to reheat it. If you want to refresh its texture, you can stir in a little coconut milk. This helps make it creamy again. Can it be frozen? Yes, you can freeze Mango Coconut Chia Pudding. However, its texture may change. Make sure to use a freezer-safe container. It can last for up to three months in the freezer. When you're ready to eat it, thaw it in the fridge overnight. Stir well before serving. For the best texture, enjoy it fresh! Mango Coconut Chia Pudding lasts for about five days in the fridge. Store it in an airtight container. This helps keep it fresh and tasty. If you see any changes in texture or smell, it’s best to discard it. For the best experience, enjoy it within the first few days. Yes, you can use other types of milk. Almond milk, oat milk, or soy milk all work well. Each type will give a different taste. Coconut milk adds creaminess, but other milks can make it lighter. Feel free to experiment to find your favorite flavor. Absolutely! This pudding is great for meal prep. You can make it in advance and store it in the fridge. It’s perfect for a quick breakfast or snack. Just layer it in jars for easy serving. You can also switch up the toppings for variety throughout the week. Chia pudding is packed with nutrients. Chia seeds are rich in fiber, protein, and omega-3 fatty acids. They help keep you full and support heart health. Coconut milk adds healthy fats. Plus, the mango gives you vitamins and antioxidants. This dessert is not just tasty but also good for you! For the full recipe, check out the detailed instructions above. This blog post showed you how to make Mango Coconut Chia Pudding. We covered each ingredient, from creamy coconut milk to sweet mango. I shared tips for perfect texture and sweetness. You can also try fun variations, like using different fruits or spices. Remember, this pudding is versatile and easy to store. You can enjoy it throughout the week. Get creative with your toppings and flavors. Dive in, and savor every delightful bite of this tasty treat.

Mango Coconut Chia Pudding Simple and Tasty Dessert

Looking for a simple and tasty dessert? Mango Coconut Chia Pudding is your answer! This creamy treat is packed with

To make this creamy tomato basil soup, gather these items: - 2 tablespoons olive oil - 1 medium onion, diced - 3 cloves garlic, minced - 2 (14.5 oz) cans diced tomatoes, undrained - 2 cups vegetable broth - 1 cup heavy cream - 1 teaspoon sugar - 1 teaspoon dried basil - Salt and pepper to taste - Fresh basil leaves for garnish You can change things up with these add-ins: - Use fresh tomatoes instead of canned. - Swap heavy cream for coconut milk for a lighter taste. - Add red pepper flakes for some heat. - Stir in cooked pasta or rice for extra texture. When picking your ingredients, here’s what to look for: - Choose ripe, firm tomatoes. They should smell sweet and fresh. - Pick onions that are heavy and have a dry, papery skin. - Select fresh basil leaves that are bright green and fragrant. - Check garlic for firm cloves that are not sprouting. These tips will help you create the best creamy tomato basil soup. If you want to see the full recipe, just check the section above. 1. Start by heating the olive oil in a large pot over medium heat. 2. Add the diced onion and sauté for about 5 minutes. Wait until it looks soft and clear. 3. Stir in the minced garlic. Cook for 1-2 minutes until you smell a nice aroma. 4. Pour in the canned diced tomatoes with their juice and the vegetable broth. Mix well and bring to a simmer. 5. Once it simmers, add the sugar, dried basil, salt, and pepper. Let it cook for about 15 minutes. This helps the flavors blend. 6. Next, use an immersion blender to blend the soup until it's smooth. If you don’t have one, pour the soup in a regular blender in small batches. Be careful, as steam can escape! 7. Return the blended soup to the pot. Stir in the heavy cream and heat on low. Make sure it warms up nicely. 8. Finally, serve hot and add fresh basil leaves on top for a pop of color and taste. - Keep the blender submerged to avoid splashes. - Move it up and down to blend evenly. - Blend until you reach your desired texture. You may want it smooth or slightly chunky. - Clean your immersion blender right away to avoid tomato stains. - Don't skip the sautéing step. It builds flavor. - Avoid blending the soup too soon. Let it simmer first to get the best taste. - Be careful with salt. Always taste before adding more. - If you use fresh tomatoes, remember they need more time to cook down. For the full recipe, you can refer to the earlier section. Enjoy your cooking! To boost the flavor of your creamy tomato basil soup, try adding a pinch of red pepper flakes. This small touch adds warmth without being too spicy. You can also use fresh basil instead of dried basil for a brighter taste. Fresh basil gives a nice herbal aroma. Adding a splash of balsamic vinegar can also deepen the flavor. This small twist adds a hint of sweetness and tang. If you prefer a thicker soup, blend it less. This keeps some chunks for texture. For a creamier soup, blend until completely smooth. If the soup is too thick, add more vegetable broth. Just pour in small amounts until it reaches the right consistency. If you want it creamier, add a touch more heavy cream. This makes the soup rich and filling. Start by sautéing the onion and garlic until soft. This step builds a strong base flavor. Make sure not to rush this stage. Cooking them slowly brings out their natural sweetness. Let the soup simmer for at least 15 minutes. This allows all the flavors to meld together. Stir often and taste as you go. Adjust the seasoning until it feels just right. For the full recipe, check out the main section. {{image_2}} You can easily turn this creamy tomato basil soup into a vegan delight. Instead of heavy cream, use coconut milk or cashew cream. Both options add creaminess without dairy. You can also switch the vegetable broth for homemade nut or bean broth. This keeps the soup rich and tasty. This soup loves fresh ingredients. In summer, use fresh tomatoes instead of canned. Just chop them and simmer them down. You can also add zucchini or bell peppers for extra flavor. In the fall, try adding roasted butternut squash for a sweet twist. Each season brings new tastes to explore. Garnishing your soup makes it pop. Try adding a swirl of olive oil or a sprinkle of nutritional yeast for a cheesy flavor. Croutons or toasted bread work great for crunch. Fresh herbs like cilantro or parsley also brighten the dish. For a fun twist, serve it with a side of grilled cheese. For more ideas, check out the Full Recipe. Once you finish your creamy tomato basil soup, let it cool first. Pour the soup into an airtight container. Seal it tightly to keep out air. Store it in the fridge for up to four days. If you want to keep it longer, freezing is a great option. Just make sure to leave some space in the container. The soup expands when it freezes. To freeze your creamy tomato basil soup, use freezer-safe containers or bags. Divide the soup into portions for easy use later. Label each container with the date. This way, you won’t forget when you made it. You can freeze the soup for up to three months. Thaw it in the fridge overnight before reheating. When you’re ready to enjoy the soup again, reheat it slowly. You can use a pot on the stove or a microwave. If using the stove, heat on low. Stir often to prevent sticking. If you find it too thick, add a splash of broth or water. This helps restore its creamy texture. Always taste before serving to adjust the seasoning. For an extra touch, add fresh basil on top before serving. Enjoy your delicious soup! You can pair this soup with simple sides. A classic choice is grilled cheese. The crispy bread and gooey cheese blend well with the soup's creaminess. You could also serve it with a fresh salad. A light Caesar or garden salad adds a nice crunch. For a heartier option, try crusty bread or garlic bread. These choices soak up the soup and add more flavor. To make this soup healthier, you can swap heavy cream for a lighter option. Use half-and-half or almond milk for fewer calories. You can also add more veggies. Spinach or carrots blend in well without changing the taste. Reducing the amount of sugar helps cut extra calories too. Lastly, use low-sodium vegetable broth to lower the salt content. Yes, you can use fresh tomatoes in this recipe. Use about 2 pounds of ripe tomatoes. First, you must peel and chop them. Blanch them in boiling water for easy peeling. Fresh tomatoes add a bright flavor to the soup. Just be sure to adjust the cooking time. They may need a bit longer to break down compared to canned tomatoes. For a complete guide on making this soup, refer to the Full Recipe. This blog post covered key ingredients for creamy tomato basil soup, cooking steps, and tips. I shared options for vegan swaps and how to elevate flavor. Storing leftovers and reheating well keeps the soup tasty. Every little detail matters in your cooking. Use fresh ingredients and avoid common mistakes. With these tools and ideas, you can create a fantastic soup. Enjoy experimenting and make it your own!

Creamy Tomato Basil Soup Simple and Delicious Recipe

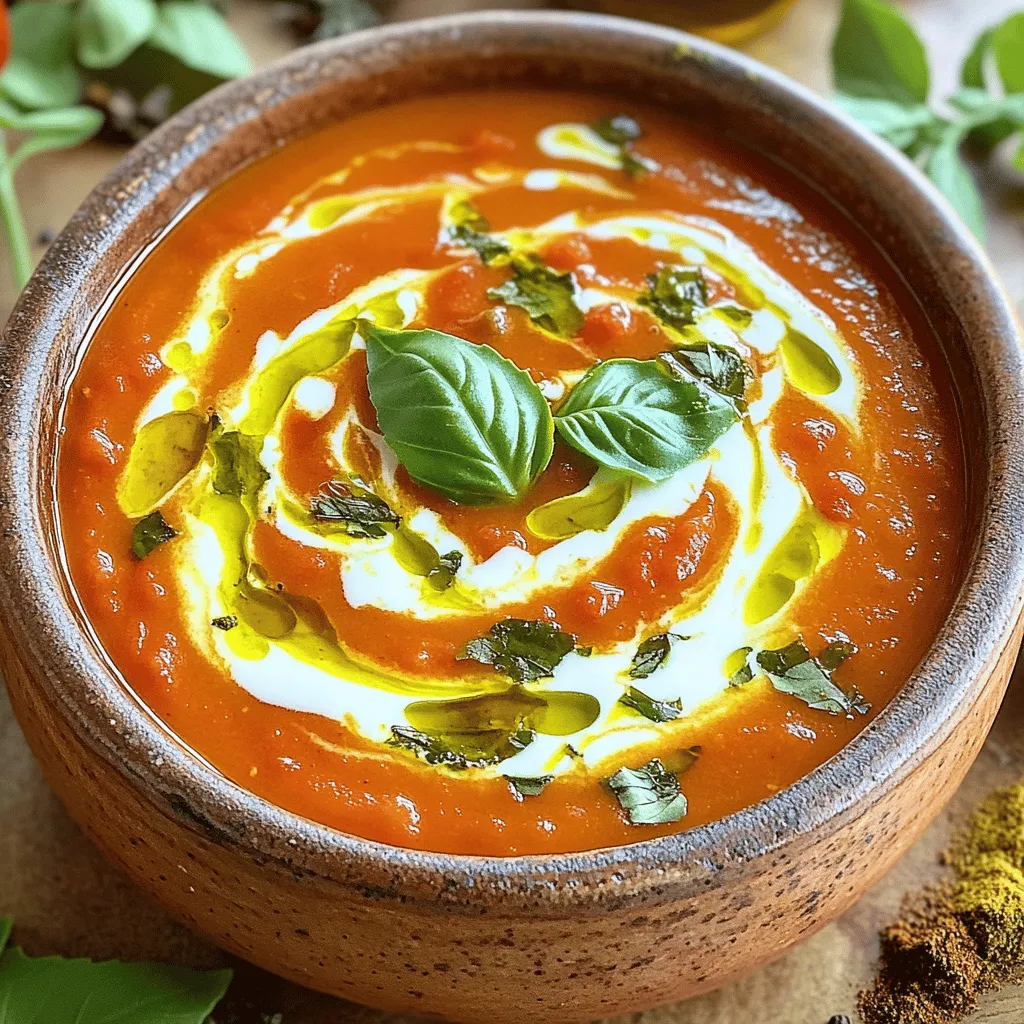
If you crave a cozy, warm bowl of soup, you’re in the right place! My creamy tomato basil soup recipe

- 4 boneless, skinless chicken breasts - 2 cups fresh spinach, chopped - 1 cup feta cheese, crumbled - 1/4 cup cream cheese, softened - 2 cloves garlic, minced - 1/2 teaspoon dried oregano - 1/4 teaspoon red pepper flakes (optional) - Salt and pepper to taste - 1 tablespoon olive oil - 1/2 cup breadcrumbs (for topping) - Fresh parsley, chopped (for garnish) - Lemon zest for brightness - Sun-dried tomatoes for additional richness - Sharp knife - Mixing bowl - Oven-safe skillet - Meat thermometer Gather these ingredients before you start. Fresh spinach and feta bring great flavor. Cream cheese adds a nice creaminess. Make sure to have a sharp knife for easy pocket creation in the chicken. An oven-safe skillet helps cook the chicken evenly. You’ll also want a meat thermometer to check the doneness. If you want to brighten the dish, add lemon zest. Sun-dried tomatoes can add a rich taste that pairs well with the feta. This dish is as tasty as it is satisfying. If you want the full recipe and instructions, check the details above! To make the filling, start by mixing the spinach, feta, and cream cheese together in a bowl. Chop the spinach finely so it blends well. Then, add two minced garlic cloves and season with oregano, salt, and pepper. If you like heat, toss in some red pepper flakes. Mix everything until it’s smooth and creamy. Next, take your chicken breasts. Use a sharp knife to create pockets in each one. Be careful not to cut all the way through. Once you have the pockets, fill each one with your spinach mixture. Make sure to pack it in well. If the pockets open, you can use toothpicks to secure them. Now it’s time to cook! Heat one tablespoon of olive oil in an oven-safe skillet over medium heat. Sear the stuffed chicken breasts for about 4 to 5 minutes on each side. You want them golden brown. After searing, sprinkle breadcrumbs on top for a crunchy finish. Transfer the skillet to your preheated oven at 375°F (190°C). Bake for 25 to 30 minutes. Check that the chicken reaches an internal temperature of 165°F (75°C) with a meat thermometer. This ensures it’s safe to eat. For the full recipe, refer to the previous section. To make a good pocket in your chicken, use a sharp knife. Slice carefully into the side of each breast. Stop before you cut all the way through. This helps keep your filling in place. Avoid overstuffing the chicken. Too much filling can cause it to spill out while cooking. Aim for a generous but manageable amount in each pocket. To add more flavor, try using fresh herbs like basil or thyme. You can also add lemon zest for a bright taste. Marinating the chicken in olive oil, lemon juice, and spices helps keep it moist. Just 30 minutes of marinating works wonders for flavor. If your chicken turns out dry, it might be overcooked. Always check the internal temperature. It should be 165°F (75°C). If you find stuffing spilling out, use toothpicks to seal the pockets. This keeps everything inside while cooking. For more details and a complete meal plan, check out the Full Recipe. {{image_2}} You can swap feta for mozzarella or goat cheese. Mozzarella adds creaminess. Goat cheese gives a tangy flavor. For a plant-based dish, use vegan cheese. There are many great options available now. Vegan cheese melts well and keeps the dish tasty. Try mixing in other greens like kale or Swiss chard. Both bring extra nutrients and flavor. You can also add roasted bell peppers for extra color and taste. They add a sweet touch and look beautiful. You can grill or air fry the stuffed chicken. Grilling adds a smoky flavor, while air frying keeps it juicy and crisp. Another option is slow cooking. This method makes the chicken tender and lets the flavors blend well. Each way offers a unique taste experience. For more details on making this dish, check the Full Recipe. To keep your Spinach Feta Stuffed Chicken fresh, store it in the fridge. Place the chicken in an airtight container to prevent it from drying out. Make sure to eat the leftovers within three days for the best taste and safety. When reheating, the best method is to use an oven. Preheat your oven to 350°F (175°C). Place the chicken in a baking dish and cover it with foil. Heat for about 15-20 minutes until warm. This method helps keep the chicken juicy and the flavors intact. You can freeze the stuffed chicken if you have leftovers. Wrap each piece tightly in plastic wrap. Then, place them in a freezer-safe bag or container. This way, they will keep for up to three months. When ready to eat, thaw in the fridge overnight. Reheat in the oven as mentioned before for the best texture and flavor. For the full recipe, check out the details above. To check if your chicken is done, use a meat thermometer. Insert it into the thickest part of the chicken. The safe internal temperature for chicken is 165°F (75°C). If you don't have a thermometer, cut into the chicken. The juices should run clear, not pink. Yes, you can prepare this dish ahead of time. Stuff the chicken and store it in the fridge for up to 24 hours. When ready to cook, take it out and let it sit at room temperature for 30 minutes. This helps it cook evenly. I love pairing this chicken with fresh salads and grains. A simple green salad with lemon vinaigrette works well. You can also serve it with quinoa or rice for a filling meal. For veggies, roasted asparagus or sautéed green beans add great color and taste. Try mixing in some cherry tomatoes for extra sweetness. Each side complements the chicken's flavors nicely. This post covered how to make delicious Spinach Feta Stuffed Chicken. We listed ingredients, kitchen tools, and step-by-step instructions. You learned tips for perfect stuffing and ways to enhance flavors. We also discussed variations and how to store the dish for later. Remember, you can customize the recipe to fit your taste. Enjoy this easy meal that’s full of flavor and nutrition! Cooking should be fun and simple. Happy cooking!

Spinach Feta Stuffed Chicken Tasty and Satisfying Dish

Looking for a delicious dinner idea? Spinach Feta Stuffed Chicken is packed with flavor and nutrients. This dish combines juicy

- 1 ripe mango, diced - 2 ripe avocados, diced - 1 small red bell pepper, finely chopped - 1 small red onion, finely chopped - 1 jalapeño, deseeded and minced - Juice of 2 limes - 1/4 cup fresh cilantro, chopped - Salt and pepper to taste - Optional: 1 teaspoon agave nectar for sweetness When I make mango avocado salsa, I start with fresh, ripe ingredients. The ripe mango gives a sweet taste. The avocados add creaminess that balances the salsa. The red bell pepper and onion provide crunch and color. The jalapeño brings a little heat, but you can skip it if you prefer mild flavors. I love using lime juice in my salsa. It brightens the dish and adds freshness. Fresh cilantro gives a herby note that ties everything together. You can add salt and pepper to enhance the flavors. If you like a hint of sweetness, try adding agave nectar. It complements the fruit well. - Calories per serving: approximately 120 - Macronutrient breakdown: - Carbohydrates: 18g - Protein: 2g - Fats: 7g Mango avocado salsa is not only tasty; it’s also healthy. The mango and avocado provide many vitamins. They are rich in fiber, which is great for digestion. The salsa is low in calories, making it a perfect snack. Enjoying this salsa can give you energy without extra calories. Eating this salsa can also support your heart health. The healthy fats from avocados help reduce bad cholesterol. Plus, the vitamins from the fruits boost your immune system. Enjoy this fresh and flavorful delight with your meals or as a snack! For the full recipe, check out the instructions above. - Start by dicing the ripe mango and avocados. - In a large bowl, combine the diced mango and avocados. - Next, add the finely chopped red bell pepper and red onion. - Don’t forget to include the minced jalapeño. - Squeeze the juice of two limes over the mixture. - Add the chopped cilantro and gently stir to mix. - Season your salsa with salt and pepper to taste. - If you want it sweeter, add agave nectar and mix again. - For the best flavor, let the salsa sit for 10-15 minutes before serving. - Serve the salsa in a colorful bowl. - Place tortilla chips on the side for dipping. - Garnish with extra cilantro leaves and lime wedges for a pop of color. This simple method makes a fresh and flavorful Mango Avocado Salsa. You can find the [Full Recipe] for more details. To get the best taste, balance sweetness and acidity. The ripe mango brings sweetness. The lime juice adds a bright kick. Adjust the lime juice if it’s too sweet. Start with less, then add more if needed. For spice, the jalapeño gives heat. If you want less heat, remove all seeds. Taste as you mix to find your ideal spice level. Don’t forget: you can always add more, but you can’t take it away! To keep your salsa fresh, store it in an airtight container. This helps prevent browning. Place a piece of plastic wrap directly on the salsa before sealing the lid. This reduces air exposure. If you have leftovers, use them within two days for the best taste. After that, the avocados may turn brown. If that happens, it's still safe to eat, but not as pretty! One mistake is over-mashing the avocados. You want chunks, not a smooth paste. Gently stir to keep some texture. This makes your salsa look great and taste fresh. Another common error is using unripe mangoes. They are hard and lack sweetness. Choose ripe mangoes for a juicy, flavorful salsa. This ensures each bite bursts with flavor. {{image_2}} You can change the mango and avocado in your salsa. Try using peaches instead of mango. They add a sweet touch. For avocado, use diced cucumbers for a fresh crunch. Tomatoes can also work well here. They bring extra juiciness and color. This salsa is easily vegan. Every ingredient is plant-based, making it a great choice. If you need it gluten-free, rest easy! All the ingredients already fit that diet. You can enjoy this salsa without worry. Want to boost the taste? Adding spices can be a great idea. Try cumin or smoked paprika for depth. Fresh herbs like mint or basil can also add a twist. To make it fruitier, toss in some diced pineapple or peach. They give a tropical vibe that is hard to resist. This salsa is a full flavor fiesta! You can find the full recipe above. Mango avocado salsa shines with many main dishes. Consider serving it with grilled chicken or fish. The sweet and tangy salsa brightens up these proteins. You can also pair it with shrimp tacos. The fresh flavors will make your meal pop. For a vegetarian option, try it with black bean tacos. This salsa adds a nice crunch and color. Events are perfect for enjoying this salsa. It works great at picnics, barbecues, or parties. Guests love the bright colors and fresh flavors. It’s a hit for any gathering! You can use mango avocado salsa in many fun ways. As a topping for tacos, it brings a fresh twist. It adds color and flavor to any taco. You can also mix it into salads. This salsa makes greens more exciting and tasty. Grilled meats also love this salsa. Try it on grilled chicken or beef. The mix of flavors will delight your taste buds. It’s a simple way to elevate your meal. When enjoying mango avocado salsa, choose drinks that complement its flavors. A light, crisp white wine pairs nicely. Think of Sauvignon Blanc or Pinot Grigio. These wines enhance the freshness of the salsa. For non-alcoholic options, go for sparkling water with lime. It’s refreshing and easy to make. You could also enjoy coconut water for a tropical vibe. Both drinks keep your meal light and fun. For the full recipe, check out our guide to making mango avocado salsa. Mango Avocado Salsa lasts about 2 to 3 days in the fridge. Store it in an airtight container. The flavors stay fresh, but the avocados can brown. To slow this down, add lime juice. Yes, you can freeze Mango Avocado Salsa. To do this, place your salsa in a freezer-safe bag or container. Make sure to remove air to prevent freezer burn. When ready to eat, thaw it overnight in the fridge. The texture may change slightly, but the taste will still shine. You can use lemon juice as an alternative. It gives a similar tang. Another option is vinegar. Apple cider vinegar or white vinegar can add the acidity you need. These substitutes keep your salsa bright and zesty. The salsa can be spicy, depending on the jalapeño. If you want less heat, remove the seeds and ribs. You can also use a milder pepper like a bell pepper. Adjust the spice to fit your taste buds. You can make this salsa ahead of time. If you do, prepare it only a few hours before serving. This gives the flavors time to blend. To keep the avocados from browning, mix in lime juice right before serving. Enjoy a boost of flavor with every bite! Mango avocado salsa is a fresh delight that combines vibrant flavors and nutrients. We explored key ingredients and steps for making it easy and tasty. I shared tips to perfect the flavor and avoid common mistakes. You can even try variations to suit your taste. Whether serving at a picnic or a gathering, this salsa brings joy to any meal. Enjoy making it your own and savor every bite.

Mango Avocado Salsa Fresh and Flavorful Delight

Dive into the vibrant world of Mango Avocado Salsa, a fresh and delicious addition to your meals! This salsa bursts

- 2 cups cooked jasmine rice (preferably chilled) - 1 ripe pineapple, halved and hollowed out (reserve the flesh) - 1 cup mixed vegetables (carrots, peas, and bell peppers) - 2 tablespoons vegetable oil - 3 cloves garlic, minced - 1 small onion, diced - 2 green onions, sliced (green parts only) - 2 tablespoons soy sauce - 1 tablespoon fish sauce (or vegetarian alternative) - 1 teaspoon sesame oil - 1/2 teaspoon black pepper - 1/4 cup cashews, toasted - Fresh cilantro, for garnish - Lime wedges, for serving Pineapple fried rice is colorful and tasty. It shines with fresh ingredients. The jasmine rice gives this dish a nice texture. Using chilled rice helps avoid clumping. The ripe pineapple adds sweetness and a fruity taste. Hollowing out the pineapple makes a fun bowl for serving. Mixed vegetables bring bright colors and crunch. Garlic and onion add aromatic flavors. The soy sauce and fish sauce give a savory kick. Sesame oil adds a nutty touch. Cashews add crunch and richness. Top it all off with cilantro for freshness. This dish is filling yet light. The mix of flavors and textures makes it special. For the full recipe, follow the steps to create this delight. First, take a ripe pineapple. Cut it in half carefully. Use a spoon to scoop out the flesh. Be gentle to avoid breaking the shell. After removing the flesh, chop it into small pieces. Set these chunks aside for later. This pineapple will add sweetness and flavor to your dish. Next, grab a large skillet or wok. Heat 2 tablespoons of vegetable oil over medium-high heat. When it’s hot, add 3 cloves of minced garlic and 1 small diced onion. Cook them for 2-3 minutes until they smell great and soften. Next, add 1 cup of mixed vegetables. Stir-fry these for about 3-4 minutes. You want them to be tender but still crisp. Now, push the vegetables to one side of the skillet. On the other side, add 2 cups of chilled jasmine rice. Break up any clumps and let it fry for 2-3 minutes. Then, stir in the reserved pineapple chunks, 2 tablespoons of soy sauce, 1 tablespoon of fish sauce, 1 teaspoon of sesame oil, and 1/2 teaspoon of black pepper. Mix everything well for another 2-3 minutes. Finally, fold in 1/4 cup of toasted cashews and 2 sliced green onions. Spoon the fried rice into the hollowed-out pineapple halves. This makes for a lovely presentation. Don’t forget to garnish with fresh cilantro and serve with lime wedges. Enjoy your meal! For the full recipe, check out the details above. Use jasmine rice for the best flavor. It has a nice aroma and texture. Cook the rice a day before. This makes it easier to fry. Chilling helps the grains stay separate. You can also use long-grain rice if you prefer. To keep your rice from getting soggy, use cooled rice. Fresh, hot rice can clump together and become mushy. Spread the rice on a baking sheet. Let it cool for about 30 minutes. This way, each grain stays firm. Add more flavor by using fresh herbs. Cilantro adds a bright touch. Lime juice gives a zesty kick. You can also try adding a bit of ginger. It pairs well with the sweetness of pineapple. For a savory note, consider using cooked bacon. It adds depth to your dish. Check out the Full Recipe for more tips on balancing flavors. {{image_2}} You can easily make this dish meat-free. Just skip the animal products. Use more veggies like bell peppers, carrots, and peas. Add tofu for protein. You can also try different greens like spinach or kale. This gives your dish a fresh look and taste. If you want some meat in your fried rice, go for chicken or shrimp. Cook the protein first, then add it back when you mix everything. For a plant-based option, tofu is a great choice. Just cube it and sauté it until golden. Each protein option adds a unique flavor. Want to turn up the heat? Add chili flakes or fresh chilies. You can mix them in while cooking the garlic. This gives your fried rice a nice kick. Adjust the spice level to your taste. Everyone loves a little adventure in their meal! For more details, check out the Full Recipe. To store leftover pineapple fried rice, let it cool first. Then, place it in an airtight container. You can keep it in the fridge for up to three days. Make sure to label the container with the date. This way, you will remember when you made it. When you want to reheat the rice, use a microwave or a skillet. If using a microwave, place the rice in a bowl with a splash of water. Cover it and heat for about two minutes. If using a skillet, add a little oil and heat over medium heat. Stir often and heat until warm. If you want to freeze pineapple fried rice, do it within two days. Use a freezer-safe container and leave some space at the top. This allows the rice to expand. It can last up to three months in the freezer. When you're ready to eat it, thaw it in the fridge overnight before reheating. Yes, you can use fresh pineapple. Fresh pineapple adds a bright flavor. It also gives a nice texture. To use fresh, cut the pineapple in half and scoop out the flesh. Chop the flesh into small pieces and mix it into your fried rice. This method keeps the dish fresh and tasty. To make pineapple fried rice gluten-free, swap soy sauce for tamari. Tamari has a similar taste and is gluten-free. Always check the labels to ensure they are safe. You can also skip the fish sauce or use a gluten-free version. This way, everyone can enjoy this dish without worry. If you want to skip fish sauce, use soy sauce instead. You can also try coconut aminos. Coconut aminos give a slightly sweet flavor. This option works well for those who avoid fish. Adjust the amount to your taste, so the dish remains balanced and flavorful. Pineapple fried rice is a fun and tasty dish. We covered the ingredients, steps, and tips to make it great. You learned how to store leftovers and reheat them too. Remember, you can customize this dish easily. Try adding proteins or spice it up with heat. This meal fits many diets, making it perfect for everyone. Enjoy your cooking adventure and share this delightful recipe with friends!

Pineapple Fried Rice Delightful and Easy Recipe

Looking for a flavorful and simple meal? Pineapple Fried Rice is your answer! This bright dish mixes sweet pineapple with

Here’s what you need for your cinnamon roll casserole: - 2 cans of refrigerated cinnamon roll dough (with icing) - 4 large eggs - 1 cup milk - 1 teaspoon vanilla extract - 1 teaspoon ground cinnamon - 1/2 cup brown sugar - 1/4 cup chopped pecans (optional) - 1/4 cup raisins (optional) - Cream cheese frosting (included in the cinnamon roll package or homemade) These ingredients make a tasty breakfast delight. The cinnamon roll dough gives the dish its sweet, fluffy base. Eggs and milk create a rich custard that soaks into the rolls. Vanilla and cinnamon add warm, comforting flavors. Brown sugar adds extra sweetness, while pecans and raisins provide a nice crunch and chew. Using cream cheese frosting on top makes it even better. You can keep the frosting simple or make your own. This dish is perfect for family gatherings or lazy weekend breakfasts. For the full recipe, check out the [Full Recipe]. First, preheat your oven to 350°F (175°C). This step is key to baking your casserole evenly. While the oven heats, grease a 9x13 inch baking dish with cooking spray or butter. This will prevent sticking and help with easy serving. Open the cans of refrigerated cinnamon roll dough. Cut each roll into quarters. You want to create bite-sized pieces. Spread the cut pieces evenly in the prepared baking dish. Make sure they are well-distributed for even cooking. In a large bowl, whisk together the eggs and milk. This mixture will bind the rolls together. Next, add in the vanilla extract, ground cinnamon, and brown sugar. Mix until everything is well combined. This step adds flavor and sweetness to your casserole. Now, pour the egg mixture over the cinnamon roll pieces in the baking dish. Make sure every piece is soaked. If you want, sprinkle chopped pecans and raisins on top for added texture and flavor. These ingredients are optional but can enhance your dish. Place the baking dish in the preheated oven. Bake for 25-30 minutes. Keep an eye on it; the casserole will be set and golden brown when done. You will know it’s ready when a toothpick inserted comes out clean. This is the perfect time to enjoy the aroma filling your kitchen. To cut the cinnamon rolls easily, use a sharp knife. Slice each roll into four pieces for even cooking. This helps each piece soak up the egg mix well. For maximum flavor, add extra spices. A pinch of nutmeg or cardamom pairs nicely with cinnamon. These spices can elevate your dish's taste. Serving your cinnamon roll casserole with a dusting of powdered sugar looks nice. It adds a sweet touch that everyone loves. You can also include fresh fruits like berries or banana slices. They add color and freshness to your meal. This makes the dish more appealing and fun to eat. You can choose between store-bought or homemade cream cheese frosting. Both options taste great, but homemade adds a personal touch. When drizzling, use a spoon or squeeze bottle for control. This way, you can make pretty patterns on each serving. It adds a nice finishing touch to your lovely cinnamon roll casserole. For the full recipe, check out the earlier section. {{image_2}} You can make your cinnamon roll casserole even more special by adding fruit. Apples and berries work great. Just chop the fruit into small pieces. Mix them in with the cinnamon rolls for added sweetness and flavor. You can also swap in different nuts or chocolate chips. Chopped walnuts or pecans add a nice crunch. Chocolate chips give a tasty twist that kids love. If you need gluten-free options, look for gluten-free cinnamon roll dough. Many stores sell it now. For dairy-free needs, use plant-based milk like almond or oat milk. You can also replace eggs with flaxseed meal. Just mix one tablespoon of flaxseed meal with three tablespoons of water. Let it sit for a few minutes to thicken. This mix works well in many baked goods. To enjoy your casserole, pair it with a warm drink. Coffee complements the sweet flavors perfectly. Fresh juice is a great option too, adding a refreshing touch. If you want to impress guests, create a brunch buffet. Serve the casserole with fresh fruit and yogurt on the side. This makes for a colorful and fun spread. You can find the full recipe online and customize it to your liking. To keep your cinnamon roll casserole fresh, place it in the fridge. Let it cool first. Then, cover it tightly with plastic wrap or foil. You can also use an airtight container. This helps keep moisture in and prevents drying out. When you're ready to enjoy leftovers, you have a few options. You can use the oven or microwave. For the oven, preheat to 350°F (175°C). Place the casserole in a baking dish and cover with foil. Bake for about 15-20 minutes until warm. In the microwave, heat in 30-second intervals. This method works fast. Be careful to not overheat, as it can make the casserole dry. You can freeze this casserole, too! If you want to freeze it before baking, prepare the dish as usual, but do not bake. Cover it tightly and place it in the freezer. To thaw, move it to the fridge overnight before baking. If you freeze it after baking, cool it first, then wrap it well. To reheat, just bake it from frozen at 350°F (175°C) for about 30-35 minutes. Enjoy your delicious treat anytime! You can use other types of dough. Try using biscuit dough for a flakier texture. Croissant dough also works well for a buttery flavor. If you are feeling adventurous, use puff pastry for a unique twist. Yes, you can. Prepare the casserole the night before. Just cover it and keep it in the fridge. In the morning, bake it straight from the fridge. This saves time and makes breakfast easy. Leftovers will last about three to four days in the fridge. Store them in an airtight container to keep them fresh. You can reheat portions in the microwave for a quick treat. In this article, we covered how to make a delicious cinnamon roll casserole. We discussed the key ingredients and each step in the process, from mixing the dough to baking. I shared helpful tips to enhance flavor and boost presentation. You can vary the recipe to suit your taste, such as using fruit or different nuts. Finally, I provided storage tips to keep leftovers fresh. With these easy steps, you can enjoy a warm, tasty dish any time.

Cinnamon Roll Casserole Tasty Breakfast Delight

Looking for a fun and easy breakfast? Let me introduce you to Cinnamon Roll Casserole! This tasty dish takes everything

- Tofu and Vegetables - 1 block firm tofu, drained and pressed - 1 red bell pepper, sliced - 1 yellow bell pepper, sliced - 1 cup broccoli florets - 1 cup sugar snap peas, trimmed - 1 medium carrot, julienned - 3 cloves garlic, minced - 1-inch piece ginger, grated - Sauces and Seasonings - 1 tablespoon cornstarch - 2 tablespoons sesame oil - 3 tablespoons soy sauce - 1 tablespoon maple syrup or honey - 1 tablespoon rice vinegar - 1 teaspoon sriracha (optional, for heat) - Sesame Seeds - Chopped green onions In this dish, I focus on fresh and colorful veggies, along with firm tofu. Tofu gives the stir-fry protein, while the vegetables add crunch and flavor. I like to use a mix of bell peppers, broccoli, and snap peas. This adds both color and texture to the meal. For sauces and seasonings, I often go with soy sauce for saltiness. Maple syrup or honey adds a bit of sweetness, which balances the salty flavor. Sesame oil gives a nutty taste that enhances the dish. If you want some heat, add sriracha. Don't skip the garnishes! Toasted sesame seeds and green onions make the dish look nice and taste even better. They add a fun crunch and fresh flavor. You can find the Full Recipe to make this delicious vegetable stir-fry with tofu. Enjoy cooking! Start by cutting the pressed tofu into bite-sized cubes. This size helps the tofu cook evenly. Then, toss the tofu cubes in cornstarch. Make sure each piece gets a nice coating. This helps create a crispy texture when you cook it. Next, heat 1 tablespoon of sesame oil in a large non-stick skillet or wok over medium-high heat. Once the oil is hot, add the tofu cubes in a single layer. Cook the tofu until it turns golden brown and crispy on all sides, about 8-10 minutes. Once crispy, remove the tofu from the skillet and set it aside. In the same skillet, add the remaining sesame oil. Once hot, add the minced garlic and grated ginger. Sauté them for about 30 seconds until they smell great. Now, add the sliced bell peppers, broccoli florets, sugar snap peas, and julienned carrots to the skillet. Stir-fry these colorful veggies for about 4-5 minutes. You want them to be bright and slightly tender but still crisp. In a small bowl, mix together soy sauce, maple syrup or honey, rice vinegar, and sriracha if you want some heat. Pour this sauce over the stir-fried veggies. Finally, return the crispy tofu to the skillet. Gently toss everything together, making sure the tofu and vegetables are well coated with the sauce. Cook for another 2-3 minutes. Remove from heat and let it rest for a minute before serving. You can find the full recipe for this dish in the main article. Enjoy your colorful and tasty meal! To make crispy tofu, start by pressing it well. Remove excess water by placing a heavy object on it. After pressing, cut the tofu into cubes. Next, coat each cube with cornstarch. This helps create a crispy outer layer. When you fry the tofu, use hot sesame oil. Cook it until golden brown, about 8-10 minutes. This method gives you that wonderful crunch. Choosing the right vegetables makes a big difference in your stir-fry. I love using seasonal produce for the best flavor. Bell peppers, broccoli, and snap peas are my favorites. They add color and crunch. You can also try carrots, zucchini, or even mushrooms. Mix a variety of colors for a fun look. Each vegetable cooks at its own pace. Keep them crisp by not overcooking. Sauces can change the whole dish. Start with soy sauce for a savory base. Then, add maple syrup or honey for sweetness. Rice vinegar brings a tangy note. If you like it spicy, add sriracha. You can adjust these amounts to match your taste. Experiment until you find your perfect mix. For a richer flavor, try garlic or ginger in the sauce. This will take your stir-fry to the next level. Remember, every ingredient counts for a great meal! For the full recipe, check out the Rainbow Vegetable Stir-Fry with Tofu 🥦. {{image_2}} If you want to change up the protein, try tempeh or chickpeas. Tempeh has a nutty taste and a firm texture. It soaks up flavors well. Simply cut it into cubes like tofu and cook it the same way. Chickpeas add a nice bite and are great for a quick meal. Use canned chickpeas for ease; just rinse and add them to your stir-fry. Both options offer a great protein boost and work well with the sauce. You can use different vegetables based on what you have. Seasonal and local veggies add freshness and flavor. In fall, use Brussels sprouts or squash. In summer, add zucchini or eggplant. Feel free to mix and match what you enjoy. Just remember to cut them into similar sizes for even cooking. This way, your stir-fry stays colorful and vibrant. Want to kick up the heat? Add more sriracha or some chili flakes. For a sweeter touch, include pineapple chunks or extra maple syrup. Sweet and spicy flavors blend nicely. You can also try adding a dash of hoisin sauce for extra depth. These little tweaks can make your stir-fry unique every time you cook it. Store your vegetable stir-fry with tofu in a sealed container. Let it cool to room temperature first. Place it in the fridge within two hours of cooking. This keeps it fresh and safe to eat. It will stay good for up to three days. You can reheat your stir-fry in two ways: the microwave or stovetop. For the microwave, place your stir-fry in a bowl. Cover it with a damp paper towel. Heat it for about one to two minutes. Stir halfway to heat evenly. If using the stovetop, put the stir-fry in a pan over medium heat. Add a splash of water or oil to help steam it. Stir often until it's hot. To freeze your stir-fry, let it cool first. Use a freezer-safe container or bag. Remove as much air as possible. Label it with the date. It will last up to three months. When ready to eat, thaw it in the fridge overnight before reheating. This keeps the flavors and textures nice. Enjoy your meal later! For the full recipe, check out the Rainbow Vegetable Stir-Fry with Tofu. Yes, you can prepare this stir-fry in advance. Here’s how: - Cook the tofu and vegetables as directed but stop before adding the sauce. - Cool the stir-fry completely before storing it in an airtight container. - Refrigerate for up to three days. - When ready to eat, reheat in a pan and add the sauce. This helps keep the flavors fresh! Tofu can become soggy if not handled well. Here are some tips: - Use firm tofu; it holds its shape better. - Press the tofu to remove excess water before cooking. - Coat the tofu in cornstarch to create a crispy layer. - Cook in hot oil until golden brown. This gives it a nice crunch! You can pair this stir-fry with many sides: - Serve over rice or quinoa for a filling meal. - Add noodles for a fun twist. - Top with nuts for added crunch and flavor. - Serve with a side salad for extra veggies. Each option adds a new layer of taste to your meal! For a complete guide, check out the Full Recipe. In this post, I covered key ingredients, cooking steps, and helpful tips for making a tasty stir-fry. You learned how to prepare crispy tofu, stir-fry veggies, and customize flavors. Remember to choose fresh ingredients for the best taste. Feel free to swap proteins or veggies based on what you love. With these steps, you can enjoy a delicious dish any time. Cooking stir-fry is easy and fun, so get creative and make it your own!

Vegetable Stir-Fry with Tofu Flavorful and Easy Dish

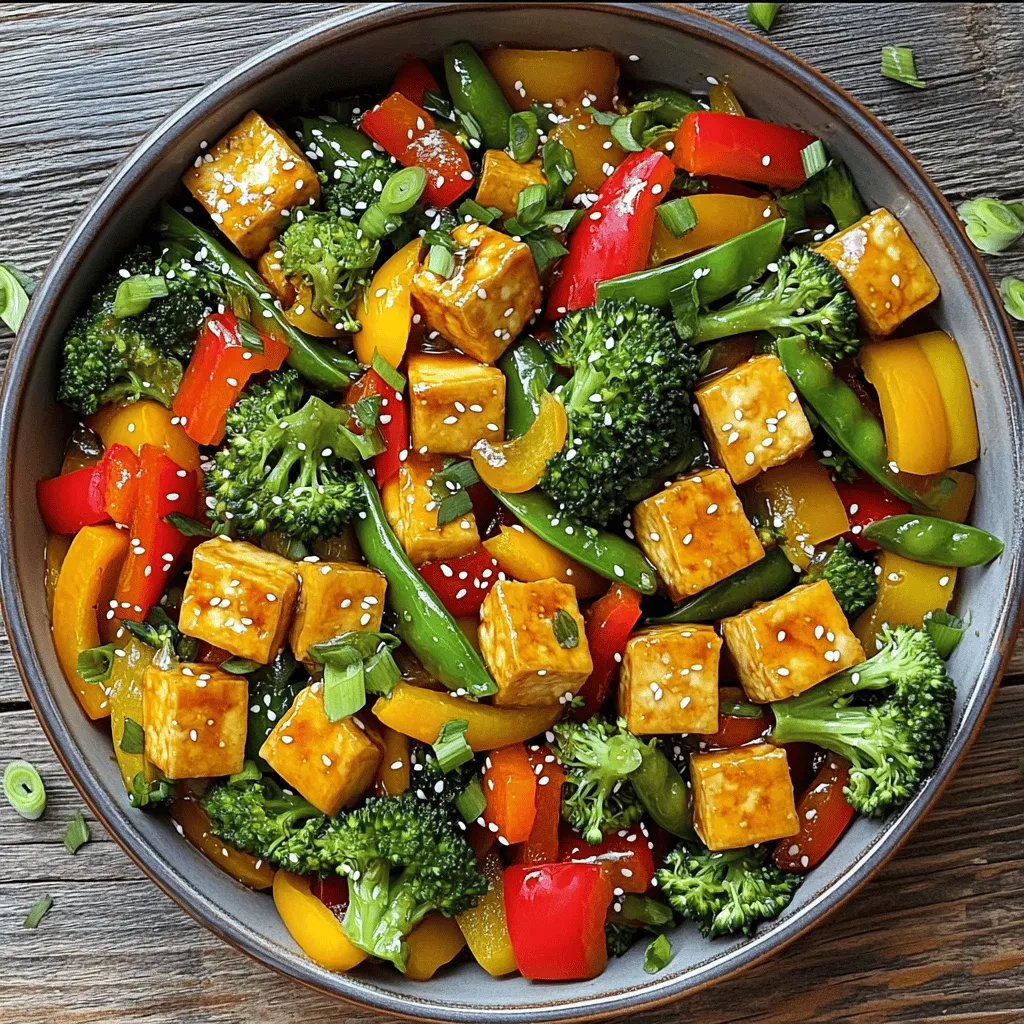
Looking for a quick and tasty meal? This Vegetable Stir-Fry with Tofu is your answer! Packed with fresh veggies and

To make a tasty savory sweet potato hash, gather these ingredients: - 2 large sweet potatoes, peeled and diced - 1 red bell pepper, diced - 1 green bell pepper, diced - 1 medium onion, diced - 3 cloves garlic, minced - 2 tablespoons olive oil - 1 teaspoon smoked paprika - 1/2 teaspoon ground cumin - Salt and pepper to taste - 4 large eggs (optional) - Fresh parsley or cilantro for garnish If you have dietary needs, here are some swaps: - Use butternut squash instead of sweet potatoes for a different taste. - Substitute olive oil with avocado oil for a higher smoke point. - For a vegan dish, skip the eggs or use tofu instead. - Choose low-sodium options for salt and spices if needed. You can boost the flavor with these add-ins: - Add chopped spinach or kale for some greens. - Mix in cooked bacon or sausage for a meatier dish. - Sprinkle feta or goat cheese on top for creaminess. - Try some hot sauce or red pepper flakes for heat. The full recipe can guide you through making this delicious dish. Enjoy! To start, gather your sweet potatoes and dice them into small cubes. You want even sizes for even cooking. Next, chop the red and green bell peppers, onion, and garlic. Toss all these veggies in a big bowl. Add the olive oil, smoked paprika, cumin, salt, and pepper. Mix it well to coat everything. Then, spread the mixture on a baking sheet lined with parchment paper. This helps with cleanup later! Preheat your oven to 400°F (200°C). Once it’s hot, place your baking sheet in the oven. Bake for about 25 minutes. Remember to stir the hash halfway through. This step helps to get that nice crispy texture on all sides. Keep an eye on it; you want the sweet potatoes tender and slightly crispy. For the best texture, ensure the sweet potatoes are cut evenly. This way, they all cook at the same rate. Stirring halfway through baking allows for even cooking and crisping. If you like your hash extra crispy, leave it in the oven for a few more minutes. When it’s done, taste it and adjust the seasoning if needed. If you're adding eggs, poach them while the hash cooks for a delightful finish. Enjoy this flavorful breakfast delight with the full recipe for more details! When making savory sweet potato hash, avoid cutting sweet potatoes too small. They may burn easily. Also, don't skip preheating the oven. This step helps the potatoes cook evenly. Ensure you stir the hash halfway through roasting. This keeps it from sticking to the pan. Finally, taste your hash before serving. Adjust the salt and pepper to your preference. To make your sweet potato hash pop, use smoked paprika. It adds a rich, smoky taste. Ground cumin brings warmth and depth too. You can also add a pinch of cayenne for heat. Fresh herbs, like parsley or cilantro, add brightness. If you want more flavor, try adding some onion powder or garlic powder. These spices boost the overall taste without much effort. Serve your savory sweet potato hash hot. Top it with a poached egg for a delicious twist. The runny yolk adds creaminess and richness. You can also add some avocado slices. They bring a nice, creamy texture. For a colorful plate, sprinkle fresh herbs on top. This makes your dish look great and adds flavor. Use a colorful plate to make your meal more inviting. For more details, check out the Full Recipe. {{image_2}} To make this dish vegetarian, simply skip the eggs. You can add more veggies instead. Try using spinach, mushrooms, or zucchini. For a vegan twist, use avocado instead of eggs. This will add creaminess and healthy fats. You can also swap olive oil for coconut oil for a different flavor. If you want more protein, add sausage or bacon. Cook them until crispy, then mix them into the hash. Chicken sausage or turkey bacon work well too. These meats bring a savory taste and make the dish heartier. You can even use leftover meats from dinner to save time. You can cook sweet potato hash in different ways. Skillet cooking gives a nice char and crispy edges. Just add oil to a pan, then cook over medium heat. Stir often until the sweet potatoes are tender. If you love grilling, use a grill basket. This method adds a smoky flavor. You can also bake it as in the Full Recipe. Roasting in the oven gives a hands-off approach and evenly cooked veggies. To keep your savory sweet potato hash fresh, let it cool first. Then, transfer it to an airtight container. This helps to lock in flavors and keep the dish moist. Make sure to use a clean spoon when serving to avoid contamination. Store it in the fridge, where it will stay tasty for a few days. When it's time to enjoy your leftovers, reheat them in the oven or on the stovetop. For the oven, preheat it to 350°F (175°C) and spread the hash on a baking sheet. Heat for about 10–15 minutes until it warms through. If using the stovetop, add a splash of olive oil and cook over medium heat. Stir often until hot. This keeps the hash crispy and delicious. If stored properly, sweet potato hash lasts about 3 to 5 days in the fridge. For longer storage, consider freezing it. In the freezer, it can last up to 3 months. Just place it in a freezer-safe container or bag. When ready to eat, thaw it overnight in the fridge before reheating. Enjoy your savory sweet potato hash from the [Full Recipe] anytime! You can use regular potatoes, butternut squash, or even carrots. Each adds a unique taste. Regular potatoes give a classic flavor. Butternut squash offers a sweet twist. Carrots add a nice crunch and sweetness. Adjust your cooking time as needed for each substitute. Yes, you can make it ahead! Cook the hash and let it cool. Store it in an airtight container in the fridge. It stays fresh for about three days. When ready to eat, just reheat on the stove or microwave. This makes breakfast so easy! To get that crispy texture, spread the sweet potatoes in a single layer. Use enough olive oil to coat them well. Roast at a high temperature, like 400°F (200°C). Stir halfway to ensure even cooking. You can also finish it off under the broiler for a minute or two. Yes, you can freeze sweet potato hash! Let it cool completely, then transfer it to a freezer-safe bag. Remove as much air as possible before sealing. It can last up to three months in the freezer. When ready, thaw it overnight in the fridge and reheat. To adjust the spice level, add more or less smoked paprika and cumin. For a kick, try adding cayenne pepper or chili powder. If you prefer milder flavors, reduce the spices. Taste as you go to find your perfect balance. In this post, I covered everything about sweet potato hash. You learned about the best ingredients and how to swap them for your needs. I shared step-by-step instructions for perfect texture and cooking times. Plus, I gave tips on avoiding common mistakes and enhancing flavors. You also discovered delicious variations, smart storage tips, and answered common questions. Feel free to try new twists on this dish. Get creative, and make it your own! Enjoy your cooking journey!

Savory Sweet Potato Hash Flavorful Breakfast Delight

Start your day with a burst of flavor! My Savory Sweet Potato Hash is not just a breakfast—it’s a delightful

Older posts
Newer posts
← Previous Page1 … Page34 Page35 Page36 … Page61 Next →

dsad

© 2025 Emmas Dish • Built with GeneratePress

Our Policies

  • Copyright Policy
  • Cookie Policy
  • GDPR Policy
  • Privacy Policy
  • Disclaimer
  • Terms Of Use

More Information

  • Home
  • About
  • Contact
  • Appetizers
  • Dessert
  • Dinner
  • Drinks
©2025, Emmas Dish About Back To Top