Skip to content
DisclaimerTerms Of UseGDPR PolicyCookie Policy

Emmas Dish

  • Home
  • Drinks
  • Appetizers
  • Dinner
  • Dessert
  • About
  • Contact
  • Privacy Policy
DisclaimerTerms Of UseGDPR PolicyCookie Policy

Emma

- 1 cup quinoa - 2 cups water or vegetable broth - 1 cup cherry tomatoes, halved - 1 cucumber, diced - 1 bell pepper (red or yellow), diced - 1/2 red onion, finely chopped - 3/4 cup kalamata olives, pitted and sliced - 1/2 cup feta cheese, crumbled - 1/4 cup fresh parsley, chopped - 1/4 cup extra virgin olive oil - 2 tablespoons lemon juice - Salt and pepper to taste This salad is not just tasty; it is also healthy. One serving has about: - Calories: 250 - Protein: 7g - Carbohydrates: 30g - Fat: 12g - Fiber: 4g These numbers can vary based on how much dressing you use. Let's talk about the key ingredients in this Mediterranean quinoa salad. - Quinoa: This is the base of our salad. Quinoa is a whole grain that cooks quickly. It is high in protein and gluten-free. - Olives: Kalamata olives add a salty, briny flavor. They also give healthy fats to your meal. - Feta cheese: This cheese adds creaminess and a tangy taste. It complements the fresh veggies well. - Cherry tomatoes and cucumber: These add crunch and freshness. They bring color and hydration to the salad. - Olive oil and lemon juice: This dressing adds richness and brightness. It ties all the flavors together. Using these fresh and wholesome ingredients makes this dish both delicious and nutritious. For the complete recipe, check out the Full Recipe section. To start, rinse 1 cup of quinoa in cold water. This step removes the bitter coating called saponin. Next, add the rinsed quinoa to a medium saucepan with 2 cups of water or vegetable broth. Bring this to a boil over medium-high heat. Once boiling, lower the heat to a simmer. Cover the pot and cook for about 15 minutes. You know it's done when all the liquid is gone. After cooking, let the quinoa sit covered for 5 minutes. Fluff it with a fork to make it light and airy. In a large mixing bowl, combine the cooked quinoa with fresh veggies. Add 1 cup of halved cherry tomatoes, 1 diced cucumber, and 1 diced bell pepper. Include 1/2 of a finely chopped red onion and 3/4 cup of sliced kalamata olives. Crumble in 1/2 cup of feta cheese for a creamy touch. Finally, fold in 1/4 cup of chopped fresh parsley. This mix gives the salad a vibrant look and a range of textures. For the dressing, grab a small bowl. Whisk together 1/4 cup of extra virgin olive oil and 2 tablespoons of lemon juice. Add salt and pepper to taste. Whisk until the mixture is smooth. Pour this dressing over the salad and toss gently. Make sure every ingredient is well-coated. To enhance the flavor, let the salad sit for about 15 minutes before serving. This waiting time helps all the flavors come together nicely. For the complete instruction set, check the Full Recipe. To cook quinoa perfectly, rinse it well. Rinsing removes the bitter coating called saponin. In a pot, add one cup of quinoa and two cups of water or broth. Bring it to a boil over medium-high heat. Once it boils, lower the heat, cover, and simmer for about 15 minutes. After that, let it sit off the heat for five minutes. Finally, fluff it with a fork to make it light and airy. To boost the flavor, add a pinch of salt to the cooking water. You can also use vegetable broth instead of water for more taste. Fresh herbs bring brightness too. Try adding basil or mint for a twist. A dash of red pepper flakes can give it a nice kick. Remember to taste as you go; it helps balance the flavors just right. Serve your Mediterranean quinoa salad in a large glass bowl or wooden platter. This makes it look inviting. Garnish with extra parsley and some lemon wedges to brighten the dish. Use colorful bowls to highlight the fresh ingredients. You can also serve it with pita bread and hummus for a complete meal. For a fun touch, let guests serve themselves from the bowl. It creates a festive feel, perfect for gatherings. For the full recipe, follow the instructions and enjoy this fresh and healthy choice! {{image_2}} You can change the ingredients in the Mediterranean quinoa salad. For example, swap out feta cheese for avocado if you want a creamier texture. You can use any beans instead of olives for a different taste. If you have fresh herbs like mint or basil, feel free to use those instead of parsley. This salad is great for everyone. If you are vegan, just skip the feta cheese. You can add more veggies like carrots or zucchini to keep it hearty. If you want protein, chickpeas work well and blend nicely with the salad. Change the ingredients based on what’s in season. In summer, add fresh corn or zucchini for extra crunch. In fall, consider roasted sweet potatoes for warmth. This keeps the salad fresh and fun all year long. Check out the Full Recipe for more ideas. To keep your Mediterranean quinoa salad fresh, store it in an airtight container. Use glass or plastic containers that seal well. Place the salad in the fridge right after serving. This helps keep the flavors bright and the veggies crisp. Avoid adding the dressing until you're ready to eat. This keeps the salad from getting soggy. When stored properly, your quinoa salad can last up to five days in the fridge. If it starts to smell off or looks mushy, it’s best to throw it out. Always trust your senses. Fresh ingredients will stay tasty longer. If you use pre-packaged items, check their expiry dates. You can enjoy this salad cold or at room temperature. If you prefer warm leftovers, gently heat it in a pan. Use low heat and stir often to avoid burning. Add a splash of olive oil or a bit of broth to keep it moist. Don't worry about reheating the salad with feta or olives; they hold up well. For the best taste, serve within a couple of days after making it. For the full recipe, check out the previous section. You can add many delicious items to Mediterranean quinoa salad. Here are some ideas: - Avocado for creaminess - Chickpeas for extra protein - Spinach for more greens - Artichoke hearts for a tangy kick - Sun-dried tomatoes for depth of flavor These additions enhance taste and boost nutrition. Feel free to mix and match to suit your preferences! Yes, Mediterranean quinoa salad is gluten-free. Quinoa is a seed, not a grain. This makes it a great choice for those with gluten sensitivities. Just ensure all other ingredients, like feta cheese and olives, are also gluten-free. Absolutely! Making Mediterranean quinoa salad ahead of time is smart. You can store it in the fridge for up to three days. The flavors improve as it sits. Just keep the dressing separate until you serve. This way, the salad stays fresh and crisp. For the full recipe, check the main article. You learned about the ingredients and steps to make a Mediterranean Quinoa Salad. We covered cooking quinoa, mixing salad components, and preparing a tasty dressing. You now have tips to cook quinoa perfectly and enhance flavor. You explored variations and how to store leftovers. This dish is healthy and flexible for all diets. Use this blog post to create a delicious and refreshing salad. Enjoy the process, and make it your own!

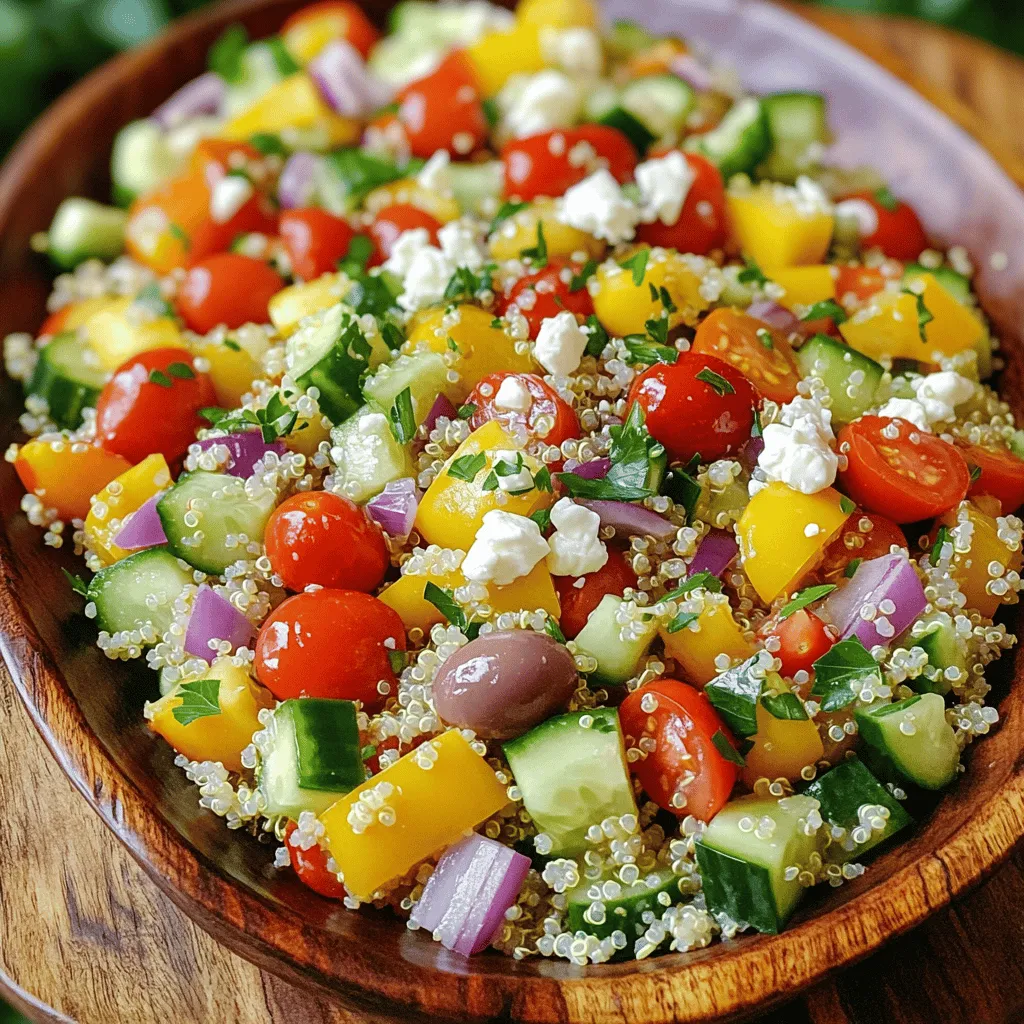
Mediterranean Quinoa Salad Fresh and Healthy Choice

Are you ready for a fresh and healthy dish? My Mediterranean Quinoa Salad brings vibrant flavors and nutrition straight to

- 1 cup fresh spinach, chopped - 1 cup canned artichoke hearts, drained and chopped Fresh spinach brings a bright green color and a subtle, earthy taste. Artichoke hearts add a unique, tangy flavor that pairs well with spinach. These two ingredients form the base of our dip, providing a healthy touch to a rich dish. - 1 cup cream cheese, softened - ½ cup sour cream - ½ cup mayonnaise - 1 cup shredded mozzarella cheese - ¼ cup grated Parmesan cheese Cream cheese gives the dip a rich, creamy base. Sour cream and mayonnaise add tanginess and depth. Mozzarella melts beautifully, creating a gooey texture. Parmesan adds a sharp, nutty flavor that enhances the overall taste. Together, these dairy components create a smooth and flavorful mix. - 2 cloves garlic, minced - 1 teaspoon onion powder - Salt and pepper to taste - Fresh parsley for garnish Garlic adds a bold and savory punch, while onion powder brings sweetness. Salt and pepper balance the flavors, making the dip pop. Garnishing with fresh parsley not only adds color but also a hint of freshness to every bite. For the full recipe, check out the instructions. Enjoy your cooking! - Preheat your oven to 350°F (175°C). - In a large mixing bowl, combine cream cheese, sour cream, and mayonnaise. - Stir in spinach, artichokes, mozzarella, Parmesan, garlic, onion powder, salt, and pepper. - Ensure all ingredients are well combined. - Transfer the mixture to a baking dish and spread evenly. - Bake for 25-30 minutes until golden and bubbly. Making spinach artichoke dip is a fun process. You start with the oven, preheating it to 350°F. This warms up your kitchen and gets the dip ready to cook. Next, you take a big bowl. In it, mix cream cheese, sour cream, and mayonnaise. This is the base of your dip. You want it smooth and creamy. Now comes the fun part. Add in the spinach and artichokes. You can use fresh or canned artichokes. Then, sprinkle in the mozzarella and Parmesan cheese. Don’t forget the minced garlic and onion powder. A pinch of salt and pepper brings the flavors alive. Mix it all together. It should look like a thick, creamy blend. When you’re ready, grab a baking dish. Pour your mixture in and spread it evenly. This helps it cook nicely. Pop the dish into the oven. Let it bake for about 25 to 30 minutes. You’ll know it’s done when the top is golden and bubbly. This step-by-step guide leads to a creamy and flavorful spinach artichoke dip that everyone will love. For the complete details, check out the Full Recipe. To make your dip creamy, use room temperature cream cheese. This helps it mix smoothly. Taste your dip as you go. You can adjust the salt and pepper for your liking. A little spice can make it more fun! Make your dip look great by garnishing with fresh parsley. It adds color and freshness. Serve your dip in a nice dish for special events. It makes the food feel fancy and inviting. I love to pair this dip with crispy tortilla chips. They add crunch that complements the smooth dip. You can also serve it with pita bread or fresh veggies. Sliced carrots and cucumbers are refreshing options. Enjoy with your favorite dippers for a tasty snack! {{image_2}} You can make spinach artichoke dip even more fun with some easy changes. - Use Greek yogurt in place of sour cream or mayonnaise. - Substitute low-fat cheese for a lighter version. These swaps keep the dip creamy but cut some calories. Greek yogurt adds protein, making the dip good for you. - Add jalapeños for a spicy kick. - Incorporate different herbs like basil or dill. These extras can change the taste and make it exciting. Jalapeños add heat, while herbs give a fresh twist. - Try adding sun-dried tomatoes for an Italian twist. - Mix in cooked, crumbled bacon for a meaty variation. Sun-dried tomatoes bring a rich flavor, perfect for Italian lovers. Bacon adds a smoky taste that many enjoy. Explore these variations to find your favorite style of spinach artichoke dip. For the full recipe, check the section above. Store leftovers in an airtight container in the fridge. This keeps the dip fresh and tasty. You can enjoy it for up to three days. Make sure to cool it down before sealing it. Reheat in the oven at 300°F (150°C) to maintain texture. This method warms the dip evenly. If you’re in a hurry, microwave it in short intervals. Check and stir it to avoid hot spots. Freeze in portions for easy reheating later. This way, you can enjoy a quick snack anytime. Thaw overnight in the fridge before reheating. Make sure to heat it well before serving for the best taste. Follow the ingredients and step-by-step instructions given above. Start with mixing the cream cheese, sour cream, and mayonnaise. Then, add the spinach and artichoke hearts. Finally, mix in the cheeses and seasonings. This blend creates a rich and creamy dip. Serve with tortilla chips, crackers, or sliced vegetables. Tortilla chips add a nice crunch. Crackers provide a sturdy base. Fresh veggies like carrots or cucumbers offer a healthy option. Yes, prepare it ahead and bake just before serving. This makes it easy to enjoy at parties. Just remember to let it cool slightly before serving. Yes, as long as you use gluten-free dippers. Check the labels on your chips or crackers. Many brands offer gluten-free options that pair well. Yes, ensure it's thawed and well-drained before use. Frozen spinach saves time and has good flavor. Just squeeze out any excess water to keep the dip creamy. Nutritional value can vary; refer to specific ingredients used for accurate info. The dip is rich in cheese and cream, so it’s best enjoyed in moderation. For the most accurate count, check the ingredients in the Full Recipe. This blog post shows how to make a delicious spinach artichoke dip. We covered fresh ingredients, step-by-step instructions, and tips for perfecting your dip. You can even explore healthy alternatives or fun variations. Remember to store leftovers properly for future enjoyment. With these tips, you can impress your friends and family at your next gathering. Enjoy making and sharing this tasty treat!

Spinach Artichoke Dip Flavorful and Creamy Delight

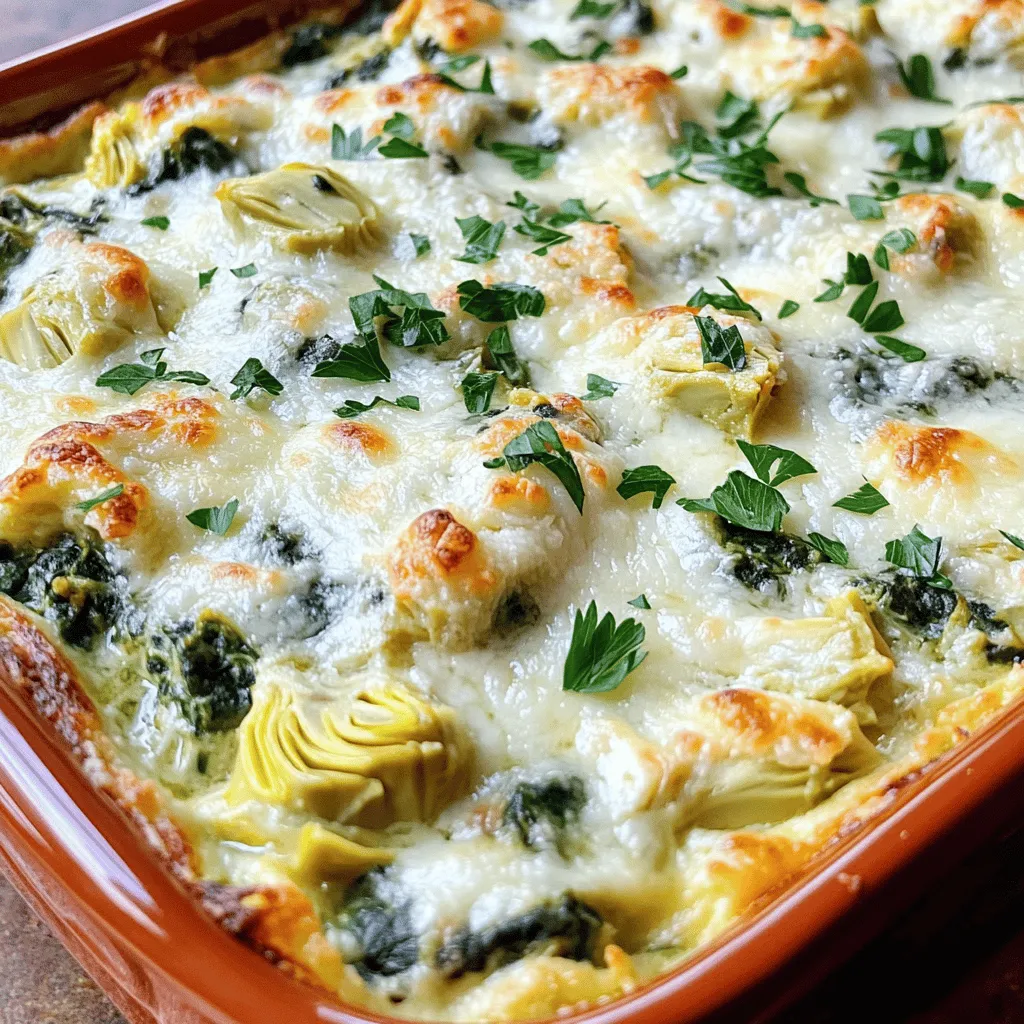
Are you ready to impress your friends with a dish that’s both simple and delicious? Spinach Artichoke Dip is the

- 2 medium sweet potatoes, peeled and diced - 1 red bell pepper, diced - 1 green bell pepper, diced - 1 small red onion, diced Sweet potatoes are the star of this dish. They bring a sweet, creamy texture. The red and green bell peppers add crunch and color. The red onion gives a slight bite that balances the flavors. - 2 cloves garlic, minced - 1 teaspoon smoked paprika - 1 teaspoon ground cumin - Salt and pepper to taste Garlic adds great aroma and flavor. Smoked paprika gives a warm, smoky taste. Ground cumin adds earthiness. Don't forget to salt and pepper to your liking! - Fresh cilantro or parsley, for garnish - Avocado slices, for serving (optional) Fresh herbs like cilantro or parsley brighten the dish. Avocado slices add creaminess. These toppings make the meal feel special. You can find the full recipe [here](#). - Heat olive oil in a skillet over medium heat. - Add the diced sweet potatoes. Season with salt and pepper. - Cook for 10-12 minutes. Stir often. The sweet potatoes should soften and get crispy. - Next, stir in the diced red and green bell peppers and red onion. - Cook for another 5-7 minutes. The vegetables should become tender. - Add minced garlic, smoked paprika, and ground cumin. - Stir well and cook for 2 more minutes. The spices will smell great. - Create four small wells in the sweet potato mix. - Crack an egg into each well. Reduce the heat to low or medium-low. - Cover the skillet and cook for 5-7 minutes. You can adjust the time for how you like your eggs. - If you want runny yolks, cook less time. For firm yolks, cook longer. For more details, check the Full Recipe. For the best flavor, you want to pick the right sweet potatoes. There are many types, but I love the orange-fleshed ones. They are sweet and creamy. Look for firm potatoes with smooth skin. Avoid any that feel soft or have spots. Fresh sweet potatoes will add great taste to your hash. To get crispy edges on your sweet potatoes, use enough olive oil. Heat it well before adding the potatoes. Don't stir too often; let them sit a bit to crisp up. For the eggs, adjust the heat carefully. Cook on low to medium-low to prevent overcooking. Cover the skillet to help the eggs cook evenly. This way, you can achieve the perfect yolk texture. Toppings can make your dish shine! Fresh cilantro or parsley adds a pop of color and flavor. You might also want to serve it with avocado slices. They bring creaminess to the meal. For a complete experience, pair this hash with a side of fresh fruit or a simple green salad. This combo will make your meal more filling and enjoyable. For the full recipe, check the [Full Recipe]. {{image_2}} You can change the sweet potato hash by swapping in different veggies. Zucchini and spinach work well here. Both add nice texture and flavor. You can also mix in mushrooms for earthiness. If you want more protein, add bacon or sausage. Cook the meat first, then set it aside. Mix it in with the veggies at the end. This gives you a hearty meal that is filling and tasty. To boost flavor, try different spices or sauces. A dash of hot sauce can add a nice kick. You might also try adding fresh herbs like thyme or rosemary. They can make the dish more aromatic. Adding cheese can bring creaminess to the dish. Feta or cheddar melts nicely and adds richness. Just sprinkle it on top before serving. It makes every bite even better. Making a vegan version is easy. You can skip the eggs and add tofu instead. Just scramble the tofu with the veggies for a protein boost. If you need a gluten-free option, this recipe is already safe. Check any sauces you use to ensure they are gluten-free. This way, everyone can enjoy this delicious hash. For the complete recipe, check out the [Full Recipe]. Store leftover sweet potato hash in the fridge. Use airtight containers to keep it fresh. It’s best to cool the hash before placing it in the fridge. This helps avoid condensation that can make it soggy. Leftovers should be eaten within three to four days for best taste. To reheat sweet potato hash, use a skillet over medium heat. This method helps keep the hash crispy. Stir occasionally to heat evenly. If you prefer using a microwave, place it in a bowl and cover it. Heat in short bursts, stirring in between, to keep the texture nice. You can freeze cooked sweet potato hash for up to three months. Let it cool completely before freezing. Portion it out into freezer bags or containers. Make sure to remove as much air as possible to prevent freezer burn. To defrost, place it in the fridge overnight. Reheat in a skillet for best results. Yes, you can make Sweet Potato Hash with Eggs ahead of time. It tastes great even after a day in the fridge. Just store it in an airtight container. It will last for about 3 to 4 days. When you want to eat it, just reheat it in a skillet. You can add a splash of water to keep it moist. Absolutely! You can use regular potatoes instead of sweet potatoes. Yukon gold or red potatoes work well. They have a nice texture and flavor. Just chop them the same size as sweet potatoes for even cooking. Want some heat? You can add jalapeños or diced green chilies to the mix. Another option is to sprinkle in some cayenne pepper. If you like hot sauces, drizzle your favorite on top. Each of these will kick up the spice level. Enjoy experimenting with flavors! In this blog post, we explored how to make a delicious sweet potato hash with eggs. We covered main ingredients, seasonings, cooking steps, and ways to customize your dish. Remember, you can swap veggies, add proteins, and even make it vegan. Try using fresh herbs or spices to boost flavor. With simple storage tips, you can enjoy leftovers too. This recipe is easy, tasty, and perfect for any meal. Enjoy your cooking journey and share your creations with others!

Sweet Potato Hash with Eggs for a Hearty Meal

Looking for a hearty meal that’s both delicious and nutritious? Sweet Potato Hash with Eggs is the answer! This vibrant

- 1 can (15 oz) chickpeas, drained and rinsed - 4 cups mixed greens (spinach, arugula, and romaine) - 1 cup cherry tomatoes, halved - 1 cucumber, diced - 1 bell pepper, diced - 1/4 red onion, thinly sliced - 1 avocado, sliced - 2 tablespoons tahini - 2 tablespoons lemon juice - Water to thin - Seasonings: Salt, pepper, smoked paprika, garlic powder - Additional toppings like sesame seeds or nuts - Alternative greens or vegetables Crispy chickpeas are the star of this salad. They add crunch and protein. Start with a can of chickpeas. Be sure to drain and rinse them well. This step helps remove extra sodium. For the greens, I love a mix of spinach, arugula, and romaine. They add different flavors and textures. You can also use other greens if you prefer. Cherry tomatoes bring sweetness to the dish. Diced cucumber and bell pepper add freshness and crunch. Red onion gives a nice bite, while the avocado adds creaminess. Now, let's talk about the dressing. Tahini is a rich base. It has a nutty flavor. Mixing it with lemon juice brightens the taste. Add water to make it thinner. Seasonings like salt, pepper, smoked paprika, and garlic powder enhance the flavor. Feel free to adjust these to your liking. You can add more toppings if you want. Sesame seeds give extra crunch. Nuts can add healthy fats. This salad is flexible, so make it your own! You can find the full recipe for a detailed guide. 1. Preheat your oven to 400°F (200°C). This helps make the chickpeas crispy. 2. In a bowl, toss the drained chickpeas with olive oil, smoked paprika, garlic powder, salt, and pepper. Make sure they are evenly coated. 1. Spread the chickpeas on a baking sheet in a single layer. 2. Bake for 25-30 minutes. Shake the pan halfway through to ensure even crispiness. 1. In a large bowl, combine the mixed greens, cherry tomatoes, cucumber, bell pepper, red onion, and avocado. 2. In a small bowl, whisk together tahini, lemon juice, and water until smooth. Adjust the thickness to your liking. 3. Season the dressing with salt and pepper. 4. Add the crispy chickpeas to the salad mix. Drizzle the tahini dressing over everything. Toss gently to combine. You can serve this salad right away for the best crunch or chill it for a refreshing treat. For the full recipe, refer back to the ingredients list and instructions. Enjoy your delicious Crispy Chickpea Salad! To make your chickpeas extra crispy, dry them well before seasoning. After draining and rinsing, use a kitchen towel to absorb moisture. This will help them roast better. You can also try different spices like cumin, curry powder, or chili powder. Each spice gives a unique flavor twist to the chickpeas. To adjust the tahini dressing, add water slowly until it reaches your desired creaminess. If you want a thinner dressing, keep adding water bit by bit. If you don’t have tahini, you can use peanut butter or sunflower seed butter as a substitute. These will still give a nice creamy texture. Serve the salad right after you make it. This keeps the chickpeas crunchy and the greens fresh. If you need a complete meal, pair the salad with grilled chicken or fish. It also goes well with whole-grain pita or quinoa for extra nutrition. {{image_2}} You can change this salad to fit your taste. Try a Mediterranean twist! Add feta cheese for a creamy touch. The salty feta pairs well with the crispy chickpeas. You can also make a spicy version. Just sprinkle chili flakes on the chickpeas before baking. This adds heat and flavor. If you follow a vegan diet, this salad is already perfect. The chickpeas provide protein and fiber. If you want a gluten-free option, you can enjoy it without worry. All the ingredients are naturally gluten-free. Seasonal vegetables can make your salad shine! In spring, add fresh asparagus or radishes. In summer, use juicy heirloom tomatoes. Autumn is great for roasted butternut squash. In winter, try shredded Brussels sprouts or kale for added crunch. Mix and match to keep things exciting! To keep your Crispy Chickpea Salad fresh, store it in the fridge. Use an airtight container to seal in the flavor. If you want to keep the chickpeas crunchy, store them separately. This way, they won’t get soggy. The salad lasts three days in the fridge. The crispy chickpeas stay good for about five days. To refresh the salad, add a splash of lemon juice or a bit of fresh greens. This brightens the flavors and keeps it tasty. Yes, you can freeze chickpeas! Just make sure they are fully cooked and cooled first. For salad components, freeze them in small bags. When ready to eat, thaw them overnight in the fridge. Avoid freezing the avocado or mixed greens as they don’t hold up well. For the full recipe, check out the Crispy Chickpea Salad section. If you need a tahini substitute, try these options: - Sunflower seed butter - Almond butter - Greek yogurt - Peanut butter - Cashew butter These choices work well in the dressing, giving nice flavor. You can make chickpeas crispy without baking by using these methods: - Pan-frying in a skillet - Air frying at high heat - Cooking in an Instant Pot with the lid off Each method will give you a nice crunch. Yes, you can prep this salad ahead! Here are some tips: - Keep crispy chickpeas separate until serving. - Mix the salad ingredients and store in the fridge. - Make the dressing and store it in a jar. This way, it stays fresh and crunchy when you eat it. This salad is very filling! It has many nutrients: - Protein from chickpeas - Healthy fats from avocado - Fiber from greens and veggies Together, these ingredients help keep you satisfied. Absolutely! Canned chickpeas work great in this recipe. They are already cooked and ready to use. Just drain and rinse them before adding to your salad. They save time and are easy to use. This blog post shared a simple, delicious salad full of healthy ingredients. We learned how to make crispy chickpeas and a tasty tahini dressing. You can customize the salad with extra toppings or seasonal vegetables, making it versatile for your taste. Remember to store leftovers correctly to keep them fresh. Whether fresh or stored, this salad is not just good for you—it’s filling too. Enjoy this recipe's many variations and tips, and get creative in your kitchen!

Crispy Chickpea Salad Fresh and Flavorful Delight

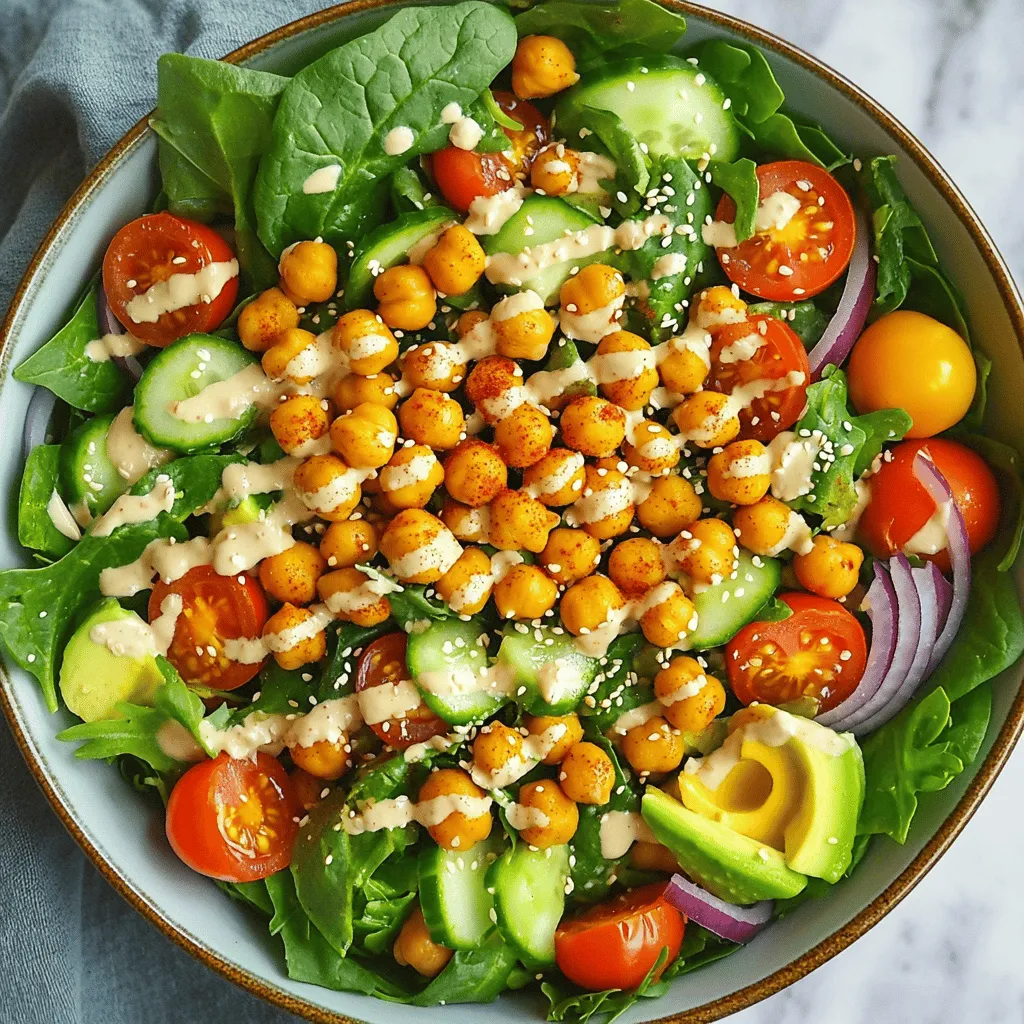
Looking for a fresh and flavorful dish? Dive into this Crispy Chickpea Salad! This vibrant salad combines crunchy chickpeas, colorful

- 1 cup all-purpose flour - 1 tablespoon baking powder - 1/4 teaspoon salt - 1 tablespoon sugar - 1 large egg - 3/4 cup milk (dairy or non-dairy) - 2 tablespoons melted butter (or coconut oil) - Zest of 1 lemon - 1 tablespoon lemon juice - 1 cup fresh blueberries (or frozen) - Maple syrup, for serving When I create these lemon blueberry pancakes, I always start with quality ingredients. Fresh blueberries add a sweet burst. The zest from the lemon gives a bright flavor. It’s a simple mix of dry and wet items. I use all-purpose flour because it helps achieve that fluffy texture. The baking powder is key. It makes the pancakes rise and stay light. I add a pinch of salt to balance the sweetness. Sugar adds a hint of sweetness but not too much. You’ll need one large egg. This binds the mix and adds moisture. Milk is next. You can choose dairy or non-dairy milk based on your preference. I often use almond milk for a nutty flavor. Melted butter or coconut oil adds richness. I use butter for a classic taste. The lemon juice adds a nice tang that complements the blueberries. When I make these pancakes, I love to serve them with maple syrup. It’s the perfect topping. For a special touch, I might also add whipped cream or yogurt. You can also top them with extra blueberries, lemon wedges, or a sprinkle of powdered sugar. These choices make the pancakes even more inviting. For the full recipe, check the details above. In a large bowl, combine the flour, baking powder, salt, and sugar. Whisk them together until they blend well. This mix is key for fluffy pancakes. In a different bowl, beat the egg. Then, add the milk, melted butter, lemon zest, and lemon juice. Stir until everything is combined. This mixture adds moisture and flavor to your pancakes. Pour the wet mixture into the dry mixture. Gently stir until just combined. Be sure not to overmix; it’s okay if the batter is a bit lumpy. Next, fold in the blueberries, ensuring they spread evenly. Heat a non-stick skillet over medium heat. Lightly grease it with butter or oil. Pour about 1/4 cup of batter onto the skillet for each pancake. Cook for 2-3 minutes until bubbles form on top and the edges appear set. Flip the pancakes and cook for another 2 minutes until they turn golden brown. Remove the pancakes from the skillet and keep them warm. Repeat with the rest of the batter. Serve the pancakes warm, topped with maple syrup and extra blueberries. Enjoy this delicious treat! For the complete recipe, check out the [Full Recipe]. To make your pancakes fluffy, avoid overmixing the batter. Gently stir until just combined. A few lumps are fine! Overmixing leads to dense pancakes. Using room temperature ingredients is key, too. Cold milk or eggs can slow down the rise. Let them sit out for a bit. This small step makes a big difference in texture. The right skillet temperature is important. Heat your skillet over medium heat. Too hot, and the pancakes will burn. Too cool, and they won’t cook through. You’ll know it’s time to flip when bubbles form on the surface. The edges should look set. Flip carefully to keep the pancake intact. Cook until golden brown on both sides. Stack your pancakes high for a beautiful look. A tall stack is more inviting. Dust with powdered sugar for an extra touch. For garnish, add fresh lemon slices and more blueberries. This not only looks great but enhances flavor, too. A drizzle of maple syrup completes the dish perfectly. For the full recipe, check out the Lemon Zest Blueberry Bliss Pancakes section above! {{image_2}} You can change up the flavors in your lemon blueberry pancakes easily. Adding fruits like strawberries or raspberries can create a tasty twist. These fruits bring their own unique sweetness and color, making your pancakes even more fun. You can also add warm spices like cinnamon or nutmeg. Just a pinch can add a cozy taste that pairs well with lemon and blueberries. If you need gluten-free pancakes, swap all-purpose flour for a gluten-free blend. Look for one that works well in baking. For dairy-free options, use almond milk or oat milk instead of regular milk. You can also replace melted butter with coconut oil for a dairy-free version. These swaps help everyone enjoy delicious pancakes. How you serve your pancakes can make a big difference. Pair them with different syrups like maple or agave. You could also try fruit sauces for extra flavor. Adding crispy bacon or a fresh fruit salad on the side completes the meal. This gives you a mix of sweet and savory that everyone will love. For a fun touch, stack your pancakes high and garnish with more blueberries and lemon zest. To keep leftover pancakes fresh, follow these tips. First, let the pancakes cool to room temperature. Then, stack them with parchment paper between each one. This prevents sticking. Place the stack in an airtight container. Store it in the fridge for up to three days. If you want to keep pancakes longer, freezing is a great option. Use the same cooling method, then wrap each pancake in plastic wrap. Place the wrapped pancakes in a freezer bag. Remove as much air as possible. You can freeze them for up to two months. Reheating pancakes is easy. You have a few methods to choose from. The microwave is quick. Just place a pancake on a microwave-safe plate. Heat it for 20-30 seconds. Check if it’s warm enough. If not, heat for a few more seconds. You can also use the oven. Preheat it to 350°F (175°C). Place the pancakes on a baking sheet. Cover with aluminum foil to keep them moist. Heat for about 10 minutes. For the best texture, use a skillet. Heat a non-stick skillet over medium heat. Add a little butter or oil. Place the pancakes in the skillet for about 1-2 minutes on each side. This keeps them fluffy and delicious. For the full recipe, check the details above and get ready to enjoy these delightful pancakes! To make pancakes fluffier, you can add a bit more baking powder. This helps the pancakes rise better. Another trick is to separate the egg whites. Whip the egg whites until they are stiff, then fold them into the batter. This adds air and makes the pancakes light and fluffy. Yes, you can use frozen blueberries! Just add them straight from the freezer. This keeps them from getting mushy. Make sure to fold them in gently to avoid staining the batter too much. You can even add a bit more flour to balance the extra moisture from the frozen fruit. If you want to make vegan pancakes, you have options! You can use mashed banana or applesauce as an egg substitute. Use about 1/4 cup of either for one egg. Another great option is to mix flaxseed meal with water. Combine 1 tablespoon of flaxseed meal with 2.5 tablespoons of water and let it sit for a few minutes before adding to the mix. You can make pancakes in advance easily! Just cook them as usual and let them cool. Then, place them in a stack and wrap them in plastic wrap. You can keep them in the fridge for a few days or freeze them for a month. To heat them, just pop them in the toaster or microwave. This way, busy mornings become a breeze! For the full recipe, check out the Lemon Zest Blueberry Bliss Pancakes section. These pancakes are easy to make and full of flavor. You learned about the ingredients, step-by-step cooking, and tips for great texture. I shared tasty variations and storage tips to keep them fresh. Now you can enjoy fluffy pancakes anytime. Experiment with your favorite flavors or toppings. Have fun cooking and impressing family or friends with this recipe!

Lemon Blueberry Pancakes Fluffy and Tasty Recipe

Get ready to brighten your breakfast with my fluffy, tasty Lemon Blueberry Pancakes! This recipe balances the sweet burst of

- 1 cup quinoa - 2 cups vegetable broth or water Quinoa is the star of this dish. It is a healthy grain packed with protein. Rinsing the quinoa removes its bitter coating. Vegetable broth adds flavor and nutrients. You can use water if you prefer. - 1 cup cherry tomatoes - 1 cup baby spinach - 1/2 avocado Cherry tomatoes bring a sweet burst. They cook down and add a nice flavor. Baby spinach is soft and wilts quickly. It adds color and nutrients. Avocado gives creaminess and healthy fats. - 1/4 cup feta cheese - 2 tablespoons olive oil - 1 clove garlic - 1 teaspoon smoked paprika - Salt and pepper to taste Feta cheese adds a salty kick. Olive oil helps sauté the veggies. Garlic gives a rich aroma. Smoked paprika adds warmth and depth. Salt and pepper enhance all the flavors. These ingredients come together in a Savory Breakfast Quinoa Bowl. For the full recipe, check out the instructions provided. Enjoy making this dish! Cooking quinoa is easy and fun. Start by bringing vegetable broth to a boil in a medium saucepan. This broth adds great flavor to the quinoa. Once the broth is boiling, add 1 cup of rinsed quinoa. Reduce the heat to low and cover the pot. Let it simmer for about 15 minutes. The quinoa will become tender and absorb all the liquid. Fluff it with a fork when it’s done. While the quinoa cooks, you can sauté the vegetables. Heat 2 tablespoons of olive oil in a skillet over medium heat. Add 1 minced clove of garlic and let it cook for about 1 minute. You want it fragrant but not brown. Next, toss in 1 cup of halved cherry tomatoes and 1 teaspoon of smoked paprika. Cook this mixture for 5 to 7 minutes. The tomatoes should soften but still hold their shape. Now, add 1 cup of baby spinach and stir. Cook until the spinach wilts, which takes about 2 minutes. Season with salt and pepper to taste. Now it’s time to bring everything together. Divide the cooked quinoa into two serving bowls. Top each bowl with the sautéed vegetable mixture. Add sliced avocado and sprinkle crumbled feta cheese on top. For a fresh touch, garnish with your favorite herbs, like basil or parsley. This bowl is not just good-looking; it’s packed with flavor and nutrition. For the complete details on making this dish, check out the Full Recipe. To avoid mushy quinoa, rinse it well before cooking. This step helps remove the bitter coating called saponin. Use a fine mesh strainer for best results. Cook the quinoa in vegetable broth for added flavor. Bring the broth to a boil, then lower the heat. Cover and simmer for about 15 minutes. Once done, fluff it gently with a fork. For veggies, aim for tender but crisp. Sauté garlic briefly to release its aroma. When you add cherry tomatoes, let them soften but keep their shape. Spinach should wilt quickly, about two minutes. This way, it stays vibrant and tasty. Spices and herbs can elevate your dish. Smoked paprika adds a warm, smoky taste. Consider fresh herbs like basil or parsley for a burst of freshness. You can also try a pinch of chili flakes for heat. Don't be afraid to experiment with flavors that excite you. Meal prep can save you time. Pre-cook the quinoa and store it in the fridge. It lasts about four to five days. You can also chop your veggies ahead of time. Store them in an airtight container. When you’re ready to eat, heat everything together. This makes for a quick, tasty breakfast. For the full recipe, check the recipe section. {{image_2}} You can change the greens in your bowl. Instead of baby spinach, try kale or arugula. These greens add a nice crunch and different flavors. Kale gives a hearty bite, while arugula brings a peppery taste. Simply chop them up and add them to the pan when you sauté the tomatoes. It'll make your breakfast bowl even more exciting! Looking to boost your protein? Add a poached egg on top. The runny yolk adds richness and flavor. You can also use chickpeas or shredded chicken. Chickpeas give a nice texture and are great for vegans. Shredded chicken is perfect for a meatier dish. Mix these proteins in with the quinoa for a filling meal that keeps you energized. If you want a vegan option, skip the feta cheese. You can add avocado for creaminess instead. Try sprinkling nutritional yeast for a cheesy flavor without dairy. You can also add seeds like pumpkin or sunflower for a fun crunch. These swaps make the bowl just as tasty while keeping it plant-based! You can store the savory breakfast quinoa bowl in the fridge. It stays fresh for up to three days. Make sure to keep it in an airtight container. This helps to keep flavors intact. If you want to freeze portions, let the bowl cool first. Use freezer-safe containers. You can freeze it for up to one month. When ready to eat, just take out a portion and thaw it in the fridge overnight. To reheat, you have a few options. You can use the microwave or stovetop. For the microwave, heat it in short bursts, stirring between. This keeps the texture nice. If using a stovetop, add a splash of water or broth. Heat on low until warmed through. This keeps the quinoa fluffy and the veggies tender. Enjoy your meal! I often recommend using white quinoa for its mild taste and fluffy texture. Red quinoa has a nuttier flavor and remains firmer after cooking. Black quinoa offers a slightly sweet taste and adds color to your dish. You can mix different types for a fun look and taste. Each type has its unique benefits, so choose what you enjoy most! Yes! This dish is perfect for meal prep. You can cook the quinoa and store it in the fridge. Just keep your veggies separate until you’re ready to eat. I like to portion everything into containers. This way, you have a quick meal ready to go. Just heat up the quinoa and sauté the veggies when you want to enjoy it. You can get creative with toppings! Here are some ideas: - Sliced radishes for crunch - Roasted sweet potatoes for sweetness - A poached egg for extra protein - Hot sauce for a spicy kick - Fresh herbs like cilantro or chives for brightness Feel free to mix and match these toppings based on your mood and what you have at home. To make quinoa fluffy, rinse it well before cooking. This removes any bitterness. Use a 2:1 ratio of liquid to quinoa. Bring the liquid to a boil, then lower the heat and cover. Let it simmer for about 15 minutes. Turn off the heat and let it sit for 5 minutes. Fluff it with a fork afterward for the best texture. These steps will help you achieve perfect, fluffy quinoa every time! In this blog post, we explored how to create a delicious quinoa bowl. We covered key ingredients like quinoa, fresh veggies, and flavorful seasonings. You learned how to cook quinoa perfectly and sauté fresh produce. I shared tips for meal prep and storage too. Try different ingredients and flavors to make it your own. Remember, cooking should be fun and exciting! Enjoy your tasty, healthy meals and share this recipe with friends.

Savory Breakfast Quinoa Bowl Delightful Morning Fuel

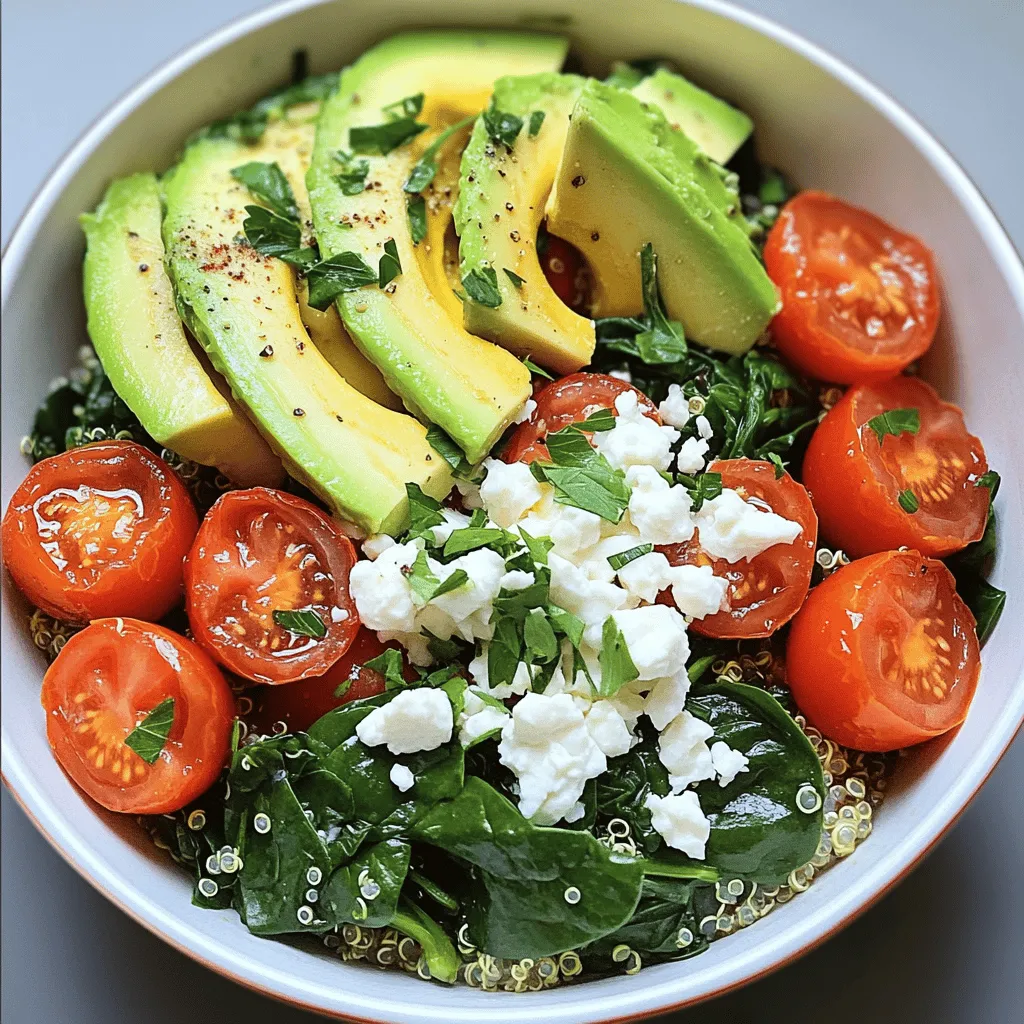
Start your day off right with a savory breakfast quinoa bowl! Packed with healthy ingredients, this dish fuels your morning

- ½ cup unsalted butter - 1 cup bittersweet chocolate chips - 2 large eggs - 2 large egg yolks - ½ cup granulated sugar - 2 tablespoons all-purpose flour - ¼ teaspoon salt - ½ teaspoon vanilla extract To make the perfect chocolate lava cake, gather these main ingredients first. The unsalted butter adds richness, while bittersweet chocolate chips give a deep, rich flavor. The eggs and egg yolks provide structure and creaminess. Granulated sugar balances the flavors, and all-purpose flour gives the cake its body. A touch of salt enhances the sweetness, and vanilla extract adds a warm aroma. - Powdered sugar for dusting - Ice cream or whipped cream for serving For a special touch, you can add powdered sugar on top. It adds a nice contrast to the rich chocolate. Serving the cake with ice cream or whipped cream makes it even better. The cold creaminess complements the warm, gooey center. Try these add-ins to elevate your dessert experience! For the complete recipe, check out the Full Recipe. - Preheat oven to 425°F (220°C). - Grease four ramekins with butter and place them on a baking tray. Prepping your oven and ramekins is key. Start by setting your oven to 425°F (220°C). This is the perfect temperature for baking. Next, grease your ramekins well. You want them slick so the cake comes out easily. Arrange them on a sturdy baking tray. This makes it easy to move them in and out of the oven. - Combine butter and chocolate chips in a microwave-safe bowl. - Microwave and stir until smooth. Now it’s time to melt the chocolate. Take a microwave-safe bowl and add unsalted butter and bittersweet chocolate chips. Microwave in short bursts, about 30 seconds at a time. Stir after each burst until it’s silky smooth. This step is vital. If the chocolate burns, it will ruin your cake. - Whisk eggs and sugar until fluffy. - Combine chocolate mixture with egg mixture. - Fold in dry ingredients. In a new bowl, crack two whole eggs and two egg yolks. Add granulated sugar into the bowl. Whisk them together until the mixture looks light and fluffy. This step adds air, making your cake rise nicely. Next, slowly pour the melted chocolate into this egg mixture. Stir gently to combine. Now, sift in all-purpose flour and salt. Carefully fold everything together until no dry bits remain. - Fill ramekins and bake for 12-14 minutes. - Let sit before inverting onto plates. Now comes the fun part! Fill each ramekin about three-quarters full with the batter. Place the tray in your preheated oven and bake for 12-14 minutes. The edges should be firm, but the center will be soft. After baking, let the cakes sit for about a minute. This helps them set. Then, carefully invert each ramekin onto a plate. Give a gentle tap to release the cake. For the full recipe, check out the detailed instructions provided. To get that perfect lava texture, timing is key. Bake your cakes for 12-14 minutes. Watch closely during the last few minutes. The edges should be firm, but the center must remain soft and jiggly. This is how you know your cake will ooze chocolate when you cut into it. Use four 6-ounce ramekins for baking. They are the right size for a perfect portion. Ramekins made from ceramic work best. Place them on a baking tray for easy handling. The tray helps catch any spills and makes it easy to move in and out of the oven. For the best experience, serve your lava cake with a scoop of vanilla ice cream or a dollop of whipped cream. The cold cream complements the warm, gooey center. For a fancy touch, dust the top with powdered sugar. You can also add fresh berries for color and flavor. A drizzle of chocolate sauce or caramel can elevate your dessert further. {{image_2}} To make a vegan chocolate lava cake, swap the butter for coconut oil or vegan butter. For eggs, use flax eggs or applesauce. These will help bind the batter. Choose dark chocolate that is dairy-free. Look for brands marked as vegan for the best results. For a gluten-free lava cake, replace all-purpose flour with almond flour or coconut flour. These options give the cake a nice texture. Brands like Bob’s Red Mill offer great gluten-free flour mixes. Check for certified gluten-free labels to avoid cross-contamination. You can make your lava cake even more special. Add a teaspoon of espresso powder to enhance the chocolate flavor. Orange zest adds a bright touch. For warmth, try adding a pinch of cinnamon or nutmeg. These spices will create a cozy vibe. To keep your chocolate lava cake fresh, store it in the fridge. Use a sealed container to prevent drying. Place a piece of plastic wrap directly on the cake before sealing. This method helps maintain the soft texture. Enjoy your leftover cake within three days for the best taste. You can freeze chocolate lava cakes for later. First, let them cool completely. Wrap each cake tightly in plastic wrap. Then place them in a freezer bag. This will prevent freezer burn. To thaw, move the cakes to the fridge overnight. For reheating, place them in a 350°F (175°C) oven for 10-12 minutes. This warms them up without drying them out. Enjoy your warm, gooey treat! Check out the Full Recipe for more tips. Yes, you can prepare the batter ahead of time. Store it in the fridge for up to 24 hours. When you are ready to bake, just fill the ramekins and bake. If you want to bake later, cover the filled ramekins with plastic wrap and chill. This keeps the batter fresh and ready. If you go this route, let them sit at room temperature for 15 minutes before baking. The most common reason is baking too long. If the center cooks fully, it won't ooze. Check the cakes at the 12-minute mark. The edges should be firm while the middle is soft. Another reason could be the oven temperature. Make sure it is accurate. Use an oven thermometer if needed. Ice cream is a classic choice. Vanilla, mint, or salted caramel flavors work great. Fresh berries add a nice touch too. They balance the rich chocolate. A strong espresso or coffee also pairs well. It enhances the chocolate flavor and adds depth. Look for firm edges and a soft center. The center should jiggle gently. If it looks too set, it may overbake. Another way is to check the time. Aim for 12 to 14 minutes in the oven. The right timing is key for that oozy center. In summary, you learned about the key ingredients and clear steps for making chocolate lava cake. We covered techniques for perfect texture, variations for dietary needs, and storage tips to keep your cakes fresh. Baking should be fun and rewarding, so don’t hesitate to experiment with flavors or serve them up with ice cream. Enjoy your baking, and create a dessert that impresses every time. You now have the tools to make it happen!

Chocolate Lava Cake Irresistible Dessert Recipe

If you crave a dessert that will impress and delight, look no further. Chocolate Lava Cake is the answer! This

To make stuffed bell peppers, you need a few key items. These ingredients create a tasty and colorful dish. Here’s what you will need: - 4 large bell peppers (any color) - 1 cup quinoa, rinsed - 2 cups vegetable broth - 1 can (15 oz) black beans, drained and rinsed - 1 cup corn kernels (fresh, frozen, or canned) - 1 medium onion, diced - 2 cloves garlic, minced - 1 teaspoon ground cumin - 1 teaspoon chili powder - 1 cup diced tomatoes (fresh or canned) - 1 cup shredded cheese (cheddar or a blend) - Salt and pepper to taste - Fresh cilantro or parsley, for garnish These ingredients work well together. The quinoa and beans add protein. The cheese gives a nice creamy taste. You can change the recipe to fit your taste. Here are some optional items you might want: - Cooked ground meat (beef, turkey, or chicken) - Different spices like paprika or oregano - Chopped peppers or zucchini for extra veggies - Avocado or sour cream for serving - Hot sauce for some heat These choices let you add your own flair to the dish. Feel free to mix and match as you like. A few kitchen tools make cooking easier. Here’s what you will need: - A large baking dish - A medium saucepan for the quinoa - A skillet for sautéing the onion and garlic - A mixing bowl for combining ingredients - A sharp knife for cutting peppers Having these tools ready helps keep your cooking smooth. You can find the full recipe for this dish in the recipe section above. Start by preheating your oven to 375°F (190°C). This helps cook the peppers evenly. Next, take the bell peppers and cut off their tops. Remove the seeds and membranes inside. If they don’t stand up well, trim the bottoms slightly. This way, they won’t tip over while baking. In a medium saucepan, mix 1 cup of rinsed quinoa with 2 cups of vegetable broth. Bring it to a boil, then reduce the heat. Cover the pot and let it simmer for 15 minutes. When done, the quinoa should be fluffy and absorb all the liquid. While the quinoa cooks, heat a tablespoon of olive oil in a skillet over medium heat. Add the diced onion and sauté for about 4-5 minutes. Stir in the minced garlic for one more minute until it smells great. In a large bowl, mix the cooked quinoa, sautéed onion, black beans, corn, and diced tomatoes. Add cumin, chili powder, salt, and pepper to taste. Stir until everything combines well. Now, stuff each bell pepper with the quinoa mixture. Press down a bit to fill them nicely. Place the stuffed peppers upright in a baking dish. Top each pepper with shredded cheese. Cover the dish with foil and bake for 30 minutes. After that, remove the foil and bake for another 10-15 minutes. This will melt the cheese and soften the peppers. Let them cool for a bit, then garnish with fresh cilantro or parsley. Enjoy your colorful quinoa-stuffed bell peppers! For the complete recipe, check out the Full Recipe. To get perfectly cooked peppers, start with fresh ones. Choose peppers that are firm and bright. Cut off the tops and remove the seeds carefully. Trim the bottom if they wobble. You want them to stand straight. Bake them covered for 30 minutes. This keeps them soft and juicy. Then, uncover and bake for 10 to 15 more minutes. This step helps the cheese melt and bubble. Adding flavor is key to making your stuffed peppers pop. Use spices like cumin and chili powder to give depth. Fresh herbs like cilantro or parsley add brightness. If you want heat, add diced jalapeños or a dash of hot sauce. For a twist, try adding olives or sun-dried tomatoes. They can enhance the mix with a salty kick. Always taste your filling before stuffing. Adjust the salt and pepper as needed. One common mistake is overcooking the peppers. This can make them mushy. Don’t skip the step of simmering the quinoa. It needs to be fluffy, or your filling will be off. Another mistake is not packing the filling tightly. Press it down to fit more in. Lastly, avoid using too much cheese. While cheese is great, too much can overpower the dish. Follow these tips for a tasty outcome! {{image_2}} For a vegetarian twist, use beans and veggies as your main filling. Black beans, corn, and onions create a hearty mix. You can add spinach or mushrooms for extra flavor and nutrition. This option keeps the dish colorful and full of life. You can also swap quinoa for rice or couscous if you prefer. For a low-carb version, skip the grains. Instead, use ground meat or cauliflower rice as a base. Ground turkey or chicken works well. Mix in spices and diced vegetables for taste. This keeps the dish filling without adding carbs. You can still top it with cheese for that gooey finish. Explore flavors from around the world. For a Mediterranean flair, add feta cheese, olives, and herbs like oregano. For a Mexican twist, mix in salsa, jalapeños, and taco seasoning. You can even try Asian flavors with soy sauce and ginger. These variations keep stuffed peppers exciting and fun. Each flavor profile brings a new taste to the dish. Feel free to get creative with your stuffed peppers. You can find the full recipe at the beginning of the article. To store leftover stuffed peppers, first let them cool. Place them in an airtight container. You can keep them in the fridge for up to four days. Make sure to separate layers with parchment paper to avoid sticking. This keeps them fresh and tasty for later meals. If you want to freeze stuffed peppers, here's how. Wrap each pepper tightly in plastic wrap. Then, place them in a freezer-safe bag. They can last up to three months in the freezer. When you're ready to eat, just thaw them in the fridge overnight before reheating. To reheat stuffed peppers, preheat your oven to 350°F (175°C). Place the peppers in a baking dish. Cover them with foil to prevent drying out. Heat for about 20-25 minutes or until warmed through. You can also reheat them in the microwave for a quicker option. Just heat for about 2-3 minutes, checking to make sure they warm evenly. Enjoy your delicious stuffed peppers again! You can use rice or couscous instead of quinoa. Both grains work well. Brown rice adds a nutty flavor, while white rice cooks faster. Couscous cooks quickly and has a light texture. Be sure to adjust cooking times as needed. Yes, you can prepare stuffed peppers ahead of time. Stuff the peppers and keep them in the fridge. You can bake them later when ready to eat. This makes meal prep easy and saves time. They can last in the fridge for up to three days. To add spice, use spicy peppers or hot sauce in the filling. You can also add crushed red pepper flakes or jalapeños for heat. Adjust according to your taste. This way, you can create your own perfect spice level. Enjoy the kick! Stuffed bell peppers are a fun and tasty dish. We discussed essential and optional ingredients, plus the tools you need. I provided a simple way to prepare, cook, and assemble your peppers. We explored tips to cook them just right and avoid mistakes. You can also try different flavors and variations, like vegetarian or low-carb options. For leftovers, we covered storage and reheating methods. Remember, stuffed peppers are easy to customize to your taste. Enjoy experimenting with this healthy meal!

Stuffed Bell Peppers Simple and Tasty Recipe

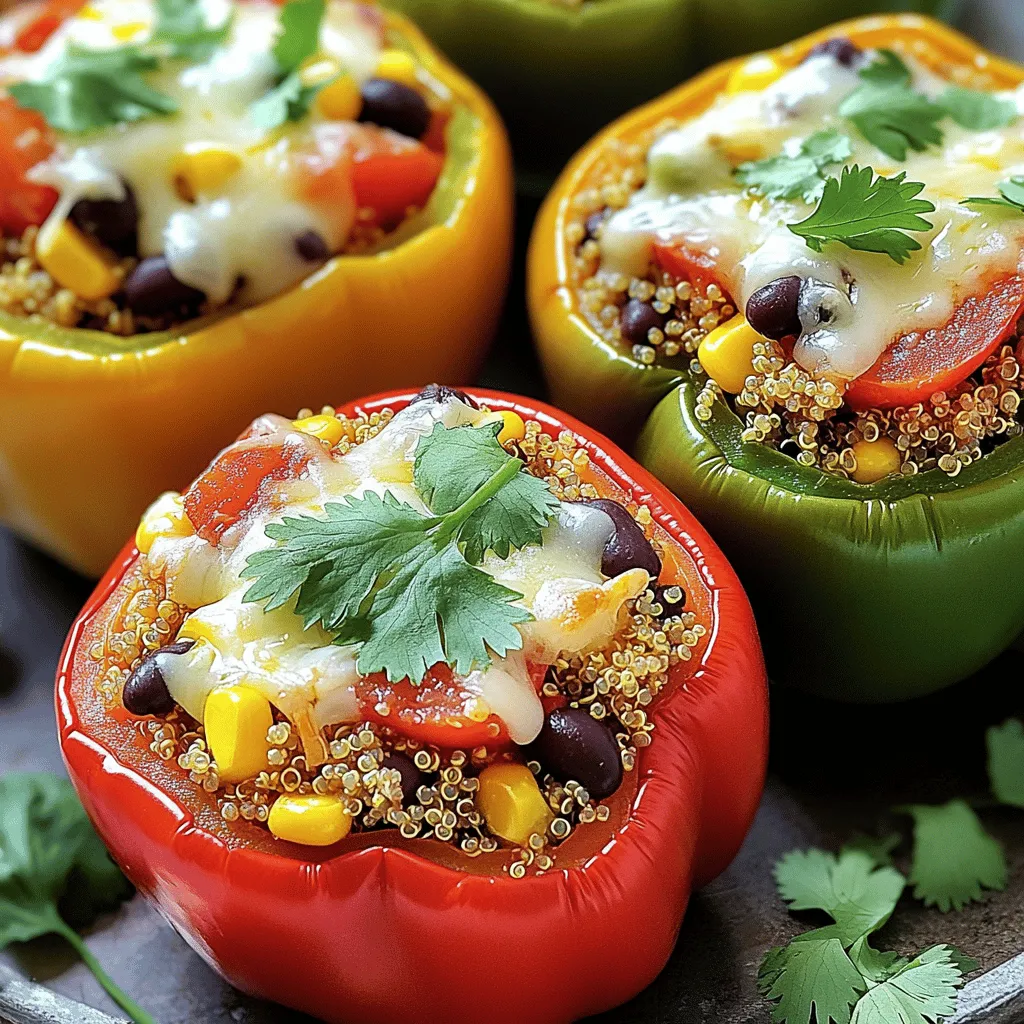
Do you love colorful meals that are easy to make? Stuffed bell peppers fit the bill! This simple, tasty recipe

Teriyaki chicken bowls are fun to make and eat. Each bite is full of flavor. Here are the key ingredients: - 1 lb boneless, skinless chicken thighs, cut into bite-sized pieces - 1 cup low-sodium soy sauce - 1/4 cup honey - 2 tablespoons rice vinegar - 1 tablespoon sesame oil - 2 cloves garlic, minced - 1 tablespoon fresh ginger, grated - 2 cups cooked jasmine rice - 1 cup broccoli florets - 1 red bell pepper, sliced - 1 carrot, julienned - 2 green onions, thinly sliced - Sesame seeds for garnish These ingredients work together to create a tasty and balanced meal. Each ingredient adds nutrients to your teriyaki chicken bowl: - Chicken thighs: Great source of protein. They keep you full. - Soy sauce: Adds flavor without too much salt. - Honey: Natural sweetness. It has antioxidants. - Rice vinegar: Helps digestion and adds a tangy taste. - Sesame oil: Provides healthy fats. It also enhances flavor. - Garlic: Good for heart health. It gives a nice kick. - Ginger: Aids digestion. It adds zing to the dish. - Jasmine rice: Offers carbs for energy. It’s soft and fragrant. - Broccoli: Packed with vitamins and fiber. It’s great for your body. - Red bell pepper: High in vitamin C. It adds color and crunch. - Carrot: Full of beta-carotene. It’s sweet and crunchy. - Green onions: Adds freshness and flavor. - Sesame seeds: Adds a nice crunch and healthy fats. If you have food allergies, here are some substitutions: - Chicken: Use tofu or tempeh for a veggie option. - Soy sauce: Try coconut aminos for a soy-free choice. - Honey: Maple syrup works well for a vegan option. - Rice vinegar: White vinegar or apple cider vinegar can replace it. - Sesame oil: Olive oil is a good substitute. These swaps help you enjoy teriyaki chicken bowls while keeping your diet safe and tasty. If you want the full recipe, check out the detailed steps to create this dish. To make the teriyaki sauce, gather your ingredients first. You need low-sodium soy sauce, honey, rice vinegar, sesame oil, garlic, and ginger. In a small saucepan, mix these ingredients together. Heat it on medium heat. Stir until the honey dissolves. Bring it to a gentle simmer. Let it cook for about 5 minutes. This will thicken the sauce slightly. Once done, remove it from heat and set it aside. Next, let’s sauté the chicken. Take a large skillet or wok and heat a tablespoon of sesame oil on medium-high heat. Add the bite-sized chicken pieces to the pan. Cook until they turn golden brown. This should take about 5-7 minutes. Stir occasionally to ensure even cooking. You want the chicken fully cooked and juicy. Now it’s time to stir-fry the vegetables. Once the chicken is done, add broccoli, red bell pepper, and carrot to the skillet. Stir-fry these for about 3-4 minutes. You want the veggies to be tender but still crisp. This keeps the colors bright and flavors fresh. Finally, combine everything. Pour the teriyaki sauce over the chicken and vegetables. Stir well, coating all the ingredients. Let it cook for another 2-3 minutes. This helps the sauce cling to the chicken. Now, serve it! Place a scoop of jasmine rice in a bowl. Top it with the teriyaki chicken and veggies. Garnish with sliced green onions and sesame seeds for extra flavor. Enjoy your tasty teriyaki chicken bowl! For the full recipe, check the recipe section above. When cooking chicken, keep a few tips in mind for the best results. Always use boneless, skinless thighs for a juicy texture. Cut the chicken into small pieces for quicker cooking. Heat your skillet or wok before adding the chicken. This ensures a nice sear and locks in flavor. Stir the chicken often to cook it evenly. Aim for a golden-brown color, which means it's fully cooked. Marinating chicken boosts its taste. A simple teriyaki marinade can work wonders. Use soy sauce, honey, garlic, and ginger. Let the chicken sit in the marinade for at least 30 minutes. If you have time, marinate it overnight for deeper flavor. Remember, always discard used marinade to avoid contamination. You can also save some marinade to drizzle on cooked chicken for extra flavor. A great presentation makes your meal more inviting. Start with a generous scoop of jasmine rice in each bowl. Place the teriyaki chicken and veggies on top. Arrange them neatly for a colorful display. Sprinkle sliced green onions and sesame seeds for a nice touch. You can also add a slice of lime or lemon for a pop of color. It not only looks good, but it adds a fresh taste too. For the full recipe, check out the complete guide above. {{image_2}} You can easily swap chicken for tofu. Tofu absorbs flavors well. Use firm or extra-firm tofu. Cut it into cubes and press to remove excess water. Sauté it until golden brown. Then, add the teriyaki sauce just like you would with chicken. This gives you a hearty vegetarian bowl. Feel free to get creative with your vegetables. You can use snap peas, bell peppers, or bok choy. Each veggie adds a unique taste and texture. Try adding mushrooms for an earthy flavor. Just remember to cook them until they are tender but still crisp. This keeps the bowl fresh and colorful. To make your dish gluten-free, replace soy sauce with tamari. Tamari has a similar taste and is gluten-free. For a low-carb option, swap jasmine rice for cauliflower rice. Cauliflower rice is light and fluffy. It soaks up the teriyaki sauce well. This way, you can enjoy a healthy, satisfying meal without the carbs. For a full recipe on crafting these delicious bowls, check the Full Recipe section. After enjoying your teriyaki chicken bowls, store leftovers in airtight containers. This keeps the chicken and veggies fresh. Make sure to let everything cool down before sealing. You can keep them in the fridge for up to three days. For the best taste, don't mix the rice with the chicken and veggies until you are ready to eat. To reheat, use the microwave or a skillet. If using the microwave, place your portion in a bowl. Cover it with a damp paper towel to keep moisture in. Heat for about 1-2 minutes, stirring halfway through. If using a skillet, add a splash of water or broth to prevent sticking. Heat over medium until warmed through. This keeps your meal juicy and delicious. You can freeze teriyaki chicken bowls for a quick meal later. Just store them in freezer-safe containers. Make sure to separate the rice from the chicken and vegetables. This helps maintain texture. They can last up to three months in the freezer. When ready to enjoy, thaw overnight in the fridge and reheat as mentioned above. For a quick meal, you can also microwave from frozen, but it may take longer to heat. You can serve teriyaki chicken bowls with many tasty sides. Steamed vegetables are a great choice. You can also add a fresh salad for crunch. Edamame makes a fun snack. For a heartier option, try egg rolls. Each of these pairs well with the savory flavors of the teriyaki sauce. Yes, you can prepare teriyaki chicken bowls in advance. Cook the chicken and veggies, then store them in the fridge. This way, you can save time on busy days. Just reheat and serve over freshly made rice. The flavors will still be great, making it a perfect meal for meal prep. To make teriyaki sauce from scratch, follow these simple steps. In a small saucepan, mix soy sauce, honey, rice vinegar, sesame oil, minced garlic, and grated ginger. Heat over medium heat and stir until the honey dissolves. Let it simmer for five minutes until it thickens slightly. That’s it! You now have a delicious sauce for your bowls. The best rice for teriyaki chicken bowls is jasmine rice. It has a nice fragrance and soft texture. You can also use sushi rice if you prefer. Both types hold up well with the chicken and sauce. Make sure to cook it fluffy to balance the flavors in your bowl. For the full recipe, check out the section above. In this blog post, we explored making teriyaki chicken bowls. We covered key ingredients and their health benefits. I shared substitutions for common allergens too. You learned step-by-step instructions for sauce, chicken, and veggies. We discussed tips for cooking and serving. Various adaptations were shared, including vegetarian and gluten-free options. In closing, teriyaki chicken bowls are fun, easy, and adaptable. Try new flavors and enjoy!

Teriyaki Chicken Bowls Flavorful and Satisfying Meal

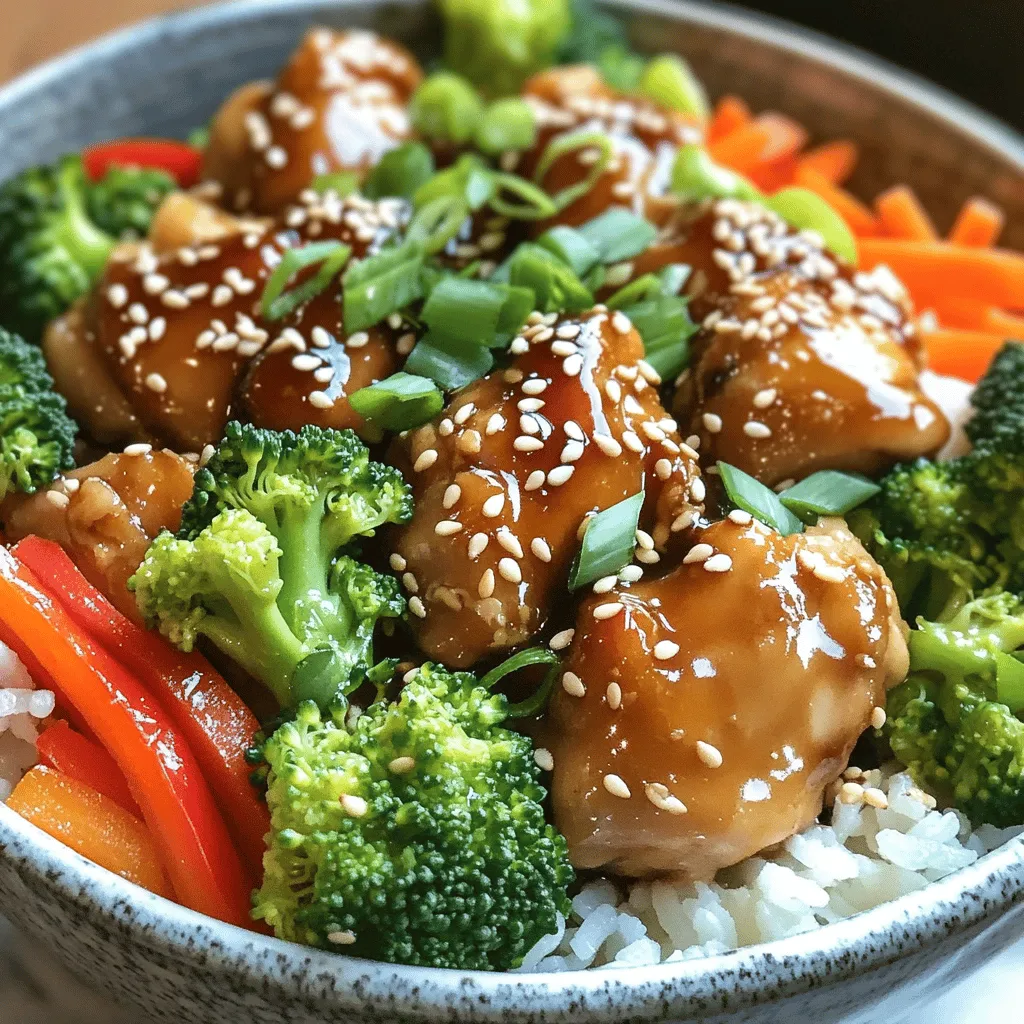
If you’re craving a meal that’s packed with flavor and easy to make, Teriyaki Chicken Bowls are your answer. These

- 4 large eggs - 1/4 cup milk - 1 cup spinach, chopped - 1/2 cup cherry tomatoes, halved - 1/4 cup onion, diced - 1/4 cup bell pepper, diced - 1/2 cup shredded cheddar cheese - 4 large flour tortillas - 1 tablespoon olive oil - Salt and pepper to taste - 1 avocado, sliced (for serving) - Salsa (for serving) In this recipe, the main components are simple yet full of flavor. The eggs and milk create a fluffy base. Spinach adds nutrients and a pop of green. Cherry tomatoes bring sweetness and color. Onions and bell peppers give a nice crunch. Cheddar cheese melts beautifully, adding richness. Flour tortillas wrap around the filling, making it easy to eat. - Cooked sausage or bacon - Additional vegetables (mushrooms, zucchini) - Different cheese options You can customize your burritos with add-ins. If you love meat, sausage or bacon suits well. For more veggies, consider mushrooms or zucchini. Want a cheesy kick? Try different types of cheese. These options let you make the burritos your own, enhancing the taste and fun. For the complete recipe, refer to the Full Recipe section. - Whisk eggs and milk together in a bowl. - Heat olive oil in a skillet over medium heat. - Sauté onions and bell peppers for about 3-4 minutes. They should soften nicely. - Add spinach and cherry tomatoes to the skillet. Cook for 2 minutes until the spinach wilts. - Pour the egg mixture into the skillet. Stir gently to scramble. Cook until the eggs set, about 3-4 minutes. - Warm tortillas in a separate pan or microwave until they are soft. - Divide the egg and vegetable mixture among the tortillas. Place it in the center of each. - Fold the sides of each tortilla over the filling. Roll tightly to secure the burritos. Now, you have a delicious breakfast burrito ready to enjoy! You can find the Full Recipe for more details. To make the best eggs for your breakfast burrito, cook them over medium heat. This temperature lets the eggs cook evenly without burning. Stir gently while they cook. This helps keep them soft and fluffy. Avoid overcooking the eggs. You want them just set, not dry. When they look slightly runny, take them off the heat. The eggs will continue to cook for a bit after you remove them. Choosing the right tortilla matters. Flour tortillas are best for breakfast burritos. They are soft and hold the filling well. Look for large tortillas so you have enough space for all your tasty ingredients. Warming tortillas properly makes a big difference. You can warm them in a skillet for about 30 seconds on each side. This makes them soft and pliable. You can also microwave them for about 15 seconds. Just be careful not to overheat them, or they might get tough. Breakfast burritos pair well with many side dishes. Fresh fruit salad adds a nice touch. You can also serve them with crispy hash browns. These sides balance the flavors and textures. Salsa is a must for serving. Choose your favorite kind. Chunky salsa gives a nice crunch, while smooth salsa adds a fresh taste. You can even try spicy salsa if you like heat. For a creamy option, serve with a side of avocado. For the full recipe, check out the complete Savory Breakfast Burritos recipe. {{image_2}} You can make tasty vegetarian breakfast burritos by using different vegetables and proteins. Try adding mushrooms, zucchini, or even sweet potatoes for a unique twist. For protein, consider using black beans or tofu. These options boost flavor and nutrition. Plant-based cheese substitutes are also great. Look for options made from nuts or soy. They melt well and fit perfectly in your burrito. Spice up your breakfast burrito with jalapeños. They add heat and excitement to your meal. If you love fresh herbs, try adding cilantro. Cumin also enhances the flavor with a warm, earthy taste. A dash of smoked paprika gives a nice depth, too. Experiment with these spices to find your favorite blend. If you want a deconstructed meal, try a breakfast burrito bowl. Start by cooking rice or quinoa as your base. Top it with the egg and vegetable mixture from the burritos. You can add salsa, avocado, or even some black beans for extra flavor. This option is great for those who prefer to eat with a fork. Plus, it’s easy to customize with your favorite toppings. To keep your burritos fresh, wrap them tightly in foil or plastic wrap. Place them in an airtight container for best results. Leftover burritos last about 3 to 4 days in the fridge. Always check for any signs of spoilage before eating. To freeze your burritos, let them cool completely first. Wrap each burrito in foil or plastic wrap, then place them in a freezer bag. Squeeze out as much air as you can. This method keeps them fresh for up to 3 months. For thawing, move them to the fridge overnight before reheating. You can use different methods to reheat your burritos. The oven works well; wrap them in foil and bake at 350°F for 15-20 minutes. You can also use the microwave; heat on high for 1-2 minutes. If you prefer a skillet, heat on medium for about 5 minutes, turning often. Ensure they are warmed evenly to enjoy every bite. Yes, you can make breakfast burritos ahead of time. To prepare them, follow these steps: - Cook the filling: Make the egg, vegetable, and cheese mix as described in the recipe. - Assemble the burritos: Fill the tortillas with the cooked mixture and wrap them tightly. - Wrap for storage: Use plastic wrap or foil to cover each burrito before placing them in the fridge. - Timing: They can be stored in the fridge for up to three days. This way, you have a quick meal ready to enjoy. You can easily change your breakfast burritos to fit your needs. Here are some ideas: - For vegetarians: Use more veggies like mushrooms or zucchini. - For meat lovers: Add cooked sausage or bacon for extra flavor. - For dairy-free: Replace cheese with a plant-based option. - For gluten-free: Use corn tortillas instead of flour ones. Feel free to mix and match to suit your taste! You can enjoy breakfast burritos with many tasty sides. Here are some great options: - Fresh fruit: Sliced avocados and fresh berries add color and nutrients. - Salsas: A zesty salsa or pico de gallo adds a kick. - Yogurt: A dollop of yogurt can balance the flavors well. - Hash browns: Crispy hash browns make a hearty side. These sides will make your meal even better! Reheating breakfast burritos is simple. Here are a few methods: - Microwave: Wrap the burrito in a damp paper towel and heat for 1-2 minutes. - Oven: Preheat the oven to 350°F (175°C). Wrap in foil and heat for 15-20 minutes. - Skillet: Heat a skillet over medium heat. Cook the burrito for 5-7 minutes, turning to heat evenly. Choose the method that fits your time and taste! For the complete Savory Breakfast Burritos recipe, click [here](#). You can create delicious breakfast burritos with simple ingredients and steps. Start with eggs, veggies, and cheese. Cook them gently for the best flavor, and warm your tortillas before filling. Experiment with add-ins for variety. Store extras wisely to enjoy later. Whether you're prepping for a busy day or a special brunch, breakfast burritos offer endless options. Enjoy making tasty meals that satisfy your whole family!

Savory Breakfast Burritos Easy and Flavorful Meal

Start your day with a burst of flavor! Savory breakfast burritos are quick and easy to whip up, packed with

Older posts
Newer posts
← Previous Page1 … Page36 Page37 Page38 … Page61 Next →

dsad

© 2025 Emmas Dish • Built with GeneratePress

Our Policies

  • Copyright Policy
  • Cookie Policy
  • GDPR Policy
  • Privacy Policy
  • Disclaimer
  • Terms Of Use

More Information

  • Home
  • About
  • Contact
  • Appetizers
  • Dessert
  • Dinner
  • Drinks
©2025, Emmas Dish About Back To Top