Skip to content
DisclaimerTerms Of UseGDPR PolicyCookie Policy

Emmas Dish

  • Home
  • Drinks
  • Appetizers
  • Dinner
  • Dessert
  • About
  • Contact
  • Privacy Policy
DisclaimerTerms Of UseGDPR PolicyCookie Policy

Emma

- 4 medium zucchinis - 1 cup quinoa - 2 cups vegetable broth - 1 can black beans - 1 cup corn kernels - 1 red bell pepper - 1 small red onion - 2 cloves garlic - 1 teaspoon cumin - 1 teaspoon chili powder - ½ teaspoon smoked paprika - Salt and pepper to taste - Fresh cilantro for garnish (optional) To make stuffed zucchini boats, gather these ingredients first. The zucchinis serve as the perfect vessel for our filling. They are mild and healthy. Quinoa adds a nice texture and boosts protein. Vegetable broth gives the quinoa a rich flavor. Next, we need the filling components. Black beans add protein and fiber. Corn brings sweetness and color. The diced bell pepper and chopped onion add crunch and taste. Garlic enhances the overall flavor. Now, let’s talk about spices. Cumin, chili powder, and smoked paprika give depth and warmth. Adjust salt and pepper to your liking. You can add fresh cilantro at the end for a bright touch. This combination makes for a tasty, colorful dish. You can find the full recipe to guide you through the cooking process. - Preheat oven to 375°F (190°C). - Cut the zucchinis in half lengthwise. - Scoop out the center with a spoon, leaving about ½ inch of flesh. This creates a perfect boat for your filling. Save that scooped-out zucchini for later. It adds flavor to the filling. - Cook 1 cup of quinoa in 2 cups of vegetable broth. - In a skillet, heat a splash of olive oil. - Sauté 1 small red onion until it turns translucent. This takes about 4 minutes. - Add 2 minced garlic cloves and cook for 1 more minute. Next, stir in 1 diced red bell pepper and the scooped zucchini flesh. Cook for 5 minutes until all veggies soften. - In the skillet, add 1 can of drained black beans, 1 cup of corn, and the cooked quinoa. - Mix in 1 teaspoon each of cumin and chili powder, along with ½ teaspoon of smoked paprika. - Season with salt and pepper to taste. - Stuff each zucchini half generously with the filling. - Top with 1 cup of shredded cheese. Now, place the stuffed zucchini in a baking dish. Pour a splash of vegetable broth in the dish to keep them moist. Cover with foil. - Bake for 25 minutes, then take off the foil. - Bake for another 10 minutes until the cheese is bubbly and golden. Remove the dish from the oven. Let the boats cool for a few minutes before serving. For a fresh touch, add cilantro on top. Enjoy your flavorful stuffed zucchini boats! For a detailed guide, check the Full Recipe. Choosing the right zucchini size Select medium zucchinis for stuffing. They hold the filling well and bake evenly. Zucchinis that are too small may not have enough space for the filling. Larger zucchinis can be watery and lose flavor. Aim for zucchinis about 6 to 8 inches long. Tips for a flavorful filling Use a mix of ingredients for a tasty filling. Combine black beans and quinoa for protein. Add corn for sweetness and crunch. Fresh herbs like cilantro brighten the dish. Spices like cumin and chili powder add warmth. Don’t forget to season with salt and pepper. Taste as you mix to adjust flavors. Alternatives to baking If you prefer not to bake, try grilling or steaming your stuffed zucchini. Grilling gives a smoky flavor that pairs well with the filling. Steaming keeps the zucchini tender and juicy. Both methods can make a delicious dish without the oven. How to check for doneness To check if your zucchini boats are done, poke them with a fork. The fork should slide in easily. The cheese should be bubbly and golden. If it’s not quite ready, bake for a few more minutes. You want the zucchini soft but not mushy. Serving suggestions Serve stuffed zucchini boats on a colorful plate. This adds visual appeal. You can pair them with a side salad for freshness. A dollop of sour cream or a sprinkle of cheese can enhance the dish. Garnish recommendations Garnish with fresh cilantro for a pop of color. Chopped green onions also work well. For a touch of heat, add sliced jalapeños. These small touches make your dish look gourmet and inviting. For the full recipe, check out Zesty Stuffed Zucchini Boats . {{image_2}} You can change the filling to suit your taste. Try using different proteins. Chicken and turkey work well. You can also use tofu for a plant-based option. For a vegetarian twist, add mushrooms and spinach. These options keep the dish fresh and exciting. If you need gluten-free options, use quinoa or rice. Both are tasty and safe. For vegan adaptations, skip the cheese or use a plant-based cheese. This allows everyone to enjoy stuffed zucchini boats without worry. Spices can bring your dish to life. Add herbs like oregano or thyme for extra flavor. You can also try different cheeses. Feta or goat cheese can add a tangy twist. Mixing and matching these elements allows you to create your perfect stuffed zucchini boat. For the full recipe, check out the details above. To keep your stuffed zucchini boats fresh, store them in the fridge. Place them in an airtight container. This keeps the flavors inside and helps them last longer. They can stay good for up to three days. If you want to freeze them, wrap each boat in plastic wrap. Then, place them in a freezer-safe bag. They can last for about three months in the freezer. To reheat your stuffed zucchini boats, preheat your oven to 350°F (175°C). Place the boats on a baking sheet and cover them with foil. This helps them heat evenly. Bake for about 15-20 minutes or until warm. If you froze the boats, let them thaw overnight in the fridge first. Then, follow the same reheating steps. Frozen boats may need an extra 5 minutes. Stuffed zucchini boats last about three days in the fridge. Check for signs of spoilage like a sour smell or slimy texture. If you see any mold, throw them away. Always trust your senses; they help you decide if food is safe. Enjoy your meals safely! For the full recipe, check out the details above. To check if your zucchini boats are done, look for a few signs. The cheese should be golden and bubbly. The zucchini should feel tender when you poke it with a fork. If you want to be sure, check the internal temperature. It should reach 165°F (74°C). This means the filling is hot and safe to eat. Yes, you can prepare stuffed zucchini boats ahead of time. You can make the filling and stuff the zucchini, then store them in the fridge. Cover them tightly to keep them fresh. You can also freeze them for later. If you freeze, wrap each one in plastic wrap and then in foil. They will last for about three months. Just thaw them in the fridge before baking. Stuffed zucchini boats pair well with many sides. Here are some good options: - A fresh garden salad with light dressing. - Quinoa or rice to soak up flavors. - Grilled vegetables for a tasty mix. For drinks, try these: - A nice white wine like Sauvignon Blanc. - Sparkling water with lemon for a refreshing choice. - Herbal tea for something warm and soothing. Stuffed zucchini boats are a tasty and versatile dish. We covered key ingredients like zucchini, quinoa, and beans. I explained the steps to prepare, cook, and assemble your boats perfectly. You learned tips for variations, proper storage, and reheating. Overall, you can enjoy a healthy meal that fits many diets. With a little creativity, you'll always find new favorites in your kitchen. Get ready to impress your family or friends with delicious stuffed zucchini boats!

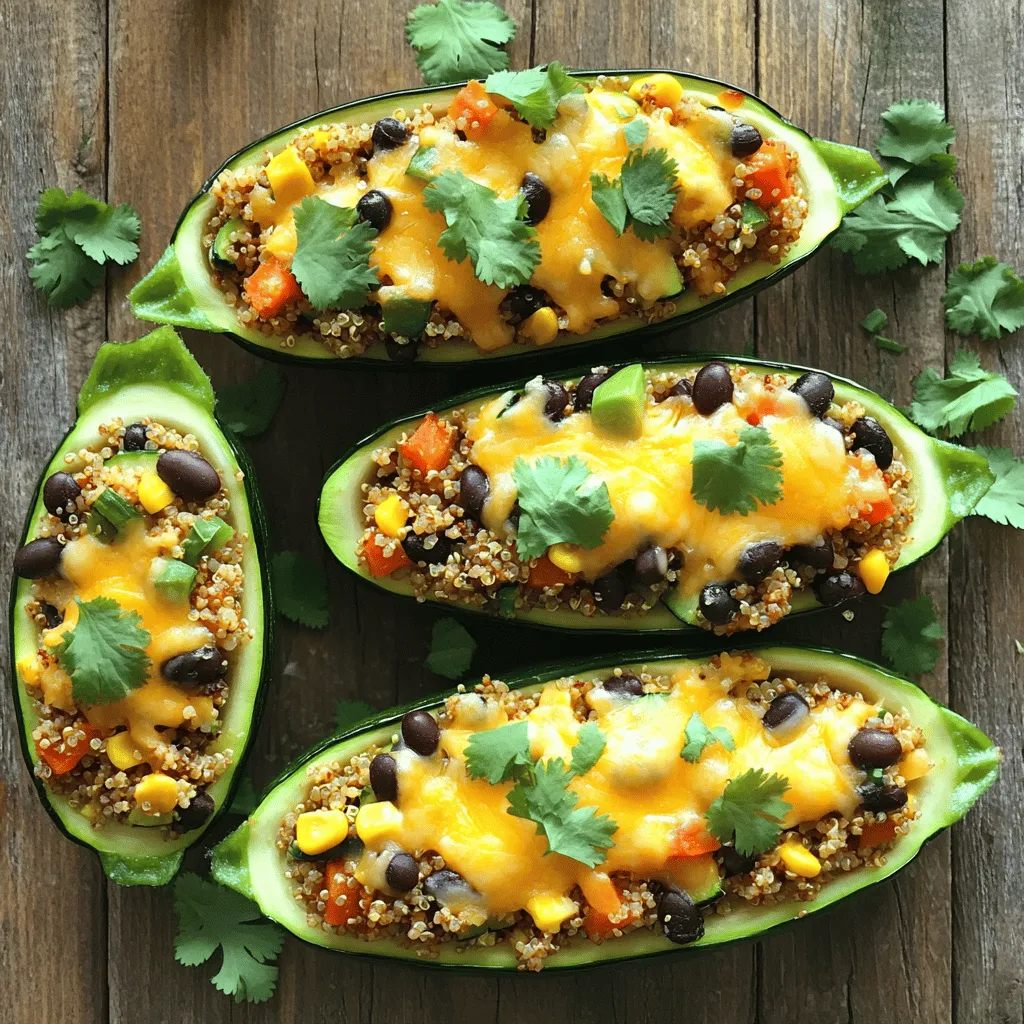
Stuffed Zucchini Boats Flavorful and Easy Recipe

Are you ready to elevate your next meal with a dish that’s both fun and healthy? Stuffed zucchini boats are

- 2 ripe bananas, sliced - 2 tablespoons creamy peanut butter - 1 cup almond milk (or any preferred milk) - 1 tablespoon honey or maple syrup (optional, for added sweetness) - 1/2 cup plain yogurt (for creaminess) - 1/2 teaspoon vanilla extract - 1/4 teaspoon cinnamon (optional, for a hint of spice) - Ice cubes (optional, for chilled smoothie) The main stars of this smoothie are ripe bananas and creamy peanut butter. Ripe bananas are sweet and soft, giving the smoothie a nice texture. Peanut butter adds a rich taste and healthy fats. You can use almond milk, but any milk works well. If you want a sweeter drink, add honey or maple syrup. Plain yogurt makes it super creamy. You can also add vanilla and cinnamon for extra flavor. - Blender - Measuring cups and spoons - Glasses for serving You need a good blender to mix everything smoothly. Measuring cups help you get the right amounts. Finally, grab some tall glasses to serve your tasty treat. This is the time to gather all your ingredients and tools. With these items ready, you can whip up a delicious Peanut Butter Banana Smoothie in no time! For the full recipe, refer to the detailed instructions provided. Start by slicing your ripe bananas. Use a sharp knife to cut them into thin rounds. This makes it easier for the blender to mix them smoothly. Next, measure out your peanut butter and milk. For this recipe, you need 2 tablespoons of creamy peanut butter and 1 cup of almond milk. You can also use any milk you prefer. Now, it’s time to blend! Combine the sliced bananas, peanut butter, almond milk, and any other ingredients in your blender. This includes yogurt, honey or maple syrup, vanilla extract, and cinnamon if you want. Blend everything on high speed until it's smooth and creamy. If you like your smoothie thicker, add some ice cubes. Blend again until it reaches your desired consistency. Once blended, pour the smoothie into tall glasses. This recipe makes two servings, so you can share or save some for later. For a fun touch, you can garnish with a sprinkle of cinnamon or a few banana slices on top. This makes your drink look even more inviting! Enjoy your creamy peanut butter banana smoothie right away. For the full recipe, be sure to check the earlier section! To get the right texture, you can add ice. This makes the smoothie cold and thick. If you want it creamier, add more yogurt. Try using different types of milk too. Almond milk works well, but you can use oat milk or cow’s milk if you prefer. You can boost flavor by adding extras. Protein powder gives it a healthy kick. Cocoa powder adds a rich taste, too. If your smoothie is not sweet enough, try honey or maple syrup. Taste as you go, and adjust until it’s just right. You can prep this smoothie ahead of time. Just slice the bananas and store them in a bag. Keep them in the freezer for later. When you’re ready, blend with the other ingredients. If you store it in the fridge, drink it within a day. The smoothie is best fresh, but it can last a bit longer if needed. {{image_2}} You can easily change the taste of your smoothie. Try adding berries for a fruity twist. Berries like strawberries or blueberries add color and nutrients. You can also use different nut butters. Almond or cashew butter can give a new flavor. Experiment and see what you like best! If you want a dairy-free or vegan option, simply swap the yogurt for plant-based yogurt. Almond milk works great too! For those watching their sugar, you can skip the honey or maple syrup. The ripe bananas already add natural sweetness. Want to make your smoothie even healthier? Incorporate spinach or kale for extra vitamins. This change won't alter the taste much at all. You can also add chia seeds or flaxseeds. These seeds boost fiber and omega-3 fatty acids, making your drink even more nutritious. This Peanut Butter Banana Smoothie is easy to adjust based on your tastes and needs. Don't be afraid to mix and match! For the full recipe, check out the Creamy Peanut Butter Banana Bliss section. To store your peanut butter banana smoothie, pour it into a sealed jar or container. Keep it in the fridge for up to 24 hours. The smoothie may separate a bit. To fix this, just shake or stir it well before drinking. If you want to keep it longer, freeze it in ice cube trays. Once frozen, transfer the cubes to a zip-top bag. This way, you can blend them later for a quick treat! If your smoothie has been in the fridge and isn’t smooth, don’t worry! Just add a little almond milk back into the blender. Then blend on high until it is creamy again. This makes sure you enjoy the same great taste as when you first made it. To thicken your smoothie, you can adjust the ingredients. Here are some tips: - Add more yogurt for creaminess. - Use less almond milk to limit liquid. - Include ice cubes to make it colder and thicker. - Blend longer to whip in air, which adds volume. Experiment with these options until you find your perfect thickness. Yes, you can easily substitute the yogurt. Here are some alternatives: - Use dairy-free yogurt for a vegan option. - Try silken tofu for a creamy texture. - Applesauce can add moisture without dairy. - Skip it entirely for a lighter drink. Choose what fits your diet best and enjoy. This smoothie can work as a meal replacement. It packs a good mix of nutrients: - Bananas provide energy and potassium. - Peanut butter adds protein and healthy fats. - Yogurt gives calcium and probiotics. Overall, this smoothie is rich in calories, so it's filling. Adjust the quantities to meet your hunger needs. For the full recipe, check out the Creamy Peanut Butter Banana Bliss section. This blog post covers how to make a delicious Peanut Butter Banana Smoothie. We explored key ingredients, equipment needed, and simple steps for preparation. I shared tips for the perfect taste and texture, along with fun variations to try. Plus, I included storage advice and answered common questions. Enjoy creating your smoothie masterpiece! With these easy steps, you can blend, sip, and savor a healthy treat anytime. The key is to experiment and find your perfect mix. Happy blending!

Peanut Butter Banana Smoothie Quick and Creamy Recipe

Looking for a quick and tasty way to fuel your day? This Peanut Butter Banana Smoothie is your answer! Creamy,

For grilled vegetable skewers, I love using a mix of colorful veggies. Here’s my go-to list: - 1 red bell pepper, cut into 1-inch pieces - 1 yellow bell pepper, cut into 1-inch pieces - 1 zucchini, sliced into thick rounds - 1 red onion, cut into wedges - 1 cup cherry tomatoes - 1 cup mushrooms, halved When picking vegetables, choose fresh, firm ones. The colors should be bright and vibrant. Look for bell peppers with smooth skin and avoid any that feel soft or have blemishes. For zucchini, select ones that are small to medium-sized. Mushrooms should be dry and firm. The fresher the veggies, the better your skewers will taste. The marinade brings out the best flavors in your vegetables. Here’s what you need: - 3 tablespoons olive oil - 2 tablespoons balsamic vinegar - 1 teaspoon garlic powder - 1 teaspoon paprika - Salt and pepper to taste Each ingredient plays a key role. Olive oil adds richness and helps with grilling. Balsamic vinegar gives a nice tang. Garlic powder adds depth and a savory touch, while paprika gives a subtle smokiness. Salt and pepper enhance all these flavors and tie everything together. To make your skewers even tastier, consider these options: - Optional spices: cumin, chili powder, or Italian seasoning - Fresh herbs: basil, parsley, or thyme for garnish Spices can add heat or earthiness depending on your choice. Fresh herbs not only add flavor but also taste fresh. They also look great on the plate, making your skewers pop with color. Try mixing and matching to find your favorite flavor combo. For the complete recipe, check out the [Full Recipe]. To make the marinade, gather these ingredients: olive oil, balsamic vinegar, garlic powder, paprika, salt, and pepper. In a large bowl, mix the olive oil and balsamic vinegar. Add the garlic powder and paprika. Season with salt and pepper. Whisk until smooth. This marinade adds depth and flavor to our vegetables. For the best taste, let the marinade sit for a few minutes. This allows the flavors to blend. Toss the vegetables in the marinade gently. Make sure each piece gets coated well. This step is key for juicy, tasty skewers. Now it's time to thread the vegetables onto skewers. Use metal or soaked wooden skewers. Start with a bell pepper, then add zucchini, onion, and tomatoes. Keep adding until the skewer is filled. Make sure to alternate colors and types of vegetables. This creates a vibrant look that is appealing. A mix of colors not only looks good but also enhances the taste. Try to pack the veggies close, but not too tight. This allows even cooking. Preheat your grill to medium-high heat, about 400°F (200°C). Place the skewers on the grill, leaving space between them. Cook for 10-12 minutes. Turn them every few minutes for even grilling. To check if they are done, look for tender veggies with nice grill marks. If they feel soft and look charred, they are ready. Once cooked, let the skewers cool for a minute. Serve them on a platter, garnished with fresh basil for a pop of color. For the full recipe, check the details above. To grill vegetables well, you need the right heat. Aim for medium-high heat, around 400°F (200°C). This temperature helps to sear the veggies quickly, locking in their juices. Here are some grilling times for common vegetables: - Red bell pepper: 8-10 minutes - Zucchini: 6-8 minutes - Red onion: 10-12 minutes - Mushrooms: 6-8 minutes - Cherry tomatoes: 4-6 minutes Rotate the skewers often. This step helps ensure even cooking and nice grill marks. One common mistake is not preheating the grill. If the grill is not hot enough, the vegetables may stick or cook unevenly. Always preheat your grill to the right temperature. Another pitfall is overcrowding the skewers. If you pack them too tight, the veggies won't cook evenly. Leave some space between each piece. If you find your veggies are burning, lower the heat or move them to a cooler part of the grill. If they’re undercooked, give them more time on the grill while checking frequently. Marinades boost flavor and tenderness. You can try different mixes to find what you love. One great option is an olive oil and balsamic vinegar mix, with added garlic powder and paprika. For the best flavor, marinate the veggies for at least 30 minutes. You can even marinate them overnight for a deeper taste. Experiment with herbs like thyme or rosemary, or add a splash of soy sauce for a savory twist. Ready to make these skewers? Check out the Full Recipe for all the details! {{image_2}} You can mix and match many vegetables for your skewers. Here are some great options: - Eggplant, cut into cubes - Bell peppers in various colors - Asparagus, trimmed and cut - Sweet corn on the cob, cut into rounds - Cherry tomatoes for sweetness Using seasonal ingredients can add fresh flavors. In summer, think of zucchini and tomatoes. In fall, add butternut squash for a warm touch. Experiment with what you find at the market. To make your skewers heartier, add protein. Here are simple ideas: - Cubes of firm tofu, marinated for flavor - Chicken breast, cut into bite-sized pieces - Shrimp, peeled and deveined If you add meat, adjust cooking times. Chicken needs about 15-20 minutes on the grill. Tofu and shrimp cook faster, around 5-7 minutes. Always check that meat is cooked through for safety. You can give your skewers a global twist. Here are some ideas: - For a Mediterranean vibe, use olive oil, lemon juice, and herbs like oregano. - For Asian flair, try soy sauce, sesame oil, and ginger in your marinade. - Mexican inspired? Use lime juice, chili powder, and cumin. Each of these flavor profiles can bring something new to your skewers. Try different marinades to discover your favorite. For a full recipe, check out the Grilled Rainbow Vegetable Skewers. To keep leftover skewers fresh, place them in an airtight container. You can also wrap them tightly in plastic wrap. This method prevents air from getting in. Store them in the fridge for up to three days. After that, the quality may drop. For reheating, use a grill or oven. Preheat your grill to medium heat. Place the skewers on the grill for about 5 minutes. Turn them halfway to warm them evenly. If using an oven, set it to 350°F (175°C). Bake for 10-15 minutes. This keeps the flavor and texture intact. Yes, you can freeze grilled vegetable skewers. First, let them cool completely. Then, place them in a freezer bag. Remove as much air as possible before sealing. They can be stored for up to three months. When ready to eat, thaw them overnight in the fridge before reheating. Soak wooden skewers for 30 minutes before grilling. This step helps prevent burning. If the skewers burn, your food may catch fire too. Soaking also keeps the skewers moist and helps them hold heat better. Yes, you can cook skewers in the oven. Preheat your oven to 400°F (200°C). Use a baking sheet lined with foil or parchment. Place skewers on the sheet, and cook for 15-20 minutes. Turn them halfway through for even cooking. The best grill temperature for vegetables is medium-high, around 400°F (200°C). This heat cooks vegetables evenly and brings out their natural sweetness. You can test the heat by holding your hand above the grill. If you can hold it there for 4-5 seconds, it's ready. To prevent sticking, oil the grill grates before cooking. You can use a paper towel dipped in oil and tongs to apply it. Also, make sure your vegetables are dry before grilling. This helps them release easily when cooking. Grilling vegetable skewers is fun and simple. We explored essential vegetables, marinades, and seasonings that boost flavor. I shared step-by-step instructions for preparing, assembling, and grilling the skewers. Don’t forget the helpful tips to avoid common mistakes and enhance your dish with international flavors. Whether you enjoy leftovers or want to explore different combinations, you now have the tools to create perfect skewers every time. Enjoy your tasty creations and impress everyone at your next barbecue!

Grilled Vegetable Skewers Flavorful and Healthy Treat

Looking for a tasty and healthy treat? Grilled vegetable skewers are the answer! Packed with vibrant colors and bold flavors,

To make the easiest homemade pizza dough, you will need: - 2 cups all-purpose flour - 1 packet (2 ¼ teaspoons) instant yeast - 1 teaspoon salt - 1 tablespoon sugar - ¾ cup warm water (about 110°F or 43°C) - 1 tablespoon olive oil Using precise measurements is key for great dough. A kitchen scale helps, but measuring cups work too. Make sure to spoon the flour into your cup and level it off. This gives you the right amount. Use warm water, around 110°F, to activate the yeast. Too hot can kill it, and too cold slows it down. You can swap all-purpose flour for whole wheat flour for a healthier option. If you're gluten-free, use a gluten-free flour blend. For the yeast, active dry yeast can also work. Just proof it in warm water first for about 5 minutes. Honey or maple syrup can replace sugar if you prefer. Each change affects the flavor, so feel free to experiment! Start by measuring ¾ cup of warm water. The water should feel warm, not hot, around 110°F (43°C). In a mixing bowl, combine the warm water, 1 tablespoon of sugar, and 2 ¼ teaspoons of instant yeast. Stir gently. Let this mixture sit for 5 minutes. You will see bubbles forming. This means the yeast is alive and ready to make your dough rise. Next, take a large bowl. In this bowl, mix 2 cups of all-purpose flour with 1 teaspoon of salt. Make a well in the center of the flour. Pour the yeast mixture and 1 tablespoon of olive oil into this well. Stir with a wooden spoon or spatula. Keep stirring until a dough starts to form. It will be a bit sticky at first, but that’s okay. Once the dough comes together, place it on a lightly floured surface. Knead the dough for about 5-7 minutes. You want it to feel smooth and elastic. If it sticks to your hands, sprinkle a little more flour. After kneading, place the dough in a lightly greased bowl. Cover it with a clean kitchen towel or plastic wrap. Let it rise in a warm spot for 30-60 minutes. It should double in size. When it rises, gently punch it down to release the air. Now, you can roll it out for your pizza. This step is key to making a great crust for your homemade pizza. For the full recipe, check the details above. To make smooth and elastic dough, follow these steps: - Use the right flour. All-purpose flour works best. - Measure your ingredients carefully. Too much flour makes dough dry. - Knead the dough well for 5-7 minutes. This builds gluten, which adds strength. - Don't skip the resting time. Let the dough rise until it doubles in size. If the dough feels sticky, add a little more flour. If it’s too dry, add a tiny bit of water. Here are some mistakes that can ruin your pizza dough: - Not letting the yeast activate. Always wait for it to foam. - Adding cold water. Warm water helps the yeast grow. - Kneading too little. Your dough needs to be elastic. - Overworking the dough. Too much kneading makes it tough. Remember, practice makes perfect. Don’t worry if it’s not perfect on your first try! To get the perfect crust, try these tips: - Preheat your oven to the right temperature. A hot oven gives a crispy crust. - Use a pizza stone or baking sheet. These retain heat well. - Roll out the dough evenly. This helps it cook evenly too. - Don’t overload with toppings. Too many can make the crust soggy. For a golden crust, bake until it looks brown and crispy. Enjoy your homemade pizza with these tips! For the full recipe, check out the Easiest Homemade Pizza Dough. {{image_2}} To make whole wheat pizza dough, swap half or all the all-purpose flour for whole wheat flour. This change adds fiber and a nutty flavor. Whole wheat flour absorbs more water, so you may need to add a little more warm water. Start with an extra tablespoon if needed. The dough will still be soft and easy to work with. Plus, it gives your pizza a healthier twist. If you need a gluten-free option, use a gluten-free flour blend. Look for a blend that contains xanthan gum, as this helps mimic the elasticity of wheat flour. Mix the dry ingredients as usual. Then, add the liquid ingredients. The dough may feel different, but it will still work well. Roll it out carefully, as gluten-free dough can be more fragile. You can make your dough more flavorful by adding herbs or spices. Try mixing in dried oregano, basil, or garlic powder. About 1 teaspoon of your chosen herb works well. This addition boosts the flavor without extra steps. You can also experiment with different combinations. For a spicy kick, add red pepper flakes or black pepper. Once you make your pizza dough, you might want to save some for later. You can store unbaked dough in the fridge. Wrap it tightly in plastic wrap or place it in an airtight container. This keeps the dough fresh. It can last in the fridge for up to three days. When you're ready to use it, just let it sit at room temperature for about 30 minutes. This helps it soften and rise a bit. Freezing pizza dough is easy and a great way to save time. First, shape the dough into a ball. Then, wrap it tightly in plastic wrap. After that, place it in a freezer bag or container. Label it with the date. You can freeze it for up to three months. When you’re ready to use it, take it out and let it thaw in the fridge overnight. After it thaws, let it sit at room temperature for about 30 minutes before rolling it out. If you've baked your pizza and have leftovers, you can reheat it easily. Preheat your oven to 375°F (190°C). Place the pizza on a baking sheet. Cover it loosely with foil to keep it from drying out. Heat for about 10-15 minutes. If you like a crispier crust, remove the foil for the last few minutes. You can also use a skillet on the stove. Heat it on medium for about 5-8 minutes. Cover it with a lid to warm the toppings. Enjoy your pizza warm and tasty again! Let the dough rise for about 30 to 60 minutes. You want it to double in size. A warm spot is best for this. This helps develop flavor and texture. If it's too cold, the dough may take longer. Just be patient! Yes, you can use active dry yeast. Just remember to activate it first. Mix it with warm water and sugar. Let it sit for about 5 to 10 minutes until it bubbles. Then, add it to your dough mixture. This step ensures it works well. Some easy toppings include: - Mozzarella cheese - Pepperoni - Bell peppers - Onions - Mushrooms - Fresh basil - Olives Feel free to mix and match your favorites. You can even try new combinations! This makes each pizza unique and fun. For more ideas, check out the Full Recipe for inspiration! In this guide, I covered all you need for perfect pizza dough. We explored ingredients, measurement details, and helpful substitutions. I shared step-by-step instructions for yeast mixture, dough creation, and kneading techniques. I offered tips to avoid common mistakes and achieve that perfect crust. You also learned about variations, from whole wheat to gluten-free. Lastly, proper storage and reheating methods ensure your dough lasts. Making pizza dough is fun and rewarding. With these tips, you're ready to create great pizzas at home. Enjoy each bite!

Easiest Homemade Pizza Dough Simple and Tasty Recipe

Making pizza at home is easier than you think! With my simple recipe for Easiest Homemade Pizza Dough, you can

Making mini cheesecake bites is fun and easy. Here’s a detailed list of ingredients you need: - 1 cup graham cracker crumbs - 1/4 cup unsalted butter, melted - 2 tablespoons sugar - 8 oz cream cheese, softened - 1/2 cup powdered sugar - 1 teaspoon vanilla extract - 1/2 cup sour cream - Suggested toppings: Fresh berries, chocolate sauce, or caramel sauce Each ingredient plays a key role in making these bites delicious. The graham cracker crumbs give a nice crust. Melted butter helps bind the crumbs together. Sugar adds sweetness, while cream cheese brings that rich, creamy texture we love. Powdered sugar helps the filling stay smooth. Vanilla extract gives a lovely aroma and taste. Sour cream adds a tangy flavor that balances the sweetness. You can get creative with toppings. Fresh berries add color and taste, while chocolate and caramel sauces bring a decadent touch. For the full recipe, check the instructions. Enjoy creating this tasty treat! 1. Preheat your oven to 325°F (163°C). This makes sure your mini cheesecakes bake evenly. 2. In a medium bowl, mix the graham cracker crumbs, melted butter, and sugar. Stir until it looks like wet sand. 3. Line a mini muffin tin with paper liners. Press about a tablespoon of the crumb mix into each liner to make a crust. 4. Bake the crusts for 5 minutes. Take them out and let them cool. 1. In a large bowl, beat the cream cheese until it is smooth and creamy. 2. Gradually mix in the powdered sugar and vanilla extract. Keep mixing until everything is well combined. 3. Add the sour cream. Mix until the filling is smooth and creamy. 1. Spoon the cheesecake filling into the cooled crusts. Fill each one about three-quarters full. 2. Bake the mini cheesecakes for 15 to 18 minutes. The edges should set while the center jiggles slightly. 3. Once baked, let them cool at room temperature for about 30 minutes. Then, refrigerate for at least 2 hours before serving. For the complete process and tips, refer to the Full Recipe. To get the best texture, start with room temperature cream cheese. It blends smoothly. This helps you avoid lumps. Mix your filling well, but don’t overmix. Overmixing can add air, which may cause cracks. To prevent cracking, bake at a lower temperature. Also, don’t open the oven door too soon. Let them cool in the oven for a few minutes before taking them out. This gradual cooling helps keep the cheesecakes intact. For topping, fresh berries add color and taste. Strawberries, blueberries, and raspberries work great. You can drizzle chocolate sauce or caramel for extra sweetness. For a nice presentation, use a piping bag to add toppings. It makes each bite look fancy. Place them on a pretty plate to wow your guests. You can also sprinkle some crushed graham crackers on top for a fun crunch. Explore the [Full Recipe] for more details on making these delightful bites! {{image_2}} You can make mini cheesecakes in many flavors. - Chocolate mini cheesecakes: Just add melted chocolate to the cream cheese mix. This creates a rich, sweet treat. - Fruit-flavored versions: You can use fresh fruit or fruit puree. Strawberries, blueberries, or mango add a bright touch. Blend fruit into the batter for a tasty twist. You can change the crust to suit your needs or tastes. - Gluten-free options: Use crushed gluten-free cookies instead of graham crackers. Almond flour also works well for a nutty flavor. - Additional flavor-infused crust ideas: Try adding spices like cinnamon or cocoa powder to the crust. This gives a deeper taste and pairs nicely with the filling. Want to try these ideas? Check the Full Recipe for details! To keep your mini cheesecake bites fresh, store them in the fridge. Place the bites in a sealed container. They will last for about five days. This helps maintain their creamy texture and flavor. If you want to save some for later, freezing is a great option. Wrap each cheesecake bite in plastic wrap, then place them in a freezer-safe bag. They can stay frozen for up to three months. Just thaw them in the fridge before enjoying. For the best taste, serve mini cheesecake bites cold. Let them chill for at least two hours after baking. This gives them time to set and develop flavor. When hosting a gathering, consider serving them on a large platter. Cut each mini cheesecake bite in half for smaller portions. This way, guests can enjoy more without feeling too full. You can also mix and match toppings to create a fun dessert bar. Can I make these ahead of time? Yes, you can make mini cheesecake bites a day before. Just store them in the fridge. They taste even better after chilling overnight. This lets the flavors meld nicely. What are the best topping combinations? I love using fresh berries like strawberries, blueberries, or raspberries. Chocolate sauce adds a rich touch. Caramel sauce gives a sweet twist. You can mix and match to find your favorite. How long do mini cheesecakes last? Mini cheesecakes stay fresh for about five days in the fridge. Make sure they are covered to keep them moist. If you want to keep them longer, freeze them for up to three months. Local bakeries with mini cheesecakes Check out your local bakeries. Many offer mini cheesecakes in various flavors. They often use fresh ingredients, which makes them taste great. Online options for purchasing mini desserts You can find pre-made mini cheesecakes online too. Websites like Goldbelly or local grocery delivery services often have them available. This is a quick way to enjoy these treats without baking. In this post, we explored how to make delicious mini cheesecake bites. We discussed the key ingredients needed, from cream cheese to graham cracker crusts. I provided step-by-step instructions to ensure perfect results every time. You learned tips for achieving the best texture and fun topping ideas to impress guests. Don't forget about variations like chocolate or fruit flavors. Now you can confidently make and store these treats. Enjoy sharing your mini cheesecakes with friends and family anytime!

Mini Cheesecake Bites Tasty and Simple Delight

Craving a sweet treat that’s both tasty and easy? Mini cheesecake bites are your answer! These little delights pack a

- 2 pounds baby potatoes, halved - 4 tablespoons olive oil - 4 cloves garlic, minced Lemon Garlic Herb Roasted Potatoes start with fresh, simple ingredients. Baby potatoes are the best choice. They are tender and cook evenly. Halve them to ensure they roast well. You will also need olive oil. It adds richness and helps the garlic stick. Minced garlic brings a strong flavor that pairs well with lemon. - 1 tablespoon fresh lemon juice - Zest of 1 lemon - Fresh herbs: rosemary and thyme Now, let’s boost the taste! Fresh lemon juice adds brightness. The zest of the lemon gives a punch of flavor. Fresh herbs like rosemary and thyme enhance the dish. They bring earthiness and aroma that make your kitchen smell amazing. - 1 teaspoon salt - ½ teaspoon black pepper - Fresh parsley for garnish Don’t forget the seasoning! Salt is a must. It brings out the flavors of the potatoes. Black pepper adds a hint of heat. Finally, sprinkle fresh parsley on top for a pop of color. It makes the dish look even more inviting. For the full recipe, follow the steps to create this savory side dish that pairs perfectly with many meals. 1. First, preheat your oven to 425°F (220°C). 2. Line a baking sheet with parchment paper. This helps with easy cleanup. 3. In a large mixing bowl, combine: - 2 pounds baby potatoes, halved - 4 tablespoons olive oil - 4 cloves garlic, minced - 1 tablespoon fresh lemon juice - Zest of 1 lemon - 1 tablespoon fresh rosemary, chopped - 1 tablespoon fresh thyme, chopped - 1 teaspoon salt - ½ teaspoon black pepper 4. Toss the potatoes until they are well coated in the mixture. 5. Spread the coated potatoes out in a single layer on the baking sheet. 6. Ensure the potatoes are not crowded for even roasting. 7. Roast them in the oven for 25-30 minutes. 8. Flip the potatoes halfway through to get a nice, crispy finish. 9. Once the potatoes are golden brown, remove them from the oven. 10. Let them cool for a few minutes. 11. Garnish with fresh parsley before serving. 12. For a fun presentation, serve in a rustic wooden bowl and drizzle with extra olive oil and lemon zest. For the full recipe, check out the details earlier! Enjoy your delicious Lemon Garlic Herb Roasted Potatoes! To get the best results, lay the potatoes in a single layer on your baking sheet. This helps them cook evenly. If they are too close together, they will steam instead of roast. Flipping the potatoes halfway through cooking adds crispiness. Use a spatula to turn them over gently. For the best taste, choose a high-quality olive oil. Extra virgin olive oil works well. You can also add more herbs like basil or oregano for extra depth. A pinch of smoked paprika can add a nice twist too. These Lemon Garlic Herb Roasted Potatoes make a great side with grilled meats or fish. They pair nicely with a fresh salad or steamed veggies. For a beautiful presentation, use a rustic bowl. Drizzle with extra olive oil and sprinkle more lemon zest on top to impress your guests. For the full recipe, check out the details above. {{image_2}} You can use different types of potatoes for this dish. Red potatoes bring a creamy texture. Yukon gold potatoes add a buttery flavor. Both options roast well, giving you delicious results. If you want something sweet, try sweet potatoes. They add a lovely color and a hint of sweetness. To make these potatoes even better, consider adding extra ingredients. Chopped bell peppers add crunch and color. Onions can bring a nice sweetness when roasted. You can also add cheese for a richer taste. Feta or parmesan melts beautifully and adds depth to the dish. You don’t have to stick to the oven. An air fryer also works great for this recipe. Just set it to 400°F and cook for about 20 minutes. Shake the basket halfway through to crisp them up. If you're grilling this summer, you can wrap the seasoned potatoes in foil. Grill them for about 25 minutes, turning once for even cooking. These methods keep the potatoes tasty and fun! For the full recipe, check out the section above. To keep your roasted potatoes fresh, let them cool first. Once they cool, place them in an airtight container. This helps lock in flavor and moisture. Store the container in the fridge for up to four days. When it’s time to enjoy your leftovers, you want them crispy. The best way to reheat them is in the oven. Preheat the oven to 400°F (200°C). Spread the potatoes on a baking sheet. Bake for about 10-15 minutes. This will make them crispy again. If you use a microwave, they may get soft and lose their crunch. If you want to freeze roasted potatoes, start by letting them cool completely. Then, spread them out in a single layer on a baking sheet. Place them in the freezer for a few hours. Once frozen, transfer them to a freezer-safe bag. This method helps keep their shape. When you’re ready to eat, thaw them in the fridge overnight. Reheat them in the oven for a great texture. Lemon Garlic Herb Roasted Potatoes can last about 3 to 5 days in the fridge. Store them in an airtight container to keep them fresh. If you want to save them longer, you can freeze them. In the freezer, they last up to 2 months. Just make sure to cool them before freezing. Yes, you can make this recipe vegan. Replace the butter with olive oil for a tasty option. Use vegetable broth instead of butter for extra flavor. This way, you keep the dish plant-based while still enjoying all the great tastes. These potatoes pair well with many main dishes. Serve them alongside grilled chicken or fish for a balanced meal. You can also enjoy them with a hearty salad or a veggie stir-fry. They complement flavors well, making them a great side for almost any dish. You can use dried herbs instead of fresh ones. Just remember that dried herbs are stronger in flavor. A good rule is to use one-third the amount of dried herbs as fresh. For example, if a recipe calls for one tablespoon of fresh rosemary, use one teaspoon of dried rosemary. This way, you still get that great taste without overpowering the dish. Lemon Garlic Herb Roasted Potatoes are a simple and tasty dish. We discussed the key ingredients, from baby potatoes to fresh herbs. You learned step-by-step instructions for perfect roasting. We shared value-adding tips to enhance flavor and offered ways to store leftovers. You can also try variations like sweet potatoes or grill them. With easy techniques, you can enjoy a delicious side dish. Remember, roasting brings out the best in potatoes. Enjoy your cooking adventure!

Lemon Garlic Herb Roasted Potatoes Savory Side Dish

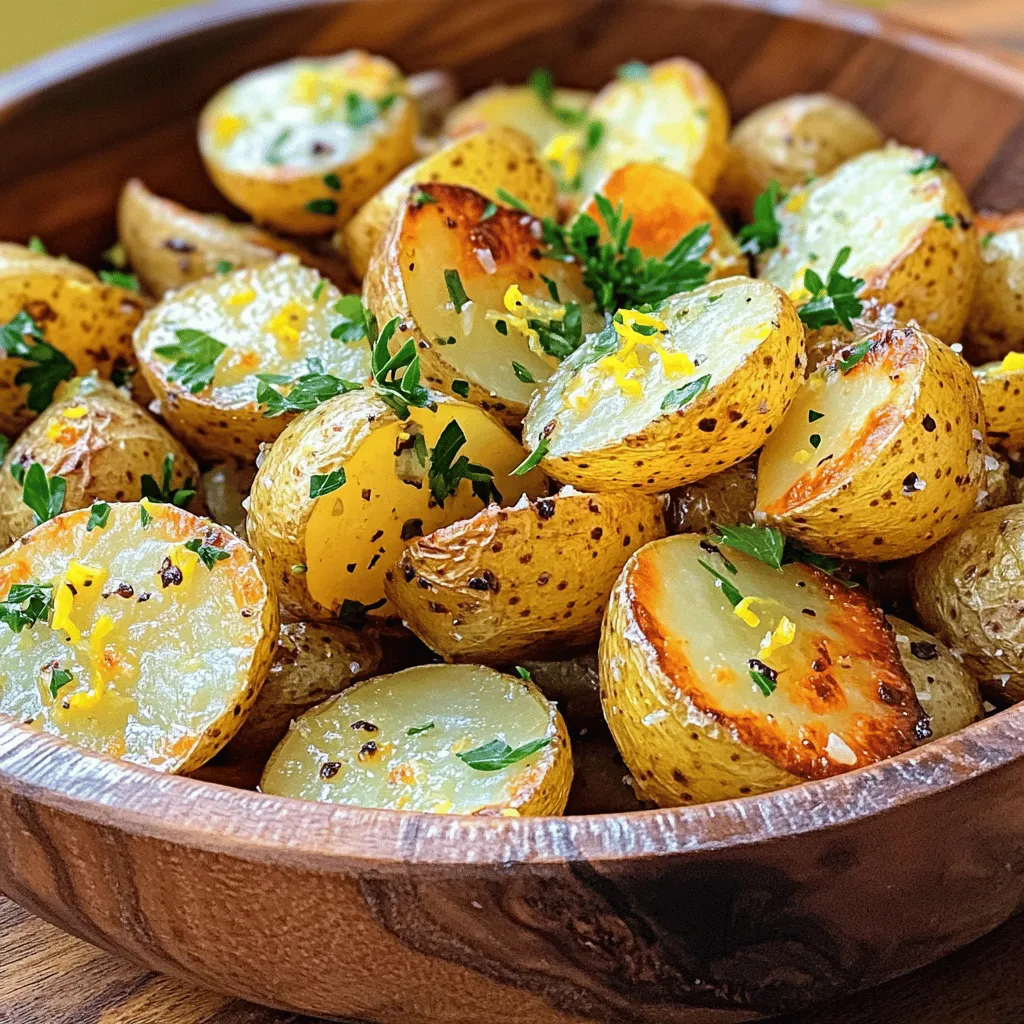
If you’re hunting for a quick and tasty side dish, look no further! My Lemon Garlic Herb Roasted Potatoes are

- 1 can (15 oz) chickpeas, drained and rinsed - 1 can (14 oz) coconut milk - 1 medium onion, diced - 2 cloves garlic, minced - 1-inch ginger, grated - 1 medium tomato, diced - 1 tablespoon curry powder - 1 teaspoon turmeric powder - 1 teaspoon cumin seeds - Salt and pepper to taste - Fresh cilantro, chopped for garnish - 1 cup spinach (optional) - 1 tablespoon olive oil The key to a rich and creamy Chickpea Curry in Coconut Milk lies in the ingredients. First, the chickpeas add protein and texture. They soak up flavors well. The coconut milk brings creaminess and a slight sweetness. It balances the spices perfectly. Onions, garlic, and ginger create a fragrant base. They build layers of flavor. The tomato adds acidity, brightening up the dish. For spices, curry powder gives depth and warmth. Turmeric adds a lovely color and earthiness. Cumin seeds provide a nutty taste. Adjust salt and pepper to fit your taste. If you want to add a pop of color, chopped cilantro works great as a garnish. Spinach can be a nice touch, adding nutrients and a vibrant green. Olive oil helps sauté the spices, bringing out their full flavor. This blend of ingredients makes every bite a delight. For the full recipe, check out the detailed cooking steps ahead. - Heat olive oil in a large saucepan over medium heat. - Add cumin seeds and sauté until popping. Start by heating the olive oil in your saucepan. This step brings out the rich taste of the oil. Next, when the oil is hot, toss in the cumin seeds. They will soon sizzle and pop, filling your kitchen with a warm, inviting aroma. This is the first step to building layers of flavor. - Sauté diced onion until soft and translucent. - Stir in garlic and ginger, cooking until fragrant. - Add tomato, spices, and cook until tomatoes soften. Once the cumin seeds are popping, add the diced onion. Cook it until it becomes soft and translucent, which usually takes about five minutes. This step adds sweetness to your curry. Then, stir in the minced garlic and grated ginger. Cook these for just a minute or two until they smell amazing. After that, add the diced tomato along with the curry powder, turmeric, salt, and pepper. Cook this mixture for about five minutes. The tomatoes will break down, creating a lovely base for your dish. - Pour in coconut milk and add chickpeas. - Bring to simmer and cook for 15-20 minutes. - Add spinach and adjust seasoning as needed. Now, it’s time to introduce the coconut milk. Pour it in, followed by the drained chickpeas. Stir everything well to mix the flavors. Bring the mixture to a gentle simmer and let it cook for 15 to 20 minutes. This allows the flavors to meld beautifully. If you're using spinach, add it in the last few minutes of cooking. It will wilt perfectly into the curry. Be sure to taste and adjust the seasoning as needed. For more details, check out the Full Recipe. - Use fresh spices for a more aromatic curry. Fresh spices make a big difference. - Adjust the amount of curry powder for your desired spice level. If you like heat, add more. - Serve in deep bowls and garnish with cilantro. This adds color and freshness. - Pair with basmati rice or warm naan for a complete meal. These sides balance the dish well. - Sautéing tips for perfect onion and garlic flavor: cook them slowly. This brings out their sweetness. - Simmering is important for flavor melding. Let your curry simmer gently. This blends all the tastes together. Enjoy making your Chickpea Curry in Coconut Milk! For the complete recipe, check out the Full Recipe. {{image_2}} You can make your chickpea curry even heartier by adding protein. Consider adding diced chicken or firm tofu. Both options soak up the rich flavors well. You can also try different beans, like lentils. They add a nice texture and give you more variety. Each protein brings its own taste, making your dish unique. Vegetables add color and nutrition to your curry. You might add bell peppers or zucchini for a fresh crunch. They cook well with the spices and coconut milk. If you want to change things up, try using kale instead of spinach. Kale gives a nice bite and holds up well in the curry. Spices make your curry exciting. Don’t be afraid to experiment! Try different curry blends, like Thai or Jamaican. Each blend brings a new twist to the dish. If you like heat, add chili flakes or fresh peppers. Adjust the spice level to your liking. It’s all about making it your own. For the full recipe, check the earlier section. Store your chickpea curry in an airtight container for up to 5 days. This helps keep it fresh and tasty. When you are ready to enjoy it again, reheat it on the stovetop over low heat. This method warms it evenly and keeps it creamy. You can freeze your curry in portions for quick meals later. This is great for meal prep. Just make sure to cool it first before placing it in freezer-safe containers. When you want to eat it, thaw it overnight in the fridge. This makes reheating easier. For the best taste, reheat your curry on the stove. This method helps keep the texture just right. If you want an extra creamy texture, add a splash of coconut milk while reheating. This will enhance the flavor and make it feel fresh again. Add chili powder or fresh chopped chilies to taste. Start with a small amount. You can always add more. This helps control the heat level. A little spice can really brighten the dish. Yes, but they will need to be soaked and cooked beforehand. Soaking helps soften them. Cook dried chickpeas until tender before adding them to the curry. This can take a few hours, so plan ahead! Serve with rice, quinoa, or warm naan bread for a complete meal. These sides soak up the rich sauce. You can also add a simple salad for freshness. Yes, all ingredients are plant-based and suitable for vegan diets. This makes it a great option for everyone. The coconut milk adds creaminess without dairy. Use almond milk or cashew cream for a dairy-free alternative, but it will change the flavor profile. Coconut milk gives a unique taste and richness. If you try a substitute, adjust spices to enhance flavor. For the full recipe, check out the Chickpea Bliss Curry in Coconut Milk! This blog post covered the essentials for making a tasty Chickpea Curry in Coconut Milk. You learned about the main ingredients, steps for preparation, and options for variation. The tips for enhancing flavor and creativity made this dish fun and versatile. Remember, cooking is all about experimenting. Use what you like and adjust flavors to fit your taste. This curry is easy to store and reheat, ensuring you can enjoy it throughout the week. Happy cooking!

Chickpea Curry in Coconut Milk Rich and Creamy Dish

Are you ready to savor a comforting bowl of Chickpea Curry in Coconut Milk? This rich and creamy dish packs

- 2 large cucumbers, diced - 4 ripe tomatoes, chopped - 1/4 red onion, thinly sliced - 1 cup feta cheese, crumbled - 1/4 cup fresh parsley, chopped - 1 teaspoon dried oregano - Salt and pepper to taste - 3 tablespoons extra-virgin olive oil - 2 tablespoons red wine vinegar (or lemon juice for a twist) When it comes to making a refreshing Cucumber Tomato Salad with Feta, fresh ingredients make a huge difference. I love using crisp cucumbers and juicy tomatoes for this dish. The colors from the veggies pop on the plate, making it look as good as it tastes. Cucumbers add crunch and a mild flavor, while tomatoes bring sweetness. The red onion offers a nice sharpness that balances everything. Feta cheese adds creaminess and a salty kick. The parsley and oregano lift the flavors. I always chop my herbs fresh for the best taste. A sprinkle of salt and pepper makes it all come together beautifully. The dressing is simple yet flavorful. Extra-virgin olive oil gives a fruity note, while red wine vinegar or lemon juice adds brightness. You can switch it up with lemon juice for a zesty twist. This Cucumber Tomato Salad with Feta is a full delight. You can find the full recipe above to make this delicious dish easily at home. - Step 1: Combine cucumbers and tomatoes Start by taking two large cucumbers and dicing them into bite-sized pieces. I love using fresh cucumbers because they add that crisp texture. Next, chop four ripe tomatoes. Mix the diced cucumbers and chopped tomatoes in a large bowl. This base is where all the flavors will come together. - Step 2: Add red onion and feta Now, grab a quarter of a red onion and slice it thinly. Add the red onion to your bowl. The onion brings a sharp flavor that pairs well with the fresh produce. Then, crumble one cup of feta cheese on top. The feta adds saltiness and creaminess that makes this salad shine. - Step 3: Whisk dressing ingredients In a separate small bowl, whisk together three tablespoons of extra-virgin olive oil and two tablespoons of red wine vinegar. If you want a twist, use lemon juice instead. Add salt, pepper, and one teaspoon of dried oregano. Whisk until it’s well mixed. This dressing brings everything together. - Step 4: Toss salad with dressing Pour the dressing over your salad ingredients. Gently toss everything together. Be careful not to break the feta too much. You want those lovely crumbles to stay intact. - Step 5: Add parsley and adjust seasoning Chop a quarter cup of fresh parsley and sprinkle it on top. This adds a bright color and flavor. Taste the salad and adjust the seasoning if needed. Maybe add a bit more salt or pepper to make it perfect. - Step 6: Let flavors meld before serving Allow the salad to sit for about ten minutes. This lets the flavors blend beautifully. When you’re ready to serve, you’ll enjoy a fresh and flavorful dish. For the full recipe, check out the detailed steps above! - Select ripe tomatoes for sweetness: Ripe tomatoes bring a juicy burst of flavor. Look for vibrant colors and slight softness when gently pressed. - Use fresh herbs for enhanced flavor: Fresh parsley adds a wonderful touch. It brightens the dish and pairs well with feta. - Pair with grilled meats or crusty bread: This salad complements grilled chicken or steak wonderfully. It also tastes great with some crusty bread to soak up the juices. - Serve chilled for a refreshing option: Chill your salad for an hour before serving. This lets the flavors mix and gives a cool bite on a hot day. - Use a beautiful serving bowl: A colorful bowl can make your salad pop. A clear glass bowl shows off the fresh colors of the salad. - Garnish with extra feta and parsley: Add a sprinkle of feta and a few parsley leaves on top. This makes the dish look fancy and inviting. For the complete recipe, check out the Full Recipe. {{image_2}} You can easily change the cheese in this salad. Swap feta with creamy goat cheese for a tangy twist. This will give your salad a new flavor. You can also use different cucumber and tomato types. Try using English cucumbers or heirloom tomatoes. Each choice adds a unique taste and look. Want to jazz up your salad? Add olives or colorful bell peppers. They bring a nice salty kick and crunch. You can also toss in some avocado. It adds creaminess and makes the salad feel rich. Each add-in can change the flavor while keeping it fresh. If you're vegan, don’t worry! You can replace feta with a plant-based cheese. Many options taste great and keep the salad creamy. Use apple cider vinegar instead of red wine vinegar. This gives a sweet tang that works well. With these swaps, you can enjoy this salad too! For the full recipe, check the Refreshing Cucumber Tomato Feta Delight section above. To keep your Cucumber Tomato Salad with Feta fresh, store it in an airtight container. This method helps prevent the ingredients from wilting. Enjoy the best taste within 1-2 days. After that, the salad may lose crunch and flavor. Freezing this salad is not recommended. When you freeze cucumbers and tomatoes, they change in texture. They can become mushy and unappealing. Enjoy this salad fresh instead! For easy meal prep, make the dressing separately. This keeps the salad crisp and fresh. You can chop the cucumbers, tomatoes, and other ingredients ahead of time. When you are ready to eat, just toss everything together. This way, you have a quick and tasty meal ready in no time! For the full recipe, check out the details above. You can add sliced jalapeños or a pinch of cayenne pepper to give the salad a nice kick. Both options bring heat without overpowering the fresh flavors. If you like more spice, try both! Just be careful to balance the heat with the cooling effect of the cucumbers and feta. This way, you make a salad that excites your taste buds. Yes, you can prepare this salad ahead of time. Just remember to add the dressing right before serving. This keeps the vegetables crisp and the flavors fresh. If you mix the dressing in too early, the cucumbers can get soggy. I recommend making it no more than a few hours in advance. This way, it stays delicious and vibrant. Yes, this salad is naturally gluten-free. It has no wheat or gluten ingredients. This makes it suitable for most diets. Whether you're gluten-free by choice or necessity, you can enjoy this salad without worry. It's a great option for gatherings, as everyone can partake in the freshness and flavor. This post shared a simple cucumber-tomato salad recipe with feta cheese. You learned how fresh produce, dairy, and herbs blend for great flavor. Choosing ripe tomatoes and fresh herbs enhances taste. Enjoy it chilled alongside grilled meats or crusty bread. Remember, storing it properly keeps it fresh. Customize it with add-ins like olives or herbs for a twist. This salad is quick to make, perfect for any meal. Explore your options, and enjoy this fresh and easy dish!

Cucumber Tomato Salad with Feta Fresh and Flavorful

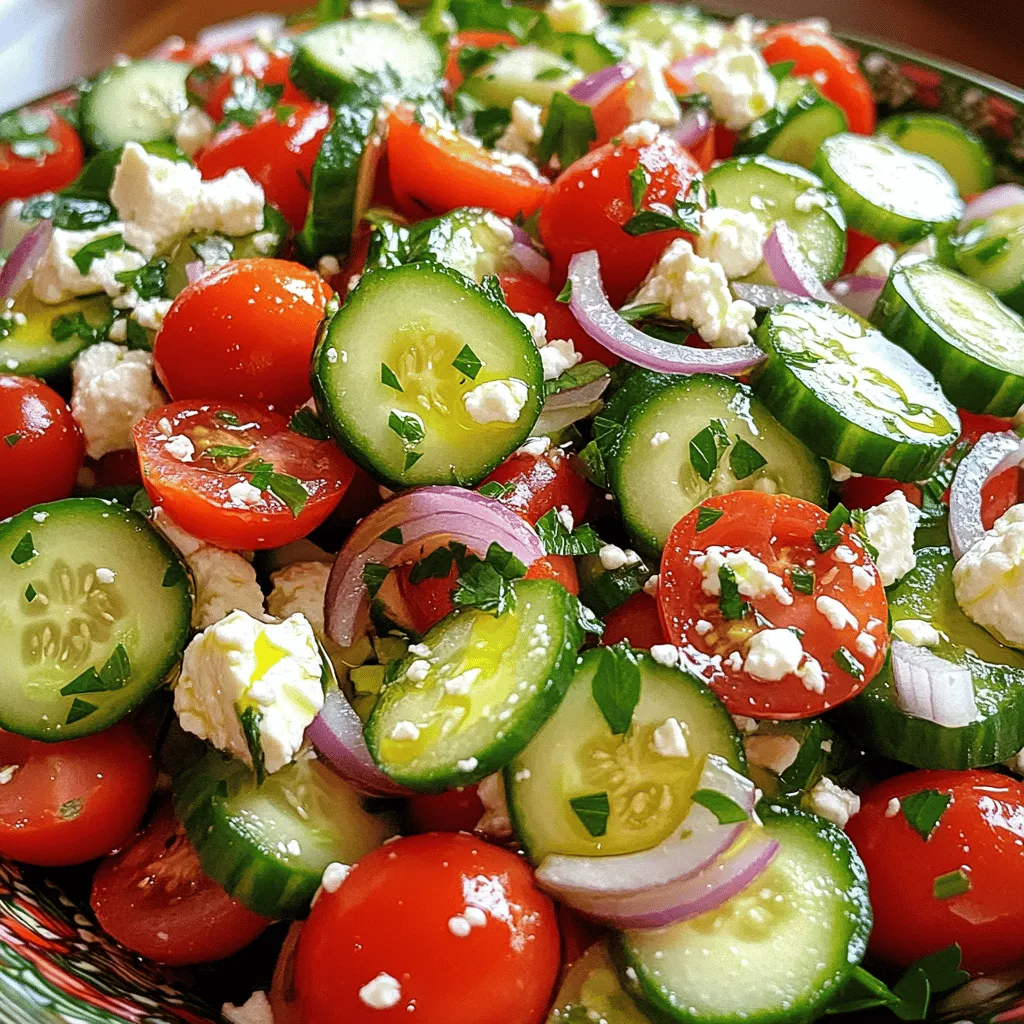
Looking for a light, refreshing dish that’s packed with flavor? This Cucumber Tomato Salad with Feta is just what you

To make this tasty dish, gather these items: - 1 lb (450g) large shrimp, peeled and deveined - 1 bunch of asparagus, trimmed and cut into 2-inch pieces - 4 tablespoons unsalted butter - 4 cloves garlic, minced - 1 tablespoon lemon juice - 1 teaspoon paprika - 1/2 teaspoon red pepper flakes (optional) - Salt and pepper to taste - Fresh parsley, chopped (for garnish) First, prepare your shrimp. Rinse them under cold water and pat them dry with paper towels. This step ensures they cook well. Next, season the shrimp with salt, pepper, and paprika. This blend adds great flavor. Now, turn to the asparagus. Trim the ends and cut the stalks into 2-inch pieces. This size helps them cook evenly. Make sure to wash them too. Fresh veggies bring a lot of taste and nutrients. This dish packs a punch in nutrition. Here’s what you get per serving: - Calories: 300 - Protein: 25g - Fat: 20g - Carbohydrates: 5g - Fiber: 2g Shrimp provides protein and healthy fats. Asparagus adds fiber and vitamins. This meal is not only delicious but also a healthy choice. For a complete cooking guide, check the Full Recipe. First, rinse the shrimp under cold water. This step makes sure the shrimp stay fresh. Next, pat them dry with paper towels. This helps the seasoning stick. Now, season the shrimp with salt, pepper, and paprika. This mix adds great flavor. Heat a large skillet over medium heat. Add 2 tablespoons of butter. Let it melt, then add the minced garlic. Cook for about 30 seconds. You want it fragrant but not browned. Now, add the seasoned shrimp to the skillet. Cook for 2-3 minutes on one side. Flip them over and cook for another 2-3 minutes. They should turn pink and opaque. Once done, remove the shrimp and set them aside. With the shrimp out, it’s time for the asparagus. In the same skillet, add the remaining 2 tablespoons of butter. Let it melt completely. Now, add the trimmed asparagus pieces. Sauté them for 4-5 minutes. You want them bright green and tender-crisp. This keeps them fresh and crunchy. Now, let’s bring it all together. Return the cooked shrimp to the skillet with the asparagus. Squeeze fresh lemon juice over the mix. This brightens the dish. If you like spice, sprinkle some red pepper flakes on top. Toss everything together for about 1 minute. This heats it through and blends the flavors. Taste the dish and adjust the seasoning if needed. Serve warm and garnish with chopped parsley. You can find the full recipe for this delicious meal in the [Full Recipe]. Enjoy! To get the best flavor, use fresh shrimp. Fresh shrimp taste sweet and tender. Thaw frozen shrimp overnight in the fridge. Always dry them well before cooking. This helps them sear properly in the pan. The garlic should sizzle, not burn, so keep an eye on it. Fresh lemon juice adds brightness. Don't skip the parsley; it gives a fresh finish. One common mistake is overcooking the shrimp. Shrimp cooks quickly, usually in 2-3 minutes per side. If you cook them too long, they become tough. Another mistake is using too much heat. Medium heat is best for cooking shrimp and asparagus. Also, avoid overcrowding the pan. Cook in batches if needed. This helps everything cook evenly. You’ll need a large skillet for this dish. A spatula helps you flip the shrimp and stir the asparagus. Use a sharp knife for mincing garlic and cutting the asparagus. A cutting board is essential for prep. If you want to make it easier, use a lemon squeezer for the juice. For the full recipe, check out the details above! {{image_2}} You can switch up the shrimp with chicken or scallops. They both pair well with garlic butter. For a vegetarian option, use mushrooms or tofu. You can also swap asparagus for broccoli or green beans. Each choice brings a new taste and texture. If you love heat, add more red pepper flakes. You could also try a dash of hot sauce or diced jalapeños. This will spice up the dish and give it a kick. Pair it with creamy avocado or a cooling yogurt sauce to balance the spice. For a cozy dinner, serve the dish with rice or pasta. This makes it filling and satisfying. If you're hosting a party, serve it on skewers. It makes for a fun finger food. You can also add a salad for a light lunch. This dish is versatile enough for any meal! Don’t forget to check out the Full Recipe for more ideas! After enjoying your garlic butter shrimp and asparagus, store leftovers right away. Let them cool to room temperature. Then, place them in an airtight container. This keeps the flavors fresh and prevents any odors from mixing. You can store them in the fridge for up to three days. When you’re ready to eat, just take them out and enjoy. If you want to save the dish for later, freezing is a great option. Place the cooled leftovers in a freezer-safe container. Make sure to leave some space at the top. Food expands when it freezes. Label the container with the date. You can freeze shrimp and asparagus for up to three months. When you’re ready to enjoy it again, just thaw in the fridge overnight. To reheat garlic butter shrimp and asparagus, you have a few options. The best way is to use the stove. Heat a skillet over medium heat. Add a splash of water or broth to keep it moist. Stir it gently for a few minutes. You can also use the microwave. Place the dish in a microwave-safe bowl. Cover it with a damp paper towel to keep it from drying out. Heat in short bursts, stirring in between, until warmed through. Enjoy your meal as if it were fresh from the pan! For the full recipe, refer to the beginning of the article. Yes, you can use frozen shrimp. Just thaw them before cooking. Place them in cold water for about 15-20 minutes. Make sure they are fully thawed and dried before seasoning. This helps the shrimp cook evenly and get that nice flavor. Season the shrimp simply with salt, pepper, and paprika. This blend enhances the shrimp’s natural taste. You can add garlic powder for extra flavor too. Feel free to adjust the seasoning to fit your taste. Shrimp are done when they turn pink and opaque. It usually takes about 2-3 minutes per side. Overcooking makes them rubbery, so watch closely. If you want to be sure, use a food thermometer. They should reach 120°F (49°C) at the center. Absolutely! Bell peppers, broccoli, or snap peas work well. Just cook them alongside the asparagus. Make sure to adjust the cooking time based on the vegetables you choose. This dish pairs well with rice or pasta. A light salad also complements the meal nicely. You can also serve it with crusty bread to soak up the garlic butter sauce. Store leftovers in an airtight container in the fridge. They stay good for 1-2 days. Reheat gently in a skillet over low heat to avoid overcooking the shrimp again. Yes, you can prep the shrimp and asparagus ahead of time. Just store them separately until you’re ready to cook. This saves time and helps keep the dish fresh. For the full recipe, check out the detailed steps provided in the main article. Garlic butter shrimp with asparagus is a tasty dish that’s easy to make. We explored the key ingredients and how to prepare them well. I shared tips to boost flavor and avoid mistakes while cooking. Variations give you options to try something new. Remember to store any leftovers properly, so they remain fresh. Use what you learned to create a flavorful meal that impresses. Enjoy cooking and savoring this delightful dish!

Garlic Butter Shrimp and Asparagus Flavorful Delight

Are you ready to whip up a quick and tasty dish? This Garlic Butter Shrimp and Asparagus recipe combines juicy

- 4 boneless, skinless chicken breasts - 1 cup fresh spinach, chopped - 1/2 cup feta cheese, crumbled - 1/4 cup cream cheese, softened - 1/4 cup sun-dried tomatoes, chopped - 2 cloves garlic, minced - 1 teaspoon dried oregano - 1 teaspoon lemon zest - 1 tablespoon olive oil - Salt and pepper, to taste - Toothpicks or kitchen twine To make Spinach Feta Stuffed Chicken Breast, you need fresh items. Start with the chicken breasts. They form the base of the dish. Next, gather your greens. Fresh spinach adds color and nutrition. Feta cheese gives a salty and creamy touch. Cream cheese makes the filling rich and smooth. Sun-dried tomatoes bring sweetness and depth. Don't forget garlic; it adds a warm flavor. Dried oregano gives an herbal note. A dash of lemon zest brightens the filling. Olive oil helps when searing the chicken. Lastly, have salt and pepper on hand to season the mix. You can find the full recipe with step-by-step instructions. This dish is not just tasty; it’s also fun to make. To start, you need to prepare the chicken breasts. Place each chicken breast flat on a cutting board. Using a sharp knife, cut a pocket into the side of each breast. Make sure not to cut all the way through. This step is important so that your filling stays inside. If you cut through, the filling can spill out while cooking. Now, let’s make the filling. In a mixing bowl, combine the chopped spinach, crumbled feta, and softened cream cheese. Add in the chopped sun-dried tomatoes, minced garlic, dried oregano, lemon zest, salt, and pepper. Mix everything well until it is fully combined. This filling is what makes the chicken so tasty. Next, it’s time to stuff the chicken. Take your filling and divide it evenly among the chicken pockets. Press down gently to pack it inside. Now, you need to secure each pocket. You can use toothpicks or kitchen twine to keep the filling from spilling out. If you use toothpicks, make sure to remove them before serving. For cooking, I recommend two methods: searing and baking. First, heat olive oil in an oven-safe skillet over medium-high heat. Sear the stuffed chicken breasts for 3-4 minutes on each side until they are golden brown. Then, transfer the skillet to a preheated oven set at 375°F (190°C). Bake for 20-25 minutes until the chicken is cooked through. This two-step method ensures a nice crust while keeping the inside juicy and flavorful. For the full recipe, refer to the [Full Recipe]. To keep chicken juicy, always use a meat thermometer. The safe internal temp is 165°F. Use medium heat when cooking to avoid burning the outside. Sear each side for 3-4 minutes. Then finish cooking in the oven. This method locks in moisture and flavor. To avoid overcooking, set a timer. Check the chicken's temperature after 20 minutes in the oven. If it needs more time, check every 5 minutes. This way, you won’t dry out your chicken. You can add more herbs for extra flavor. Fresh basil or parsley works well. A pinch of red pepper flakes adds a nice kick. Try marinating the chicken for at least 30 minutes. Olive oil, lemon juice, and garlic make great marinades. This adds depth to the dish. For a beautiful plate, garnish with fresh herbs. Chopped parsley or basil adds color. Serve with roasted vegetables or a side salad. A scoop of rice or quinoa pairs well too. This adds balance and makes the meal more filling. For a special touch, drizzle balsamic glaze over the chicken before serving. For the complete recipe, check out the Full Recipe section. {{image_2}} You can change the cheese in this dish for fun. Try goat cheese or mozzarella. Each cheese brings a new taste. You can also use ricotta if you want a creamier filling. For veggies, think outside the box! You can add mushrooms, roasted red peppers, or artichokes. They all work well with spinach and cheese. Mix and match to find your favorite flavor. If you need this dish gluten-free, you are in luck! The recipe is already gluten-free. Just check your ingredients, especially the cream cheese and sun-dried tomatoes, to ensure they are certified gluten-free. For a low-carb option, skip the cream cheese or choose a lower-carb cheese. You can also serve it with a fresh salad instead of grains. This gives you more flavor without the carbs. Pair this dish with sides that complement its rich flavors. Roasted vegetables work well, as do garlic mashed potatoes. A simple side salad adds freshness to the meal. For sauces, a lemon butter sauce is perfect. It brightens the dish and adds zing. You could also try a yogurt dip, which cools the heat. A nice sauce can elevate the whole experience. Explore more details in the Full Recipe for Spinach Feta Stuffed Chicken Breast! You can store leftovers of Spinach Feta Stuffed Chicken Breast in the fridge for 3-4 days. To keep it fresh, place the chicken in an airtight container. This helps maintain its flavor and moisture. When you are ready to enjoy it again, reheat the chicken in the oven or microwave. If using an oven, set it to 350°F (175°C) and warm the chicken for about 15-20 minutes. If using a microwave, heat for about 2-3 minutes, checking to ensure it heats evenly. To freeze stuffed chicken, follow these steps: 1. Cool Completely: Let the cooked chicken cool down to room temperature. 2. Wrap Properly: Wrap each chicken breast tightly in plastic wrap. Then, place it in a freezer-safe bag or container. 3. Label and Date: Write the date on the bag so you remember when you froze it. You can freeze the stuffed chicken for up to 3 months. To defrost, move the chicken to the fridge for 24 hours before cooking. When ready to reheat, you can use the oven. Preheat to 375°F (190°C) and bake for 30-35 minutes. Check the internal temperature to ensure it reaches 165°F (74°C) for safe eating. How long should I bake Spinach Feta Stuffed Chicken Breast? You should bake the stuffed chicken for 20-25 minutes. Always check that the chicken is cooked through. The outside should be golden brown, and the filling should be hot. What is the internal temperature for cooked chicken? The safe internal temperature for cooked chicken is 165°F (74°C). Use a meat thermometer to check this. This step ensures your meal is safe to eat. Can I make this dish ahead of time? Yes, you can prepare the stuffed chicken ahead of time. Stuff and sear the chicken, then store it in the fridge. Bake it when you are ready to serve. What can I serve with Spinach Feta Stuffed Chicken Breast? This dish pairs well with many sides. Consider serving it with a fresh salad, roasted vegetables, or garlic mashed potatoes. You can also serve it with rice or quinoa for a complete meal. For the full recipe, check out the details above. This article covers how to make Spinach Feta Stuffed Chicken Breast, from ingredients to cooking tips. You learned to prepare the chicken, create a tasty filling, and explore cooking methods. Remember, juicy chicken comes from careful attention to cooking time. Use fresh flavors and try different ingredients to keep it exciting. Leftovers can be stored or frozen for later. Enjoy mastering this dish, and impress your family with your new skills!

Spinach Feta Stuffed Chicken Breast Flavorful Delight

If you’re looking for a dish that combines rich flavors and healthy ingredients, you’re in for a treat! Spinach Feta

Older posts
Newer posts
← Previous Page1 … Page38 Page39 Page40 … Page61 Next →

dsad

© 2025 Emmas Dish • Built with GeneratePress

Our Policies

  • Copyright Policy
  • Cookie Policy
  • GDPR Policy
  • Privacy Policy
  • Disclaimer
  • Terms Of Use

More Information

  • Home
  • About
  • Contact
  • Appetizers
  • Dessert
  • Dinner
  • Drinks
©2025, Emmas Dish About Back To Top