Skip to content
DisclaimerTerms Of UseGDPR PolicyCookie Policy

Emmas Dish

  • Home
  • Drinks
  • Appetizers
  • Dinner
  • Dessert
  • About
  • Contact
  • Privacy Policy
DisclaimerTerms Of UseGDPR PolicyCookie Policy

Emma

To make your Chocolate Hazelnut Energy Balls, gather these ingredients: - 1 cup rolled oats - 1/2 cup hazelnut butter - 1/4 cup honey or maple syrup - 1/4 cup cocoa powder - 1/2 cup chopped hazelnuts - 1/4 cup dark chocolate chips - 1 teaspoon vanilla extract - A pinch of sea salt You can swap out some ingredients if you have different tastes or needs. For nut butter, try almond or sunflower seed butter. For sweetness, agave syrup works well. If you run out of cocoa powder, carob powder is a good alternative. These energy balls pack a punch of nutrition. Rolled oats offer fiber, which helps keep you full. Hazelnuts provide healthy fats that are good for your heart. Dark chocolate gives you antioxidants that protect your body. Enjoying these energy balls not only satisfies your cravings but also fuels your body with wholesome goodness. Start by gathering all your ingredients. This makes cooking easier. You need a large mixing bowl and a smaller one. It helps if you measure everything first. Set aside about 15 minutes for prep. 1. Mixing dry ingredients: In a large bowl, add the rolled oats, cocoa powder, and chopped hazelnuts. Stir them well. Make sure everything is mixed evenly. This step gives the energy balls texture. 2. Combining wet ingredients: Take a separate bowl. Mix the hazelnut butter, honey, vanilla extract, and a pinch of sea salt. Stir until it looks smooth. This creates a sweet and nutty base for your balls. 3. Forming energy balls: Now, add the wet mixture to the dry ingredients. Stir until everything comes together. You want a dough-like texture. Next, fold in the dark chocolate chips. Scoop out a tablespoon of the mixture. Roll it into a ball with your hands. Place each ball on a parchment-lined sheet. Chilling the mixture is key. It makes the dough firm and easy to handle. Refrigerate the balls for about 30 minutes. After they chill, they will hold their shape better. For storage, keep the energy balls in an airtight container. They last up to a week in the fridge. You can also freeze them for longer. Just make sure to thaw before eating. Enjoy your tasty power snack! When you make Chocolate Hazelnut Energy Balls, some mistakes can ruin the fun. Here are two to watch for: - Overmixing the dough: If you mix too much, the energy balls can become tough. Mix just until combined for the best texture. - Not chilling long enough: Chilling the mixture helps it set. If you skip this step, the balls may fall apart. Chill for at least 30 minutes. Want to make your energy balls even better? Try these tips: - Adding spices: A little cinnamon can add warmth to your energy balls. It pairs well with chocolate and hazelnuts. - Incorporating seeds or dried fruits: Adding chia seeds or dried cranberries can boost nutrition and add a fun texture. These energy balls are great for any time of day. Here are some ways to enjoy them: - Pairing with fruits or yogurt: Serve your energy balls with fresh fruit or a dip of yogurt. This adds flavor and nutrition. - Ideal snacks for workouts or desserts: They are perfect before a workout or as a sweet treat after dinner. For the complete recipe, check out the Full Recipe section. Enjoy making your tasty power snack! {{image_2}} You can switch up the taste of your energy balls by using different nut butters. Almond butter, peanut butter, or cashew butter can all work great. Each nut butter adds a unique flavor. You might also add flavored protein powders to boost nutrition. Vanilla or chocolate protein powder can enhance the taste and add extra protein. If you follow a vegan or gluten-free diet, you can make simple changes. Use maple syrup instead of honey for vegan energy balls. For gluten-free options, make sure your oats are certified gluten-free. This keeps the recipe delicious for everyone. Seasonality can inspire fun twists on this recipe. For example, during the fall, try adding pumpkin spice. Mix in some pumpkin puree for a festive touch. You can also add crushed peppermint during the winter holidays. These seasonal flavors keep your snacks fresh and exciting. For the full recipe, check out the [Full Recipe]. To keep your chocolate hazelnut energy balls fresh, store them in an airtight container. Place them in the fridge right after making them. This will keep them cool and tasty. The energy balls will stay fresh for up to a week. If you want to enjoy them longer, consider freezing them. For long-term storage, freezing is the best option. Start by placing the energy balls in a single layer on a baking sheet. Freeze them for about 1-2 hours until solid. Once frozen, transfer them to a zip-top bag or airtight container. Label the bag with the date. They can last in the freezer for up to three months. Check your energy balls for signs of spoilage. If they smell off or have an unusual texture, it’s best to toss them. Look for changes in color too. If the chocolate chips have faded or the balls seem dry, they may not taste as good. Always trust your senses. When in doubt, throw them out. To make Chocolate Hazelnut Energy Balls, follow these steps. First, mix rolled oats, cocoa powder, and chopped hazelnuts in a bowl. Then, in another bowl, combine hazelnut butter, honey or maple syrup, vanilla, and sea salt. Mix until smooth. Add the wet mix to the dry ingredients and stir until combined. Fold in dark chocolate chips. Chill the mixture for 30 minutes, then shape into balls. This quick reference will guide you to the full recipe! Yes, you can use many nut butters! Almond butter, peanut butter, or cashew butter are great choices. Each nut butter adds its own flavor and texture. If you have a nut allergy, try sunflower seed butter. It works well and is safe for most people. Feel free to experiment with different options to find your favorite! Each energy ball contains about 100 calories. This amount may vary based on the ingredients you use. The serving size is typically one ball. These energy bites are a great way to get a tasty snack without too many calories. They pack a nutritious punch with healthy fats and fiber. Enjoy them as a quick energy boost during your day! In summary, we explored the fun and simple process of making chocolate hazelnut energy balls. We reviewed key ingredients, cooking tips, and nutritional benefits. You learned how to avoid common mistakes and even discovered creative variations. These energy balls make great snacks for workouts or desserts. With a few tweaks, you can cater to different diets or seasons. I hope you feel inspired to try this healthy recipe at home. Enjoy your delicious creations and snack smart!

Chocolate Hazelnut Energy Balls Tasty Power Snack

Looking for a healthy snack that packs a punch? Let me introduce you to my Chocolate Hazelnut Energy Balls! These

- 2 pounds of russet potatoes - 4 cloves of garlic - 1 cup heavy cream - ½ cup unsalted butter - ¼ cup cream cheese - Fresh chives or parsley for garnish - Salt and pepper to taste Creamy garlic mashed potatoes are a joy to make and eat. You start with russet potatoes. They get soft and creamy when boiled. I love adding garlic for a rich flavor. Minced garlic mixed with cream gives a wonderful taste. Heavy cream makes the potatoes smooth and rich. Butter adds a nice touch too. If you want even more creaminess, try cream cheese. You can also sprinkle fresh herbs on top. Chives or parsley not only look nice but add a fresh taste. Salt and pepper balance all the flavors. For the full recipe, check out the details above. This dish is simple yet very tasty! To start, you need to prepare the potatoes. First, peel and cube 2 pounds of russet potatoes. Next, place them in a large pot. Cover the potatoes with cold water and add a pinch of salt. Bring the pot to a boil over medium-high heat. Once it starts boiling, reduce the heat. Simmer the potatoes for about 15-20 minutes. You will know they are done when a fork can easily go through them. While the potatoes cook, let's infuse the cream. In a small saucepan, warm 1 cup of heavy cream over low heat. Add 4 cloves of minced garlic to the cream. Let the garlic soften for about 5 minutes. Stir occasionally. This method helps the cream soak up all the garlic flavor. After your potatoes are cooked, drain them well. Return the potatoes back to the pot. Now it's time to mash! Use a potato masher or a hand mixer to mash until the potatoes are smooth and creamy. Gradually mix in the warm garlic-infused cream and ½ cup of unsalted butter. If you want extra creaminess, you can also add ¼ cup of cream cheese. Mix everything until well combined. Finally, season with salt and pepper to taste. Adjust as you like. Transfer your creamy garlic mashed potatoes to a serving bowl. Top with fresh chives or parsley for a nice touch. For the full recipe, check out the earlier section! To get the perfect texture, start with russet potatoes. They are starchy and yield creamy results. After boiling, drain the potatoes well. This keeps excess water from making them runny. Use a potato masher for a rustic feel. For a super smooth finish, try a hand mixer. For extra richness, add cream cheese. It gives a velvety texture and tangy flavor. Just mix it in with the warm garlic-infused cream and butter. This small step makes a big difference. Balancing flavors is key. Always taste your mashed potatoes before serving. Add salt and pepper to enhance the garlic. A bit of salt boosts all flavors. Freshly ground pepper adds a warm kick. You can also add fresh herbs for extra flavor. Chives and parsley work well. They add color and freshness. Try mixing in some rosemary or thyme for a twist. Serving mashed potatoes can be fun! Transfer them to a nice bowl for a warm look. To elevate the dish, create a small well in the center. Add a pat of butter that will melt into the potatoes. It looks inviting and tastes great. Garnish with fresh herbs on top. This adds a pop of color and makes the dish look fancy. You can also sprinkle some paprika for a touch of warmth. For more details on how to make this dish, check the Full Recipe. {{image_2}} You can easily change up your creamy garlic mashed potatoes. One way is by adding roasted garlic. Roasting garlic gives it a sweet and deep flavor. To roast garlic, wrap it in foil and bake it until soft. Then, mix it into your mashed potatoes. Cheese is another tasty option. You can add Parmesan for a nutty kick or cheddar for a sharp taste. Just stir in the cheese after mashing, and let it melt. This extra step makes the dish even more delicious. If you want a lighter dish, try using Greek yogurt instead of heavy cream. It adds creaminess and a touch of tang. This swap also gives protein to your meal. You can also explore plant-based butter and cream. These options can make your mashed potatoes dairy-free. Look for brands that taste good and have simple ingredients. These swaps allow you to enjoy mashed potatoes while following your diet. For the full recipe, refer to the section above. Store leftover creamy garlic mashed potatoes in an airtight container. This keeps them fresh and safe. Before sealing, let them cool to room temperature. They can last in the fridge for up to three days. When reheating, use a microwave or stovetop. For the microwave, place the potatoes in a bowl. Add a splash of milk or cream to keep them creamy. Heat in short bursts, stirring in between. On the stovetop, warm them in a pot over low heat. Stir often to avoid sticking. You can freeze mashed potatoes, but they will change texture. To freeze, scoop portions into freezer bags. Remove as much air as possible before sealing. Label the bags with the date. Frozen mashed potatoes are best used within three months. To thaw, move them from the freezer to the fridge a day before serving. For quick thawing, place the bag in cold water. When ready to reheat, warm them on the stovetop. Add a little cream or milk to restore creaminess. This method works best for keeping that rich flavor. For the full recipe, check out the earlier section. Yes, you can use different types of potatoes. Here is a quick look at three main kinds: - Russet Potatoes: These have a high starch content. They become fluffy and light when mashed. They are great for creamy garlic mashed potatoes. - Yukon Gold Potatoes: These potatoes are creamy and dense. They have a rich flavor and a buttery texture. They hold up well when mashed. - Red Potatoes: These have a waxy texture. They are less starchy and can make your mash a bit chunky. They also have a slightly sweet taste. Using different potatoes will affect the texture and flavor of your dish. Choose the type you prefer for your creamy garlic mashed potatoes. You can make mashed potatoes ahead of time. Here is how: 1. Prepare Them: Follow the Full Recipe to make your mashed potatoes. 2. Cool Down: Let them cool to room temperature before storing. 3. Store: Place the mashed potatoes in an airtight container. You can keep them in the fridge for up to three days. Reheating Directions: - Place the mashed potatoes in a pot over low heat. - Stir in a splash of milk or cream to help them stay creamy. - Heat until warmed through, stirring often. This way, you can enjoy your creamy garlic mashed potatoes without stress on the day of your meal. Creamy garlic mashed potatoes pair well with many dishes. Here are some ideas: - Roasted Chicken: The flavors of garlic and herbs complement the chicken well. - Grilled Steak: The richness of mashed potatoes balances the meat's savory taste. - Baked Salmon: The creamy texture pairs nicely with the fish's light flavor. - Vegetable Stir-Fry: For a lighter option, serve it with colorful veggies. These options can help you create a delicious meal around your creamy garlic mashed potatoes. You've learned how to make creamy garlic mashed potatoes from scratch. We covered the key ingredients, like russet potatoes, garlic, and cream. You saw step-by-step instructions to ensure perfect texture and flavor. We even discussed tips for variations and storage methods. Now, you can impress your family and friends with delicious mashed potatoes. Don't be afraid to get creative with flavors and presentations. Enjoy every bite and make them a regular part of your meals!

Creamy Garlic Mashed Potatoes Flavorful and Simple Dish

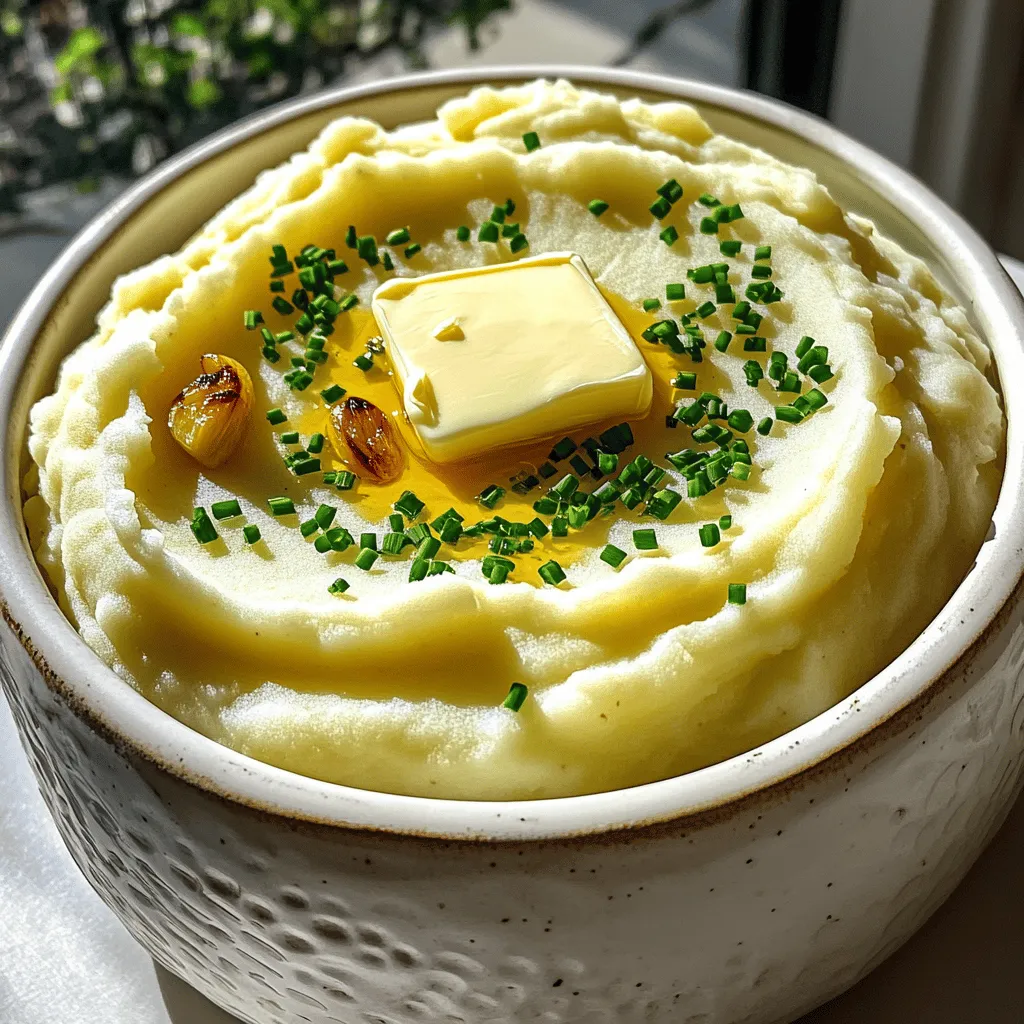
If you want the ultimate comfort food, look no further than creamy garlic mashed potatoes. This simple dish is rich,

- 1 pound smoked chicken sausage, sliced - 2 bell peppers (one red, one yellow), chopped - 1 medium red onion, diced - 1 zucchini, sliced - 1 cup cherry tomatoes, halved - 2 tablespoons olive oil - 1 teaspoon smoked paprika - 1 teaspoon garlic powder - 1 teaspoon Italian seasoning - Salt and pepper to taste To make this dish, you need a few simple and fresh ingredients. The smoked chicken sausage brings a rich flavor. You can find it at most grocery stores. I prefer using bell peppers, red onion, zucchini, and cherry tomatoes. They add color and nutrition. A drizzle of olive oil helps everything roast nicely. The spices enhance the taste, giving it a warm, savory kick. - Different types of sausage - Other vegetables (e.g., carrots, broccoli) - Fresh herbs for garnish You can switch up the sausage if you want. Turkey, pork, or even plant-based options work great. Feel free to add other veggies like carrots or broccoli. They can change the flavor and texture. Fresh herbs like parsley can make your dish look and taste even better. Adding these options allows for creativity in the kitchen! For the full recipe, check out the complete guide. 1. Preheat your oven to 400°F (200°C). This helps cook the dish evenly. 2. Line a large baking sheet with parchment paper. This makes cleanup easy. 3. Slice the sausage into rounds. 4. Chop the bell peppers into bite-sized pieces. 5. Dice the red onion into small bits. 6. Slice the zucchini into half-moons. 7. Halve the cherry tomatoes. 1. In a large bowl, combine the sliced sausage and all the chopped veggies. 2. Drizzle the olive oil over the mixture. This adds flavor and helps cook. 3. Sprinkle smoked paprika, garlic powder, Italian seasoning, salt, and pepper on top. 4. Toss everything together until well coated. You want every piece to get flavor. 5. Spread the mixture evenly on the prepared baking sheet. This allows even cooking. 6. Bake in the preheated oven for 25-30 minutes. Stir halfway through for even browning. 1. Once cooked, remove the pan from the oven. 2. Toss the dish with fresh parsley for a bright finish. 3. Serve immediately and enjoy the tasty flavors of the roasted sausage and veggies. To ensure even cooking, cut your veggies and sausage into similar sizes. This helps them cook at the same rate. Stir halfway through baking for the best results. For crispy veggies, use a higher oven temperature. This helps to caramelize them, bringing out their natural sweetness. Using different spice blends can change the whole dish. Try adding chili powder for heat or cumin for warmth. Marinating the sausage overnight adds depth to the flavors. Use olive oil, lemon juice, and your favorite herbs for a simple marinade. Parchment paper is key for easy cleanup and prevents sticking. It helps your food roast evenly. Space the ingredients out on the baking sheet to allow air to circulate. Crowding them can lead to steaming instead of roasting. This simple step makes a big difference in texture and flavor. For the full recipe, check out [Full Recipe]. {{image_2}} You can change the sausage type for different flavors. Turkey sausage is a great choice if you want less fat. Vegan sausage works well too for a plant-based option. You might also try chicken or pork sausage. Each protein will bring its unique taste to the dish. Using seasonal vegetables can make your meal fresh and exciting. In spring, consider asparagus or snap peas. In fall, add butternut squash or Brussels sprouts. Each veggie has different cooking times. For hard vegetables like carrots, add them early. For softer ones like zucchini, add them later to avoid overcooking. Experimenting with seasonings can change your dish's flavor completely. Try adding cumin and chili powder for a southwest twist. You can also use lemon zest and dill for a fresh taste. Adding zesty sauces like barbecue or hot sauce just before serving can elevate the dish even more. These little changes can make each meal unique. To store leftovers, let the dish cool first. Place it in an airtight container. This helps keep it fresh. You can keep it in the fridge for up to three days. A glass container works well. It lets you see what’s inside. You can also use plastic containers. Just make sure they are sealed tight. The best way to reheat this dish is in the oven. Preheat the oven to 350°F (175°C). Spread the food on a baking sheet. Heat for about 10-15 minutes. This keeps the sausage and veggies nice and warm. You can also use a microwave. Just cover the dish with a damp paper towel. This prevents it from drying out. Stir halfway through to heat evenly. For longer storage, you can freeze the leftovers. Allow the dish to cool completely. Then, place it in a freezer-safe container. Use a vacuum seal bag for best results. Label it with the date. You can freeze it for up to three months. To thaw, place it in the fridge overnight. For quicker thawing, use the microwave on defrost. Always reheat until hot before eating. Enjoy your meal again later! You can find the full recipe [here](#). To make this recipe gluten-free, choose gluten-free sausage. Many brands offer tasty options. Look for condiments that do not contain gluten. Read labels to be sure. You can also use gluten-free soy sauce or hot sauce for added flavor. Yes, you can use frozen vegetables. They are quick and easy. However, they may release more moisture. To fix this, increase the cooking time by 5 to 10 minutes. Stir them halfway through cooking to ensure they cook evenly. This dish pairs well with several sides. Consider serving it with: - Rice or quinoa for a hearty meal - A fresh green salad for crunch - Crusty bread to soak up juices - Mashed potatoes for comfort food These options enhance the meal and make it more filling. This blog post covered how to make a tasty sheet pan sausage and veggies. We discussed the main ingredients like smoked chicken sausage and colorful veggies. You learned step-by-step how to prepare, cook, and finish the dish. I shared tips for the best flavor and texture, along with storage information. Remember, you can customize this dish in many ways to fit your taste. Making it your own will make every meal fun! Enjoy your cooking!

Sheet Pan Sausage and Veggies Quick and Flavorful Meal

Looking for a quick and tasty meal? I’ve got you covered with this Sheet Pan Sausage and Veggies recipe. It’s

- 1 cup semi-sweet chocolate chips - 1 cup mini marshmallows - 1 tablespoon unsalted butter - 1 teaspoon vanilla extract - Graham crackers (for dipping) - Optional: crushed graham crackers and chocolate shavings for garnish If you want to switch things up, consider these options: - Alternatives for chocolate chips: You can use dark or milk chocolate chips. For a fruity twist, try using butterscotch or peanut butter chips. - Gluten-free options for graham crackers: Look for gluten-free graham crackers at the store. You can also use rice cakes or apple slices if you cannot find them. - Vegan alternatives for butter and marshmallows: Replace butter with coconut oil or vegan butter. For marshmallows, use vegan versions made from plant-based ingredients. This recipe gives you room to be creative. The Full Recipe shows how to make a delightful dessert that fits many diets. 1. Preheat your oven to 350°F (175°C). This step is key for even cooking. 2. Choose an oven-safe skillet or baking dish. Make sure it’s ready for the dip. 1. In your skillet, add 1 tablespoon of unsalted butter. 2. Melt the butter over low heat. Stir gently until it turns clear. 3. Once melted, add 1 cup of semi-sweet chocolate chips. 4. Stir the chocolate until it melts and blends. Remove from heat. 5. Now, add 1 teaspoon of vanilla extract. Mix well for added flavor. 1. Spread 1 cup of mini marshmallows evenly on top of the melted chocolate. 2. Place your skillet in the oven. Bake for 5-7 minutes. 3. Keep an eye on it. The marshmallows should puff and turn golden brown. 4. When done, take it out and let it cool for a minute. Now, you're ready to enjoy a warm, gooey s'mores dip! For the full recipe, check out the delicious details above. To get perfect marshmallows, watch them closely. You want them golden, not burnt. The ideal time in the oven is about 5-7 minutes. Keep an eye on the color change. If they turn dark too fast, lower the oven temperature. Burning chocolate can ruin your dip. To avoid this, melt it slowly with butter. Stir gently as it melts. If you see it getting too hot, remove it from the heat. This will keep the chocolate smooth and tasty. For dipping, graham crackers are classic. I love using honey graham crackers for a sweet touch. You can also try chocolate graham crackers for extra flavor. They add a nice twist to your dip experience. If you want to mix it up, serve fresh fruit too. Strawberries, bananas, or apple slices work great. They add freshness and balance the sweet dip. To make your dip even better, think about extra toppings. Try crushed nuts, caramel, or cookie crumbs. They give added texture and a fun crunch. You can also add a drizzle of caramel sauce for more sweetness. Using flavored chocolate can change the game. You can use dark chocolate or even mint chocolate. Adding a splash of flavored extract, like almond or orange, can also enhance the taste. These small changes can take your S'mores dip to the next level. {{image_2}} You can change the taste of your S'mores dip by adding peanut butter. Just mix in 1/2 cup of creamy peanut butter with the chocolate. This gives a nutty twist that pairs well with marshmallows. Another fun option is to incorporate caramel or nuts. Adding 1/2 cup of caramel sauce creates a rich, sweet flavor. Chopped nuts, like pecans or almonds, add crunch and texture. For a quick treat, you can make a microwave version. Just melt the butter and chocolate in a bowl. Heat in 30-second bursts until smooth. Then, add marshmallows and heat for 30 seconds more. If you want to make a larger batch, use a slow cooker. Mix all ingredients in the slow cooker and set it on low. Stir occasionally until the dip is warm and gooey. This method is great for parties or gatherings. If you need a nut-free version, skip the peanut butter. Use sunflower seed butter instead for a similar taste. For those following a keto diet, swap the chocolate chips for sugar-free chocolate. You can also use almond flour or coconut flour to make low-carb dippers. These options keep the fun of S'mores dip while sticking to your diet. Feel free to explore these variations and make the recipe your own. For the full recipe, check the detailed instructions above. To keep your S'mores dip fresh, use an airtight container. This will help prevent air from drying it out. You can also cover it with plastic wrap if you don’t have a container. Store the dip in the fridge after it cools. Recommended containers include: - Glass containers with lids - Plastic food storage containers You can reheat S'mores dip in the microwave or oven. If using the microwave, place it in a bowl. Heat in short bursts, about 20 seconds each. Stir in between to keep it smooth. For oven reheating, place the dip in a baking dish. Cover it with foil to keep it from drying out. Heat at 350°F (175°C) for about 10 minutes. This helps maintain the dip’s texture and flavor. S'mores dip can last in the fridge for about 3-5 days. After that, it may start to lose its taste and texture. Signs it has gone bad include: - An off smell - Changes in color - A hard or dried-out texture You can store S'mores Dip for up to three days. Keep it in an airtight container. This will help it stay fresh. If you see any signs of spoilage, it's best to toss it. Yes, you can prepare S'mores Dip ahead of time. Just follow the recipe and let it cool. Store it in the fridge until you're ready to heat it. When you want to serve it, reheat in the oven. This method keeps it warm and gooey. S'mores Dip can be gluten-free. The main ingredients, like chocolate and marshmallows, are gluten-free. However, check the labels to be sure. Use gluten-free graham crackers for dipping. This way, everyone can enjoy it. You can dip many things in S'mores Dip! Try using: - Pretzels - Sliced fruit, like strawberries or bananas - Cookies, such as vanilla wafers or Oreos - Rice cakes These options add fun flavors and crunch! This blog post covers all you need to make tasty S'mores dip. We explored the key ingredients and fun variations. Remember to follow the steps carefully for great results. You can customize the dip with different flavors and ingredients. Store leftovers properly to enjoy later. Now that you're ready, dive in and enjoy your delicious creation!

S’mores Dip Delightful and Easy Dessert Recipe

Get ready to indulge in a warm, gooey treat with my S’mores Dip recipe! This delightful dessert brings the classic

To make a no-bake chocolate cheesecake, gather these key ingredients: - 1 ½ cups chocolate cookie crumbs - ½ cup unsalted butter, melted - 2 cups cream cheese, softened - 1 cup powdered sugar - 1 cup heavy cream - 1 teaspoon vanilla extract - 8 oz dark chocolate, melted and slightly cooled - ¼ cup cocoa powder These ingredients form the base for your cheesecake. The chocolate cookie crumbs create a tasty crust. The cream cheese and heavy cream give it a smooth texture. The melted dark chocolate makes it rich and decadent. To make your cheesecake even better, consider these garnishes: - Chocolate shavings - Cocoa nibs - Fresh berries - Whipped cream These extras add flavor and a lovely look to your dessert. You can mix and match based on your taste. If you need to swap ingredients, here are some ideas: - Use graham cracker crumbs instead of chocolate cookie crumbs for a different crust. - Swap the cream cheese for Greek yogurt for a lighter version. - Use almond milk instead of heavy cream for a dairy-free option. These substitutions can fit your diet or taste preferences while still keeping the cheesecake delicious. For the full recipe, check the details provided above. To start, gather your ingredients. You need chocolate cookie crumbs and melted butter. In a mixing bowl, combine 1 ½ cups of chocolate cookie crumbs with ½ cup of unsalted butter. Mix until it looks like wet sand. Next, take a 9-inch springform pan. Press the crumb mixture firmly into the bottom of the pan. Make sure it is even. This helps the crust hold together. Once done, place the pan in the refrigerator. Let it chill while you make the filling. Now, it’s time for the filling. In a large bowl, beat 2 cups of softened cream cheese with 1 cup of powdered sugar. Mix until smooth and creamy. In another bowl, take 1 cup of heavy cream and 1 teaspoon of vanilla extract. Whip this until soft peaks form. Gently fold the whipped cream into the cream cheese mixture. Be careful not to deflate the air bubbles. This keeps the filling light and fluffy. After this, stir in 8 oz of melted dark chocolate and ¼ cup of cocoa powder. Mix until there are no lumps in the filling. Pour the chocolate filling over the chilled crust. Use a spatula to spread it evenly. After that, cover the cheesecake with plastic wrap. Place it in the refrigerator for at least 4 hours. If you want the best results, let it chill overnight. Once set, remove the cheesecake from the springform pan. Transfer it to a serving plate. Finally, garnish with chocolate shavings or cocoa nibs. Now, your no-bake chocolate cheesecake is ready to enjoy! For the complete list of ingredients and detailed steps, check out the Full Recipe. One big mistake is not measuring your ingredients. Precision matters in baking. Too much butter can make the crust greasy. If you don’t whip the cream well, your cheesecake may be flat. Lastly, don't skip chilling time. Rushing this step leads to a runny filling. Start with cold heavy cream. Cold cream whips up better and faster. Use a clean bowl and beaters. This helps the cream reach soft peaks. Whip until it forms peaks but is not too stiff. Over-whipping can turn it into butter. To get a creamy texture, mix your cream cheese until smooth. Make sure it is at room temperature. This helps it blend easily. When you fold in the whipped cream, do it gently. This keeps air in the mixture for that light feel. Finally, add melted chocolate slowly. Stir until everything is well mixed without lumps. {{image_2}} You can easily change the flavor of this cheesecake. For a mint chocolate cheesecake, add 1 teaspoon of peppermint extract to the filling. This gives it a fresh taste. You can also mix in crushed mint candies for crunch. If you love coffee, add 1 tablespoon of instant coffee granules to the melted chocolate. This makes the chocolate richer. Try different flavors to find your favorite! If you want a lighter cheesecake, swap regular cream cheese with low-fat cream cheese. This keeps the taste but cuts fat. You can also use Greek yogurt instead of heavy cream. This adds protein and gives a nice tang. For the crust, try using oat flour mixed with coconut oil. These changes make it healthier without losing flavor. When serving your cheesecake, add fresh berries on top for color. Raspberries or strawberries work well. You can also drizzle some caramel or chocolate sauce for extra sweetness. Pair it with a scoop of vanilla ice cream for a special treat. A cup of coffee or herbal tea goes well with this dessert. For more ideas, check out the Full Recipe. After you enjoy your no-bake chocolate cheesecake, store leftovers in the fridge. Cover the cheesecake with plastic wrap or place it in an airtight container. This keeps it fresh for up to four days. If you cut slices, use parchment paper between them to help with easy serving. You can freeze this cheesecake if you want to save it for later. Wrap the whole cheesecake tightly in plastic wrap, then in foil. This prevents freezer burn. You can freeze it for up to two months. When you are ready to eat it, move it to the fridge overnight to thaw. You don’t need to reheat a no-bake cheesecake. This treat is best served chilled. Simply slice the cheesecake straight from the fridge. If you want it a little softer, let it sit out for 10 to 15 minutes before serving. Enjoy the creamy texture and rich chocolate flavor! A no-bake cheesecake takes about 4 hours to set. For the best texture, refrigerate it overnight. This extra time helps the flavors blend well and gives it a firmer finish. Yes, you can use other crusts. Graham cracker crumbs work well, or try crushed nuts for a gluten-free option. Just make sure to adjust the butter amount if needed to bind the crust. If you need a cream cheese substitute, try mascarpone or ricotta cheese. For a dairy-free option, use cashew cream or a vegan cream cheese. Each option will change the taste slightly, but they can work well in this recipe. For the complete recipe, see the Full Recipe section. To make a no-bake chocolate cheesecake, we covered the key ingredients and steps. I shared tips on common mistakes and how to achieve a creamy texture. You can also try fun variations like mint or coffee flavors. Remember to store leftovers properly to keep them fresh. In the end, this cheesecake is simple and fun to make. Enjoy the process and share your tasty results!

No-Bake Chocolate Cheesecake Simple and Delicious Treat

Who doesn’t love a rich, creamy chocolate cheesecake? If you’re looking for an easy treat, you’re in the right place!

- 2 cans (16 oz each) refrigerated biscuit dough - 1 cup shredded mozzarella cheese - 1/2 cup grated Parmesan cheese - 1/2 cup unsalted butter, melted - 4 cloves garlic, minced - 2 tablespoons fresh parsley, chopped (plus more for garnish) - 1 teaspoon Italian seasoning - 1/2 teaspoon salt - 1/2 teaspoon black pepper - Alternative cheeses: You can swap mozzarella with cheddar or gouda. These cheeses add a nice twist. - Gluten-free biscuit options: Look for gluten-free biscuit dough in stores. This makes it easy for those with gluten needs. - Herb variations: Try basil or oregano instead of parsley. These herbs give a different flavor. You can also add some red pepper flakes for heat. This recipe is flexible. Feel free to mix and match ingredients to suit your taste. The full recipe is a guide, but your creativity can shine through! 1. First, preheat your oven to 350°F (175°C). Grease a bundt pan with non-stick spray. This helps the bread come out easily. 2. In a small bowl, mix melted butter, minced garlic, chopped parsley, Italian seasoning, salt, and black pepper. This garlic butter mixture gives the bread its amazing flavor. 1. Open the biscuit dough and cut each biscuit into quarters. This makes it easy to coat each piece. 2. In a large mixing bowl, toss the biscuit pieces with half of the garlic butter mixture. Make sure each piece gets coated well. 3. Layer half of the coated biscuit pieces into the bundt pan. Sprinkle a layer of shredded mozzarella and Parmesan cheese on top. Then, add the remaining biscuit pieces. 4. Pour the rest of the garlic butter mixture over the top. This ensures every bite is full of flavor. 1. Bake in the preheated oven for 25-30 minutes. Look for a golden brown top. A toothpick should come out clean when you poke it in the center. 2. After baking, let the monkey bread cool in the pan for about 10 minutes. Then, carefully invert it onto a serving dish. This reveals the beautiful, cheesy top. 3. Garnish with extra parsley for a nice touch. Serve warm and watch everyone pull apart the cheesy, garlic-filled pieces. Enjoy this easy and fun dish! For the full recipe, check the earlier section. To avoid soggy bread, make sure not to over-soak the biscuit pieces in the garlic butter. Just enough butter should coat each piece. Too much moisture can lead to a dense texture. For even baking, arrange the biscuit pieces in the bundt pan in a way that allows heat to circulate. Place larger pieces on the outside and smaller ones in the center. This helps them bake uniformly. Serve your Cheesy Garlic Monkey Bread with a side of marinara sauce for dipping. The tangy sauce balances the rich, cheesy flavor. You can also try it with a side salad for a fresh touch. For presentation, sprinkle extra chopped parsley on top right before serving. This adds a pop of color and makes it look even more inviting. One common mistake is overmixing the dough. This can make the bread tough. Just mix until the dough is combined and no dry spots remain. Another mistake is burning the garlic. If you cook the garlic too long in the butter, it can turn bitter. Watch it closely and remove it from heat as soon as it becomes fragrant. For the full recipe, check out the complete guide. {{image_2}} You can make Cheesy Garlic Monkey Bread even more fun. Try adding spices for a kick. Red pepper flakes bring heat, while herbs add freshness. You could also mix in some meats. Pepperoni and bacon are great options. They add a savory depth that pairs well with garlic and cheese. Cheese is the star of this dish. You can use different cheese blends to switch things up. Cheddar or gouda will give a rich flavor. For a creamy twist, try adding cream cheese. It melts beautifully and gives a smooth texture that everyone loves. You don’t have to stick to the oven. A slow cooker can make this dish too. Just layer the ingredients and cook on low. It will slowly meld the flavors together. If you're short on time, an air fryer works well. It cooks quickly and gives you a nice crispy outside. For the full recipe, check out the ingredients and instructions above. To keep your Cheesy Garlic Monkey Bread fresh, follow these tips: - Cool it down: Let the bread cool to room temperature. - Use airtight containers: Place leftovers in a sealed container. - Refrigerate promptly: Store in the fridge within two hours. This method helps maintain flavor and texture. When you're ready for round two, you can reheat it easily. Here are two methods: - Oven: Preheat your oven to 350°F (175°C). Place the bread in a baking dish. Cover it with foil to keep it moist. Heat for about 10-15 minutes. - Microwave: Place a piece on a microwave-safe plate. Heat for 20-30 seconds. To keep it soft, don't overheat. Enjoy your cheesy, garlicky treat just like fresh! For the full recipe, check out the detailed instructions above! Yes, you can prepare the dough ahead of time. You can cut the biscuit dough and coat it with the garlic mixture. Place this in the bundt pan before baking. Cover it tightly with plastic wrap and keep it in the fridge. It will stay fresh for up to 24 hours. When you are ready to bake, simply remove it from the fridge and let it sit for about 30 minutes. This helps it bake evenly. Cheesy Garlic Monkey Bread pairs well with many dishes. Try serving it with a fresh salad. A light Caesar or garden salad works great. For drinks, a crisp white wine or sparkling water complements the flavors. You can also enjoy it with a warm bowl of soup, like tomato or minestrone. Yes, you can freeze it. After baking, let it cool completely. Wrap it tightly in plastic wrap and then in aluminum foil. This will protect it from freezer burn. You can freeze it for up to three months. To thaw, place it in the fridge overnight. For reheating, preheat your oven to 350°F (175°C). Cover with foil to keep it moist and heat for about 20 minutes. To pull apart the monkey bread easily, use a sharp knife to cut it into sections first. Then, you can pull the pieces apart with your hands. This keeps the bread from tearing. It also helps keep the gooey cheese intact. Enjoy the cheesy goodness! For the full recipe, check out the preparation steps. You now have a complete guide to making Cheesy Garlic Monkey Bread. We covered all the ingredients, step-by-step instructions, and tips for perfection. Remember to customize it with your favorite cheese or herbs. Avoid common mistakes for the best results. Serve it warm for the greatest taste. This dish is fun and sure to please your guests. Enjoy making, sharing, and indulging in this tasty treat!

Cheesy Garlic Monkey Bread Irresistible and Easy Recipe

Get ready for a treat! This Cheesy Garlic Monkey Bread is easy, fun, and oh-so-tasty. With just a few simple

To make Pumpkin Spice Energy Bites, you need the following items: - 1 cup rolled oats - 1/2 cup almond butter - 1/2 cup pumpkin puree - 1/4 cup honey or maple syrup - 1 teaspoon pumpkin spice - 1/2 teaspoon vanilla extract - 1/4 teaspoon salt - 1/4 cup mini chocolate chips (optional) - 1/4 cup chopped nuts or seeds (e.g., walnuts, sunflower seeds) These ingredients work together to create a tasty and healthy snack. You can easily swap some items for others. If you don't have almond butter, use peanut butter instead. You can also try sunflower seed butter for a nut-free option. If you want to avoid honey, agave syrup or even mashed banana work well. For the pumpkin puree, you can use sweet potato puree as a great alternative. For a sweeter bite, adjust the honey or maple syrup to your taste. Each energy bite is packed with nutrients. They are high in fiber and protein, thanks to the oats and nut butter. This snack also provides healthy fats from the nuts and seeds. Here’s a rough estimate per bite: - Calories: 100 - Protein: 3g - Carbohydrates: 12g - Fat: 5g - Fiber: 2g - Sugar: 3g These bites offer a good balance of energy and nutrition. You can enjoy them as a quick snack or a pre-workout boost. For the full recipe, check out the details above! Start by gathering all your ingredients. You will need rolled oats, almond butter, pumpkin puree, honey or maple syrup, pumpkin spice, vanilla extract, salt, and optional mix-ins. In a large bowl, add the rolled oats, almond butter, pumpkin puree, and honey or maple syrup. Mix these ingredients well. Then, add the pumpkin spice, vanilla extract, and salt. Stir until everything is combined. If you like, fold in mini chocolate chips and nuts or seeds for extra crunch. Make sure your almond butter is smooth. This helps the mixture blend well. If it’s too thick, you can warm it slightly in the microwave. This can help with mixing. When folding in chocolate chips or nuts, do it gently. You want to keep the bites soft and chewy. If the mix feels too sticky, you can add a bit more oats. After mixing, chill the mixture in the fridge for about 30 minutes. This makes it easier to roll. Use your hands to scoop out about a tablespoon of the mixture. Roll it into a ball and place it on a parchment-lined baking sheet. Repeat until all the mixture is rolled. Store the energy bites in an airtight container in the fridge. They will last for up to a week. You can also find the Full Recipe for more details. To get the right texture, use creamy almond butter. It binds the oats well. If the mixture feels too dry, add more pumpkin puree or almond butter. A chilly mixture helps when rolling the bites. The cold makes them firm and easy to shape. To boost flavor, try adding a pinch of nutmeg or cinnamon. These spices blend well with pumpkin spice and add warmth. If you want a sweet touch, toss in some mini chocolate chips. You can also mix in chopped nuts or seeds for extra crunch. Experimenting will make your bites unique and delicious. Cleaning up after cooking can be a hassle. To make it easier, use a bowl liner or wax paper. This way, you avoid sticky messes. Soak your mixing tools in warm water right after use. This helps remove any leftover mixture easily. Keeping your space tidy makes cooking more fun! For the full recipe, click [here](#). {{image_2}} You can mix things up in many ways with your energy bites. Want a twist? Try adding cocoa powder for a chocolate boost. You can also use different spices like cinnamon or nutmeg for a unique taste. For a fruity flavor, consider adding dried fruits like cranberries or raisins. Each change offers a new experience! If you need a nut-free snack, it's easy to adjust! Swap almond butter for sunflower seed butter. This keeps the bites creamy and rich. Ensure all other ingredients are nut-free too. You can enjoy a tasty treat without the worry of nut allergies. Feel free to get creative with mix-ins! Adding seeds like chia or flax can boost nutrition. You can also throw in shredded coconut for a chewy texture. Mini chocolate chips add sweetness, but you can skip them if you want less sugar. Each mix-in enhances the flavor and nutrition of your bites! For the Full Recipe, check the section above. To keep your pumpkin spice energy bites fresh, place them in an airtight container. This helps prevent them from drying out. Store them in the refrigerator. This method keeps them tasty and safe to eat for later. If you want to enjoy these bites later, freezing works well. First, roll the energy bites as usual. Then, place them on a baking sheet lined with parchment paper. Freeze them for about two hours. Once they are firm, transfer them to a freezer bag. Make sure to remove as much air as possible. They can last in the freezer for about three months. When stored in the fridge, these bites stay fresh for up to one week. Check them for any changes in smell or texture before eating. If you see any signs of spoilage, do not eat them. For the best taste, try to eat them within a few days after making. This way, you enjoy their full flavor. For the full recipe, you can refer back to the main article. Yes, you can use peanut butter. It will change the taste but still taste great. Peanut butter adds a nutty flavor and creamy texture. Just make sure to choose a natural option with no added sugar or oils. These energy bites last about a week in the fridge. Store them in an airtight container. If you want to keep them longer, you can freeze them. They can last up to three months in the freezer. Yes, these bites can fit various diets. They are gluten-free if you use certified oats. They are also vegan if you opt for maple syrup instead of honey. Always check the labels of your ingredients to ensure they meet your needs. You can use agave syrup or brown rice syrup. Both work well to sweeten the bites. You can also mash ripe bananas for a natural sweetener. This will add a different flavor, so adjust to your taste. To make larger batches, simply double or triple the recipe. Use the same ratios for all ingredients. Just keep an eye on the mixing time. If you make a big batch, you might need to mix in parts for even distribution. For the full recipe, refer back to the main section. In this post, we covered how to make delicious pumpkin spice energy bites. We explored key ingredients and their substitutes. You learned step-by-step instructions for mixing and storing them. We shared tips to perfect the texture and flavor, plus easy cleanup methods. Different variations and storage tips help you customize and preserve your treats. Now you can enjoy these tasty bites knowing they fit your needs and preferences. Happy snacking!

Pumpkin Spice Energy Bites Nutritious and Easy Snack

If you’re looking for a healthy snack that bursts with seasonal flavor, you’re in the right place! These Pumpkin Spice

To make Spaghetti Squash Primavera, gather these fresh items: - 1 medium spaghetti squash - 1 tablespoon olive oil - 1 cup bell peppers (mixed colors), sliced - 1 cup zucchini, sliced into half-moons - 1 cup cherry tomatoes, halved - 1 small red onion, thinly sliced - 2 cloves garlic, minced - 1 teaspoon dried oregano - 1 teaspoon dried basil - Salt and pepper to taste - 1/4 cup grated Parmesan cheese (optional) - Fresh basil leaves for garnish You can add these items for more taste: - A pinch of red pepper flakes for heat - Fresh lemon juice for brightness - Sliced mushrooms for earthiness - Spinach for added greens If you can't find an ingredient, here are some swaps: - Use butternut squash instead of spaghetti squash. - Replace olive oil with avocado oil. - Try yellow squash or eggplant in place of zucchini. - Use feta or nutritional yeast instead of Parmesan for a different taste. Feel free to adjust the ingredients to match your taste or what you have on hand. This dish is all about fresh flavors and vibrant colors! Check the Full Recipe for more details on preparing this delightful meal. Start by gathering all your ingredients. This makes cooking easier and fun. You'll need: - 1 medium spaghetti squash - 1 tablespoon olive oil - 1 cup bell peppers, sliced - 1 cup zucchini, sliced - 1 cup cherry tomatoes, halved - 1 small red onion, sliced - 2 cloves garlic, minced - 1 teaspoon dried oregano - 1 teaspoon dried basil - Salt and pepper - 1/4 cup grated Parmesan cheese (optional) - Fresh basil leaves for garnish Now, preheat your oven to 400°F (200°C). This step is key for roasting the squash to perfection. Cut the spaghetti squash in half lengthwise. Scoop out the seeds with a spoon. Drizzle olive oil inside each half and sprinkle with salt and pepper. Place the halves cut side down on a baking sheet. Roast them for about 30-35 minutes. Check if it's fork-tender. While the squash roasts, heat olive oil in a large skillet over medium heat. Add the sliced red onion. Sauté for 3-4 minutes until softened. Next, stir in the minced garlic, bell peppers, and zucchini. Cook for another 5-7 minutes until the veggies are tender. Add the cherry tomatoes, oregano, basil, salt, and pepper to the skillet. Cook for 3-4 minutes until the tomatoes blister. This adds a burst of flavor. Once the spaghetti squash is ready, take it out of the oven. Let it cool for a bit and then scrape the flesh with a fork. This creates those spaghetti-like strands that give the dish its name. Mix the spaghetti squash strands with the sautéed vegetables in the skillet. Toss to combine everything evenly. If you want, sprinkle grated Parmesan on top and toss again for extra flavor. Serve your dish hot on a plate. Garnish with fresh basil leaves. This adds color and freshness. The dish looks bright and inviting. Enjoy your spaghetti squash primavera as a fresh and flavorful meal! For the complete details, check the Full Recipe. Roasting spaghetti squash gives it a sweet taste and nice texture. First, cut your squash in half and scoop out the seeds. This step is key. Use a sharp knife for safety. Drizzle olive oil inside each half. A little salt and pepper will enhance the flavor. Place the squash cut side down on a baking sheet. Roast at 400°F for 30-35 minutes. You want it fork-tender. Check it often to avoid overcooking. To get the best texture from your veggies, start with the onion. Sauté it first until it softens. Then, add bell peppers and zucchini next. Cook them for a few minutes. This way, they keep some crunch. Finally, toss in the cherry tomatoes last. They cook quickly and add freshness. Stir everything gently to mix. This helps the flavors blend without turning the veggies mushy. You can boost flavors in many ways. For a kick, add red pepper flakes while cooking. Fresh herbs like thyme or parsley can brighten the dish. A splash of lemon juice adds zest. If you like a cheesy flavor, sprinkle in more Parmesan cheese. Lastly, consider adding nuts like pine nuts or walnuts for crunch. These tweaks will make your spaghetti squash primavera even more delicious. You can find the full recipe in the article. {{image_2}} You can make Spaghetti Squash Primavera a true veggie delight. Simply switch out any of the vegetables for your favorites. Try adding spinach, kale, or even mushrooms. These choices add rich flavors and textures. You can also toss in fresh herbs like parsley or dill for extra zest. The beauty of this dish is its flexibility; you can make it your own! Adding protein boosts the meal's heartiness. Chicken is a great choice. Just grill or sauté it before mixing with the veggies. Shrimp works well, too. Cook shrimp until they turn pink, then add them to the mix. Tofu is perfect for a plant-based option. Just cube it and pan-fry until golden. These proteins make your dish filling and tasty. Sauces can change the whole vibe of your dish. A simple olive oil and lemon juice mix brightens flavors. If you want something creamier, try adding a splash of cream or a dollop of ricotta. For a kick, consider a spicy marinara sauce. This can amp up the heat and add depth. Feel free to experiment with sauces to find your favorite match! For the full recipe, check out Spaghetti Squash Primavera and enjoy all the delicious possibilities! After enjoying your Spaghetti Squash Primavera, let it cool. Transfer leftovers to an airtight container. Store in the fridge for up to four days. Keep the squash and the sauce separate if possible. This helps maintain the texture. Reheat your leftovers in a skillet or microwave. For the skillet, add a splash of olive oil over medium heat. Stir until heated through, which takes about 5-7 minutes. If using the microwave, place the dish in a microwave-safe container. Heat for 2-3 minutes, stirring halfway through. To freeze, let the dish cool completely. Portion it into freezer-safe bags or containers. Remove as much air as possible to prevent freezer burn. You can freeze the dish for 2-3 months. When you're ready to eat, thaw it overnight in the fridge before reheating. Enjoy a fresh meal anytime! For the full recipe, check the section above. Spaghetti Squash Primavera is a tasty dish made with roasted spaghetti squash and fresh vegetables. The squash has a fun texture that looks like spaghetti. It pairs well with colorful veggies like bell peppers, zucchini, and cherry tomatoes. This dish is light, healthy, and full of flavor. You can enjoy it as a main or a side. Check out the Full Recipe for all the details. To make Spaghetti Squash Primavera vegan, skip the Parmesan cheese. Replace it with nutritional yeast for a cheesy taste. You can also add more vegetables or beans for extra protein. This keeps the dish hearty and satisfying without any animal products. Yes! You can customize this dish with your favorite vegetables. Try adding broccoli, carrots, or spinach. You can also use seasonal veggies for freshness. Just make sure to keep similar cooking times for the best texture. This dish pairs well with a simple salad or garlic bread. You can also serve it with grilled chicken or fish for added protein. If you want a complete meal, consider a light soup on the side. You’ll know the spaghetti squash is done when the skin looks golden and feels soft. You can poke it with a fork. If it goes in easily, it’s ready! The flesh should also be fork-tender, making it easy to scrape into strands. This blog post covered all you need to know about spaghetti squash. We discussed key ingredients, cooking steps, and tips for the best results. We also explored options for variations and storage methods. Whether you want a simple meal or extra flavor, this dish is versatile. Keep these tips in mind for tasty results every time. With your new skills, you can create wonderful spaghetti squash dishes that fit your taste. Happy cooking!

Spaghetti Squash Primavera Fresh and Flavorful Meal

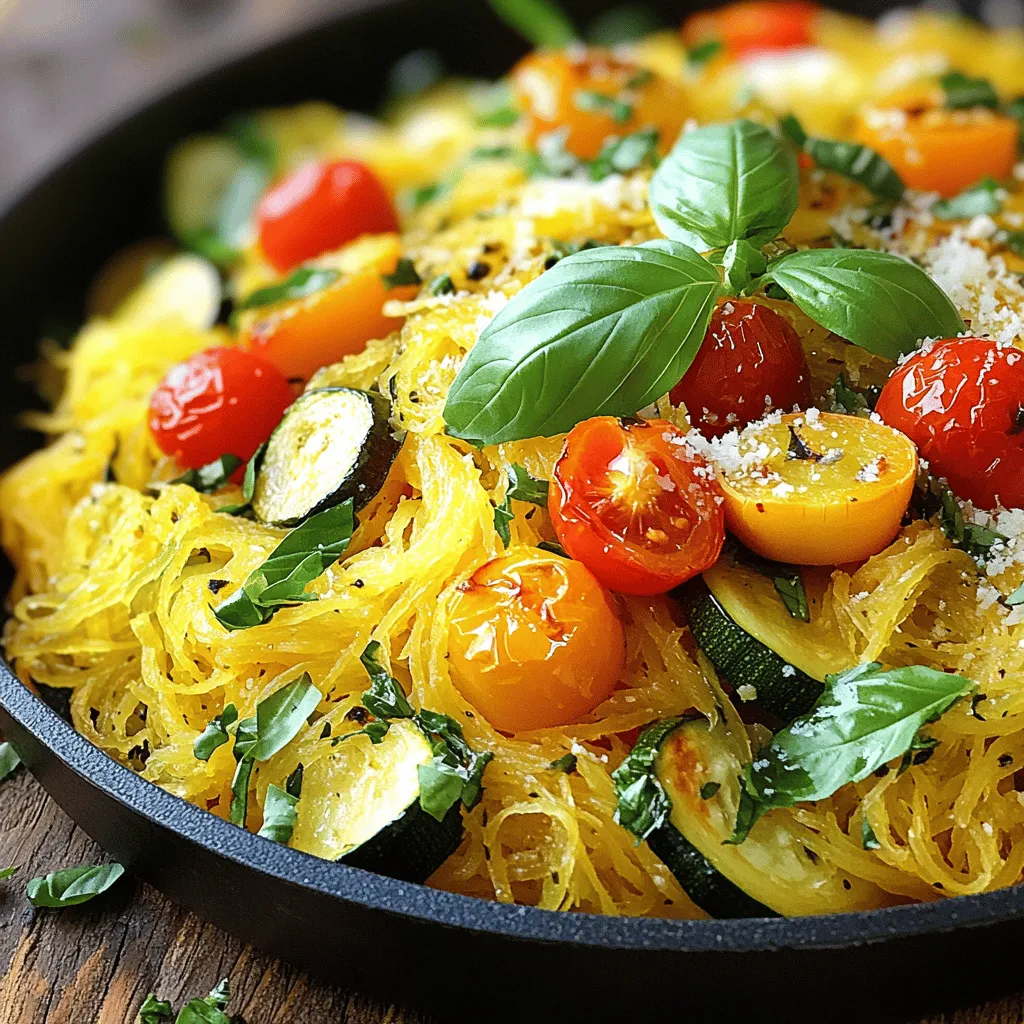
Ready for a fresh meal that bursts with flavor? Let’s dive into Spaghetti Squash Primavera! This tasty dish is a

- 4 medium-sized green tomatoes - 1 cup cornmeal - 1/2 cup all-purpose flour - 1 teaspoon paprika - 1/2 teaspoon garlic powder - 1/2 teaspoon onion powder - 1/4 teaspoon cayenne pepper (optional) - Salt and pepper - 1 cup buttermilk - Vegetable oil for frying Fried green tomatoes start with the right ingredients. First, select firm, green tomatoes. They should feel heavy and bright. This choice gives you the best crunch. You need cornmeal for that classic Southern flavor. The all-purpose flour adds a bit of extra texture. Spices like paprika, garlic powder, and onion powder create depth. If you like heat, add cayenne pepper. Salt and pepper enhance all these flavors. Buttermilk is key for the batter. It helps the coating stick well. Use vegetable oil for frying. It has a high smoke point, making it perfect for frying. You can also make your own buttermilk by mixing milk and vinegar. Just stir one tablespoon of vinegar into one cup of milk and let it sit for five minutes. For the full recipe, check out the detailed steps that follow. First, slice the green tomatoes into 1/4-inch thick rounds. Next, sprinkle salt on the slices. This step draws out extra moisture. Let them sit in a colander for about 15 minutes. After that, pat the slices dry with paper towels. This helps the breading stick better. Now, let’s set up our breading station. In one shallow dish, combine the following dry ingredients for breading: - 1 cup cornmeal - 1/2 cup all-purpose flour - 1 teaspoon paprika - 1/2 teaspoon garlic powder - 1/2 teaspoon onion powder - 1/4 teaspoon cayenne pepper (optional) - Salt and pepper to taste In another dish, pour in 1 cup of buttermilk. This will be our dip for the tomatoes. To start dredging, dip each tomato slice in the buttermilk. Make sure to let any excess buttermilk drip off. Then, coat it well in the cornmeal mixture. Repeat this until all slices are breaded. Heat about 1/2 inch of vegetable oil in a large skillet over medium-high heat. The oil should shimmer, which means it's ready. This usually happens around 350°F. Now, carefully add the breaded tomato slices to the hot oil. Fry them in batches. Don’t overcrowd the pan. Fry for about 3-4 minutes on each side. Look for a perfect golden brown color. Once cooked, transfer the fried green tomatoes to a plate lined with paper towels. This helps drain any extra oil. Enjoy your crispy Southern delight! For more detailed steps, check out the Full Recipe. Choose firm green tomatoes with a smooth skin. Ripe green tomatoes should feel heavy for their size. Look for bright color and no blemishes. Freshness is key, as older tomatoes lose their crispness. Always select tomatoes from local markets when possible. They often taste better and support local farmers. For the best crunch, use a double coating method. First, dip the tomato slices in buttermilk. Then, coat them in the cornmeal mixture. Repeat this step for even more crunch. Using chilled buttermilk helps the breading stick better. It also creates a thicker, crispier layer. This extra effort makes a big difference in texture. Fried green tomatoes shine with great dipping sauces. Try ranch dressing or a zesty remoulade. These add a creamy contrast to the crispness. Serve them alongside shrimp or grits for a true Southern meal. They also pair well with a fresh salad or coleslaw. The bright flavors balance the richness of the tomatoes. For a fun twist, stack them in a sandwich for a tasty treat. {{image_2}} You can turn up the heat by adding spices. A sprinkle of cayenne pepper gives a nice kick. If you want more heat, try adding crushed red pepper flakes. Adjust the amount based on your taste. This way, you can enjoy fried green tomatoes with a spicy twist! For a gluten-free option, swap all-purpose flour for gluten-free flour. You can also use cornmeal alone if you prefer. Some people like to use almond flour, which adds a nutty flavor. These options let everyone enjoy this dish without worry. Fried green tomatoes make a great sandwich filling. Stack them between slices of bread with some cheese and greens. You can also layer fried green tomatoes in salads. They add crunch and flavor to any dish. Try them as appetizers topped with a dollop of creamy sauce. These ideas can make your meal even more special. To keep your fried green tomatoes fresh, use these best practices. First, let them cool completely. This step helps avoid steam that can make them soggy. Next, place them in an airtight container. This keeps moisture out and preserves their crispiness. Store the container in the fridge for up to three days. When it's time to enjoy leftovers, you have options. The oven works well. Preheat it to 375°F (190°C). Place the tomatoes on a baking sheet and heat for about 10 minutes. This method helps them regain some crunch. You can also use an air fryer. Set it to 350°F (175°C) and cook for 5 to 7 minutes. This method crisps them up nicely without adding extra oil. For stovetop reheating, use a skillet. Heat a small amount of oil over medium heat. Add the tomatoes and cook for about 2-3 minutes on each side. This method gives them a fresh-fried taste. Whichever method you choose, keep an eye on them to avoid burning. Enjoy those crispy bites again! You can use ripened tomatoes, but the taste will change. Fried green tomatoes have a tangy and firm texture. Ripe tomatoes are sweeter and softer. This makes them less suitable for frying. The firm texture of green tomatoes holds up better when cooked. If you prefer a sweeter flavor, use ripe tomatoes but expect a different dish. Fried green tomatoes offer some health benefits. Green tomatoes are low in calories and high in fiber. They are a good source of vitamins A and C. These nutrients support your immune system and skin health. However, frying adds calories and fat. Enjoy fried green tomatoes in moderation. Pair them with fresh salads for a balanced meal. To check the oil temperature, use a thermometer. Aim for 350°F (175°C). If you don’t have a thermometer, drop a small piece of bread in the oil. If it sizzles and browns in about 30 seconds, the oil is ready. You want the oil hot enough for a crispy crust, but not so hot that it burns the food. Fried green tomatoes are a tasty treat you can make at home. We explored the right ingredients, from fresh green tomatoes to flavorful spices. You learned the step-by-step process, tips for crispiness, and how to store leftovers. Consider trying variations for a spicy twist or gluten-free options. Enjoy them alone or as part of a meal. Fried green tomatoes are not just delicious; they also offer fun ways to improve your cooking skills. Happy frying.

Fried Green Tomatoes Crispy Southern Delight Recipe

Are you ready to dive into a crispy Southern delight? Fried green tomatoes are a must-try dish that bursts with

- 1 cup chocolate chips (semi-sweet or milk chocolate) - 1 cup mini marshmallows - 1 tablespoon coconut oil or unsalted butter - 1/2 teaspoon vanilla extract - 1/4 teaspoon sea salt - Graham crackers - Fresh strawberries or bananas (optional) The main ingredients for S'mores Dip are simple but key. You need chocolate chips, mini marshmallows, and coconut oil or butter. These create a rich and gooey mix that everyone will love. The chocolate chips are the star. They melt and form a smooth base. You can use semi-sweet or milk chocolate, depending on your taste. The mini marshmallows add sweetness and a fluffy texture. They puff up nicely when baked. Coconut oil or butter helps the chocolate melt perfectly. It adds a bit of shine and richness. For flavor, a touch of vanilla extract brings warmth. The sea salt enhances the sweet flavors. Just a small amount makes a big impact. Finally, you need something to dip. Graham crackers are classic, but you can get creative. Fresh strawberries or bananas add a fruity twist. They pair well with the chocolate and marshmallows. For the full recipe, check out the complete instructions to make this delicious treat! - Preheat your oven to 450°F (232°C). - In a medium-sized oven-safe skillet, combine 1 cup of chocolate chips and 1 tablespoon of coconut oil. Stir until smooth and well mixed. - Spread the chocolate mixture evenly across the bottom of the skillet. - Generously sprinkle 1 cup of mini marshmallows over the chocolate layer. - Place the skillet in the oven and bake for 5-7 minutes until the marshmallows turn golden brown. - Carefully take the skillet out. Drizzle 1/2 teaspoon of vanilla extract over the top. Serve immediately with graham crackers for dipping. Enjoy the gooey goodness! For the full recipe, check the section above. To get that ideal melt, use coconut oil or butter. These fats help chocolate melt smoothly and blend well with marshmallows. This mixture creates a rich, gooey base that makes every bite a delight. Monitor your baking time closely. Bake for about 5-7 minutes. This timing ensures your marshmallows puff up and turn golden brown, adding a sweet crunch. Serve the dip hot in the skillet. This keeps it warm and inviting. Top it with a few whole marshmallows for fun. Surround the skillet with graham cracker halves and fresh fruits. Use strawberries or bananas for a colorful touch. This platter setup makes dipping easy and enjoyable for everyone. Use parchment paper in your baking dish. It helps with easy removal and prevents sticking. For best results, choose an oven-safe skillet or a ceramic baking dish. These options retain heat well and make serving a breeze. Enjoy the dip without worrying about a messy cleanup! {{image_2}} You can have fun with flavors in your S'mores dip. Try adding peanut butter or Nutella for a creamy twist. This mix adds a nutty richness that pairs well with chocolate. You can also use flavored chocolate chips. Think mint, caramel, or even espresso. These choices can change the whole vibe of your dip. For a lighter option, swap in dark chocolate. It has less sugar and more cocoa flavor. You can also look for sugar-free chocolate chips. These options still taste great while being a healthier choice. Another fun idea is to add fresh fruits. Strawberries, bananas, or apples can add a burst of flavor and a healthy crunch. Make S'mores dip even more fun for kids. Use colored marshmallows to brighten up the dish. You can find colors like pink, blue, or green. Kids love the visual appeal! Also, consider themed toppings for parties. For a birthday party, add sprinkles or mini candies. These small touches can make your dip a hit with kids and adults alike. Store your S'mores Dip in an airtight container. Let it cool first. Place it in the fridge if you have leftovers. This dip tastes best within two days. Use a shallow container for quick cooling. Avoid using a deep dish; it makes it hard to cool. To reheat, use the oven or microwave. For the oven, set it to 350°F (175°C). Place the dip in a safe dish and cover it with foil. Heat it for about 10 minutes. This helps keep the dip creamy. For the microwave, heat in short bursts. Stir between each burst until warm. This keeps the texture nice and smooth. Can you freeze S'mores Dip? Yes, you can freeze it. But it may change the texture a bit. To freeze, let it cool completely. Transfer it to a freezer-safe container. Make sure to leave some space at the top. It will expand when frozen. To thaw, move it to the fridge overnight. Reheat it gently after thawing to refresh the flavors. If you want to swap chocolate chips, here are some great options: - Carob chips: Good for a caffeine-free choice. - Butterscotch chips: Adds a sweet, buttery flavor. - White chocolate chips: Sweet and creamy alternative. - Dairy-free chocolate chips: Ideal for vegan diets. - Cocoa powder: Mix it with coconut oil for a rich taste. These options cater to different diets while keeping your S'mores Dip delicious. Yes, you can! Here are some tips: - Prepare the chocolate and marshmallow layers in the skillet. - Cover the skillet tightly with plastic wrap. - Store it in the fridge for up to 24 hours. - Bake it just before you plan to serve. This way, you save time and still enjoy a warm dip. If you want to switch things up, try these dippers: - Chocolate cookies: Add a rich flavor to the dip. - Pretzel sticks: Offer a salty crunch. - Rice cakes: Light and crispy option. - Apple slices: Fresh and juicy for a twist. - Pound cake pieces: Sweet and soft for dipping. These alternatives keep your S'mores Dip fun and exciting! S'mores dip is an easy and fun treat. With just chocolate, marshmallows, and coconut oil, you can enjoy this sweet dish in no time. I shared tips for perfecting the melt and ways to serve it beautifully. You can even add flavors like peanut butter or make healthier choices. Remember to store leftovers properly and reheat them right. This dip brings joy to gatherings or cozy nights in. Try it out and enjoy every gooey bite. Your taste buds will thank you!

S’mores Dip Irresistible Chocolatey Delight

Get ready to indulge in a treat that brings the joy of campfire s’mores right to your home: S’mores Dip!

Older posts
Newer posts
← Previous Page1 … Page39 Page40 Page41 … Page61 Next →

dsad

© 2025 Emmas Dish • Built with GeneratePress

Our Policies

  • Copyright Policy
  • Cookie Policy
  • GDPR Policy
  • Privacy Policy
  • Disclaimer
  • Terms Of Use

More Information

  • Home
  • About
  • Contact
  • Appetizers
  • Dessert
  • Dinner
  • Drinks
©2025, Emmas Dish About Back To Top