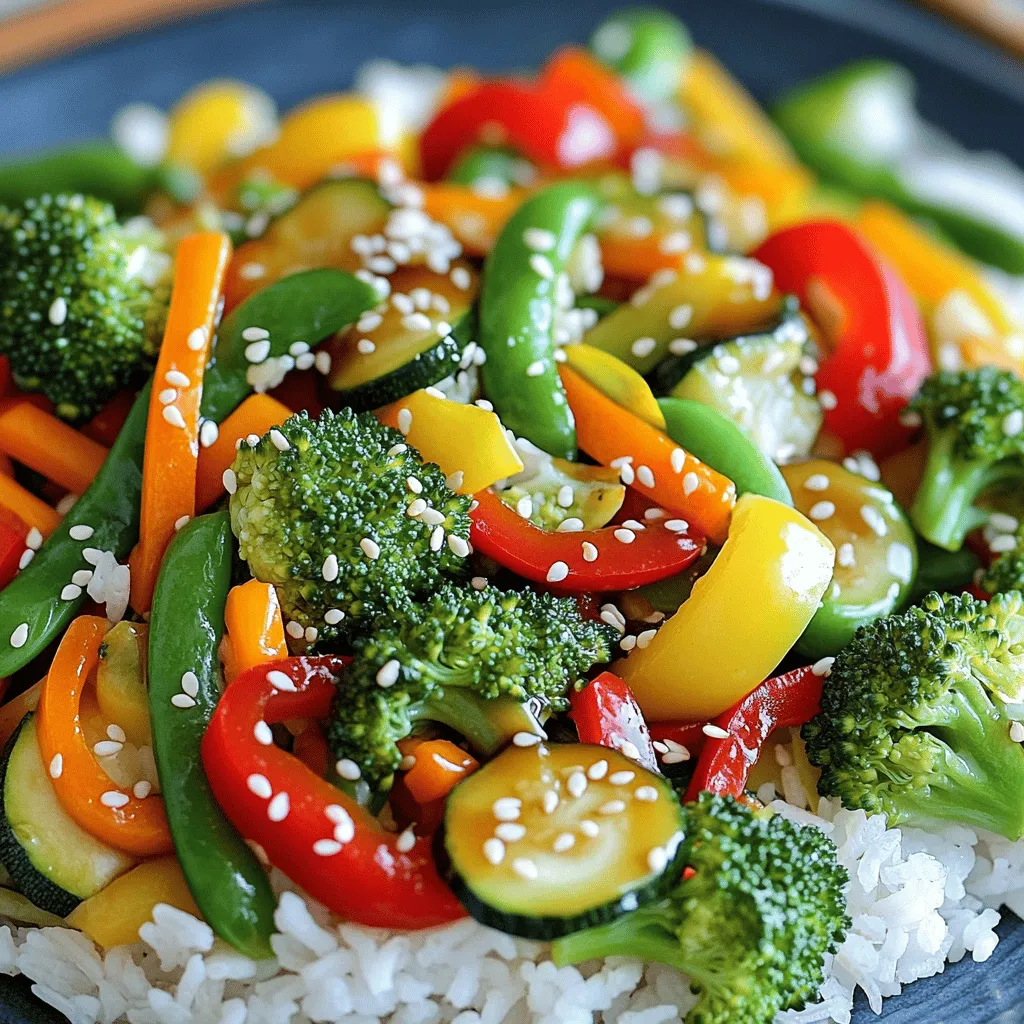
Easy Vegetable Stir-Fry Quick and Flavorful Recipe
Are you looking for a quick and tasty meal? My Easy Vegetable Stir-Fry recipe is just what you need! With
Are you looking for a quick and tasty meal? My Easy Vegetable Stir-Fry recipe is just what you need! With
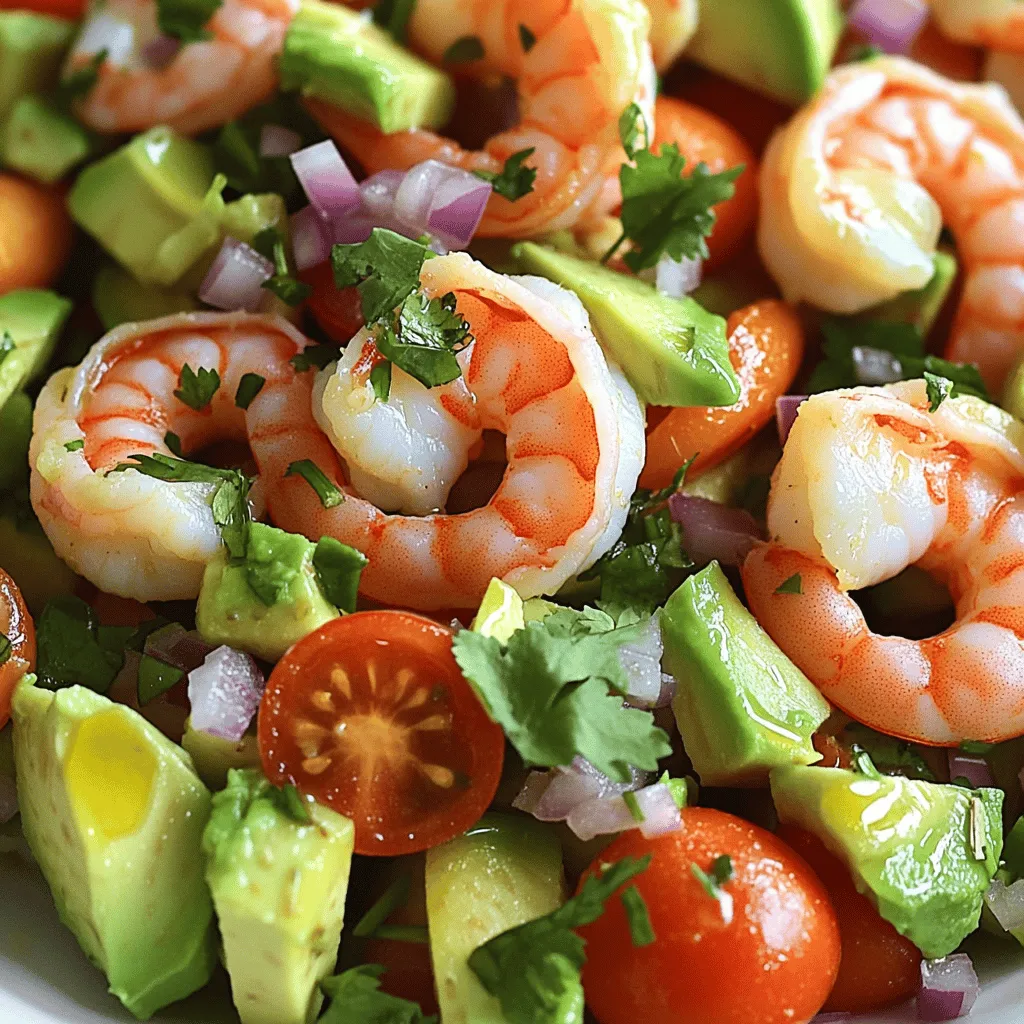
Looking for a light and tasty meal? My Savory Shrimp and Avocado Salad is a refreshing delight packed with flavor.
![- 1 cup rolled oats - 1 ½ cups almond milk (or regular milk) - 1 medium apple, grated The base of this dish is rolled oats. They are hearty and filling. I prefer almond milk for a nutty flavor, but regular milk works well too. Grating an apple adds natural sweetness and moisture. - 1 tablespoon chia seeds - 1 teaspoon ground cinnamon - 2 tablespoons maple syrup (or honey) Chia seeds give a nice boost of fiber. Ground cinnamon adds warmth and spice. Maple syrup or honey sweetens the oats perfectly. - Chopped walnuts - Sliced apples - Extra cinnamon Toppings make it fun! Chopped walnuts add crunch. Sliced apples give freshness. A sprinkle of extra cinnamon enhances the flavor. For the complete recipe, check out the [Full Recipe]. To make Apple Cinnamon Overnight Oats, start by gathering your ingredients. In a mixing bowl, combine: - 1 cup rolled oats - 1 ½ cups almond milk (or regular milk) - 1 medium apple, grated (leave the skin on for added fiber) - 1 tablespoon chia seeds - 1 teaspoon ground cinnamon - 2 tablespoons maple syrup (or honey) - 1 teaspoon vanilla extract - Pinch of salt Stir these ingredients together until they mix well. You want everything to be evenly combined. Next, divide the mixture into jars or containers. This makes for easy serving later. Once you have divided the mixture, seal the jars tightly. Place them in the refrigerator overnight. This soaking time helps the oats and chia seeds absorb the liquid. It also softens the oats, making them creamy and tasty. When you are ready to enjoy your oats, take them out of the fridge. Give the oats a good stir before serving. If they seem too thick, add a splash of almond milk to reach your desired consistency. For extra flavor and crunch, you can add optional toppings like: - Chopped walnuts - Sliced apples - A sprinkle of extra cinnamon These little additions can make your breakfast even more delightful. Enjoy your healthy and delicious apple cinnamon overnight oats! For the complete recipe, check the Full Recipe. - Use fresh ingredients for optimal flavor. Fresh apples offer a sweet crunch. - Adjust sweetness to taste. Add more or less maple syrup to fit your preference. - Not letting the oats soak long enough. This step helps soften the oats and chia seeds. - Overpacking the jars. Leave some space for the oats to expand and absorb moisture. - Try different types of apples. Honeycrisp, Granny Smith, or Fuji can change the taste. - Experiment with spices. Add nutmeg or ginger for a fun twist on the classic flavor. For more details on making this dish, check out the Full Recipe. {{image_2}} You can change the flavor of your apple cinnamon overnight oats in fun ways. One option is to add nut butter. Peanut butter or almond butter can give your oats a rich taste. Just mix in a tablespoon to your bowl before refrigerating. You can also try using other fruits. Bananas add creaminess, while berries bring a burst of flavor. Adding these fruits gives you more choices and makes breakfast more exciting. If you need a gluten-free option, use gluten-free rolled oats. These oats taste just as good and keep your breakfast healthy. You can find them easily in most stores. For a vegan twist, replace honey with maple syrup. This keeps the sweetness while making it plant-based. You can also swap regular milk for almond milk, keeping your oats dairy-free and light. You can change your overnight oats with the seasons. In the fall, try adding pumpkin spice. Just a pinch gives a warm flavor that's perfect for cool mornings. In winter, add spices like nutmeg or ginger. These spices add warmth and comfort to your oats. You can mix and match these ideas to enjoy your apple cinnamon overnight oats all year long. For more tips and details, check out the Full Recipe. Apple cinnamon overnight oats stay fresh in the fridge for up to five days. Use airtight containers to keep them safe from other food odors. Glass jars work well, as do BPA-free plastic containers. Always seal them tightly to maintain flavor. If you prefer warm oats, simply heat them in the microwave. Place the oats in a microwave-safe bowl and cover with a paper towel. Warm them in short intervals, about 30 seconds at a time. Stir between intervals to ensure even heating. If they seem too thick, add a splash of almond milk to loosen them up. You can freeze overnight oats, but I recommend doing this without toppings. Store them in freezer-safe containers. They will last for up to three months. When you're ready to enjoy, move them to the fridge overnight to thaw. You can also warm them directly from the freezer, but allow extra time for heating. Add your favorite toppings after thawing for the best taste and texture. For the complete recipe, check out the Full Recipe section. Yes, you can make these oats in advance. They taste great after a night in the fridge. You can store them for up to five days. Just keep them in airtight containers. This makes breakfast easy and quick on busy mornings. You can use quick oats if you want. They will soak up the liquid faster. This means your oats may be softer. To adjust, use less liquid than the recipe states. Start with about one cup of milk for one cup of oats. Chia seeds are not a must, but they help. They add fiber and protein. If you don't have them, you can skip them. Another option is to use ground flaxseeds. They offer similar benefits and mix well. Apple cinnamon overnight oats are healthy and tasty. Here are some benefits: - Rolled oats: They are full of fiber. This helps keep you full. - Almond milk: It is low in calories and dairy-free. - Apples: They provide vitamins and antioxidants. - Chia seeds: They add omega-3 fatty acids and protein. - Cinnamon: It may help lower blood sugar levels. Enjoy a nutritious start to your day with this simple recipe! For the full recipe, check the earlier section. Apple cinnamon overnight oats are simple to make and delicious. We explored the main ingredients like rolled oats, almond milk, and grated apple. I shared preparation steps to help you combine and refrigerate your oats overnight. Remember to use fresh ingredients and avoid common mistakes like not soaking long enough. You can customize flavors and toppings to make your oats unique. In short, these oats are a tasty, healthy meal option that saves time. Enjoy experimenting with this recipe for a quick, satisfying breakfast!](https://emmasdish.com/wp-content/uploads/2025/05/29bec36a-f264-426b-a4be-5920bcdf371f.webp)
Looking for a quick, healthy breakfast that packs flavor and nutrients? Apple Cinnamon Overnight Oats are here to save your
![- 4 boneless, skinless chicken breasts - 3 tablespoons fresh ginger, grated - 2 cloves garlic, minced - 1/4 cup fresh lime juice - 3 tablespoons honey - 2 tablespoons soy sauce - 1 teaspoon black pepper - 1/2 teaspoon salt - 1 tablespoon olive oil - Fresh cilantro for garnish Fresh vs. Ground Ginger I always prefer fresh ginger over ground ginger. Fresh ginger has a brighter flavor and adds zest to the dish. It also brings a nice texture when grated. If you only have ground ginger, use half the amount. The taste will not be as strong, but it works in a pinch. Substitutions for Soy Sauce If you're looking for a gluten-free option, use tamari instead of soy sauce. You can also try coconut aminos for a sweeter taste. Both options keep the flavor profile intact and cater to different diets. Tips for Selecting Fresh Limes When choosing limes, look for ones that are firm and heavy for their size. A shiny skin indicates freshness. If you give them a gentle squeeze, they should feel slightly soft, which means they are juicy. Fresh limes make all the difference in this recipe! You can find the full recipe for Ginger Lime Grilled Chicken in the previous section. Enjoy cooking! Combining Ingredients To start, gather the marinade ingredients. You need fresh ginger, minced garlic, lime juice, honey, soy sauce, black pepper, and salt. In a large bowl, mix these items well. Whisk until they blend into a smooth marinade. This mix will give the chicken a zesty kick. How to Store Leftover Marinade If you have extra marinade, store it in an airtight container. Keep it in the fridge for up to three days. You can use it for another batch of chicken or even for fish. Just remember, don't reuse marinade that touched raw chicken without cooking it first. Ideal Marinating Time I recommend marinating the chicken for at least 30 minutes. If you have more time, let it sit for up to 24 hours. The longer it marinates, the better the flavor. This step is key to juicy, tasty chicken. Tips for Flavor Enhancement Want to boost the flavor? Try scoring the chicken breasts lightly. This helps the marinade soak in better. You can also add a splash of lime zest for an extra zing. Fresh herbs like cilantro can also add depth to the flavor. Prepping the Grill Before grilling, preheat your grill to medium-high heat, around 375°F (190°C). Brush the grates with olive oil to stop the chicken from sticking. This step is important for clean grill marks and easy flipping. Cooking Times and Temperatures Place the chicken on the grill and cook for about 6-7 minutes. Look for good grill marks before flipping. Then, grill the other side for another 6-7 minutes. Use a meat thermometer to check that the internal temperature hits 165°F (75°C). This ensures your chicken is safe to eat. Let it rest for 5 minutes after grilling. This keeps it juicy and flavorful. For a complete guide, check the Full Recipe. To get those nice grill marks, start with a hot grill. Preheat it to medium-high heat, about 375°F. Brush the grates with olive oil. This helps the chicken not stick. Place the chicken on the grill and don’t move it. Let it cook for about 6-7 minutes. Flip it gently to keep those marks. Cook for another 6-7 minutes until it’s done. Resting the chicken is very important. After grilling, take it off the heat. Let it sit for five minutes. This helps keep the juices inside. If you slice it too soon, it will dry out. Resting makes each bite juicy and tender. You can add extra herbs like cilantro for more flavor. Fresh lime wedges also add a nice touch. If you want a kick, try adding sliced jalapeños on the side. Serve the chicken with rice or a fresh salad. This makes a great summer meal. For the full recipe, check the recipe section above. {{image_2}} You can add more zest to your Ginger Lime Grilled Chicken by mixing in orange or lemon juice. This adds a new layer of flavor. You can replace part of the lime juice or add an extra splash of citrus. This gives a sweet and tangy taste that pairs well with ginger. Try this when you want to surprise your guests with something fresh. If you like heat, adding chili flakes or ginger paste can take this dish to another level. Chili flakes bring a nice kick, while ginger paste gives a deeper ginger flavor. Adjust the amount based on your spice tolerance. Both options enhance the flavor and make this dish even more exciting. You don’t have to grill to enjoy this dish. You can also bake or cook it on the stovetop. For oven-baked Ginger Lime Chicken, preheat your oven to 375°F (190°C). Place marinated chicken on a baking sheet and bake for 25-30 minutes. This method keeps the chicken juicy and tender. For stovetop cooking, heat a skillet over medium-high heat. Add a bit of olive oil. Cook the chicken for about 6-7 minutes on each side. Make sure it reaches an internal temperature of 165°F (75°C). This method is quick and gives a nice sear. Check the [Full Recipe] for the detailed steps and enjoy experimenting with these variations! To keep your Ginger Lime Grilled Chicken fresh, store it in the fridge. First, let the chicken cool down. Then, place it in an airtight container. It can last for about 3 to 4 days in the fridge. If you have extra marinade, you can keep that too. Just make sure to store it in a separate container. This way, it stays fresh for your next meal. If you want to save your grilled chicken for later, freezing is a great option. Wrap each piece in plastic wrap tightly. Then, place the wrapped chicken in a freezer bag. Make sure to remove as much air as possible. You can freeze it for up to 3 months. When you are ready to eat it, thaw it in the fridge overnight. To reheat your Ginger Lime Grilled Chicken, avoid using the microwave if you can. Instead, use the oven or grill for the best results. Preheat your oven to 350°F (175°C). Place the chicken on a baking tray and cover it with foil. Heat it for about 10-15 minutes, or until warm. This method helps keep the chicken juicy and flavorful. Enjoy it just like when you first cooked it! You can marinate the chicken for 30 minutes to 24 hours. For the best flavor, I suggest marinating overnight. This longer time lets the ginger and lime flavors soak in. If you're in a hurry, 30 minutes works too. Just remember, the longer you marinate, the tastier it gets! Yes, you can. Bone-in chicken adds more flavor. However, it takes longer to cook. Expect about 10 extra minutes on the grill. Make sure to check the thickest part for doneness. It must reach 165°F (75°C). This will ensure it is safe to eat. This chicken pairs well with many sides. Here are some ideas: - Cilantro lime rice - Grilled vegetables - Fresh salads - Quinoa with herbs These sides balance the bright flavors of the chicken. They also add color and texture to your meal. Here’s the estimated nutritional information per serving: - Calories: 250 - Protein: 28g - Carbohydrates: 16g - Fat: 8g - Fiber: 0g This dish is a great source of protein and has a good flavor profile. Enjoy guilt-free! For the complete recipe, check the Full Recipe section above. This blog post covered how to make Ginger Lime Grilled Chicken step by step. We reviewed key ingredients, perfect marinating tips, and cooking methods. You learned about variations to suit your taste and important storage tips. To sum up, mastering this dish elevates your grilling skills. Enjoy experimenting with flavors to create a dish your loved ones will cherish. Happy cooking!](https://emmasdish.com/wp-content/uploads/2025/05/95b18022-18a5-4577-87ec-5977c5f3ec72.webp)
Summer is here, and it’s time to fire up the grill! If you’re craving a dish that bursts with flavor,
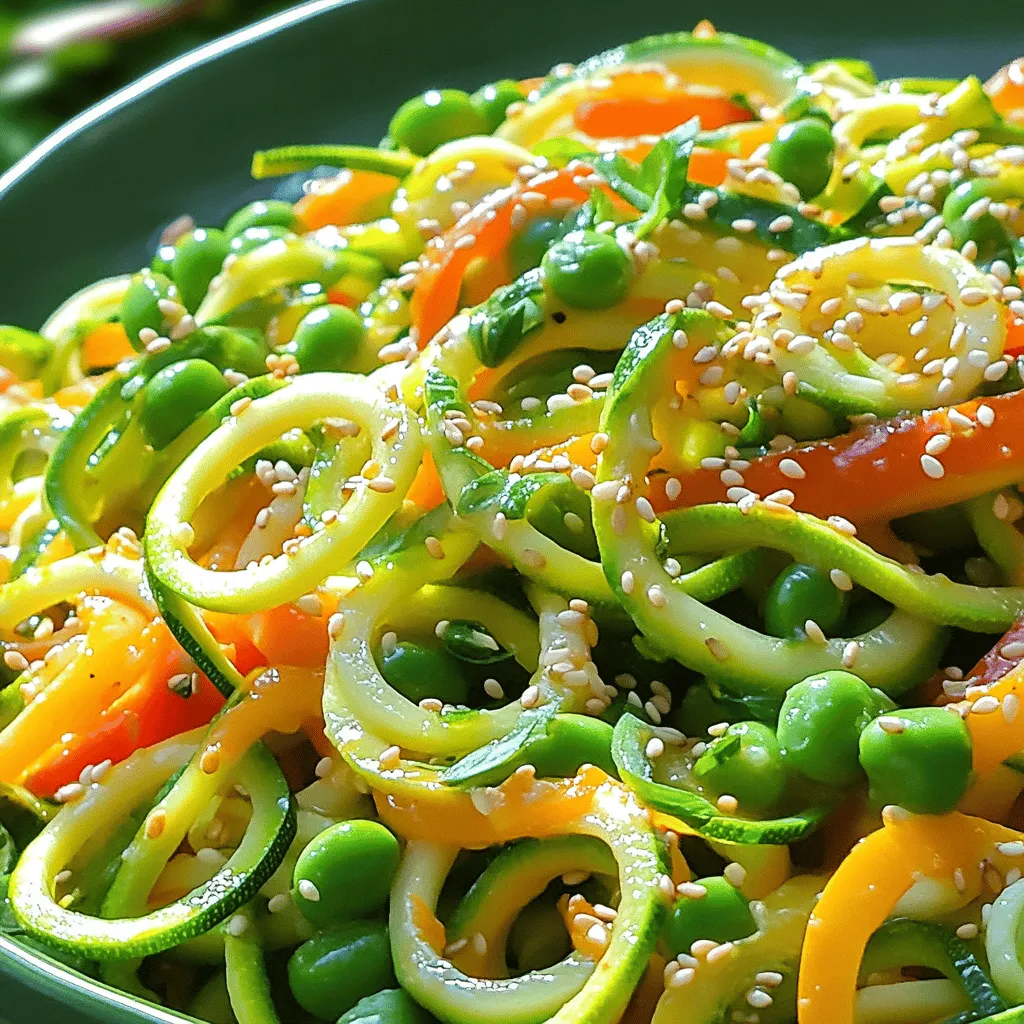
Are you craving a quick and tasty meal? My Zucchini Noodle Stir Fry recipe is here to save the day!

If you’re looking for a comforting dish that’s full of flavor, creamy mushroom risotto is a must-try! This easy recipe
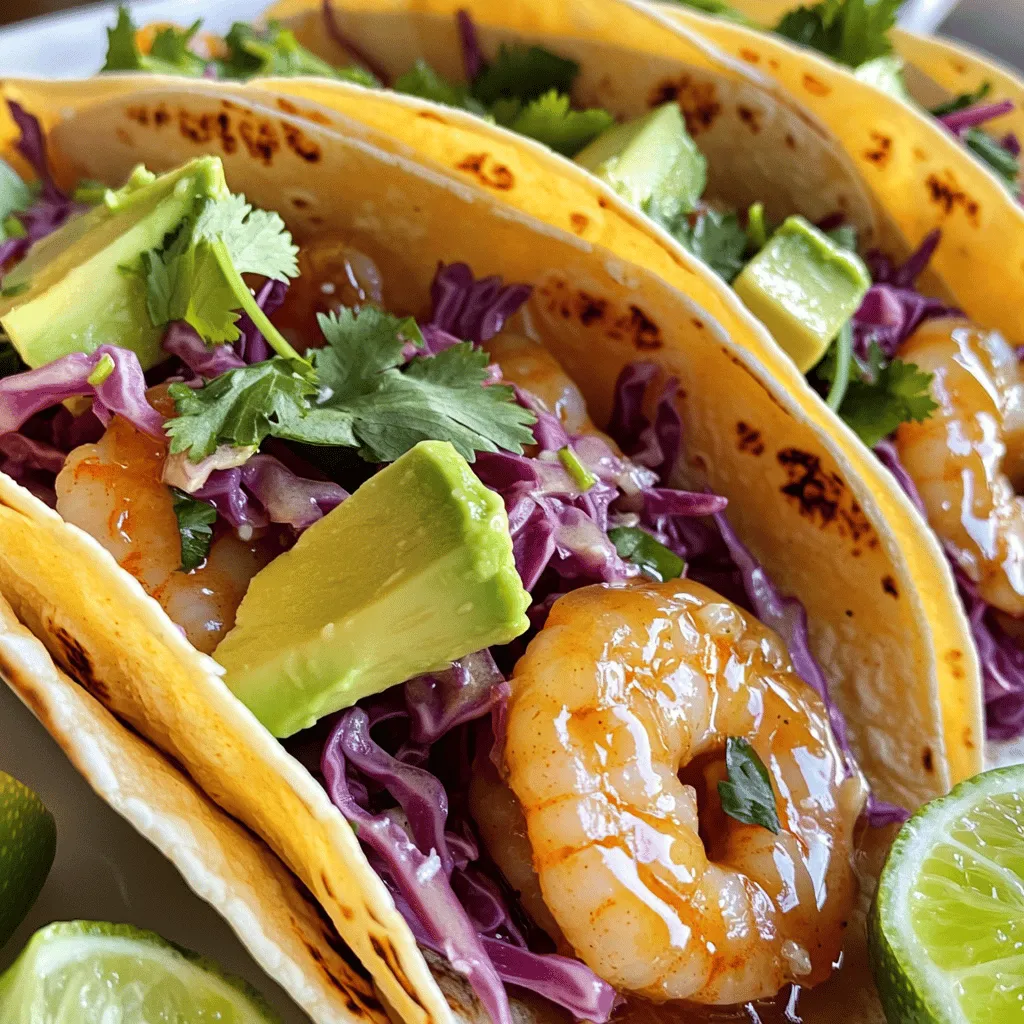
If you’re craving a quick, delicious meal, let’s dive into Honey Garlic Shrimp Tacos! This easy recipe is packed with
![To make a delightful roasted beet and goat cheese salad, you need fresh ingredients that shine. Here’s what you’ll need: - Beets: 3 medium beets, scrubbed clean. Roast them to bring out their sweet flavor. - Mixed greens: 4 cups of mixed greens, like arugula, spinach, and radicchio. They add a crunchy texture. - Goat cheese: 1/2 cup of crumbled goat cheese. It gives a creamy, tangy taste. - Additional toppings: - 1/4 cup of walnuts, toasted and chopped for crunch. - 1/2 red onion, thinly sliced to add some bite. - Fresh herbs like parsley or dill for garnish. These ingredients come together for a salad that is both colorful and tasty. You can find the full recipe [Full Recipe]. Preheating the oven: Temperature and tips Start by preheating your oven to 400°F (200°C). This is the perfect temperature for roasting beets. A hot oven makes the beets tender and flavorful. Wrapping and roasting: Duration and method Wrap each beet in aluminum foil. Place them on a baking sheet. Roast for 45-60 minutes. Check if they are done by piercing them with a fork. They should feel soft. Cooling and peeling beets: Best practices Once the beets are done, take them out and let them cool. This makes them easier to handle. Use your hands or a paper towel to peel off the skin. It should come off easily. Cut the beets into small cubes. Combining ingredients: Assembly tips In a large bowl, add your mixed greens. Next, toss in the roasted beets and sliced red onion. Make sure to mix them gently. You want the greens to stay crisp. Mixing the dressing: Proportions and techniques In a small bowl, mix 2 tablespoons of balsamic vinegar and 2 tablespoons of olive oil. This dressing will add a nice tangy flavor. You may add salt and pepper to taste. Tossing ingredients: Tips for even coating Drizzle the dressing over the salad. Toss everything together gently. Make sure all the ingredients are well coated with the dressing. This step helps the flavors blend nicely. For the full recipe, check out the [Full Recipe]. Enjoy your delicious roasted beet and goat cheese salad! Cooking time adjustments: Check the beets after 45 minutes. You want them tender. Insert a fork to test doneness. If the fork slides in easily, they are ready. If not, roast for another 10 to 15 minutes. All ovens differ, so keep an eye on them. Foil wrapping techniques: Wrapping beets in foil helps them steam. This keeps them moist and flavorful. Make sure the foil is tightly sealed around each beet. This way, they will roast evenly. The steam will also make peeling easier after roasting. Ideal pairings: Roasted beet and goat cheese salad shines with nuts and fruits. Try adding sliced apples or pears. They add sweetness and crunch. Also, consider serving it with grilled chicken or fish for a full meal. Presentation tips: Make your salad pop with color. Use a large bowl to show off the mixed greens. Arrange the beets and goat cheese on top. Sprinkle the walnuts and red onion for a beautiful finish. A drizzle of balsamic vinegar adds a nice touch. Fresh herbs like parsley or dill make the dish look fresh and inviting. For the complete recipe, refer to the Full Recipe. {{image_2}} You can make your roasted beet and goat cheese salad even better by adding proteins. Grilled chicken is a great choice. It adds a nice flavor and makes the salad filling. You can also use chickpeas if you want a plant-based option. Chickpeas are rich in fiber and protein, making your salad more nutritious. Adding protein changes the taste of your salad. Chicken gives a smoky, savory flavor. Chickpeas add a mild, nutty taste. Both options help balance the sweetness of the beets and the tanginess of the goat cheese. If you want to change the nuts, try using pecans or almonds instead of walnuts. Pecans have a sweeter, buttery flavor. Almonds bring a crunchy texture and mild taste. Both options will complement your salad perfectly. Toasting the nuts enhances their flavor. Just place them in a dry skillet over medium heat. Stir them frequently for about five minutes until they are golden brown. This simple step makes a big difference in taste and texture. To keep your Roasted Beet and Goat Cheese Salad fresh, store it in the fridge. Use an airtight container. This keeps the salad crisp for up to three days. If you have extra dressing, keep it separate. This will prevent the greens from wilting too fast. If you notice your greens look a bit sad, don’t worry! You can revive them. Just place them in a bowl of cold water for about 10-15 minutes. This helps them regain some crunch. Afterward, dry them gently with a towel. Want to save some roasted beets for later? You can freeze them! First, let the beets cool completely. Then, cut them into cubes. Place the cubes in a freezer bag, removing as much air as possible. Seal the bag tightly. Your beets can last up to six months in the freezer. When you’re ready to use frozen beets, simply thaw them in the fridge overnight. You can add them to salads or warm them up for a tasty side dish. Using frozen beets is a great way to enjoy their flavor while saving time in the kitchen. Yes, you can use canned beets. They save time and effort. However, the taste and texture differ from fresh roasted beets. Canned beets are softer and may lack the rich, earthy flavor of roasted ones. Fresh beets bring a sweet and smoky taste that enhances this salad. If you choose canned beets, rinse them well to remove excess salt. The best goat cheese for this salad is creamy and tangy. Soft goat cheese, often called chevre, adds a smooth texture. You can also use aged goat cheese for a sharper flavor. Each option brings a unique taste to the dish. Try different types to see what you like best. A herbed goat cheese can add extra flavor and freshness, too. This salad serves four people. It’s perfect for a light lunch or as a side dish at dinner. If you need more servings, just double the ingredients. You can also make smaller portions by halving the recipe. This flexibility makes it a great choice for any gathering. In this blog post, we covered how to create a delicious beet salad. We listed the key ingredients, including beets, mixed greens, and goat cheese. You learned step-by-step instructions for roasting beets, preparing the salad, and making the dressing. We shared tips for cooking and serving, along with variations to try. Remember, this salad is flexible; you can add proteins or switch up the nuts. I hope you create this tasty dish and enjoy every bite. Happy cooking!](https://emmasdish.com/wp-content/uploads/2025/05/1cac6a3c-3cbd-4bc6-96ff-a26a53a2173b.webp)
If you’re searching for a delightful salad that bursts with flavor and color, you’ve found it! My Roasted Beet and
![- 1 cup red lentils, rinsed - 1 can (14 oz) coconut milk - 4 cups vegetable broth - 1 medium onion, diced - 3 cloves garlic, minced To make a rich and creamy soup, I use red lentils. They cook fast and add a nice texture. The coconut milk gives the soup its smoothness and sweet taste. I always choose vegetable broth for a deep flavor base. Fresh onion and garlic add a great aroma and taste. - 1 tablespoon fresh ginger, minced - 1 tablespoon curry powder - 1 teaspoon turmeric powder - 1 teaspoon cumin powder - Salt and pepper to taste Spices are key to this recipe. Fresh ginger brings warmth and zest. Curry powder adds a complex flavor. Turmeric gives a bright color and earthy taste. Cumin adds a rich, savory kick. Don’t forget to season with salt and pepper to enhance all the flavors. - Fresh cilantro, for garnish - Diced carrots and spinach For garnish, fresh cilantro adds a pop of color and freshness. You can also add diced carrots for crunch and spinach for extra greens. Both are great choices to elevate your soup. To see the full recipe, check out the [Full Recipe]. 1. First, heat olive oil in a large pot over medium heat. 2. Next, add the diced onion. Sauté for about 3 minutes until it turns soft and clear. 3. Then, stir in minced garlic and ginger. Cook for one more minute until fragrant. 1. Now, add curry powder, turmeric, and cumin. Stir well to coat the onion mix. Toast the spices for about 30 seconds. 2. Add diced carrots and rinsed red lentils into the pot. Mix them well. 3. Pour in vegetable broth. Bring everything to a boil. Once boiling, reduce heat and cover. Let it simmer for 15 to 20 minutes. Lentils should be tender. 1. Stir in the coconut milk and spinach. Cook for another 5 minutes until the spinach wilts. 2. Season your soup with salt and pepper to taste. 3. Serve hot, garnished with fresh cilantro on top. You can find the full recipe for more details. To make great soup, start with the lentils. Rinse them well. This removes dust and helps them cook better. Use red lentils for this soup. They cook fast and get soft. You want a smooth texture. Cook them for about 15-20 minutes. Keep an eye on them. Spices are key to flavor. Toast them in oil first. This wakes up their taste. Use curry powder for warmth. Turmeric adds color and health benefits. Cumin gives a nice earthiness. Mix these spices well with the onion. You will smell the difference! Sautéing your veggies is an art. Heat olive oil in a pot. Add diced onion and let it cook. Stir it often until it gets soft and clear. Then, add garlic and ginger. Cook for just a minute. You want them to smell great, not burn. Simmering is important too. After adding broth, bring it to a boil. Then, reduce the heat. Cover the pot and let it simmer. This keeps your lentils from overcooking. Stir occasionally to check on it. You want it to be creamy and thick. Pair this soup with rice or bread. They soak up the tasty broth well. You could also serve it with a side salad. Fresh veggies add a nice crunch. Garnishing makes your dish pop. Use fresh cilantro on top. It adds color and a fresh taste. You could also add a swirl of coconut milk. This not only looks good but also adds creaminess. Enjoy your meal! You can find the Full Recipe for Coconut Curry Lentil Soup to guide you as you cook. {{image_2}} You can swap out lentils to change the flavor. Try green or brown lentils for a heartier taste. They will take longer to cook, so adjust your time. If you want a different texture, split peas are a good choice too. For a dairy-free or vegan option, use coconut milk as stated in the recipe. You can also add nut milk for creaminess. If you like, replace olive oil with coconut oil for added flavor. Adding spices can elevate this soup. Try a pinch of cayenne for heat or garam masala for depth. Fresh herbs like basil or cilantro can also brighten the dish. You can incorporate other vegetables too. Bell peppers add sweetness, while zucchini gives a nice crunch. Try adding sweet potatoes or peas for more color and flavor. The way you serve this soup can change the vibe. Use a deep bowl for a cozy feel or a wide plate for a fancy look. You can also serve it over rice or quinoa to make it a full meal. To turn it into a curry dish, just reduce the liquid. This makes it thicker, perfect for serving over rice. For a stew, add more broth and cook longer. You can also top it with fresh herbs or a squeeze of lime for a fresh kick. For the Full Recipe, check the main section of the article. To store leftovers, let the soup cool down first. Then, place it in an airtight container. This keeps it fresh. You can store it in the fridge for up to five days. When you want to reheat, pour the soup into a pot. Heat it on low and stir often. It warms up nicely this way. If it seems too thick, add a splash of vegetable broth or water. Yes, you can freeze Coconut Curry Lentil Soup! It’s a great way to save some for later. Use freezer-safe containers or heavy-duty zip-top bags. Make sure to leave some space at the top for expansion. Label the containers with the date. This helps you remember when you made it. In the fridge, the soup lasts about five days. If you freeze it, it stays good for up to three months. Look for signs of spoilage. If the soup smells off or has a strange color, do not eat it. Always trust your senses when it comes to food safety. What are the health benefits of lentils? Lentils are packed with nutrients. They are high in protein, fiber, and iron. These little gems can help with digestion and keep your heart healthy. They also support weight loss due to their low calorie count. Can I make this soup ahead of time? Yes, you can make this soup ahead of time. It tastes even better after sitting for a day. Just store it in the fridge in an airtight container. Reheat it gently before serving. How do I know when lentils are cooked? Lentils are cooked when they are soft but not mushy. You can taste a few to check. They should have a slight bite, similar to pasta al dente. Can I use canned lentils instead? Yes, you can use canned lentils. This saves time and makes cooking easier. Just rinse and drain them before adding to the soup. Reduce the cooking time since canned lentils are already cooked. Is this recipe gluten-free? Yes, this recipe is gluten-free. All the ingredients are safe for those with gluten allergies. You can enjoy this soup without worry. What to serve with Coconut Curry Lentil Soup? This soup pairs well with crusty bread or a fresh salad. You can also serve it over rice for a filling meal. Feel free to add a dollop of yogurt on top for creaminess. Coconut Curry Lentil Soup is a tasty dish packed with nutrition. We covered key ingredients like lentils, coconut milk, and spices. I shared easy steps for cooking and serving, plus tips for making it perfect. You can customize it with different vegetables or spices to fit your taste. Whether you store it in the fridge or freeze it, this soup remains a great choice. Enjoy making and sharing this flavorful meal!](https://emmasdish.com/wp-content/uploads/2025/05/b56ece67-d8f2-4c55-8f0c-21af206902b1.webp)
Looking for a quick and tasty meal? You’ve found it! This Coconut Curry Lentil Soup is not only packed with
![- Pasta and Main Ingredients - 8 oz (225g) whole wheat pasta (fusilli or penne) - 1 red bell pepper, sliced - 1 yellow bell pepper, sliced - 1 zucchini, sliced into rounds - 1 red onion, sliced into rings - 1 cup cherry tomatoes, halved - Seasonings and Dressings - 2 tablespoons olive oil - Salt and pepper to taste - 1 teaspoon dried oregano - 1 teaspoon garlic powder - ¼ cup balsamic vinegar - Optional Toppings - ½ cup feta cheese, crumbled - Fresh basil leaves, for garnish This grilled vegetable pasta salad shines with fresh, bright flavors. You can use any whole wheat pasta you like. I enjoy fusilli or penne for their great texture. The colorful bell peppers, zucchini, and red onion provide a delightful crunch. Grilling these veggies gives them a smoky taste that brings everything together. For seasonings, the olive oil, salt, pepper, and herbs enhance the natural flavors of the vegetables. I love using balsamic vinegar to add a tangy kick to the dish. Feta cheese adds creaminess and saltiness. Fresh basil leaves on top make it look beautiful and fresh. You can find the full recipe in the article. Don't skip the chance to enjoy this vibrant dish! To start, boil a large pot of salted water. Add your whole wheat pasta. Cook it according to the package instructions until it's al dente. This usually takes about 8 to 10 minutes. Once done, drain the pasta in a colander. Rinse it under cold water to stop the cooking. This helps keep your pasta firm. Set the pasta aside while you grill the veggies. Next, we prep the veggies. Slice the red and yellow bell peppers, zucchini, and red onion. Put them in a bowl. Toss the vegetables with olive oil, salt, pepper, oregano, and garlic powder. This adds great flavor. Now, heat the grill or grill pan to medium-high. Place the seasoned veggies on the grill. Grill for about 4 to 5 minutes on each side. Look for those nice grill marks and a tender texture. Once done, take them off the grill and let them cool a bit. In a large mixing bowl, combine the cooked pasta, grilled vegetables, and halved cherry tomatoes. Drizzle balsamic vinegar over the top. Toss everything until it's mixed well. This is where the magic happens! Now, gently fold in the crumbled feta cheese. This adds a creamy burst of flavor. For the best taste, let the salad chill in the fridge for at least 30 minutes. Serve it cold or at room temperature. Add fresh basil leaves on top for a lovely finish. Enjoy your fresh and flavorful grilled vegetable pasta salad! For more details, check the Full Recipe. For pasta salad, choose short shapes. Fusilli and penne work well. They hold onto the dressing and mix easily with veggies. Whole wheat pasta adds more fiber and flavor. Always cook pasta until al dente to keep it firm. Overcooked pasta can turn mushy in salad. To get great grill marks, preheat your grill. Make sure it’s hot before adding veggies. Brush them lightly with olive oil. This helps prevent sticking and adds flavor. Place the veggies on the grill without crowding. Grill each side for about 4-5 minutes. Turn them only once for those perfect marks. You want them tender but still crisp. Fresh herbs can elevate your salad. Add basil, parsley, or thyme for more flavor. You can also mix in spices like red pepper flakes for heat. A splash of lemon juice brightens the dish. Try to use balsamic vinegar for a sweet touch. It pairs well with feta cheese in the salad. For the full recipe, check out the full recipe. {{image_2}} You can make this grilled vegetable pasta salad heartier by adding protein. Here are some tasty options: - Chicken: Grilled chicken adds flavor and a nice texture. Cook it with herbs for extra taste. - Tofu: For a plant-based option, grilled tofu works well. Marinate it in soy sauce for a savory twist. - Shrimp: Grilled shrimp brings a seafood flair. Toss it on the grill for a quick cook. If you want a vegan dish, you can swap out some ingredients. Here are the best choices: - Cheese: Instead of feta, try vegan cheese. You can also use avocado for creaminess. - Dressings: Choose a plant-based dressing. Olive oil and lemon juice are fresh and simple. Using different veggies can keep this dish exciting. Here are some ideas for seasonal variety: - Asparagus: This spring veggie adds a crisp bite. Grill it for a few minutes. - Corn: Sweet corn brings a pop of flavor. Grill it on the cob or use frozen kernels. - Eggplant: This hearty vegetable adds depth. Slice it and grill until soft. Feel free to mix and match these ideas! Check out the Full Recipe for more inspiration. Experiment to find your favorite combination. To keep your grilled vegetable pasta salad fresh, store it in an airtight container. This helps lock in flavor and moisture. When stored properly, it lasts about 3 to 5 days in the fridge. Always check for signs of spoilage before eating. Can you freeze pasta salad? Yes, but it may change in texture. To freeze, place the salad in a freezer-safe container. You can keep it frozen for up to 2 months. When you are ready to eat, thaw it overnight in the fridge for the best results. To maintain texture, reheat pasta salad gently. The best method is to use the microwave on low power. Stir it every 30 seconds until warm. You can also let it sit at room temperature for about an hour before serving. This way, it stays fresh and tasty. Yes, you can make this salad ahead. It tastes even better after chilling. I suggest making it up to a day before serving. Just keep it in the fridge. This allows the flavors to mix well. If you don't have feta, try goat cheese or mozzarella. Both add great flavors. You can also use a vegan cheese for a dairy-free option. It keeps the dish fresh and tasty. Absolutely! You can use red wine vinegar or apple cider vinegar. Each type will change the taste slightly. Balsamic gives a sweet flavor, while red wine adds a tangy note. Choose what you like best! For the full recipe, visit [Full Recipe]. In this blog post, I covered how to make a tasty pasta salad. We explored the key ingredients, from pasta to veggies and seasonings. I shared step-by-step cooking tips for grilling and combining your salad. I also provided ways to enhance flavor and create variations. Finally, I discussed storage tips to keep your salad fresh. With these tips, you can easily create a delicious dish. Enjoy the process and get creative with your flavors!](https://emmasdish.com/wp-content/uploads/2025/05/71b6dc10-d970-4179-b95f-d63019ca2912.webp)
Are you ready to elevate your pasta salad game? My Grilled Vegetable Pasta Salad is both fresh and full of
