Skip to content
DisclaimerTerms Of UseGDPR PolicyCookie Policy

Emmas Dish

  • Home
  • Drinks
  • Appetizers
  • Dinner
  • Dessert
  • About
  • Contact
  • Privacy Policy
DisclaimerTerms Of UseGDPR PolicyCookie Policy

Emma

For tasty Mini Caprese Skewers, you need fresh ingredients. Here’s what you will need: - 1 pint cherry tomatoes - 8 oz fresh mozzarella balls (bocconcini) - Fresh basil leaves These fresh ingredients bring vibrant colors and flavors to your skewers. The cherry tomatoes add a sweet burst. The mozzarella offers a creamy texture. The basil gives a fresh, herbal note. Together, they create a classic Italian taste. You can enhance your skewers with some simple extras. Here are a few options: - 2 tablespoons balsamic glaze - 1 tablespoon extra virgin olive oil - Salt and pepper, to taste The balsamic glaze adds a tangy sweetness. The olive oil boosts the flavor and makes it richer. A sprinkle of salt and pepper can bring out the best in these simple ingredients. You don’t need much to make these skewers. Here’s what you will need: - Skewers (6-inch) - A plate or serving platter The skewers hold everything together. You can use a plate for a nice display. A fun idea is to use a jar to stand them up. This makes for a beautiful presentation at your gathering. For the complete cooking process, check the Full Recipe. Start by washing the cherry tomatoes. Use cold water to rinse them well. After rinsing, dry them gently with a paper towel. This step helps to keep the tomatoes fresh and clean. Next, take the fresh mozzarella balls out of the package. If they are packed in water, drain them well. Now, grab fresh basil leaves. Look for bright, green leaves without brown spots. Take a skewer and thread on one cherry tomato first. Next, add a basil leaf. Then, slide on a mozzarella ball. Repeat this until the skewer is filled. Aim for three cherry tomatoes, two basil leaves, and two mozzarella balls per skewer. Leave space at the bottom for easy handling. This order creates a lovely balance of flavors. Place your finished skewers on a serving platter. You can arrange them in a fan shape. For a fun touch, stand them up in a jar or glass. This adds height and makes them look appealing. Drizzle extra virgin olive oil over the skewers, then add balsamic glaze. Finish with a sprinkle of salt and pepper. This enhances the taste and makes them pop. You can find the complete steps in the Full Recipe. To keep your Mini Caprese Skewers fresh, use the best ingredients. Look for ripe cherry tomatoes and fresh mozzarella. Fresh basil adds a burst of flavor. Buy them close to your gathering. Store these items in the fridge until you are ready to use them. This helps keep them crisp and tasty. When making these skewers, assembly matters. Thread the cherry tomato first. This helps keep the skewer stable. Next, add a basil leaf. Then, follow with a mozzarella ball. Repeat until the skewer is full. Aim for a mix of colors and textures. This adds to the visual appeal. You can also use different sizes of skewers. Shorter skewers work well for snacks. Longer ones are great for larger gatherings. To elevate the taste, consider adding more layers. You can sprinkle some crushed red pepper for heat. A pinch of garlic powder adds depth. Try using flavored oils like basil-infused olive oil. Drizzle balsamic glaze generously for sweetness. Each ingredient enhances the overall flavor. Experiment with combinations until you find your favorite. Pair your skewers with a nice wine or sparkling water for a refreshing touch. For the full recipe, check out the details above. {{image_2}} Making gluten-free mini Caprese skewers is easy. All the main ingredients are naturally gluten-free. Use cherry tomatoes, mozzarella, and basil. Drizzle with balsamic glaze and olive oil. Just ensure any dressings or sauces are gluten-free. This way, everyone can enjoy them without worry. For a vegetarian option, keep the original recipe as it is. The fresh mozzarella adds a creamy touch. If you want a vegan twist, swap mozzarella for marinated tofu or avocado. Both options add creaminess and flavor without dairy. Use a vegan balsamic glaze for a complete plant-based dish. Get creative with your skewers! You can swap cherry tomatoes for roasted peppers or artichoke hearts. Green olives can replace mozzarella for a briny kick. Add fresh mint instead of basil for a unique flavor. Experiment with different cheese types, like feta or goat cheese, for varied tastes. Each swap changes the dish's profile, making it fun to try new combinations. For the full recipe, check out the detailed steps provided earlier. If you have leftover skewers, store them in the fridge. Place them in a sealed container. This keeps them fresh and tasty. Enjoy them within two days for the best flavor. If you notice any moisture, add a paper towel to absorb it. You can freeze some ingredients, but not the skewers. Freeze cherry tomatoes or mozzarella balls separately. Place them in freezer bags and remove as much air as possible. Use them in sauces or soups later. Basil does not freeze well, so use it fresh. For the best storage, use airtight containers. Glass containers work well, but plastic ones are fine too. Make sure the lid seals tightly. If you want to enjoy your skewers later, this method helps keep them fresh. For the full recipe, check the section above. You can store Mini Caprese Skewers in the fridge for up to two days. Keep them in an airtight container. This helps maintain their freshness. If you leave them out, they may spoil quickly. Yes, you can make Mini Caprese Skewers a few hours before your event. Just assemble them and chill them in the fridge. This way, they are ready when guests arrive. However, I recommend adding the balsamic glaze right before serving for the best taste. Mini Caprese Skewers pair well with light dishes. Try serving them with grilled chicken or fish. A fresh salad can also complement these skewers nicely. You could even add some crusty bread. These options make a balanced meal. For more ideas, check the Full Recipe for inspiration! In this post, we explored how to make delicious mini Caprese skewers. We covered fresh ingredients, assembly steps, and tips for perfect skewers. I shared variations for different diets and provided storage info to keep your creations fresh. Remember, using quality ingredients enhances flavor. Try new twists for your skewers and enjoy their fun presentation. You can impress your friends and family with these easy snacks. Enjoy this tasty treat and make it your own!

Mini Caprese Skewers Easy Appetizer for Gatherings

Looking for a quick and tasty appetizer for your next gathering? Mini Caprese skewers are your answer! These vibrant bites

For these spicy chickpea tacos, you need a mix of simple and tasty items. Here's what you will use: - 1 can (15 oz) chickpeas, drained and rinsed - 1 tablespoon olive oil - 1 teaspoon smoked paprika - 1/2 teaspoon cumin - 1/2 teaspoon chili powder - 1/4 teaspoon cayenne pepper (adjust to taste) - Salt and pepper to taste - 1 small red onion, diced - 1 bell pepper (any color), diced - 2 cloves garlic, minced - 8 small corn tortillas - Fresh cilantro, chopped (for garnish) - Lime wedges (for serving) You can swap some ingredients if you need to. If you can't find chickpeas, use black beans or lentils. For spices, feel free to change them based on what you like. You can use regular paprika instead of smoked paprika. If you prefer flour tortillas, those work too! Each serving of spicy chickpea tacos is not only tasty but also healthy. Here's a quick look at what you get: - Calories: About 250 - Protein: 10 grams - Carbohydrates: 40 grams - Fat: 7 grams These tacos are rich in protein from the chickpeas. They also provide fiber and vitamins from the veggies. This makes them a balanced meal option for everyone! 1. Heat the olive oil in a large skillet over medium heat. This takes about 1-2 minutes. 2. Add the diced red onion and bell pepper. Sauté for about 5 minutes. They should become soft and fragrant. 3. Stir in the minced garlic. Cook for an additional minute. You want to smell the garlic but not burn it. 4. Add the chickpeas. Follow with smoked paprika, cumin, chili powder, cayenne pepper, salt, and pepper. Mix well. 5. Cook the mixture for 5-7 minutes. Stir occasionally to heat through and get a little crispy. 6. Warm the corn tortillas. Do this in a separate skillet for 30 seconds per side or in the microwave. Cover with a damp paper towel to keep them soft. 7. Fill each tortilla with a scoop of the spicy chickpea mix. Don’t be shy with the filling! 8. Garnish each taco with fresh cilantro. Serve with lime wedges for that zesty kick. - For the best texture, let the chickpeas get slightly crispy. This adds a nice crunch. - Adjust the spice levels to fit your taste. Add more cayenne for heat or cut it down for a milder dish. - For deeper flavor, let the spices cook a bit longer before adding the chickpeas. This brings out their warmth. - Experiment with toppings! Avocado, cheese, or fresh salsa add great flavor and texture. This recipe makes a quick and tasty dinner. You can whip it up in about 20 minutes. If you want to see the full recipe, check out the recipe section above. To make your spicy chickpea tacos even better, think about toppings. Fresh avocado adds creaminess. You can also sprinkle cheese for a rich taste. For crunch, add shredded cabbage or radishes. If you enjoy heat, try sliced jalapeños or a drizzle of hot sauce. Adjusting spice levels is easy. If you like it mild, skip the cayenne pepper. For more heat, add extra chili powder or a pinch of cayenne. Taste as you go to find your perfect balance. Using canned chickpeas is quick and easy. Just drain and rinse them to remove excess salt. They cook fast and save time. Dried chickpeas take longer but have great flavor. Soak them overnight, then cook until tender. Chickpeas are a great choice for your diet. They are high in protein and fiber. This helps you feel full and satisfied. They also offer vitamins and minerals, making them a healthy option for any meal. {{image_2}} You can swap chickpeas for black beans or lentils. Black beans add a rich, earthy taste. Lentils bring a soft texture that works well. Both options keep the meal healthy and filling. For a vegetarian twist, use extra veggies. Try adding zucchini or corn for more flavor. If you want meat, ground turkey or chicken works great. These meats absorb spices well, making them tasty and satisfying. Taco style matters! You can choose hard-shell or soft-shell tacos. Hard shells give a nice crunch. Soft shells are warm and easy to fold. Both styles are fun and delicious. Think outside the taco! You can make taco bowls by serving the spicy chickpeas over rice. For a burrito, wrap the mixture in a large tortilla. It’s a tasty way to enjoy this dish. For the full recipe, check out the link above. To keep your spicy chickpea tacos fresh, store them in the fridge. Place the tacos in an airtight container. This helps maintain their flavor and texture. If you have leftover filling, store it separately. The chickpea mixture stays good for about three to four days in the fridge. If you want to save them longer, consider freezing. Wrap the tacos in plastic wrap or foil. Then, place them in a freezer-safe bag. This method can keep them fresh for up to three months. When ready to eat, just thaw overnight in the fridge. Reheating your spicy chickpea tacos needs care. You want to keep them tasty and crispy. The best way is to use a skillet. Heat it over medium heat. Add the tacos and warm them for about two to three minutes on each side. This method brings back their crunch. If you prefer the microwave, use it with caution. Place the tacos on a plate and cover them with a damp paper towel. Heat them for about 30 seconds. Check if they are warm enough. If not, add more time in short bursts. This method can make them soft, so it's best to use the skillet when you can. What are the best sides to serve with spicy chickpea tacos? I love to pair spicy chickpea tacos with a fresh salad or a side of rice. You can add some guacamole or salsa for extra flavor. Corn on the cob or a simple black bean salad also work well. These sides balance the spice and add a nice crunch. Can I make spicy chickpea tacos gluten-free? Yes, you can! Just use corn tortillas instead of wheat ones. Many brands offer gluten-free options. Always check the label to be sure. This way, everyone can enjoy these tasty tacos. How can I adjust the recipe for a larger crowd? To serve more people, just double or triple the ingredients. Cook in batches if your skillet is small. This helps keep everything hot and tasty. You can also set up a taco bar. Let guests fill their own tortillas with your delicious chickpea mix. What can I substitute for chickpeas if I don't have any? If you run out of chickpeas, black beans or lentils work great. They have a similar texture and soak up flavors well. You can also use cooked quinoa for a different twist. Each option brings a unique taste to your tacos. For the full recipe, check the section above. In this blog post, we explored how to make tasty spicy chickpea tacos. We covered key ingredients, offered cooking tips, and shared flavor-enhancing ideas. You learned about variations like protein swaps and serving styles too. Storing and reheating your tacos was also addressed. Now, it's time to try these recipes for yourself. Enjoy tweaking and personalizing each dish to make it your own. Happy cooking!

Spicy Chickpea Tacos Quick Dinner Delight

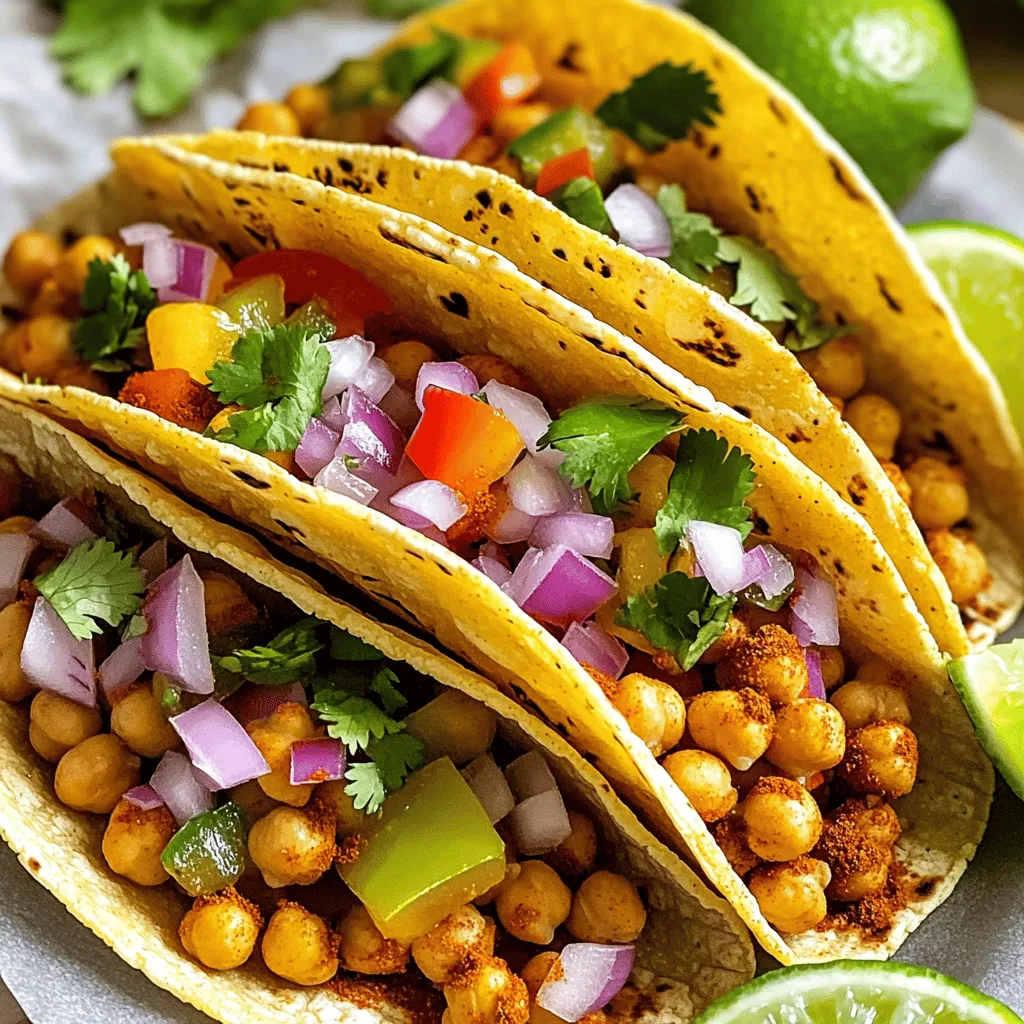
Craving a quick and tasty dinner? Let me introduce you to Spicy Chickpea Tacos! These vibrant tacos are easy to

- 500g fresh button mushrooms, cleaned and halved - 4 tablespoons unsalted butter - 4 cloves garlic, minced - 2 tablespoons fresh parsley, chopped - 1 tablespoon fresh thyme, chopped - 1 tablespoon fresh oregano, chopped - Salt and pepper to taste - Zest of 1 lemon - Juiced lemon for finishing When you gather your fresh ingredients, you set the stage for magic. Start with 500g of fresh button mushrooms. Make sure they are clean and cut in half. Their earthy taste is key to this dish. Next, grab 4 tablespoons of unsalted butter. It will add richness. You also need 4 cloves of garlic, minced finely. Garlic brings aroma and depth. Herbs give life to our dish. Use 2 tablespoons of fresh parsley, chopped well. Then, add 1 tablespoon each of fresh thyme and fresh oregano. These will make the mushrooms sing. Don’t forget salt and pepper to taste. They balance the flavors perfectly. For zesty additions, you will need the zest of 1 lemon. The zest brightens the dish. Finally, have a lemon ready for juicing. A squeeze of fresh juice at the end lifts the taste further. This rich and flavorful dish comes together with these ingredients. You can find the full recipe later. Let’s get cooking! First, I melt the butter in a large skillet over medium heat. This step helps create a rich base for the dish. Next, I add the minced garlic to the skillet. I sauté it for about one minute until it smells amazing but does not brown. This fragrant garlic gives the mushrooms a wonderful taste. Once the garlic is ready, I increase the heat to medium-high. I add the halved mushrooms to the skillet. It’s important to stir gently, coating the mushrooms in the butter and garlic. I cook the mushrooms for about five to seven minutes. I stir them occasionally until they turn golden brown and become tender. This step makes them juicy and full of flavor. Now, it's time to add the herbs and seasoning. I sprinkle in the chopped parsley, thyme, and oregano. Stirring well ensures all the herbs mix with the mushrooms. Next, I season with salt and pepper to taste. The final touch is adding lemon zest and a squeeze of fresh lemon juice. This brightens up the dish and enhances the flavors. I cook for one more minute, allowing all the tastes to blend. You can find the full recipe in the earlier section. - Sautéing tips for perfect mushrooms: Start with a hot skillet. This helps keep the mushrooms juicy. Do not overcrowd the pan. If you add too many at once, they will steam instead of brown. Cook them in batches if needed. - Adjusting heat for optimal browning: Use medium-high heat for browning. This gives a nice color and flavor. If they brown too fast, lower the heat slightly. You want them golden, not burnt. - Suggested seasonings for a personalized touch: Feel free to add spices like smoked paprika or chili flakes. They add warmth and depth. Experiment with different seasonings to find your favorite mix. - Pairing additional herbs with mushrooms: You can swap or add herbs like basil or dill. These can change the flavor profile. Use what you have on hand or what you love. - Creative serving suggestions: Serve the mushrooms in a rustic wooden bowl. This adds charm to your dish. You can also plate them on a white dish for a nice contrast. - Garnishing for visual appeal: Top with fresh herbs and lemon slices. This not only looks good but adds fresh flavor. A sprinkle of coarse sea salt can make the dish pop even more. {{image_2}} You can change up the taste of herbed garlic butter mushrooms easily. Try using different types of mushrooms. For example, shiitake, cremini, or portobello mushrooms all add unique flavors. They can make your dish rich and exciting. You can also mix in other herbs and spices. Basil, tarragon, or even a pinch of red pepper flakes can spice things up. Don’t be afraid to experiment. Each swap gives you a new flavor to enjoy. If you want a dairy-free version, swap the butter for olive oil or coconut oil. These alternatives work well and keep the dish flavorful. You can still enjoy the same taste without dairy. For gluten-free options, this recipe is already safe. Just make sure any added sauces comply with gluten-free rules. Your mushrooms will still be delicious and healthy. Herbed garlic butter mushrooms pair well with many dishes. You can serve them with grilled meats like chicken or steak. They also taste great with pasta or grains like rice and quinoa. If you want to add toppings, consider grated cheese or chopped nuts. A drizzle of balsamic glaze adds a nice touch too. These ideas make the dish even more enjoyable. To see the full recipe, check out the [Full Recipe]. To store leftovers, let the mushrooms cool first. Place them in an airtight container. This helps keep them fresh. In the fridge, they last about 3 to 5 days. Always check for any signs of spoilage before eating. You can freeze cooked mushrooms for later use. Allow them to cool completely. Then, pack them in freezer bags or containers. Remove as much air as possible. When you're ready to use them, thaw overnight in the fridge. For quick thawing, use the microwave on the defrost setting. Reheating mushrooms can be tricky. To keep the flavor, use a skillet over medium heat. Add a little butter or oil to keep them moist. Stir gently until warmed through. If you need a quick option, the microwave works too. Just heat in short bursts to avoid overcooking. Can I use frozen mushrooms for this recipe? Yes, you can use frozen mushrooms. However, fresh mushrooms taste better. Frozen mushrooms may lose some texture. If using frozen, thaw and drain them first. How do I make this recipe vegan-friendly? To make this dish vegan, replace butter with plant-based margarine. Use the same amount for great flavor. You can also add nutritional yeast for a cheesy taste. What are the best mushrooms to use for optimal flavor? I recommend using fresh button mushrooms or cremini mushrooms. These mushrooms soak up flavors well and give a nice texture. Shiitake mushrooms are another great choice for a deeper taste. How can I prevent mushrooms from getting soggy? To avoid soggy mushrooms, cook them on medium-high heat. Make sure not to overcrowd the skillet. Stir them less often to allow for browning and flavor development. What is the role of lemon juice in this dish? Lemon juice brightens the flavors in the dish. It adds a fresh taste and balances the richness of the butter. The acidity helps enhance the earthy taste of the mushrooms. How can I enhance the umami flavor in the mushrooms? To boost umami, add a dash of soy sauce or tamari. You can also use mushroom broth in place of some butter. This adds depth and richness to the dish. What dishes pair well with herbed garlic butter mushrooms? These mushrooms pair well with steak, chicken, or pasta. Serve them as a side dish or atop a grain bowl. They also make a great topping for pizza or bruschetta. For the full recipe, check out the complete guide. This blog post shared a tasty way to prepare herbed garlic butter mushrooms. You learned about fresh ingredients, cooking steps, and clever tips. Remember, you can swap ingredients or adapt for dietary needs. Enjoy experimenting with flavors and presentation. Feel free to save or share your mushrooms with others. A simple dish can bring great joy and a healthy boost to your meals. Happy cooking!

Herbed Garlic Butter Mushrooms Rich and Flavorful Dish

If you’re craving a rich and flavorful dish, look no further than herbed garlic butter mushrooms. This easy recipe uses

Making savory avocado toast with feta and tomatoes is simple and fun. Here’s what you need: - 2 ripe avocados - 4 slices of whole grain or sourdough bread - 100g feta cheese, crumbled - 1 cup cherry tomatoes, halved - 1 tablespoon olive oil - 1 tablespoon balsamic vinegar - 1 clove garlic, minced - Salt and black pepper to taste - Fresh basil leaves for garnish - Red pepper flakes (optional) Each ingredient adds its own flavor. The avocados are creamy and rich. Feta brings a salty bite. Tomatoes add freshness and sweetness. Olive oil and balsamic vinegar enhance all these tastes. Garlic gives a nice kick, while fresh basil adds a lovely aroma. If you like some heat, red pepper flakes are a great touch. Using fresh, high-quality ingredients makes a big difference. I recommend choosing ripe avocados. They should feel slightly soft when you press them. This ensures a smooth mash that will spread easily on your toast. For the bread, consider whole grain or sourdough. Both give a hearty base. Whole grain adds a nutty taste, while sourdough provides a tangy flavor. You can even use gluten-free bread if needed. Don't forget! You can find the full recipe [here](#). Enjoy crafting your own delicious avocado toast! To start, you need to toast the bread. You can use a toaster or a skillet. I like to use a skillet for an extra crispy edge. Aim for a nice golden brown color. This gives the toast a warm base for the toppings. Next, grab your ripe avocados. Cut them in half and remove the pit. Use a spoon to scoop out the green flesh into a bowl. Mash the avocado with a fork until you get the texture you like. I prefer a mix of smooth and chunky for more flavor. Now, let’s add some flavor to the mashed avocado. Stir in one clove of minced garlic. Add one tablespoon of olive oil and one tablespoon of balsamic vinegar. Don’t forget to sprinkle in some salt and black pepper. Mix everything well so the flavors blend nicely. For the tomatoes, take your halved cherry tomatoes and place them in a bowl. Season them with a pinch of salt and pepper, plus a drizzle of olive oil. Toss them gently to coat without squishing them. This keeps them fresh and vibrant. Once your bread is toasted, it’s time to assemble. Spread the avocado mixture generously on each slice. Then, layer the seasoned tomatoes on top. Finish off by sprinkling crumbled feta cheese over everything. This makes it look beautiful and tasty. You can check the [Full Recipe] for more details. Pair this savory avocado toast with a fresh juice or herbal tea. It also goes well with a light salad on the side. I love serving it for brunch or a quick lunch. You can even enjoy it as a snack any time of the day. To store leftover avocado spread, place it in a bowl. Cover it tightly with plastic wrap, pressing the wrap onto the surface to limit air. This helps keep it fresh. If you have leftover bread, store it in a paper bag. This keeps the bread from getting soggy but still fresh. To add more flavor, try adding a poached egg on top. You can also sprinkle some chopped nuts for crunch. Fresh herbs like cilantro or dill can brighten the taste. Adjust the salt and pepper to your liking for the best flavor. Use the Full Recipe for all the details on making your toast perfect! {{image_2}} You can use many types of bread for avocado toast. Whole grain bread adds a nutty taste. It also gives you more fiber. Sourdough is another great choice. It has a tangy flavor and chewy texture. If you need gluten-free bread, look for options made from rice or almond flour. These can still give you a satisfying crunch without the gluten. If you want to switch cheeses, try goat cheese or ricotta. Both can add a creamy texture. For vegetables, consider thinly sliced radishes or cucumbers. These choices will add fresh crunch and flavor. You can also mix in some arugula or spinach for extra greens. Feel free to get creative with toppings! Adding spices can elevate your avocado toast. Try a pinch of cumin or smoked paprika for warmth. Fresh herbs like dill or cilantro can brighten the dish. You can also use different oils to change the taste. Instead of olive oil, try avocado oil or chili-infused oil for a kick. These small changes can make a big difference in flavor. For the full recipe, check the full recipe section. - 10 minutes prep time - 20 minutes total time - Serves 2-4 individuals This savory avocado toast with feta and tomatoes is quick and easy to make. You start by toasting the bread until it is golden brown. The creamy avocado is mashed and mixed with garlic, olive oil, and balsamic vinegar for a rich flavor. The fresh cherry tomatoes add a juicy burst, while the crumbled feta brings a salty kick. Each bite is a mix of creamy, crunchy, and tangy. You can find the complete steps in the Full Recipe. Presentation is key. Serve this dish on a wooden board or a stylish plate. A drizzle of olive oil or balsamic reduction gives it a nice shine. Add fresh basil leaves for a pop of color. Enjoy this delightful dish at breakfast, lunch, or as a snack! Yes, you can use frozen avocados. They work well if you thaw them first. To thaw, move them to the fridge overnight. If you need them faster, place them in warm water for about 10-15 minutes. Frozen avocados may be softer than fresh, but they still taste great. You can mash them just like fresh ones. To keep your avocado fresh, use lemon or lime juice. The citric acid slows browning. You can also cover it tightly with plastic wrap. Make sure no air gets in. Storing it in an airtight container helps, too. If you leave the pit in the mashed avocado, it can help reduce browning, but it won’t stop it completely. If you don’t have balsamic vinegar, try apple cider vinegar or red wine vinegar. Both add a tangy flavor. You can also use lemon juice for a fresh twist. Each will change the taste slightly, so adjust your salt and pepper to balance the flavor. Yes, you can prep some parts ahead. Toast the bread right before serving to keep it crispy. You can mash the avocado and store it in the fridge for up to a day. Just remember to add lemon juice to keep it fresh. The tomatoes can be prepped an hour ahead. Keep them in the fridge until you are ready to assemble your toast. This blog post covered a simple and tasty recipe for avocado toast. We discussed the key ingredients and provided step-by-step instructions to make it perfect. Along with tips for serving, storing, and variations, you can create your own unique dish. Remember, avocados are versatile. With easy substitutions and additional flavors, this dish is sure to impress. Enjoy your toast as a snack or meal, and don't be afraid to get creative with toppings!

Savory Avocado Toast with Feta and Tomatoes Delight

Are you ready to elevate your breakfast or snack game? This Savory Avocado Toast with Feta and Tomatoes is a

- 1 cup rolled oats - 1/2 cup natural peanut butter - 1/3 cup honey or maple syrup - 1/2 cup mini chocolate chips - 1/4 cup ground flaxseed - 1 teaspoon vanilla extract - A pinch of sea salt - Optional: 1/4 cup shredded coconut or chopped nuts The ingredients in Peanut Butter Chocolate Chip Energy Bites are simple and wholesome. Each one adds flavor and nutrition. Rolled oats serve as the base. They provide fiber and help keep you full. Natural peanut butter gives a creamy texture and adds protein. Honey or maple syrup sweetens the bites. You can adjust the sweetness to your taste. Mini chocolate chips are a fun treat. They melt in your mouth and make these bites feel special. Ground flaxseed adds healthy fats and boosts nutrition. A pinch of sea salt enhances all the flavors. For added taste and texture, you can include shredded coconut or chopped nuts. Both options make these bites even more delightful. - Caloric content per serving: About 100 calories - Macros breakdown: - Protein: 3 grams - Fats: 5 grams - Carbs: 10 grams These energy bites not only taste great but also pack a nutritional punch. Each bite is a good source of energy. The protein helps with muscle recovery, making it a perfect snack post-workout. The healthy fats from peanut butter and flaxseed support overall health. You can enjoy Peanut Butter Chocolate Chip Energy Bites as a snack or a quick breakfast. They are filling and good for you. Look out for the full recipe to start making these tasty bites today! To make these tasty energy bites, start with the dry ingredients. In a large mixing bowl, combine: - 1 cup rolled oats - 1/4 cup ground flaxseed - A pinch of sea salt Mix these three ingredients well. This step helps ensure even flavor throughout the bites. Next, prepare the wet ingredients in a separate bowl. Whisk together: - 1/2 cup natural peanut butter - 1/3 cup honey or maple syrup - 1 teaspoon vanilla extract Make sure this mixture is smooth. This will give your energy bites a rich and sweet taste. Now it’s time to combine everything. Pour the peanut butter mixture into the oat mixture. Stir until well combined. The consistency should be thick and sticky. It's okay if it’s a bit crumbly, but it should hold together when pressed. Fold in: - 1/2 cup mini chocolate chips The chocolate chips add a delightful sweetness and texture. You can also add optional ingredients like shredded coconut or chopped nuts for more flavor and crunch. Chilling the mix is key. Cover the bowl with plastic wrap and place it in the refrigerator for about 30 minutes. This helps the mixture firm up. After chilling, scoop out the mixture using a tablespoon. Roll it into bite-sized balls with your hands. Each ball should be about the size of a golf ball. This size makes them easy to grab and enjoy. Place the energy bites on a baking sheet lined with parchment paper. They are now ready for storage or immediate snacking. Enjoy these bites packed with goodness! To get the right texture, adjust the stickiness. If your mix feels too sticky, add more oats. If it's too dry, stir in more peanut butter. This balance helps form perfect bites. For chocolate chips, ensure even distribution. Fold them gently into the mix. This way, every bite gets a taste of that sweet chocolate. Chilling the mixture is key. I recommend at least 30 minutes in the fridge. This helps the bites firm up nicely. For best storage, use an airtight container. Keep them in the fridge for up to a week. If you want them fresh longer, freeze them. They can last for months this way. Get creative with how you serve energy bites! You can stack them on a plate or use cupcake liners. They make a great snack for parties or lunch boxes. Pair these bites with milk or a smoothie. They also go well with coffee or tea. Enjoy them as a quick breakfast or an afternoon pick-me-up! {{image_2}} You can change the taste of your energy bites easily. Try using almond or cashew butter instead of peanut butter. These nut butters bring unique flavors and textures. You can also add dried fruits like raisins or cranberries. They add sweetness and chewiness. Seeds like chia or sunflower seeds make a great addition too. They boost nutrition and give a nice crunch. Want to make your energy bites vegan? Just swap honey for maple syrup. This keeps the recipe plant-based and still sweet. If you're gluten-free, check your oats. Use certified gluten-free oats to ensure safety. For extra protein, add a scoop of protein powder. This makes your bites even more filling and helps with energy. Kids love fun mix-ins! Try adding mini marshmallows or colorful sprinkles. These make the bites more exciting for little ones. If you need more sweetness, use a little extra honey or syrup. This can make them more appealing to young taste buds. Your kids will enjoy these bites while you feel good about their snacks. For the full recipe, check out the details above. Store your Peanut Butter Chocolate Chip Energy Bites in an airtight container. This keeps them fresh and tasty. You can put the container in the fridge or freezer. - In the fridge: They stay good for up to a week. - In the freezer: They last for about three months. Just remember to label your container with the date! These bites are best when fresh. They stay good for about a week in the fridge. Here are signs they may spoil: - A strange smell or taste. - A change in color or texture. - A dry or hard feel when you bite into one. If you notice any of these signs, it’s time to toss them out! If you freeze your energy bites, here’s how to bring them back to life: - Take them out of the freezer and let them sit at room temperature for about 10-15 minutes. - You can also pop them in the microwave for about 10 seconds, but avoid overheating. After refrigeration, the bites might feel a bit firmer. They will still taste great but may lose some softness. Enjoy them as a quick snack when needed! For the full recipe, check out the earlier section. Peanut Butter Chocolate Chip Energy Bites can last up to one week in the fridge. Store them in an airtight container. If you freeze them, they can last for about three months. Just remember to thaw them in the fridge before enjoying. Yes, you can use crunchy peanut butter! It will change the texture slightly. Crunchy peanut butter adds a nice bite and extra flavor. If you enjoy a bit of crunch, go for it! Smooth peanut butter will give you a creamier result. If you want to substitute honey, you have a few good options. You can use agave syrup or maple syrup. Both will add sweetness and moisture. Adjust the amount if needed, as they may vary in sweetness. In this blog post, we covered how to make delicious peanut butter chocolate chip energy bites. We outlined the ingredients, showed step-by-step instructions, and shared helpful tips. You learned about variations, storage tips, and common questions. These energy bites are easy to make and fun to customize. You can enjoy them as a snack or treat. With simple ingredients and clear steps, you can create a healthy snack in no time. Enjoy the process and get creative with your mix-ins!

Peanut Butter Chocolate Chip Energy Bites Packed with Goodness

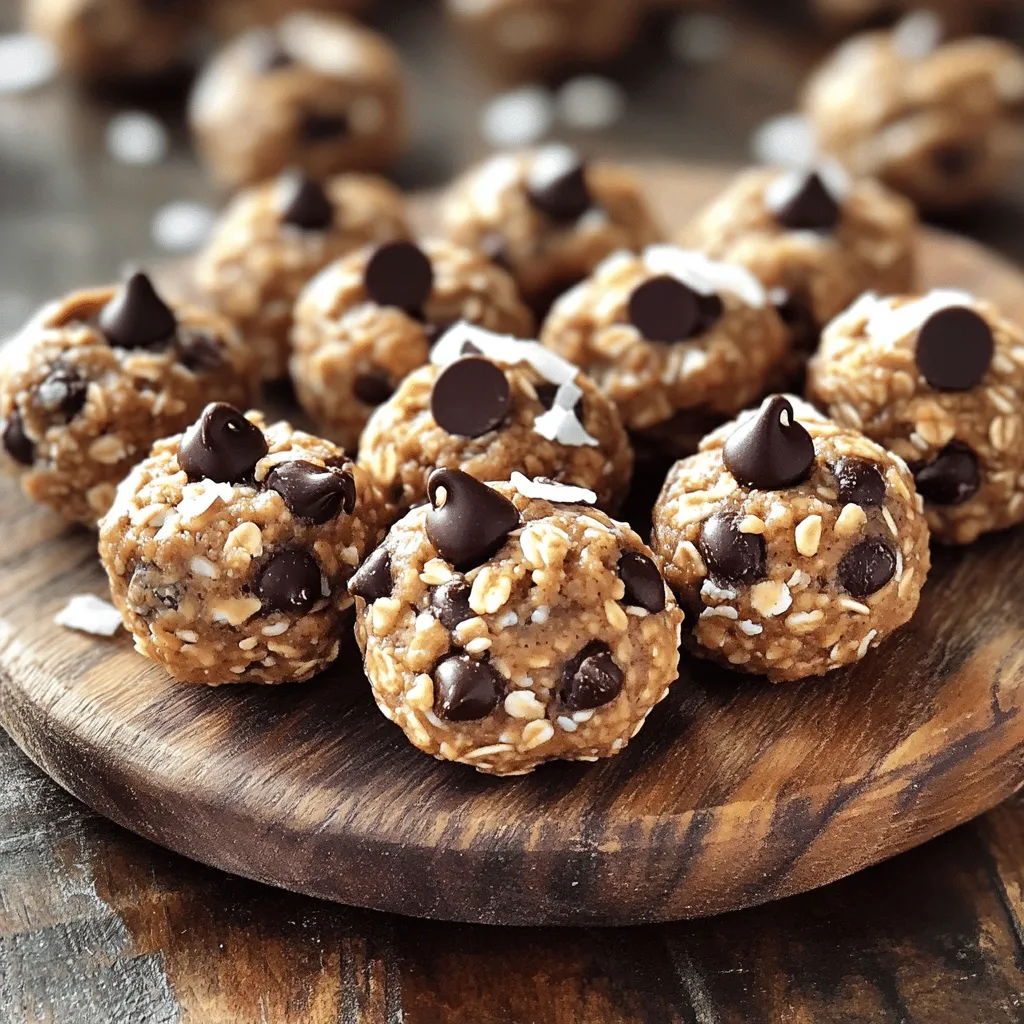
Looking for a quick and tasty snack? Try my Peanut Butter Chocolate Chip Energy Bites! These bites are not only

To make fresh mango salsa, you need these key ingredients: - 2 ripe mangoes, diced - 1 small red onion, finely chopped - 1 red bell pepper, diced - 1 jalapeño, deseeded and minced (adjust for spice level) - 1/4 cup fresh cilantro, chopped - Juice of 2 limes - 1 tablespoon honey - Salt to taste - Black pepper to taste These ingredients create a bright and vibrant salsa. The ripe mangoes give it sweetness. The red onion adds crunch, while the jalapeño offers a kick. Fresh cilantro ties it all together, and lime juice brightens the flavors. When choosing mangoes, look for these signs of ripeness: - A slight give when you press the skin - A sweet aroma near the stem - Skin color that is mostly yellow or red The best types of mangoes for salsa are the Haden and Tommy Atkins varieties. They are sweet and juicy, making them perfect for this dish. You can add more flavor to your salsa with these options: - A pinch of cumin for warmth - A dash of chili powder for extra heat - Diced avocado for creaminess - Chopped pineapple for sweetness These additional ingredients can enhance the taste or create unique flavor profiles. Feel free to experiment and make it your own! For the full recipe, check out the Mango Salsa Fiesta section. To make great mango salsa, start with the mangoes. Choose ripe mangoes that yield slightly when pressed. This means they are sweet and juicy. 1. How to dice mangoes correctly: - Cut off the sides of the mango. - Score each piece into cubes, but do not cut through the skin. - Use a spoon to scoop out the cubes. Next, prepare the onions and peppers. 2. Chopping onions and peppers: - For the red onion, cut it in half and then slice thinly. - For the red bell pepper, remove the seeds and slice into small pieces. - If you like spice, take a jalapeño, cut it in half, and remove the seeds before mincing it finely. Now it's time to mix all the fresh ingredients. 1. Mixing fresh ingredients: - In a medium bowl, add the diced mango, chopped onion, diced bell pepper, and minced jalapeño. - Remember to stir gently. You don’t want to mash the mango. 2. Proper method for tossing without mashing: - Use a large spoon to lift and turn the mixture. - This way, you keep the mango cubes intact and the salsa looks pretty. The dressing adds a zesty touch to the salsa. 1. Steps for whisking lime juice and honey: - In a small bowl, squeeze the juice of two limes. - Add a tablespoon of honey and a pinch of salt and black pepper. - Whisk this mixture until it combines smoothly. 2. Importance of seasoning balance: - Taste your dressing. It should be tangy and sweet. - Adjust with more salt or lime juice if needed. After mixing, pour the dressing over the salsa. Toss lightly, and let it sit for 15 minutes. This helps all the flavors blend. Enjoy your fresh and flavorful mango salsa! For the complete instructions, check the Full Recipe. To make mango salsa truly shine, let it rest before serving. This time allows all the flavors to blend well. Just 15 minutes is enough for a tasty salsa. You can also adjust the spice level to suit your taste. If you prefer mild salsa, leave out the jalapeño seeds. If you like heat, add more minced jalapeño or use a hotter pepper. Serving your mango salsa in a colorful bowl makes it pop. I love to pair it with tacos or grilled fish. The sweet and spicy flavors of the salsa balance perfectly with these dishes. You can also serve it with tortilla chips for a fun snack. One common mistake is over-mixing the ingredients. This can mash the mango and ruin the texture. Instead, gently stir to keep the mango pieces intact. Another mistake is not using ripe fruit. Ripe mangoes make the salsa sweet and juicy. Check for a slight give when you press the skin. Always choose ripe mangoes for the best results. For the full recipe, check the earlier section. {{image_2}} You can add more fruit to your mango salsa. Pineapple or kiwi works great. Both fruits bring a sweet and tangy flavor. They also add fun colors to your dish. You can chop them small and mix them in. You can also try different herbs. Mint or basil can give a fresh twist to the salsa. Each herb adds its own unique taste, so feel free to play around! Not everyone loves the heat from jalapeño. If you want less spice, try using bell pepper instead. You can also use a milder pepper, like poblano. For more heat, add crushed red pepper flakes or cayenne. A little goes a long way! You can experiment with spices like cumin for a smoky flavor. This adds depth and excitement to your mango salsa. Mango salsa is not just about mango. You can mix it with black beans for added protein. This combo makes it hearty and filling. Just rinse canned black beans before adding them. You can also blend in ripe avocado for creaminess. Avocado makes the salsa smooth and rich. Both options create a different and tasty twist on the classic mango salsa. To keep mango salsa fresh, use airtight containers. Glass or plastic containers work well. Make sure the lid seals tightly to keep air out. Store the salsa in the fridge right after making it. This helps maintain its bright flavors. The cooler temperature slows down spoilage. You can freeze mango salsa if you want to save some for later. First, pour the salsa into freezer-safe bags or containers. Leave some space at the top for expansion. Seal them tightly. To thaw, place the salsa in the fridge overnight. This keeps the flavor intact and helps the texture. Avoid thawing it in the microwave, as it may change the salsa's quality. Mango salsa lasts about 3 to 5 days in the fridge. Always check for signs of spoilage. If you see any mold or off smells, it’s best to throw it away. Fresh salsa should have a vibrant look and smell fruity and tangy. If it looks dull or watery, it may be time to say goodbye. For the best taste, enjoy your salsa within the first few days. You can find the full recipe in the article. To add heat, use more jalapeños. You can also try these tips: - Use a serrano pepper instead of jalapeño for a bolder kick. - Add crushed red pepper flakes to the mix for extra spice. - Incorporate hot sauce into the dressing for a zesty twist. Adjust the spice level to suit your taste. Always start with a little, then add more if needed. Yes, you can prepare mango salsa ahead of time! Here are some best practices: - Chop all ingredients and mix them together, but wait to add the dressing. - Cover it tightly with plastic wrap and store it in the fridge. - Add the dressing just before serving to keep the salsa fresh. This way, the flavors will blend well, but the veggies stay crisp. Mango salsa is very versatile. Here are some great serving suggestions: - Serve it with tacos for a fresh topping. - Top grilled fish or chicken to enhance the flavor. - Use it as a dip with tortilla chips for a fun snack. Mango salsa adds a bright touch to many dishes. Enjoy the vibrant flavors! Making fresh mango salsa is easy and fun. You learned the key ingredients, like ripe mangoes, fresh veggies, and herbs. I shared tips on picking perfect mangoes and how to prepare them. You can mix in optional spices and even try tropical fruit variations. In closing, don't hesitate to experiment. Allow your salsa to rest for better flavor. Serve it with tacos or grilled fish for a tasty twist. Proper storage keeps your salsa fresh for days. Get creative and enjoy this bright, flavorful treat!

Mango Salsa: Fresh and Flavorful Delight Recipe

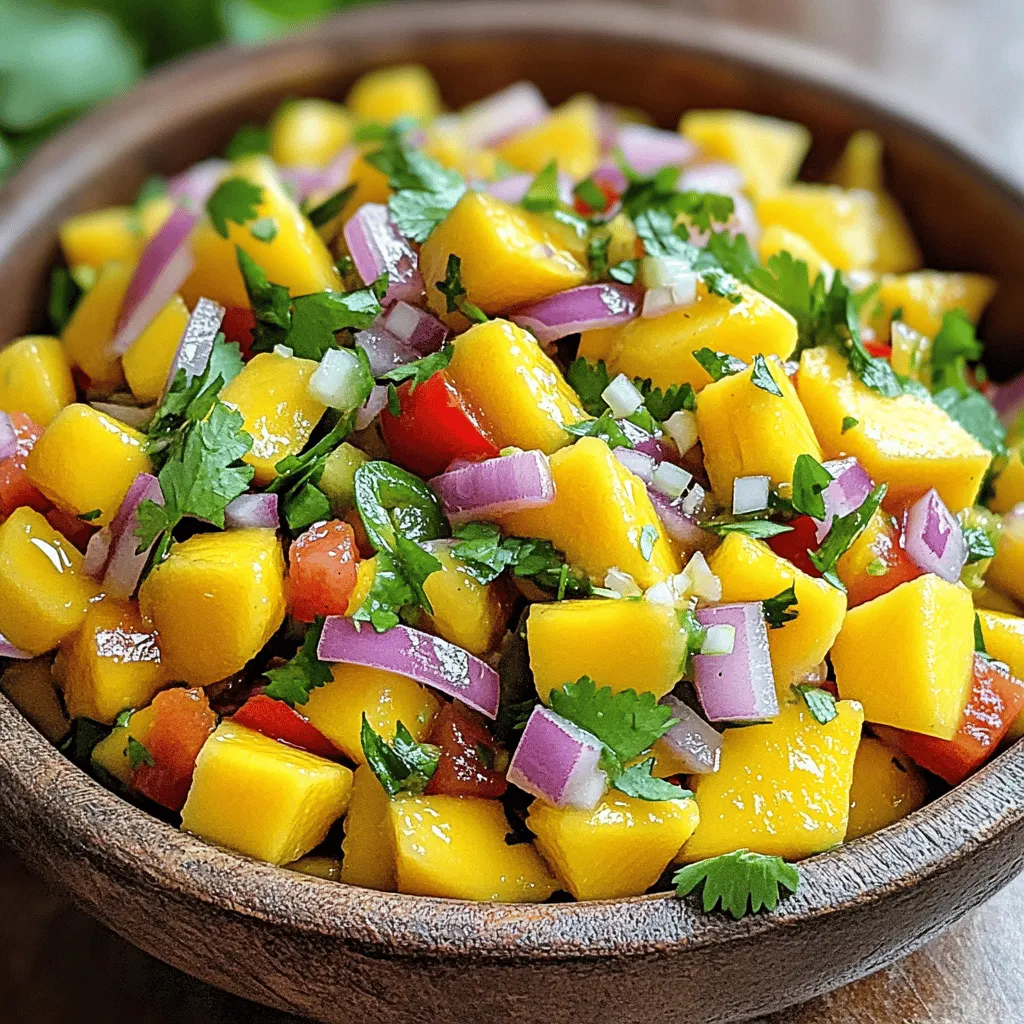
Mango salsa is a sweet and spicy treat that brightens up any meal. This easy recipe combines ripe mangoes with

- 1 pound large shrimp, peeled and deveined - 4 tablespoons unsalted butter - 4 cloves garlic, minced - 1 teaspoon paprika - 1 teaspoon lemon juice - 1 tablespoon fresh parsley, chopped - Salt and pepper to taste - Lemon wedges for serving You can swap unsalted butter for olive oil or coconut oil if you want. This change will give a different taste but still work well. If you don't have shrimp, try scallops or chicken instead. For herbs, fresh parsley adds bright flavor, but dried parsley works too. Just use less, as dried herbs are stronger. This recipe is flexible, so feel free to mix and match based on what you have! For the full recipe, check out the detailed instructions. 1. Patting shrimp dry and seasoning: Start by patting the shrimp dry with a paper towel. This helps the shrimp sear well. Next, season them lightly with salt and pepper. This simple step brings out the shrimp's natural taste. 2. Melting butter in the skillet: In a large skillet, melt the butter over medium heat. Wait until it starts to foam. The foaming shows the butter is ready. This will give your dish a rich flavor. 1. Sautéing garlic and adding shrimp: Once the butter is melted, add minced garlic to the skillet. Sauté the garlic for about one minute. Stir it often to avoid burning. When the garlic smells great, it’s time to add the seasoned shrimp. 2. Cooking times for perfectly tender shrimp: Cook the shrimp for about 2-3 minutes on each side. They should turn pink and opaque when done. This short cooking time keeps them tender and juicy. 1. Adding lemon juice and parsley: After cooking, sprinkle in paprika for color and taste. Squeeze fresh lemon juice over the shrimp and mix well. This brightens the dish. Then, remove the skillet from heat and garnish with fresh parsley. 2. Presentation tips for serving: Serve the garlic butter shrimp in a shallow dish. Sprinkle more parsley on top and add lemon wedges on the side. This not only looks nice but also adds a fresh burst of flavor. Enjoy with crusty bread to soak up that delicious garlic butter sauce. For the full recipe, please see the recipe section above. To avoid overcooking shrimp, always keep an eye on the color. Shrimp turn pink and opaque when cooked. This usually takes about 2-3 minutes per side. Don’t walk away; stay by the stove. For enhanced garlic flavor, sauté the minced garlic in butter on medium heat. Stir it often. This keeps it from burning and helps release its rich aroma. You want to cook it just until fragrant. To spice up your dish, consider adding herbs like thyme or basil. They pair well with garlic and butter. A pinch of paprika adds a nice color and a slight smokiness. If you like heat, sprinkle in chili flakes. Start small. You can always add more, but you can’t take it out! Adjust to your taste for an extra kick. For side dishes, crusty bread works great. It’s perfect for soaking up the buttery garlic sauce. You can also serve it with a fresh salad or steamed rice for balance. Wine pairs nicely with garlic butter shrimp. A crisp white wine, like Sauvignon Blanc, complements the dish well. It cuts through the richness and enhances the meal’s flavors. {{image_2}} You can easily change this dish to suit your taste. Try adding vegetables like asparagus or bell peppers. These veggies add color and crunch. Just cut them into small pieces and add them to the skillet when you cook the shrimp. They will cook quickly and soak up the garlic butter flavor. Want some heat? You can make the dish spicy with red pepper flakes. Just sprinkle some in when you add the garlic. Start with a little, then add more if you like it hot. This small change can transform your meal into a zesty delight. Looking to explore different flavors? Consider an Asian-style garlic shrimp. Add soy sauce and a bit of ginger for an umami kick. This gives the dish a savory twist that pairs well with rice or noodles. If you're in the mood for something Mediterranean, try using olives and feta. Toss these in just before serving. The briny olives and creamy feta will add a new layer of taste. This variation works great with a fresh salad on the side. For the full recipe, check out the details above. To keep your garlic butter shrimp fresh, follow these steps: - Place leftovers in an airtight container. - Let the shrimp cool to room temperature before sealing. - Store in the fridge for best results. Garlic butter shrimp lasts about 2 to 3 days in the fridge. After that, the taste may change, and the texture could suffer. You can choose between microwave and stovetop reheating. Each method has its perks. - Microwave: This is quick, but it can make shrimp tough. Heat in short bursts, about 30 seconds at a time. Stir in between to heat evenly. - Stovetop: This method is slower but keeps the flavor and texture. Heat a skillet over low heat. Add a splash of water or broth to help steam the shrimp. Stir gently until warm. To retain flavor and texture, avoid high heat. Add a bit of garlic butter when reheating for extra taste. Enjoy your meal once more! Can I use frozen shrimp for this recipe? Yes, you can use frozen shrimp. Just make sure to thaw them first. Place the shrimp in a bowl of cold water for about 15-20 minutes. After thawing, pat them dry with a paper towel before cooking. This helps the shrimp sear well and lets the garlic butter flavors shine. What can I substitute for garlic? If you don’t have garlic, try using garlic powder or garlic salt. You can also use shallots for a milder taste. Fresh herbs like chives can add a nice flavor, too. It’s fun to experiment and find what you like best! How do I know when shrimp are done cooking? Shrimp cook quickly. They turn pink and opaque when done. This usually takes about 2-3 minutes per side. Overcooked shrimp can become rubbery, so watch them closely. Remove them from heat once they look perfect! Can I prepare this dish in advance? You can prep some parts in advance. Peel and devein the shrimp ahead of time. You can also mince the garlic and chop the parsley before cooking. However, cook the shrimp just before serving for the best taste and texture. How many calories are in garlic butter shrimp? Garlic butter shrimp has about 300 calories per serving. This count can change based on how much butter you use. If you want to lower the calories, use less butter or pair it with a salad. Is this dish gluten-free? Yes, garlic butter shrimp is naturally gluten-free. It has no wheat or gluten ingredients. Enjoy it with confidence if you follow a gluten-free diet! This post covered how to make delicious garlic butter shrimp. We explored the main ingredients, substitutions, and cooking methods. I shared tips to avoid overcooked shrimp and enhance flavors. You also learned how to store and reheat leftovers. Try out the variations and serving suggestions to suit your taste. Enjoy experimenting in your kitchen, and make this dish your own! Keeping it simple lets you savor every bite.

Simple Garlic Butter Shrimp Delightful and Quick Meal

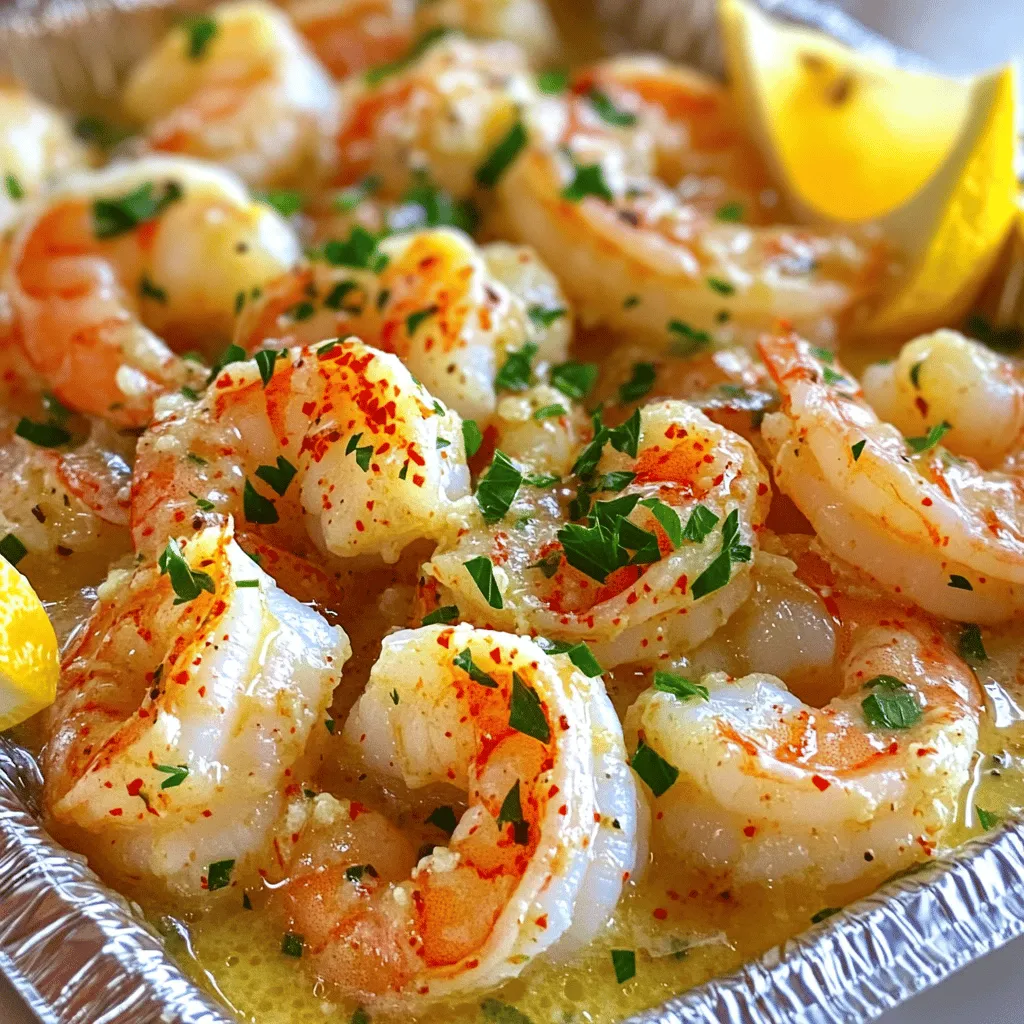
Are you craving a quick and tasty meal? Look no further than my Simple Garlic Butter Shrimp! This dish is

To make this teriyaki chicken, you'll need: - 4 boneless, skinless chicken thighs - 1/2 cup soy sauce - 1/4 cup honey - 2 tablespoons rice vinegar - 2 cloves garlic, minced - 1 inch ginger, grated - 1 tablespoon vegetable oil These main ingredients work together to create a savory and sweet flavor. The soy sauce adds depth, while honey gives it a nice glaze. Rice vinegar brings a slight tang, balancing all the flavors. If you want to switch things up, consider these optional ingredients: - Pineapple juice for a fruity twist - A splash of sesame oil for rich flavor - Red pepper flakes for heat These extras can change the dish’s taste. They allow you to play with flavors and make it your own. Garnishing adds a nice touch to your dish. Here are some great options: - 2 green onions, sliced - 1 tablespoon sesame seeds These garnishes bring color and crunch. They also enhance the dish's look and taste. For serving, place the chicken over steamed jasmine rice. This adds a comforting base to your meal. For the full recipe, check out the details above for a perfect meal. To start, gather your ingredients for the marinade. You’ll need soy sauce, honey, rice vinegar, garlic, and ginger. In a bowl, whisk them together until they blend well. This mix brings a sweet and savory taste. It’s the heart of your teriyaki chicken. I love how simple it is to make this flavorful mix at home. Next, take the chicken thighs. Place them in a resealable bag or a shallow dish. Pour the marinade over the chicken, making sure it covers every piece. Seal the bag or cover the dish tightly. Pop it into the fridge for at least 30 minutes. If you have more time, let it sit for up to 2 hours. This step is key for deep flavor. The longer it marinates, the better it tastes. Now comes the cooking! Heat vegetable oil in a large skillet over medium heat. Take the chicken out of the marinade. Save the marinade for later. Cook the chicken in the skillet for 5-7 minutes on each side. You want it golden brown and fully cooked. Once done, pour the reserved marinade into the skillet. Let it simmer for 3-5 minutes until it thickens slightly. Finally, return the chicken to the skillet, coating it with the rich teriyaki sauce. The aroma will fill your kitchen! Follow this full recipe for a delicious meal that everyone will love. To boost the flavor of your teriyaki chicken, add a few ingredients to the marinade. Try sesame oil for a nutty taste. You can also add chili flakes for a bit of heat. If you love citrus, squeeze in fresh lime juice. These additions will make the marinade more vibrant. Let your chicken soak in the marinade for at least 30 minutes. If you can wait longer, do so. The more time it has, the tastier it gets! Cooking the chicken just right is key to juicy bites. I recommend pan-searing in a skillet. Heat a bit of oil over medium heat. This method gives a nice sear on the outside while keeping the inside moist. Cook for about 5 to 7 minutes on each side. You can also grill the chicken for a smoky flavor. Just make sure to monitor the heat to avoid drying it out. The goal is golden brown on the outside and juicy on the inside. For a complete meal, serve your teriyaki chicken over steamed jasmine rice. The rice soaks up the tasty sauce. Add some sautéed veggies on the side for color and crunch. Broccoli, bell peppers, or snap peas work great. Finish with a sprinkle of green onions and sesame seeds for a lovely touch. This combination makes for a balanced plate that’s as pleasing to the eye as it is to the palate. Check out the Full Recipe for more details! {{image_2}} You can easily add vegetables to your teriyaki chicken. This not only boosts flavor but also adds color and nutrients. Think about using bell peppers, broccoli, or snap peas. Just chop them up and add them to the skillet when the chicken is almost done cooking. Stir-fry them with the chicken and sauce for a tasty, healthy meal. The veggies soak up the teriyaki flavor, making each bite a delight. If you want to switch things up, try using different proteins. Salmon or tofu can work great in teriyaki dishes. For salmon, cook it the same way as the chicken. Just make sure to watch the cooking time, as salmon cooks faster. For tofu, press it to remove water, then cube and sauté until golden. Both options bring a unique taste while keeping that classic teriyaki flair. Do you like a little heat? Turn your teriyaki chicken spicy! Simply add sriracha or chili sauce to your marinade. Start with one tablespoon and adjust to your taste. This will give your dish a nice kick without losing the sweet teriyaki flavor. You can also sprinkle red pepper flakes on top before serving for an extra pop. Enjoy the balance of sweet and spicy in every bite! For more details, check out the Full Recipe. After enjoying your teriyaki chicken, store the leftovers safely. First, let the chicken cool down to room temperature. Then, place it in an airtight container. This helps keep the chicken fresh. You can store it in the fridge for up to four days. Make sure to keep the rice separate to avoid sogginess. When it's time to eat the leftovers, reheating is key. The best way is to use a skillet. Heat it over medium-low heat. Add the chicken and a splash of water or sauce to keep it moist. Stir gently until it warms through. You can also use a microwave if you're in a hurry. Just cover the dish to trap steam and heat for 1-2 minutes. If you want to save some for later, freezing is a great option. Place the cooled chicken in a freezer-safe bag. Remove as much air as possible before sealing. It can last up to three months in the freezer. When you are ready to eat it, thaw it in the fridge overnight. Then, reheat as mentioned above. Enjoy your teriyaki chicken anytime! For the full recipe, check out the earlier sections. Teriyaki chicken is a dish made with chicken cooked in a sweet soy sauce. The sauce gives the chicken a shiny glaze and a rich flavor. It combines savory and sweet tastes that make it very popular. You can serve it with rice or veggies for a complete meal. I love how easy it is to prepare and how it pleases everyone at the table. To make teriyaki sauce from scratch, you need a few simple ingredients. Combine soy sauce, honey, and rice vinegar in a bowl. Add minced garlic and grated ginger for extra flavor. Whisk everything together until it mixes well. You can adjust the sweetness by adding more honey if you like. This homemade sauce is fresh and tasty, perfect for your teriyaki chicken. Yes, teriyaki chicken can be made in advance. You can marinate the chicken a few hours ahead or even overnight. This helps the flavors soak in deeply. After cooking, you can store the chicken in the fridge for up to three days. Just reheat it in a skillet or microwave when you are ready to eat. You can find the full recipe above for a quick guide on preparing it! In this post, we explored making teriyaki chicken, from ingredients to cooking tips. You learned about key and optional ingredients for a tasty dish and how to prepare a flavorful marinade. We also discussed cooking methods for juicy chicken and gave you serving ideas. Finally, we shared storage tips to keep your leftovers fresh. I hope you feel ready to try your hand at this easy dish. Enjoy your cooking!

Mouthwatering Teriyaki Chicken Easy and Flavorful Meal

Have you ever craved a dish that’s simple yet bursting with flavor? Look no further! In this post, we’ll dive

- 4 large bell peppers (any color) - 1 cup quinoa, rinsed - 2 cups vegetable broth - 1 can (15 oz) black beans, drained and rinsed - 1 cup corn kernels (fresh or frozen) - 1 cup diced tomatoes (canned or fresh) - 1 tsp cumin - 1 tsp smoked paprika - 1/2 tsp chili powder - Salt and pepper to taste - 1 cup shredded cheese (cheddar or Monterey Jack, optional) - Fresh cilantro or parsley for garnish You can change this dish to suit your taste. Here are some fun ideas: - Add cooked ground meat like turkey or beef for extra protein. - Include chopped onions or garlic for a savory kick. - Toss in some spinach or kale for added greens. - Swap black beans with kidney beans or lentils for a different flavor. This dish is not just tasty; it's healthy too. Here’s a quick look at what you get: - High in protein from quinoa and beans. - Packed with fiber from peppers and beans, aiding digestion. - Rich in vitamins and minerals from fresh vegetables. - A great source of antioxidants, especially from tomatoes. For a full recipe, check out the Full Recipe. This gives you a chance to enjoy a colorful and tasty meal that is good for you! First, rinse one cup of quinoa under cold water. This step removes any bitter taste. In a medium pot, combine the rinsed quinoa with two cups of vegetable broth. Bring this to a boil over high heat. Once it boils, lower the heat to a simmer and cover the pot. Cook for about 15 minutes. After 15 minutes, check if the quinoa has absorbed all the liquid. If it has, remove it from heat and fluff it with a fork. This creates a light and airy texture. Next, choose four large bell peppers in any color you like. Slice the tops off each pepper. Be careful not to cut too deep. Remove the seeds and membranes inside. This ensures the filling fits well. Stand the peppers upright in a baking dish. This makes it easy to fill them later. In a large mixing bowl, combine the cooked quinoa, black beans, corn, and diced tomatoes. Add cumin, smoked paprika, chili powder, and salt and pepper to taste. Mix all these ingredients well until they are evenly distributed. Take a spoon and fill each bell pepper with the quinoa mixture. Pack it down gently to fit more filling. If you want to add cheese, sprinkle it on top of each pepper. Now it's time to bake! Preheat the oven to 375°F (190°C). Cover the baking dish with aluminum foil. Place it in the oven and bake for 25 to 30 minutes. This helps the peppers become tender. After the time is up, remove the foil. If you used cheese, bake for another 10 minutes. This lets the cheese melt and become golden. Once they are tender and the cheese is bubbly, take them out. Let them cool for a few minutes. Garnish with fresh cilantro or parsley for a pop of color. Enjoy your savory quinoa stuffed peppers! To cook quinoa well, rinse it first. This step removes any bitter taste. Use a ratio of 1 cup quinoa to 2 cups vegetable broth for flavor. Bring the broth to a boil and add the rinsed quinoa. Reduce the heat and cover the pot. Cook for about 15 minutes or until the liquid is gone. Fluff the quinoa with a fork after cooking. This makes it light and fluffy, perfect for stuffing your peppers. Select large bell peppers for this recipe. They hold the filling well and look great. Choose any color you like: red, yellow, green, or orange. Check for firmness and avoid any with soft spots. Fresh peppers taste better and add color to your dish. Slice the tops off carefully to create a bowl for the filling. Remove all seeds and white membranes to make room for the tasty quinoa mixture. To boost the flavor of your quinoa stuffing, use spices. Cumin and smoked paprika add warmth and depth. A little chili powder gives a gentle kick. Taste your mixture before stuffing the peppers. Adjust salt and pepper as needed. For a cheesy touch, sprinkle shredded cheese on top before baking. Fresh herbs like cilantro or parsley brighten the dish and add freshness. You can find more details in the Full Recipe. {{image_2}} You can swap quinoa with other grains. Brown rice works well. It adds a nice texture. You can also use bulgur or farro for a chewy bite. If you want something lighter, try cauliflower rice. It gives a fresh taste and fewer carbs. Adding protein can make your dish heartier. Ground turkey or beef adds a savory flavor. Cook it before mixing with the quinoa. You can also use shredded chicken for a tasty twist. If you prefer plant-based options, try crumbled tofu or tempeh. They soak up flavors and are very filling. Adjust the spice level to suit your taste. For a mild dish, stick to basic spices. Avoid chili powder or add only a pinch. For a spicy kick, add jalapeños or cayenne pepper. You can also use hot sauce in the filling. Experiment with herbs like cilantro or parsley for fresh taste. These changes keep your stuffed peppers exciting. For the complete recipe, check the Full Recipe section. To store leftover stuffed peppers, let them cool to room temperature. Place them in an airtight container. You can keep them in the fridge for up to three days. Make sure to separate layers with parchment paper. This keeps them from sticking together. You can freeze stuffed peppers for later use. Wrap each pepper in plastic wrap. Then, place them in a freezer-safe bag. Label the bag with the date. They can stay frozen for up to three months. To thaw, move them to the fridge overnight. This will help them stay moist. To reheat your stuffed peppers, preheat the oven to 350°F (175°C). Place the peppers in a baking dish. Cover them with foil to keep moisture in. Heat for about 20 minutes or until they are hot. You can also microwave them. Heat on high for 2-3 minutes. This works well if you're short on time. For the best flavor, avoid reheating more than once. For the full recipe, check out Savory Quinoa Stuffed Peppers. Yes, you can make savory quinoa stuffed peppers ahead of time. Prepare the peppers and fill them with the quinoa mix. Cover them and store in the fridge for up to two days. When ready to eat, bake them as per the instructions. This makes meal prep easy and fast. Yes, quinoa stuffed peppers are gluten-free. Quinoa is a grain that does not contain gluten. This dish is safe for those with gluten intolerance. Just ensure any added ingredients, like canned beans or cheese, are also gluten-free. You can enjoy this meal without worry. Some great toppings for stuffed peppers include: - Shredded cheese (like cheddar or Monterey Jack) - Sour cream or Greek yogurt - Fresh herbs (like cilantro or parsley) - Avocado slices - Sliced jalapeños for spice These toppings add flavor and make the dish more fun. To know when the peppers are done cooking, check their tenderness. They should be soft but still hold their shape. If you poke a fork into them, it should go in easily. If you used cheese, it should be melted and slightly browned. Enjoy the lovely colors and flavors! Savory quinoa stuffed peppers are a tasty and healthy meal choice. We discussed key ingredients, preparation steps, and tips to make them perfect. You can easily customize them with various proteins and flavors. Storing leftovers is simple, ensuring you can enjoy them later. In conclusion, these peppers are fun to make and are packed with nutrients. They bring joy to your table and can fit many diets. Give them a try; they might become a favorite!

Savory Quinoa Stuffed Peppers Healthy and Simple Dish

Are you ready to enjoy a tasty and healthy meal? Savory quinoa stuffed peppers pack a punch of flavor while

To make these delicious caramel apple cheesecake bars, you need fresh and simple ingredients. Here’s what you will need: - 1 ½ cups graham cracker crumbs - ½ cup unsalted butter, melted - 1 cup cream cheese, softened - ½ cup granulated sugar - 1 teaspoon vanilla extract - 2 large eggs - 2 cups peeled and diced apples (preferably Granny Smith) - 1 teaspoon ground cinnamon - ½ cup caramel sauce (plus extra for drizzling) - A pinch of salt These ingredients blend together to create a rich, creamy filling with a crunchy crust. The diced apples add a nice texture and flavor, while the caramel sauce gives it that sweet touch. Using Granny Smith apples is key. Their tartness balances the sweetness of the cheesecake and caramel. This perfect mix makes each bite a treat. For the full recipe, check out the complete guide above. 1. Preheat your oven to 325°F (160°C). This helps the cheesecake bake evenly. 2. Line an 8x8 inch baking pan with parchment paper. Leave some paper hanging over the edges. This makes it easy to lift out the bars later. 3. In a bowl, mix 1 ½ cups of graham cracker crumbs and ½ cup of melted unsalted butter. Stir until combined. 4. Press the mixture firmly into the bottom of the pan. This forms a solid crust. Bake this for 10 minutes and then let it cool. 1. In a large bowl, beat 1 cup of softened cream cheese, ½ cup of granulated sugar, and 1 teaspoon of vanilla extract. Mix until the mixture is smooth and creamy. 2. Add 2 large eggs to the cream cheese mix, one at a time. Mix well after each egg. This helps the batter become fluffy. 3. Fold in 2 cups of peeled and diced Granny Smith apples, 1 teaspoon of ground cinnamon, and a pinch of salt. Make sure these ingredients are evenly mixed into the cheesecake batter. 1. Pour the cheesecake mixture over the cooled crust in the pan. Spread it evenly to cover the crust. 2. Drizzle ½ cup of caramel sauce over the top. Use a knife to gently swirl it into the batter. This creates a lovely marbled effect. 3. Bake in the preheated oven for 35-40 minutes. The cheesecake should be set and slightly puffed at the edges. The center can still jiggle a little. 4. Once baked, remove it from the oven. Let it cool for about 30 minutes at room temperature. Then, refrigerate it for at least 2 hours. This helps it set completely. For the full recipe, check the ingredients and instructions listed above! To get a smooth cheesecake batter, you must start with softened cream cheese. Cold cream cheese makes lumps. Mix it well with sugar and vanilla until creamy. After that, add eggs one by one. This keeps the batter smooth and fluffy. When you pour the batter into the crust, be sure to spread it evenly. For proper baking, keep an eye on the time. Bake at 325°F (160°C) for 35-40 minutes. The edges should puff slightly, and the center should jiggle a bit. This means it’s perfectly set. You can serve these bars warm or cold. Pair them with whipped cream or vanilla ice cream for a treat. A sprinkle of cinnamon on top adds a nice touch. For presentation, cut them into neat squares. Drizzle extra caramel sauce over the top for a sweet finish. You can also add chopped nuts or a few apple slices on the side for color and crunch. One common mistake is overmixing the batter. This can make the cheesecake dense. Mix just until combined, and don’t beat too hard. Another mistake is baking at the wrong temperature. Always check your oven’s setting. If it’s too hot, your cheesecake may crack. If it’s too cool, it won’t set properly. Following these tips will help you make perfect caramel apple cheesecake bars. For the complete recipe, check the Full Recipe section. {{image_2}} You can change up the flavors in your caramel apple cheesecake bars. Try using other fruits! Pears, peaches, or berries work well too. Each fruit gives a new taste. You can also mix in nuts. Chopped walnuts or pecans add a nice crunch. Want extra sweetness? Add caramel chunks to the batter. This makes every bite even more delightful. Have special diet needs? No problem! You can make a gluten-free crust. Use almond flour or gluten-free cookies instead of graham crackers. This keeps the bars tasty and safe for gluten-free diets. Want a vegan version? Substitute cream cheese with a plant-based alternative. You can also use flax eggs or applesauce in place of regular eggs. These swaps keep the flavor rich while meeting dietary needs. Check out the Full Recipe for all the details! First, let the caramel apple cheesecake bars cool down completely. This step is key. If you store them warm, they can get soggy. Once cooled, cut the bars into squares. Next, wrap them tightly. You can use plastic wrap or aluminum foil. Make sure no air can get in. This helps keep them fresh. Place the wrapped bars in an airtight container. Store them in the fridge. They stay good for about five days. If you want to save some for later, freezing works well. Wrap each bar in plastic wrap. Then, put the wrapped bars in a freezer-safe bag. This keeps them from getting freezer burn. To thaw, take them out of the freezer. Leave them in the fridge overnight. This way, they thaw slowly and stay tasty. You can also let them sit at room temperature for about an hour. Enjoy your frozen treats whenever you like! Yes, you can! While Granny Smith apples are the best choice for flavor and tartness, other varieties work well too. Here are some good options: - Honeycrisp: Sweet and crunchy - Fuji: Crisp and juicy - Gala: Sweet and soft These apples add unique tastes and textures to your bars. You can prep the cheesecake bars a day in advance. Here’s how: - Make the crust and cheesecake batter the day before. - Bake and cool them fully. - Cover the pan with plastic wrap and refrigerate. This way, they will be ready to slice and serve the next day. If you need an alternative, here are some options: - Greek yogurt: It adds creaminess. - Mascarpone cheese: It’s rich and smooth. - Silken tofu: Blend until creamy for a vegan option. Each has a unique taste, so choose what fits your needs. These bars last up to five days in the fridge. To keep them fresh: - Store them in an airtight container. - Place parchment paper between layers for easy removal. This helps maintain their taste and texture for longer. This blog post covers a delicious apple cheesecake bars recipe. You learned about key ingredients like graham cracker crumbs, cream cheese, and fresh apples. The step-by-step instructions make baking easy for anyone. You also discovered tips to avoid common mistakes and ways to personalize your cheesecake. For the best results, use fresh ingredients and don’t rush the process. Enjoy creating your own tasty treats, and remember, practice makes perfect! Happy baking!

Caramel Apple Cheesecake Bars Delightful Recipe Guide

Step into the sweet world of Caramel Apple Cheesecake Bars! This delightful recipe merges the creamy goodness of cheesecake with

Older posts
Newer posts
← Previous Page1 … Page44 Page45 Page46 … Page61 Next →

dsad

© 2025 Emmas Dish • Built with GeneratePress

Our Policies

  • Copyright Policy
  • Cookie Policy
  • GDPR Policy
  • Privacy Policy
  • Disclaimer
  • Terms Of Use

More Information

  • Home
  • About
  • Contact
  • Appetizers
  • Dessert
  • Dinner
  • Drinks
©2025, Emmas Dish About Back To Top