Skip to content
DisclaimerTerms Of UseGDPR PolicyCookie Policy

Emmas Dish

  • Home
  • Drinks
  • Appetizers
  • Dinner
  • Dessert
  • About
  • Contact
  • Privacy Policy
DisclaimerTerms Of UseGDPR PolicyCookie Policy

Emma

To make the Easy Chicken Alfredo Bake, you need a few key items. Here’s what you’ll need: - 2 cups cooked rotini pasta - 2 cups cooked chicken breast, diced - 1 cup broccoli florets, blanched - 1 cup Alfredo sauce (store-bought or homemade) - 1 cup shredded mozzarella cheese - 1/2 cup grated Parmesan cheese - 1 teaspoon garlic powder - 1 teaspoon Italian seasoning - Salt and pepper to taste - 2 tablespoons olive oil - Fresh parsley, chopped (for garnish) These ingredients create a creamy, flavorful dish. The rotini pasta holds sauce well, and the chicken adds protein. Broccoli gives a nice crunch and color. You can add some optional ingredients to make your dish even tastier: - Sun-dried tomatoes for a tangy kick - Spinach for added nutrients - Mushrooms for an earthy flavor - Red pepper flakes for heat These extras can really change the flavor profile. Feel free to mix and match to find your favorite combo. If you need to swap out some ingredients, here are a few easy ideas: - Use penne or fusilli pasta instead of rotini. - Swap cooked turkey for the chicken if you have it. - Use green beans instead of broccoli for a different veggie. - Try a dairy-free Alfredo sauce if you want a lighter option. Experimenting with ingredients can lead to fun new flavors. Don’t be afraid to get creative! For the full recipe, check out the detailed instructions above. First, turn on your oven. Set it to 350°F (175°C). This heat makes your dish warm and yummy. Next, grab a 9x13 inch baking dish. Lightly coat it with olive oil. This step helps the food not stick. In a big mixing bowl, add the cooked rotini pasta. Then, toss in the diced chicken and the blanched broccoli. Pour in the Alfredo sauce next. It's the heart of this dish! Add garlic powder, Italian seasoning, salt, and pepper. Stir well until everything is coated in sauce. Now, pour the pasta mix into your greased baking dish. Spread it out evenly. Next, sprinkle a layer of mozzarella cheese on top. Add the Parmesan cheese too. This cheese makes your bake golden and crunchy. Place it in the oven and bake for 25-30 minutes. Watch for the cheese to melt and bubble. When it looks golden, it's ready! Let it cool for a few minutes. Garnish with fresh parsley before serving. Enjoy your Easy Chicken Alfredo Bake! For the complete recipe, check the Full Recipe section. To make the creamiest Alfredo sauce, start with high-quality ingredients. Use a good brand of heavy cream or make your own. If you want to enhance the flavor, add freshly grated Parmesan cheese. Always stir slowly over low heat. This prevents the sauce from clumping. If the sauce gets too thick, you can add a bit of pasta water. This keeps it creamy and smooth. When serving, let your Easy Chicken Alfredo Bake sit for a few minutes. This helps the dish set. Use a sharp knife to cut clean slices. For storing leftovers, let the dish cool completely. Place it in an airtight container. Refrigerate for up to three days. When reheating, add a splash of milk to keep it creamy. Heat it in the oven or microwave until warm. One common mistake is overcooking the pasta. Cook it just until al dente. It will finish cooking in the oven. Another mistake is not seasoning enough. Taste the mixture before baking and adjust the salt and pepper. Finally, avoid using pre-shredded cheese. It often contains anti-caking agents, which can make your sauce gritty. Grate your cheese fresh for the best results. {{image_2}} Customizing your Easy Chicken Alfredo Bake is fun and easy. You can add many veggies to make it better. Some great choices are spinach, bell peppers, or zucchini. These veggies add color and taste. Just chop them small and mix them in with the pasta. You can also switch up the protein. If you want something different, try shrimp or turkey. You can even use tofu for a plant-based option. Just ensure that any meat is cooked before adding it to the dish. This way, it cooks evenly in the oven. Another fun twist is changing the pasta shape. While rotini is great, you can use penne, fusilli, or even macaroni. Each shape holds the sauce in a unique way. This makes every bite delightful. You can follow the Full Recipe for all the instructions and details to create your custom dish. Store your Easy Chicken Alfredo Bake in an airtight container. Let it cool first to room temperature. Then, cover it tightly. It can last in the fridge for about 3 to 4 days. If you want to keep it longer, consider freezing it. When you’re ready to enjoy your leftovers, reheat them in the oven for the best taste. Preheat your oven to 350°F (175°C). Place your dish covered with foil to keep it moist. Heat for about 20 minutes. You can also use a microwave. Place a portion on a microwave-safe plate, cover it, and heat for 1-2 minutes. Stir halfway for even warming. To freeze, use a freezer-safe container. Make sure it’s airtight. Label it with the date. You can freeze the dish for about 2 to 3 months. When ready to eat, thaw it in the fridge overnight. Then, reheat as mentioned above. This way, you keep the flavor and texture intact. Enjoy your meal later without losing quality! Yes, you can make Easy Chicken Alfredo Bake ahead of time. I often prep this dish the night before. Just mix all the ingredients as the recipe shows. Then, cover the baking dish with foil and store it in the fridge. When you're ready to bake, just pop it in the oven. It may need a few extra minutes to heat through. If you don’t have rotini, you can use other pasta shapes. Penne, fusilli, or even elbow macaroni work well. Just adjust the cooking time according to the pasta type you choose. The key is to cook the pasta until al dente before mixing it with the other ingredients. To make this recipe gluten-free, use gluten-free pasta. Many brands offer great options that taste just as good. Also, check the Alfredo sauce label to ensure it is gluten-free. You can even make your own sauce to avoid gluten. This article covered how to make an Easy Chicken Alfredo Bake. We explored the key ingredients, tips for a creamy sauce, and common mistakes to avoid. You can customize this dish with different proteins or veggies. Storing and reheating leftovers can be easy too. With these steps, you can serve a tasty meal to your family. Remember, cooking is fun! With practice, you’ll get better and impress everyone. Enjoy your cooking adventure!

Easy Chicken Alfredo Bake Simple and Tasty Recipe

Craving comfort food that’s easy to make? Look no further! This Easy Chicken Alfredo Bake is your ticket to a

- 1 cup rolled oats - ½ cup almond butter - ¼ cup honey or maple syrup - ½ cup unsweetened shredded coconut The main ingredients create a strong base for the Almond Joy Energy Balls. The rolled oats give a hearty texture. Almond butter adds creaminess and healthy fats. Honey or maple syrup sweetens the mix without guilt. The shredded coconut brings a tropical flair. - ¼ cup chopped almonds - ¼ cup dark chocolate chips - 1 teaspoon vanilla extract - Pinch of salt The additional components enhance flavor and crunch. Chopped almonds add a satisfying bite. Dark chocolate chips give a rich, sweet taste. Vanilla extract boosts the overall flavor. A pinch of salt balances the sweetness and rounds out the taste. These ingredients work together to make tasty, energy-packed snacks. You can easily adapt the amounts to suit your taste. For the full recipe, check the earlier section. First, grab a large mixing bowl. You need to combine the rolled oats, almond butter, and honey. Use a spatula or spoon to mix these until they blend well. The mixture should be sticky and thick. Next, it's time to add in the fun stuff! Incorporate the shredded coconut, chopped almonds, and chocolate chips. If you love chocolate, feel free to add a bit more. Stir everything together until it looks colorful and tasty. Now, scoop out some of the mixture. You can use your hands or a tablespoon. Roll the mixture into small balls, about one inch in size. This is the fun part! Once you have rolled all the mixture, place the balls on a baking sheet lined with parchment paper. Make sure they have space between them. Finally, refrigerate the energy balls for at least 30 minutes. This helps them firm up and makes them easy to eat. Enjoy these tasty Almond Joy Energy Balls as a quick snack or a pre-workout treat! For the full recipe, check the earlier section. When making Almond Joy Energy Balls, you might want to tweak the sweetness. You can use honey or maple syrup to suit your taste. If you like it sweeter, add a bit more. If you prefer less sweet, reduce the amount. To get the right texture, balance your oatmeal. The rolled oats hold the mix together. If the mixture feels too wet, add more oats. If it’s too dry, a splash of almond butter helps. Finding the right mix makes a big difference. Flavor is key in these energy balls. Using flavored almond butter can change the game. Try cinnamon or chocolate almond butter for a fun twist. It adds depth and excitement to each bite. You can also play with spices or extracts. A pinch of cinnamon or a drop of almond extract can boost the taste. Just remember, a little goes a long way. You want to enhance, not overpower. For more ideas, check out the Full Recipe. It gives you all the details needed for a tasty snack. Enjoy crafting your Almond Joy Energy Balls! {{image_2}} You can change the nut butter for a new taste. Cashew butter offers a creamy texture. It brings a mild flavor that works well with the other ingredients. Peanut butter is another great option. It adds a rich taste and a bit of saltiness that pairs nicely with chocolate. Try these nut butters to make your Almond Joy Energy Balls even more fun! Want to add more flavor? You can use dried fruits like raisins or cranberries. They add natural sweetness and chewiness. Seeds, like chia or flaxseed, can boost nutrition too. They add a nice crunch and healthy fats. Mix and match to find your favorite combo. The more variety, the more exciting your energy balls will be! Coconut and chocolate are the stars here. For a coconut twist, try adding coconut extract. It enhances the tropical flavor. If you love chocolate, use cocoa powder in the mix. This adds a deep, rich taste to your energy balls. You can also try dark chocolate-covered almonds for a fun crunch. Experiment with flavors to make each batch unique! For the complete recipe, check out the [Full Recipe]. To keep your Almond Joy Energy Balls fresh, store them in the fridge. Place them in an airtight container. This helps maintain their texture and flavor. They last about one week in the fridge. If you want a quick snack, just grab one when you need it. Freezing is a great option for longer storage. To freeze, first, let the energy balls cool in the fridge for about 30 minutes. Then, place them in a freezer-safe bag or container. Be sure to remove as much air as possible. This helps prevent freezer burn. You can freeze them for up to three months. When you're ready to eat, just thaw them in the fridge overnight. Enjoy your tasty treat anytime you want! Almond Joy Energy Balls stay fresh for about one week in the fridge. Store them in an airtight container. If you want them to last longer, freeze them. They can last up to three months in the freezer. Just remember to wrap them well to avoid freezer burn. Yes, you can easily substitute ingredients! If you have nut allergies, use sunflower seed butter instead of almond butter. For sweeteners, you can swap honey for agave syrup or maple syrup. You can also use gluten-free oats if you are sensitive to gluten. Almond Joy Energy Balls are a healthy snack. They are packed with fiber and protein from oats and almond butter. Each energy ball has about 100 calories. They contain healthy fats from almonds and coconut. Dark chocolate adds antioxidants, making this treat both tasty and nutritious. To make Almond Joy Energy Balls vegan, simply replace honey with maple syrup. All other ingredients are already vegan-friendly. Enjoy your delicious vegan snack without any worry! We've covered all you need to make Almond Joy Energy Balls. The key ingredients are rolled oats, almond butter, and honey. You learned the step-by-step process, from mixing to refrigerating. I shared tips for adjusting sweetness and enhancing flavor. You also discovered various nut butters and mix-ins to keep things fresh. Remember to refrigerate for short-term storage, or freeze for longer life. With these energy balls, you'll have a tasty and healthy snack ready for any time. Enjoy making them your own!

Almond Joy Energy Balls Quick and Simple Recipe

Looking for a quick snack that packs a punch? I’ve got just the treat for you—Almond Joy Energy Balls! This

To make a savory vegetable frittata, you will need: - 6 large eggs - 1 cup spinach, chopped - 1 bell pepper, diced (any color) - 1 small zucchini, diced - 1/2 cup cherry tomatoes, halved - 1/4 cup onion, finely chopped - 1/2 cup feta cheese, crumbled - 2 tablespoons olive oil - Salt and pepper, to taste - Fresh parsley, for garnish Each ingredient brings unique benefits to your frittata: - Eggs: Packed with protein and nutrients like vitamin D. - Spinach: Rich in iron, calcium, and vitamins A and C. - Bell Peppers: High in antioxidants and vitamin C. - Zucchini: Low in calories and full of fiber. - Cherry Tomatoes: Provide hydration and vitamins K and C. - Feta Cheese: Adds flavor and calcium, while being lower in fat. - Olive Oil: A healthy fat that supports heart health. - Fresh Parsley: Adds a nice touch of color and vitamins. When selecting your ingredients, keep these tips in mind: - Eggs: Look for eggs with clean, uncracked shells. Check the expiration date. - Spinach: Choose bright green leaves without wilting or yellowing. - Bell Peppers: Pick firm peppers with smooth skin. Avoid soft spots. - Zucchini: Select smaller ones for better flavor and texture. - Cherry Tomatoes: Go for plump, shiny tomatoes with a sweet smell. - Onion: Choose firm onions with dry skins. Avoid any soft areas. - Feta Cheese: Try to buy it from a deli for the best taste. - Olive Oil: Opt for extra virgin for the best flavor. - Parsley: Fresh parsley should be bright green and fragrant. These simple tips will help you find the best ingredients for your savory vegetable frittata. For the full recipe, please refer to the section above. Start by gathering your ingredients. You will need: - 6 large eggs - 1 cup spinach, chopped - 1 bell pepper, diced (any color) - 1 small zucchini, diced - 1/2 cup cherry tomatoes, halved - 1/4 cup onion, finely chopped - 1/2 cup feta cheese, crumbled - 2 tablespoons olive oil - Salt and pepper, to taste - Fresh parsley, for garnish Next, preheat your oven to 375°F (190°C). This step helps cook the frittata evenly. While the oven heats, chop your vegetables. Make sure the pieces are small. This helps them cook faster. In a large oven-safe skillet, heat the olive oil over medium heat. Add the chopped onions. Sauté them until they turn translucent, about 3-4 minutes. Next, add the diced bell pepper and zucchini. Cook these for another 3-5 minutes. You want them soft but not mushy. Now, stir in the chopped spinach. Cook until it wilts, about 1-2 minutes. In a bowl, whisk together the eggs, salt, and pepper. Pour this egg mixture over the cooked vegetables in the skillet. Spread the halved cherry tomatoes on top. Finally, sprinkle the crumbled feta cheese across everything. Cook the frittata on the stovetop for about 2-3 minutes. This helps the edges set. Then, transfer the skillet to your preheated oven. Bake for 15-20 minutes. The frittata is done when it's set in the middle and lightly golden on top. Once baked, remove the skillet from the oven. Let it cool for a few minutes before slicing. This makes serving easier. Garnish the frittata with fresh parsley for a pop of color. Now, you have a beautiful dish ready to enjoy! For the full recipe, check out the detailed instructions above. When making a vegetable frittata, avoid overcooking the eggs. This can make them dry and rubbery. Another mistake is not using enough salt. Salt brings out the flavors of the veggies and eggs. Also, be careful not to skip the preheating step. A hot skillet helps the frittata cook evenly and rise nicely. To boost flavor, try adding herbs like basil or thyme. Fresh herbs add depth to the dish. You can also use spices like paprika or garlic powder. These can really change the taste. Lastly, consider a splash of hot sauce for a kick. It adds a nice heat that pairs well with the veggies. Timing is key for a perfect frittata. Cook the veggies until just tender, but not mushy. This usually takes about 5-7 minutes. After adding the egg mixture, watch it closely on the stovetop. Let it cook until the edges start to firm up. Then bake it until it's set in the middle. This usually takes 15-20 minutes in the oven. A perfectly cooked frittata is firm but still moist. For a complete guide, check out the Full Recipe. {{image_2}} You can mix and match veggies in your frittata. Try using mushrooms, kale, or broccoli. Each vegetable brings its own flavor and texture. If you want a spicy kick, add jalapeños or red chili flakes. For a lighter touch, use asparagus or artichokes. This recipe is all about what you love. Feta cheese is great, but you can switch it out. Try cheddar, goat cheese, or mozzarella. Each cheese will change the taste. Goat cheese adds creaminess, while cheddar gives a sharp bite. For a milder flavor, use mozzarella. You can even mix cheeses for a unique twist. Pair your frittata with fresh salad or crusty bread. A side of sliced avocado adds creaminess. You can dip it in salsa or hot sauce for added flavor. Serve it warm or at room temperature. Leftovers make a great breakfast the next day. You can even enjoy it cold! You can store leftover frittata in an airtight container. Let it cool first, then cover it tightly. Place it in the fridge for up to three days. If you want to keep it longer, freezing is a great option. When you’re ready to eat the frittata, reheat it gently. You can use a microwave or an oven. For the microwave, heat for about 1-2 minutes. For the oven, preheat to 350°F (175°C) and bake for about 10 minutes. This keeps it moist and tasty. To freeze your frittata, cut it into slices. Wrap each slice in plastic wrap. Then place them in a freezer bag. You can freeze it for up to two months. When you're ready to enjoy, thaw in the fridge overnight and reheat. This way, you can savor every bite of your savory vegetable frittata later! For the full recipe, check out the original details. You can tell the frittata is done when it is set in the middle. The edges should be firm, and the top should look slightly golden. A toothpick inserted in the center should come out clean. If it wobbles too much, give it more time in the oven. Yes, you can make a frittata ahead of time. It stores well in the fridge for up to three days. Just cool it completely before wrapping it tightly. You can reheat it in the oven or microwave when you're ready to enjoy it. If you want to make a frittata without eggs, try using tofu. Silken tofu works best. You can blend it until smooth and season it with salt and spices to mimic the egg flavor. Another option is chickpea flour mixed with water, which creates a similar texture. This blog post covered the key ingredients, steps, and tips for making a frittata. We explored how to choose fresh ingredients and learn cooking techniques. Common mistakes to avoid can help you level up your dish. We also looked at variations and how to store leftovers properly. With these insights, you can create a frittata that impresses everyone. Enjoy your cooking journey, and remember to have fun experimenting!

Savory Vegetable Frittata Quick and Tasty Recipe

Looking for a simple and tasty way to enjoy veggies? This Savory Vegetable Frittata is your answer! Packed with vibrant

- 8 oz pasta (your choice: fusilli, penne, or bowtie) - 1 cup cherry tomatoes, halved - 1 cucumber, diced - 1/2 red onion, finely chopped - 1/2 cup fresh basil leaves, chopped - 1/4 cup feta cheese, crumbled (optional) - 1/4 cup olives (black or green), pitted and sliced For the main ingredients, I love to use pasta like fusilli, penne, or bowtie. Each shape holds the dressing well. Fresh vegetables make this dish bright and colorful. I always add cherry tomatoes for sweetness. Chopped cucumber gives a nice crunch. Finely chopped red onion adds a bit of zest. You can also toss in feta cheese or olives for more flavor. - 1/3 cup olive oil - 1/4 cup fresh lemon juice - 1 teaspoon lemon zest - Salt and pepper to taste The dressing is what brings this salad to life. I mix olive oil, fresh lemon juice, and lemon zest for a bright taste. The salt and pepper enhance the flavors. This dressing is simple but very flavorful. If you want to try something new, you can add feta or olives to your salad. Follow the [Full Recipe] to create this wonderful dish! First, I boil a large pot of salted water. It should be bubbling and ready. Add your choice of pasta—fusilli, penne, or bowtie. Cook it according to the package directions until it is al dente. This means it should be firm but not hard. Once done, drain the pasta and rinse it under cold water. This helps stop the cooking process and cools it down. In a small bowl, whisk together the olive oil, fresh lemon juice, and lemon zest. Add a pinch of salt and pepper to taste. Mix it well until it combines into a smooth dressing. This dressing adds a bright, fresh flavor to the salad. In a big mixing bowl, combine the cooled pasta with the halved cherry tomatoes, diced cucumber, finely chopped red onion, and sliced olives. Toss in the chopped basil leaves too. Pour the lemon dressing over the pasta salad. Gently toss everything together until all the ingredients are coated. If you like, you can add crumbled feta cheese for extra creaminess. Just fold it in carefully. For the full recipe, refer back to the section above. Enjoy your fresh and simple lemon basil pasta salad! Let the salad chill for at least 30 minutes. This helps the flavors blend well. You can really taste the difference. Using fresh lemon juice adds brightness to the dish. It elevates the taste and makes it more refreshing. You can serve the salad in a large bowl or in individual cups. This makes it fun and easy for guests. For a lovely touch, garnish with fresh basil and lemon wedges. It adds color and makes the dish look fancy. {{image_2}} You can change the pasta type to suit your taste. For a healthier option, try whole wheat pasta. It adds a nice nutty flavor and extra fiber. If you want to skip the feta cheese, you have choices! Use goat cheese for a creamy touch or leave it out for a vegan dish. The salad will still taste great without the cheese. Want to make your salad heartier? Add grilled chicken or shrimp. They bring protein and flavor to your meal. Just slice the chicken or shrimp into bite-sized pieces before mixing them in. For a crunchy twist, toss in some nuts. Pine nuts and walnuts work well. They add a delightful crunch and a nutty taste that contrasts with the fresh veggies. These variations let you get creative. You can make this salad fit your style or dietary needs. Enjoy making it your own! For the full recipe, check out the earlier section. To keep your leftover Lemon Basil Pasta Salad fresh, store it in the fridge. First, let it cool to room temperature. This helps avoid condensation in the container. Use an airtight container to keep the salad crisp. Glass containers are great, but plastic ones work too. Avoid using metal containers, as they can react with the lemon juice. In the fridge, your pasta salad can last about three to five days. Check for any signs of spoilage before eating. If it looks or smells off, toss it. Always trust your senses when it comes to food safety! Yes, you can make this salad ahead of time. I often prepare it the night before. This gives the flavors more time to mix. Here are some tips: - Cook the pasta and let it cool completely. - Mix in the vegetables and dressing. - Cover the bowl with plastic wrap. - Chill in the fridge for at least 30 minutes before serving. This way, you save time when you are ready to eat. This salad pairs well with many dishes. I love serving it with grilled chicken or fish. Here are some great options: - Grilled shrimp for a seafood touch. - A side of garlic bread for some crunch. - A fresh green salad to add more veggies. These sides make a complete meal that everyone will enjoy. Yes, you can make this salad gluten-free. Just swap regular pasta for gluten-free options. Here are some good choices: - Brown rice pasta for a nice texture. - Quinoa pasta for added protein. - Chickpea pasta for a unique flavor. These substitutes keep the taste great while making it gluten-free. For the full recipe, check the section above! In this blog post, we explored how to make a fresh and tasty Lemon Basil Pasta Salad. You learned about the key ingredients, from pasta to fresh veggies. The step-by-step guide showed how to cook, dress, and mix everything together. We also shared tips for flavor and storage, plus fun variations to try. Remember, this salad is easy to customize to fit your taste. Enjoy a bright and delicious meal any time! Make it your own and savor every bite.

Lemon Basil Pasta Salad Fresh and Simple Recipe

Looking for a bright, fresh dish that’s easy to make? You’re in the right place! My Lemon Basil Pasta Salad

- 6 cups Rice Krispies cereal - 4 cups mini marshmallows - 1/2 cup unsalted butter - 1/2 teaspoon vanilla extract - 1/2 teaspoon salt - 1/2 cup creamy peanut butter - 1/2 cup chocolate chips You can swap Rice Krispies with other puffed cereals. Options include corn puffs or brown rice cereal. If you need a dairy-free option, use coconut oil instead of butter. For marshmallows, try vegan marshmallows, which melt well too. These swaps still keep your treats tasty. Using these tips, you can customize your chewy Rice Krispies treats to fit your needs. The Full Recipe provides a great base to start from. - Greasing the baking dish: Start by greasing a 9x13 inch baking dish. Use butter or cooking spray to prevent sticking. A well-greased dish ensures your treats come out easily. - Preparing your workspace: Clear your counter and gather all ingredients. This setup helps you cook faster and keeps your space neat. - Melting the butter and marshmallows together: In a large saucepan, melt the unsalted butter over low heat. Once it melts, add the mini marshmallows. Stir gently until they are smooth and melted. This mixture is the key to your chewy texture. - Tips for avoiding burning: Always keep the heat low. Stir constantly to avoid the mixture sticking to the bottom and burning. If you notice it getting too hot, remove it from the heat. - Combining all ingredients: Remove the saucepan from heat. Stir in the vanilla extract and salt. If you want a twist, add creamy peanut butter now. Slowly add the Rice Krispies cereal, stirring until coated. - Pressing the mixture into the dish: Pour everything into the greased baking dish. Use a spatula to spread it evenly. Lightly butter the spatula or your hands to prevent sticking while pressing down. - Cooling time specifics: Let the treats cool at room temperature for about 30 minutes. Once cooled and set, cut them into squares or rectangles. Enjoy your chewy Rice Krispies treats as a delightful snack! For the complete recipe, check the Full Recipe. To get the best chewy Rice Krispies treats, focus on the right ingredient ratio. You need 6 cups of Rice Krispies and 4 cups of mini marshmallows. This balance keeps them soft. When you melt the butter and marshmallows, stir gently. This helps them melt smoothly together. If you rush, you might burn the mixture. If your treats turn out too hard, it's often because the mixture was pressed too tightly. Loosen them by warming them in the microwave for a few seconds. If they are sticky, try adding a bit more Rice Krispies. You can also coat your hands with butter to handle the sticky mixture more easily. If the mixture is too dry, you can salvage it. Warm it up again and add a splash of melted butter or a little more marshmallow. Stir it well to combine. Get creative when serving your treats! You can cut them into fun shapes using cookie cutters. This makes them great for parties. Consider stacking them on a plate or wrapping them in colorful cellophane for gifts. Pair your treats with milk, hot chocolate, or even coffee. They also go well with fruits and nuts for a snack mix. The choices are endless! {{image_2}} You can change up your Rice Krispies treats by adding different nut butters. Creamy peanut butter adds a rich taste. Almond or cashew butter can give a new twist. Swapping chocolate chips for other mix-ins also makes it fun. Try adding dried fruit, nuts, or even candies. Each new ingredient can turn a classic into something special. You can make themed treats for holidays. For instance, add colorful sprinkles for birthdays. Use colored marshmallows for Halloween or Valentine’s Day. Seasonal flavors can also enhance your treats. In fall, add pumpkin spice. In summer, use fruity flavors like strawberry or lemon. Themed treats add joy to any occasion. If you want a healthier version, use whole grain cereals. They add more fiber and taste. You could also think about reducing sugar. Try using less marshmallow or using a sugar substitute. This way, you can enjoy chewy treats while making smarter choices. To keep your Chewy Rice Krispies Treats fresh, use an airtight container. This will keep them soft and chewy. You can also wrap them tightly in plastic wrap. If you store them at room temperature, they will last for up to a week. If you prefer to put them in the fridge, be aware they may harden a bit. However, they will still taste great! If you want to freeze your treats, here’s how: First, let them cool completely. Then, cut them into squares. Wrap each square in plastic wrap. Place the wrapped treats in a freezer-safe bag. They will stay fresh for about three months when frozen. When ready to eat, just take them out and let them thaw at room temperature. If your treats become hard, don’t worry! You can revive them easily. Place them in the microwave for about ten seconds. This will soften them up. You can also add a slice of bread to the container for a few hours. The bread will help keep the treats fresh and chewy. Enjoy your treats again! To make your Rice Krispies treats chewy, adjust your ingredient ratios. Use more marshmallows and less cereal. A solid ratio is 4 cups of mini marshmallows for every 6 cups of Rice Krispies. This increases the gooey factor. Also, melt your marshmallows slowly over low heat. Stir gently to avoid burning. Mixing in creamy peanut butter adds extra chewiness and flavor. Yes, you can prepare Chewy Rice Krispies Treats ahead of time. Make them a day or two before you need them. Store them in an airtight container to keep them fresh. You can also wrap them tightly with plastic wrap. This keeps the treats soft and chewy longer. To cut your Rice Krispies treats cleanly, use a sharp knife. Lightly grease the knife or spray it with cooking spray. This helps prevent sticking. Cut them into squares or rectangles. For best results, make smooth, even cuts straight down. Avoid sawing back and forth. Chewy Rice Krispies Treats last about 3 days at room temperature. Keep them in an airtight container to maintain freshness. If you store them in the fridge, they can last up to a week. Just remember, refrigeration may make them a bit firmer. For longer storage, freeze them for up to 3 months. Just thaw at room temperature before enjoying. Making Chewy Rice Krispies Treats is fun and easy. You learned about key ingredients and how to adjust flavors. I shared tips for perfect texture and creative serving ideas. Use the storage methods to keep your treats fresh longer. Remember, you can customize these treats to suit your taste. Overall, enjoy experimenting with flavors and variations. You’ll impress family and friends with your delicious, chewy treats.

Chewy Rice Krispies Treats Simple and Tasty Recipe

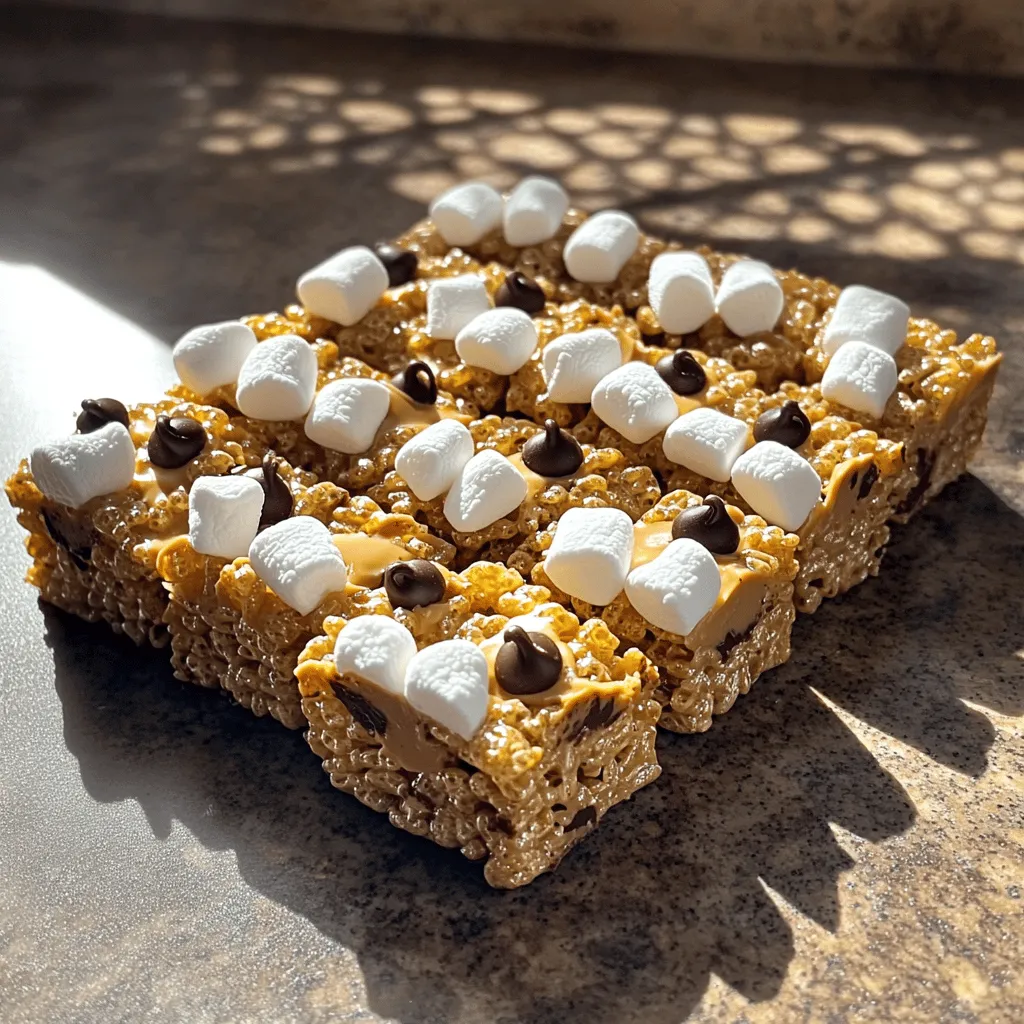
Who doesn’t crave a sweet, chewy treat? My Chewy Rice Krispies Treats recipe is simple, fun, and packed with flavor.

Here’s what you need to make these savory breakfast burritos: - 2 large russet potatoes, peeled and diced - 4 large eggs - 1/2 cup shredded cheddar cheese - 1/4 cup green onions, chopped - 1/2 teaspoon garlic powder - 1/2 teaspoon paprika - Salt and pepper to taste - 2 tablespoons olive oil - 4 large flour tortillas - 1/2 cup salsa (optional for serving) - 1 avocado, sliced (optional for serving) These ingredients create a hearty meal that fills you up. The potatoes add texture. The eggs bring fluffiness. Together, they make a great base for your burrito. You can customize this recipe if you want. Check out the Full Recipe for more tips and tricks. - Heat 2 tablespoons of olive oil in a skillet over medium heat. - Add 2 large russet potatoes, peeled and diced. - Season with salt, pepper, 1/2 teaspoon garlic powder, and 1/2 teaspoon paprika. - Cook the diced potatoes for about 10-15 minutes. Stir them often until they are golden brown and fork-tender. - In a bowl, whisk 4 large eggs with a pinch of salt and pepper. - Lower the heat and pour the eggs into the same skillet. - Cook the eggs gently for about 2-3 minutes. - Stir until the eggs are soft and fluffy. Remove from heat. - Add the cooked potatoes and 1/4 cup chopped green onions to the skillet. - Mix everything together until well combined. - Sprinkle in 1/2 cup shredded cheddar cheese and let it melt slightly. - Warm 4 large flour tortillas in a dry skillet or microwave until they are soft. - Lay out each tortilla and spoon a generous amount of the potato and egg mixture in the center. - Fold in the sides of each tortilla. - Roll it up from the bottom, tucking in the filling as you go. - Optional: Slice the burritos in half for serving. For the full recipe, refer to the earlier section. Enjoy your savory breakfast burritos! - Tips for crispy potatoes: Start with dry potatoes. After peeling and dicing, let them sit for a few minutes. This helps remove excess moisture. Use enough olive oil to coat the bottom of your skillet. Cook the potatoes over medium heat. This allows them to brown evenly. Stir them occasionally to avoid burning. - Achieving fluffy scrambled eggs: Whisk the eggs well before cooking. This incorporates air, which helps them fluff up. Use a non-stick skillet for easy cooking. Cook the eggs on low heat. Stir gently and consistently for the best texture. Remove them from heat when they are still slightly undercooked. They will continue to cook off the heat. - Alternative filling ideas: You can swap potatoes for sweet potatoes for a twist. Try adding spinach, bell peppers, or mushrooms for more veggies. For protein, consider adding cooked bacon, sausage, or beans. You can even use cheese blends for extra flavor. - Spice adjustments: Want more heat? Add jalapeños or cayenne pepper. For a smoky flavor, try chipotle powder. If you prefer milder spices, reduce or eliminate the paprika. Adjust the seasoning to fit your taste. - Make-ahead tips for breakfast burritos: You can prepare the potato and egg mixture a day before. Store it in the fridge in an airtight container. This saves time in the morning. Just warm it up before assembling the burritos. - Freezing and reheating recommendations: To freeze, wrap each burrito tightly in foil. Place them in a freezer bag. They can last up to three months. To reheat, remove the foil and microwave for 2-3 minutes. For a crispy finish, heat in a skillet for a few minutes after microwaving. For the full recipe, check out the complete guide. {{image_2}} For a tasty vegetarian option, swap out eggs and potatoes with tofu or veggies. Firm tofu works great. Just crumble it and cook it in the skillet. Add spices like cumin or turmeric for flavor. You can also use bell peppers, spinach, or mushrooms. These veggies bring color and crunch to your burrito. This option is healthy and full of flavor. If you love meat, add bacon or sausage to your burrito. Cook the bacon until crispy and chop it into pieces. For sausage, brown it in the skillet before adding the potatoes. Both options add a savory taste that will please any meat lover. You can even mix different meats for more flavor. For a spicy kick, include jalapeños or hot sauce in your burrito. Dice fresh jalapeños and stir them into the egg mixture. If you want a milder spice, try pickled jalapeños. Hot sauce can also add a zesty touch. Just drizzle it over your filling before rolling the burrito. This variation adds excitement and heat to your breakfast! To store your breakfast burritos, wrap each one tightly in plastic wrap. Place them in an airtight container or a resealable bag. Keep them in the fridge for up to three days. This method keeps the burritos fresh and ready to eat. For long-term storage, freezing is a great option. First, let the cooked burritos cool completely. Wrap each burrito in plastic wrap and then in aluminum foil. This double-layer prevents freezer burn. You can freeze them for up to three months. Label the bags with the date so you can track freshness. To reheat your burritos, you have a few tasty options. For the best results, use the oven. Preheat it to 350°F (175°C). Remove the foil and place the burrito on a baking sheet. Heat for about 15-20 minutes or until warm. Alternatively, you can use the microwave. Place the burrito on a microwave-safe plate and cover it with a damp paper towel. Heat for 1-2 minutes, checking every 30 seconds. This method is quick but may make the tortilla a bit soft. Enjoy your burrito as if it was fresh! To make the perfect breakfast burrito, focus on the filling. Start with fresh ingredients. I use two large russet potatoes and four eggs as a base. Cook the potatoes until they are golden and soft. Scramble the eggs gently for a fluffy texture. Combine both in a warm tortilla and roll it tightly. Serve it with salsa for extra flavor. Yes, you can use different types of cheese. Cheddar is my go-to, but Monterey Jack or pepper jack works well too. For a creamier option, try cream cheese or goat cheese. Experiment to find your favorite blend. Cheese adds richness and flavor to your burrito. I recommend serving breakfast burritos with salsa and avocado slices. You can also add a side of fresh fruit or a simple green salad. For a heartier meal, try serving them with hash browns or refried beans. These sides complement the burrito perfectly. Breakfast burritos last about three to four days in the fridge. Make sure to wrap them tightly in foil or plastic wrap. This keeps them fresh and prevents them from drying out. Reheat them in the microwave or on a skillet for the best taste. Absolutely! Whole wheat tortillas are a great choice. They add more fiber and nutrients. Plus, they have a nice nutty flavor. Just warm them up before filling to make them more pliable. Your burrito will still taste amazing! Yes, you can make vegan breakfast burritos. Substitute eggs with tofu or chickpea flour. Use plant-based cheese or skip it altogether. Add veggies like spinach, bell peppers, or mushrooms for extra flavor. This way, you can enjoy a tasty burrito without animal products. Customizing the filling is fun! You can add cooked meats like bacon or sausage for a heartier option. Try adding different veggies, like zucchini or corn, for more texture. Adjust the spices to your taste. You can even add beans for a protein boost. Be creative and make it yours! For the full recipe, check out the specific instructions that I outlined earlier. This blog post covered a simple, tasty breakfast burrito recipe. We shared the key ingredients like potatoes, eggs, and cheese. You learned step-by-step how to cook and assemble the burritos. We also explored tips for crispiness and fluffiness. Plus, we discussed fun variations for all tastes. Making these burritos brings a fun meal to your table. You can customize them to fit your likes or needs. Enjoy experimenting and sharing with friends or family.

Savory Breakfast Burritos with Potatoes and Eggs

Are you ready to elevate your mornings? Savory breakfast burritos with potatoes and eggs are the perfect start to your

- 2 cups raw almonds - 2 tablespoons coconut oil (melted) - 1 tablespoon maple syrup - 1 teaspoon vanilla extract - 1 teaspoon ground cinnamon - 1/2 teaspoon ground ginger - 1/4 teaspoon ground nutmeg - 1/4 teaspoon ground allspice - 1/4 teaspoon sea salt - 1 tablespoon brown sugar (optional for extra sweetness) The main star of this snack is the raw almonds. They provide a nice crunch and healthy fats. I love using coconut oil because it adds a rich flavor. Maple syrup gives a natural sweetness that pairs well with the spices. - Calories per serving: About 200 calories. - Breakdown of macronutrients: Each serving has around 7g of protein, 18g of fat, and 8g of carbs. - Health benefits of almonds: Almonds are great for your heart. They have fiber, protein, and healthy fats. They can help lower cholesterol and keep you full. This snack is not only tasty but also gives you a boost of energy. Enjoy these Pumpkin Pie Spiced Almonds as a fun treat. If you want to make this snack, check out the Full Recipe! 1. First, preheat your oven to 350°F (175°C). This step is key to getting the almonds crispy. 2. Next, line a baking sheet with parchment paper. This prevents sticking and makes cleanup easy. 3. In a large mixing bowl, combine melted coconut oil, maple syrup, and vanilla extract. Stir until well mixed. 4. Add the raw almonds to the bowl and toss them in the coconut oil mixture. Make sure they are evenly coated. 1. In a small bowl, mix together ground cinnamon, ginger, nutmeg, allspice, and sea salt. This spice blend gives the nuts their warm flavor. 2. If you want extra sweetness, add brown sugar to the spice mix. 3. Sprinkle the spice mixture over the coated almonds. Toss everything together until the almonds are fully coated with the spices. 1. Spread the spiced almonds in a single layer on the prepared baking sheet. This helps them bake evenly. 2. Bake in the oven for 10-12 minutes. Stir halfway through to ensure even roasting. The almonds should turn golden brown and smell great. 3. Once done, remove the baking sheet from the oven. Let the almonds cool completely. The coating will harden as they cool, making them crunchy. 4. Store the cooled Pumpkin Pie Spiced Almonds in an airtight container. They will stay fresh for up to two weeks. For the complete recipe, check the [Full Recipe]. To make your Pumpkin Pie Spiced Almonds unique, adjust the spice levels to your taste. If you love cinnamon, add more. If ginger is your favorite, feel free to boost it. You can also try adding a pinch of clove for an extra kick. For sweeteners, maple syrup works well, but honey and agave are great too. If you want more sweetness, include brown sugar in the spice mix. Just remember to taste as you go! Present your almonds in a fun way. Use a colorful bowl or a glass jar. Tie a ribbon around the jar for a nice touch. You can also sprinkle some extra spices on top for a fancy look. Pair these almonds with drinks like apple cider or spiced tea. They also make a great snack with cheese or crackers. The flavors blend well together! Keep your spiced almonds fresh by storing them in an airtight container. This will keep them crunchy. If you want them to last longer, put the container in the fridge. To extend shelf life, avoid moisture. Make sure your container is dry before adding the almonds. This way, you can enjoy your tasty snack for up to two weeks! {{image_2}} You can switch up the spice blend for fun. Try adding chai spices for a warm twist. Cocoa powder can give a rich chocolate flavor. These changes keep your snack exciting. You can also use different nuts. Walnuts or pecans work great if you want a change. Each nut brings its own taste and texture. Adjust the sweetness to fit your taste. Instead of maple syrup, use honey or agave syrup. Both give a sweet touch that pairs well with spices. If you want less sweetness, skip the brown sugar. This makes a savory snack that is just as tasty. Think about seasonal flavors for a festive treat. In fall, add a hint of clove or cardamom. For winter, try a splash of peppermint extract. You can also mix in dried fruits like cranberries or raisins. This adds texture and bursts of flavor. Use your creativity to make each batch special! For the full recipe, check out the earlier section. You can find Pumpkin Pie Spiced Almonds online. Websites like Amazon and Thrive Market often carry them. Check out local grocery delivery services too. Prices can vary, so compare a few sites. Buying in bulk may save you money if you love these almonds. If you prefer shopping in person, visit health food stores or specialty shops. Whole Foods and Trader Joe's are great options. They often stock unique snacks like spiced almonds. Local farmers’ markets might also have fresh, homemade versions. Don’t forget to ask about samples! Making your own Pumpkin Pie Spiced Almonds has many benefits. You control the ingredients and can adjust the spices. The cost may be lower if you buy raw almonds in bulk. Store-bought options may have added preservatives, which you can avoid by making them at home. For my full recipe, check the earlier section. This way, you can enjoy a fresh, tasty snack with just a bit of effort! To make Pumpkin Pie Spiced Almonds, start by preheating your oven to 350°F (175°C). Line a baking sheet with parchment paper. In a bowl, mix melted coconut oil, maple syrup, and vanilla extract. Toss the raw almonds in this mixture until they are well coated. Next, combine ground cinnamon, ginger, nutmeg, allspice, and sea salt in a separate bowl. If you like it sweeter, add brown sugar. Sprinkle this spice mix over the almonds and toss to coat them. Spread the almonds on the baking sheet and bake for 10 to 12 minutes, stirring halfway through. When they turn golden brown, cool them completely. The coating will harden as they cool. You can find the Full Recipe at the end of this article. Almonds offer many health benefits. They are rich in healthy fats, protein, and fiber. These nutrients help keep you full and satisfied. Almonds also contain vitamin E, which is good for your skin and eyes. They help support heart health by lowering bad cholesterol levels. Eating almonds can also improve blood sugar control. This makes them a great snack for everyone, including those with diabetes. Spiced almonds can last up to two weeks when stored properly. Keep them in an airtight container to maintain freshness. Store the container in a cool, dry place. If you want them to last longer, you can freeze them. Just make sure to use a freezer-safe container. They can stay fresh for about three months in the freezer. Yes, you can easily customize the spice blend! If you love a little more heat, add cayenne pepper. For a sweeter twist, try adding cocoa powder or pumpkin spice. You can also mix different nuts for a unique flavor. Adjust the spices to match your taste. Don't be afraid to experiment and find your perfect blend! This blog post covers delicious Pumpkin Pie Spiced Almonds. We discussed key ingredients, from raw almonds to warm spices. You learned how to prepare, spice, and bake them perfectly. I shared tips for adjusting flavors and serving ideas. Making your own spiced almonds can be fun and rewarding. It's a healthy snack to enjoy anytime. With easy steps and variations, you can impress friends and family. So grab your ingredients and get started. Enjoy your tasty creation!

Pumpkin Pie Spiced Almonds Irresistible Flavor Snack

Are you craving a snack that’s both tasty and healthy? Pumpkin Pie Spiced Almonds offer a delicious twist on traditional

To make a tasty chickpea and potato curry, gather these ingredients: - 1 can (15 oz) chickpeas, drained and rinsed - 2 large potatoes, diced - 1 medium onion, finely chopped - 2 cloves garlic, minced - 1-inch piece of ginger, grated - 1 can (14 oz) coconut milk - 2 tablespoons curry powder - 1 teaspoon turmeric powder - 1 teaspoon cumin seeds - 1 teaspoon garam masala - 2 tablespoons vegetable oil - Salt to taste - Fresh cilantro, chopped (for garnish) - Optional: 1 cup spinach You can often find these pantry staples in your kitchen. They make cooking easy: - Curry powder adds warmth and depth. - Turmeric gives a lovely color and health benefits. - Cumin seeds bring a nutty flavor. - Garam masala is a blend of spices that enhances the dish. - Coconut milk adds creaminess and sweetness. These ingredients help create a rich and comforting curry. Choosing the right produce makes a big difference in taste. Here’s how: - Potatoes: Pick firm potatoes without sprouts or soft spots. - Onions: Look for dry, firm onions with shiny skin. - Garlic: Choose bulbs that are plump and free from green shoots. - Ginger: Select smooth, firm ginger roots without wrinkles. - Spinach: If using, choose fresh spinach with vibrant green leaves. Fresh ingredients lead to a more delicious curry. For the full recipe, check out the detailed instructions above. First, gather your ingredients. You will need chickpeas, potatoes, onions, garlic, ginger, coconut milk, and spices. Start by heating the vegetable oil in a large pot over medium heat. Once the oil is hot, add the cumin seeds. They should sizzle right away. This step adds a nice flavor to your curry. Next, add the chopped onion, minced garlic, and grated ginger to the pot. Sauté these ingredients until the onions become soft and clear. This usually takes about 3 to 5 minutes. The smell will fill your kitchen! After that, stir in the curry powder, turmeric, and garam masala. Cook them for one more minute. This helps to release the flavors of the spices. Now, it’s time to add the diced potatoes. Stir them well to coat with the spice mix. Cook the potatoes for about 5 minutes. They should start to soften. Next, pour in the drained chickpeas and the coconut milk. Mix everything well. Bring the whole mix to a boil. Then, reduce the heat to low and cover the pot. Let it simmer for 15 to 20 minutes or until the potatoes are tender. If you want to use spinach, add it in the last 5 minutes of cooking. Stir gently until the spinach wilts. Finally, taste the curry and add salt as needed. Remove it from heat and let it sit for a couple of minutes before serving. Sautéing is key in this recipe. It builds flavor right at the start. You want to cook the onions, garlic, and ginger until soft. This step makes the base for your curry rich and tasty. Simmering is another important technique. By cooking the chickpeas and potatoes slowly, you let the flavors mix well. It also makes the potatoes soft and creamy. One common mistake is not letting the spices cook long enough. Always cook your spices until they smell fragrant. This step is crucial for a full flavor. Another mistake is rushing the cooking time. Make sure to simmer until the potatoes are tender. If they are still hard, your curry won’t be as good. Lastly, be careful not to skip the salt. It enhances all the flavors in your curry. Taste before serving, and adjust as needed to make it delicious. For the full recipe, check out the ingredients list above. Enjoy your cooking! To make your chickpea and potato curry shine, focus on fresh ingredients. Use fresh ginger and garlic for the best taste. Toast your spices in oil before adding other ingredients. This step releases their full flavor. Consider adding a squeeze of lemon juice at the end. It brightens the dish and adds a refreshing zing. To save time, prep your ingredients ahead of cooking. Chop the onion, garlic, and ginger earlier in the day. You can also dice the potatoes and store them in water to prevent browning. Using canned chickpeas speeds up cooking. If you have leftover curry, it tastes even better the next day! A large pot works best for this dish. A wooden spoon helps stir without scratching the pot. Use a sharp knife for easy chopping. A cutting board is essential for safety. If you have a blender, you can smooth out leftovers for a creamy soup. These tools make cooking more enjoyable and efficient. For the full recipe, check out the Chickpea & Potato Curry Delight. {{image_2}} Chickpea and potato curry is already a great choice for vegetarians and vegans. The recipe uses plant-based ingredients. If you want to keep it vegan, just skip any dairy sides. Serve it with rice or naan for a full meal. You can also add more veggies. Try carrots, peas, or bell peppers for extra color and flavor. Do you like heat? You can adjust the spice level easily. For a mild curry, use less curry powder. If you want more heat, add chili powder or fresh chilies. You can also use green chilies for a bright flavor. Taste as you go. You can always add more spice but can’t take it out. This dish is super flexible. If you don’t have chickpeas, try lentils or black beans. They both work well. If you want a creamier texture, use cashew cream instead of coconut milk. For a different taste, swap the potatoes for sweet potatoes. Each change gives a unique twist to the dish. Check the full recipe for more ideas. Storing leftover chickpea and potato curry is easy. First, let it cool down to room temperature. Then, transfer it into an airtight container. Make sure to seal it well to keep the flavors fresh. You can store it in the fridge for up to three days. If you want to keep it longer, consider freezing it. To freeze your chickpea and potato curry, use a freezer-safe container. Leave some space at the top, as the curry will expand when frozen. Label the container with the date, so you know when to use it. It can last up to three months in the freezer. When you're ready to eat, just thaw it in the fridge overnight. Reheating chickpea and potato curry is simple. You can microwave it in a bowl for quick warmth. Stir every minute to heat it evenly. If you prefer the stove, pour the curry into a pot over low heat. Stir it often to avoid sticking. Add a splash of water or coconut milk if it seems too thick. Enjoy your meal as if it was just made! You can serve chickpea and potato curry with many sides. Here are some great options: - Steamed basmati rice - Warm naan bread - Quinoa for a healthier twist - Fresh salad with cucumbers and tomatoes - Raita, a yogurt-based side dish These sides balance the curry's rich flavors and add texture to your meal. Yes, you can make chickpea and potato curry ahead of time. It tastes even better the next day! Here’s how: - Cook the curry as per the full recipe. - Let it cool completely. - Store it in an airtight container in the fridge for up to three days. When you're ready to eat, just reheat it on the stove or in the microwave. To make more servings of chickpea and potato curry, you can simply double or triple the ingredients. Here’s what to consider: - Use two cans of chickpeas instead of one. - Add more potatoes as needed. - Adjust spices to taste; you may need to increase spices slightly to keep the flavor strong. This way, you can easily feed a larger group without losing the dish's great taste! In this article, we covered the key ingredients for chickpea and potato curry, including how to select fresh produce. We explored a step-by-step guide to prepare your dish, shared cooking techniques, and warned against common mistakes. You learned useful tips for enhancing flavor, saving time, and using essential tools. We also discussed variations to suit dietary needs and how to store leftovers properly. Chickpea and potato curry is tasty and easy to make. Enjoy experimenting with your own twists on this classic dish!

Chickpea and Potato Curry Simple and Flavorful Dish

Looking for a warm, hearty dish that’s both simple and full of flavor? Chickpea and Potato Curry might be your

To make Cheese Tteokbokki, gather these ingredients: - 400g Korean rice cakes (tteok) - 150g fish cakes, sliced - 1 cup water - 2 tablespoons gochujang (Korean chili paste) - 1 tablespoon gochugaru (Korean chili flakes) - 2 tablespoons soy sauce - 1 tablespoon sugar - 1 teaspoon minced garlic - 1/2 teaspoon sesame oil - 200g shredded mozzarella cheese - 2 green onions, chopped (for garnish) These ingredients make a delightful and cheesy dish that warms the soul. You may need some specialty items for this recipe. The most important is gochujang. This chili paste adds spice and depth to the sauce. Gochugaru is another key ingredient; it gives a smoky flavor. Korean rice cakes are essential for texture. They can be found in Asian markets or online. You can buy most ingredients at local Asian grocery stores. Look for the rice cakes, gochujang, and gochugaru there. Big supermarkets may have some, but not all. If you want convenience, try online shops. Many sites sell Korean ingredients. They deliver right to your door, making it easy to enjoy Cheese Tteokbokki. For the freshest fish cakes, visit a local seafood market. Check the Full Recipe for step-by-step instructions on making this comforting dish! To start, take your Korean rice cakes, known as tteok. If you have store-bought ones, soak them in hot water for about 15-20 minutes. This step softens the rice cakes, making them chewy and delicious. After soaking, drain the rice cakes and set them aside. They are now ready to absorb all the tasty flavors you will add. Next, let’s make the sauce that brings everything together. In a large pan, mix one cup of water with two tablespoons of gochujang, one tablespoon of gochugaru, two tablespoons of soy sauce, one tablespoon of sugar, one teaspoon of minced garlic, and half a teaspoon of sesame oil. Stir well to combine these ingredients. This sauce has a great mix of spicy and sweet flavors that make tteokbokki so special. Once the sauce is ready, place the pan over medium heat. Bring the sauce to a gentle simmer. Now, it’s time to add the soaked rice cakes and sliced fish cakes. Stir them in well to coat them with the sauce. Let this mixture simmer on medium-low heat for about 10-15 minutes. Stir occasionally. You want the sauce to thicken and the rice cakes to become nice and tender. Now for the best part: cheese! When the tteokbokki is cooked and the sauce is thick, lower the heat. Sprinkle 200g of shredded mozzarella cheese evenly over the top. Cover the pan with a lid and let the cheese melt for about 2-3 minutes. When you lift the lid, stir the melted cheese into the tteokbokki. This step makes it creamy and even more comforting. Finish by garnishing with chopped green onions for a fresh touch. Enjoy your delightful and cheesy comfort dish! To get the best texture in your tteokbokki, use fresh rice cakes. They should be chewy and soft. Soak them in hot water for 15-20 minutes before cooking. This step helps them absorb the sauce better. When you simmer, stir gently. This prevents sticking and keeps them intact. For a richer taste, add more gochujang. This gives a nice heat and depth. You can also mix in some fish sauce for umami. Adding a little sugar balances the spice and enhances the flavors. Fresh garlic adds a great aroma. Don’t skip the sesame oil; it brings a nutty warmth to the dish. One mistake is overcooking the rice cakes. They should be tender but not mushy. Another is not stirring enough. This can lead to uneven cooking. Be careful with the cheese; add it when the sauce is thick. It melts better that way. Lastly, don’t forget to garnish with green onions. They add freshness and color to your dish. {{image_2}} You can change the flavor of Cheese Tteokbokki by swapping ingredients. For a sweeter taste, use ketchup instead of sugar. If you want a tangy kick, try adding some cream cheese. You can also replace fish cakes with cooked chicken or beef. This swap adds a savory touch. Want a fresh twist? Add chopped kimchi for a spicy, fermented flavor. Adding proteins or veggies makes this dish more filling and healthy. You can toss in shrimp or tofu for added protein. Both options absorb the tasty sauce well. For veggies, consider adding bell peppers, carrots, or even broccoli. They not only add color but also crunch. You can stir them in while the rice cakes cook. These additions make each bite more exciting. If you love spice, increase the gochujang or gochugaru. Start with one extra teaspoon and taste as you go. For milder flavors, cut back on these chili ingredients. You can also add a splash of coconut milk to tone down the heat. This way, you can enjoy the creamy cheese without too much spice. Make it your own! After you enjoy your cheese tteokbokki, store leftovers in an airtight container. This keeps the dish fresh. Let it cool down to room temperature first. Avoid putting hot food directly in the fridge. Place the container in the fridge within two hours. Cheese tteokbokki is best eaten within two days, but it can last up to three days. To reheat cheese tteokbokki, you can use the stove or microwave. If using the stove, place the leftovers in a pan with a splash of water. Heat it on low until warm, stirring often. This keeps the rice cakes tender. For the microwave, use a microwave-safe bowl. Heat in short bursts of 30 seconds. Stir in between to ensure even warming. Add a bit of cheese on top to bring back that gooey texture. You can freeze cheese tteokbokki, but be careful. The texture may change after thawing. To freeze, let it cool completely. Then, portion it into freezer-safe bags or containers. Squeeze out air to prevent freezer burn. It can last up to one month in the freezer. When ready to eat, thaw in the fridge overnight. Reheat using the methods above for the best taste. Cheese tteokbokki is a tasty twist on a classic Korean dish. It features chewy rice cakes in a spicy sauce, topped with gooey cheese. The dish combines flavors from gochujang, soy sauce, and garlic, making it rich and comforting. It's perfect for a snack or meal! Yes, you can make cheese tteokbokki vegetarian! Skip the fish cakes and replace them with vegetables like mushrooms or bell peppers. You can also add tofu for extra protein. The sauce remains the same, keeping that spicy and savory kick. Cheese tteokbokki is slightly less spicy than traditional tteokbokki. The cheese helps tone down the heat from the gochujang. You can adjust the spice level by adding less gochujang or more cheese to suit your taste. For a detailed guide on how to make cheese tteokbokki, check out the [Full Recipe]. It includes all the ingredients and steps to help you create this delightful dish. Cheese tteokbokki brings joy with its creamy texture and bold flavors. You learned about the essential ingredients and where to find them. I shared step-by-step instructions to help you cook this dish perfectly. You also discovered tips to avoid common errors and variations to suit your taste. With the right care, leftovers can taste just as good. Explore your creativity with mixes and swaps. Dive in, enjoy, and share your tteokbokki with others!

Cheese Tteokbokki Delightful and Cheesy Comfort Dish

If you’re craving a dish that is both cheesy and comforting, Cheese Tteokbokki is your answer! This popular Korean street

To make Garlic Parmesan Baked Shrimp, you need the following: - 1 lb large shrimp, peeled and deveined - 3 tablespoons olive oil - 4 cloves garlic, minced - 1 teaspoon paprika - 1/2 teaspoon red pepper flakes (optional) - 1/2 cup grated Parmesan cheese - 1/4 cup breadcrumbs (panko recommended for extra crunch) - 2 tablespoons fresh parsley, chopped - Juice of 1 lemon - Salt and pepper to taste This list gives you a great start. Each ingredient plays a key role in the dish's flavor. Fresh shrimp often tastes sweeter and has a firmer texture. It also cooks more evenly. However, frozen shrimp can be just as good. They are often frozen quickly, which locks in flavor. If you choose frozen, try to buy shrimp that has been flash-frozen. Check the label to see if they were frozen right after catch. This helps maintain freshness. You can swap some ingredients for variety: - Use lemon zest instead of lemon juice for a stronger lemon flavor. - Try other cheeses like feta or mozzarella if you want a twist on the classic. - Instead of breadcrumbs, crush some crackers for a different crunch. - For a zesty kick, add lime juice instead of lemon juice. These swaps allow you to customize the dish to your taste. Feel free to experiment! First, gather all your ingredients to make this dish. This helps keep things neat. Here’s what you need: - 1 lb large shrimp, peeled and deveined - 3 tablespoons olive oil - 4 cloves garlic, minced - 1 teaspoon paprika - 1/2 teaspoon red pepper flakes (optional) - 1/2 cup grated Parmesan cheese - 1/4 cup breadcrumbs (panko recommended for extra crunch) - 2 tablespoons fresh parsley, chopped - Juice of 1 lemon - Salt and pepper to taste Make sure your shrimp are thawed if you use frozen ones. This step is key to even cooking. Next, it's time to marinate your shrimp. In a large bowl, mix the olive oil, minced garlic, paprika, salt, and pepper. If you like some heat, add red pepper flakes. Mix until everything is well combined. Now, add the shrimp. Toss them well in the marinade. This step allows the shrimp to soak up all the great flavors. Let them sit for about 15 to 20 minutes. This wait makes a big difference! Now we’re ready to bake! Preheat your oven to 400°F (200°C). While it heats, prepare a baking dish by lightly greasing it with oil. In another bowl, combine the grated Parmesan cheese, breadcrumbs, and chopped parsley. This mixture will top the shrimp. Place the marinated shrimp in a single layer in the baking dish. Squeeze the lemon juice over them for extra zest. Now, sprinkle your cheese and breadcrumb mix on top of the shrimp. Bake in the oven for 12 to 15 minutes. You’ll know they’re done when the shrimp turn pink and opaque, and the topping is golden brown and crispy. Once baked, take them out and let them rest for a few minutes. For a pretty touch, garnish with fresh parsley and lemon wedges. For the full recipe, check the section above. Enjoy your Garlic Parmesan Baked Shrimp! To make your Garlic Parmesan Baked Shrimp tasty, focus on fresh ingredients. Use large shrimp for the best texture. When you marinate the shrimp, let them soak for at least 15-20 minutes. This step helps the flavors meld. Don't rush this part; good flavor takes time. Use a mix of olive oil, garlic, and spices for the marinade. The garlic adds a nice depth while the paprika brings in warmth. For that perfect crunch, use panko breadcrumbs. They are lighter and crispier than regular breadcrumbs. Mix them with grated Parmesan cheese for a great topping. When you spread the mixture over the shrimp, make sure to cover them well. This ensures every bite has a satisfying crunch. Bake the shrimp at 400°F (200°C) to get that golden-brown look. Keep an eye on them; you want the topping crispy but not burnt. One common mistake is overcooking the shrimp. They cook quickly, so check them at 12 minutes. Shrimp should be pink and opaque when done. Another mistake is not using enough seasoning. Don’t skip the salt and pepper in the marinade. It brings out the flavors. Lastly, avoid overcrowding the baking dish. Give shrimp space to cook evenly. Cooking them in a single layer ensures they bake just right. For more detailed steps, check out the Full Recipe. {{image_2}} You can make this dish even better by adding vegetables. Vegetables boost flavor and healthy nutrients. Try adding bell peppers, zucchini, or cherry tomatoes. Chop them into bite-sized pieces. Toss them with the shrimp in the marinade. They will roast nicely in the oven. You can also add spinach right before serving for extra color and taste. While Parmesan is great, you can try other cheeses too. Mozzarella melts well, giving a gooey texture. Feta adds a salty kick and a different flavor. Cheddar can bring a sharp taste that pairs well with shrimp. Feel free to mix and match cheeses for a unique topping. Just remember to keep your cheese choices fresh and high quality for the best taste. If you like heat, add more spice to your shrimp. Increase red pepper flakes in the marinade to make it hotter. You can also add sliced jalapeños for extra kick. Another option is to mix in a bit of hot sauce with the marinade. Just a dash can change the whole dish! Experiment with spiciness to find the right balance for your taste buds. For the full recipe, check the original section above. To keep your Garlic Parmesan Baked Shrimp fresh, store it in the fridge. Use an airtight container. Make sure to cool the shrimp down first. Leftovers can stay good for up to three days. If you want to keep them longer, freezing is a great option. When you are ready to eat the leftovers, reheat them gently. Preheat your oven to 350°F (175°C). Place the shrimp on a baking sheet. Cover them with foil to keep them moist. Heat for about 10 minutes. You can also use the microwave, but be careful. Heat in short bursts to avoid overcooking. If you want to freeze the shrimp, do it right after cooking. Allow them to cool, then place them in a freezer-safe bag. Be sure to remove as much air as possible. The shrimp can last up to three months in the freezer. When you are ready to eat, thaw them overnight in the fridge before reheating. For the best flavor, consider following the Full Recipe again after thawing. You should bake shrimp for 12 to 15 minutes at 400°F (200°C). The shrimp will turn pink and opaque. The topping should be golden and crispy. Keep an eye on them to avoid overcooking. Overcooked shrimp can become tough and rubbery. Yes, you can use this recipe for other seafood like scallops or fish. Just adjust the baking time based on the type of seafood. For example, scallops may need only 10 to 12 minutes. Fish fillets might require a bit longer. Always check for doneness by looking for a firm texture and opaque color. Garlic Parmesan Baked Shrimp pairs well with many sides. I recommend serving it with a fresh salad or steamed vegetables. Rice or pasta can also complement the dish nicely. You can add a squeeze of lemon for a bright touch. Feel free to explore your favorites! For the full recipe, check out the complete directions. In this blog post, we explored the delicious world of Garlic Parmesan Baked Shrimp. You learned about the key ingredients and the debate between fresh and frozen shrimp. I shared step-by-step instructions for preparing, marinating, and baking the shrimp to perfection. We also covered tips for great flavor and crunchy texture, and I offered variations to suit your taste. Finally, I discussed how to store and reheat leftovers. Enjoy trying this recipe and making it your own!

Garlic Parmesan Baked Shrimp Flavorful and Easy Dish

Craving a dish that’s both easy to make and packed with flavor? Garlic Parmesan Baked Shrimp hits the spot! This

Older posts
Newer posts
← Previous Page1 … Page45 Page46 Page47 … Page60 Next →

dsad

© 2025 Emmas Dish • Built with GeneratePress

Our Policies

  • Copyright Policy
  • Cookie Policy
  • GDPR Policy
  • Privacy Policy
  • Disclaimer
  • Terms Of Use

More Information

  • Home
  • About
  • Contact
  • Appetizers
  • Dessert
  • Dinner
  • Drinks
©2025, Emmas Dish About Back To Top