Skip to content
DisclaimerTerms Of UseGDPR PolicyCookie Policy

Emmas Dish

  • Home
  • Drinks
  • Appetizers
  • Dinner
  • Dessert
  • About
  • Contact
  • Privacy Policy
DisclaimerTerms Of UseGDPR PolicyCookie Policy

Emma

To make McGriddle Muffins, you need the right base. Here are the must-have dry ingredients: - 1 cup all-purpose flour - 1/2 cup cornmeal - 2 tablespoons sugar - 1 tablespoon baking powder - 1/2 teaspoon salt These ingredients make the muffins light and fluffy. The cornmeal adds a nice texture. Next, we add the wet ingredients to bring it all together. You need: - 1 cup milk - 1 large egg - 1/4 cup melted butter - 4 tablespoons maple syrup These wet ingredients help create a moist muffin. Maple syrup gives a sweet touch that pairs beautifully with savory flavors. Now for the fun part! Let’s boost the flavor with some tasty additions: - 1/2 cup cooked sausage, crumbled - 1/2 cup shredded cheddar cheese - 4 slices cooked bacon (optional) The sausage and cheese make each bite rich and savory. If you love bacon, add it on top for extra crunch and flavor. You can find the Full Recipe above for detailed steps. First, set your oven to 375°F (or 190°C). This temperature helps the muffins rise well. Next, grease the muffin tin with butter or cooking spray. You can also line it with muffin liners for easy clean-up. In a large bowl, combine the following dry ingredients: - 1 cup all-purpose flour - 1/2 cup cornmeal - 2 tablespoons sugar - 1 tablespoon baking powder - 1/2 teaspoon salt Whisk these together until they are mixed well. Make sure there are no clumps. This step is key for a smooth batter. In a separate bowl, mix these wet ingredients well: - 1 cup milk - 1 large egg - 1/4 cup melted butter Stir until everything is fully blended. This will add moisture to your muffins. Slowly pour this mixture into the dry ingredients. Now, gently stir the wet and dry mixes together. Be careful not to overmix. Fold in: - 1/2 cup cooked sausage, crumbled - 1/2 cup shredded cheddar cheese - 4 tablespoons maple syrup Divide this batter evenly into the muffin tins, filling each cup about two-thirds full. For an extra treat, you can add a slice of cooked bacon on top of each muffin. Bake for 15 to 18 minutes. Check for doneness by inserting a toothpick. If it comes out clean, your muffins are ready. Let them cool for a few minutes before serving warm with extra maple syrup. For the full recipe, check the detailed instructions above. To make your McGriddle muffins fluffy, avoid overmixing. When you mix the wet and dry ingredients, stir gently. This keeps the muffins light and airy. If you like bacon, add a slice on top. It gives a nice crunch and salty flavor. For a fun presentation, stack the muffins on a large plate. Add a small bowl of maple syrup for dipping. You can also garnish with fresh fruit like strawberries or blueberries. For drinks, serve with coffee or orange juice. Both pair well with the sweet and savory taste of the muffins. To adjust the sweetness, add more or less sugar. If you want a different flavor, try vanilla extract or cinnamon. If you have dietary restrictions, use gluten-free flour instead of all-purpose. You can swap milk for almond milk or any dairy-free option. These easy changes will keep your muffins tasty and fun. {{image_2}} You can spice up your McGriddle muffins with fun flavors. For sweet options, try adding blueberries or chocolate chips. These fruits and treats give a nice burst of flavor. They also add a lovely color to your muffins. For savory additions, mix in chopped peppers or onions. These veggies bring a tasty crunch. They complement the sausage and cheese well. Experimenting with flavors makes each batch unique. If you need gluten-free muffins, use gluten-free flour. Almond flour or coconut flour are great choices. They can make your muffins soft and tasty. For those who want dairy-free options, swap milk with almond or oat milk. You can also use dairy-free butter. These swaps keep the muffins rich and moist without dairy. If you want smaller snacks, try making mini muffins. Use a mini muffin tin for bite-sized treats. It’s a fun way to enjoy these muffins at any time. You can adjust the muffin tin size to fit your needs. Just remember that bake time may change. Check them often to avoid burning. To keep your McGriddle muffins fresh, store them in an airtight container. You can refrigerate them for up to five days. If you want to keep them longer, freeze the muffins. Wrap each muffin in plastic wrap, then place them in a freezer bag. This method keeps them moist and tasty. When you want to enjoy your muffins again, reheating is key. For the best results, microwave each muffin for about 15-20 seconds. This keeps them soft and warm. If you prefer the oven, preheat it to 350°F (175°C). Heat the muffins for about 10 minutes. This method helps them stay moist and delicious. McGriddle muffins are best when fresh, but they can last. In the fridge, they stay good for five days. In the freezer, they can last for up to three months. Always check for any signs of spoilage, like mold or off smells. Enjoy your homemade treats at their best! Yes, you can prepare these muffins ahead of time. For best results, mix the dry and wet ingredients separately. Store the dry mix in one bowl and the wet mix in another, both covered. When you are ready to bake, just combine them. You can also bake them a day ahead. Store baked muffins in an airtight container. They stay fresh for about two days at room temperature. To check if your muffins are done, look for a golden brown color on top. Insert a toothpick into the center of one muffin. If it comes out clean, they are ready. If it has batter on it, give them a few more minutes. You can also gently press the top. It should spring back if they are done. You can find most ingredients at your local supermarket. Look for all-purpose flour, cornmeal, and sugar in the baking aisle. Milk, eggs, and butter are in the dairy section. For sausage and cheese, check the meat and dairy areas. If you prefer online shopping, try websites like Amazon or grocery delivery services. They often have all these ingredients. Each muffin has about 200 calories. They contain 8 grams of fat, 25 grams of carbs, and 6 grams of protein. The cheese and sausage add flavor and protein. If you want lower calories, you can use less cheese or sausage. You can also swap out some butter for applesauce to make them lighter. Check the full recipe for more details on nutrition. You now know how to make McGriddle Muffins from scratch. We covered the essential ingredients, mixing methods, tips for success, and ways to customize your muffins. Remember, the key is to avoid overmixing and to have fun experimenting with flavors. Enjoy serving them warm with your favorite sides. These muffins are versatile, so feel free to get creative. Whether for breakfast or a snack, they will surely please. Keep this guide handy for the next time you're ready to bake!

McGriddle Muffins Fluffy and Flavorful Breakfast Treat

Love a tasty breakfast? McGriddle Muffins are your answer! These fluffy treats are packed with flavor and easy to make.

- 1 pound chicken breast, cut into bite-sized pieces - 1 cup buttermilk - 1 cup all-purpose flour - 1 teaspoon garlic powder - 1 teaspoon onion powder - 1 teaspoon paprika - 1/2 teaspoon cayenne pepper (adjust to taste) - Salt and pepper to taste - Vegetable oil for frying When I make Crispy Bang Bang Chicken, the chicken breast is my star. I cut it into small, bite-sized pieces to help it cook evenly. The buttermilk adds moisture and flavor. The all-purpose flour creates a crispy coating. The spices—garlic powder, onion powder, paprika, and cayenne—give the chicken its zing. - 1 teaspoon sriracha (for extra heat) - Sesame seeds and green onions (for garnish) If you like heat, add sriracha to the mix. It gives a nice kick. For a pop of color, I like to garnish with sesame seeds and sliced green onions. These additions make the dish look even more appealing. - 1/2 cup mayonnaise - 1/4 cup sweet chili sauce - 1 tablespoon honey The sauce is where the magic happens! I mix mayonnaise, sweet chili sauce, and honey together. This combination gives the chicken a creamy, sweet, and slightly spicy flavor. You can adjust the sauce to your liking. If you want more heat, add that sriracha again. For the full recipe, check the link provided. This dish truly packs a flavor punch! To make your chicken juicy and full of flavor, marinate it well. Start by mixing the chicken pieces with buttermilk in a bowl. The buttermilk tenderizes the meat and adds taste. Cover the bowl and place it in the fridge. I recommend marinating for at least 30 minutes. Longer is better, but 1-2 hours is great if you have the time. Next, we’ll mix the dry ingredients for the breading. In a separate bowl, combine the flour, garlic powder, onion powder, paprika, cayenne pepper, salt, and pepper. This mix gives the chicken a nice kick and a crispy texture. Good texture is key, so make sure all ingredients are well blended. You want every piece of chicken to get that flavorful coating. Frying is where the magic happens. Heat about 1 inch of vegetable oil in a deep skillet to 350°F (175°C). The oil needs to be hot to get that crispy crust. Avoid overcrowding the pan. Fry the chicken in batches, so they cook evenly. Each batch takes about 5-7 minutes. When they turn golden brown, they are ready. Use a slotted spoon to transfer the chicken to a paper towel-lined plate. This helps soak up extra oil. For the full recipe, check out the detailed instructions above! To get that perfect crunch, you need to pay attention to the frying. Here are some tips: - Use a heavy pot to retain heat better. - Keep the oil at 350°F (175°C) for crispiness. - Fry in small batches to avoid steaming. For frying oil, I recommend using vegetable oil. It has a high smoke point and is great for frying. Canola and peanut oil also work well. Want to spice things up? Here are some suggestions: - Add a bit of garlic powder for extra zest. - Try onion powder for depth. - Paprika gives a nice color and flavor. If you like it hot, adjust the cayenne pepper. Add more for heat or less for a milder kick. You control the spice! How you serve your Crispy Bang Bang Chicken can make it even better. Here are some ideas: - Serve it on a bed of rice or noodles for a hearty meal. - Try it with a side of fresh veggies for a nice crunch. - Pair it with a cold drink, like iced tea or lemonade. For a fun twist, serve the Bang Bang sauce on the side for dipping. It makes for a tasty experience. For the full recipe, check out the details above! {{image_2}} You can use shrimp or tofu instead of chicken. Both options taste great and add variety. - Shrimp: Use large shrimp, and cook them for about 3-5 minutes until they turn pink. - Tofu: Firm tofu works best. Cut it into cubes and fry for about 4-6 minutes until golden. Both options will soak up the flavors of the sauce well, making them just as tasty as chicken. The sauce is key to the dish’s flavor. You can switch it up for fun. - Spicy Mango Sauce: Mix mango puree with hot sauce for a fruity kick. - Peanut Sauce: Blend peanut butter with soy sauce and lime juice for a nutty twist. - Creamy Avocado Sauce: Mash ripe avocados with lime and garlic for a fresh touch. Feel free to combine sauces too! Try mixing the sweet chili sauce with the spicy mango sauce for a unique taste. You can easily make Crispy Bang Bang Chicken fit different diets. - Gluten-Free: Use gluten-free flour for the breading. Ensure the sauces are gluten-free as well. - Vegan: Substitute chicken with tofu or tempeh. Use vegan mayo for the sauce. These changes keep the dish delicious while meeting dietary needs. You can find the full recipe for Crispy Bang Bang Chicken to start your cooking adventure! To keep leftover crispy bang bang chicken fresh, store it in an airtight container. This helps lock in moisture and flavor. Place the chicken in the fridge within two hours of cooking. For best taste, eat it within three days. For the homemade bang bang sauce, store it separately. Use a clean jar or container to keep it fresh. The sauce stays good in the fridge for up to one week. Always make sure to label your containers with the date. For reheating chicken, the oven works best. Preheat your oven to 350°F (175°C). Place the chicken on a baking sheet and cover it loosely with foil. Heat for about 15 to 20 minutes. This method helps keep the chicken crispy. You can also use an air fryer. Set it to 375°F (190°C) and heat the chicken for about 5 to 7 minutes. Check it often to avoid overcooking. Yes, you can freeze crispy bang bang chicken. First, let it cool completely. Then, place the chicken in a freezer-safe bag. Remove as much air as possible to prevent freezer burn. The chicken can last up to three months in the freezer. To thaw, move the chicken to the fridge overnight. For quick thawing, you can use the microwave. After thawing, reheat using the oven or air fryer to keep it crispy. Enjoy your delicious leftovers! Marinate the chicken for at least 30 minutes. This time allows the buttermilk to tenderize the meat and add flavor. For an even richer taste, try marinating for up to 2 hours. Don’t go too long, as the chicken can become mushy. Crispy Bang Bang Chicken pairs well with several sides. You can serve it with: - Steamed rice - Crispy coleslaw - Sweet potato fries - Garlic broccoli - A fresh garden salad These sides balance the rich flavors of the chicken and make a full meal. To make this dish lighter, you can swap a few ingredients. Try these tips: - Use skinless chicken breast for less fat. - Replace mayonnaise with Greek yogurt for a creamy texture. - Air fry the chicken instead of deep frying to cut calories. These changes keep the taste while lowering calories. To keep your chicken crispy, follow these tips: - Make sure the oil is hot enough before frying. Aim for 350°F (175°C). - Fry in small batches to avoid steaming. - After frying, place the chicken on a wire rack instead of a towel. This helps air circulate and keeps it crispy. These steps help you serve the best crispy chicken. For the full recipe, check out the earlier sections! This blog post provided a complete guide for making Crispy Bang Bang Chicken. We explored essential ingredients, marination, and frying techniques. I shared tips for achieving that perfect crispiness and suggested various sauces and sides. In closing, enjoy experimenting with different flavors and variations. Cooking is about finding what you love. Have fun with this recipe, and savor each bite of your delicious creation!

Crispy Bang Bang Chicken Irresistible Flavor Delight

Are you ready to unlock a world of flavor with Crispy Bang Bang Chicken? This easy-to-follow recipe will make your

In this veggie-loaded tortellini soup, you will find a mix of fresh and pantry items. Each ingredient adds taste and nutrition. The balance of flavors is key. This soup is hearty and filling. You can enjoy it on a chilly day or any time you crave comfort food. Here are the fresh items you will need: - 1 medium onion, diced - 2 cloves garlic, minced - 2 medium carrots, diced - 2 celery stalks, diced - 1 red bell pepper, chopped - 1 zucchini, chopped - 1 cup fresh spinach, chopped Using fresh produce makes the soup vibrant. Each veggie brings its unique taste and texture. Carrots add sweetness, while spinach adds a healthy touch. The bell pepper gives it a nice crunch. You will also need some pantry staples and seasonings: - 1 tablespoon olive oil - 1 can (14.5 oz) diced tomatoes, undrained - 4 cups vegetable broth - 1 teaspoon dried oregano - 1 teaspoon dried basil - 1/2 teaspoon salt - 1/4 teaspoon black pepper - 1 package (9 oz) fresh cheese tortellini - 1 cup frozen peas - Grated Parmesan cheese (for serving) - Fresh basil leaves (for garnish) These ingredients bring warmth and depth to the soup. The olive oil gives a rich base. The tomatoes and broth make it hearty. The seasonings tie everything together. You can find the full recipe to see how these ingredients create magic in your bowl. Sautéing the Base Start by heating the olive oil in a large pot over medium heat. Once hot, add the diced onion. Sauté it for about 3 to 4 minutes until it softens and turns translucent. This step builds the flavor base for your soup. Next, stir in the minced garlic. Cook it for about a minute until it smells great. Adding Vegetables Now, add the diced carrots and celery to the pot. Sauté these for 5 to 6 minutes. Stir them occasionally until they begin to soften. Next, toss in the chopped red bell pepper, zucchini, and spinach. Cook this mix for another 3 to 4 minutes. You want the spinach to wilt down, adding more color and nutrients to your soup. Simmering the Soup After the vegetables look good, pour in the diced tomatoes, with their juice, and the vegetable broth. Then, stir in the dried oregano, basil, salt, and black pepper. Bring this mixture to a gentle simmer. It should bubble lightly, and the flavors will start to blend beautifully. Final Touches Once it’s simmering, add the fresh tortellini and frozen peas. Cook these for about 3 to 5 minutes, or as the tortellini package says. They will float to the top when they’re done. Taste your soup and adjust the seasoning if needed. Finally, serve the soup hot, garnished with grated Parmesan cheese and fresh basil leaves. For the full recipe, check out the details above. Adjusting Seasoning When you taste your soup, the flavors should pop. If it seems bland, add more salt or herbs. A squeeze of lemon juice can brighten it up too. Taste as you go. This step helps you find the balance that suits your taste. Cooking Time Tips Keep an eye on the cooking time. Overcooking the tortellini makes them mushy. Follow the package instructions carefully. When they float, they are ready. The soup can sit on low heat after cooking, keeping it warm without overcooking. Adding Heat Want some kick? Add crushed red pepper flakes or a splash of hot sauce. Start small, then add more to taste. This can transform your soup with just a little spice. Boosting Nutrition Looking to make your soup even healthier? Toss in extra greens like kale or Swiss chard. You can also add beans for fiber and protein. These ingredients not only enhance nutrition but also add texture and flavor to your meal. For the complete Veggie-Loaded Tortellini Soup recipe, check the Full Recipe. {{image_2}} You can change the veggies in this soup to fit your taste. Carrots, celery, and spinach are great, but you can also use others. Try adding kale for a hearty touch or bell peppers for sweetness. Broccoli and cauliflower add nice crunch. If you love mushrooms, throw in some sliced ones for earthiness. The beauty of this soup is its flexibility. Use what you have on hand, and it will still taste amazing. If you want to add protein, beans are a great choice. Canned chickpeas or black beans work well. Just rinse and stir them in during cooking. If you prefer chicken, use cooked, shredded chicken. It adds flavor and makes the soup more filling. You can add the chicken at the same time as the tortellini. This way, it heats through, and you enjoy every bite. When serving this soup, you can pair it with bread for a complete meal. A crusty baguette or garlic bread is perfect for dipping. If you want something lighter, a slice of whole-grain bread works well. You can also try a simple side salad to balance the dish. Toppings can make your soup even better. Besides grated Parmesan, try adding fresh herbs like parsley or cilantro. A sprinkle of red pepper flakes can add a kick. If you like creaminess, a dollop of sour cream or yogurt can enhance the flavors. These small touches can elevate your soup and impress your guests. For the detailed recipe, check the Full Recipe. Store your veggie-loaded tortellini soup in an airtight container. Let it cool to room temperature first. This helps keep the flavors fresh. In the fridge, it lasts for up to four days. Make sure to label the container with the date. When you're ready to enjoy the soup again, pour it into a pot. Heat it over medium heat. Stir occasionally until it's hot. You can also use a microwave. Heat for one to two minutes, stirring halfway. Add a splash of broth or water to keep it moist. You can freeze this soup for later! Use freezer-safe containers or bags. Leave some space at the top for expansion. It will keep well for about three months. To thaw, place it in the fridge overnight. Reheat it on the stove or in the microwave. Enjoy the same great taste even after freezing! For the full recipe, check out the complete guide. Veggie-Loaded Tortellini Soup can last in the fridge for about three to four days. Store it in an airtight container to keep it fresh. If you notice any changes in smell or color, it's best to throw it away. Yes, you can make this soup ahead of time. It tastes even better the next day. Just let it cool after cooking, then store it in the fridge. When you’re ready to eat, heat it on the stove or in the microwave. If you don’t have tortellini, try other pasta types, like shells or bowties. You can also use gnocchi or even rice. These options work well and will still make a tasty soup. For a gluten-free choice, use gluten-free pasta. For the full recipe and more details, check out the Full Recipe section. This blog post covered how to create a Veggie-Loaded Tortellini Soup. We explored the ingredients, from fresh produce to pantry staples. Then, I shared simple steps for preparation and cooking. You learned helpful tips for flavor and variety. Finally, I discussed proper storage and answered common questions. Now you have the tools to make this soup your own. Enjoy crafting delicious meals that nourish your body and mind.

Veggie-Loaded Tortellini Soup Flavorful and Nourishing

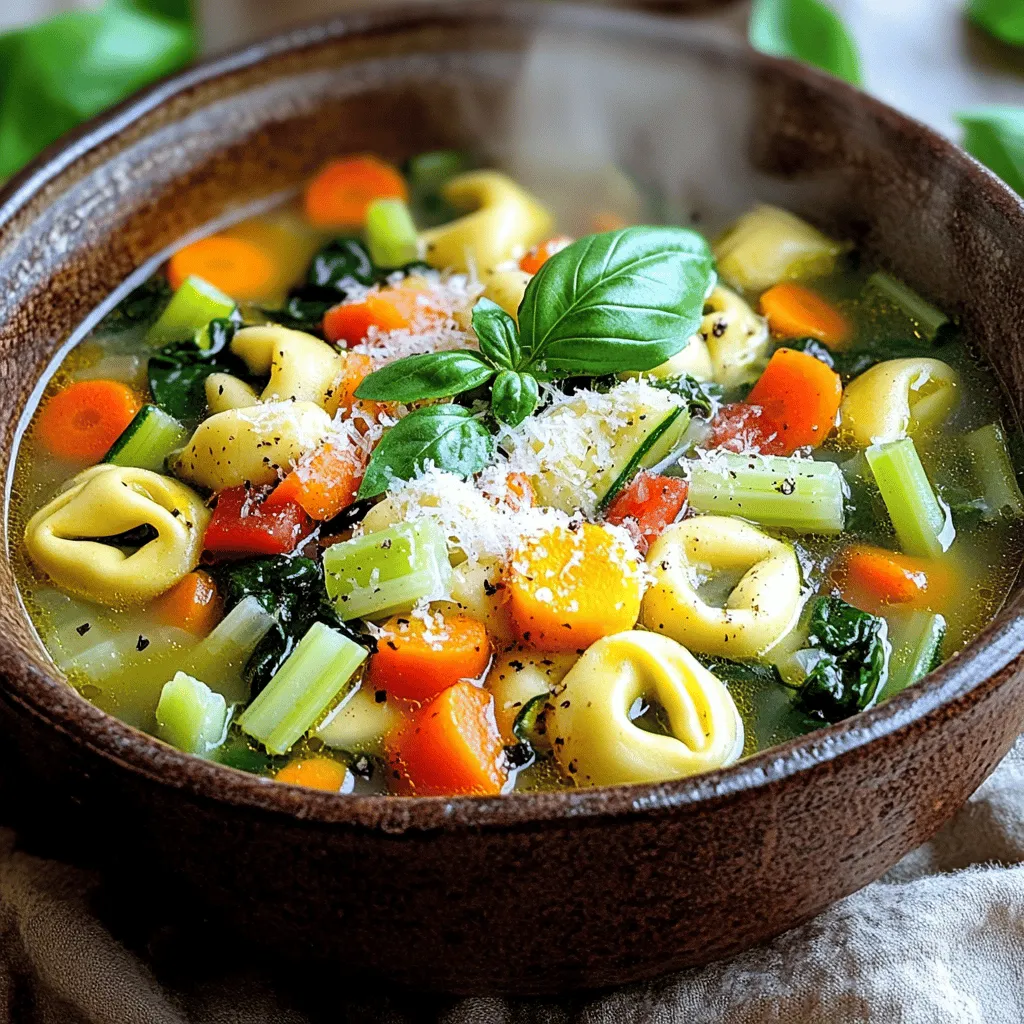
If you’re craving a warm, cozy meal, look no further than veggie-loaded tortellini soup! This soup is not just tasty;

Fried pineapple rings are a delicious treat. They are crispy on the outside and sweet on the inside. This recipe is simple and fun to make. You can serve them as a snack or dessert. Here’s what you need for the fried pineapple rings: - 1 ripe pineapple, peeled and cut into 1-inch thick rings - 1 cup all-purpose flour - 1 teaspoon baking powder - 1 tablespoon sugar - 1/2 teaspoon cinnamon - 1/4 teaspoon salt - 1 cup coconut milk (or regular milk) - 1/2 cup shredded coconut (optional, for added texture) - 1/2 cup vegetable oil (for frying) - Honey or maple syrup (for drizzling) You can switch some ingredients for new flavors. For example, use almond milk instead of coconut milk for a nutty taste. You can add more spices, like nutmeg or ginger, for a warm flavor. If you like crunch, try adding crushed nuts to the batter. Start with a ripe pineapple. Peel it and cut it into 1-inch thick rings. Remove the core using a cookie cutter or a knife. This step is key for a tender bite. Use paper towels to pat the rings dry. This helps the batter stick better. In a mixing bowl, whisk together the dry ingredients. Combine 1 cup of flour, 1 teaspoon of baking powder, 1 tablespoon of sugar, 1/2 teaspoon of cinnamon, and 1/4 teaspoon of salt. Mix them well. Slowly add 1 cup of coconut milk to the dry mix. Stir until the batter is smooth. If you want extra texture, fold in 1/2 cup of shredded coconut. Heat 1/2 cup of vegetable oil in a large frying pan over medium heat. To check if the oil is hot enough, drop a small amount of batter in. If it sizzles, you’re ready! Dip each pineapple ring into the batter, covering it fully. Carefully place the ring into the hot oil. Fry each side for 2-3 minutes until it's golden brown and crispy. Once done, transfer the rings to a plate lined with paper towels. This absorbs any extra oil. Serve the fried pineapple rings warm. Drizzle honey or maple syrup on top for a sweet finish. For the complete recipe and more tips, check out the Full Recipe. Frying pineapples can be fun and tasty. Here are some tips to get it right: - Use fresh pineapple: Fresh fruit gives the best taste. - Dry the rings: Pat the pineapple rings dry. This helps the batter stick well. - Heat the oil: Make sure the oil is hot enough. Test it with a drop of batter. - Don’t crowd the pan: Fry a few rings at a time. This keeps them crispy. - Keep an eye on them: Fry for 2-3 minutes per side. Watch for a golden color. Adding flavors can make your fried pineapple rings sparkle: - Cinnamon: This spice adds warmth. Mix it into the batter or sprinkle on top. - Coconut: Shredded coconut gives a tropical twist. Fold it into the batter for added texture. - Sugar: A dash of sugar in the batter makes the rings sweeter. - Salt: A pinch of salt balances the sweetness. Make your fried pineapple rings look as good as they taste: - Stack them high: Arrange the rings on a colorful plate. - Add fresh mint: Garnish with mint leaves for a bright touch. - Drizzle with syrup: Serve honey or maple syrup in a small bowl. Let guests drizzle it on top. - Serve warm: Fried pineapple rings taste best right after cooking. {{image_2}} You can change the coating of your fried pineapple rings for fun. Panko breadcrumbs give a great crunch. They are light and airy, adding a fun texture. You can dip the rings in the batter, then coat them in panko before frying. For a lighter option, try tempura batter. It uses less flour and gives a crispy finish. You can also mix in some shredded coconut for a tropical twist. Want to spice things up? Add some chili powder or cayenne to the batter. This gives a sweet and spicy kick. You could also try adding vanilla or almond extract to the batter. It makes the rings taste more like dessert. For a savory twist, sprinkle some garlic powder or herbs in the mix. These flavors pair well with grilled meats. Fried pineapple rings are great on their own, but you can serve them in many ways. They make a great dessert when drizzled with honey or maple syrup. You can also add a scoop of vanilla ice cream on top. For a fun snack, serve them with yogurt or whipped cream. They also work well as a side dish for grilled chicken or fish. Try stacking them with other fruits for a colorful fruit salad. You can find the full recipe for these delicious fried pineapple rings to explore all these variations. To store leftover fried pineapple rings, let them cool completely. Place them in an airtight container. Keep the container in the fridge. They will last for about 2 to 3 days. Make sure to separate layers with parchment paper. This helps to avoid sticking. When you're ready to enjoy them again, use the oven to reheat. Preheat your oven to 350°F (175°C). Place the pineapple rings on a baking sheet. Bake for about 10 minutes. This method helps to keep them crispy. You can also use an air fryer for about 5 minutes at 350°F. This will add crunch back to your fried treats. If you want to save them for later, freezing works too! First, cool the rings completely. Then, arrange them in a single layer on a baking sheet. Freeze them for about 2 hours. Once frozen, transfer them to a freezer-safe bag. They can stay in the freezer for up to a month. When you're ready to eat, just reheat directly from the freezer. Enjoy your sweet treat anytime! You can use both fresh and canned pineapple. Fresh pineapple offers a crisp bite. It also has a bright, natural flavor. Canned pineapple is softer and sweeter, making it easy to use. Just make sure to drain the canned fruit well. If you choose fresh, pick ripe pineapples for the best taste. Fried pineapple rings are a tasty treat but do contain calories. One serving has about 200 calories. They also have sugar from the pineapple and added sugar from the batter. Pineapples provide vitamin C and manganese, but frying adds fat. For a healthier option, consider baking instead of frying. To make this recipe gluten-free, swap the all-purpose flour for a gluten-free blend. Many blends work well for frying. Just ensure your baking powder is also gluten-free. This way, you still enjoy crispy pineapple rings without gluten. This blog post covered how to make delicious fried pineapple rings. We explored the best ingredients and provided a full recipe overview. You learned about preparation, frying tips, and how to make them taste great. We also discussed tasty variations and storage options. Fried pineapple rings can be a fun treat for any meal. Experiment with flavors and enjoy this unique dish!

Fried Pineapple Rings Crispy and Sweet Treat Recipe

Craving a sweet and crispy treat? Look no further than my Fried Pineapple Rings recipe! These golden delights are easy

- 8 oz penne pasta - 1 lb chicken breast, diced - 2 cups fresh broccoli florets - 1 cup heavy cream - 1 cup grated Parmesan cheese - 2 cloves garlic, minced - 1 teaspoon Italian seasoning - 2 tablespoons olive oil - 1/4 cup sun-dried tomatoes, chopped (optional) - Fresh basil leaves for garnish To start, you need the main ingredients. First, grab some penne pasta. This shape holds the sauce well. Next, you’ll need chicken breast. Dice it into small pieces for even cooking. Fresh broccoli adds color and crunch. For the sauce, heavy cream gives a rich taste. Grated Parmesan cheese adds a nice, cheesy flavor. Minced garlic brings a warm aroma. Lastly, season your dish. Italian seasoning adds herbs. Olive oil helps with sautéing. You can also add sun-dried tomatoes for a sweet touch. Fresh basil leaves make a beautiful garnish. You can find the full recipe in the main article. Enjoy your cooking! To start, fill a large pot with water. Add salt to the water for flavor. Bring the water to a boil over high heat. Once boiling, add the penne pasta. Cook the pasta for about 10-12 minutes. Stir occasionally to prevent sticking. You want it to be al dente, firm but not hard. After cooking, drain the pasta and set it aside. For the chicken, take a large skillet and place it on medium-high heat. Pour in the olive oil and let it heat up. Add the diced chicken breast to the skillet. Season it with salt, pepper, and Italian seasoning. Cook the chicken for 5-7 minutes until it turns golden brown. Make sure it’s fully cooked inside. Remove the chicken from the skillet and set it aside. Use the same skillet for the broccoli. Add the minced garlic and cook for about 30 seconds. This will give the garlic a nice aroma. Next, toss in the broccoli florets and a splash of water. Cover the skillet and steam the broccoli for 3-4 minutes. You want it to be tender-crisp, bright green, and not mushy. After that, lower the heat. Pour in the heavy cream and stir well. Let it come to a gentle simmer. Add the grated Parmesan cheese and mix until it melts into a creamy sauce. Now it's time to bring everything together. Add the cooked chicken and penne pasta back to the skillet. If you want an extra touch, include the chopped sun-dried tomatoes. Gently toss everything so it’s coated in the creamy sauce. Taste and adjust the seasoning if needed. To serve, scoop the creamy chicken penne onto plates. Garnish with fresh basil leaves for a burst of color and flavor. For the full recipe, check the section above. To make your dish just right, adjust the creaminess. If you want a richer sauce, add more heavy cream. For a lighter version, use less cream or substitute with milk. You can also play with flavors. Add a squeeze of lemon juice for brightness. A pinch of red pepper flakes boosts heat and adds depth. Sautéing works best for this recipe. It gives the chicken a nice sear and keeps it juicy. Baking can dry out the chicken, so stick to sautéing. For broccoli, timing is key. Steam it until it’s bright green and tender-crisp. Overcooked broccoli becomes mushy and loses nutrients. Aim for about 3-4 minutes of steaming. Avoid overcooking the pasta. Cook it until al dente, so it holds its shape. If you overcook it, the pasta can turn mushy in the sauce. Burning garlic is another mistake. Garlic cooks fast, so keep an eye on it. Cook for just 30 seconds until fragrant, then add the broccoli. Perfect garlic enhances your dish without overpowering it. {{image_2}} You can switch up the pasta shape in this dish. Try using fusilli or farfalle for a fun twist. Each shape holds the sauce differently, giving new textures. If you want to substitute proteins, consider shrimp or tofu. Both options add unique flavors and pair well with the creamy sauce. If you need a gluten-free option, use gluten-free penne. Many brands offer great alternatives that taste amazing. For a vegan version, swap the chicken with chickpeas or lentils. Use coconut cream instead of heavy cream. This keeps the dish rich and creamy without dairy. Add a pinch of red pepper flakes for some heat. This little change can really spice things up! You might also mix in other veggies like bell peppers or spinach. These add color and extra nutrients to your meal. If you want more depth, try adding a splash of lemon juice. It brightens the flavors and makes every bite pop. For the full recipe, check out the Creamy Broccoli Chicken Penne recipe above. Store leftover creamy broccoli chicken penne in an airtight container. This keeps it fresh. The dish lasts up to three days in the fridge. Make sure it cools down first before sealing. When ready to eat, just reheat it gently on the stove or in the microwave. To freeze, place the dish in a freezer-safe container. Leave some space at the top for expansion. This method helps keep the flavors intact. It can stay frozen for up to three months. When you want to enjoy it again, pull it from the freezer and let it thaw in the fridge overnight. Reheat it slowly on the stove for the best taste. You can add a splash of cream if it seems dry. For quick reheating, the microwave also works well. The total time is 30 minutes. - Prep time: 15 minutes - Cook time: 15 minutes You can cook the penne while sautéing chicken. This saves time. Always check the pasta for doneness. Aim for al dente, so it stays firm. Yes, you can prepare this dish ahead of time. - Cook the chicken and pasta in advance. - Store them separately in the fridge. - Prepare the sauce the day you serve it. This keeps the pasta from getting soggy. Reheat the chicken and pasta together in the sauce. This helps blend the flavors well. Pair this dish with simple sides. - Garlic bread - Mixed green salad - Roasted vegetables These sides balance the creamy penne. Choose a light salad or fresh veggies for a nice contrast. For more flavor, add a sprinkle of herbs on your sides. You can find the full recipe for Creamy Broccoli Chicken Penne [here](#). This blog post covered a simple yet tasty Creamy Broccoli Chicken Penne recipe. We explored the main ingredients, like penne pasta, chicken breast, and fresh broccoli. I shared step-by-step instructions for cooking and assembling the dish. Tips for perfecting the recipe and variations catered to different diets were included, too. In the end, this meal is quick to prepare and easy to adapt. Enjoy making this dish your own, while impressing family and friends!

Creamy Broccoli Chicken Penne Simple Dinner Delight

If you’re craving a quick and tasty meal, you’ve hit the jackpot! My Creamy Broccoli Chicken Penne is your simple

To make mini crème brûlée cheesecakes, you need simple ingredients. This recipe blends creamy cheesecake and a crunchy sugar topping. Follow the steps for a delightful treat that impresses everyone. - 1 cup graham cracker crumbs - 2 tablespoons unsalted butter, melted - 1 cup cream cheese, softened - 1/2 cup granulated sugar - 1 teaspoon vanilla extract - 2 large eggs - 1 cup heavy cream - 1/4 cup granulated sugar (for brûlée topping) These ingredients create a perfect balance of flavors and textures. The graham crackers form a tasty base. Cream cheese gives richness, while the heavy cream adds smoothness. You can swap some ingredients if needed. Use digestive biscuits instead of graham crackers for a different flavor. If you want a lighter option, try low-fat cream cheese. For a dairy-free version, use a plant-based cream cheese. You can also replace granulated sugar with coconut sugar for a hint of caramel flavor. For those who want to add a twist, explore different flavors. Adding citrus zest or a splash of liqueur can give your cheesecakes a unique taste. The options are endless! To start, gather all your ingredients. You will need graham cracker crumbs, butter, cream cheese, sugar, eggs, heavy cream, and vanilla. Preheat your oven to 325°F (160°C). This step is key for even baking. Next, prepare your crust. In a bowl, mix the graham cracker crumbs with melted butter. Stir until the crumbs are moist. Now, take mini cheesecake molds or muffin cups. Firmly press the crumb mixture into the bottom of each mold. This forms a nice base for your cheesecake. In a new bowl, beat the softened cream cheese with granulated sugar. You want a smooth and creamy texture. Add in the vanilla extract and mix until it's well combined. Next, add eggs one at a time. Beat on low until just mixed. This helps keep the batter light. Now, gently stir in the heavy cream. Make sure it’s all smooth. Your batter should look rich and creamy at this point. Pour the cheesecake batter into each crust-filled mold. Fill them about three-quarters full. This will give them room to rise. Place the molds in a baking dish. Fill the dish with hot water. This water bath helps the cheesecakes bake evenly. Bake for about 25-30 minutes. They should be set but still jiggly in the center. Once done, let them cool at room temperature. After cooling, refrigerate them for at least 4 hours, or overnight if you can wait. For a sweet finish, sprinkle granulated sugar on top before serving. Use a kitchen torch to caramelize the sugar until it’s golden and crisp. If you don’t have a torch, broil them for 1-2 minutes. Just watch closely to avoid burning. Enjoy your mini crème brûlée cheesecakes! For the complete guide, check the Full Recipe. To make the best mini crème brûlée cheesecakes, follow these tips: - Use Room Temperature Ingredients: Bring your cream cheese and eggs to room temperature. This helps them mix better. - Water Bath: Always use a water bath. It keeps the heat even and helps prevent cracks. - Don’t Overmix: Mix just until combined. Overmixing adds too much air, leading to a puffed and cracked cheesecake. For the perfect brûlée finish, consider these steps: - Choose the Right Sugar: Use fine granulated sugar for even melting. - Torch Technique: Hold the torch about 2 inches above the sugar. Move in circles for even caramelization. - Broiler Option: If using a broiler, keep a close eye. Sugar can burn quickly, so check every minute. Many people make a few common mistakes when baking these cheesecakes. Here’s what to watch for: - Underbaking: Make sure the center is set but slightly jiggly. If it’s too runny, it won’t set in the fridge. - Skipping Chill Time: Refrigerate for at least 4 hours. This helps the cheesecake firm up and enhances flavors. - Too Much Sugar on Top: Use just a thin layer of sugar for the best crack and texture. Too much can lead to a burnt topping. These tips will help you create delightful mini crème brûlée cheesecakes. For more detailed steps, check the Full Recipe. {{image_2}} You can give your mini crème brûlée cheesecakes a fun twist. Try adding chocolate or fruit. For chocolate, melt 4 ounces of dark chocolate. Mix it in with the cream cheese. This adds a rich, deep flavor. If you prefer fruit, blend in fresh berries or puree. Raspberry or mango puree gives a nice touch. These flavors make your cheesecakes unique and tasty. You can make these cheesecakes gluten-free or vegan. For gluten-free, use crushed gluten-free cookies instead of graham crackers. The rest of the recipe stays the same. If you want a vegan version, substitute cream cheese with a vegan cream cheese. Use coconut cream instead of heavy cream. Replace eggs with flax eggs. Mix 1 tablespoon of flaxseed meal with 2.5 tablespoons of water to make one flax egg. These swaps keep the flavors while meeting dietary needs. Change the toppings based on the season. In spring, top with fresh strawberries or a lemon zest. For summer, use peaches or cherries. In fall, sprinkle some cinnamon or pumpkin spice on top. Winter calls for a hint of peppermint or chocolate ganache. These seasonal ideas make your cheesecakes fun for any event. Each bite offers a new taste of the season. Enjoy these variations to impress your guests! To keep your mini crème brûlée cheesecakes fresh, store them in the fridge. Place them in an airtight container. This helps to prevent them from drying out. If you have not brûléed the tops, you can cover them without worry. If you have already caramelized the sugar, avoid covering them tightly. This keeps the sugar crisp. You can freeze mini crème brûlée cheesecakes, but it requires some care. First, let them cool completely after baking. Once cooled, place them in a single layer in a freezer-safe container. Wrap each cheesecake in plastic wrap before adding them to the container. This extra layer protects them from freezer burn. They can last in the freezer for up to three months. When stored in the fridge, mini crème brûlée cheesecakes last about 4 days. If you freeze them, they can be good for up to 3 months. Just remember to thaw them in the fridge overnight before serving. Do not refreeze them once thawed, as this will change their texture. Enjoying them fresh is always best! Yes, you can make these cheesecakes ahead of time. I often prepare them the day before a party. After baking, let them cool, then chill in the fridge. This allows the flavors to blend well. The longer they sit, the better they taste! To avoid cracks, mix the batter gently. Over-mixing adds air, which can cause cracks. Bake in a water bath to keep moisture around the cheesecakes. Also, do not open the oven door while baking. A sudden change in temperature can lead to cracks. The best way to caramelize sugar is by using a kitchen torch. Lightly sprinkle sugar on top, then torch it until golden brown. If you don’t have a torch, use your broiler. Keep a close eye on it, as it can burn quickly. This creates that perfect crackly top! For the full recipe, check out the Full Recipe section. Making mini crème brûlée cheesecakes is fun and tasty. We explored key ingredients and provided simple steps. I shared tips to avoid common baking errors and achieve that perfect brûlée finish. You can even experiment with flavors or make them gluten-free or vegan. Finally, I covered how to store your treats so they stay fresh. With these insights, you can create delicious desserts that impress. Enjoy your baking journey!

Mini Crème Brûlée Cheesecakes Delightful Sweet Treats

Get ready to indulge in a sweet treat with my Mini Crème Brûlée Cheesecakes! These delightful bites combine the rich

To make crispy shrimp balls, gather these key ingredients: - 1 pound fresh shrimp, peeled and deveined - 1/2 cup breadcrumbs (plus extra for coating) - 1/4 cup green onions, finely chopped - 1/4 cup cilantro, chopped - 1 egg, beaten - 2 cloves garlic, minced - 1 teaspoon ginger, grated - 1 tablespoon fish sauce - 1 teaspoon lime juice - Salt and pepper to taste - Vegetable oil for frying These ingredients combine to create a burst of flavor. The shrimp should be fresh for the best taste. The breadcrumbs help achieve that perfect crispiness. The sweet chili sauce adds a nice touch. For the sauce, you will need: - 1/2 cup sweet chili sauce (store-bought or homemade) - 1 tablespoon soy sauce - 1 teaspoon rice vinegar - 1 teaspoon sesame oil This sauce balances the shrimp balls with its sweetness and tang. You can elevate your dish with some fun garnishes. Consider using: - Extra cilantro leaves - Lime wedges - Sliced red chili for heat These garnishes not only look pretty but also add flavor. They can make your dish more vibrant and appealing. For the full recipe, refer to the section above. Start by washing the shrimp well. Peel and devein them if they are not ready. Place the shrimp in a food processor. Pulse the shrimp until it is finely chopped but not mushy. Then, grab a large bowl. Mix the chopped shrimp with breadcrumbs, green onions, cilantro, and the other ingredients. Make sure to add the beaten egg, minced garlic, grated ginger, fish sauce, lime juice, salt, and pepper. Stir until it is well combined. Now it’s time to form the shrimp balls. Wet your hands with water to prevent sticking. Take about one tablespoon of the shrimp mixture and roll it into a ball. Make sure it is tightly packed. Repeat this step until all the mixture is used. Once you have formed the balls, roll each one in breadcrumbs. This step adds a crispy texture when fried. Heat vegetable oil in a deep frying pan or pot. Aim for a temperature of 350°F (175°C). Use a thermometer to check the heat. Carefully place the shrimp balls in the hot oil. Do it in batches to avoid crowding. Fry them for about 3 to 4 minutes. Turn them occasionally until they turn golden brown. Once cooked, use a slotted spoon to take them out. Let them drain on a plate lined with paper towels. This helps remove excess oil. Enjoy them hot with sweet chili sauce for a tasty treat! When making crispy shrimp balls, the shrimp you pick really matters. I recommend using fresh shrimp for the best taste. Look for shrimp that is firm and has a clean smell. If fresh shrimp is not available, frozen shrimp works too. Just be sure to thaw it completely before using. You want shrimp that is peeled and deveined. This makes prep faster and easier. To get that golden, crispy texture, heat your oil properly. I suggest using vegetable oil because it has a high smoke point. Heat the oil to about 350°F (175°C). Test the oil by dropping in a small piece of the shrimp mixture. If it sizzles and rises, you’re ready to fry. Fry the shrimp balls in small batches. This helps them cook evenly and stay crisp. Turn them often to avoid burning. If you have leftovers, let them cool completely before storing. Place them in an airtight container and store in the fridge for up to 2 days. To reheat, bake them in the oven at 350°F (175°C) for about 10 minutes. This makes them crispy again. Avoid the microwave, as it can make them soggy. Enjoy your tasty shrimp balls again! For the full recipe, check out the recipe section. {{image_2}} You can choose to bake or fry shrimp balls. Frying gives them a crispy outside. Bake them for a healthier option. To bake, preheat your oven to 400°F (200°C). Lightly coat the shrimp balls in oil and place them on a baking sheet. Bake for about 15-20 minutes or until golden brown. Feel free to get creative with spices. Add chili flakes for heat or paprika for smokiness. You can also mix in grated carrot for extra crunch. Fresh herbs like basil or dill can add a unique twist. Try adding shredded coconut for a sweet touch. Serve your shrimp balls with sweet chili sauce for a tasty dip. You can also try soy sauce mixed with lime juice. A spicy mayo or garlic aioli makes a great option too. Pair with fresh veggies like cucumber or carrot sticks for a complete dish. For a fun twist, serve them in lettuce wraps! You can tell shrimp balls are cooked when they turn golden brown. Use a thermometer to check if the oil is at 350°F (175°C). Fry them for 3-4 minutes. When they are crispy and float to the top, they are ready. Cut one open to see the inside. It should be opaque and firm. Yes, you can make shrimp balls ahead of time. Form the balls and store them in the fridge for a few hours. You can also freeze them for later. Place them on a tray and freeze until firm. After that, transfer them to a freezer bag. When you are ready to cook, fry them straight from the freezer. They may need an extra minute to cook through. If you need a substitute for fish sauce, try soy sauce. It gives a salty flavor similar to fish sauce. For a bit of sweetness, add a splash of lime juice. You can also use coconut aminos for a gluten-free option. Adjust the amount to taste, as these substitutes can vary in saltiness. To make crispy shrimp balls, start by preparing the shrimp mixture. You will chop fresh shrimp finely. Then, mix it with breadcrumbs, green onions, cilantro, and spices. Next, form the mixture into small balls and coat them in breadcrumbs. Heat oil in a pan and fry the balls until they are golden and crispy. Finally, serve them hot with sweet chili sauce for dipping. - For the Shrimp Balls: - 1 pound fresh shrimp, peeled and deveined - 1/2 cup breadcrumbs (plus extra for coating) - 1/4 cup green onions, finely chopped - 1/4 cup cilantro, chopped - 1 egg, beaten - 2 cloves garlic, minced - 1 teaspoon ginger, grated - 1 tablespoon fish sauce - 1 teaspoon lime juice - Salt and pepper to taste - Vegetable oil for frying - For the Sweet Chili Sauce: - 1/2 cup sweet chili sauce (store-bought or homemade) - 1 tablespoon soy sauce - 1 teaspoon rice vinegar - 1 teaspoon sesame oil The prep time for this recipe is about 20 minutes. The total cooking time is around 40 minutes. This recipe serves 4 to 6 people. You can easily adjust the amounts for a bigger crowd or a small snack. Enjoy these tasty shrimp balls any time! For the full recipe, refer to the details above. Crispy shrimp balls are a fun dish to make. You learned about their key ingredients, tips for frying, and fun variations. I shared steps to prepare them perfectly, from mixing to frying. With simple garnishes and sauces, these shrimp balls are a crowd-pleaser. Try these methods for crispiness and flavor. Enjoy making this dish. It’s great for any occasion! Your guests will love it, and you will feel proud.

Crispy Shrimp Balls with Sweet Chili Sauce Delight

Dive into the world of flavor with my Crispy Shrimp Balls with Sweet Chili Sauce Delight! This dish promises a

- 2 large egg whites - 1 cup granulated sugar - 1/4 cup water - 1/4 teaspoon cream of tartar - 1 teaspoon vanilla extract - A pinch of salt The ingredients for 7-Minute Marshmallow Frosting are simple yet essential. The egg whites give the frosting its light and fluffy texture. Granulated sugar sweetens the mix while also helping to create the glossy finish. Water helps to dissolve the sugar, which is key for smooth frosting. Cream of tartar stabilizes the egg whites, making it easier to whip them into peaks. Vanilla extract adds a lovely flavor, and a pinch of salt balances the sweetness. - Choosing egg whites: Use fresh eggs for the best results. Check the expiration date. Fresh egg whites whip better and hold air, creating a fluffier frosting. - Selecting granulated sugar: Opt for fine granulated sugar. It dissolves quickly, which is important for a smooth frosting. Avoid any lumps or clumps. - Importance of fresh vanilla extract: Fresh vanilla extract enhances flavor. It should smell strong and sweet. If it doesn’t, it may be past its prime. Using fresh ingredients makes a big difference in your frosting. They help you achieve the best taste and texture. For the full recipe, check the details above. You will love how easy and fun this frosting is to make! To start, grab a pot and a heatproof bowl. Fill the pot with a couple of inches of water. Heat it on the stove until it simmers gently. Place the heatproof bowl on top of the pot. Make sure the bowl doesn’t touch the water. This setup creates steam, which helps cook the frosting gently. Simmering water is key. It keeps the heat steady and prevents the egg whites from cooking too fast. This method helps you create that light, fluffy frosting we all love. Next, it’s time to mix your ingredients. In the heatproof bowl, add two large egg whites, one cup of granulated sugar, a quarter cup of water, a quarter teaspoon of cream of tartar, and a pinch of salt. Mix these together well. Make sure the sugar is fully blended in. This step is crucial because you want a smooth base for your frosting. If the sugar isn't mixed well, it may not dissolve properly later on. Now, let’s focus on whisking. Place the bowl over the pot and start whisking the mixture. Keep whisking until it feels warm and the sugar dissolves. This should take about three to four minutes. Once the mixture is warm, remove the bowl from the heat. Switch to an electric mixer on medium-high speed. Beat the mixture until stiff peaks form. This usually takes another three to four minutes. How do you know when you have stiff peaks? When you lift the whisk, the mixture should hold its shape and stand up straight. It should look glossy and smooth. Once you reach that stage, add one teaspoon of vanilla extract and mix until just combined. For the full recipe, refer to the main section to get all the details. Now you're ready to frost your favorite cakes or cupcakes! - Overheating ingredients: If you let the mixture get too hot, it can cook the egg whites. This will result in a grainy texture instead of a smooth frosting. Keep a close eye on the temperature. - Not whisking long enough: You need to whisk until stiff peaks form. If you stop too soon, your frosting will not hold its shape. Keep whisking until you see those peaks! - Testing for the right consistency: The frosting should be glossy and hold stiff peaks. You can test it by lifting the whisk. If it stands tall without drooping, you’re good to go! This means it can hold its shape on cupcakes or cakes. - Variations in flavor and texture: You can change the taste by adding different extracts. Almond or lemon can give a nice twist. You can also fold in melted chocolate for a richer flavor. - Recommended mixers and bowls: A stand mixer works best for this frosting. If you use a hand mixer, make sure it has good power. Use a large heatproof bowl to allow enough space for the mixture to expand. - Importance of kitchen thermometers: A kitchen thermometer helps you check the water temperature in the double boiler. Aim for a gentle simmer. This keeps the egg whites safe without cooking them too much. Try the full recipe for the perfect topping on your favorite desserts! {{image_2}} You can easily change up the flavor of your 7-minute marshmallow frosting. Try adding extracts like chocolate, lemon, or almond. Just a teaspoon can change everything. This makes your treats more fun and unique. You can also add food coloring for a pop of color. A few drops can brighten up your frosting. Mix in your favorite shades to match any occasion. If you have dietary needs, don't worry! You can make this frosting vegan. Use aquafaba instead of egg whites. Aquafaba is the liquid from canned chickpeas. It whips up just like egg whites. For a low-sugar option, try using a sugar substitute. Make sure it’s suitable for baking. This way, everyone can enjoy the sweet taste of 7-minute marshmallow frosting. For the full recipe, check out the details above. To keep your leftover frosting fresh, follow these steps: - Room Temperature: You can store the frosting at room temperature for a few hours. Just cover it with plastic wrap or place it in an airtight container. This keeps it from drying out. - Refrigeration Tips: For longer storage, place the frosting in the fridge. Make sure to use an airtight container. It can last up to a week in the fridge. Just remember, frosting may lose some fluffiness when cold. If you have leftover frosting, you can use it again. Here are some ideas: - How to Re-whip Frosting: When ready to use, take it out of the fridge. Let it sit at room temperature for a bit. Then, re-whip it with a mixer. This helps restore its fluffy texture. - Best Ways to Incorporate into Other Desserts: Use the frosting to top brownies, pancakes, or even ice cream. You can also fold it into whipped cream for a light dessert dip. Get creative and have fun! 7-minute marshmallow frosting can last up to 2 hours at room temperature. If you store it in the fridge, it can last for about 3 days. Be sure to keep it in a sealed container to maintain its freshness. Yes, you can use a heatproof bowl placed over a pot of simmering water. If you don't have a double boiler, a metal bowl works well too. Just make sure the bowl does not touch the water. This frosting is great for many treats. You can use it on cakes, cupcakes, and cookies. It also works well as a dip for fruits or as a filling for sandwich cookies. Yes, it is safe to eat. The heat from the double boiler cooks the egg whites. This method makes it safe from raw egg risks. Always use fresh eggs for the best results. To make the frosting stiffer, add a bit more sugar. You can also whip the mixture longer. If it’s too soft, try chilling it for a few minutes. This can help it hold its shape better. This blog post covered key ingredients, methods, tips, and variations for 7-minute marshmallow frosting. You learned to select fresh ingredients, use the double boiler, whisk to the right peaks, and avoid common mistakes. With insights on storage and dietary adaptations, you can tailor this frosting to your needs. Remember, practice makes perfect. Enjoy experimenting with flavors and remember to have fun while you create delicious desserts!

7-Minute Marshmallow Frosting Simple and Sweet Treat

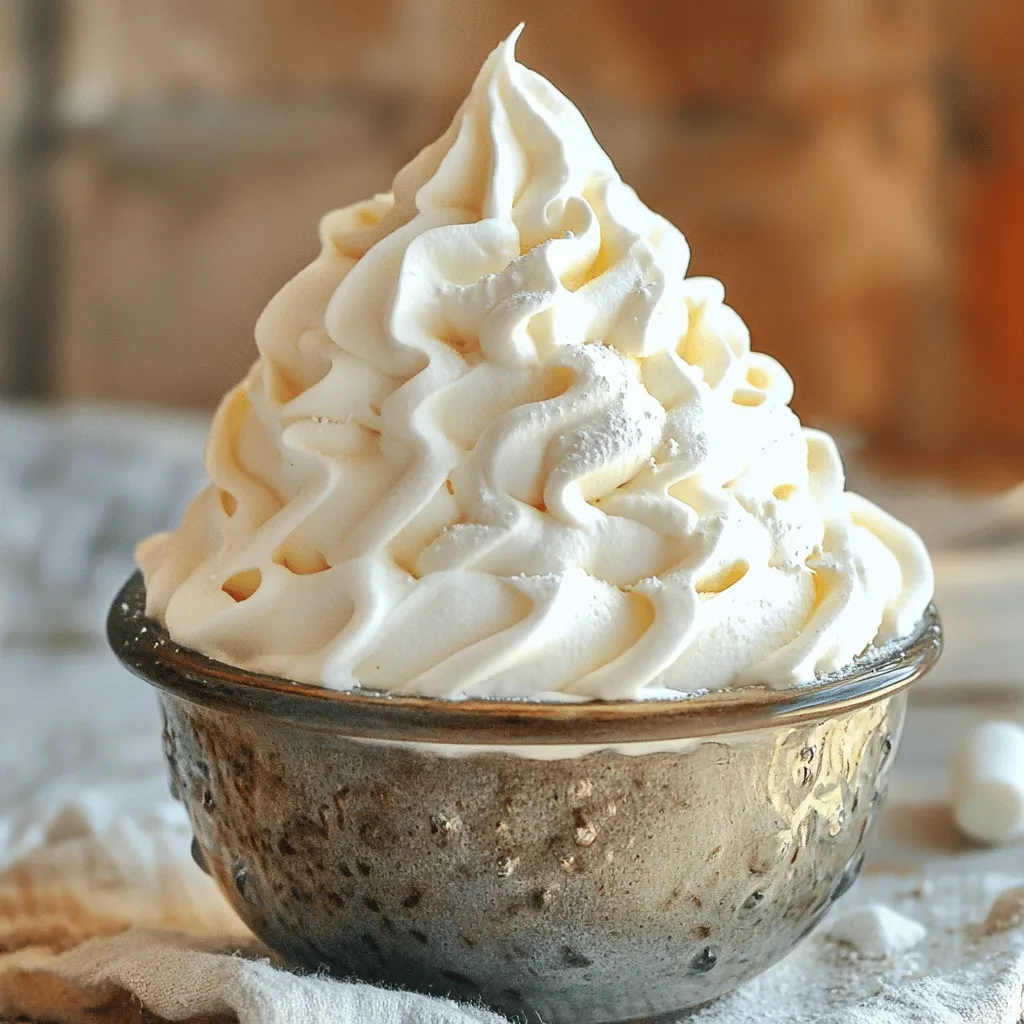
If you’re craving a light and fluffy treat that’s perfect for any dessert, try 7-Minute Marshmallow Frosting! This simple and

- 1 can (15 oz) chickpeas, drained and rinsed - 1 small onion, roughly chopped - 3 cloves garlic, minced - 1 cup fresh parsley leaves, chopped - 1/4 cup fresh cilantro leaves, chopped Chickpeas are the star. They give falafel its base and creamy texture. Fresh herbs like parsley and cilantro add bright flavors. Onion and garlic bring depth and aroma. - 1 teaspoon ground cumin - 1 teaspoon ground coriander - 1/2 teaspoon baking powder - Salt and pepper to taste - Optional: 1 teaspoon chili powder for heat Spices are key to falafel's flavor. Cumin and coriander give it warmth. Baking powder helps the falafel rise in the air fryer. You can add chili powder for some heat if you like. - 2 tablespoons all-purpose flour (or chickpea flour for gluten-free) - 1 tablespoon tahini Binding ingredients hold everything together. Flour keeps the falafel from falling apart. Tahini adds a nutty flavor and creamy texture. For the Full Recipe, check out the detailed cooking steps! - Rinse and drain the chickpeas. This step is key for the right texture. - Chop the onion, garlic, parsley, and cilantro into small pieces. Fresh herbs add great flavor. - In your food processor, combine the chickpeas, onion, garlic, parsley, cilantro, ground cumin, ground coriander, baking powder, flour, tahini, and optional chili powder. - Add salt and pepper to taste. - Pulse the mixture until it’s blended but still slightly chunky. Avoid making it too smooth; you want some texture. - Preheat your air fryer to 375°F (190°C). This ensures even cooking. - Form the mixture into small balls or patties, about 1.5 inches wide. Squeeze them tightly to keep their shape. - Brush or spray the falafel with olive oil. This step makes them crispy. - Place the falafel in the air fryer basket in a single layer. Cook in batches if needed. - Set the timer for 12-15 minutes. Flip the falafel halfway through. They should be golden brown and crispy when done. For the full recipe, check out the detailed cooking instructions. Enjoy your crispy air fryer falafel! To get that nice, fluffy texture in your falafel, avoid over-processing the mixture. You want it to be smooth but still have some chunks. This gives the falafel a great bite. After mixing, let the mixture rest for about 15-20 minutes before shaping. This helps it firm up and makes it easier to form into balls. Properly oil the falafel to get that crispy outside. Brush or spray the falafel with olive oil on all sides. This step is key! Cooking in batches is also important. If you crowd the air fryer, some falafel may not cook evenly. Air needs space to circulate for the best results. Falafel tastes great with many accompaniments. Serve it with warm pita bread and drizzle tahini sauce on top. You can also add fresh toppings like chopped tomatoes and cucumber for crunch. For a fun presentation, arrange the falafel on a colorful plate. Add veggies and a drizzle of tahini sauce for a vibrant look. You can find the full recipe above to get started! {{image_2}} You can easily swap some ingredients for a different taste. If you need a gluten-free option, use chickpea flour instead of all-purpose flour. It binds well and keeps the falafel crispy. You can also add spices like paprika or herbs like dill for a fun twist. Experiment with flavors to match your taste. While the air fryer makes falafel crispy, you can try other methods too. For oven-baked falafel, place them on a baking sheet. Bake at 400°F (200°C) for about 20-25 minutes. Flip halfway for even cooking. If you prefer pan-fried falafel, heat oil in a pan over medium heat. Fry the falafel for about 3-4 minutes on each side until golden brown. Both methods yield delicious results. Serving falafel is where the fun begins! You can offer different sauces or dips. Tahini sauce, yogurt sauce, or even spicy sriracha work well. For wrapping, use pita bread for a classic touch. You can also use lettuce wraps for a low-carb option. Fill them with falafel, fresh veggies, and your choice of sauce for a tasty meal. Check out the Full Recipe to make your own air fryer falafel! To store leftover falafel, let them cool first. Place them in an airtight container. This keeps them fresh. In the fridge, they last about 3 to 4 days. If you want to keep them longer, freezing is a good option. You can freeze both uncooked and cooked falafel. For uncooked falafel, form them into balls and place them on a baking sheet. Freeze for about an hour, then transfer to a zip-top bag. They can stay in the freezer for up to 3 months. For cooked falafel, let them cool completely. Then, place them in a container or bag. They also last about 3 months in the freezer. To reheat frozen uncooked falafel, you can cook them straight from the freezer. Just add a few extra minutes to the cooking time. For cooked falafel, let them thaw in the fridge overnight before reheating. For the best crispiness, reheat falafel in your air fryer. Set it to 350°F (175°C) and cook for about 5 to 7 minutes. This keeps them crunchy. You can also use an oven. Place them on a baking sheet and reheat at 375°F (190°C) for 10 minutes. Avoid microwaving falafel, as this makes them mushy. If you must use a microwave, heat them in short intervals. This will help keep some of their texture. Enjoy your falafel hot and crispy! Air fryer falafel is a crispy, flavorful snack made from chickpeas. The air frying technique uses hot air to cook food, making it crispy without deep frying. This method cuts down the oil needed, which keeps the dish lighter. You still get that golden-brown crunch. The air fryer works well here, giving falafel a nice texture without the mess of frying in oil. Yes, you can make falafel ahead of time! Prepare the falafel mix and shape it into balls. Lay them on a tray and freeze them. Once frozen, store the falafel in a bag. This way, you can cook small batches whenever you want a quick meal. Just air fry them straight from the freezer; add a few extra minutes to the cooking time. This method saves time and makes meal prepping easy. Falafels can be a healthy choice. They are rich in protein and fiber thanks to chickpeas. This helps keep you full longer. The fresh herbs, like parsley and cilantro, add vitamins and minerals, too. Using olive oil in the recipe gives healthy fats. Overall, air fryer falafel offers a nutritious option that fits well in many diets. This blog covered how to make delicious air fryer falafel. We started with key ingredients like chickpeas, fresh herbs, and spices. I shared step-by-step instructions, tips for the best texture, and serving ideas. You can also explore variations and smart storage methods for leftovers. In conclusion, making falafel at home is easy and fun! With these steps, you can enjoy them fresh and tasty any time. So, grab your ingredients and start cooking your perfect batch! Enjoy every bite.

Air Fryer Falafel Crispy and Delicious Recipe

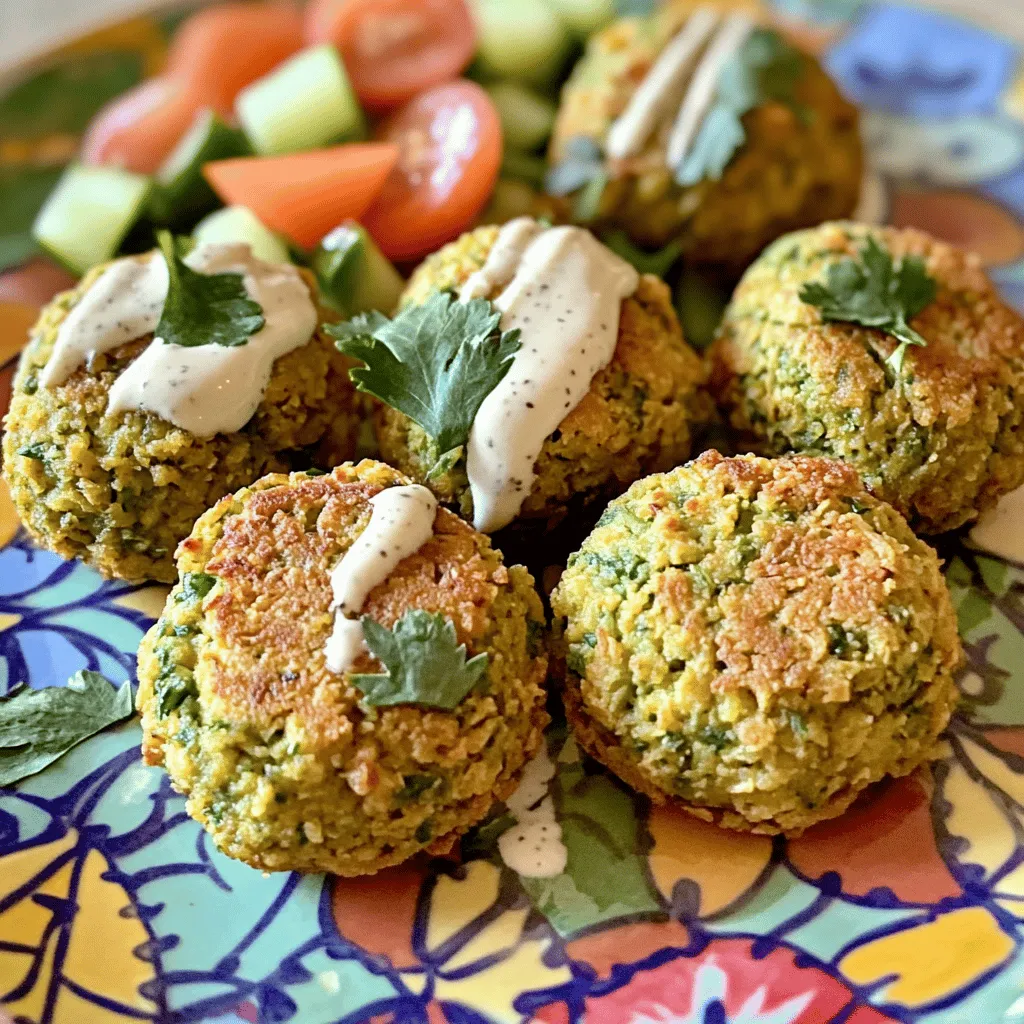
Are you ready to make crispy and delicious air fryer falafel at home? This recipe will guide you through simple

To make Bang Bang Chicken Sliders, you need some key ingredients. Here’s what you'll need: - 1 lb ground chicken - 1/2 cup panko breadcrumbs - 1/4 cup green onions, finely chopped - 1 egg, lightly beaten - 1 teaspoon garlic powder - 1 teaspoon ginger powder - 1/2 teaspoon salt - 1/4 teaspoon black pepper - 1/2 cup mayonnaise - 2 tablespoons chili garlic sauce (adjust to taste) - 12 slider buns These ingredients create juicy, flavorful patties. The ground chicken is lean and perfect for sliders. Panko breadcrumbs give a nice crunch. Green onions add a fresh taste. The egg helps bind everything together. The spices and seasonings enhance the flavor. The mayo and chili garlic sauce make the Bang Bang sauce creamy and spicy. You can adjust the heat of the sauce by changing the amount of chili garlic sauce. You can add some fun garnishes to your sliders: - Lettuce leaves - Sliced cucumbers - Fresh herbs These garnishes add color and freshness. Lettuce gives a nice crunch. Cucumbers add a cool taste. Fresh herbs can brighten up the flavor. For the full recipe, check out the complete details! 1. Start with a large mixing bowl. 2. Add the ground chicken. 3. Pour in the panko breadcrumbs. 4. Add the chopped green onions. 5. Crack the egg and add it in. 6. Sprinkle in the garlic powder, ginger powder, salt, and black pepper. 7. Mix everything well with your hands or a spatula. - Take a handful of the mixture. - Shape it into a small patty. - Aim for the size of the slider buns. - Place the patties on a plate as you form them. 1. Preheat your grill or stovetop skillet over medium heat. 2. Place the patties on the grill or skillet. 3. Cook for 5-6 minutes on one side. 4. Flip the patties and cook for another 5-6 minutes. 5. Check the internal temperature; it should reach 165°F (75°C). 1. Grab your slider buns. 2. Place a cooked chicken patty on the bottom half of each bun. 3. Drizzle the Bang Bang sauce over the patty. 4. Add a lettuce leaf and a couple of cucumber slices. 5. Cap with the top half of the bun. 6. Use a toothpick to hold them together if needed. To ensure the perfect patty texture, use fresh ground chicken. Mix it with panko breadcrumbs. This helps the patties stay juicy and not too dense. When you shape the patties, make them slightly thicker in the center. This helps them cook evenly. Checking for doneness is key. Use a meat thermometer to confirm the internal temperature. It should reach 165°F (75°C). If you don’t have a thermometer, cut one in half. The meat should be white, not pink. For presentation, arrange the sliders on a large platter. This makes them look inviting. You can serve extra Bang Bang sauce in a small bowl for dipping. It adds a fun touch. Garnish with cucumber slices or fresh herbs for color. For sides, you can offer crispy sweet potato fries or a fresh salad. These pair well with the sliders. For drinks, iced tea or sparkling lemonade works great. They balance the spicy flavors nicely. For the full recipe, check the instructions above. {{image_2}} You can easily change the flavor of your Bang Bang Chicken Sliders. First, adjust the spice levels to fit your taste. If you like it hot, add more chili garlic sauce. If you prefer mild, cut back on the sauce. You can also mix in some honey or lime juice for a sweet and tangy kick. Next, try different sauces or toppings. Instead of the Bang Bang sauce, use BBQ sauce or ranch dressing. You can also add sliced jalapeños for extra heat or avocado for creaminess. These small changes can create a whole new flavor experience. If you want to swap proteins, ground turkey works great in this recipe. It has a similar texture and absorbs flavors well. You could also use beef for a heartier slider. Just be sure to adjust the cooking time to ensure it is fully cooked. For vegetarian options, use black beans or chickpeas. Mash them up and mix with breadcrumbs and spices to form patties. You can also try tofu; just press it to remove moisture, then crumble it into your mix. These swaps keep the dish tasty and fun while fitting different diets. For the full recipe, check out the Bang Bang Chicken Sliders section above. To store leftover Bang Bang chicken sliders, let them cool first. Place them in an airtight container. This keeps the sliders fresh for up to three days. When you want to eat them, reheat them in the oven or on the stovetop. Avoid using the microwave, as it may make the buns soggy. Heat them until warm, about 10 minutes at 350°F. You can freeze the patties and sauce separately. This helps maintain their taste and texture. Place the patties in a freezer-safe bag. Squeeze out excess air to prevent freezer burn. The sauce should also go in a sealed container. It keeps them fresh for up to three months. To thaw, move the patties and sauce to the fridge for several hours or overnight. You can also use the microwave for a quicker option. Just be sure to check the heat levels before cooking. This way, you can enjoy Bang Bang chicken sliders anytime! You can pair these sliders with tasty sides and drinks. Here are some great options: - Sweet potato fries - Coleslaw - Fresh fruit salad - Crispy onion rings - Sparkling water or iced tea These sides balance the spicy flavor of the sliders. You can mix and match them to suit your taste. Yes, you can prepare these sliders ahead of time. Here are some helpful tips: - Make the chicken patties and store them in the fridge for up to 24 hours. - You can also cook and freeze the patties. Just reheat them when you are ready to serve. - Prepare the Bang Bang sauce a day in advance. Store it in a sealed container in the fridge. This meal prep saves time when you have guests or a busy week ahead. If you want a milder sauce, here are some ideas: - Reduce the chili garlic sauce to one tablespoon. - Add more mayonnaise to tone down the heat. - Mix in a bit of honey or sugar. This adds sweetness and balances the spice. These changes let you control the heat level to suit your taste buds. Bang Bang Chicken comes from China. It is popular for its bold flavors. The name "Bang Bang" refers to the way it is prepared. Traditionally, the chicken is pounded with a heavy tool to make it tender. This dish has gained fame in many countries. Now, you can enjoy it in a slider form! Bang Bang Chicken Sliders are fun and tasty. We covered the main ingredients and their prep. You learned how to mix, form, and cook the patties. Assembling the sliders with fresh toppings makes them even better. Remember, you can tweak spices or use different proteins to fit your taste. Don’t forget storage tips for leftovers! You can enjoy these later with ease. With these steps and tips, you can impress your family and friends. Making these sliders is simple and rewarding. Happy cooking!

Bang Bang Chicken Sliders Delicious and Easy Recipe

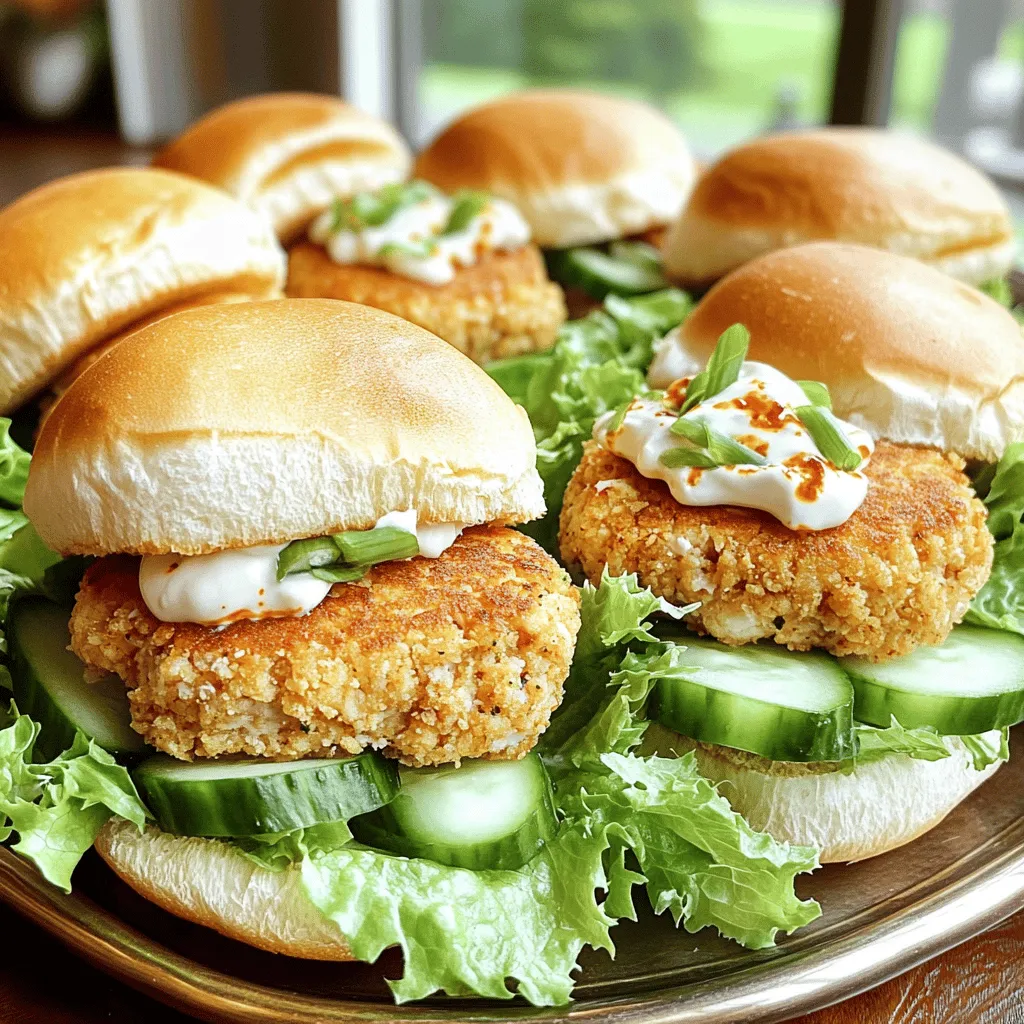
Get ready to spice up your dinner with my Bang Bang Chicken Sliders! This easy recipe combines juicy ground chicken

Older posts
Newer posts
← Previous Page1 … Page46 Page47 Page48 … Page60 Next →

dsad

© 2025 Emmas Dish • Built with GeneratePress

Our Policies

  • Copyright Policy
  • Cookie Policy
  • GDPR Policy
  • Privacy Policy
  • Disclaimer
  • Terms Of Use

More Information

  • Home
  • About
  • Contact
  • Appetizers
  • Dessert
  • Dinner
  • Drinks
©2025, Emmas Dish About Back To Top