Skip to content
DisclaimerTerms Of UseGDPR PolicyCookie Policy

Emmas Dish

  • Home
  • Drinks
  • Appetizers
  • Dinner
  • Dessert
  • About
  • Contact
  • Privacy Policy
DisclaimerTerms Of UseGDPR PolicyCookie Policy

Emma

For the base of your burgers, you'll need: - 1 lb ground chicken - 1 cup fresh spinach, finely chopped - ½ cup white cheddar cheese, shredded - 1 garlic clove, minced These main ingredients create a juicy, flavorful patty. Ground chicken keeps it light, while spinach adds freshness and color. The white cheddar gives a creamy, sharp flavor that pairs perfectly with the chicken. To enhance the taste, use these seasonings and condiments: - ½ teaspoon onion powder - ½ teaspoon smoked paprika - 1 teaspoon salt - ½ teaspoon black pepper - 1 tablespoon olive oil - ¼ cup mayonnaise - 1 tablespoon lemon juice These seasonings bring depth and warmth to your burgers. Smoked paprika adds a hint of smokiness, while the aioli made from mayonnaise and lemon juice adds a zesty kick. For a fun touch, consider these garnishes: - Lettuce leaves - Tomato slices Adding these garnishes not only makes your burger look great but also adds texture and flavor. The crisp lettuce and juicy tomato balance the rich flavors of the chicken and cheese. For the full recipe, check out [Full Recipe]. To start, gather your ingredients for the chicken mixture. In a large bowl, combine: - 1 lb ground chicken - 1 cup fresh spinach, finely chopped - ½ cup white cheddar cheese, shredded - 1 garlic clove, minced - ½ teaspoon onion powder - ½ teaspoon smoked paprika - 1 teaspoon salt - ½ teaspoon black pepper Mix these ingredients using your hands. You want to blend them well, but don’t overdo it. The goal is to keep the chicken light and fluffy. Next, shape the mixture into four patties, each about ¾ inch thick. Heat 1 tablespoon of olive oil in a grill pan or skillet over medium heat. Once the oil is hot, place the patties in the pan. Cook them for about 5-6 minutes on each side. You want a nice golden crust. Check that the internal temperature reaches 165°F to ensure they are fully cooked. While the patties cook, mix ¼ cup mayonnaise with 1 tablespoon lemon juice to make a quick aioli. Toast your whole wheat burger buns until they are lightly browned. To assemble, spread the aioli on the bottom half of each bun. Place a cooked chicken patty on top, and add lettuce leaves and tomato slices. Finish with the top half of the bun. Serve immediately for a fresh, tasty meal. For the full recipe, check out the complete guide above. For the best chicken burgers, use a grill or cast-iron skillet. Both methods give a nice sear. Preheat your cooking surface well. This step helps the burgers cook evenly and keeps them juicy. Don't crowd the pan. If you add too many patties, they will steam instead of sear. A smooth, moist texture is key for chicken burgers. Use fresh ground chicken for a tender bite. Mix in finely chopped spinach and white cheddar cheese. These ingredients add moisture and flavor. Avoid overmixing. This can make the burgers tough. Shape the patties gently. Aim for about ¾ inch thick for even cooking. You can prep these burgers ahead of time. Form the patties and place them on a baking sheet. Freeze them for about an hour, then transfer to a freezer bag. This method prevents them from sticking together. They can last in the freezer for up to three months. When ready to cook, just thaw and grill as per the full recipe. {{image_2}} You can switch up the cheese for extra flavor. Try gouda or feta for a tangy kick. If you prefer a milder taste, mozzarella works well too. For greens, kale or arugula can bring a fresh twist. These choices keep your burgers exciting and tasty. Chicken isn’t your only option. Ground turkey is a leaner choice. It can give you a similar flavor. If you want something heartier, try using ground beef or pork. Each protein adds its own unique twist to the burger. Add spices to kick things up a notch. Cumin or chili powder can add warmth. You can also mix in some chopped herbs like parsley or basil for freshness. If you like a bit of heat, diced jalapeños or red pepper flakes work great. These simple tweaks bring your burgers to life. For the full recipe, check out the White Cheddar Spinach Chicken Burgers. To keep your White Cheddar Spinach Chicken Burgers fresh, store them well. Place the cooked burgers in an airtight container. This helps keep moisture in. You can also wrap each burger in plastic wrap. Make sure to keep them in the fridge. They should be eaten within three days for the best taste. If you want to save some for later, freezing is a great option. First, let the burgers cool completely. Once cool, wrap each burger tightly in plastic wrap. Then, place them in a freezer bag. Be sure to label the bag with the date. You can freeze them for up to three months. When you are ready to eat, just thaw them in the fridge overnight. To reheat your burgers, avoid using the microwave for the best results. Instead, heat a skillet over medium heat. Add a bit of oil to the pan. Place the burger in the skillet and cook for about 5 minutes on each side. This keeps the burger juicy and warms it through. You can also reheat them in the oven at 350°F for about 10-15 minutes. Enjoy your meal with the delicious flavors intact! For the full recipe, check out the complete guide. Yes, you can use ground turkey. It works well and keeps a similar taste. Ground turkey has less fat than chicken, so it may cook faster. Be sure to check for doneness using a meat thermometer. Aim for an internal temperature of 165°F. Ground turkey provides a lighter option but still pairs nicely with spinach and white cheddar. To check if the burgers are done, use a meat thermometer. The center should reach 165°F. You can also cut one open to see if it is no longer pink. Cook for about 5-6 minutes on each side. If you see clear juices, that means they are likely cooked through. Always double-check for safety. These burgers pair well with many sides. Consider serving them with: - Sweet potato fries - A fresh garden salad - Grilled veggies - Coleslaw - Corn on the cob These sides add color and texture to your meal, making it even more delicious. For a special touch, try the burgers with a side of homemade aioli. You can find the full recipe for these tasty burgers above! In this post, we covered how to make White Cheddar Spinach Chicken Burgers. We explored main ingredients, cooking steps, and tips for perfect burgers. I shared tasty variations and storage tips for leftovers. These simple techniques help create a delicious meal. Now, with the right seasonings and techniques, you can impress anyone. Enjoy your cooking journey and the tasty results!

White Cheddar Spinach Chicken Burgers Flavor Boost

If you’re craving a delicious twist on classic chicken burgers, I’ve got just the recipe for you. My White Cheddar

To create these tasty bites, gather these key ingredients: - 1 can (12 oz) refrigerated cinnamon roll dough - 3 large eggs - 1/2 cup milk - 1 tsp vanilla extract - 1/2 tsp ground cinnamon - 2 tablespoons butter - 1/4 cup maple syrup (for serving) - Powdered sugar (for dusting, optional) These ingredients make the bites sweet and fluffy. The cinnamon roll dough gives that classic flavor. Eggs and milk create a nice soak, making each piece delicious. The vanilla adds a lovely aroma. Ground cinnamon enhances this treat's warmth. Butter helps with browning and adds richness. You can personalize these bites with a few extra ingredients: - Fresh fruit (like berries or bananas) - Nuts (such as pecans or walnuts) - Chocolate chips for sweetness - Cream cheese frosting for dipping Adding fruits or nuts can boost the flavor and add texture. Chocolate chips make them extra special. Cream cheese frosting can turn them into a rich dessert. To make Cinnamon Roll French Toast Bites, you’ll need: - A baking tray - Parchment paper - Mixing bowls - Whisk - Large skillet - Tongs or a spatula Using the right tools makes cooking easier. The parchment paper helps with cleanup, while the skillet ensures even cooking. A whisk is perfect for mixing the egg mixture well. Tongs or a spatula let you flip the bites safely. For the complete recipe, check out the [Full Recipe]. Start by preheating your oven to 375°F (190°C). Line a baking tray with parchment paper. Open the can of refrigerated cinnamon rolls. Carefully pull apart each roll and cut them into four small pieces. This makes them easy to dip and cook. Keep them close as you will use them soon. In a mixing bowl, gather your eggs, milk, vanilla extract, and ground cinnamon. Whisk these together until they blend well. This egg mixture gives the bites a nice flavor and helps them cook evenly. Make sure there are no lumps. Take each piece of cinnamon roll dough and dip it into the egg mixture. Let it soak for a few seconds but do not let it get too soggy. In a large skillet, melt 2 tablespoons of butter over medium heat. Add the soaked pieces carefully, making sure they do not overlap. Cook for about 2-3 minutes until golden brown. Flip them and cook for another 2-3 minutes. Once browned, move the bites to your prepared baking tray. Bake in the oven for 10 minutes to set. After baking, let them cool for a few minutes. Drizzle with maple syrup and dust with powdered sugar, if you like. Enjoy your sweet treat! For the complete process, check out the Full Recipe. To get fluffy bites, use fresh cinnamon roll dough. The dough should be soft and pillowy. Cut each roll into equal pieces for even cooking. Soak them in the egg mix just long enough. A few seconds is perfect! This way, they absorb enough flavor without falling apart. When cooking, space the pieces out in the pan. This helps them brown nicely and stay fluffy. If you have leftovers, store them in an airtight container. Let the bites cool completely before sealing. This keeps them from getting soggy. You can keep them in the fridge for up to three days. For longer storage, freeze them in a single layer. After freezing, move them to a freezer bag. They will last for about a month. One common mistake is overcrowding the skillet. If the bites touch, they won’t cook evenly. Always make sure there is space between each piece. Another mistake is not soaking the dough enough. If you don’t soak them long enough, they will be dry. Lastly, check your oven temperature. An oven that is too hot can burn the outside while leaving the inside doughy. Follow these tips for perfect bites every time! {{image_2}} You can easily mix flavors with your Cinnamon Roll French Toast Bites. Here are some ideas: - Nutty Delight: Add chopped walnuts or pecans to the egg mix. - Chocolate Swirl: Include mini chocolate chips in the dough. - Fruit Burst: Toss in fresh berries or sliced bananas before cooking. - Maple Pecan: Drizzle with a maple pecan sauce instead of syrup. Each of these options adds a new twist. Experiment and find what you love most. If you need a different approach, I have you covered. Here are some alternatives: - Gluten-Free: Use gluten-free cinnamon roll dough. - Dairy-Free: Swap milk for almond or oat milk. - Vegan: Replace eggs with a flaxseed mixture or a commercial egg replacer. - Sugar-Free: Use sugar-free syrup or a natural sweetener. These swaps let everyone enjoy the treat. Serving your bites can be fun and creative. Try these ideas: - Skewers: Place bites on skewers for a fun presentation. - Dipping Sauces: Offer different sauces like chocolate, caramel, or yogurt. - Fruit Garnish: Add fresh fruit on the side for color and taste. - Breakfast Platter: Serve with bacon or sausage for a full meal. These ideas can make your brunch special. For the full recipe, check the details above. After enjoying your Cinnamon Roll French Toast Bites, store any leftovers in the fridge. Place them in an airtight container. This keeps them fresh for up to three days. Make sure to let them cool completely before sealing. This helps avoid moisture buildup inside the container. To enjoy your bites again, reheat them in the oven. Preheat the oven to 350°F (175°C). Place the bites on a baking sheet for about 5-7 minutes. This method keeps them crispy and warm. You can also use a microwave. Simply heat them for about 30 seconds. However, the oven gives a better texture. If you want to save some bites for later, freezing is a great option. Let them cool completely, then place them in a freezer-safe bag. Squeeze out as much air as possible before sealing. They can last up to three months in the freezer. When you’re ready to eat, thaw them in the fridge overnight. Reheat as mentioned above for the best taste. The prep time for Cinnamon Roll French Toast Bites is just 15 minutes. You can whip these up quickly. The total time from start to finish is around 30 minutes. That includes cooking and baking. This makes it a great choice for a fast breakfast or brunch. Yes, you can make these bites ahead of time. Prepare them fully and let them cool. Store them in an airtight container in the fridge. They will last for about three days. When you are ready to eat, you can reheat them in the oven or microwave. They taste best warm and fresh. To make Cinnamon Roll French Toast Bites without eggs, use a simple substitute. You can mix 1 tablespoon of ground flaxseed with 2.5 tablespoons of water. Let it sit for a few minutes until it thickens. This mix will act as an egg replacement in your recipe. You can also use mashed banana or unsweetened applesauce for a different twist. Just keep the same amount as you would for eggs. This way, you still get tasty bites! You learned how to make tasty Cinnamon Roll French Toast Bites. We covered key ingredients and tools you need. I shared step-by-step instructions for perfect bites every time. You also got tips on storing leftovers and avoiding common mistakes. Variations and dietary options can help make this dish your own. Enjoy making this fun and sweet treat! It’s easy to share and always a hit. Try it out, and you’ll see how simple it is to impress your friends and family.

Cinnamon Roll French Toast Bites Simple and Sweet Treat

Craving a breakfast treat that’s both fun and delicious? Let’s dive into making Cinnamon Roll French Toast Bites! This simple

To make a delightful Skinny Strawberry Cake, gather these ingredients: - 1 cup whole wheat flour - 1/2 cup almond flour - 1 teaspoon baking powder - 1/2 teaspoon baking soda - 1/4 teaspoon salt - 1/3 cup honey or maple syrup - 1/2 cup unsweetened applesauce - 2 large eggs - 1 teaspoon vanilla extract - 1 1/2 cups fresh strawberries, hulled and sliced - 1/4 cup low-fat Greek yogurt (for frosting) - 2 tablespoons honey (for frosting) - Extra strawberries for garnish You can tweak this recipe for an even healthier twist. Here are some ideas: - Use coconut flour instead of almond flour for a different nut-free option. - Replace honey with agave syrup for a lower glycemic index. - Substitute applesauce with mashed banana for a fruity flavor. - Try using egg whites instead of whole eggs to cut down on fat. - For a dairy-free frosting, use a plant-based yogurt alternative. Understanding what goes into your cake helps you enjoy it more. Here's a quick look at the nutritional benefits: - Whole Wheat Flour: High in fiber, it aids digestion and keeps you full. - Almond Flour: Packed with healthy fats and protein, it adds a nutty taste. - Honey/Maple Syrup: Natural sweeteners that provide antioxidants. - Applesauce: Low in calories, it keeps the cake moist and adds natural sweetness. - Strawberries: Rich in vitamins and antioxidants, they add color and flavor. - Greek Yogurt: High in protein, it adds creaminess to the frosting without extra fat. By using these ingredients, you create a cake that is not just tasty but also nutritious. For the complete recipe, check out the Full Recipe. Start by preheating your oven to 350°F (175°C). This step is key for a perfect bake. Next, grease a round 9-inch cake pan or line it with parchment paper. This keeps the cake from sticking. In a mixing bowl, mix together the dry ingredients: whole wheat flour, almond flour, baking powder, baking soda, and salt. Use a whisk to blend them well. In another bowl, combine honey or maple syrup, applesauce, eggs, and vanilla extract. Stir until they are smooth. Slowly add the dry mix to the wet mix. Stir just until combined; don’t overmix. Finally, fold in the sliced strawberries gently. This helps keep them whole. Now, pour the batter into your prepared cake pan. Smooth the top with a spatula for an even surface. Bake in the preheated oven for 20-25 minutes. Check if it is done by inserting a toothpick into the center. It should come out clean. Once baked, take the cake out of the oven. Let it cool in the pan for 10 minutes. After that, transfer it to a wire rack and let it cool completely. For the frosting, take a small bowl and mix the low-fat Greek yogurt with honey until it is smooth. This makes a tasty and healthy frosting. Once your cake has fully cooled, spread the Greek yogurt frosting evenly over the top. For a lovely finish, add extra fresh strawberries on top. This will not only make it look great, but also add flavor. Follow the full recipe to enjoy your Skinny Strawberry Cake! To keep your Skinny Strawberry Cake moist, use fresh fruit. Fresh strawberries add juice and flavor. Another tip is to avoid overmixing the batter. Mix just until the dry and wet ingredients blend. This keeps the cake light and fluffy. You can lower sugar by using ripe bananas or unsweetened applesauce. They add sweetness without extra calories. To cut even more calories, use a sugar substitute like Stevia. This can keep the great taste while making it even healthier. For the best results, use a 9-inch round cake pan. A non-stick pan works well, but parchment paper helps too. You need a mixing bowl and a whisk for blending. A spatula is great for smoothing the batter. Finally, a toothpick helps check if your cake is done. To see the full recipe, check the section where we list all the steps. {{image_2}} You can make a gluten-free version of this cake easily. Just swap whole wheat flour for a gluten-free flour blend. Look for a blend that has rice flour, potato starch, and tapioca flour. These blends work well in cakes. They keep the cake light and fluffy while being kind to your tummy. This version still tastes great, and you won’t miss the gluten! You can play with flavors in this cake. Adding lemon zest gives a fresh twist. Just a teaspoon of zest will brighten the cake. If you love chocolate, try mixing in some cocoa powder. About 1/4 cup will add a rich flavor. You could also fold in nuts or other fruits for a unique taste. Each change brings new joy to this classic dish. The frosting can change too! Instead of Greek yogurt, you can use a light cream cheese. Mix it with honey for sweetness. You could also try a coconut whipped topping for a dairy-free option. Each frosting adds its own flair. Choose one based on what you love or what you have at home. The right frosting makes this cake even more delightful. For the full recipe, check the section above! To keep your Skinny Strawberry Cake fresh, store it in an airtight container. This method keeps the cake moist. Place the cake at room temperature if you eat it within two days. If you need to store it longer, refrigerate it. Just remember, the cold can dry it out. Freezing your cake is a great option for saving it. Cut the cake into slices to make it easier to thaw later. Wrap each slice in plastic wrap. Then, place them in a freezer bag or container. This method keeps the cake fresh for up to three months. To enjoy, simply remove a slice and let it thaw at room temperature. When stored properly, your Skinny Strawberry Cake can last up to four days at room temperature. If refrigerated, it can last up to a week. If frozen, remember to use it within three months for the best taste. Enjoy your cake while it’s fresh! This cake is called "skinny" because it uses healthier ingredients. I replace regular flour with whole wheat and almond flour. These flours add fiber and protein. I also use honey or maple syrup instead of white sugar. This lowers the sugar content while keeping it sweet. Plus, I add unsweetened applesauce, which makes the cake moist and cuts down on fat. My favorite part is that it tastes great without the extra calories. Yes, you can make this cake vegan! Just swap the eggs for flaxseed meal. Mix one tablespoon of flaxseed meal with three tablespoons of water for each egg. Let it sit for a few minutes until it thickens. You can also use a plant-based yogurt for the frosting instead of Greek yogurt. This way, you keep the cake tasty and healthy while making it vegan-friendly. To check if the cake is done, use a toothpick. Insert it into the center of the cake. If it comes out clean, the cake is ready. If you see wet batter, bake it a few more minutes. Usually, the baking time is about 20-25 minutes. Just keep an eye on it near the end. Once it's done, let it cool before frosting. You can find the full recipe for more details. This article covers everything you need for a delicious skinny strawberry cake. You learned about ingredients, substitutions, and baking steps. I shared tips for a moist cake and gave storage advice. You can make variations, too, like gluten-free or with different flavors. Baking can be fun with this light dessert. Enjoy trying new options and making it your own. Happy baking!

Skinny Strawberry Cake Delightfully Healthy Treat

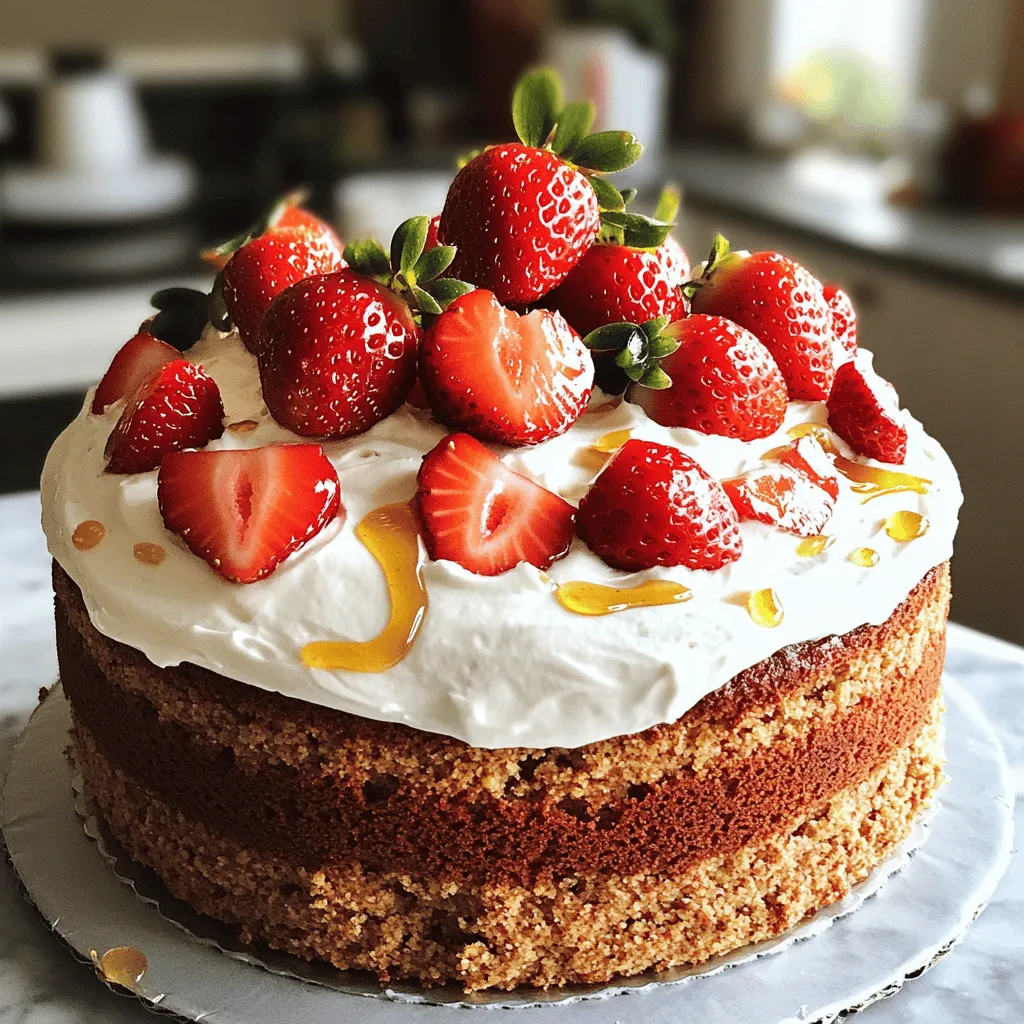
Looking for a sweet treat that won’t ruin your healthy diet? Let me introduce you to my Skinny Strawberry Cake!

To make Chicken Alfredo Stuffed Garlic Bread, gather these ingredients: - 1 large loaf of fresh Italian bread - 2 cups cooked chicken breast, shredded - 1 cup heavy cream - 1 cup grated Parmesan cheese - 1 teaspoon garlic powder - 1 tablespoon fresh parsley, chopped - 1 tablespoon olive oil - 1 teaspoon Italian seasoning - Salt and pepper to taste - 4 cloves garlic, minced - 1 cup shredded mozzarella cheese - 2 tablespoons butter, softened These ingredients make a rich and creamy filling. Each one plays a role in creating a tasty dish that you will love. If you don't have some ingredients, don't worry! Here are some easy swaps: - Use rotisserie chicken instead of cooking your own. - Swap heavy cream for half and half for a lighter version. - Try using garlic salt instead of garlic powder. - For a dairy-free option, use a plant-based cream and cheese. - Use any bread you have on hand like French bread or hoagie rolls. These substitutions can still give you a delicious meal without losing the flavor. Here is a quick look at the nutrition per serving: - Calories: 600 - Protein: 35g - Carbohydrates: 45g - Fat: 30g - Fiber: 2g This dish is rich and filling, perfect for a family meal. Keep in mind that adding more cheese or cream will change these values. Enjoy this tasty dish while being mindful of your dietary needs. To start, gather your ingredients. You will need butter, garlic, heavy cream, and cheese. First, melt the butter in a medium saucepan over medium heat. Add minced garlic and cook for one minute. Next, pour in the heavy cream and bring it to a simmer. Stir often to prevent sticking. Once it simmers, lower the heat. Add Parmesan cheese, garlic powder, Italian seasoning, salt, and pepper. Mix until the cheese melts and the sauce thickens. This should take about three to five minutes. Now, combine the shredded chicken with the Alfredo sauce. Make sure every piece of chicken is well-coated. Set this mixture aside. Now, it's time to prepare the bread. Take your large loaf of fresh Italian bread and slice it lengthwise. Be careful not to cut all the way through. You want to create a pocket. Hollow out some of the bread's insides to make space for the filling. Brush the inside of the loaf with olive oil. Sprinkle a pinch of salt and chopped parsley for added flavor. Next, fill the pocket with your creamy Chicken Alfredo mixture. Spread it evenly for the best taste. Finally, top it off with shredded mozzarella cheese. This will give it a wonderful melt. Preheat your oven to 375°F (190°C). Wrap the stuffed bread in aluminum foil and place it on a baking sheet. Bake it for about 20 minutes. After that, unwrap the bread and bake it for an extra 10 minutes. This will allow the top to crisp up nicely. Keep an eye on it as it bakes. You want it golden and bubbly. Once done, remove it from the oven. Let it cool for a few minutes before slicing. Enjoy your Chicken Alfredo stuffed garlic bread! For great flavor, use fresh herbs like parsley. Fresh herbs add brightness to the dish. You can also add a pinch of red pepper flakes for a little heat. Mix in some sun-dried tomatoes for a sweet and tangy kick. If you want more depth, try adding sautéed onions or mushrooms. These add great texture and flavor. To get a crispy crust, brush the bread with olive oil. This helps create a golden layer. Don't skip hollowing out some of the bread. This makes room for the filling and keeps it from getting soggy. Bake the bread wrapped in foil for 20 minutes first. Then, unwrap it for the last 10 minutes. This gives you that perfect mix of crispy and soft. One mistake is overfilling the bread. If you pack too much filling, it may spill out while baking. Also, don’t forget to season your Alfredo sauce. Salt and pepper are key for good flavor. Another common error is baking at too high a temperature. Stick to the recommended 375°F to ensure even cooking. These tips will help you make a better Chicken Alfredo stuffed garlic bread. For the full recipe, check out Chicken Alfredo Stuffed Garlic Bread. {{image_2}} You can make this dish vegetarian by swapping out the chicken. Use cooked mushrooms or spinach for great flavor. Add artichoke hearts or roasted red peppers for added texture. You still get a creamy treat without losing taste. The Alfredo sauce works well with these veggies. It keeps the dish rich and satisfying. Cheese is key for flavor! While Parmesan and mozzarella are classics, you can mix it up. Try using provolone or gouda for a different taste. Adding sharp cheddar gives a nice kick. You can even blend in cream cheese for extra creaminess. Each cheese brings its own twist to the dish. Feel free to get creative with fillings! You can add cooked bacon for a smoky flavor. Diced bell peppers add crunch and color. For a spicy kick, sprinkle in some red pepper flakes. Top the bread with fresh herbs like basil or oregano for extra freshness. Each addition makes the dish more exciting! Check out the Full Recipe for more ideas. Store leftover chicken Alfredo stuffed garlic bread in an airtight container. This keeps it fresh. You can also wrap it tightly in plastic wrap or aluminum foil. Make sure it is cooled before wrapping. Leftovers will stay good in the fridge for up to 3 days. However, the bread may lose some crispness over time. To reheat your stuffed garlic bread, you have a few options. The best method is the oven. Preheat your oven to 350°F (175°C). Wrap the bread in foil and heat for 10-15 minutes. This keeps the bread soft and warms the filling. You can also use a microwave, but it may make the bread chewy. Heat in short bursts of 30 seconds. Check often to avoid overheating. If you want to save your stuffed garlic bread for later, freezing is a great option. First, let the bread cool completely. Wrap it tightly in plastic wrap and then in foil to prevent freezer burn. You can store it in the freezer for up to 2 months. When ready to eat, thaw it in the fridge overnight. Reheat in the oven as described above for the best taste. Enjoy your chicken Alfredo stuffed garlic bread anytime! Yes, you can use different types of bread for this recipe. Try French bread, ciabatta, or even sourdough. Each type will add a unique taste and texture. Just make sure the bread is sturdy enough to hold the filling. If the bread is too soft, it might fall apart. To make Chicken Alfredo from scratch, gather these ingredients: heavy cream, Parmesan cheese, garlic, and butter. Start by melting butter in a pan. Add minced garlic and cook until it smells great. Then, pour in the heavy cream and let it simmer. Stir in the cheese until it melts. Season with salt and pepper for taste. This simple sauce is rich and creamy, perfect for your stuffed bread. Serve Chicken Alfredo Stuffed Garlic Bread warm and fresh. Cut it into portions for easy sharing. Pair it with a fresh salad or marinara sauce for dipping. You can also add a sprinkle of fresh herbs on top for color and flavor. This dish is perfect for gatherings or a cozy night in. Explore the Full Recipe for more details! You now know how to make Chicken Alfredo Stuffed Garlic Bread. We covered the needed ingredients, step-by-step instructions, and useful tips. Variations allow you to customize this dish to your taste. Plus, you learned how to store, reheat, and freeze leftovers for later. Cooking can be fun and easy, so try this recipe today. Enjoy making and sharing this tasty dish with family and friends.

Chicken Alfredo Stuffed Garlic Bread Delightful Recipe

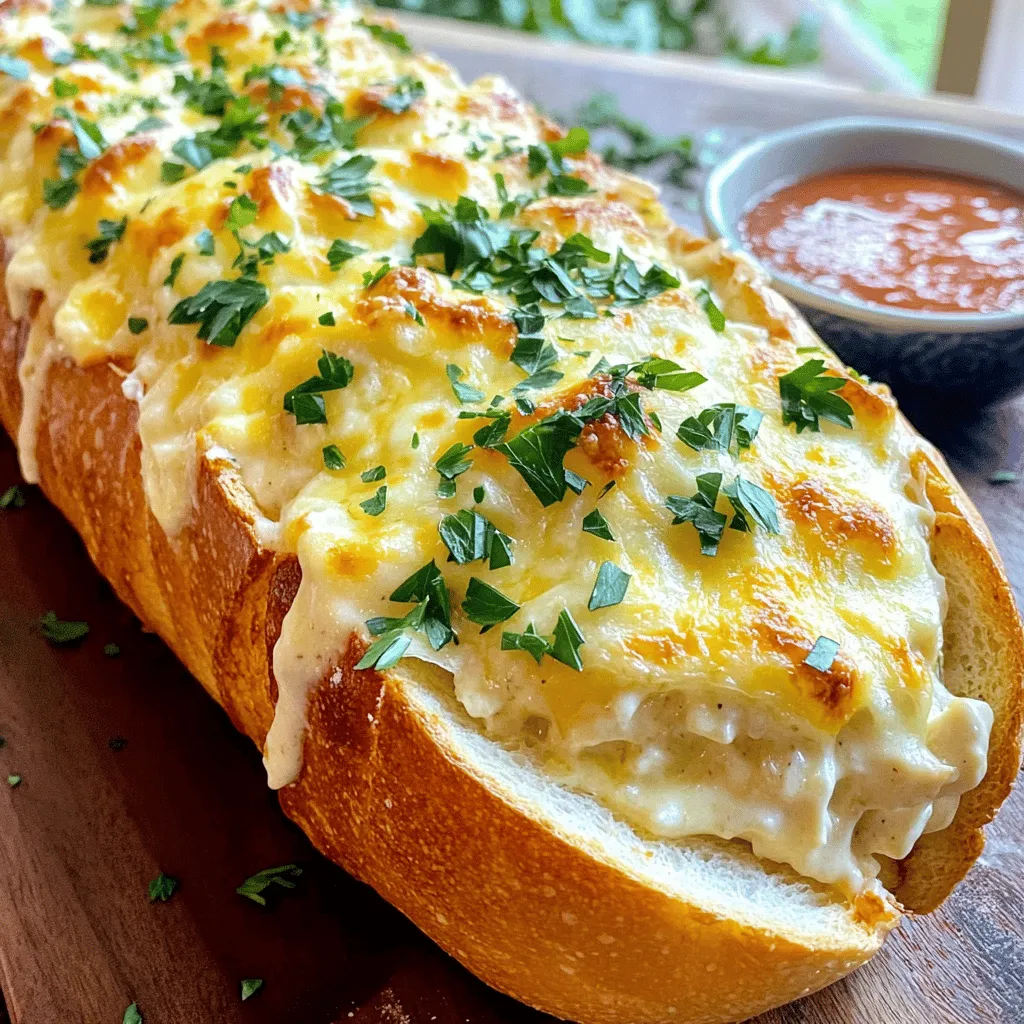
Are you ready to elevate your dinner game? This Chicken Alfredo Stuffed Garlic Bread is a delicious twist on two

To make Voodoo Fries, you need a few key items. First, use 4 large russet potatoes. They have the right starch content for great fries. Next, grab 2 tablespoons of olive oil to help the fries crisp up. You will also need 1 cup of shredded cheddar cheese for that melty goodness. Add 1/2 cup of crumbled feta cheese for a tangy twist. Seasoning makes these fries pop! Use 1 teaspoon of smoked paprika for a deep flavor. Add 1 teaspoon of garlic powder and 1 teaspoon of onion powder for extra taste. The real kick comes from 1 teaspoon of cayenne pepper. Adjust this to fit your spice level. Don’t forget to sprinkle salt to taste. This simple mix of spices will elevate your Voodoo Fries. Want to make your Voodoo Fries even better? Consider adding some fun toppings. Sliced jalapeños give a spicy crunch. Fresh cilantro adds a bright flavor. Drizzle 1/2 cup of sour cream mixed with 1 tablespoon of lime juice on top for creaminess. These toppings make each bite special and fun! For the full recipe, click here. Start by washing four large russet potatoes. Cut them into thin fries. I like to keep the skin on for extra flavor. In a big bowl, toss the fries with two tablespoons of olive oil. Add one teaspoon of smoked paprika, garlic powder, onion powder, and cayenne pepper. Sprinkle salt to taste. Mix well until all fries are coated. This step brings out the spices’ flavors. Preheat your oven to 425°F (220°C). Line a baking sheet with parchment paper for easy cleanup. Spread the fries out on the sheet. Make sure they are in a single layer. Overcrowding can make them soggy. Bake the fries for 25-30 minutes. Flip them halfway through for even cooking. Look for a golden-brown color and crispy texture. This is key for great Voodoo Fries. When the fries are done, take them out of the oven. Sprinkle one cup of shredded cheddar cheese on top. Return them to the oven for five minutes. Wait until the cheese melts nicely. While that’s happening, make the voodoo dressing. In a small bowl, mix half a cup of sour cream with one tablespoon of lime juice. Set it aside. Once the cheese is melted, top the fries with half a cup of crumbled feta cheese, sliced jalapeños, and chopped cilantro. Drizzle the voodoo dressing over the top. Your spicy and flavorful snack delight is ready to enjoy! Choosing the right potatoes is key. I like using russet potatoes for Voodoo fries. They have a high starch content, giving you that fluffy inside. Look for firm potatoes without any green spots or bruises. A good potato should feel heavy for its size. This tells you it’s fresh and has enough moisture. To get those fries crispy, follow these tips. First, cut the potatoes evenly. This ensures they cook at the same rate. Rinse them in cold water to remove excess starch. After rinsing, dry them well with a clean towel. Moisture can make fries soggy. Toss the fries in olive oil and seasonings, then spread them out on the baking sheet. Avoid crowding them. Air needs to flow around each fry. For different tastes, you can change the spices. If you like it mild, reduce the cayenne pepper. You can add more garlic powder for a stronger flavor. For a smoky touch, try adding smoked paprika. If you want a fresh twist, sprinkle lime juice over the finished fries. You can also mix in different cheeses or toppings based on your mood. The Full Recipe gives you a great base, but feel free to experiment! {{image_2}} If you love spice, add more cayenne pepper. Start with two teaspoons instead of one. You can also use hot sauce. A few dashes will add heat. For an extra kick, top the fries with sliced jalapeños. This makes your Voodoo Fries even spicier and more exciting. Making Voodoo Fries vegetarian is simple. Just skip the feta cheese or use a plant-based cheese instead. For a vegan option, replace sour cream with a dairy-free yogurt. You can still enjoy all the great flavors without meat or dairy. Try adding avocado slices for creaminess. Not a fan of cheddar? You can use mozzarella or pepper jack cheese. Both melt well and add different flavors. For a stronger taste, consider blue cheese. If you want a twist, try goat cheese. Each cheese gives a unique touch to your Voodoo Fries. For the full recipe, check out the Voodoo Fries section earlier in this article. After enjoying your voodoo fries, let them cool down. Place the fries in an airtight container. Store them in the fridge for up to three days. This helps keep them fresh and tasty. When you're ready to eat your leftover fries, reheating is key. Preheat your oven to 375°F (190°C). Spread the fries on a baking sheet. Bake for about 10-15 minutes. This keeps them crispy. You can also use an air fryer at 350°F (175°C) for about 5 minutes. This method works great to bring back their crunch. If you want to save voodoo fries for later, freezing is a good option. Let them cool completely. Spread them on a baking sheet in a single layer. Freeze for about 1 hour. Once frozen, transfer them to a freezer bag. They can last up to three months. When you're ready to eat, bake them straight from the freezer. Adjust the cooking time, adding a few extra minutes to ensure they heat through. Voodoo Fries are a fun and spicy snack. They start with crispy fries. You season them with spices like smoked paprika and cayenne. Then, you add melted cheese and fresh toppings. These toppings can include jalapeños and cilantro. The mix of flavors makes them a tasty treat. You can find Voodoo Fries at some food trucks and casual restaurants. They often serve them as a side or snack. However, making them at home is easy and fun. You can find all the ingredients at your local grocery store. This way, you can enjoy them anytime. Yes, you can! Making Voodoo Fries in an air fryer is simple. Just follow the same steps for seasoning. Then, place the fries in the air fryer basket. Set the temperature to 400°F (200°C) and cook for about 15-20 minutes. Shake the basket halfway for even cooking. This method gives you crispy fries with less oil. You can easily adapt Voodoo Fries for various diets. If you want a vegan version, skip the cheese or use a plant-based cheese. For a gluten-free option, just ensure your spices are gluten-free. You can also adjust the spice level by adding less cayenne or using milder spices. Feel free to experiment with toppings to make them your own! In this blog post, we explored the tasty world of Voodoo Fries. We covered key ingredients, from potatoes to spices, and shared step-by-step cooking tips. Don't forget the optional toppings for extra flavor! You learned how to store leftovers and even freeze them for later. Voodoo Fries can fit many diets with easy swaps. Enjoy trying these tips to make your fries better. There’s no limit to the fun you can have with this dish!

Voodoo Fries Spicy and Flavorful Snack Delight

Get ready to spice up your snack game with Voodoo Fries! This tasty treat packs a punch of flavor and

- 1 pound large shrimp, peeled and deveined (tails on) - 1/4 cup olive oil - 1/2 cup unsalted butter - 4 cloves garlic, minced - 1 tablespoon Worcestershire sauce - 1 tablespoon hot sauce (like Tabasco) - 1 tablespoon smoked paprika - 1 teaspoon cayenne pepper (adjust to taste) - 1 teaspoon onion powder - 1 teaspoon black pepper - 2 teaspoons salt - 1 tablespoon fresh lemon juice - 1/4 cup fresh parsley, chopped (for garnish) - Crusty French bread (for serving) I love using fresh shrimp for this dish. The shrimp should be large, peeled, and deveined. The tails can stay on for that classic look. For fats, we need olive oil and unsalted butter. They create a rich base for the sauce. Garlic adds aroma and flavor. The Worcestershire sauce and hot sauce give the dish its zest. Smoked paprika adds a hint of smokiness. Adjust the cayenne pepper based on your heat preference. Onion powder and black pepper enhance the overall taste. Salt is a must for balance. Fresh lemon juice brightens the dish at the end. Garnish with chopped parsley for a pop of color. Serve with crusty French bread to soak up the sauce. If you want to swap ingredients, use ghee instead of butter for a dairy-free option. You can also replace shrimp with fish or chicken. For a vegetarian dish, try mushrooms or tofu. For the full recipe, check the comprehensive guide above. Start by cleaning and preparing the shrimp. Rinse the shrimp under cold water. Pat them dry with paper towels. This step helps remove any grit. Set the shrimp aside for later. Next, set up your cooking workspace. Gather all your ingredients. Place them within reach. This saves time and makes cooking easier. Make sure to have a large skillet ready. You’ll need it for the sauce and shrimp. Now, it’s time to cook the sauce. In your large skillet, combine butter and olive oil. Heat these over medium heat. Wait for the butter to melt completely. This mix adds richness to the dish. Once the butter melts, add minced garlic. Sauté the garlic for about one minute. You want it fragrant but not brown. Then, it’s time to add your essential seasonings. Stir in Worcestershire sauce, hot sauce, smoked paprika, cayenne pepper, onion powder, black pepper, and salt. Mix everything together. Let it simmer for two to three minutes. This allows the flavors to blend nicely. Next, cook the shrimp to perfection. Carefully add the shrimp to the skillet. Toss them well in the sauce. Cook for about four to five minutes. The shrimp should turn pink and opaque. Be careful not to overcook them. This will keep them tender. Finally, add finishing touches for flavor enhancement. Remove the skillet from heat. Stir in fresh lemon juice. This adds a nice brightness to the dish. Transfer the BBQ shrimp to a serving dish. Sprinkle with chopped parsley for color. Serve hot with crusty French bread to soak up that delicious sauce. For the complete recipe, check out the Full Recipe. To avoid overcooked shrimp, watch the time closely. Cook the shrimp for just 4 to 5 minutes. They should turn pink and opaque. If they curl too much, they are overcooked. For sauce consistency, ensure it is thick and rich. Stir the sauce while it simmers. If it’s too runny, cook it longer. This will help the flavors blend well. Adjust spice levels by tasting your sauce. If you like it hot, add more cayenne pepper. For milder heat, use less hot sauce. Fresh herbs pack more flavor than dried ones. Always choose fresh parsley for garnishing. Louisiana BBQ shrimp pairs well with crusty French bread. It’s perfect for soaking up the sauce. Serve with a fresh salad for a light touch. For drinks, a cold beer works great. A crisp white wine like Sauvignon Blanc also complements the dish well. You’ll enjoy every bite and sip! {{image_2}} Louisiana BBQ shrimp has two main styles: Cajun and Creole. Cajun food is rustic and bold. It uses fewer ingredients. Creole, on the other hand, is more refined. It combines French, Spanish, and African flavors. In Cajun BBQ shrimp, you might see more spice and smoky flavors. It often uses ingredients like andouille sausage. Creole BBQ shrimp may include fresh tomatoes and other veggies. Both styles celebrate local Louisiana ingredients, like fresh shrimp and spices. You can switch up the protein in BBQ shrimp recipes. Try using fish like catfish or tilapia. These fish absorb the sauce well and keep it light. For chicken lovers, skinless chicken thighs work great. Just cut them into bite-sized pieces and cook until done. Don’t forget about vegetarian options! You can replace shrimp with hearty veggies like eggplant or mushrooms. These can soak in the rich sauce, making them flavorful and filling. Louisiana BBQ shrimp can shine in many dishes. Serve it over creamy grits for a comforting meal. You can also use it in tacos with fresh toppings. For a twist, try BBQ shrimp on a pizza! Spread the sauce on the dough and add shrimp before baking. This dish can also inspire other cuisines. Think of shrimp served with Asian noodles or Mediterranean couscous. Each variation adds a new layer of taste, showing the dish's versatility. For the full recipe, check the [Full Recipe]. To keep your BBQ shrimp fresh, cool them down quickly. After serving, let them sit for no more than two hours at room temperature. Transfer the shrimp to a shallow dish to help them cool faster. Cover the dish with plastic wrap or a lid. Use airtight containers for the best flavor retention. Glass or BPA-free plastic containers work well. When you reheat BBQ shrimp, you want to keep them juicy. The best method is to use a skillet. Heat it on low and add a little butter or oil. Stir in the shrimp until warm. Avoid using the microwave, as it can make shrimp rubbery. If you have extra shrimp, try adding them to pasta or rice dishes for a new meal. Yes, you can freeze BBQ shrimp! To freeze, start by letting them cool completely. Then, place them in a single layer on a baking sheet. Freeze them for about an hour. Once frozen, transfer the shrimp to a freezer-safe bag or container. Remove as much air as possible to prevent freezer burn. They can last up to three months in the freezer. When you’re ready to use them, thaw in the fridge overnight. Enjoy the flavors of your BBQ shrimp again! For the full recipe, don’t forget to check out the main guide. Louisiana BBQ shrimp is a classic dish from New Orleans. It does not involve a grill. Instead, it features shrimp cooked in a spicy, buttery sauce. This dish reflects the rich flavors of Cajun and Creole cooking. It has roots in the coastal areas of Louisiana, where shrimp are plentiful. The dish showcases local ingredients like spices, garlic, and Worcestershire sauce. It is often served with French bread to soak up the sauce. Enjoying this dish connects you to the vibrant culture of New Orleans. To make your Louisiana BBQ shrimp spicier, add more cayenne pepper. You can also increase the hot sauce while cooking. Consider using a spicier hot sauce than Tabasco if you want a real kick. Another option is to include diced jalapeños for added heat. Always taste the sauce as you go. Adjust the spice to match your heat preference. Remember, you can start mild and build up the heat level. Yes, you can use frozen shrimp for this recipe. Frozen shrimp are convenient and often just as tasty. Thaw the shrimp before cooking to ensure even cooking. Place them in cold water for about 15 minutes to speed up the thawing. Using frozen shrimp may save time, but they can lose some texture if overcooked. Keep an eye on them while cooking. Perfectly cooked shrimp should be pink and opaque. Louisiana BBQ shrimp pairs well with crusty French bread. The bread is perfect for soaking up the rich sauce. You might also serve it with a fresh green salad to balance the meal. A side of coleslaw adds a crunchy texture. For drinks, try a cold beer or a refreshing lemonade. These sides and drinks enhance the meal and create a great dining experience. Louisiana BBQ shrimp is a dish bursting with flavor and history. We explored key ingredients like shrimp, olive oil, and spices. You learned how to prepare and cook shrimp to perfection. I shared tips to avoid overcooking and enhance flavors. Variations, like Cajun and Creole styles, can add local flair. Remember to store leftovers properly and reheat them for the best taste. Enjoy experimenting with this dish and make it your own!

Louisiana BBQ Shrimp Flavorful and Easy Recipe Guide

If you crave bold flavors and a taste of the South, you’ll love Louisiana BBQ Shrimp. This dish combines juicy

To make One-Pot Creamy Beef Pasta, gather these key items: - 1 pound ground beef - 12 ounces pasta (fusilli or penne work well) - 1 medium onion, finely chopped - 3 cloves garlic, minced - 2 cups beef broth - 1 cup heavy cream - 1 cup cherry tomatoes, halved - 1 cup spinach, roughly chopped - 1 teaspoon Italian seasoning - Salt and pepper to taste - 1 tablespoon olive oil - Grated Parmesan cheese for serving - Fresh basil leaves for garnish Want to kick up the taste? Consider these additions: - Red pepper flakes for heat - Mushrooms for earthiness - Bell peppers for sweetness - Zucchini for added veggies - Fresh herbs like parsley for brightness To cook this dish, you’ll need some basic tools: - A large pot or Dutch oven - A wooden spoon for stirring - A sharp knife for chopping - A cutting board to prep ingredients - Measuring cups and spoons for accuracy These simple ingredients and tools will help you create a tasty, creamy meal that everyone will love. Check out the Full Recipe for more detailed steps. To make One-Pot Creamy Beef Pasta, gather your ingredients first. You will need: - 1 pound ground beef - 12 ounces pasta (like fusilli or penne) - 1 medium onion, finely chopped - 3 cloves garlic, minced - 2 cups beef broth - 1 cup heavy cream - 1 cup cherry tomatoes, halved - 1 cup spinach, roughly chopped - 1 teaspoon Italian seasoning - Salt and pepper to taste - 1 tablespoon olive oil - Grated Parmesan cheese for serving - Fresh basil leaves for garnish Start by heating the olive oil in a large pot over medium heat. Add the chopped onion and sauté for about 3-4 minutes. You want the onion to become soft and clear. Next, add the minced garlic and cook for another minute. This step adds great flavor. Now increase the heat to medium-high. Add the ground beef and break it apart with a spoon. Cook this for about 5-7 minutes until it turns brown. Remember to season it with salt, pepper, and Italian seasoning. Once the beef is brown, stir in the cherry tomatoes. Let them cook for about 2 minutes to soften. Then, add the pasta, beef broth, and heavy cream to the pot. Bring everything to a boil. After it boils, lower the heat and cover the pot. Simmer for about 10-12 minutes. Stir occasionally. You want the pasta to be cooked al dente and the liquid mostly absorbed. Finally, add the chopped spinach and stir until it wilts, about 1-2 minutes. Taste your dish and adjust the seasoning if needed. To serve, dish out the pasta into bowls. Sprinkle grated Parmesan cheese on top. Add fresh basil leaves for a nice touch. This simple meal is ready to enjoy! For more details, check the Full Recipe. To get a creamy sauce for your One-Pot Creamy Beef Pasta, start with heavy cream. It gives the dish a rich texture. You can also use cream cheese for a thicker sauce. Make sure to stir the cream in gently. This helps it blend well with the beef and pasta. Adding cheese at the end adds extra creaminess. Grated Parmesan melts nicely and enhances flavor. One mistake is cooking pasta too long. It should be al dente, or firm to the bite. If you overcook it, the pasta can turn mushy. Another mistake is not using enough seasoning. Salt and pepper can make a big difference in taste. Lastly, don’t skip the sautéing step. Cooking the onion and garlic first brings out their flavors. For one-pot meals, use a wide pot. This allows even cooking of all ingredients. Start by browning the meat well. This gives a nice flavor base. Add ingredients in stages. First, the onions and garlic, then the beef, and finally the pasta and liquids. Cover the pot while simmering. This traps steam and helps cook the pasta evenly. Stir occasionally to prevent sticking. For the full recipe, check out the One-Pot Creamy Beef Pasta. {{image_2}} If you want to make this dish meat-free, it is easy! You can swap the ground beef for some hearty mushrooms or lentils. Both options add nice texture and flavor. Use about 1 pound of mushrooms, chopped, or 1 cup of cooked lentils. This keeps the dish filling and delicious while making it vegetarian. Want to spice things up? You can add more herbs and spices to enhance the taste. Try adding a pinch of red pepper flakes for heat. You can also mix in some smoked paprika for a deeper flavor. Fresh herbs like thyme or oregano can bring freshness to the dish. Just add them when you cook the onions to release their aroma. Feel free to get creative with your ingredients! If you don’t have heavy cream, you can use Greek yogurt or a plant-based cream. They will still give you that creamy texture. You can also use different types of pasta, like spaghetti or macaroni. Just make sure to adjust the cooking time as needed. If you’re out of cherry tomatoes, canned diced tomatoes can work well too. To keep your One-Pot Creamy Beef Pasta fresh, let it cool first. Then, place it in an airtight container. Make sure to cover the container tightly. This helps keep the flavors in and the pasta moisture intact. Store it in the fridge for up to three days. If you want to save it for later, freezing is a great option. Portion the pasta into smaller containers or freezer bags. Be sure to remove as much air as possible. This helps prevent freezer burn. You can freeze it for up to three months. Just remember to label the containers with the date. When you're ready to enjoy your leftovers, take them out of the fridge or freezer. If frozen, let it thaw in the fridge overnight. To reheat, place the pasta in a pot over low heat. Add a splash of water or broth to keep it creamy. Stir often until it’s heated through. You can also use the microwave, but be sure to stir halfway for even warmth. Enjoy your meal! Yes, you can use any pasta you like. I often use fusilli or penne. Both hold sauce well and cook evenly. If you choose a different shape, check the cooking time. Smaller pasta may cook faster, while larger shapes may take longer. This dish lasts about three to four days in the fridge. Make sure to store it in an airtight container. If you want it to stay fresh, cool it completely before sealing. One-Pot Creamy Beef Pasta pairs well with garlic bread or a fresh salad. You could also serve it with steamed veggies for added nutrition. A light dessert, like fruit salad, makes a nice finish too. Yes, you can make this recipe ahead of time. Cook it fully and let it cool. Store in the fridge for later. When ready to eat, just reheat on the stove. You may need to add a splash of broth or cream to keep it creamy. For the complete recipe, check out the Full Recipe link. You now have all the steps to create a tasty One-Pot Creamy Beef Pasta. We covered the key ingredients and shared helpful tips for cooking success. Remember to avoid common mistakes for the best results. Feel free to experiment with variations to suit your taste. When storing leftovers, keep the dish fresh for future meals. This recipe is easy to make and versatile. Enjoy every bite! Your cooking journey has just begun.

One-Pot Creamy Beef Pasta Simple and Tasty Meal

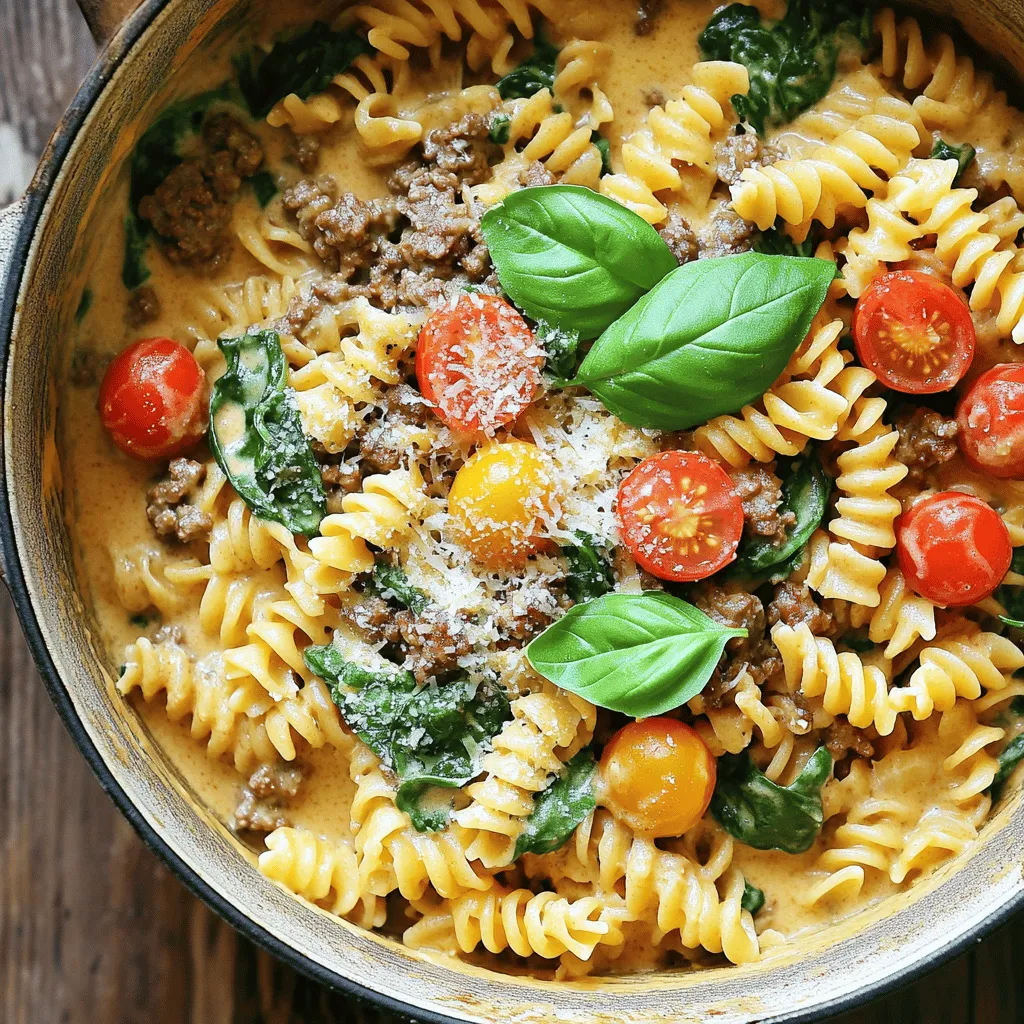
Are you looking for a simple and tasty meal that packs a punch? This One-Pot Creamy Beef Pasta is your

To make delicious Crock Pot Birria Tacos, you need a few key ingredients: - 2 lbs beef chuck roast - 1 lb bone-in beef shank - 4 dried guajillo peppers, stemmed and seeded - 2 dried ancho peppers, stemmed and seeded - 1 medium onion, quartered - 4 cloves garlic, minced - 1 tbsp ground cumin - 1 tbsp dried oregano - 1 tsp ground cinnamon - 1 tsp black pepper - 1 tbsp salt (adjust to taste) - 4 cups beef broth - 2 bay leaves - Corn tortillas - Fresh cilantro, chopped (for garnish) - Lime wedges (for serving) Dried guajillo and ancho peppers add unique flavors. The guajillo brings fruity notes, while the ancho gives a mild sweetness. These peppers are vital for authentic taste. Using quality beef cuts is also crucial. Beef chuck roast is tender and flavorful. Bone-in beef shank adds depth to the broth. You will need a reliable slow cooker or Crock Pot. A 6-quart model works well for this recipe. Here are some kitchen tools for preparation: - Blender: To blend the spice mix smoothly. - Skillet: For toasting the dried peppers and cooking the tacos. - Measuring spoons: For accurate spice measurements. - Forks: To shred the beef after cooking. These tools help ensure your Birria Tacos turn out perfectly every time. For the full recipe, check out the details above. Start by toasting the dried guajillo and ancho peppers. Heat them in a dry skillet for about 2-3 minutes. Watch them closely; you want them fragrant, not burnt. After toasting, put the peppers in a blender. Add the quartered onion, minced garlic, ground cumin, dried oregano, ground cinnamon, black pepper, and salt. Blend until smooth. If it’s too thick, add a splash of beef broth. The right texture is smooth but thick, similar to a paste. In a large bowl, mix the beef chuck roast and bone-in beef shank. Pour the spice blend over the meat. Make sure each piece is well-coated. This step adds rich flavor. Next, transfer the meat and spice mixture to your crock pot. Pour in the remaining beef broth, then add the bay leaves. Set the crock pot to low and cook for about 8 hours. The meat should be very tender and shred easily with a fork. To assemble the tacos, you need to soak the corn tortillas. Dip each tortilla briefly in the broth to soften them. This adds flavor and makes them easier to fold. After soaking, place some shredded beef on one half of the tortilla. Fold the tortilla over and cook it in a skillet over medium heat. Cook for about 2 minutes on each side until crispy and golden. The crispy texture makes these tacos even better. Enjoy them topped with fresh cilantro and served with lime wedges for extra zest. To adjust the spice level, add more or fewer dried peppers. Guajillo peppers are mild, while ancho peppers add depth. You can also add a pinch of cayenne for extra heat. For a richer broth, include a splash of apple cider vinegar. This adds brightness and balances the flavors. One common mistake is cooking the meat for too long. This can make it dry. Keep an eye on the time. When shredding beef, use two forks for best results. Shred in the direction of the grain. This keeps the pieces tender and juicy. Always return the shredded beef to the broth. This keeps it moist and flavorful. {{image_2}} You can easily make Birria Tacos without meat. Use jackfruit or mushrooms as the base. Both have great texture. For jackfruit, drain and shred it. Sauté with spices to add flavor. For mushrooms, use a mix of portobello and shiitake. These mushrooms add depth and umami. To create a flavorful plant-based version, use vegetable broth instead of beef broth. Blend in spices like cumin, oregano, and smoked paprika. This gives a rich taste. Don't forget to add lime juice for brightness. You can still enjoy that dipping broth with these plant-based options. When serving Birria Tacos, think about toppings. Fresh cilantro and chopped onions add crunch and flavor. You can also use avocado slices or guacamole for creaminess. If you like some heat, add pickled jalapeños or hot sauce. For sides, consider serving with rice or beans. These pair well and make a complete meal. You can also try serving with a refreshing corn salad or a simple slaw. Dips or sauces can elevate your meal. Try a zesty lime crema. Just mix sour cream with lime juice and zest. Another option is a spicy salsa. Blend tomatoes, jalapeños, onion, and cilantro for a fresh dip. Each of these adds a unique twist to your Birria Tacos. To keep your Birria Tacos fresh, store them in airtight containers. This keeps moisture in and air out. Place the tacos and broth in separate containers if you have leftovers. They stay fresh in the fridge for up to three days. After that, the meat may lose flavor and texture. Always check for signs of spoilage before eating. If you want to save Birria Tacos for later, freezing is a great option. First, let the meat cool completely. Then, portion the cooked meat and broth into freezer-safe bags. Remove as much air as possible before sealing. You can freeze them for up to three months. To thaw, place the bags in the fridge overnight. Reheat the meat in a skillet or microwave. Be sure to warm the broth too, as it adds flavor. This method keeps your tacos tasty and fresh, even after freezing. It takes about 15 minutes to prep and 8 hours to cook. Slow cooking is great because it makes the meat tender and tasty. The long cook time allows flavors to blend well. You can set it in the morning and enjoy it at dinner. Yes, you can use other meats! Pork shoulder or lamb works well. You can also try chicken for a lighter option. Choose cuts with some fat for the best taste. Just adjust the cooking time based on the meat you select. Birria Tacos are great with a few sides. Try serving them with rice and beans. A fresh salad can add a nice crunch. For drinks, pair tacos with a cold Mexican soda or a refreshing agua fresca. Enjoying these sides enhances the whole meal! In this article, we explored how to make delicious Crock Pot Birria Tacos. You learned about essential ingredients like guajillo and ancho peppers, and the best beef cuts. We discussed the tools you need, like a slow cooker and blender, and provided clear instructions for spice preparation, cooking, and assembling your tacos. I shared tips to perfect flavors, avoid mistakes, and explore variations, including vegan options. Finally, I explained proper storage and addressed common questions. With these insights, you’re ready to impress with your own Birria Tacos. Enjoy your cooking!

Crock Pot Birria Tacos Flavorful and Simple Recipe

Are you ready to savor the flavors of authentic Crock Pot Birria Tacos? This dish is simple, delicious, and perfect

- Chicken or Pork Options - You can use boneless chicken thighs or pork loin. Both give great flavor and texture. I often prefer chicken for its juiciness. - Key Seasonings - Use salt and pepper for basic seasoning. They enhance the meat's natural taste. Miso paste adds a deep, umami flavor to the sauce. - Components for Miso Sauce - The sauce needs miso paste, soy sauce, water, sesame oil, honey, and rice vinegar. Each ingredient works together to create a balanced taste. - Recommended Kitchen Tools - You will need a frying pan, three bowls for breading, and a whisk for the sauce. A thermometer helps check oil temperature. - Best Oils for Frying - I recommend vegetable oil for frying. It has a high smoke point and a neutral flavor, which is perfect for crispy katsu. Seasoning the Meat Start by seasoning your chicken thighs. Use salt and pepper to bring out the flavor. This simple step makes a big difference. Make sure to coat both sides evenly. Setting Up the Breading Station Next, prepare your breading station. You will need three bowls. Put flour in the first bowl. In the second bowl, beat one large egg. Finally, fill the third bowl with panko breadcrumbs. This setup helps you coat the meat easily. Best Practices for Frying When it’s time to fry, heat about half an inch of vegetable oil in a pan. Aim for 350°F or 175°C. This temperature is key for crispy katsu. Use a thermometer if you have one. It helps ensure perfect frying. How to Achieve a Perfect Crunch To get that crunch, carefully place the breaded chicken in the hot oil. Fry for about 4-5 minutes on each side. Look for a golden brown color. Once done, drain the chicken on paper towels to remove excess oil. Layering Ingredients Now it’s time to build your katsu bowls. Start with a scoop of cooked white rice in each bowl. Then, top it with sliced crispy katsu. Add a handful of shredded cabbage and some edamame for crunch. Drizzling Miso Sauce Finally, drizzle the miso sauce over the katsu. This sauce adds a rich flavor. For the best taste, don’t be shy with the sauce. Garnish with sesame seeds to finish. Enjoy this delicious meal! For the full recipe, see the above section. - Achieving Extra Crunchiness For a super crunchy katsu, use panko breadcrumbs. They are lighter and crispier than traditional breadcrumbs. Press the panko firmly onto the meat before frying. You can also double bread your katsu. Dredge it in flour, dip in egg, then coat again in panko. This adds more layers for crunch. - Cooking Times for Different Proteins Chicken thighs take about 4-5 minutes per side to cook. Pork loin also cooks in the same time. If you use chicken breasts, they may need a minute more due to their thickness. Always check that the meat is cooked to an internal temperature of 165°F. - Prepping in Advance You can prep katsu ahead of time. Bread the meat and store it in the fridge for up to 2 hours. This helps the coating stick better when you fry it. You can also make the miso sauce a day before. Keep it in a sealed container in the fridge until you’re ready to use it. - Reheating Techniques To reheat leftover katsu, use an oven. Preheat it to 350°F. Place the katsu on a baking sheet for 10-15 minutes until hot. This keeps the breading crispy. You can also use an air fryer. Set it to 350°F for about 5-7 minutes. This method revives the crunch nicely. {{image_2}} Flavor Differences Chicken katsu has a mild taste. It absorbs flavor well. Pork katsu offers a richer, savory profile. The fat in pork gives it a juicy bite. Each option brings a unique twist to your bowl. Cooking Time Adjustments Chicken usually cooks faster than pork. Fry chicken for about 4-5 minutes per side. Pork takes a little longer, around 6-7 minutes per side. Always check for doneness with a meat thermometer. Chicken should reach 165°F, while pork is best at 145°F. Tofu Katsu Recipe For a tasty tofu katsu, use firm tofu. Press it to remove extra water. Cut it into thick slices. Follow the same breading steps as chicken or pork. Fry until golden brown and crispy. Other Plant-Based Alternatives You can also try eggplant or tempeh. Eggplant gives a nice texture. Tempeh adds protein and a nutty taste. Both options work well as katsu in your bowl. Spicy Miso Enhancements For a spicy kick, add chili paste or sriracha to your miso sauce. Start with a small amount. Adjust to your heat preference. This twist adds depth to your dish. Alternative Sauces to Try You can use tonkatsu sauce for a sweet and tangy flavor. Or try a sesame dressing for a nutty taste. Experiment with these sauces to find your favorite combination. Check the [Full Recipe](#) for more details on making your katsu bowls! To keep your katsu bowls fresh, store them properly. First, let the katsu cool down. Place it in an airtight container. You can keep the rice and toppings in separate containers. This way, the katsu stays crispy, and the rice does not get soggy. Refrigerate your leftovers within two hours of cooking. They will last for about three days. For best flavor, eat them within the first two days. Want to save your katsu bowls for later? Freezing them is a great choice. First, make sure the katsu is completely cool. Wrap each piece tightly in plastic wrap. Then, place the wrapped katsu in a freezer-safe bag or container. You can also freeze the rice separately. When you are ready to eat, remove the katsu from the freezer. Thaw it in the fridge overnight. To keep the texture nice, reheat the katsu in the oven. Set it to 375°F (190°C) for about 10-15 minutes. This helps keep the crunch! If you microwave it, the katsu may turn soggy. Enjoy your meal with the miso sauce once it’s heated through. Katsu originated in Japan during the late 19th century. It comes from the French dish, "côtelette," a breaded meat cutlet. The Japanese adapted this idea, creating a crispy and tender dish. Katsu became popular as a quick meal and comfort food. You can find it in many Japanese homes and restaurants today. Yes, you can use gluten-free breadcrumbs for Katsu Bowls. They work well as a substitute. Look for brands made from rice flour or cornmeal. This option helps those with gluten allergies enjoy Katsu without worry. Just ensure the rest of your ingredients are also gluten-free. Serve Katsu Bowls with simple garnishes. Shredded cabbage adds crunch and freshness. Edamame gives a pop of color and nutrition. You can also sprinkle sesame seeds for a nutty flavor. A drizzle of miso sauce ties all the flavors together nicely. Enjoy it warm for the best taste! For authentic Katsu Bowls, seek out Japanese restaurants in your area. Look for places with a good reputation for traditional cuisine. Many cities have spots known for their Katsu. Ask locals for their favorite recommendations. You might discover hidden gems that serve excellent Katsu Bowls. Check out the full recipe for Crispy Katsu Bowls with Miso Zing [here](#). It includes all the steps you need for a delicious meal! In this guide, we've explored the essential ingredients and tools for making katsu bowls. You learned how to properly prepare your protein, achieve the perfect crunch, and assemble delicious bowls. I shared tips for making ahead and offered variations for everyone, including vegetarian options. Remember, katsu bowls are versatile and can be enjoyed in many ways. With these steps and tips, you'll impress anyone who tries your katsu bowl masterpiece. Enjoy cooking and let your creativity shine!

Japanese Katsu Bowls Simple and Flavorful Meal Guide

Are you ready to take your dinner game to the next level? Japanese Katsu Bowls are simple, tasty, and fun

To make your Mini Crème Brûlée Cheesecakes, you will need some simple ingredients. Each one plays a key role in creating a delicious dessert. Here’s what you should gather: - 1 cup graham cracker crumbs - 1/4 cup unsalted butter, melted - 2 cups cream cheese, softened - 1/2 cup granulated sugar - 1 teaspoon vanilla extract - 1 cup heavy cream - 2 large eggs - 1/4 cup brown sugar (for topping) - Fresh berries or mint leaves (for garnish) These ingredients come together to create a rich and creamy cheesecake. The graham cracker crumbs form a crunchy crust that contrasts well with the smooth filling. The cream cheese gives the cheesecake its signature texture, while the heavy cream adds richness. Vanilla extract enhances the flavors, making each bite delightful. You can customize these ingredients a bit. If you prefer a different crust, consider using crushed cookies or nuts. You can also swap the berries for other fruits to match your taste. For the full recipe and instructions, check out the [Full Recipe]. Enjoy your baking! First, preheat your oven to 325°F (160°C). This step makes sure your cheesecakes bake evenly. In a mixing bowl, combine the graham cracker crumbs and melted butter. Stir until it looks like wet sand. Press about 1 tablespoon firmly into each cavity of a mini cheesecake pan or muffin tin. Use paper liners for easy removal later. In a large bowl, beat the softened cream cheese until it’s smooth and creamy. Gradually add the granulated sugar while mixing until they are well combined. Don’t forget to add the vanilla extract for extra flavor. Next, pour in the heavy cream and beat until fluffy. Add the eggs one at a time. Mix on low speed until just combined. Be careful not to overmix; we want a smooth mix, not a frothy one. Spoon or pour the cheesecake mixture over the crusts in the mini cheesecake pan. Fill each cavity almost to the top. This ensures a nice, full cheesecake. Place the pan in the oven. Bake for 20-25 minutes. The edges should set, and the centers should jiggle slightly. After baking, allow them to cool in the oven with the door slightly ajar for about 10 minutes. After cooling in the oven, let them cool at room temperature for 30 minutes. Then, refrigerate for at least 4 hours or overnight. This helps the cheesecakes set fully. Right before serving, sprinkle a thin layer of brown sugar on each cheesecake. Use a kitchen torch to caramelize the sugar into a crispy layer. If you lack a torch, broil them on high for 1-2 minutes. Keep a close eye to prevent burning! Serve your mini cheesecakes with fresh berries or mint leaves. This adds color and makes them look extra special. You can find the full recipe to guide you through these steps. Enjoy your delightful creation! To make a great crust, use fresh graham cracker crumbs. You can crush them easily in a food processor or place them in a zip-top bag and crush with a rolling pin. Mix the crumbs with melted butter until it looks like wet sand. Press it firmly into the bottom of your mini cheesecake pan. This helps it hold together well after baking. If your cheesecake is too runny, it may need more time to bake. The centers should jiggle slightly but not look liquid. If it’s too dense, you might have overmixed the batter. Mix just until combined, especially after adding eggs. Letting the cheesecake cool gradually in the oven can also help it set correctly. Using a kitchen torch is fun but requires care. Always hold the torch away from your body and keep it pointed down. Light it before you get too close to the cheesecake. A thin layer of brown sugar caramelizes best. Move the flame in small circles to avoid burning any one spot. If you don’t have a torch, broil them briefly in your oven. Just watch closely to get that golden crust without burning. For the complete recipe, check out the [Full Recipe]. {{image_2}} You can easily change the flavor of your mini crème brûlée cheesecakes. To add chocolate, just mix in 1/2 cup of melted chocolate when you blend the cream cheese. This gives a rich and creamy taste. If you prefer fruit, try adding pureed strawberries or raspberries. Use about 1/2 cup of fruit puree in the mixture. This will make your cheesecakes fruity and fresh. You can also top them with whole fruits for a fun look. The crust can change the whole dessert. Instead of graham crackers, you can use crushed Oreos for a chocolate twist. For a nutty flavor, finely chop almonds or pecans and mix them with melted butter. Use about 1 cup of nuts for a tasty crust. This adds a crunchy texture that pairs well with the creamy filling. You can even mix different cookies or nuts to create a unique flavor. Presentation makes a big difference. For a fancy touch, serve your mini cheesecakes on a beautiful platter. Use small dessert glasses or jars for individual servings. This adds a cute look. Top each cheesecake with a sprinkle of edible gold or silver glitter for a wow factor. You can also add fresh mint leaves or edible flowers. These little details can impress your guests. If you want to go all out, drizzle some chocolate sauce or fruit coulis on the plate before placing the cheesecakes. For more ideas, check out the Full Recipe. To keep your mini crème brûlée cheesecakes fresh, store them in the fridge. Place them in an airtight container. This will help prevent them from drying out. They can last for up to five days in the fridge. Just make sure to keep them covered. If you want to save some for later, freezing works well too. First, let the cheesecakes cool completely. Then, wrap each one in plastic wrap. After that, place them in a freezer-safe bag. They can stay in the freezer for up to three months. When you're ready to eat, simply thaw them in the fridge overnight. Serve your cheesecakes cold for the best flavor. If you prefer them slightly warm, you can reheat them gently. Place them in a warm oven for a few minutes. Just remember to remove the sugar topping before reheating. Always brûlée the top just before serving for that perfect crunch! For more details, check the Full Recipe. Yes, you can make these cheesecakes ahead of time. Once they cool, store them in the fridge. They stay fresh for about three days. This makes them a great option for parties or special events. Just brûlée the tops right before serving for that perfect crispy layer. If you need a substitute for cream cheese, try mascarpone or ricotta cheese. Both give a creamy texture and rich flavor. You can also use Greek yogurt for a lighter option. Adjust the sugar if you use plain yogurt, as it can be tangy. To avoid cracks, don’t overmix your batter. Mix just until smooth. Bake at a low temperature and place a pan of water in the oven. This adds moisture and helps cook the cheesecake evenly. Let them cool slowly in the oven, too. This reduces sudden temperature changes. Yes, you can use a regular cheesecake pan. Just adjust the baking time. A larger pan takes longer to bake. Keep an eye on it and look for the same jiggle in the center. You can also cut the cheesecake into slices after it cools. You now have the tools to make great mini Crème Brûlée cheesecakes. We covered all the key ingredients, from graham cracker crumbs to fresh berries. You learned step-by-step instructions to prepare, bake, and cool your desserts. I shared helpful tips for a perfect crust and variations for added fun. Proper storage keeps them fresh, and you found answers to common questions. Now, it’s time to get creative and make these treats your own. Enjoy the process and share them with friends!

Mini Crème Brûlée Cheesecakes Delightful Easy Dessert

If you’re craving a sweet treat that’s both simple and fancy, mini crème brûlée cheesecakes are for you! These tiny

Older posts
Newer posts
← Previous Page1 … Page47 Page48 Page49 … Page60 Next →

dsad

© 2025 Emmas Dish • Built with GeneratePress

Our Policies

  • Copyright Policy
  • Cookie Policy
  • GDPR Policy
  • Privacy Policy
  • Disclaimer
  • Terms Of Use

More Information

  • Home
  • About
  • Contact
  • Appetizers
  • Dessert
  • Dinner
  • Drinks
©2025, Emmas Dish About Back To Top