Skip to content
DisclaimerTerms Of UseGDPR PolicyCookie Policy

Emmas Dish

  • Home
  • Drinks
  • Appetizers
  • Dinner
  • Dessert
  • About
  • Contact
  • Privacy Policy
DisclaimerTerms Of UseGDPR PolicyCookie Policy

Emma

- 3 cups all-purpose flour - 1 packet (2 1/4 teaspoons) active dry yeast - 1 cup warm water (110°F/45°C) - 2 tablespoons sugar - 1 teaspoon salt - 3 tablespoons olive oil - 4 cloves garlic, minced - 1/4 cup fresh parsley, chopped - 1/4 cup fresh basil, chopped - 1/4 cup grated Parmesan cheese - 1/2 teaspoon black pepper - 1 egg, beaten (for egg wash) To make my Herb & Garlic Swirl Rolls, you need a few key ingredients. All-purpose flour is a must. It gives the rolls their soft texture. Next, active dry yeast helps the dough rise. Warm water activates the yeast. Sugar feeds the yeast and adds a hint of sweetness. Salt enhances flavor, while olive oil keeps the dough moist. Garlic is the star ingredient for flavor. Fresh herbs like parsley and basil add freshness and depth. Grated Parmesan cheese gives a savory touch. Black pepper adds a bit of heat. Lastly, an egg wash gives the rolls a shiny finish. - Additional herbs - Cheese variations - Spices for added flavor You can customize these rolls with optional ingredients. Try adding more herbs like thyme or oregano for extra flavor. Different cheeses like mozzarella or cheddar can make them even richer. You can also add spices like red pepper flakes for a kick. These options let you personalize the rolls to your taste. For the full recipe, check out the detailed steps to create these delightful rolls. - Activating the yeast: Start by mixing warm water, sugar, and yeast in a bowl. Wait about 5 minutes until it foams. This shows the yeast is alive. - Mixing dry and wet ingredients: Add salt, olive oil, and 2 cups of flour to the yeast mix. Stir until it all blends well. - Kneading the dough: Transfer the dough to a floured surface. Knead it for 5-7 minutes, making it smooth and elastic. - Ideal rising conditions: Place the dough in a greased bowl. Cover it with a damp cloth. Find a warm spot in your kitchen. - Time needed for rising: Let the dough rise for about 1 hour. It should double in size, showing it's ready for the next step. - Combining the herb ingredients: In a small bowl, mix minced garlic, parsley, basil, Parmesan cheese, and black pepper. This blend gives the rolls their flavor. - Spreading on the dough: Roll out the dough into a rectangle. Spread the herb and garlic mixture evenly over the dough. - Rolling the dough into a log: Start from one long edge and roll the dough tightly into a log. Pinch the seam to seal it well. - Slicing and placing in the dish: Cut the log into 12 equal slices. Place them in a greased baking dish or on a parchment-lined baking sheet. - Proofing after shaping: Cover the rolls with a cloth. Let them rise for another 30 minutes to puff up before baking. - Preparing for the oven: Preheat your oven to 375°F (190°C). Brush the tops with the beaten egg for a shiny finish. - Baking and finishing: Bake for 20-25 minutes until golden brown. Let cool slightly before serving. For the full recipe, check the section above. To make the best Herb & Garlic Swirl Rolls, you need the right dough. Start with the flour. Use all-purpose flour for a soft, fluffy texture. The dough should feel smooth and elastic. Knead it for about 5 to 7 minutes. This helps develop the gluten. You can tell the dough is ready when it springs back after a poke. If it feels sticky, add a little more flour. Avoid adding too much, or the rolls will be tough. Want to boost the flavor? Try adding more herbs. Thyme, oregano, or dill work great. You can also mix in some sun-dried tomatoes for a twist. For cheese lovers, different cheeses can really change the taste. Mozzarella gives a creamy texture. Feta adds a salty kick. Just remember to adjust the amount based on your taste. Checking for doneness is key. Your rolls should be golden brown on top. You can tap the bottom of a roll. If it sounds hollow, it’s done. For that crispy crust, place a pan of water in the oven. This creates steam and helps the rolls bake evenly. Let them cool before serving to keep the texture perfect. For the full recipe, refer to the earlier section. Enjoy your baking! {{image_2}} You can easily add cheese to these rolls. This step adds a creamy, rich taste that pairs well with herbs. I recommend using mozzarella for a gooey center or sharp cheddar for a bolder flavor. Cream cheese can also work great if you want a softer filling. Simply spread your chosen cheese on top of the herb mix before rolling. To make these rolls gluten-free, swap the all-purpose flour with a gluten-free blend. Look for a blend that contains xanthan gum. This helps mimic the texture of wheat flour. Use the same amount as the original recipe. You may need to bake a bit longer, so check for golden brown edges. For a vegan twist, replace dairy and eggs. Use almond milk or soy milk instead of regular milk. You can also swap butter for vegan margarine. For the egg wash, brush the tops with a mix of plant-based milk and a little maple syrup. This keeps the flavors balanced while making them vegan-friendly. For the full recipe and details, refer to the earlier section. Store leftover rolls in the fridge. Use an airtight container to keep them fresh. This helps prevent them from drying out. They should last about 3 to 4 days. If you want to enjoy them warm, reheat them in the oven for a few minutes. You can freeze these rolls for later. First, let them cool completely. Wrap each roll in plastic wrap, then place them in a freezer bag. This keeps the rolls safe from freezer burns. They can last for about 2 to 3 months in the freezer. To reheat, take them out and let them thaw. You can warm them in the oven or microwave. Enjoy the fresh taste as if they were just baked. For the full recipe, check the previous section on how to make Herb & Garlic Swirl Rolls. To make these rolls, start by mixing warm water, sugar, and yeast. Let it sit. Then, add salt, olive oil, and flour. Mix until you have a dough. Knead it for a few minutes. Let the dough rise until it doubles in size. Roll it out, spread the garlic and herb mixture, then roll it up. Slice the log and let the rolls rise again. Bake until golden. That’s it! For more details, check the Full Recipe. Yes, you can use dried herbs! Just remember, dried herbs are stronger. Use about one-third of the amount. For example, if the recipe calls for 1 tablespoon of fresh herbs, use 1 teaspoon of dried instead. This swap works well. The taste may differ slightly, but your rolls will still be tasty! These rolls stay fresh for about 2-3 days at room temperature. Keep them in an airtight container. If you want them to last longer, you can freeze them. They will stay good in the freezer for up to 3 months. Just thaw and warm them when ready to eat. You can find pre-made rolls at local bakeries. Look for ones that focus on fresh ingredients. Many grocery stores also carry them. Check the bakery section. If you need them fast, some stores have frozen options. Just bake them at home! Yes, you can easily double the recipe. Just use twice the amount of each ingredient. Make sure you have a big bowl for mixing. You might need a larger baking dish too. The baking time will stay the same, but check for doneness. Enjoy making more rolls! You now have all the tools to make delicious Herb and Garlic Swirl Rolls. We covered the essential ingredients, from all-purpose flour to fresh herbs. You learned how to prepare the dough, create a tasty filling, and shape the rolls. I shared tips to perfect your dough and enhance the flavor. You can even try different variations to suit your taste. With proper storage advice, your leftovers will stay fresh. Enjoy your baking journey and the delightful rolls that come from it!

Herb & Garlic Swirl Rolls Flavorful and Easy Recipe

If you’re craving warm, flavorful bread, you’re in the right place! My Herb & Garlic Swirl Rolls are easy to

To make Cajun potato soup, you need: - 4 medium russet potatoes, peeled and diced - 1 onion, finely chopped - 3 cloves garlic, minced - 2 celery stalks, diced - 1 bell pepper (red or green), diced - 4 cups vegetable or chicken broth - 1 cup heavy cream (or coconut milk for a lighter option) - 2 tablespoons Cajun seasoning - 1/2 teaspoon smoked paprika - 1/4 teaspoon cayenne pepper (adjust for heat preference) - 2 tablespoons olive oil - Salt and pepper to taste - 1/4 cup green onions, chopped (for garnish) - 1/4 cup fresh parsley, chopped (for garnish) Using fresh ingredients makes your soup taste great. Fresh potatoes, onions, and peppers bring vibrant flavors. Fresh garlic gives a strong aroma. If you use dried herbs, you might lose some of that flavor. Dried seasoning can work in a pinch, but always choose fresh when you can. This recipe allows for easy swaps. If you're dairy-free, use coconut milk instead of heavy cream. For a gluten-free option, use certified gluten-free broth. If you can't have nightshades, swap the bell pepper with zucchini or carrots. These changes keep the soup tasty and safe for everyone. Ingredients Preparation Start by gathering your ingredients. You need: - 4 medium russet potatoes, peeled and diced - 1 onion, finely chopped - 3 cloves garlic, minced - 2 celery stalks, diced - 1 bell pepper (red or green), diced - 4 cups vegetable or chicken broth - 1 cup heavy cream (or coconut milk for a lighter option) - 2 tablespoons Cajun seasoning - 1/2 teaspoon smoked paprika - 1/4 teaspoon cayenne pepper (adjust for heat preference) - 2 tablespoons olive oil - Salt and pepper to taste - 1/4 cup green onions, chopped (for garnish) - 1/4 cup fresh parsley, chopped (for garnish) Wash and chop all vegetables. Make sure to dice them evenly. This helps them cook at the same rate. Cooking Techniques for Perfect Consistency Heat olive oil over medium heat in a large pot. Add the chopped onion, celery, and bell pepper. Sauté for about 5 minutes until they soften. Stir in minced garlic and cook for 1 more minute. Be careful not to burn the garlic. Next, add the diced potatoes and pour in the broth. Bring the mixture to a boil, then lower the heat to a simmer. Stir in the Cajun seasoning, smoked paprika, and cayenne pepper. Let the soup simmer for 15 to 20 minutes until the potatoes are tender. When the potatoes are soft, use an immersion blender to mix the soup. Blend it to your desired smoothness. If you don't have one, use a regular blender. Just be sure to let it cool slightly before blending. Once blended, return the soup to the pot. Stir in the heavy cream or coconut milk. Let it heat for another 5 minutes. Taste, then add salt and pepper as needed. You can also add more Cajun seasoning if you want more heat. This soup is fun to make and packed with flavor. Don't forget to check out the Full Recipe for more details! To make your Cajun potato soup pop, consider adding more spices. Try using thyme or oregano for an herbal touch. A pinch of garlic powder can boost the garlic flavor. If you love heat, a bit more cayenne pepper works wonders. Always taste as you go to find the right balance for you. This method ensures that each bowl has a rich, full flavor. Sautéing vegetables right is key for great flavor. Start with a hot pan; this helps the veggies brown. Use olive oil to prevent sticking. Add onions first, as they need more time to soften. After a few minutes, add celery and bell pepper. Cook until they are tender. This process creates a nice base for your soup. The goal is to unlock those natural sugars for deeper flavor. Want a heat boost? Increase your Cajun seasoning. You can also add extra cayenne pepper. For a smoky kick, a dash of hot sauce will do. If you want a unique twist, try adding diced jalapeños while sautéing. Always start small, then adjust to your taste. This way, you can enjoy your soup just how you like it. {{image_2}} You can easily make Cajun potato soup vegetarian or vegan. Simply swap the chicken broth for vegetable broth. Use coconut milk instead of heavy cream. This keeps the soup creamy while being dairy-free. You still get that rich flavor, thanks to the Cajun seasoning. This version is just as hearty and tasty. Want to add protein? Chicken and sausage fit well in this soup. For chicken, use cooked, shredded pieces. Stir it in right before serving. If you prefer sausage, I suggest andouille for a spicy kick. Slice it and sauté it with the veggies. This adds depth and flavor to the dish. Choosing the right potatoes can change the soup's taste and texture. Russet potatoes are classic for a creamy base. They break down well in the soup. Yukon gold potatoes give a buttery flavor. If you want a firmer texture, use red potatoes. They hold their shape. Each potato brings its unique charm to the recipe. After enjoying your Cajun potato soup, let it cool down. Then, scoop it into an airtight container. Make sure to seal it tightly. Store it in the fridge. It will stay fresh for about three to four days. If you want to keep it longer, consider freezing it. When you’re ready to enjoy it again, take out your soup. Pour the soup into a pot over medium heat. Stir often to warm it evenly. If it seems too thick, add a splash of broth or water. You can also use the microwave. Heat in short intervals. Stir between each interval for even warming. To freeze your Cajun potato soup, use freezer-safe containers. Leave some space at the top, as the soup will expand. Label the containers with the date. It can stay frozen for up to three months. When you’re ready to eat, thaw it in the fridge overnight before reheating. This method helps keep the flavor and texture intact. For a quick thaw, place the container in cold water. Cajun Potato Soup is a warm, creamy dish. It features hearty potatoes, savory spices, and rich broth. This soup comes from Cajun cooking, which blends French, African, and Spanish flavors. The spices give it a unique kick. You can taste the warmth of the South in every bite. It's comfort food that fills you up and warms your soul. To make Cajun Potato Soup gluten-free, choose the right broth. Use vegetable or chicken broth that is labeled gluten-free. Also, check the Cajun seasoning. Some brands may add gluten. You can also make your own blend with spices like paprika, cayenne, and garlic powder. This way, you avoid gluten while keeping the flavor. Cajun Potato Soup pairs well with many dishes. Here are some great options: - Crusty bread or cornbread - A fresh green salad - Fried shrimp or chicken for a protein boost - A side of rice for a filling meal These options complement the soup's rich flavors and add variety to your meal. You can find the full recipe for Spicy Cajun Potato Soup Delight here. This soup is easy to make and brings joy to any table. Enjoy making it! This blog post covered everything you need for a great Cajun Potato Soup. We discussed ingredients, including fresh versus dried options and substitutions for allergens. We provided a step-by-step cooking guide and useful tips for using an immersion blender. You can customize flavors and choose different protein options for variety. Finally, we shared storage tips to keep leftovers fresh. Enjoy making your soup spicy or mild. Explore different variations and find what you love best. Happy cooking!

Cajun Potato Soup Flavorful and Easy Comfort Dish

Looking for a hearty and easy dish that warms the soul? Cajun Potato Soup is your answer! Packed with rich

- 2 large apples (Granny Smith or Honeycrisp), thinly sliced - 1/4 cup almond butter (or any nut/seed butter of choice) - 2 tablespoons honey or maple syrup - 1/4 cup granola (your favorite mix) - 2 tablespoons mini dark chocolate chips - 1/4 cup shredded coconut (unsweetened) - 1/4 teaspoon cinnamon (optional) - A handful of chopped nuts (walnuts or pecans) for topping (optional) Healthy apple nachos need fresh apples as the base. I prefer Granny Smith for their crispness. Honeycrisp works well too for a sweeter bite. Slice them thin to create great layers of flavor. Next, choose a nut butter. Almond butter is my go-to. It pairs nicely with apples. You can also use peanut or sunflower seed butter if you prefer. For sweetness, I add honey or maple syrup. This choice brings a lovely flavor to the mix. Granola adds crunch and texture. Pick a mix that has nuts or seeds for more nutrition. Dark chocolate chips bring a sweet surprise. They melt a bit on warm apples, adding richness. Shredded coconut adds a tropical twist. I like to use unsweetened coconut for a healthier option. If you want a hint of spice, add cinnamon. It enhances the overall taste. Finally, consider adding chopped nuts. Walnuts or pecans provide a nice crunch. With these ingredients, you create a tasty and healthy snack. Check the full recipe for preparation steps. - First, wash the apples under cool water. - Next, core the apples to remove the seeds. - Slice the apples into thin rounds, about 1/4 inch thick. - Arrange the apple slices in a single layer on a large plate. - In a small bowl, mix the almond butter and honey or maple syrup. - Stir until smooth and creamy. - If the mixture is too thick, warm it in the microwave for 10-15 seconds. - This helps it drizzle easily over the apples. - Begin layering the apple slices on the plate. - Drizzle the nut butter mixture evenly over the apple slices. - Sprinkle the granola on top for a nice crunch. - Add mini dark chocolate chips for a sweet touch. - Finally, sprinkle shredded coconut over everything. - If you like, dust with cinnamon or add chopped nuts for extra flavor. Your healthy apple nachos are now ready to enjoy! Check out the Full Recipe for more details on this tasty snack. For the best apple nachos, I recommend using Granny Smith or Honeycrisp apples. These apples are both crunchy and tart. They hold their shape well when sliced. This firmness makes them perfect for nachos. Plus, their flavors balance nicely with nut butter and toppings. To make your apple nachos even tastier, consider adding more toppings. Dried fruits like raisins or cranberries bring sweetness. You can also use yogurt for creaminess. Greek yogurt works well for a protein boost. A sprinkle of chia seeds adds nutrition and crunch. If you're serving a larger group, it's easy to scale the recipe. Simply increase the number of apples and toppings. For each extra apple, use the same amount of nut butter and sweetener. This way, everyone gets a generous serving. Arrange the nachos on multiple plates for a fun sharing experience. {{image_2}} For a nut-free treat, you can swap nut butter with sunflower seed butter or soy nut butter. These options give you a similar creaminess without nuts. You can also try tahini, which has a unique flavor. For toppings, consider using pumpkin seeds or sunflower seeds. You can add dried fruits like raisins or cranberries for extra sweetness. To cut down on sugar, use sugar-free sweeteners like stevia or erythritol. You can also skip the honey or maple syrup altogether. Instead, let the natural sweetness of the apples shine. Adding ripe banana slices can offer a sweet touch without adding sugar. Fresh berries also make a great topping and are low in sugar. Want to spice things up? You can add a dash of cinnamon or nutmeg for warmth. A few drops of vanilla extract can enhance the flavor too. For a fun twist, try adding a sprinkle of chili powder for a kick. You can also mix in some cocoa powder with the nut butter for a chocolatey vibe. To keep apple nachos fresh, store them in an airtight container. This prevents them from browning. I suggest eating them within a day for the best taste. If you have leftover toppings, store them separately. This helps maintain the crunch of the granola and the creaminess of the nut butter drizzle. You can prepare components in advance to save time. Slice the apples and store them in water with a splash of lemon juice. This keeps them bright and fresh. You can also mix the nut butter and honey ahead of time. Just store it in a small jar and keep it in the fridge. Granola and toppings can be pre-portioned for easy assembly. Reheating apple nachos is not recommended, as it may make them soggy. Instead, enjoy them cold. If you want warm toppings, consider microwaving the nut butter mixture slightly before drizzling it over the fresh apples. This adds warmth without losing the crispness of the nachos. Enjoy your healthy apple nachos right after you prepare them for the best flavor and crunch. You can prepare apple nachos in advance, but they taste best fresh. To do this, slice the apples and store them in water with lemon juice. This keeps them from browning. You can mix your toppings ahead too. Just add them right before serving for the best crunch. Granny Smith and Honeycrisp apples are my favorites for this recipe. Granny Smith gives a nice tart taste. Honeycrisp is sweet and crunchy. Both apples hold up well and taste great with toppings. Yes! Try using yogurt instead of nut butter for a creamy touch. You can also add fresh berries for sweetness. Dried fruits like raisins or dates can add flavor without many calories. Just keep an eye on portion sizes to stay low-calorie. You can create delicious healthy apple nachos with just a few simple steps. We covered the ingredients needed, from apples to nut butter. I also shared tips for making them special and answers to common questions. These nachos are fun to prepare and are great for any crowd. Try different toppings or flavors to find what you love most. Enjoy your tasty treat and feel good about the healthy choices you've made!

Healthy Apple Nachos Irresistible Tasty Snack

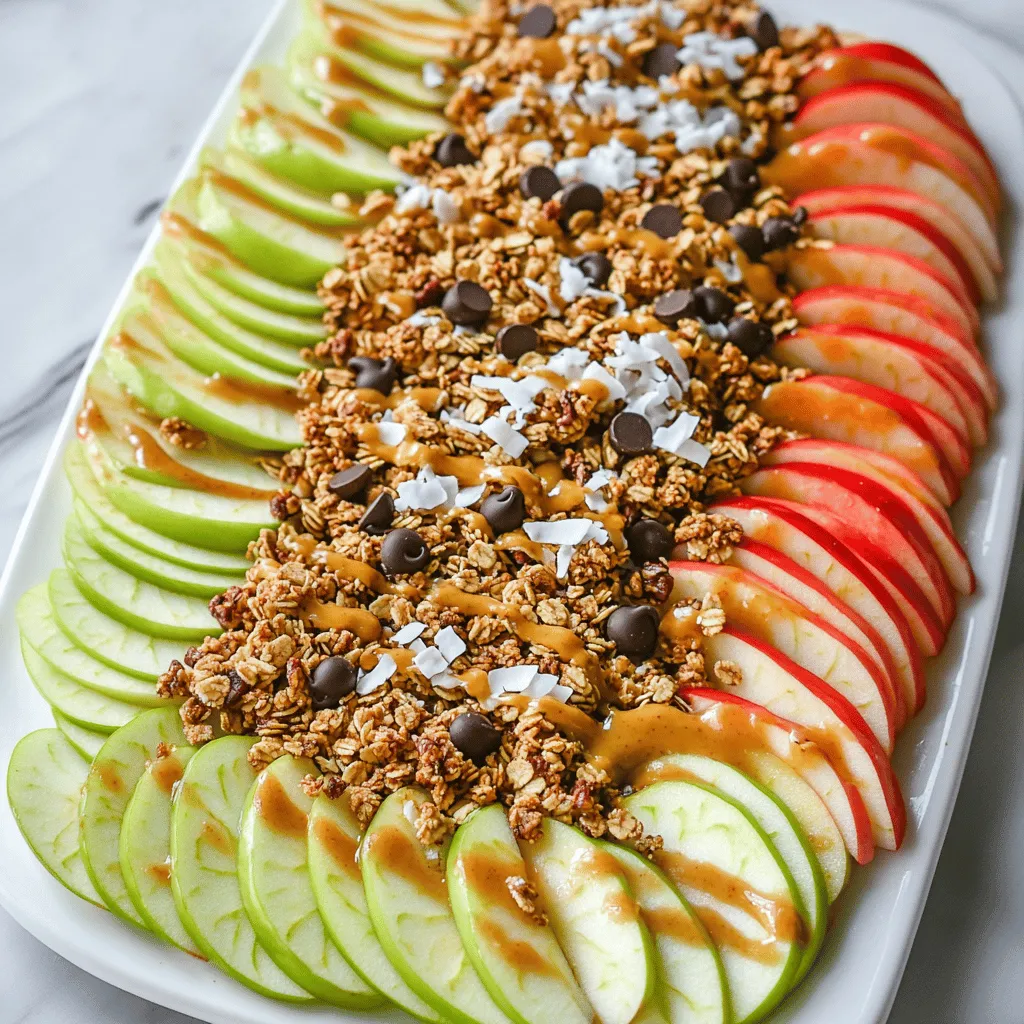
Are you looking for a fun and tasty snack that’s also good for you? Let me introduce you to Healthy

- 1 cup milk chocolate chips - 1 cup white chocolate chips - 1 can (14 oz) sweetened condensed milk - 1 cup crushed chocolate sandwich cookies (like Oreos) - 1 teaspoon vanilla extract - 1/2 cup mini chocolate chips (for topping) - Pinch of salt To make this fudge, gather your ingredients. You need both milk and white chocolate chips to create a creamy base. Sweetened condensed milk adds richness, while crushed cookies give texture. Don’t forget the vanilla extract for flavor, and a pinch of salt to balance the sweetness. The mini chocolate chips on top add a fun crunch. - Medium saucepan - Baking dish (8x8 inch) - Parchment paper You will need a medium saucepan for melting the chocolate. An 8x8 inch baking dish is perfect for setting the fudge. Line it with parchment paper. This makes it easy to lift out the fudge later. These tools help you create a smooth and delicious treat. For the full recipe and details on making your fudge, check out the [Full Recipe]. - Line the baking dish with parchment paper. - Combine chocolate chips and sweetened condensed milk in a saucepan. Start by taking your baking dish. Grab some parchment paper and line the bottom. Leave some paper hanging over the edges. This helps you lift the fudge out later. Next, take a medium saucepan. Add one cup of milk chocolate chips and one cup of white chocolate chips. Pour in one can of sweetened condensed milk. Mix these ingredients well. - Melt mixture over low heat, stirring constantly. - Remove from heat and add vanilla extract and salt. Now, place the saucepan on the stove over low heat. Stir the mixture constantly. This step is key. You want it to melt into a smooth blend. Once it’s all melted, take it off the heat. Stir in one teaspoon of vanilla extract and a pinch of salt. Mix until everything is well combined. - Fold in crushed cookies. - Pour mixture into baking dish and top with mini chocolate chips. - Refrigerate until firm. Next, fold in one cup of crushed chocolate sandwich cookies. Use a spatula to mix them gently. Pour the fudge mixture into your prepared baking dish. Spread it evenly. Then, sprinkle half a cup of mini chocolate chips on top. Press them lightly into the fudge. Finally, place the dish in the fridge. Let it chill for three hours or until firm. For the full recipe, check the details above. To make the best milk and cookies fudge, you need to pay close attention to detail. First, ensure that all chocolate chips are fully melted. This step is key for a smooth texture. Use low heat and stir constantly. If you rush this, your fudge may end up grainy. Next, use a spatula to spread the fudge evenly in your baking dish. This helps it set nicely and look great when cut. When it comes time to serve, make it fun! Decorate each square of fudge with a mini cookie on top. This simple touch adds charm and tempts everyone to take a bite. You can also serve the fudge in cute cupcake liners. This not only looks nice but makes it easy for guests to grab a piece. With these tips, your fudge will surely impress! {{image_2}} You can make this fudge even better by adding flavors. Try mixing in peanut butter or almond extract for a twist. Just a teaspoon of either will change the taste. You can also experiment with other crushed cookies. Try gingersnaps or chocolate chip cookies to create new textures and flavors. Each type of cookie adds its unique crunch and taste. If you're vegan, use vegan chocolate chips and coconut cream instead of sweetened condensed milk. This keeps the fudge creamy and rich, without dairy. For those who need it, there are gluten-free cookies available. Look for gluten-free chocolate sandwich cookies to make this treat safe for everyone. These small changes help all your friends enjoy this sweet delight! To keep your Milk and Cookies Fudge fresh, refrigeration is key. After the fudge sets, you should cut it into squares. Place the squares in an airtight container. This will help prevent them from drying out. You can store the fudge in the fridge for up to two weeks. For best taste and texture, enjoy it within the first week. If you want to save some fudge for later, freezing works well. Wrap each square tightly in plastic wrap. Then, place them in a freezer-safe bag. This method keeps them fresh for up to three months. When you are ready to eat, take the fudge out of the freezer. Let it thaw in the fridge overnight. This way, it will stay soft and tasty. Enjoy your sweet treat even after some time! Yes, you can make Milk and Cookies Fudge ahead of time. I suggest preparing it up to one week before you plan to serve it. Just keep it stored in an airtight container in the fridge. This way, the fudge stays fresh and tasty. If you need alternatives for sweetened condensed milk, try using coconut cream or evaporated milk. You can also mix milk and sugar to create a homemade version. This works well for those with dietary needs, like lactose intolerance. Milk and Cookies Fudge makes a fun treat for any gathering. You can cut it into small squares and arrange them on a nice plate. Guests will love the unique flavor and cute look. You can also serve it with milk or coffee for a delightful pairing! You can find pre-made Milk and Cookies Fudge at some local bakeries. Many online stores also sell it. Check websites like Amazon or specialty dessert shops for ready-to-eat options. In this post, we explored how to make delicious Milk and Cookies Fudge. You learned about the main ingredients, tools, and step-by-step instructions. Tips for perfecting your fudge and fun flavor variations added depth to the recipe. You also discovered proper storage methods to keep your fudge fresh. Final thoughts: This fudge is a sweet treat that’s easy to make. Whether for a party or a simple snack, enjoy every bite!

Milk and Cookies Fudge Delightful Sweet Treat

Are you ready to enjoy a treat that combines classic flavors with a fun twist? This Milk and Cookies Fudge

To make baked Parmesan zucchini, gather these items: - 4 medium zucchini, sliced into 1/4 inch rounds - 1 cup grated Parmesan cheese - 1 cup breadcrumbs (preferably panko for extra crunch) - 2 tablespoons olive oil - 2 cloves garlic, minced - 1 teaspoon dried oregano - 1 teaspoon dried thyme - Salt and pepper to taste - Fresh parsley, chopped (for garnish) These ingredients come together to create a crispy and flavorful snack. Each component plays a key role in making the dish tasty. When choosing zucchini, look for firm, smooth skin. Fresh zucchini should feel heavy for its size. Check for bright color and no soft spots. Small to medium zucchini often taste better than larger ones. They have fewer seeds and more flavor. If you can't find Parmesan cheese, try Pecorino Romano. It has a similar taste but is a bit saltier. For breadcrumbs, you can use crushed crackers or even cornmeal. Both will give a nice crunch. If you want a dairy-free option, use nutritional yeast instead of cheese. This keeps the flavor rich without dairy. Start by washing the zucchini well. I like to choose medium-sized zucchinis for this recipe. Slice them into 1/4 inch rounds. Try to keep each piece the same size. This helps them cook evenly. Once sliced, place the zucchini rounds on a paper towel. This step helps remove extra moisture. Less moisture means crispier bites! In a large bowl, mix together the grated Parmesan cheese, breadcrumbs, minced garlic, oregano, thyme, salt, and pepper. Stir it until everything is blended. Next, take the sliced zucchini and drizzle olive oil over them. Use your hands to gently toss the slices, so they are coated. Now, dip each slice into the breadcrumb mixture. Press down gently to ensure the coating sticks well. Place the coated slices on a baking sheet lined with parchment paper. Make sure they don’t touch each other. For the best results, preheat your oven to 425°F (220°C). Once the oven is ready, place the baking sheet inside. Bake the zucchini for about 20-25 minutes. Watch for the tops to turn golden brown and crispy. The zucchini should feel tender to the touch. Once they are done, take them out and let them cool for a few minutes. Garnish with freshly chopped parsley before serving. Enjoy your crispy, flavorful snack! For a detailed look at the method, check the Full Recipe. For that crispy bite, use panko breadcrumbs. They give a great crunch. Make sure to coat each zucchini slice well. Press the breadcrumb mixture onto the slices firmly. This step helps the coating stick better during baking. To boost crunch, add some cornstarch to the breadcrumb mix. It helps create a crispier texture. Bake the zucchini at a high temperature, around 425°F (220°C). This ensures they cook fast and brown nicely. One common mistake is overcrowding the baking sheet. Give each piece space to breathe. If they are too close, they will steam instead of crisp. Another mistake is not drying the zucchini. Make sure to pat them dry before coating. This helps the oil and breadcrumbs stick better. Watch the time, too. Baking them longer may make them soggy. Check for doneness at around 20 minutes. If they look golden and crispy, they are ready. Fresh herbs add bright flavor. Use them if you can find them. Thyme and oregano are great choices. If fresh is not available, dried herbs work well too. They still pack a lot of flavor. When using dried herbs, use about one-third of the amount. Dried herbs are stronger than fresh. Mix them well into the breadcrumb mixture for even flavor. This small change can make a big difference in taste. For more details, check the full recipe for Baked Parmesan Zucchini. {{image_2}} You can switch up the cheese for more taste. Try mixing mozzarella with Parmesan. This adds a nice stretch and creaminess. Feta cheese is another great choice. It brings a tangy kick that pairs well with zucchini. You can also use cheddar for a sharp flavor. Just remember, each cheese will change the final taste a bit. So, feel free to explore! Zucchini is just the start. You can add other veggies to the mix. Eggplant works well and has a similar texture. Bell peppers can add a sweet crunch. Even thin slices of sweet potato can be fun. Just adjust the bake time as needed. Keep an eye on them so they cook through and get crispy like the zucchini. Want some heat? You can easily spice things up! Add red pepper flakes to the breadcrumb mix. This gives a nice kick without overpowering the taste. For more heat, try adding diced jalapeños. You can even use a dash of hot sauce in the olive oil. Just be careful not to overdo it. A little goes a long way in keeping it tasty! Explore these variations to create your perfect Baked Parmesan Zucchini snack. You can find the Full Recipe above to get started! To store leftover baked Parmesan zucchini, let it cool first. Once cooled, place it in an airtight container. This keeps the zucchini fresh. You can store it in the fridge for up to three days. Make sure to layer the zucchini with parchment paper. This prevents sticking and keeps it crispy. To reheat, use the oven for the best results. Preheat your oven to 350°F (175°C). Place the zucchini on a baking sheet. Warm it for about 10-15 minutes. This helps regain the crispiness. You can also use a microwave, but it may make the zucchini soft. Heat in 30-second intervals until warm. You can freeze baked Parmesan zucchini for long-term storage. First, let the zucchini cool completely. Then, place the slices in a single layer on a baking sheet. Freeze them for a couple of hours until firm. Once frozen, transfer the slices to a freezer bag. Remove as much air as possible. Label the bag and store it in the freezer for up to three months. When ready to eat, bake from frozen. This keeps the flavor and texture intact. For more details, check the Full Recipe. Yes, you can make Baked Parmesan Zucchini ahead of time. Prepare the zucchini slices up to the coating step. Store them in the fridge for up to a day. This keeps them fresh and ready to bake. When you are ready, just coat them and bake. It saves time for busy days. No, this recipe is not gluten-free. The breadcrumbs used contain gluten. If you need a gluten-free option, use gluten-free breadcrumbs. They work well and still give great flavor and crunch. You can also skip the breadcrumbs for a low-carb version. The zucchini will still taste good. Baked Parmesan Zucchini pairs well with many dishes. You can serve it as a snack or side dish. Try pairing it with grilled chicken or fish for a full meal. It also goes great with a fresh salad. For a fun twist, serve it with marinara sauce for dipping. You learned about the key ingredients for Baked Parmesan Zucchini, how to prepare it, and tips for perfecting the dish. We explored variations, storage tips, and answered common questions. Remember, fresh zucchini can make all the difference. Try different cheeses or spices to find your favorite flavor. You can enjoy this tasty dish and share it with friends and family anytime. Incorporate these tips into your cooking to make it even better next time. Enjoy your cooking journey and the delicious results!

Baked Parmesan Zucchini Crispy and Flavorful Snack

Are you ready to take your snacking game to the next level? Baked Parmesan Zucchini is the answer! This crispy,

To create a tasty Teriyaki Chicken Casserole, gather the following ingredients: - 2 cups cooked rice (white or brown) - 1 pound boneless, skinless chicken thighs, diced - 1 cup broccoli florets - 1 cup snap peas, trimmed - 1 cup bell peppers (any color), diced - 1 medium onion, diced - 3 cloves garlic, minced - 1/2 cup teriyaki sauce (store-bought or homemade) - 1 tablespoon sesame oil - 1 teaspoon grated fresh ginger - 1 cup shredded mozzarella cheese - 2 green onions, sliced for garnish - Sesame seeds for garnish - Salt and pepper to taste These ingredients create a dish full of flavor and texture. Using chicken thighs keeps the meat juicy. The veggies add crunch and color. The teriyaki sauce brings a sweet and savory taste that makes the meal special. Feel free to mix and match veggies based on what you like or have on hand. You can find the full recipe to guide you through the cooking process. Enjoy making this simple and delicious casserole! 1. Preheat the oven: Set your oven to 350°F (175°C). This heat works well for baking. 2. Sauté the chicken: In a large skillet, pour in sesame oil. Heat it over medium. Add diced chicken thighs and cook them for about 6-8 minutes. They should turn brown and be fully cooked. Season with salt and pepper to taste. 3. Add vegetables and garlic: Now, add diced onion, minced garlic, bell peppers, broccoli, and snap peas. Sauté these for 4-5 minutes. You want the veggies to be tender but still crisp. 1. Combine rice and chicken mixture: In a large bowl, mix the cooked rice with the chicken and veggies. Stir well to make sure everything is coated nicely with the teriyaki sauce. 2. Transfer to baking dish: Grease a 9x13 inch baking dish. Pour the rice and chicken mixture into it. Spread it evenly across the dish. 3. Top with cheese and bake: Sprinkle shredded mozzarella cheese on top. Place the dish in the oven and bake for 25-30 minutes. You want the cheese to be melted and bubbly. 1. Cool and garnish: After taking it out of the oven, let it cool for a few minutes. Then, garnish with sliced green onions and sesame seeds. This adds color and flavor. 2. Serving suggestions: You can serve this directly from the baking dish. For a nice touch, scoop portions onto individual plates. Add more green onions and sesame seeds for extra flair. Enjoy your meal! How to choose the right chicken When picking chicken, use boneless, skinless thighs. They stay juicy and tender. Look for pieces with a nice pink color. Avoid any that look gray or dry. Fresh chicken has no smell. This is key for great flavor in your casserole. Best practices for sautéing vegetables Start with a hot pan. Add oil and let it heat up. Use fresh veggies for the best taste. Cut them into even pieces. This helps them cook evenly. Stir often to avoid burning. Cook until they are bright and just tender. This keeps their crunch. Ideal side dishes Serve your casserole with a simple salad. A side of steamed rice works too. You can even try pickled veggies. They add a nice tang. These sides balance the sweet teriyaki flavor well. Pairing with sauces or dips You can add a splash of extra teriyaki sauce on top. It gives a rich flavor boost. Soy sauce also pairs nicely. For something different, try a sweet chili sauce. It adds a kick that many love. Decorating the dish Serve the casserole right from the baking dish. It looks warm and inviting. If you want to impress, scoop portions onto plates. This makes it feel fancy without extra work. Using garnishes effectively Garnish with sliced green onions and sesame seeds. They add color and crunch. A sprinkle of fresh herbs can also brighten the dish. Keep it simple for a beautiful finish. {{image_2}} You can easily change up the proteins in this dish. If you want a meat-free meal, use tofu. For seafood lovers, shrimp works great too. Both options add a fun twist. If you need gluten-free choices, find gluten-free teriyaki sauce. Many brands offer tasty options that fit this need. This swap helps everyone enjoy the dish without worry. For those on a low-carb diet, swap the rice for cauliflower rice. It gives a great texture without the carbs. Plus, it absorbs the sauce well, keeping the flavor strong. If you're vegan, you can replace the chicken with chickpeas or mushrooms. Add a vegan teriyaki sauce for the same rich taste. This way, everyone can enjoy a delicious meal. To make your casserole even better, think about adding spices. Try a pinch of red pepper flakes for heat or some smoked paprika for depth. These simple spices can elevate the dish. You can also mix in more vegetables. Carrots, zucchini, or spinach work well. They add color, crunch, and nutrients. Use what you have on hand for a dish that feels fresh and exciting. For more details on making this dish, see the Full Recipe. To keep your Teriyaki Chicken Casserole fresh, store leftovers in an airtight container. Place the container in the fridge. This keeps the dish tasty for about 3 to 4 days. If you want to save it longer, freezing is a great option. Here are some tips for freezing: - Let the casserole cool completely before freezing. - Divide it into smaller portions for easy thawing and reheating. - Wrap the portions tightly in plastic wrap and place them in a freezer-safe bag. When you're ready to enjoy your casserole again, reheating can be simple. For best results, the oven is a great choice. Preheat your oven to 350°F (175°C). Place the casserole in a baking dish and cover it with foil. Bake for about 20-25 minutes until heated through. If you're short on time, you can use the microwave: - Place a single portion on a microwave-safe plate. - Heat on high for 2-3 minutes. - Stir halfway through to ensure even warming. In the fridge, your casserole lasts about 3 to 4 days. After that, it may not taste good anymore. Look for signs that it has gone bad. If you see mold or notice an off smell, it’s best to throw it away. By following these storage tips, you can enjoy your Teriyaki Chicken Casserole for days. For the full recipe, refer back to the ingredients and steps mentioned earlier. Happy cooking! Can I make this casserole ahead of time? Yes, you can prepare the casserole ahead of time. Just follow the recipe, then cover and refrigerate it. When you're ready to bake, remove it from the fridge and let it sit for 30 minutes. This helps it cook evenly. Bake as directed for a great meal. What can I substitute for teriyaki sauce? If you don't have teriyaki sauce, you can use soy sauce mixed with a bit of honey. This mix gives a sweet and salty flavor. You can also try a mix of soy sauce, brown sugar, and a splash of rice vinegar. Both options work well in the casserole. How many calories are in Teriyaki Chicken Casserole? This casserole has about 450 calories per serving. It can vary based on the amount of cheese and sauce you use. If you want to lower calories, use less cheese or choose brown rice. Is it healthy? Yes, Teriyaki Chicken Casserole can be healthy. It has lean protein and lots of veggies. You can make it even healthier by using brown rice and adding more vegetables. This gives you fiber and nutrients. How to avoid dry chicken in the casserole? To keep chicken moist, use thighs instead of breasts. Thighs have more fat, which helps them stay juicy. Also, don’t overcook the chicken. It should be tender and cooked through but not dry. How do I know when it's fully cooked? Check the casserole after 25 minutes. The cheese should be melted and bubbly. You can also use a meat thermometer. Chicken should reach 165°F (74°C) to be safe to eat. If it’s not done, bake for a few more minutes. This blog post covered a tasty Teriyaki Chicken Casserole. We explored the key ingredients, step-by-step instructions, and helpful tips. I shared variations to suit different diets and provided storage info. In closing, this dish is simple and fun to make. It’s a great meal for any night. Enjoy creating your own version, and remember to have fun with it. Your kitchen can become the center of joy with this easy casserole.

Teriyaki Chicken Casserole Tasty and Simple Dinner

Are you ready to spice up your dinner routine? This Teriyaki Chicken Casserole is tasty and easy to make! With

This slow cooker broccoli cheese soup is a creamy delight. It blends fresh broccoli with sharp cheddar cheese. The soup is easy to make and perfect for chilly days. Here’s what you will need: - 4 cups fresh broccoli florets - 1 medium onion, diced - 2 cloves garlic, minced - 3 cups vegetable broth - 2 cups sharp cheddar cheese, shredded - 1 cup heavy cream - 1 teaspoon Dijon mustard - 1/2 teaspoon smoked paprika - Salt and pepper to taste - 1 tablespoon olive oil To make your soup even better, you can add: - Croutons for crunch - Extra cheese for a gooey touch - Fresh herbs like parsley or chives for color These extras will give your bowl a nice finish and more flavor. First, gather your ingredients. You need fresh broccoli, onion, garlic, and vegetable broth. I like to use sharp cheddar cheese for the best flavor. Start by heating olive oil in a skillet over medium heat. Add the diced onion and sauté for about five minutes until it turns soft. Then, add minced garlic and cook for one more minute. This step builds a great base for your soup. Next, transfer the sautéed onion and garlic into your slow cooker. Add the broccoli florets and vegetable broth. Stir the mixture gently to combine all the flavors. Make sure the broccoli is well-coated in the broth. Now it's time to let the slow cooker work its magic. Cover the slow cooker and set it to low for four to five hours. If you're short on time, you can set it to high for two to three hours. The key is to wait until the broccoli is tender. You want it soft enough for blending but not mushy. After the cooking time is up, it’s blending time! Use an immersion blender to puree the soup directly in the slow cooker. If you don’t have one, carefully transfer the soup in batches to a regular blender. Be very careful, as the soup will be hot. Blend until the soup is smooth. After blending, stir in heavy cream, Dijon mustard, smoked paprika, and shredded cheddar cheese. Allow the cheese to melt fully, and season with salt and pepper to taste. If you like a thicker soup, leave it on low for another 30 minutes to an hour. This creamy and savory treat is sure to delight anyone who tries it! You can find the [Full Recipe] to guide you through this delicious dish. To boost the taste of your soup, use fresh ingredients. Fresh broccoli shines in this dish. I love adding a pinch of nutmeg for warmth. It blends well with cheese. A splash of lemon juice brightens the flavors, too. Don’t forget to taste as you cook, adjusting salt and pepper to your liking. For a smoky touch, try using smoked cheddar instead of regular. To get that creamy, thick texture, start with heavy cream. If you want a lighter version, use half-and-half. Another trick is to blend some of the soup, then mix it back in. This adds body without losing flavor. If your soup is too thin, let it cook longer. You can also add a bit of cornstarch mixed with water to thicken it up quickly. Serving matters just as much as taste. Pour the soup into warm bowls to keep it hot. Top each bowl with extra cheese for a melty finish. A sprinkle of smoked paprika adds color. Croutons give a nice crunch, making each bite special. Fresh herbs like parsley or chives can brighten the dish and add a pop of color. Your slow cooker broccoli cheese soup will impress everyone! For the complete recipe, check out the Full Recipe section. {{image_2}} You can change up the cheese to suit your taste. While sharp cheddar gives a nice bite, you can try other cheeses too. Gruyère adds a rich flavor. Monterey Jack melts well and keeps it creamy. For a tangy twist, use pepper jack. Mixing cheeses can create a complex taste. Just keep the total amount similar to the recipe. Want to make your soup heartier? Adding proteins or grains is a great idea. Cooked chicken or turkey can add protein and make it filling. If you prefer plant-based options, try adding cooked lentils or chickpeas. You can also mix in some quinoa or rice. These additions will give the soup more texture and make it a full meal. To make this soup vegan, swap the cheese and cream for plant-based options. Use cashew cream or coconut milk for creaminess. Nutritional yeast can give a cheesy flavor without dairy. Instead of cheddar, look for vegan cheese that melts well. These swaps keep the soup tasty and creamy. You can still enjoy all the warming flavors in this vegan version. To keep your slow cooker broccoli cheese soup fresh, store it in an airtight container. Let it cool before sealing. This helps prevent condensation and keeps the soup creamy. Place the container in the fridge. It can stay fresh for about 3 to 4 days. If you plan to eat it later, keep the toppings separate until serving. You can freeze this soup for later use. First, let it cool completely in the fridge. Then, transfer the soup to a freezer-safe container. Leave some space at the top for expansion. It can last in the freezer for about 3 months. When you're ready to enjoy it, thaw it in the fridge overnight. To reheat your soup, use a pot on the stove over low heat. Stir often to avoid burning. If the soup seems thick, add a bit of broth or water to loosen it up. You can also use a microwave. Heat it in short bursts, stirring in between. This keeps the soup smooth and creamy. For the best flavor, enjoy it warm with your favorite toppings. The cook time for slow cooker broccoli cheese soup is about 4-5 hours on low. If you are in a hurry, you can cook it on high for 2-3 hours. Either way, the goal is to make the broccoli tender and blend well with the cheese. Yes, you can use frozen broccoli! Just make sure to add it directly to the slow cooker without thawing. Frozen broccoli cooks well and will still give you that creamy texture. It may take a little less time, so check it after about 3-4 hours on low. For the best storage, let the soup cool first. Then, place it in an airtight container. You can keep it in the fridge for up to 3-4 days. If you want to keep it longer, consider freezing it. Just make sure to leave some space in the container for expansion. To make this soup gluten-free, simply use gluten-free vegetable broth. Also, check the cheese you use. Some brands may add gluten ingredients. With these changes, you can enjoy this creamy soup without worry. For a delicious twist, consider adding gluten-free croutons on top. For the full recipe, you will find all the details you need to create this comforting dish. In this article, we explored a delicious slow cooker broccoli cheese soup recipe. We covered ingredients, preparation, and tips to enhance flavor. We also looked at variations to suit different diets and storage advice for leftovers. Remember, the right tools and techniques can make cooking fun! Share this recipe with friends and enjoy a warm bowl together. Cooking is about creativity and joy, so keep experimenting and have fun!

Slow Cooker Broccoli Cheese Soup Creamy and Savory Treat

If you’re craving a warm, cheesy hug in a bowl, you’ve come to the right place! This Slow Cooker Broccoli

To make these tasty carrot cake bars, you will need: - 2 cups grated carrots (about 4 medium carrots) - 1 cup all-purpose flour - 1 cup brown sugar - 1/2 cup granulated sugar - 1/2 cup vegetable oil - 3 large eggs - 1 teaspoon vanilla extract - 1 teaspoon baking soda - 1 teaspoon ground cinnamon - 1/2 teaspoon ground nutmeg - 1/2 teaspoon salt - 1/2 cup crushed pineapple, drained - 1/2 cup chopped walnuts or pecans (optional) - 1/2 cup raisins (optional) - 1 cup cream cheese, softened - 1/4 cup powdered sugar - Zest of 1 orange (for frosting) You can customize your carrot cake bars with a few fun add-ins: - Chopped nuts: Use walnuts or pecans for crunch. - Dried fruits: Add raisins or chopped dates for sweetness. - Fresh ginger: Grate some fresh ginger for a warm kick. - Coconut flakes: Add unsweetened coconut for extra flavor. If you want to make swaps, here are some ideas: - Gluten-free flour: Use a gluten-free mix instead of all-purpose flour. - Applesauce: Swap half the oil with applesauce for a lighter version. - Non-dairy cream cheese: Use this for a dairy-free frosting. Choosing the right ingredients can boost your bars: - Carrots: Fresh, juicy carrots give the best flavor. - Brown sugar: This adds moisture and a rich taste. - Eggs: Use large eggs for best results. - Pineapple: Drain well to keep the batter from getting too wet. Make sure to sift your dry ingredients. This helps to mix them evenly. When mixing, don’t overdo it! Stir just until combined to keep your bars light. 1. Preheat your oven to 350°F (175°C). 2. Grease and line an 8x8-inch baking pan with parchment paper. 3. In a large bowl, mix vegetable oil, brown sugar, and granulated sugar. 4. Add eggs one by one, mixing well after each. Stir in vanilla extract. 5. In another bowl, sift flour, baking soda, cinnamon, nutmeg, and salt. 6. Gradually add dry ingredients to the wet mixture. Stir gently until mixed. 7. Fold in grated carrots, crushed pineapple, walnuts, and raisins if you like. 1. Pour the batter into your prepared pan. Smooth the top with a spatula. 2. Bake for 30-35 minutes. Check with a toothpick; it should come out clean. 1. Let the bars cool in the pan for 10 minutes. Use parchment to lift them out. 2. Cool completely on a wire rack. 3. For frosting, beat cream cheese and powdered sugar until smooth. 4. Stir in orange zest for a fresh taste. 5. Spread the frosting over the cooled bars. Cut into squares or rectangles. For the full recipe, refer to the ingredients section earlier in this article. Enjoy your delicious carrot cake bars! To bake the perfect carrot cake bars, follow these tips: - Use fresh ingredients: Fresh carrots give the best flavor. - Don't overmix: Mix the batter gently. Overmixing can make the bars tough. - Check for doneness: Insert a toothpick in the center. If it comes out clean, they are done. - Cool before frosting: Let the bars cool completely for the best frosting results. For a tasty frosting, consider these ideas: - Room temperature cream cheese: Make sure your cream cheese is soft. This helps it mix smoothly. - Add zest: Adding orange zest brightens the flavor of the frosting. - Taste and adjust: After mixing the frosting, taste it. Add more sugar if you like it sweeter. Avoid these pitfalls for better carrot cake bars: - Skipping the parchment paper: It helps you lift the bars out of the pan easily. - Using too much flour: Measure flour accurately. Too much can result in dry bars. - Not letting them cool: Frosting warm bars can melt the frosting and ruin the look. For the full recipe, check out the detailed steps above. {{image_2}} You can make gluten-free carrot cake bars by swapping the all-purpose flour. Use a gluten-free flour blend that measures cup-for-cup. Brands like Bob's Red Mill or King Arthur Flour work well. Keep the other ingredients the same. The bars will still taste great, and you'll enjoy the same moist texture. To make these bars vegan, replace the eggs with flax eggs. Mix one tablespoon of ground flaxseed with three tablespoons of water. Let it sit for five minutes until it thickens. For the cream cheese frosting, use a vegan cream cheese or a coconut whipped cream. This keeps the flavor rich while being animal-friendly. You can add fun flavors and textures to your carrot cake bars. Try mixing in some shredded coconut for a tropical twist. You can also add spices like ginger or cardamom for extra warmth. For a nutty crunch, include chopped pecans or walnuts. Dried fruit, like cranberries or chopped apricots, can add a burst of sweetness. The options are endless! For the full recipe, check out the detailed instructions above. To keep your carrot cake bars fresh, store them in an airtight container. Place parchment paper between layers to avoid sticking. They can stay at room temperature for up to three days. If you want them to last longer, refrigerate them. They will stay fresh for about one week in the fridge. If you want to freeze your carrot cake bars, wrap them well in plastic wrap. Then put them in a freezer-safe bag or container. This will protect them from freezer burn. They can last up to three months in the freezer. To enjoy, just thaw them in the fridge overnight before serving. To reheat your carrot cake bars, place them in the microwave for about 15-20 seconds. This warms them up without drying them out. You can also heat them in the oven at 350°F (175°C) for about 5-10 minutes. Enjoy your delicious bars warm, making them even more tempting! To make carrot cake bars from scratch, start with fresh ingredients. You need grated carrots, flour, sugar, eggs, and spices. Mix your wet and dry ingredients separately. Then combine them and fold in carrots and any extras like nuts or raisins. Bake in a greased pan at 350°F for about 30-35 minutes. Let them cool before frosting. This method gives you rich flavors and soft texture. Yes, you can substitute ingredients in this recipe. If you want a lighter option, use applesauce instead of oil. You can swap all-purpose flour with a gluten-free blend. For sweetness, you can use honey or maple syrup. Nuts and raisins are optional, so feel free to leave them out if you prefer. Just keep in mind that substitutions may alter the taste and texture slightly. Carrot cake bars last about 4-5 days at room temperature if stored in an airtight container. If you want them to last longer, you can refrigerate them for up to a week. For even longer storage, freeze the bars wrapped tightly in plastic. They can stay fresh for about three months in the freezer. Just remember to thaw them in the fridge before serving. This blog post covered carrot cake bars from start to finish. You learned about the key ingredients, tips for baking, and helpful variations. I shared important advice on storage and reheating. Making these bars can be simple and fun. As you create your own version, remember to play with flavors and ingredients. Enjoy the process and make this treat your own. Happy baking!

Decadent Carrot Cake Bars Irresistible and Easy Recipe

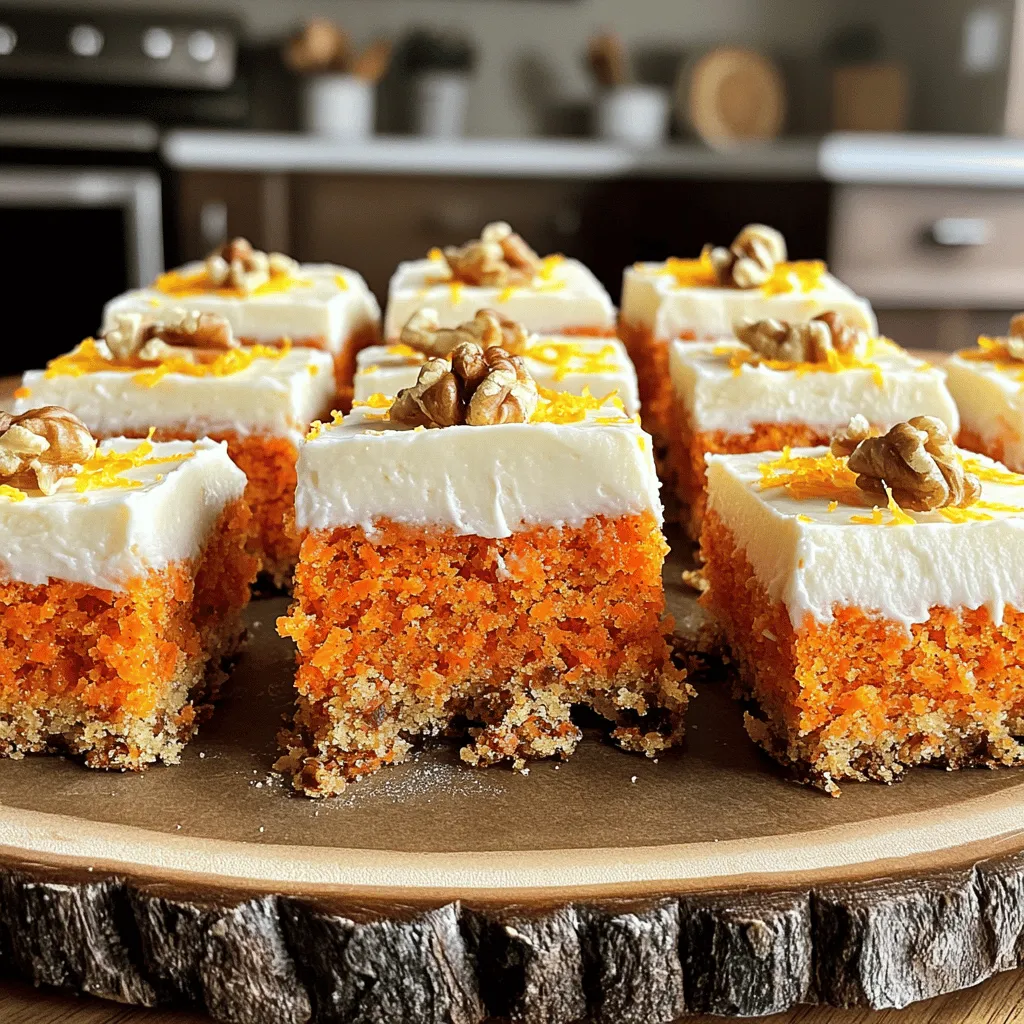
If you crave a sweet treat that’s both easy to make and packed with flavor, you’ll love my Decadent Carrot

To make Easy Creamy Garlic Sauce Baby Potatoes, gather these items: - 500g baby potatoes, washed and scrubbed - 4 cloves garlic, minced - 1 cup heavy cream - 2 tablespoons butter - 1 teaspoon dried thyme - 1 teaspoon dried parsley - Salt and black pepper to taste - Fresh chives, chopped (for garnish) Here’s a quick look at the measurements: - Baby Potatoes: 500 grams equals about 1.1 pounds. This amount serves about four people. - Garlic: Four cloves add a strong, rich flavor. - Heavy Cream: One cup gives the sauce its creamy texture. - Butter: Two tablespoons make the sauce rich and smooth. - Dried Thyme and Parsley: One teaspoon each adds earthy flavors. - Salt and Pepper: Use to taste for the perfect seasoning. - Chives: Fresh chives add a bright touch when serving. For the best results, follow these tips: - Potatoes: Choose firm, unblemished baby potatoes. They should be uniform in size to cook evenly. - Garlic: Fresh garlic will give the best flavor. Avoid pre-minced garlic. - Cream: Use high-quality heavy cream. It affects the sauce's richness. - Herbs: If possible, use fresh thyme and parsley for more vibrant flavors. Dried herbs are great too, especially when you don’t have fresh on hand. - Chives: Use fresh chives for garnish. They add color and a mild onion flavor. For a full list of instructions, check out the Full Recipe. To make Easy Creamy Garlic Sauce Baby Potatoes, follow these simple steps. First, start by boiling the baby potatoes. Place them in a large pot and cover them with water. Add a pinch of salt to the water to enhance flavor. Bring it to a boil over medium-high heat. Once boiling, cook for about 15-20 minutes. You want them tender but not mushy. Check if they are done by piercing them with a fork. If the fork goes in easily, they are ready. Next, let’s make the garlic sauce. In a large skillet, melt the butter over medium heat. Once it’s melted, add the minced garlic. Sauté it for about 1-2 minutes. You want it fragrant, but be careful not to let it burn. A burnt garlic can spoil the sauce. After that, reduce the heat to low. Pour in the heavy cream and mix it well with the garlic. This will create a rich and creamy base for our sauce. Now it’s time to add some herbs. Sprinkle in the dried thyme and dried parsley. Don’t forget to season with salt and black pepper to taste. Stir everything gently and let it simmer for about 3-4 minutes. This helps the sauce thicken slightly and allows the flavors to blend. Finally, add the boiled baby potatoes to the skillet. Toss them in the creamy garlic sauce until they are fully coated. Let them cook together for another 2-3 minutes. This step helps the potatoes soak up all that delicious flavor. The total cooking time for this dish is about 30 minutes. Here’s a breakdown: - Boiling Potatoes: 15-20 minutes - Making Sauce: 10 minutes - Combining and Coating: 2-3 minutes Using medium heat is key for both boiling and making the sauce. It ensures that the potatoes cook evenly and the garlic does not burn. You can easily tell when the potatoes are done. Use a fork to pierce one. If it slides in smoothly, they are tender. If you feel resistance, cook them a bit longer. Remember, overcooking can turn them mushy. It’s best to check them a few minutes before the time is up to avoid this. For the best results, stick to the recipe. You can find the full recipe above to guide you through these steps. Enjoy your creamy garlic sauce baby potatoes! To boost the flavor of your creamy garlic sauce baby potatoes, try these tips: - Use fresh garlic: Fresh garlic gives a stronger, better taste than jarred garlic. - Add cheese: Stir in grated Parmesan for a rich, savory flavor. - Introduce heat: Add a pinch of red pepper flakes for a spicy kick. - Experiment with herbs: Fresh herbs like basil or rosemary can add new notes to your dish. Here are a few mistakes to steer clear of: - Overcooking the potatoes: If you cook them too long, they can become mushy. Aim for tender but firm potatoes. - Burning the garlic: Garlic cooks fast. Keep an eye on it to avoid a bitter taste. - Skipping the seasoning: Don’t forget the salt and pepper! They help enhance all the flavors. - Not letting the sauce thicken: Allow your sauce to simmer a bit longer for that perfect creamy texture. Having the right tools makes cooking easier: - Large pot: For boiling the baby potatoes. - Skillet: A wide skillet works best for making the sauce. - Wooden spoon: Great for stirring without scratching your pan. - Potato masher: If you want a creamier texture, a masher can help blend the potatoes with the sauce. These tips will help you create the best creamy garlic sauce baby potatoes. Remember, cooking is all about experimenting and finding what you love! For the complete recipe, check out the [Full Recipe]. {{image_2}} You can easily change the recipe to fit what you have. If you don't have heavy cream, use half-and-half or whole milk. This will give you a lighter sauce. For a dairy-free option, try coconut milk or a plant-based cream. If you can't find baby potatoes, regular potatoes work too. Just chop them into smaller pieces. You can even use sweet potatoes for a sweet twist. Want to mix it up? Add different herbs for new flavors. For a spicy kick, toss in red pepper flakes. You can also use fresh herbs like basil or rosemary. These add freshness and depth. If you prefer a tangy taste, squeeze some lemon juice into the sauce. It brightens the dish and adds a zesty note. Try adding cheese for a richer flavor. Grated Parmesan or feta works great! These creamy garlic sauce baby potatoes shine on their own. But they also pair well with various dishes. Serve them alongside grilled chicken or fish for a complete meal. They also go well with roasted veggies. For a cozy night, serve them with a warm salad. Don’t forget to drizzle extra garlic sauce on top for added flavor. You can find the full recipe for these delightful potatoes linked above! To keep your creamy garlic sauce baby potatoes fresh, place them in an airtight container. You can store them in the fridge for up to 3 days. Make sure the potatoes are cool before sealing the container. This helps keep the sauce creamy and tasty. Reheating the potatoes is easy. You can use the microwave or the stovetop. For the microwave, place them in a safe dish. Heat in short bursts, stirring in between, until warm. If using the stovetop, add a splash of cream or water to the skillet. Heat over low until warmed through, stirring gently. You can freeze creamy garlic sauce baby potatoes, but the texture may change. To freeze, let them cool completely. Then, place them in a freezer-safe bag or container. They can last up to 2 months in the freezer. When ready to eat, thaw in the fridge overnight before reheating. For best results, use the full recipe soon after making it. Yes, you can use larger potatoes. Just cut them into smaller pieces. This helps them cook evenly. Make sure to adjust the cooking time. Larger chunks may take longer to soften. Aim for bite-sized pieces for the best texture. To make the sauce vegan, replace heavy cream with coconut cream or cashew cream. Use vegan butter instead of regular butter. Both options give a rich taste without dairy. You can still add garlic and herbs for flavor. The vegan sauce will be creamy and delicious. These baby potatoes pair well with many dishes. Try serving them with grilled chicken or fish. They also go great with roasted vegetables. For a full meal, add a fresh salad on the side. You can find more ideas in the Full Recipe. In this article, I covered how to make creamy garlic sauce baby potatoes. We explored the key ingredients and their measurements, highlighting tips for selecting quality items. I detailed step-by-step cooking instructions, including timing and signs of doneness. I shared helpful tips to enhance flavor and avoid common mistakes. I also offered variations, storage advice, and answered frequently asked questions. Overall, cooking these potatoes can be simple and fun. With the right ingredients and techniques, you can create a tasty dish that impresses anyone. Enjoy your cooking adventure!

Easy Creamy Garlic Sauce Baby Potatoes Delight

Get ready to savor every bite of my Easy Creamy Garlic Sauce Baby Potatoes Delight! This dish combines tender baby

- 1 cup green or brown lentils, rinsed - 1 medium onion, chopped - 2 garlic cloves, minced - 1 carrot, diced - 1 red bell pepper, chopped - 1 can (14 oz) diced tomatoes (with juices) - 3 cups vegetable broth - 2 tablespoons olive oil - 2 teaspoons ground cumin - 2 teaspoons ground coriander - 1/2 teaspoon cinnamon - 1/2 teaspoon turmeric - 1/4 teaspoon cayenne pepper (optional) - Salt and pepper to taste - Fresh cilantro or parsley for garnish - Lemon wedges for serving When I create Moroccan Instant Pot lentils, I start with the basics. Lentils are the star here. You can use green or brown lentils. They are packed with protein and fiber. Rinsing them helps remove any debris. Next, I chop up a medium onion. The onion adds sweetness and depth to the dish. Then, I mince two garlic cloves. Garlic gives a nice kick. I also dice one carrot and chop one red bell pepper. These veggies bring color and texture to the meal. For the liquid, I choose a can of diced tomatoes. I keep the juices for added flavor. I also use three cups of vegetable broth to make it hearty. Olive oil is key too. I use two tablespoons. It helps sauté the veggies and boosts flavor. Now, let’s talk about spices. To get that Moroccan flavor, I add two teaspoons of ground cumin and two teaspoons of ground coriander. These spices are aromatic and warm. A half teaspoon of cinnamon adds sweetness. A half teaspoon of turmeric gives a lovely color. If you like heat, add a quarter teaspoon of cayenne pepper. Don't forget salt and pepper to taste. Lastly, I like to garnish with fresh cilantro or parsley. A squeeze of lemon brightens the dish. For the full recipe, check out the complete details. Enjoy making this flavorful and easy meal! - Turn on the Instant Pot and select the 'Sauté' function. - Add olive oil and chopped onions, sauté for 3-4 minutes. To begin, I heat the Instant Pot by selecting 'Sauté.' This step warms the pot and gets it ready for cooking. I add the olive oil, which gives flavor to the dish. Next, I toss in the chopped onions. I cook them for about 3-4 minutes until they become soft and clear. This creates a great base for my lentils. - Stir in minced garlic, diced carrot, and chopped red bell pepper. - Cook for another 3-4 minutes until veggies soften. Once the onions are ready, I add minced garlic. The scent of garlic makes everything better! Then, I toss in the diced carrot and chopped red bell pepper. I stir them all together and let them cook for another 3-4 minutes. This step helps the veggies soften and blend flavors. - Add rinsed lentils, diced tomatoes, vegetable broth, and spices. - Stir to combine all ingredients well and prepare for cooking. Next, I grab my rinsed lentils. I add them to the pot along with the diced tomatoes, including their juices. Then, I pour in the vegetable broth and add my spices: cumin, coriander, cinnamon, turmeric, and optional cayenne pepper. I season with salt and pepper too. I stir everything well to mix the flavors and prepare for cooking. - Close the lid and set the valve to 'sealing.' - Select 'Manual' or 'Pressure Cook' function, set timer for 15 minutes. Now it’s time to cook! I close the lid tightly. It’s important to set the valve to 'sealing.' This helps build pressure inside the pot. I then select 'Manual' or 'Pressure Cook' and set the timer for 15 minutes. The pressure will help cook the lentils quickly. - Allow for natural pressure release for 10 minutes. - Carefully open the lid, stir, and adjust seasoning. When the timer goes off, I let the pot release pressure naturally for 10 minutes. This step helps the lentils finish cooking gently. After that, I carefully switch the valve to 'venting' to let out any remaining steam. As I open the lid, I stir the lentils. I taste them and adjust the seasoning as needed. Now, my Moroccan Instant Pot lentils are ready to serve! For the full recipe, check out the detailed steps above. To know when lentils are perfectly cooked, look for a soft but firm bite. They should not turn mushy. The best way to adjust cooking time is by knowing your lentil type. Green and brown lentils usually take about 15 minutes. Red lentils cook faster, around 10 minutes. If you prefer a firmer texture, reduce the time by a few minutes. To boost flavor, consider adding spices like smoked paprika or ginger. These add warmth and depth. You can also play with herbs such as thyme or bay leaves. For protein, add cooked chicken or chickpeas after cooking. You can toss in veggies like spinach or zucchini to increase nutrition and color. When serving Moroccan lentils, pair them with warm pita or rice. A dollop of yogurt adds creaminess, while fresh lemon juice brightens the dish. For leftovers, mix them into a grain bowl or use them in tacos. You can even blend them into a soup for a cozy meal. {{image_2}} You can change the flavor and texture by using different lentil types. Red or yellow lentils cook faster than green or brown ones. They also break down more, making your dish creamier. If you use red or yellow lentils, reduce the cooking time to about 10 minutes. Always rinse them before cooking to remove dust and debris. This recipe is already vegetarian. To make it vegan, ensure your broth is plant-based. You can use vegetable broth instead of chicken broth for a richer taste. To boost flavor, add a splash of soy sauce or a spoonful of miso paste. Both options add depth without extra calories. Want some heat? You can add spices to make it spicier. Consider using cayenne pepper, jalapeños, or even a dash of hot sauce. Start small and taste as you go. You can always add more heat! If you like a smoky flavor, try smoked paprika. It gives your dish a unique twist. To store leftover Moroccan Instant Pot lentils, let them cool first. Place the lentils in an airtight container. Store them in the fridge for up to five days. For the best taste, try to eat them within three days. Keeping them in a sealed container helps maintain flavor and texture. The lentils may absorb moisture, so avoid leaving them in open dishes. If you want to freeze lentils, use a freezer-safe container or a heavy-duty bag. Divide the lentils into smaller portions for easy thawing. Make sure to leave some space in the container for expansion. Label the bags with dates for reference. Lentils can last up to three months in the freezer. To thaw, move them to the fridge overnight or use the microwave. You can reheat lentils in the microwave or on the stovetop. For the microwave, place lentils in a bowl with a splash of water. Cover with a lid and heat for 1-2 minutes, stirring halfway. For the stovetop, warm them in a saucepan over low heat. Add a little broth or water to keep them moist. To refresh flavors, add a squeeze of lemon juice or a sprinkle of fresh herbs. This gives your lentils a nice boost! Yes, you can use dried spices. Dried spices have a stronger flavor. Use about one-third of the amount when switching from fresh. Always taste as you go to adjust to your liking. To avoid mushy lentils, rinse them well and soak them for an hour. Use less liquid when cooking. Keep an eye on the cooking time. For green or brown lentils, 15 minutes usually works well. Moroccan lentils pair well with rice or couscous. You can also serve them with crusty bread. A simple salad with lemon vinaigrette adds freshness. Roasted vegetables are another great side option. Cooked lentils can last up to five days in the fridge. Store them in an airtight container. Always check for signs of spoilage before eating. If in doubt, throw them out! Yes, you can easily double this recipe. Just make sure your Instant Pot can handle the extra volume. Adjust the cooking time slightly if needed. Always check for doneness before serving. We've explored how to make delicious Moroccan lentils in your Instant Pot. From selecting the right ingredients to perfecting the cooking process, this dish is simple and flavorful. I shared tips for different lentil types, enhancing flavors, and storing leftovers. Remember, you can easily adjust the spices to match your taste. This recipe is nutritious and versatile, perfect for any meal. Enjoy experimenting with it, and make it your own!

Moroccan Instant Pot Lentils Flavorful and Easy Meal

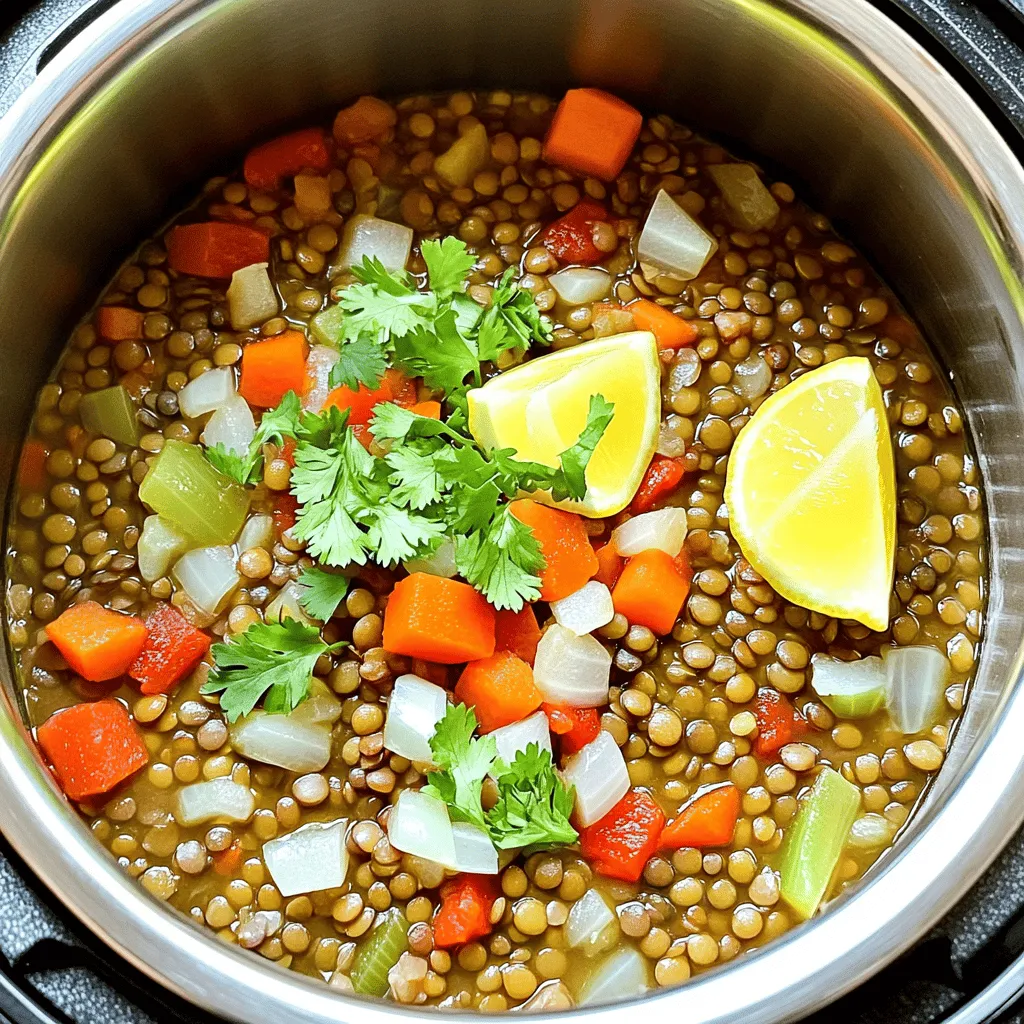
Looking for a quick, healthy, and tasty meal? Try my Moroccan Instant Pot Lentils! This dish is packed with flavor

Older posts
Newer posts
← Previous Page1 … Page50 Page51 Page52 … Page59 Next →

dsad

© 2025 Emmas Dish • Built with GeneratePress

Our Policies

  • Copyright Policy
  • Cookie Policy
  • GDPR Policy
  • Privacy Policy
  • Disclaimer
  • Terms Of Use

More Information

  • Home
  • About
  • Contact
  • Appetizers
  • Dessert
  • Dinner
  • Drinks
©2025, Emmas Dish About Back To Top