Skip to content
DisclaimerTerms Of UseGDPR PolicyCookie Policy

Emmas Dish

  • Home
  • Drinks
  • Appetizers
  • Dinner
  • Dessert
  • About
  • Contact
  • Privacy Policy
DisclaimerTerms Of UseGDPR PolicyCookie Policy

Emma

- 1 lb large shrimp, peeled and deveined - 1/4 cup honey - 3 cloves garlic, minced - 2 tablespoons soy sauce (or tamari for gluten-free) - 1 tablespoon lime juice - 1 tablespoon olive oil - Salt and pepper to taste - Fresh cilantro for garnish - Lime wedges for serving Every ingredient plays a key role in this dish. The shrimp is the star. It should be fresh and firm. Honey adds sweetness and helps the sauce stick. Garlic brings a rich flavor. Soy sauce adds saltiness and depth. Lime juice gives a bright zing. Olive oil helps cook the shrimp and adds richness. Salt and pepper enhance the overall taste. Cilantro and lime wedges add freshness and a nice touch when serving. You can switch ingredients if needed. For honey, use maple syrup for a vegan option. Tamari works as a gluten-free soy sauce. If you lack fresh garlic, garlic powder can work in a pinch. Lime juice can be replaced with lemon juice for a different flavor. You can also use vegetable oil instead of olive oil. Each substitute will change the taste slightly, but the dish will still be tasty. For a twist, try different herbs like parsley or basil as a garnish. For the full recipe, check out the 10 Minute Honey Garlic Shrimp section. To make the honey garlic sauce, grab a small bowl. In it, mix together the honey, minced garlic, soy sauce, and lime juice. Whisk until the ingredients blend well. This sauce is the star of the dish. It adds sweet and tangy flavors to the shrimp. Set the sauce aside while you cook the shrimp. Next, heat olive oil in a large skillet over medium-high heat. Once the oil is hot, add the shrimp in a single layer. Season them with salt and pepper. Let them cook for about two minutes. You want the shrimp to turn pink but not overcook. After two minutes, flip the shrimp over. Now, pour the honey garlic sauce over the shrimp. Stir gently to coat them. Cook for two to three more minutes. This ensures they are fully cooked and flavorful. Once the shrimp are done, remove them from heat. Let them rest for a minute. For plating, choose a white platter. The shrimp look stunning against the white background. Drizzle any leftover sauce from the skillet over the shrimp. Garnish with freshly chopped cilantro for color and taste. Serve lime wedges on the side for a zesty kick. This dish is not just a meal; it’s a treat for the eyes too. For the full recipe, check out the earlier section. When picking shrimp, freshness is key. Look for shrimp with a slight ocean smell. They should be firm and not mushy. Choose large or jumbo shrimp for this recipe. Their size holds up well in the hot pan. Fresh shrimp often have a glossy look. If you buy frozen shrimp, ensure they are wild-caught for the best taste. Cooking shrimp takes just a few minutes. If your shrimp are smaller, reduce cooking time to about 1-2 minutes per side. They cook quickly, so stay close! Overcooking makes shrimp tough. When they turn pink, they're ready. Use a timer if you need to. This way, you can focus on the sauce and enjoy the process. Add a pinch of red pepper flakes for heat. This spice goes well with the sweet honey. To make the dish pop, serve it on a white plate. The color of the shrimp shines against the plate. Garnish with fresh cilantro and lime wedges. This adds a fresh taste and bright look. Drizzle extra sauce over the shrimp when serving. For a crunch, sprinkle sesame seeds on top. {{image_2}} You can boost the nutrition of your honey garlic shrimp by adding vegetables. Broccoli, bell peppers, or snap peas work great. Just chop them into bite-sized pieces. Add them to the skillet a minute before the shrimp. This way, they cook but stay crisp. The colors add a beautiful look to your dish. Plus, it makes every bite more exciting! If you like heat, try my spicy version! Just add red pepper flakes or sriracha to the sauce. Start with a pinch and taste. You can always add more if you want it spicier. The heat pairs well with the sweetness of the honey. It adds a fun twist to the dish that will impress your guests! To make this dish gluten-free, use tamari instead of soy sauce. Tamari is a great choice for those who need to avoid gluten. It gives the same rich flavor but without any gluten. Always check labels on other ingredients too. This way, you ensure your meal is safe and tasty for everyone. After cooking the honey garlic shrimp, let them cool. Place the shrimp in an airtight container. You can keep them in the fridge for up to three days. Make sure to add a bit of the sauce to keep them moist. To reheat, use a skillet over medium heat. Add a splash of water or sauce to help steam the shrimp. Cook for about 3-4 minutes, stirring gently. You can also use the microwave. Heat in short bursts of 30 seconds until warm. You can freeze the shrimp if you have leftovers. Place them in a freezer-safe bag or container. Remove as much air as possible. They can last for up to three months in the freezer. Thaw in the fridge overnight before reheating. If you want the full recipe, check it out [here](#). Shrimp cooks very quickly. It takes about 4-6 minutes total. You will cook them for 2 minutes on one side. Then, flip them and cook for another 2-3 minutes. Watch for them to turn pink and curl. This means they are done. Yes, you can use frozen shrimp. Just thaw them first. Place the shrimp in cold water for about 10-15 minutes. Once thawed, pat them dry with a paper towel. This helps the shrimp sear well in the pan. There are many great side dishes for honey garlic shrimp. Here are some ideas: - Steamed rice, for a nice base. - Quinoa, for a healthy twist. - Stir-fried vegetables, to add color and crunch. - A fresh salad, for a light option. - Noodles, for a fun twist. Pair your shrimp with any of these, and you will have a tasty meal. Check out the Full Recipe for more tips! You learned about the key ingredients for honey garlic shrimp and their roles. I shared easy steps to make the dish, from sauce prep to cooking shrimp. Tips on shrimp selection and cooking time help you perfect your meal. You explored fun variations like adding veggies or making it spicy. Finally, I covered how to store and reheat leftovers, ensuring nothing goes to waste. Enjoy this simple yet flavorful dish, and let your kitchen be filled with delightful scents. Cooking can be fun and rewarding!

10 Minute Honey Garlic Shrimp Quick and Simple Recipe

Are you ready to whip up a delicious meal in just 10 minutes? My Honey Garlic Shrimp recipe makes cooking

To make these delicious cookies, gather these key ingredients: - 1 cup unsalted butter, softened - 1 cup brown sugar, packed - 1/2 cup granulated sugar - 2 large eggs - 1 teaspoon vanilla extract - 2 1/4 cups all-purpose flour - 1 teaspoon baking soda - 1/2 teaspoon salt - 1 cup white chocolate chips - 1 cup freeze-dried strawberries, crushed - 1/2 cup chopped fresh strawberries These ingredients create a soft, chewy cookie with a sweet and fruity taste. The white chocolate adds creaminess, while the strawberries bring a refreshing flavor. You can add more depth to your cookies with these optional ingredients: - 1/2 teaspoon almond extract - 1/2 cup chopped nuts (like walnuts or pecans) - A pinch of cinnamon These extras can enhance the taste and offer a unique twist. Experiment with them to find your favorite flavor profile. Sometimes, you may not have all the ingredients. Here are some simple substitutions: - Use coconut oil instead of butter for a dairy-free option. - Swap granulated sugar for coconut sugar for a healthier choice. - Replace white chocolate chips with dark chocolate chips for a richer flavor. These substitutions can help you adjust the recipe based on what you have at home. For the complete recipe, check out the [Full Recipe]. To start, gather your ingredients. You will need unsalted butter, brown sugar, granulated sugar, eggs, vanilla, flour, baking soda, salt, white chocolate chips, freeze-dried strawberries, and fresh strawberries. 1. Preheat your oven to 350°F (180°C). Line two baking sheets with parchment paper. 2. In a large bowl, cream together the softened butter, brown sugar, and granulated sugar. Mix until it feels light and fluffy. 3. Add the eggs one at a time, mixing well after each addition. Then, stir in the vanilla extract. 4. In a separate bowl, whisk together the flour, baking soda, and salt. Gradually add this dry mix to the wet ingredients. Mix until just combined. 5. Fold in white chocolate chips, crushed freeze-dried strawberries, and chopped fresh strawberries. Make sure they are evenly spread in the dough. Now it’s time to bake. 1. Scoop tablespoon-sized dough portions onto your baking sheets, leaving about 2 inches between each scoop. 2. Place the sheets in the oven. Bake for 10-12 minutes. Look for lightly golden edges. The centers should look slightly under-baked. 3. Remove the sheets from the oven. Let the cookies cool. 1. Allow the cookies to cool on the baking sheets for about 5 minutes. 2. After that, transfer them to a wire rack to cool completely. 3. Store the cookies in an airtight container to keep them fresh. For the complete recipe, check out the [Full Recipe]. Keep your cookies fresh by storing them in an airtight container. This helps seal in moisture. You can also place a slice of bread in the container. The bread will absorb excess moisture and keep the cookies soft. For longer storage, freeze them. Wrap each cookie in plastic wrap and then place in a freezer bag. They can last up to three months in the freezer. To get the best cookies, always measure your ingredients carefully. Use a kitchen scale for accuracy. Make sure your butter is softened, not melted. This helps create a fluffy texture. When mixing the dough, don’t overmix; just mix until combined. Underbaking the cookies slightly will keep them soft. They will firm up as they cool. One common mistake is not chilling the dough. Chilling helps the flavors meld and keeps the cookies from spreading too much. Another mistake is using too much flour. Be sure to spoon the flour into the measuring cup and level it off. Lastly, avoid baking cookies on a hot baking sheet. Always use a cool sheet for even baking. For the full recipe, check out the detailed instructions and enjoy your baking! {{image_2}} You can change up the white chocolate strawberry cookies easily. Try adding nuts like walnuts or pecans. They give a nice crunch and flavor. You could also mix in some coconut flakes for a tropical twist. If you love citrus, add some orange zest for a bright flavor. It pairs well with strawberries and white chocolate. You can make these cookies gluten-free. Just swap the all-purpose flour with a gluten-free blend. Make sure it has xanthan gum for good texture. For a vegan version, use coconut oil instead of butter. Replace eggs with flax eggs. Just mix one tablespoon of ground flaxseed with three tablespoons of water for each egg. Let it sit for a few minutes until it thickens. To make your cookies even sweeter, try icing them. A simple glaze of powdered sugar and milk works well. Drizzle it over the cookies after they cool. For extra flavor, add a bit of vanilla or almond extract to the glaze. You can also melt some extra white chocolate to drizzle on top. This adds a lovely look and taste to the cookies. For the full recipe, check out the complete details. To keep your white chocolate strawberry cookies fresh, store them in an airtight container. You can place parchment paper between layers to avoid sticking. This method keeps the cookies soft and tasty for days. If you want to enjoy them later, follow my freezing instructions below. Freezing your cookies is easy. First, let them cool completely on a wire rack. Once cooled, you can freeze them in a single layer on a baking sheet for about an hour. This prevents them from sticking together. After that, transfer the cookies to a freezer-safe bag or container. They can stay in the freezer for up to three months. When you are ready to eat them, just thaw at room temperature. These cookies have a good shelf life. When stored properly, they last for about a week at room temperature. If you notice them becoming hard, that is a sign they are going stale. Look for any strange smells or discoloration. If you see either, it’s best to toss them. Enjoy your white chocolate strawberry cookies while they are fresh and delicious! For the full recipe, visit the main article. Yes, you can use frozen strawberries. Just make sure to thaw and drain them first. This step helps avoid too much moisture in the dough. Frozen strawberries can still give you that sweet flavor. However, fresh strawberries often bring a better texture. To prevent spreading, chill the dough before baking. Place it in the fridge for 30 minutes. Cold dough holds its shape better. Also, make sure your butter is softened, not melted. This keeps the cookies nice and thick. You can easily double the recipe. Just mix your ingredients in a larger bowl. Watch the baking time as larger batches may take a bit longer. Keep an eye on your cookies while they bake to get them just right. For the complete recipe, check out the [Full Recipe]. In this article, we explored the key ingredients for white chocolate strawberry cookies and how to make them. I shared tips for baking success, storage, and ingredient swaps. Mixing in optional flavors can elevate your cookies. Remember to avoid common baking mistakes for the best results. Whether you choose to freeze them or enjoy them fresh, these cookies are sure to please. Experiment with variations and have fun with your baking! Enjoy the sweet rewards of your efforts.

Irresistible White Chocolate Strawberry Cookies Recipe

If you love the sweet blend of white chocolate and fresh strawberries, you’re in for a treat! My irresistible White

When you're low on cash, cooking can still be fun. You can make tasty meals with just a few simple ingredients. Some great options are pasta dishes, rice bowls, and stir-fries. These meals are filling, easy to make, and cheap. For instance, Pasta Primavera Delight is a colorful and healthy choice. You can use any pasta you like and add seasonal veggies. This dish is quick to prepare and perfect for busy days. You can also try rice with beans, which is cheap and packed with protein. Cooking on a budget helps you save money. You get to control what goes into your food. This means you can skip unhealthy additives and focus on fresh ingredients. Plus, cooking at home is often healthier than eating out. Making meals at home gives you the chance to be creative. You can mix and match flavors to find what you love. Plus, cooking can be a fun activity to enjoy with friends or family. Eating well is key, even when you're broke. Good nutrition helps you feel your best. It gives you energy and keeps you healthy. You can still eat nutritious meals without spending much money. Focus on whole foods like fruits, veggies, grains, and proteins. These items are often less expensive than processed foods. By choosing fresh ingredients, you can create meals that nourish your body and support your wallet. For more ideas, check out the Full Recipe for Pasta Primavera Delight. It offers a simple way to eat well while spending very little. For Pasta Primavera Delight, you will need: - 8 oz spaghetti or any pasta of your choice - 1 cup broccoli florets - 1 cup bell peppers (mixed colors), sliced - 1 cup carrots, julienned - 1 zucchini, sliced - 2 tablespoons olive oil - 2 cloves garlic, minced - 1 teaspoon dried Italian herbs (oregano, basil, thyme) - Salt and pepper to taste - 1/4 cup grated Parmesan cheese (optional) - Fresh basil leaves for garnish (optional) Pasta is one of the best cheap staples. It fills you up without breaking the bank. You can buy a box for just a few dollars. Fresh vegetables add flavor and color. Look for seasonal veggies. They cost less and taste better. Broccoli, zucchini, and bell peppers are often on sale. Use what you find cheap at your store. Olive oil is a must for flavor. A small bottle lasts a while, so it’s worth the price. You can swap out ingredients easily. Don’t have zucchini? Use squash or green beans instead. Carrots can be replaced with peas or even frozen mixed veggies. If you lack Parmesan, try any cheese you have on hand. For a vegan dish, skip the cheese or use a nut-based option. Be creative with what you have. This helps keep costs down while still making a tasty meal. Check out the Full Recipe for more details. 1. Start by boiling a large pot of water. Add salt for flavor. 2. Toss in 8 oz of spaghetti or your favorite pasta. Cook until al dente. 3. Save 1/2 cup of the pasta water, then drain the pasta. Set it aside. 4. In a large skillet, heat 2 tablespoons of olive oil over medium heat. 5. Once hot, add 2 minced garlic cloves. Sauté for 1 minute until it smells great. 6. Add 1 cup each of broccoli florets, sliced bell peppers, julienned carrots, and sliced zucchini. 7. Cook the veggies for 5-7 minutes until they are tender but still crisp. 8. Mix in 1 teaspoon of dried Italian herbs and season with salt and pepper. 9. Add the drained pasta to the skillet with the veggies. 10. Pour in the reserved pasta water. Toss everything together for 2-3 minutes. 11. If you like, add 1/4 cup of grated Parmesan cheese and stir until melted. 12. Serve hot, garnished with fresh basil leaves if you want. - Use plenty of water to boil your pasta; this keeps it from sticking. - Always add salt to the water. It adds flavor to the pasta. - Stir the pasta a few times while cooking to keep it separated. - Test the pasta a minute before the package time is up. It should be firm but not hard. - Choose seasonal vegetables for better taste and lower cost. - You can mix and match veggies based on what you have at home. - Cut the vegetables into similar sizes for even cooking. - Sauté the veggies until they are bright and colorful, which means they are done. This recipe is a great way to enjoy a tasty meal without spending much. For the full recipe, refer to the section above. {{image_2}} Meal prep helps you use your food wisely. Cook large batches of meals. Store them in the fridge for later. This way, you avoid waste and save time. Choose recipes that keep well. Pasta primavera is a great option. Cook it once and enjoy it for days. Leftovers can be a lifesaver. You can turn them into new meals. For example, use leftover pasta in a salad. Mix it with fresh veggies and a dressing. This adds flavor and nutrition. Always store leftovers properly. Use airtight containers to keep them fresh. You don’t need fancy tools to cook well. A good knife and cutting board are key. A pot and a pan will cover most recipes. A basic blender can help you make sauces or soups. Look for tools at thrift stores or yard sales. Always choose quality over brand when on a budget. You can easily make Pasta Primavera vegan. Just skip the Parmesan cheese. Use a vegan cheese substitute or nutritional yeast for flavor. This dish is full of veggies. They add great taste and color. You can mix in any veggies you like. Try spinach, peas, or asparagus for variety. To make Pasta Primavera more filling, add protein. Chickpeas are a great choice. They are cheap and packed with protein. You can also use canned beans or tofu. Just sauté them with the veggies. This gives you a balanced meal that keeps you full. Using seasonal veggies can save you money. In spring, use fresh peas and asparagus. In summer, add zucchini and bell peppers. Fall brings squash and mushrooms, while winter gives you hearty greens. Each season offers unique flavors. This way, your dish will always taste fresh and exciting. For the full recipe, check out Pasta Primavera Delight . Store your leftover Pasta Primavera Delight in an airtight container. This keeps out air and moisture. Place the container in the fridge right after your meal. Make sure to cool the food down first. Avoid putting hot food in the fridge. It can raise the temperature inside. Use the leftovers within three to four days for best flavor and safety. If you want to save your Pasta Primavera for later, freezing is a great option. First, let the dish cool completely. Then, divide it into single-serving portions. Use freezer-safe containers or bags. Make sure to label them with the date. This way, you’ll know how long they’ve been stored. Frozen meals can last up to three months without losing taste. When you’re ready to eat, take your leftovers out of the fridge or freezer. If frozen, let the dish thaw overnight in the fridge. To reheat, use a microwave or stovetop. Add a splash of water or olive oil to keep it moist. Heat it until it’s warm throughout. For best results, avoid overcooking. This keeps the veggies crisp and the pasta yummy. Enjoy your meal without worry! When you need more cheap meal ideas, think simple. Here are a few: - Rice and Beans: This combo is tasty, filling, and cheap. Use canned beans for quick prep. - Egg Fried Rice: Use leftover rice and add eggs, peas, and carrots for a quick meal. - Vegetable Soup: Use any leftover veggies. Add broth or water, and season well. - Grilled Cheese and Tomato Soup: Easy to make and comforting. Pair with a simple salad. - Tacos: Use tortillas, beans, or ground meat, and top with any leftover veggies. These meals are not only cheap but also easy to make. You can mix and match ingredients you have at home. To make meals stretch further, think about bulk cooking. Here are some tips: - Batch Cooking: Make a large pot of soup or stew. It lasts for days and tastes better the next day. - Use Grains: Grains like rice or quinoa can fill you up. They are cheap and versatile. - Freeze Portions: If you have leftovers, freeze them in small portions. You can eat them later. - Add Veggies: Mix in more veggies to meals. They are low-cost and add nutrition. - Plan Meals: Plan your meals for the week. It helps avoid waste and saves money. These tips can help you get more from your food budget. You can enjoy nutritious meals without overspending. When shopping for affordable groceries, consider these stores: - Discount Stores: Stores like Aldi and Lidl offer great prices on basic items. - Local Markets: Farmers' markets often have fresh produce at lower prices. - Warehouse Clubs: Costco or Sam's Club can save you money on bulk items. - Dollartree: You can find many pantry staples for just one dollar. - Online Grocery Stores: Check for deals on websites like Thrive Market for organic options. Visiting these stores can help you save money on everyday items. Always compare prices to find the best deals. For a delicious meal, try the Pasta Primavera Delight. It’s not only easy to make but also budget-friendly! Check out the Full Recipe for detailed instructions. Cooking cheap meals, like Pasta Primavera, offers tasty nutrition without breaking the bank. You’ve learned about budget-friendly ingredients, smart cooking tips, and meal prep strategies. These ideas help you make meals stretch, reduce waste, and enjoy great taste. Always remember, cooking on a budget can be fun and healthy. Use what you have and get creative with meals. You can eat well even while saving money!

Cheap Meals to Make When You Are Broke and Easy

Are you feeling the pinch of a tight budget but still want tasty meals? I get it! Cooking cheap doesn’t

- 1 pound raw shrimp, peeled and deveined - 3 tablespoons butter - 4 cloves garlic, minced - 1 cup heavy cream - 1/2 cup grated Parmesan cheese - Salt and pepper to taste - 1 teaspoon red pepper flakes (optional) - 2 tablespoons fresh parsley, chopped (for garnish) - Cooked pasta or rice (for serving) To make Easy Creamy Garlic Shrimp, gather these simple yet rich ingredients. Start with fresh shrimp, as they provide the best flavor. The butter gives a nice base to your dish. Garlic adds that wonderful aroma and taste. Heavy cream makes it creamy and dreamy. Parmesan cheese adds depth and richness. Don't forget to season with salt and pepper. If you like a bit of heat, red pepper flakes work great. Finally, garnish with parsley for color and freshness. Serve it over pasta or rice to soak up all that delicious sauce. You can find the Full Recipe for easy cooking steps to create this mouthwatering dish. - Step 1: Melt the butter over medium heat. In a large skillet, add the butter. Let it melt slowly. This step builds a rich flavor base. - Step 2: Sauté garlic until fragrant. Add the minced garlic to the melted butter. Stir it for about 1-2 minutes. Watch closely so it does not burn. The smell will be amazing! - Step 3: Add shrimp to the skillet. Increase the heat to medium-high. Toss in the raw shrimp. Cook for 2-3 minutes until the shrimp turns pink. This means they are cooked through. - Step 4: Pour in heavy cream and stir. Next, pour in the heavy cream. Stir well to combine the cream with the butter and garlic. This creates a creamy sauce that coats the shrimp. - Step 5: Mix in Parmesan cheese. Add the grated Parmesan cheese to the skillet. Stir until it melts into the sauce. This adds a nice cheesy flavor. - Step 6: Season and simmer. Finally, season with salt and pepper. If you like a kick, add red pepper flakes. Let it simmer for another 2 minutes. This thickens the sauce and brings all the flavors together. Now, you can enjoy this dish over cooked pasta or rice for a complete meal. For the full recipe, check out the Easy Creamy Garlic Shrimp section. Choosing the right shrimp Select fresh or frozen shrimp that is raw and deveined. Look for shrimp that is firm and has a slight ocean scent. Avoid shrimp with a strong fishy smell. For this recipe, I prefer medium to large shrimp. They cook evenly and stay juicy. How to avoid overcooking shrimp Shrimp cooks quickly. Aim for 2-3 minutes in the skillet. Watch for color change from gray to pink. Remove shrimp as soon as they turn pink. Overcooking makes shrimp rubbery and tough. Adding herbs and spices Boost flavor by adding fresh herbs like parsley or basil. A pinch of red pepper flakes gives a nice kick. You can also include lemon zest for a fresh taste. These flavors elevate the dish and make it special. Serving suggestions with sides Serve creamy garlic shrimp over pasta or rice. This adds a hearty base. Add a side of steamed veggies for color and crunch. Garlic bread pairs well too, soaking up the creamy sauce. Best skillet types Use a large skillet for even cooking. A non-stick skillet makes cleanup easy. Cast iron works well for heat retention, but requires more care. Always preheat your skillet before adding shrimp. Recommended tools for ease Keep a sturdy spatula on hand. It helps flip shrimp without breaking them. Measuring cups and a garlic press make prep faster. A good knife is essential for mincing garlic finely. For the full recipe, check out the details above. {{image_2}} You can switch the shrimp for chicken or scallops. Chicken thighs work great. Cook them until golden brown. Then, follow the same steps as in the recipe. Scallops are another tasty choice. Sear them for about 2-3 minutes. They cook fast, so watch them closely. For a vegetarian option, use mushrooms. Slice them thick and sauté until they’re soft. They soak up the sauce well. Adding sun-dried tomatoes brings a burst of flavor. Chop them up and add them when you pour in the cream. They add a nice tang. You can also toss in fresh spinach or kale. Add them after the cream, and let them wilt. They boost nutrition and color. Each bite will feel fresh and lively. For low-carb options, skip the pasta or rice. Serve the creamy garlic shrimp over zucchini noodles instead. This keeps it light and healthy. If you need a dairy-free sauce, use coconut milk. It gives a creamy texture without dairy. Just make sure to adjust the seasoning since coconut has a sweeter taste. These swaps help fit different diets while keeping the dish delicious. To keep your creamy garlic shrimp fresh, refrigerate it right away. Place the shrimp in an airtight container. Make sure it cools to room temperature before sealing. This helps keep moisture in and prevents bacteria growth. For freezing, use freezer-safe bags or containers. Remove as much air as possible to avoid freezer burn. Label the container with the date for easy tracking. You can reheat shrimp in both the microwave and on the stovetop. The microwave is quick and easy. Use a microwave-safe dish and cover it loosely to keep moisture in. Heat in short bursts, stirring often. For stovetop reheating, use low heat in a skillet. Add a splash of cream or water to keep it creamy. This helps avoid rubbery shrimp. Always check that shrimp is hot all the way through before serving. In the fridge, creamy garlic shrimp lasts about 3 days. Store it properly to maintain freshness. If you notice a sour smell, off color, or unusual texture, it's best to throw it away. These are signs of spoilage. Always trust your senses when it comes to food safety. For the best taste, enjoy it within the first couple of days. For the full recipe, check out Easy Creamy Garlic Shrimp. You can tell shrimp is cooked by its color and texture. Look for a bright pink hue. The shrimp should curl into a C shape. If it turns white and opaque, it's ready. Cook it for about 2-3 minutes per side. Overcooked shrimp become tough. Yes, you can make creamy garlic shrimp ahead of time. Cook it as usual, then cool it down. Store it in an airtight container in the fridge. For best results, reheat it gently on the stove. Add a splash of cream to keep it rich and smooth. Creamy garlic shrimp pairs well with many sides. Here are some great options: - Cooked pasta, like fettuccine or linguine - White rice or jasmine rice - Steamed broccoli or asparagus - Garlic bread or a fresh salad These sides will complement the rich flavors of the shrimp. Enjoy your meal! For the full recipe, check out the Easy Creamy Garlic Shrimp section. This creamy garlic shrimp recipe is quick and easy. You learned about the key ingredients, simple steps, and helpful tips for success. Consider your options to change flavors or proteins. Storing leftovers and reheating correctly will keep your dish tasty. With these insights, you can create a meal that impresses everyone. Enjoy the process and have fun in the kitchen!

Easy Creamy Garlic Shrimp Irresistible Dinner Recipe

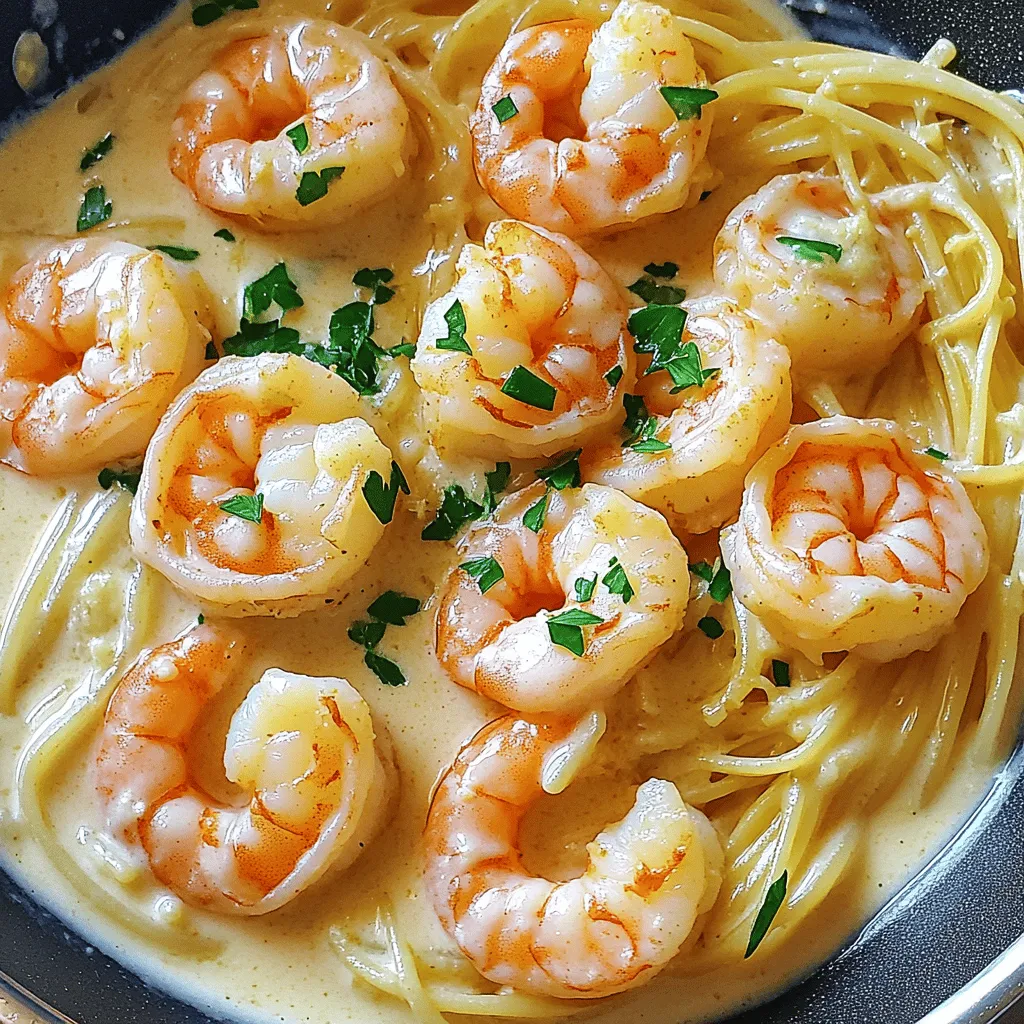
Are you ready to impress dinner guests with a dish that’s simple yet elegant? My Easy Creamy Garlic Shrimp brings

- 1 lb large shrimp, peeled and deveined - 2 tablespoons olive oil - 3 cloves garlic, minced - 1 cup fresh spinach, chopped - 1 cup canned artichoke hearts, drained and chopped - 1 cup heavy cream - ½ cup grated Parmesan cheese - 1 teaspoon Italian seasoning - ½ teaspoon red pepper flakes (optional) - Salt and black pepper to taste - Fresh parsley, chopped (for garnish) - Prep Time: 10 minutes - Total Time: 25 minutes - Servings: 4 Gather these ingredients before you start. Having everything ready helps the cooking go smoothly. You can find the full recipe [here](Full Recipe). The fresh shrimp, creamy sauce, and bright spinach make this dish shine. Enjoy the vibrant colors and flavors as you cook! - Step 1: Heat olive oil over medium heat in a large skillet. - Step 2: Sauté minced garlic for 1 minute until fragrant. In this first part, you want to set the stage. The olive oil should shimmer, showing it's ready. Then, add the garlic. This step fills your kitchen with a warm, inviting aroma. - Step 3: Add shrimp and season with salt, pepper, and red pepper flakes. - Step 4: Cook shrimp for 3-4 minutes until pink and opaque. - Step 5: Remove shrimp and set aside. Next, toss in the shrimp. They need that seasoning to shine. Watch as they change color. The transformation from gray to pink is a sign they are cooking. Once cooked, take them out to keep them tender. - Step 6: Cook spinach and artichokes until spinach wilts. - Step 7: Pour in heavy cream and simmer, adding Italian seasoning. - Step 8: Stir in Parmesan cheese and thicken the sauce. - Step 9: Return shrimp to skillet, adjust seasoning, and garnish with parsley. Now, add the spinach and artichokes. Stir until the spinach wilts. Then, pour in the heavy cream and let it simmer. This is where the magic happens! Add the Parmesan cheese to create a rich sauce. Finally, mix in the shrimp again for a creamy delight. Don't forget to taste and adjust the seasoning. You can find the full recipe for Tuscan Shrimp with Spinach Artichokes online. Enjoy making this dish! - Ensure shrimp are fresh for the best flavor. Fresh shrimp taste sweet and juicy. - Adjust cooking time based on shrimp size. Larger shrimp need a bit more time. - Use a heavy skillet for even heat distribution. This helps cook your shrimp perfectly. When cooking shrimp, timing is key. Overcooking makes them tough. - Serve over pasta, rice, or a bed of greens. Each option adds a tasty base. - Drizzle with extra olive oil or a splash of lemon juice. This adds brightness. - Garnish with additional Parmesan cheese if desired. It adds a rich, savory touch. I love serving this dish with fresh bread. It soaks up all the creamy sauce. You can find the full recipe [here](#). {{image_2}} You can easily change some ingredients in this dish. If you want variety, try using chicken or tofu instead of shrimp. Both options will absorb the creamy sauce well. For a lighter dish, swap the heavy cream with non-dairy cream. Almond or coconut milk works great here. To boost the flavor, consider adding sun-dried tomatoes. They bring a nice sweetness and depth. You can also mix in fresh herbs like basil or oregano. These herbs will brighten the dish and make it even more aromatic. Do you like it spicy? Adjust the red pepper flakes to your taste. If you want more heat, try adding some diced jalapeños. This will give your dish a nice kick. Just remember, always taste as you go! You can explore more ideas with the [Full Recipe]. Store any leftovers in an airtight container in the fridge. This keeps the shrimp fresh and safe to eat. Aim to consume the dish within 2-3 days for the best taste and quality. The creamy sauce may thicken over time, but it will still be delicious. If you have more than you can eat, freeze the dish in portions. Use a freezer-safe container to keep it fresh for up to 3 months. When you're ready to enjoy it again, thaw the dish in the fridge. This slow thawing helps maintain flavor and texture. Reheat your Tuscan shrimp gently. You can use the stovetop or microwave. If the sauce seems thick, add a splash of cream. This will bring back its creamy texture. Make sure it’s heated through before serving. Enjoy your meal again! To make this dish healthier, use low-fat cream instead of heavy cream. You can also add more vegetables like zucchini or bell peppers. These options boost nutrition without losing flavor. They also add color and texture to your dish. Yes, you can use frozen shrimp. Just ensure they are fully thawed before cooking. This step helps the shrimp cook evenly and keeps them tender. Place them in the fridge overnight or run them under cold water. This dish pairs well with garlic bread. A light salad also complements the creamy sauce. If you enjoy wine, try a glass of white wine. These sides enhance the meal and create a balanced dining experience. Yes, this recipe is naturally gluten-free. Just be sure to avoid pasta unless you use gluten-free options. You can serve the shrimp over rice or a bed of greens for a delightful meal. This blog post walked you through a simple, tasty recipe for Tuscan shrimp with spinach and artichokes. You learned about the key ingredients, easy cooking steps, and thoughtful serving suggestions. Remember to choose fresh shrimp for the best outcome. Adjust spices and swap ingredients to make it your own. Enjoy your dish over pasta or greens for a delightful meal. Cooking can be fun and rewarding, so don’t hesitate to experiment with flavors!

Tuscan Shrimp with Spinach Artichokes Creamy Delight

Ready to delight your taste buds with a dish that’s both creamy and savory? In this blog post, I’m sharing

- 1 lb ground beef - 1 large onion, thinly sliced - 2 cups beef broth The main ingredients for French Onion Soup Burgers are simple yet vital. Ground beef serves as a hearty base. You want a good quality beef to make your patties juicy. Onions bring the sweet, caramelized flavor we love in onion soup. Thin slicing helps them cook evenly. Beef broth adds depth and richness, tying all the flavors together. - 4 slices Swiss cheese - Salt and pepper to taste - 1 tablespoon olive oil - 1 tablespoon butter - 1 teaspoon sugar - 1 teaspoon thyme (fresh or dried) You can add cheese for that classic French onion flavor. Swiss cheese melts beautifully. Feel free to experiment with other cheese varieties too. Seasoning is key, so a pinch of salt and pepper can enhance the taste. Olive oil and butter help caramelize the onions, making them sweet and golden. Sugar boosts this sweetness. Thyme adds a nice herbal note. - Fresh parsley for garnish (optional) Garnishes can brighten your dish. Fresh parsley adds a pop of color and a hint of freshness. You might also consider adding condiments, like mustard or a hint of mayo, for extra flavor. Enjoy crafting your perfect French Onion Soup Burger with these ingredients. For the complete recipe, be sure to check out the Full Recipe. To start, you’ll need to sauté the onions. Heat 1 tablespoon of olive oil and 1 tablespoon of butter in a large skillet over medium heat. Add the thinly sliced onions and a pinch of salt. This helps them cook evenly. Stir the onions often. They need about 15-20 minutes to caramelize. For perfect caramelization, keep an eye on the heat. Too high, and they burn. Too low, and they won't brown. Add 1 teaspoon of sugar halfway through to enhance the sweetness. In the last few minutes, stir in 1 teaspoon of thyme. This adds a nice flavor. Now, let’s work on the burger patties. In a mixing bowl, combine 1 pound of ground beef with salt and pepper. Mix it gently. You want to keep the meat loose for a juicy burger. Shape the mixture into 4 equal patties. Make them about 1 inch thick. You can cook these patties on a grill or a skillet. Preheat your grill or skillet over medium-high heat. Cook each patty for 4-5 minutes per side. This gives you a medium burger. If you like it more done, just add a minute or two. Once your patties are done, it’s time to assemble. Start with the toasted burger bun. Spoon some of the onion and beef broth mixture on the bottom half. Place the cheese-topped burger patty on top. Use 1 slice of Swiss cheese per patty. Ensure that cheese melts by covering the burger with a lid for the last minute of cooking. Next, add more onion mixture on top of the patty. Finish with the top half of the bun. That’s it! Your French Onion Soup Burger is ready to enjoy. For the full recipe, check back on our site. To get great caramelized onions, keep the heat low. A medium heat works well. This helps the onions cook slowly and evenly. Stir them often to avoid burning. Aim for about 15 to 20 minutes to reach that golden brown color. Make sure to add a pinch of salt and a teaspoon of sugar. This helps with the caramelization. Choosing the right broth can change the taste of your burger. Use a rich beef broth for a deep flavor. If you want a lighter touch, try chicken broth. You can also add more seasoning to enhance the taste. Try adding garlic powder, or even a splash of Worcestershire sauce for extra depth. When cooking your burgers, know your doneness levels. A medium burger is juicy and pink inside. A well-done burger has no pink and is firmer. Use a meat thermometer to check the temperature. Aim for 160°F for medium and 170°F for well-done. This ensures your burger is safe to eat while keeping it moist. {{image_2}} You can use many different cheeses on your French onion soup burgers. While Swiss cheese is classic, try Gruyère for a nutty taste. Cheddar adds sharpness, while fontina brings creaminess. Feel free to mix and match cheeses for extra flavor. To make a vegetarian version, swap out the beef patties for plant-based ones. Look for patties made from beans, lentils, or mushrooms. For the broth, use vegetable broth instead of beef broth. This keeps the rich taste while making it meat-free. Get creative with toppings! Consider adding sautéed mushrooms or crispy bacon for texture. You can also drizzle balsamic glaze or add fresh arugula for a peppery kick. For sides, try sweet potato fries or a simple salad. These add balance to your hearty meal. To keep your French Onion Soup Burgers fresh, store them properly. First, let them cool down. Place the burgers in an airtight container. You can keep them in the fridge for up to three days. If you want to save them longer, freezing is a great option. Wrap each burger tightly in plastic wrap, then put them in a freezer bag. They can last for about three months. When you’re ready to enjoy leftovers, reheating is key. The best way to reheat a burger is in the oven. Preheat your oven to 350°F (175°C). Place the burgers on a baking sheet and cover them with aluminum foil. Heat for about 10-15 minutes. This method keeps the buns from getting soggy. If you're in a hurry, you can use the microwave too. Heat for about 30 seconds, but remember, the texture may change. If you love planning ahead, meal prep is a smart choice. You can cook the onions and beef broth a day before. Store them in separate containers in the fridge. The next day, just shape the patties and cook them as needed. For quick assembly, you can toast the buns while the burgers cook. This saves time and keeps everything fresh. Enjoy the ease of making this dish any day! For the full recipe, check out the details above. For French Onion Soup Burgers, Swiss cheese works best. It melts beautifully and adds a mild flavor. You can also try Gruyère cheese for a richer taste. Both cheeses enhance the onion and beef flavors in the burger. Yes, you can prepare parts of this recipe ahead. You can caramelize the onions and make the broth a day in advance. Store them in the fridge. On the day of serving, shape the patties and cook them fresh. This saves time and ensures the best taste. To make a vegetarian French Onion Soup Burger, use plant-based patties instead of ground beef. You can find many options in stores. For the broth, use vegetable broth instead of beef broth. This keeps the rich flavor while making it meat-free. This blog post covered how to make delicious French Onion Soup Burgers. You learned about key ingredients like ground beef and onions and optional items like cheese and seasonings. I shared tips for cooking, assembling, and even variations for vegetarian options. Remember to store leftovers properly and reheat in the best way. With these steps, you can create tasty burgers that impress anyone. Enjoy making your own versions and have fun in the kitchen!

French Onion Soup Burgers Flavorful and Hearty Meal

Imagine a burger bursting with the rich, hearty flavors of French onion soup. That’s exactly what you get with French

- 1 lb large shrimp, peeled and deveined - 2 cups cooked quinoa - 1 avocado, diced - 2 tablespoons olive oil - 1 teaspoon garlic powder - 1 cup fresh or canned sweet corn - Fresh cilantro - Lime wedges - Diced red bell pepper This recipe is simple and fun, and it packs a punch of flavor. The shrimp stands out with its tender texture, while the quinoa adds a nice base. The diced avocado brings creaminess, and the corn adds sweetness. You can swap or add other veggies too! For the seasoning, the olive oil and garlic powder create a great marinade for the shrimp. The optional garnishes like cilantro and lime wedges give it that extra zing. Each bite is fresh and satisfying. You can find the complete preparation details in the Full Recipe, and I encourage you to play with the ingredients! To start, take your large shrimp. In a big bowl, mix them with 2 tablespoons of olive oil. Add 1 teaspoon of garlic powder and 1 teaspoon of smoked paprika. Season with salt and pepper to your taste. Toss everything until the shrimp are well coated. Let the shrimp sit for about 15 minutes. This step helps the shrimp soak in all the flavors. While the shrimp marinate, you can make the salsa. In another bowl, combine 1 diced avocado, 1 cup of sweet corn, 1/2 diced red bell pepper, and 1/4 finely chopped red onion. Add 2 tablespoons of chopped cilantro and the juice of 1 lime. Gently stir everything together. Season with salt if needed and set it aside. This salsa adds freshness to the bowl. Next, it’s time to grill. Preheat your grill or grill pan to medium-high heat. If using skewers, thread the marinated shrimp onto them. If you use wooden skewers, soak them in water for 30 minutes first. Place the shrimp on the grill and cook for about 2-3 minutes on each side. They should turn pink and opaque when done. Now for the fun part—putting it all together! Take serving bowls and start with a layer of cooked quinoa. Place the grilled shrimp on top of the quinoa. Add a generous scoop of your avocado corn salsa. This layering creates a beautiful and tasty dish. For a finishing touch, sprinkle some extra cilantro on top. You can also add a lime wedge on the side. This adds a burst of freshness when you squeeze the lime over the bowl. Enjoy your Grilled Shrimp Bowl with Avocado Corn Salsa! For the full recipe, check the details above. Grilling shrimp can be simple if you know a few tricks. First, set your grill to medium-high heat. This temperature helps cook the shrimp quickly without drying them out. Aim for 2-3 minutes per side. When they turn pink and opaque, they are ready. Using skewers makes grilling easier. For wooden skewers, soak them in water for 30 minutes first. This helps prevent burning. Metal skewers are great too, and they don’t need soaking. Just remember to space the shrimp so they cook evenly. Your salsa can be your own creation. Start with the base of avocado and corn. Then, feel free to add spices like cumin or chili powder for heat. You can also mix in other veggies, such as diced tomatoes or jalapeños. Fresh ingredients always taste best, but canned corn works in a pinch. Just rinse it well before using. Toppings can change your bowl from good to great. Try adding crumbled feta or diced mango for extra flavor. You can also drizzle with a tangy yogurt sauce or a zesty vinaigrette. These small changes make a big impact on taste. Don't be afraid to experiment and find what you love. For the full recipe, check the main article. Enjoy your grilled shrimp bowl! {{image_2}} You can switch up the shrimp for other proteins. Chicken works great and adds a nice flavor. Just marinate it like the shrimp. Fish is another choice, and it cooks fast. Try salmon or tilapia for a tasty twist. If you want a meat-free option, tofu is perfect. Make sure to press the tofu to remove extra water. This helps it absorb flavors better. To make the bowl plant-based, skip the shrimp. Use more veggies instead. Try adding black beans or chickpeas for protein. You can also add extra greens like spinach or kale. Adjust the quinoa toppings to keep it filling and nutritious. A squeeze of lime juice adds a fresh taste to the dish. Get creative with your seasonings! Instead of garlic powder, try onion powder for a different taste. Lime zest can brighten up the dish. If you like heat, sprinkle some chili powder or cayenne pepper on the shrimp. Fresh herbs like mint or basil can also change the flavor. Play with these swaps to find your favorite mix. Check out the [Full Recipe] for more ideas! To keep your Grilled Shrimp Bowl fresh, store leftovers in airtight containers. Place shrimp, quinoa, and salsa in separate containers. This helps maintain texture and flavor. Refrigerate within two hours of cooking. Properly stored, shrimp lasts for up to three days. Quinoa can stay fresh for five days, while salsa is best used within two days. You can prep parts of this dish ahead of time. Cook the quinoa one day before serving. Store it in the fridge until you need it. Marinate the shrimp a few hours before grilling for more flavor. You can also chop veggies for the salsa the night before. Just keep everything in airtight containers. To safely reheat leftovers, use the microwave or stovetop. For quinoa, add a splash of water and cover the bowl. Heat for 1-2 minutes, stirring halfway. For shrimp, warm them in a skillet over medium heat for about 3-4 minutes. Stir gently to avoid overcooking. Salsa is best served cold, so no reheating needed. Enjoy your meal! Yes, you can use frozen shrimp. Just follow these best practices: - Thaw shrimp in the fridge overnight. - For quick thawing, place shrimp in a sealed bag and submerge in cold water for 15-20 minutes. - Pat them dry before marinating to help the flavors stick. Using frozen shrimp is a great option. They are often frozen right after catch, so they can be fresh and tasty. You can tell shrimp are done when they turn pink and opaque. Here are some key indicators: - Look for a C-shape; if they curl, they are cooked. - The internal temperature should reach 120°F. - Avoid overcooking, as shrimp can become tough and rubbery. Perfectly cooked shrimp are juicy and tender. To make your meal even better, consider these side dishes: - A fresh green salad with lemon dressing. - Grilled vegetables like bell peppers and zucchini. - Cornbread or tortilla chips for crunch. These sides enhance the flavors of the shrimp bowl. Leftovers can last in the fridge for about 3 days. Here are some tips for safety: - Store shrimp and quinoa in airtight containers. - Keep the avocado corn salsa separate to stay fresh longer. - Reheat shrimp gently to keep them tender. Always check for any off smells before eating leftovers. You can make the avocado corn salsa a few hours ahead. Here’s how to store it: - Keep it in an airtight container in the fridge. - To prevent browning, squeeze a little extra lime juice on top. - Stir gently before serving to mix flavors. Making salsa ahead saves time and allows the flavors to meld nicely. For the full recipe, check out the section above! In this article, I shared a recipe for a delicious grilled shrimp bowl. We covered key ingredients like shrimp, quinoa, and a fresh avocado corn salsa. I discussed easy steps to marinate shrimp and grill it perfectly. You can customize your bowl with different proteins or toppings to suit your taste. Proper storage tips ensure your leftovers stay fresh. This meal is tasty, easy to make, and full of healthy ingredients. Enjoy creating your shrimp bowl and experimenting with flavors!

Grilled Shrimp Bowl with Avocado Corn Salsa Delight

If you crave a fresh and vibrant meal, you’re in for a treat! The Grilled Shrimp Bowl with Avocado Corn

To make Shanghai Fried Noodles, gather these simple yet essential ingredients: - 8 oz thick egg noodles - 2 tablespoons vegetable oil - 3 cloves garlic, minced - 1 small onion, thinly sliced - 1 bell pepper (any color), julienned - 1 cup bok choy, chopped (or any leafy green) - 1 cup shredded carrots - 1/2 cup bean sprouts - 1 cup cooked chicken breast, shredded (or tofu for a vegetarian option) - 3 tablespoons soy sauce - 1 tablespoon oyster sauce (or mushroom sauce for vegetarian) - 1 teaspoon sesame oil - Salt and pepper to taste - 2 green onions, chopped (for garnish) - Sesame seeds (optional, for garnish) These ingredients create a vibrant and tasty dish. The thick egg noodles give a nice chew, while the mix of fresh vegetables adds color and crunch. The protein options let you choose between chicken or tofu, making it flexible for all diets. The sauces bring depth and umami to the dish. To cook your Shanghai Fried Noodles, you'll need a few key tools: - Large skillet or wok - Cooking utensils: spatula or wooden spoon A large skillet or wok helps you stir-fry the noodles and vegetables evenly. Use a spatula or wooden spoon to toss everything together, ensuring that all flavors blend well. Having the right tools makes the cooking process smooth and fun. For the full recipe, check out the [Full Recipe]. To cook egg noodles perfectly, boil water in a large pot. Add the noodles and cook until they are al dente. This usually takes about 4-6 minutes, but check the package for exact timing. Once cooked, drain the noodles and set them aside. To prevent sticky noodles, toss them with a little vegetable oil right after draining. This helps keep them separate. Start by heating 2 tablespoons of vegetable oil in a large skillet or wok. Add minced garlic and sliced onion first. Sauté them for about a minute until they smell great and the onion turns translucent. Next, add the bell pepper and shredded carrots. Cook these for about 2 minutes until they are slightly tender. After that, stir in the bok choy and bean sprouts. Cook them for about 2 more minutes until they wilt. This order ensures that each vegetable retains its best flavor and crunch. When the vegetables are ready, push them to one side of the skillet. Add your cooked chicken or tofu to the pan. Stir everything together so the chicken heats up. Then, add the drained egg noodles. Pour in the soy sauce, oyster sauce, and sesame oil. Toss all the ingredients well to coat the noodles evenly. Stir-fry everything together for another 2-3 minutes. This ensures that the flavors mix and the dish heats through. You want a nice, even sauce distribution for the best taste. For the full recipe, check the detailed instructions above. To get the best results, timing is key when sautéing. Start with garlic and onion. Sauté them for just one minute. This builds a strong flavor base. Then, add bell pepper and carrots. Cook for two minutes more. The goal is for them to be tender, but not mushy. High heat is also vital for stir-frying. It helps the food cook fast and keeps it crispy. Make sure your skillet is hot before adding any ingredients. This way, you achieve that perfect texture. One common mistake is overcooking the noodles. If you cook them too long, they become mushy. Always follow the package instructions for perfect al dente noodles. Toss them with oil once drained. This keeps them from sticking together. Another mistake is skipping the oil for tossing noodles. Oil helps coat the noodles and prevents them from clumping. It also allows the sauces to mix well. Adding spices can boost the flavor of your dish. Try a pinch of chili flakes for heat or some five-spice powder for depth. Just a little can change your dish dramatically! For presentation, serve the noodles hot in large bowls. Garnish them with chopped green onions and sesame seeds. This adds color and crunch. You can even sprinkle some chili flakes for a spicy touch. For a fun twist, try serving in takeout boxes for that authentic feel. For the full recipe, check out the detailed guide to ensure your Shanghai Fried Noodles are perfect! {{image_2}} When making Shanghai fried noodles, you can choose between chicken and tofu. Chicken gives a nice flavor and texture. Use cooked chicken breast, shredded for easy mixing. If you prefer a plant-based option, tofu works great. Just press and cube it before cooking. You can also add shrimp for a seafood twist. Cook the shrimp until pink and tender. This adds a different taste and protein boost. Feel free to mix and match based on what you have or enjoy. The beauty of this dish is its flexibility with veggies. You can swap seasonal vegetables as you like. Think zucchini, mushrooms, or snow peas for fresh flavors. Adding unique greens can change the dish too. Try kale, spinach, or even arugula for a different bite. These swaps keep your noodles exciting and colorful. For sauce, consider using vegetarian oyster sauce. It gives a rich flavor without seafood. You can also mix in other sauces for a unique taste. Try hoisin sauce for sweetness or chili paste for heat. These alternatives add depth to your dish. Experiment with sauces to find what you love best. You can discover new favorites with each batch of noodles. After you enjoy your Shanghai fried noodles, store leftovers safely. Let them cool down to room temperature first. Place the noodles in an airtight container. This method keeps them fresh. Use a container made of glass or BPA-free plastic. These options help maintain their taste and texture. When you're ready to eat leftovers, reheating them is key. The best way is to use a skillet. Heat it on low and add a splash of water. Stir the noodles gently as they warm up. This helps keep them from getting dry. You can also use a microwave. Cover the bowl with a damp paper towel. This keeps moisture in. To revitalize flavors, add a dash of soy sauce while reheating. It boosts the taste and makes the noodles pop again. Enjoy your meal just like it was fresh! Shanghai Fried Noodles is a tasty dish from China. It uses thick egg noodles, which are chewy and satisfying. Traditional ingredients include: - Thick egg noodles - Garlic and onions for flavor - Bell peppers, bok choy, and carrots for crunch - Chicken or tofu for protein - Soy sauce and oyster sauce for umami taste This dish is stir-fried, making it quick and simple to prepare. The mix of flavors and textures makes it a favorite among many. Yes, you can make Shanghai Fried Noodles ahead of time! Here are some meal prep tips: - Cook the noodles and store them in the fridge for up to three days. - Prepare the vegetables and protein in advance. - Store each component separately to keep them fresh. To serve, just stir-fry everything together and add sauces. This makes mealtime easy and stress-free. Finding the best Shanghai Fried Noodles can be fun! Look for local Chinese restaurants that specialize in Shanghai cuisine. They often have authentic dishes. You can also check food delivery apps for popular options. Look for high ratings and customer reviews. This way, you can enjoy a delicious meal without cooking! Shanghai Fried Noodles are not gluten-free due to the egg noodles and soy sauce. However, you can make it gluten-free by using: - Rice noodles or gluten-free egg noodles - Gluten-free soy sauce or tamari These swaps keep the dish tasty while meeting your dietary needs. Absolutely! You can make Shanghai Fried Noodles your own. Here are some tips for personalizing the recipe: - Change the protein: Use shrimp, beef, or keep it vegetarian with tofu. - Add your favorite vegetables: Try snow peas, mushrooms, or zucchini. - Adjust the sauces: Use more soy sauce for saltiness or add chili sauce for heat. Feel free to play with flavors and textures to create your perfect dish. For the full recipe, check out the section above! Shanghai Fried Noodles come together with simple ingredients and easy steps. Thick egg noodles, fresh veggies, and your choice of protein create a delightful dish. Cooking techniques matter too—timing and high heat are key. Remember, avoid common mistakes to get the best texture and flavor. You can experiment with variations, sauces, and storage tips for leftovers. This dish adapts to your tastes, making every meal special. Dive in, enjoy your cooking, and create delicious moments!

Savory Shanghai Fried Noodles Quick and Easy Recipe

Looking for a quick and tasty dinner? You’ve stumbled upon the right recipe! My Savory Shanghai Fried Noodles are easy

- Mixed fruit puree options: Use strawberries, mangoes, or blueberries. You can mix them up for fun flavors. Fresh or frozen fruits work well here. Just make sure to blend them until smooth. - Sweetener choices: You can sweeten your fruit snacks with honey or maple syrup. Both options add a nice touch. Choose what you like best based on your taste. - Gelatin vs. pectin: Gelatin gives a chewy texture, while pectin is a great vegan option. Gelatin comes from animal products, while pectin is plant-based. Both can help your snacks set well. - Optional ingredients for enhancing flavor: Adding lemon juice brightens the taste. A pinch of salt can also boost the sweetness. Feel free to experiment with these extras to find your favorite mix. For the full recipe, check out the Fruity Chewy Delights section! To make your fruit puree, start by blending. Use 2 cups of mixed fruits like strawberries, mangoes, and blueberries. Blend them until smooth. For a silkier texture, you can strain the puree. Straining removes seeds and pulp, giving you a nice finish. If you like a bit of texture, leave it unstrained. Next, let's make the gelatin mixture. In a small pot, combine 1/2 cup of water and 1/4 cup of your sweetener, like honey or maple syrup. Heat this over low to medium heat. Stir until the sweetener fully dissolves. This step is key for a good mix. Now, slowly whisk in 1/4 cup of gelatin. Whisking is crucial here. It helps to avoid lumps. Keep whisking until you see no lumps at all. Then, take the pot off the heat. Now, it’s time to combine. Pour your fruit puree into the gelatin mix. Add 2 tablespoons of lemon juice for a zesty kick. Stir until everything blends smoothly. This creates a nice, colorful mixture. For pouring, use a silicone mold or a parchment-lined dish. Make sure to spread the mixture evenly. This ensures all the snacks will set the same way. Finally, let’s set the snacks. Place your mold in the fridge. Leave it there for at least 4 to 6 hours, or until they are firm. When they are set, carefully remove the snacks. If you used a dish, cut them into squares. Store these tasty treats in an airtight container. They can last up to two weeks in the fridge. Enjoy your homemade fruity chewy delights! To make your fruit snacks pop with flavor, mix different fruits. I love combining strawberries, mangoes, and blueberries. You can also try peaches, raspberries, or even bananas for a sweet twist. Each fruit brings its own taste, making snacks more fun. When sweetening your snacks, you can use honey or maple syrup. Both options work well but change the flavor slightly. You might want to try agave syrup or stevia for a different taste. Adjust the amount based on how sweet you like your snacks. Making your fruit snacks look good is key. Use colorful plates to catch the eye. Arrange snacks in fun shapes or alongside other healthy treats. Kids enjoy seeing bright colors, so don’t be shy with your choices. For a special touch, add garnishes. Edible flowers or fresh mint leaves can make a big difference. You can also sprinkle some coconut flakes or crushed nuts on top for added texture. Sometimes, the mixture doesn’t set right. If this happens, check the gelatin or pectin amount. You might need a bit more to help it firm up. Make sure you mix well and let it chill long enough. If your snacks taste too sweet, try adding a little lemon juice. It helps balance the sweetness. You can also reduce the sweetener next time. Just keep tasting as you go to find your perfect flavor! {{image_2}} You can make these fruit snacks vegan by using pectin instead of gelatin. Pectin is a natural thickener from fruits. It works great, and you won’t lose flavor. For sweeteners, try using agave syrup or coconut sugar. They add a nice taste and fit a vegan diet. Want to mix things up? Try tropical fruits like pineapple or coconut. These fruits add a bright and fun taste. You can also blend berries like raspberry and blackberry. They create a tasty and colorful snack that kids love. Using seasonal fruits makes your snacks special. In summer, try fresh peaches or cherries. In fall, use apples or pears. You can adjust the recipe by changing the fruit puree amount. Just keep the same total volume for the best results. This way, you can enjoy unique snacks all year round. To keep your fruit snacks fresh, choose airtight containers. Glass jars or plastic containers work well. Ensure they are dry before adding snacks. This helps prevent moisture buildup. Store them in the fridge for the best flavor and texture. Avoid leaving them out at room temperature for long. This keeps them safe and tasty. Homemade fruit snacks last about two weeks in the fridge. After that, they may lose flavor and texture. Look for signs of spoilage. If they become sticky or develop an off smell, it's time to toss them. Always use your senses to check if they are still good to eat. To keep your fruit snacks from sticking, dust them with a little cornstarch or powdered sugar. This helps create a barrier. You can also store them in layers with parchment paper in between. This way, they won’t touch each other and stick. Yes! You can use pectin instead of gelatin for a vegan option. Pectin is a great substitute and works well in fruit snacks. Follow the instructions on the package for the best results. You can also try agar-agar, a seaweed-based option. I recommend using soft fruits like strawberries, mangoes, and blueberries. They blend well and create a nice texture. You can mix different fruits for fun flavors. Apples and peaches are also great choices. Just make sure to use ripe fruits for the best taste. You can easily customize this recipe for allergies. Use honey or maple syrup based on your preference. For those who avoid gluten, this recipe is naturally gluten-free. If you have fruit allergies, swap in safe fruits like bananas or pears. Just ensure they are safe for your needs. You can make tasty homemade fruit snacks with simple ingredients and steps. We talked about choosing fruit purees, sweeteners, and whether to use gelatin or pectin. I shared tips on mixing and presenting your snacks. You can also experiment with flavors and seasonal fruits. Proper storage helps keep your snacks fresh longer. Now, you are ready to create your own delicious fruit snacks and impress everyone. Enjoy the fun of making snacks that taste great and fit your needs!

Homemade Fruit Snacks Simple and Healthy Treat

Are you tired of store-bought snacks loaded with sugar? You can easily make delicious, healthy fruit snacks at home! In

To make these delicious poppers, gather the following key ingredients: - 1 cup cornmeal - 1 cup all-purpose flour - 1 tablespoon baking powder - 1/2 teaspoon salt - 1 cup buttermilk - 2 large eggs - 1/4 cup unsalted butter, melted - 1/4 cup honey - 1 cup corn kernels (fresh, frozen, or canned) - 1/3 cup sour cream - 2 tablespoons honey (for drizzling on top) These ingredients blend together to create a sweet and fluffy texture. Cornmeal gives the poppers a nice bite, while the honey adds a rich sweetness. You can add a twist to your poppers with these optional ingredients: - 1/2 teaspoon cayenne pepper (for a spicy kick) - Chopped green onions (for a savory note) - Shredded cheese (for extra creaminess) These optional ingredients help you customize the flavor. A dash of cayenne adds heat, while cheese brings a melty goodness. To make your Southern-style honey butter cornbread poppers, you will need: - Mini muffin tin - Mixing bowls - Whisk - Spoon or ice cream scoop - Wire rack Having the right tools makes the process smoother. A mini muffin tin is perfect for shaping the poppers. Use a whisk for easy mixing, and a wire rack helps cool them evenly. For more detailed cooking steps, check out the Full Recipe. First, turn your oven to 400°F (200°C). This heat helps the poppers rise nicely. Next, take a mini muffin tin and grease it. You can use non-stick spray or butter. This step keeps the poppers from sticking. In a large bowl, combine the cornmeal, all-purpose flour, baking powder, and salt. If you like a little heat, add cayenne pepper. Whisk these dry ingredients together until mixed. This blends the flavors well. In another bowl, mix the buttermilk, eggs, melted butter, and honey. Stir until everything is well combined. This mixture adds moisture and sweetness to your poppers. Now, pour the wet ingredients into the dry bowl. Stir gently until just combined. Be careful not to over-mix. Fold in the corn kernels and sour cream. This adds a nice texture. Use a spoon or ice cream scoop to fill each muffin cup about three-quarters full. Bake for 12-15 minutes. The tops should be golden and a toothpick should come out clean. Once baked, remove the poppers from the oven. Let them cool in the pan for about 5 minutes. After that, transfer them to a wire rack to cool fully. Finally, drizzle the extra honey over the warm poppers. This adds a sweet touch that everyone loves. Enjoy your Southern-Style Honey Butter Cornbread Poppers! For the complete recipe, check the Full Recipe. To get the best texture in your cornbread poppers, use fresh ingredients. Fresh corn kernels add sweetness. Use buttermilk for moisture and richness. Mix dry and wet ingredients separately first. This helps keep the batter light. Don't over-mix; stir gently until just combined. This keeps your poppers fluffy and airy. Let the batter rest for a few minutes. This allows the cornmeal to soak in the liquid, which improves the texture. For extra flavor, add a pinch of cayenne pepper. It gives a nice kick without being too spicy. Consider mixing in some shredded cheese, like cheddar. This adds creaminess and a savory touch. You can also fold in diced jalapeños for heat. Drizzle honey right after baking, while they are still warm. This enhances the sweet flavor and makes them shine. One mistake is not greasing the muffin tin well. This can make your poppers stick. Also, avoid using old baking powder; it can make your cornbread dense. Make sure your oven is preheated properly. This helps your poppers rise well. Lastly, don’t skip the cooling time. Letting them cool slightly makes them easier to remove and enhances their flavor. For more detailed steps, check the Full Recipe. {{image_2}} You can spice up your cornbread poppers easily. Adding spices can change the taste. I love using cayenne pepper for a little heat. Just add 1/2 teaspoon to the dry mix. You can also try smoked paprika for a smoky flavor. Garlic powder or onion powder adds a savory touch. Experiment and find what you like best. If you have dietary needs, you can swap some ingredients. For a gluten-free option, use a gluten-free flour blend instead of all-purpose flour. You can also replace buttermilk with almond milk mixed with a bit of vinegar for a dairy-free choice. If you want lower sugar, use less honey or a sugar substitute. These changes keep the taste good! Cornbread poppers taste great on their own. But you can serve them with dips for extra flavor. Try a spicy salsa or a creamy ranch dip. Honey chipotle sauce also pairs well. You might even serve them with butter for a classic touch. These poppers are perfect for parties or family dinners. Check the Full Recipe for other serving ideas! To keep your Southern-Style Honey Butter Cornbread Poppers fresh, store them in an airtight container. This method keeps them moist and tasty. You can leave them at room temperature for up to two days. If you want them to last longer, refrigerate them for up to a week. When you're ready to eat your poppers, reheating is easy. Preheat your oven to 350°F (175°C). Place the poppers on a baking sheet. Heat for about 5-7 minutes or until warm. You can also use the microwave. Heat for 15-20 seconds, but watch them closely. You want them warm, not hot. Freezing is a great way to save your cornbread poppers for later. Let them cool completely before freezing. Place them in a freezer-safe bag or container. They can last up to three months in the freezer. When you're ready to enjoy them, thaw overnight in the fridge. Then, reheat as mentioned above. This way, you have a tasty snack ready anytime! For the full recipe, check out the Southern-Style Honey Butter Cornbread Poppers. Yes, you can make these cornbread poppers ahead of time. Bake them, then let them cool. Store them in an airtight container for up to two days. Reheat them in the oven for a warm treat. It keeps the taste fresh and fluffy. If you do not have buttermilk, you can use milk with vinegar or lemon juice. Just add one tablespoon of vinegar or lemon juice to one cup of milk. Let it sit for five minutes. This mix gives a similar tangy flavor. You will know the poppers are done when the tops are golden brown. Insert a toothpick into the center of a popper. If it comes out clean, they are ready. This usually takes about 12-15 minutes in the oven. Yes, you can make these poppers gluten-free. Use a gluten-free flour blend instead of all-purpose flour. Check the blend for a good rise and taste. This way, everyone can enjoy these tasty bites. You can try many toppings! Some favorites include cheese, jalapeños, or ranch dressing. You can also use a mix of herbs or spices for extra flavor. Get creative and find your favorite! For the full recipe, check out the details above. Southern-style honey butter cornbread poppers are easy to make and delicious. I covered key ingredients, step-by-step instructions, and helpful tips to ensure success. You can adjust flavors and serve them with various dips. Proper storage keeps them fresh for later cravings. As you try this recipe, remember to enjoy the process. With a few simple tricks, your poppers will always shine. Dive into creating your version, and share the joy of this tasty treat with family and friends.

Southern-Style Honey Butter Cornbread Poppers Recipe

Get ready to delight in the warmth and joy of Southern cooking with my Southern-Style Honey Butter Cornbread Poppers! This

Older posts
Newer posts
← Previous Page1 … Page51 Page52 Page53 … Page59 Next →

dsad

© 2025 Emmas Dish • Built with GeneratePress

Our Policies

  • Copyright Policy
  • Cookie Policy
  • GDPR Policy
  • Privacy Policy
  • Disclaimer
  • Terms Of Use

More Information

  • Home
  • About
  • Contact
  • Appetizers
  • Dessert
  • Dinner
  • Drinks
©2025, Emmas Dish About Back To Top