If you’re looking for a dish that’s both cheesy and easy, you’ve found it! My Cheesy Cauliflower Casserole will delight your taste buds without making you sweat in the kitchen. This recipe is packed with flavor and nutrition, making it perfect for a family meal or a cozy dinner. Ready to dive into the scrumptious world of cheesy goodness? Let’s get started!
Why I Love This Recipe
- Deliciously Cheesy: This casserole is packed with rich and creamy cheeses that create a satisfyingly indulgent flavor profile.
- Healthy Twist: Using cauliflower instead of pasta or rice makes this dish a healthier option without sacrificing taste.
- Easy to Prepare: The simple steps and straightforward ingredients make this a perfect recipe for weeknight dinners.
- Versatile Side Dish: This casserole pairs well with a variety of main courses, making it a great addition to any meal.
Ingredients
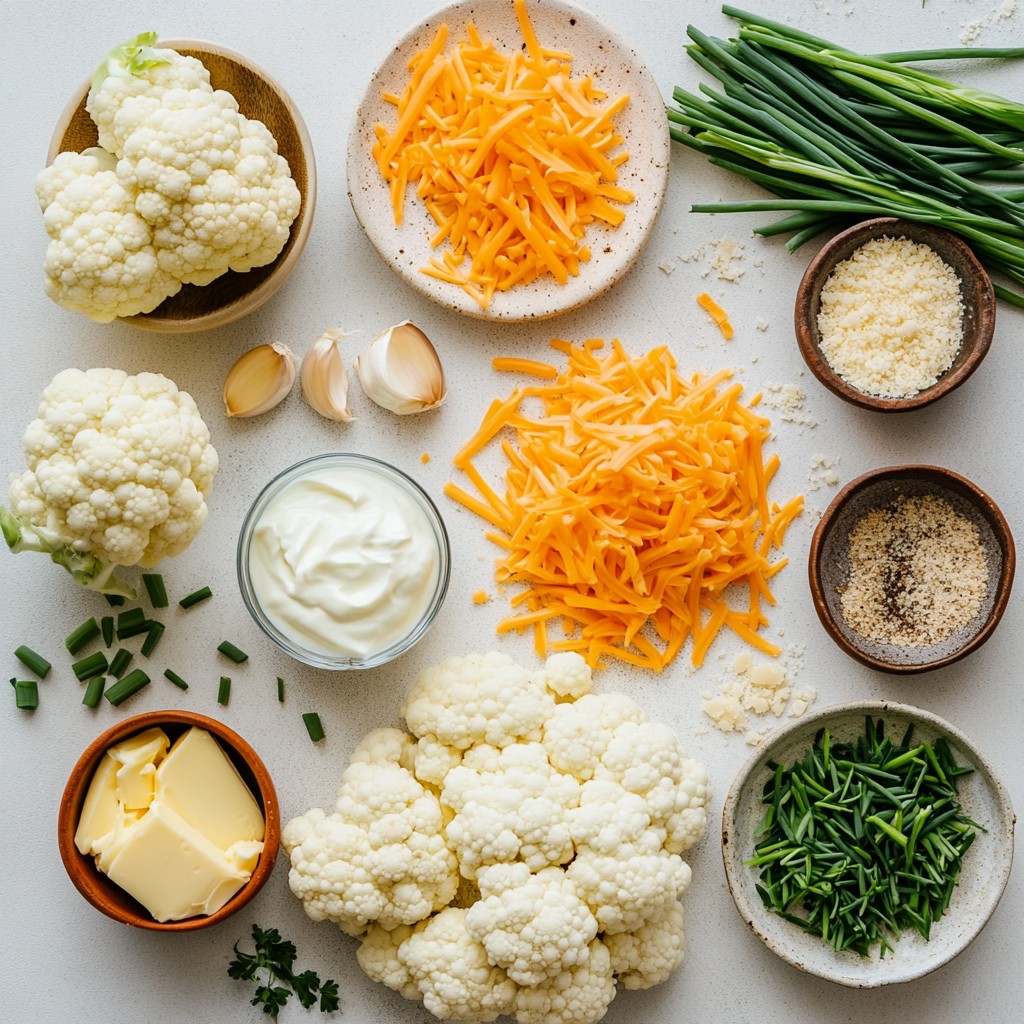
List of Ingredients
- 1 large head of cauliflower, cut into florets
- 1 cup of sharp cheddar cheese, shredded
- 1/2 cup of cream cheese, softened
- 1/2 cup of Greek yogurt or sour cream
- 1/2 cup of grated Parmesan cheese
- 1/4 cup of butter, melted
- 2 cloves of garlic, minced
- 1 teaspoon of onion powder
- 1/2 teaspoon of paprika
- Salt and pepper to taste
- 1/4 cup of chives, chopped (for garnish)
Measurement Details
When cooking, measuring ingredients is key. A large head of cauliflower gives you about 4-6 cups of florets. This amount is perfect for a family-sized dish. You will need one cup of sharp cheddar cheese. This cheese adds a nice kick. The cream cheese and Greek yogurt each need half a cup. They make the dish creamy and rich. The butter is a quarter cup and gives flavor. The two cloves of garlic add aroma and taste. One teaspoon of onion powder enhances the flavor. Paprika adds color and a bit of warmth. Use salt and pepper to taste, so adjust these to your liking. Finally, the chives add a fresh touch when you garnish your casserole.
Fresh vs. Frozen Cauliflower
You can use fresh or frozen cauliflower for this recipe. Fresh cauliflower has a better texture. It stays firm and has a nice crunch. Frozen cauliflower is convenient and saves time. It is already cut and ready to use. Just remember to thaw it first. If using frozen, drain excess water to avoid a soggy casserole. Both options work well, so choose what fits your needs.
Step-by-Step Instructions
Prepping the Cauliflower
Start by boiling water in a large pot. Add salt to the water for flavor. Cut the cauliflower into small florets. Once the water boils, add the florets. Cook them for 5-7 minutes until they are slightly tender. Drain the florets and set them aside. This step helps soften the cauliflower, making it easier to mix.
Making the Cheese Mixture
In a mixing bowl, add the cream cheese. Use softened cream cheese for easy mixing. Next, add Greek yogurt or sour cream for creaminess. Pour in melted butter, minced garlic, onion powder, paprika, salt, and pepper. Mix everything until it is smooth and well blended. This mixture gives the casserole its rich and cheesy flavor.
Assembling the Casserole
Take a large casserole dish and place the cooked cauliflower florets inside. Pour the cheese mixture over the florets. Toss gently to coat the cauliflower evenly. Fold in half of the sharp cheddar and half of the Parmesan cheese. Make sure the cheese is well distributed. Top the dish with the remaining cheddar and Parmesan. Cover the dish with aluminum foil. Bake in a preheated oven at 375°F for 25 minutes. After 25 minutes, remove the foil and bake for another 10-15 minutes. This step makes the cheese bubbly and golden brown. Let it cool for a few minutes, then garnish with chopped chives. Enjoy your cheesy cauliflower casserole!
Tips & Tricks
How to Perfect the Texture
To get a great texture, cook the cauliflower just right. Boil it lightly for 5-7 minutes. This helps keep it tender but not mushy. When you mix it with the cheese, it should stay firm. Overcooking can make it soggy.
Flavor Enhancements
You can boost the flavor in simple ways. Add some herbs like thyme or rosemary for a fresh taste. If you like heat, sprinkle in some red pepper flakes. You can also mix different cheeses. Try gouda or mozzarella for a twist.
Common Mistakes to Avoid
One big mistake is not draining the cauliflower well. Excess water can make the dish watery. Also, don’t skip the foil while baking. It helps the cheese melt evenly. Lastly, avoid using too much salt. Taste the mix before you add more.
Pro Tips
- Blanching Cauliflower: To retain the bright white color and crisp texture, blanch the cauliflower just until tender, about 5-7 minutes.
- Cheese Variations: Experiment with different cheese combinations like Gruyère or mozzarella for a unique flavor profile.
- Make Ahead: This casserole can be prepped a day in advance. Assemble it, cover it, and store it in the refrigerator until you're ready to bake.
- Garnishing: For an extra touch, consider adding crispy bacon bits or toasted breadcrumbs on top before serving for added texture.
Variations
Adding Other Vegetables
You can make this casserole even better by adding other veggies. Broccoli works well and adds nice color. Carrots also give a sweet taste. Just chop them small so they cook well. You can mix in peas or spinach too. Each veggie brings its own flavor. This makes the dish fun and tasty.
Cheese Substitutions
Feeling creative? You can swap out the cheese! Instead of sharp cheddar, try mozzarella for a milder taste. For a strong flavor, use Gouda or Gruyère. Vegan cheese is a great choice if you're avoiding dairy. Just pick one that melts well. Each cheese change will give a new spin to the dish.
Gluten-Free Adaptations
Making this casserole gluten-free is easy! The base of the recipe is already gluten-free. Just check your cream cheese and yogurt brands. Some may add gluten, so read the labels. You can also use gluten-free breadcrumbs on top for crunch. This keeps the dish safe for those with gluten issues. Enjoy your cheesy cauliflower casserole without worry!
Storage Info
Refrigeration Guidelines
After you bake the cheesy cauliflower casserole, let it cool down. Once cool, cover it tightly with plastic wrap or foil. Store it in the fridge for up to three days. When ready to eat, check for freshness before reheating.
Freezing Instructions
To freeze, allow the casserole to cool completely. Cut it into portions for easy serving. Wrap each piece in plastic wrap, then place it in a freezer-safe bag. It can last for up to three months in the freezer. When you're ready to enjoy it, thaw it in the fridge overnight before reheating.
Reheating Tips
For the best taste, reheat the casserole in the oven. Preheat your oven to 350°F (175°C). Place the casserole in an oven-safe dish. Cover it with foil to keep it moist. Heat for about 20 minutes, or until it's warmed through. You can also microwave individual portions. Just cover them to avoid drying out. Enjoy your cheesy goodness!
FAQs
Can I make this recipe ahead of time?
Yes, you can make this casserole ahead of time. Prepare the dish up to the baking step. Cover it and store it in the fridge for up to two days. When ready to bake, just add 5-10 extra minutes to the cooking time. This helps the casserole heat through.
How can I make it healthier?
To make this dish healthier, you can swap cream cheese with low-fat cream cheese. Greek yogurt is a good option for sour cream. You can also add more veggies like spinach or bell peppers for extra nutrients. Cut down on cheese to lower calories, but remember, cheese adds great taste.
What can I serve it with?
This cheesy cauliflower casserole pairs well with grilled chicken or fish. You can also serve it alongside a fresh salad. It complements roasted meats perfectly. For a hearty meal, add whole grain bread or quinoa. Each option adds more flavor and texture to your plate.
This blog post covered all you need to know about making a delicious cauliflower casserole. We talked about the best ingredients, how to prepare each step, and tips to perfect your dish. Remember to try different veggies and cheeses for fun flavors. With proper storage, you can enjoy it later, too. Follow these steps to create a tasty meal that everyone will love. Your cooking journey just got easier, and I hope you feel ready to dive in!