Chocolate Covered Pumpkin Truffles Simple Delight

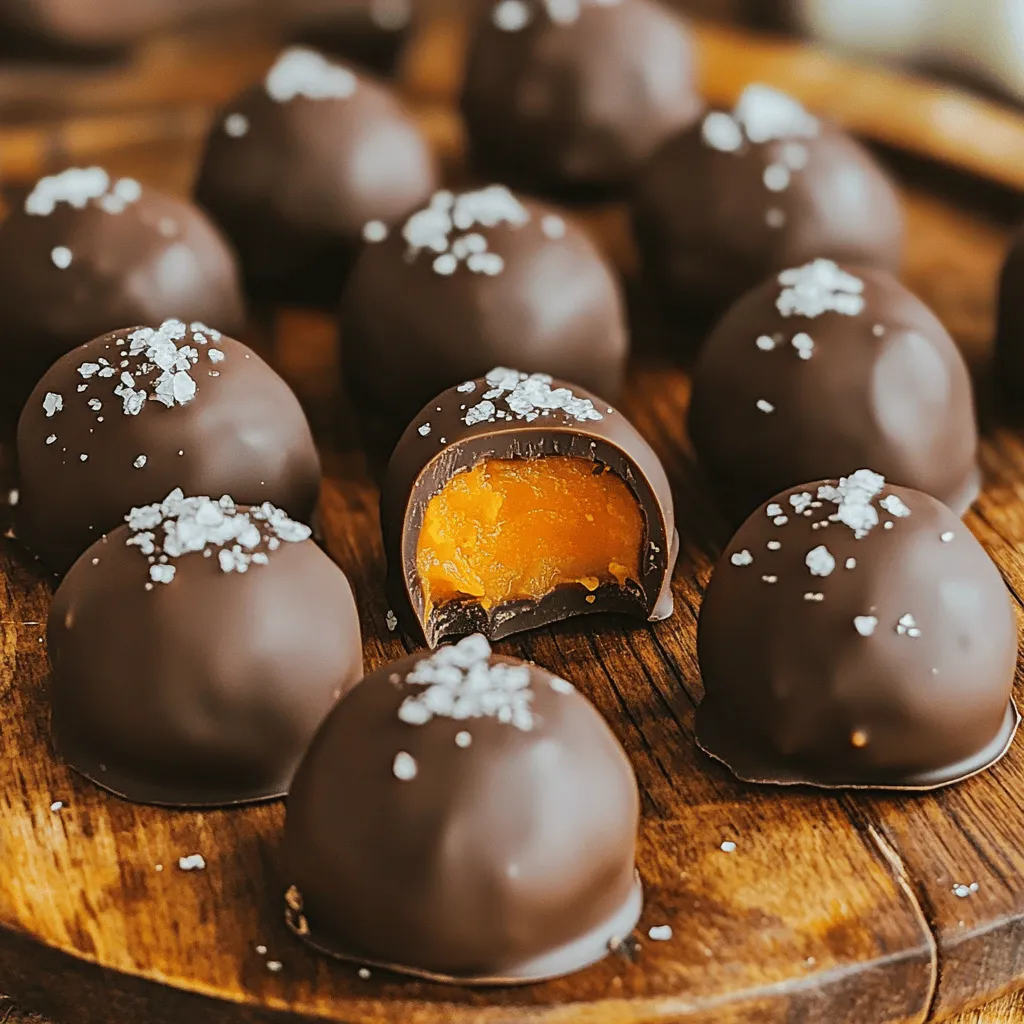
Do you love sweet treats that are easy to make? Chocolate Covered Pumpkin Truffles are a fun blend of fall flavors and creamy cocoa. In this article, I’ll show you how to create these simple delights with just a few key ingredients. From pumpkin puree to dark chocolate, each bite is a cozy experience. Let’s dive into making these delicious truffles that are perfect for sharing—or keeping all to yourself!

Ingredients

Main Ingredients

To make Chocolate Covered Pumpkin Truffles, gather these main ingredients:

– 1 cup pumpkin puree (canned or homemade)

– 1 ½ cups crushed graham crackers

– ½ cup powdered sugar

– ½ teaspoon pumpkin spice

– 1 teaspoon vanilla extract

– 8 oz dark chocolate (chopped)

– 1 tablespoon coconut oil

These ingredients create the base for our truffles. Pumpkin puree gives a smooth texture. Crushed graham crackers add crunch and sweetness. Dark chocolate provides a rich, bold flavor.

Seasoning and Flavor Enhancers

Next, we enhance the flavor with these key seasonings:

– ½ teaspoon pumpkin spice

– 1 teaspoon vanilla extract

Pumpkin spice brings warmth and a hint of fall. Vanilla extract adds depth and sweetness. Together, these make the truffles burst with flavor.

Optional Garnishes

For garnish, consider these options:

– Sea salt

– Crushed nuts or sprinkles

Sprinkling sea salt on top adds a tasty contrast to the sweet truffles. You can also use nuts or colorful sprinkles for a fun touch. These garnishes not only look great but also add extra flavor.

For a detailed list of how to make these delightful truffles, check out the Full Recipe.

Step-by-Step Instructions

Prepare the Pumpkin Mixture

– In a mixing bowl, combine:

– 1 cup pumpkin puree

– 1 ½ cups crushed graham crackers

– ½ teaspoon pumpkin spice

– ½ cup powdered sugar

– 1 teaspoon vanilla extract

Mix these ingredients well. You want them to come together to form a dough-like consistency. This mixture smells great and has a nice, thick feel.

Form the Truffles

– Use your hands to scoop out tablespoon-sized portions. Roll each portion into a ball.

– Place the rolled truffles on a parchment-lined baking sheet. This keeps them from sticking.

– Chill the truffles in the fridge for about 30 minutes. This helps them firm up.

Melt the Chocolate

– You can melt the chocolate in two ways:

Double boiler method: Place a heatproof bowl over simmering water. Stir until smooth.

Microwave method: Melt in 20-second intervals, stirring in between.

– The goal is to achieve a smooth, creamy chocolate. This makes coating easier and looks nicer.

Coat and Garnish the Truffles

– Remove the truffles from the fridge. Dip each truffle into the melted chocolate. Make sure they are fully coated.

– Use a fork to lift them out. Let the excess chocolate drip back into the bowl.

– Place the coated truffles back on the parchment-lined baking sheet.

– While the chocolate is still wet, sprinkle a pinch of sea salt on top of each truffle. This adds a nice touch.

Let the chocolate set. You can leave them at room temperature or chill them in the fridge for about 15 to 20 minutes. Once set, enjoy your delicious truffles! For the complete recipe, check out the Full Recipe.

Tips & Tricks

Ensuring Perfect Truffle Consistency

To get the right consistency, moisture is key. If your mixture feels too wet, add more crushed graham crackers. This helps absorb extra moisture. If it is too dry, add a bit of pumpkin puree. Always check for a dough-like feel.

Chilling the truffles is crucial. I like to chill them for about 30 minutes. This helps firm them up before coating. The colder they are, the easier they are to dip in chocolate.

Chocolate Coating Tips

For the best flavor, use dark chocolate. It pairs well with the pumpkin. If you want a sweeter taste, try milk chocolate. You can also use white chocolate for a fun twist. Just remember, each type melts differently.

To get a smooth finish, melt chocolate gently. I prefer the double boiler method. It allows the chocolate to melt slowly. If using a microwave, heat in short bursts. Stir after each burst to prevent burning.

Presentation Ideas

When serving, I like using a pretty platter. It makes the truffles stand out. You can also place them in cupcake liners for a pop of color.

For decoration, sprinkle crushed nuts or colorful sprinkles on top. You can even drizzle extra chocolate over the truffles. This adds a nice touch and makes them look fancy. For more details, check the Full Recipe.

Variations

Flavor Variations

You can easily tweak flavors in your truffles. Try adding different spices for a fun twist. Cinnamon and nutmeg blend well with pumpkin. You can also explore cardamom or allspice for a unique taste. If you want your truffles sweeter, use alternative sweeteners. Maple syrup or honey works great and adds a nice touch.

Chocolate Types

The type of chocolate you choose makes a big difference. For a sweeter treat, consider using white chocolate. This option gives a creamy contrast to the pumpkin. Milk chocolate is another popular choice. It adds richness and balances the flavors well. You can even mix dark and milk chocolate for a delightful blend.

Dietary Alternatives

If you follow a vegan diet, you can still enjoy these truffles. Use dairy-free chocolate and maple syrup for sweetness. For a gluten-free version, substitute crushed graham crackers with gluten-free options. Almond flour or gluten-free cookies can work just as well. These simple changes keep the truffles tasty and enjoyable for everyone.

For the full recipe, check out the [Full Recipe].

Storage Info

Best Practices for Storage

To keep your chocolate covered pumpkin truffles fresh, store them in airtight containers. This helps prevent moisture and keeps the truffles from drying out. If you want to keep them longer, refrigeration is your best choice. Make sure they are in a sealed container to avoid fridge odors. You can also freeze them for up to three months. Just make sure to wrap them tightly.

Shelf Life

These truffles stay fresh for about one week in the fridge. After that, they start to lose flavor and texture. If you notice any changes in smell or a dry, crumbly texture, it’s time to toss them. Always trust your senses. If something seems off, it’s not worth the risk.

Serving After Storage

When you’re ready to enjoy your truffles, you might find them a bit firm from the fridge. To bring them back to life, let them sit at room temperature for about 15 minutes. This softens them and enhances the flavor. If they were frozen, thaw them in the fridge overnight. Avoid using heat to thaw, as it can ruin the texture. Enjoy the rich flavor and creamy texture of your chocolate covered pumpkin truffles from the [Full Recipe].

FAQs

Can I use fresh pumpkin instead of canned?

Yes, you can use fresh pumpkin. Just make sure to cook and puree it first. Fresh pumpkin may have more moisture, so adjust other ingredients if needed. Canned pumpkin is often thicker and easier to work with, which is why I prefer it.

How do I get my chocolate to not crack?

To avoid cracks, temper your chocolate. Heat it gently and let it cool slightly. Ensure each truffle is fully coated before it sets. Using a fork to lift the truffles helps keep the coating smooth.

What can I serve with Chocolate Covered Pumpkin Truffles?

These truffles pair well with coffee, tea, or hot cocoa. You can also serve them with a scoop of vanilla ice cream. For a fun twist, try them with spiced apple cider.

Are these truffles suitable for gifting?

Absolutely! They make a great gift. Pack them in a nice box or jar. Add a ribbon for extra charm. Homemade treats show thoughtfulness and care. Everyone loves a sweet surprise!

How do I store leftover truffles?

Store leftover truffles in an airtight container. Keep them in the fridge for up to a week. You can also freeze them for longer storage. Just let them thaw in the fridge before serving. Enjoy your tasty treats!

For the full recipe, check out the recipe section above.

In this blog post, we covered how to make delicious chocolate-covered pumpkin truffles. We discussed key ingredients like pumpkin puree, graham crackers, and chocolate. I shared step-by-step instructions to ensure your truffles come out perfect every time. Remember to experiment with flavors and toppings to make them your own. With the right storage and serving tips, you can enjoy these treats longer. Embrace your creativity, and have fun making these tasty truffles!

To make Chocolate Covered Pumpkin Truffles, gather these main ingredients: - 1 cup pumpkin puree (canned or homemade) - 1 ½ cups crushed graham crackers - ½ cup powdered sugar - ½ teaspoon pumpkin spice - 1 teaspoon vanilla extract - 8 oz dark chocolate (chopped) - 1 tablespoon coconut oil These ingredients create the base for our truffles. Pumpkin puree gives a smooth texture. Crushed graham crackers add crunch and sweetness. Dark chocolate provides a rich, bold flavor. Next, we enhance the flavor with these key seasonings: - ½ teaspoon pumpkin spice - 1 teaspoon vanilla extract Pumpkin spice brings warmth and a hint of fall. Vanilla extract adds depth and sweetness. Together, these make the truffles burst with flavor. For garnish, consider these options: - Sea salt - Crushed nuts or sprinkles Sprinkling sea salt on top adds a tasty contrast to the sweet truffles. You can also use nuts or colorful sprinkles for a fun touch. These garnishes not only look great but also add extra flavor. For a detailed list of how to make these delightful truffles, check out the Full Recipe. - In a mixing bowl, combine: - 1 cup pumpkin puree - 1 ½ cups crushed graham crackers - ½ teaspoon pumpkin spice - ½ cup powdered sugar - 1 teaspoon vanilla extract Mix these ingredients well. You want them to come together to form a dough-like consistency. This mixture smells great and has a nice, thick feel. - Use your hands to scoop out tablespoon-sized portions. Roll each portion into a ball. - Place the rolled truffles on a parchment-lined baking sheet. This keeps them from sticking. - Chill the truffles in the fridge for about 30 minutes. This helps them firm up. - You can melt the chocolate in two ways: - Double boiler method: Place a heatproof bowl over simmering water. Stir until smooth. - Microwave method: Melt in 20-second intervals, stirring in between. - The goal is to achieve a smooth, creamy chocolate. This makes coating easier and looks nicer. - Remove the truffles from the fridge. Dip each truffle into the melted chocolate. Make sure they are fully coated. - Use a fork to lift them out. Let the excess chocolate drip back into the bowl. - Place the coated truffles back on the parchment-lined baking sheet. - While the chocolate is still wet, sprinkle a pinch of sea salt on top of each truffle. This adds a nice touch. Let the chocolate set. You can leave them at room temperature or chill them in the fridge for about 15 to 20 minutes. Once set, enjoy your delicious truffles! For the complete recipe, check out the Full Recipe. To get the right consistency, moisture is key. If your mixture feels too wet, add more crushed graham crackers. This helps absorb extra moisture. If it is too dry, add a bit of pumpkin puree. Always check for a dough-like feel. Chilling the truffles is crucial. I like to chill them for about 30 minutes. This helps firm them up before coating. The colder they are, the easier they are to dip in chocolate. For the best flavor, use dark chocolate. It pairs well with the pumpkin. If you want a sweeter taste, try milk chocolate. You can also use white chocolate for a fun twist. Just remember, each type melts differently. To get a smooth finish, melt chocolate gently. I prefer the double boiler method. It allows the chocolate to melt slowly. If using a microwave, heat in short bursts. Stir after each burst to prevent burning. When serving, I like using a pretty platter. It makes the truffles stand out. You can also place them in cupcake liners for a pop of color. For decoration, sprinkle crushed nuts or colorful sprinkles on top. You can even drizzle extra chocolate over the truffles. This adds a nice touch and makes them look fancy. For more details, check the Full Recipe. {{image_2}} You can easily tweak flavors in your truffles. Try adding different spices for a fun twist. Cinnamon and nutmeg blend well with pumpkin. You can also explore cardamom or allspice for a unique taste. If you want your truffles sweeter, use alternative sweeteners. Maple syrup or honey works great and adds a nice touch. The type of chocolate you choose makes a big difference. For a sweeter treat, consider using white chocolate. This option gives a creamy contrast to the pumpkin. Milk chocolate is another popular choice. It adds richness and balances the flavors well. You can even mix dark and milk chocolate for a delightful blend. If you follow a vegan diet, you can still enjoy these truffles. Use dairy-free chocolate and maple syrup for sweetness. For a gluten-free version, substitute crushed graham crackers with gluten-free options. Almond flour or gluten-free cookies can work just as well. These simple changes keep the truffles tasty and enjoyable for everyone. For the full recipe, check out the [Full Recipe]. To keep your chocolate covered pumpkin truffles fresh, store them in airtight containers. This helps prevent moisture and keeps the truffles from drying out. If you want to keep them longer, refrigeration is your best choice. Make sure they are in a sealed container to avoid fridge odors. You can also freeze them for up to three months. Just make sure to wrap them tightly. These truffles stay fresh for about one week in the fridge. After that, they start to lose flavor and texture. If you notice any changes in smell or a dry, crumbly texture, it’s time to toss them. Always trust your senses. If something seems off, it’s not worth the risk. When you’re ready to enjoy your truffles, you might find them a bit firm from the fridge. To bring them back to life, let them sit at room temperature for about 15 minutes. This softens them and enhances the flavor. If they were frozen, thaw them in the fridge overnight. Avoid using heat to thaw, as it can ruin the texture. Enjoy the rich flavor and creamy texture of your chocolate covered pumpkin truffles from the [Full Recipe]. Yes, you can use fresh pumpkin. Just make sure to cook and puree it first. Fresh pumpkin may have more moisture, so adjust other ingredients if needed. Canned pumpkin is often thicker and easier to work with, which is why I prefer it. To avoid cracks, temper your chocolate. Heat it gently and let it cool slightly. Ensure each truffle is fully coated before it sets. Using a fork to lift the truffles helps keep the coating smooth. These truffles pair well with coffee, tea, or hot cocoa. You can also serve them with a scoop of vanilla ice cream. For a fun twist, try them with spiced apple cider. Absolutely! They make a great gift. Pack them in a nice box or jar. Add a ribbon for extra charm. Homemade treats show thoughtfulness and care. Everyone loves a sweet surprise! Store leftover truffles in an airtight container. Keep them in the fridge for up to a week. You can also freeze them for longer storage. Just let them thaw in the fridge before serving. Enjoy your tasty treats! For the full recipe, check out the recipe section above. In this blog post, we covered how to make delicious chocolate-covered pumpkin truffles. We discussed key ingredients like pumpkin puree, graham crackers, and chocolate. I shared step-by-step instructions to ensure your truffles come out perfect every time. Remember to experiment with flavors and toppings to make them your own. With the right storage and serving tips, you can enjoy these treats longer. Embrace your creativity, and have fun making these tasty truffles!

Chocolate Covered Pumpkin Truffles

Indulge in the deliciousness of Chocolate Covered Pumpkin Truffles, the perfect sweet treat for fall! With just a few simple ingredients, you can create creamy, spiced truffles coated in rich dark chocolate that are sure to impress. Follow our easy step-by-step instructions to make your own batch and wow your family and friends. Click through to explore this delightful recipe and satisfy your pumpkin cravings today!

Ingredients
  

1 cup pumpkin puree (canned or homemade)

1 ½ cups crushed graham crackers

½ teaspoon pumpkin spice

½ cup powdered sugar

1 teaspoon vanilla extract

8 oz dark chocolate (chopped)

1 tablespoon coconut oil

Sea salt (for garnish)

Instructions
 

In a mixing bowl, combine the pumpkin puree, crushed graham crackers, pumpkin spice, powdered sugar, and vanilla extract. Mix well until the ingredients are fully incorporated and form a dough-like consistency.

    Using your hands, scoop out tablespoon-sized portions of the mixture and roll them into balls. Place the rolled truffles on a parchment-lined baking sheet.

      Once all the truffles are rolled, refrigerate them for about 30 minutes to firm up.

        While the truffles are chilling, melt the dark chocolate and coconut oil together in a heatproof bowl over a pot of simmering water (double boiler method), stirring until smooth. Alternatively, you can melt them in the microwave in 20-second intervals, stirring in between.

          Remove the truffles from the refrigerator. Dip each truffle into the melted chocolate, ensuring they are fully coated. Use a fork to lift them out, letting excess chocolate drip off, and place them back onto the parchment-lined baking sheet.

            While the chocolate is still wet, sprinkle a pinch of sea salt on top of each truffle for added flavor.

              Allow the chocolate to set at room temperature or place the truffles back in the refrigerator for about 15-20 minutes until the coating hardens.

                Once the chocolate has set, serve the truffles on a beautiful platter or store them in an airtight container in the refrigerator until ready to enjoy.

                  Prep Time: 20 minutes | Total Time: 1 hour | Servings: 12 truffles

                    Leave a Comment

                    Recipe Rating