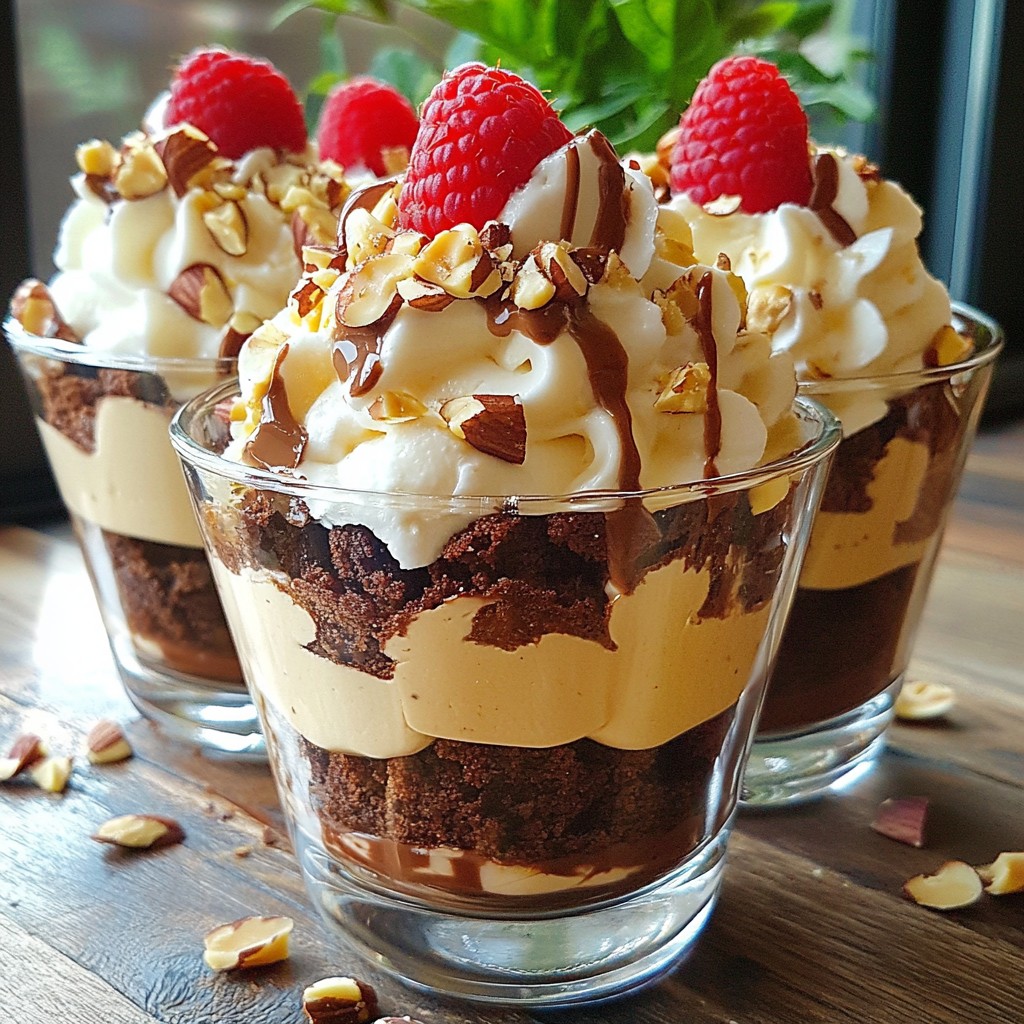
Indulge your sweet tooth with my rich and creamy Chocolate Hazelnut Brownie Trifle! This dessert layers fudgy brownies, whipped cream, and chocolate hazelnut goodness into a delightful treat. You don’t need to be a master chef to wow your friends and family. In just a few steps, you can create a showstopper that’s sure to impress. Dive into this recipe and enjoy the bliss of layers upon layers of chocolate heaven!
Why I Love This Recipe
- Indulgent Layers: This trifle combines rich brownie layers with creamy hazelnut goodness, making each bite a delightful experience.
- Easy to Assemble: With just a few simple steps, you can create a stunning dessert that impresses without requiring advanced baking skills.
- Perfect for Any Occasion: This dessert is versatile enough for birthdays, holidays, or a casual gathering, satisfying chocolate and nut lovers alike.
- Chill and Serve: Letting the trifle chill enhances the flavor, making it a make-ahead dessert that saves time on the day of your event.
Ingredients
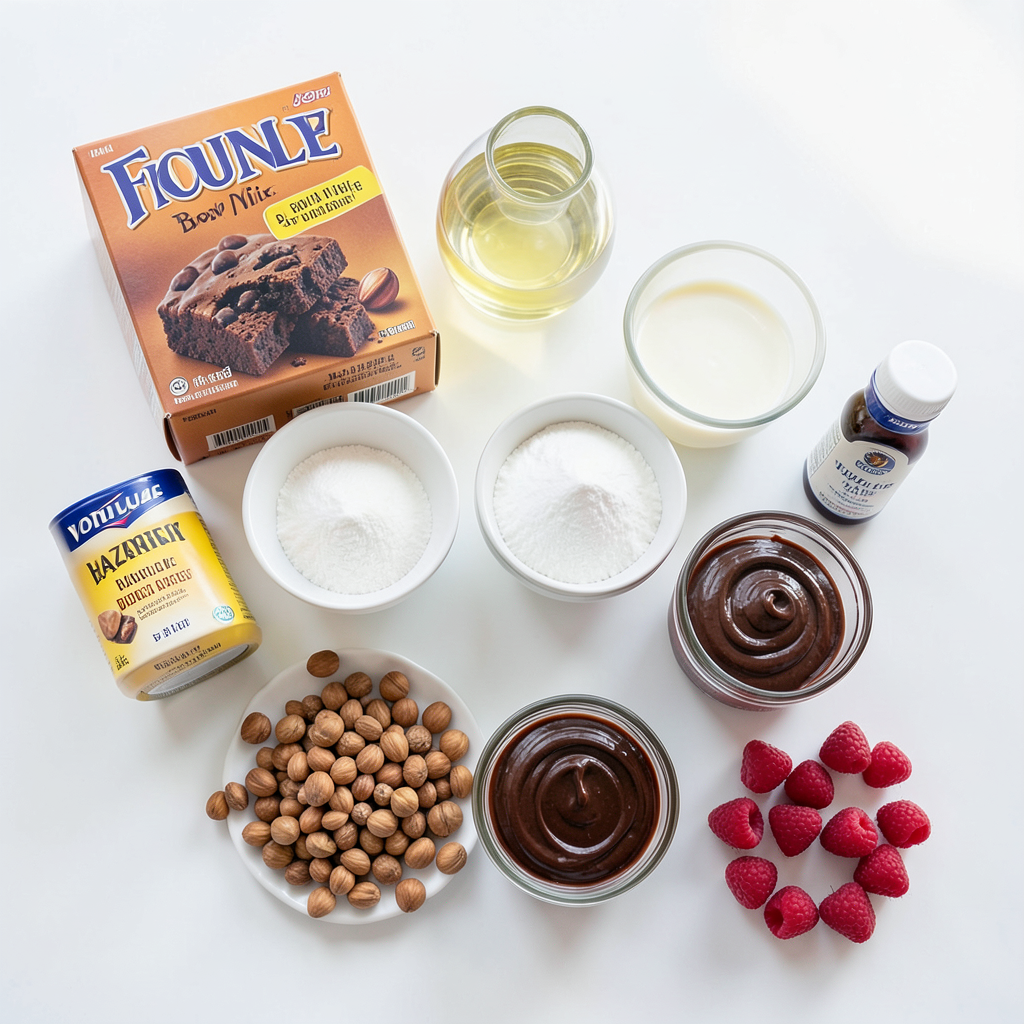
Essential Ingredients
- 1 box of fudge brownie mix (plus eggs, water, and oil)
- 1 cup heavy whipping cream
- 1/4 cup powdered sugar
- 1 teaspoon vanilla extract
- 1 cup chocolate hazelnut spread
- 1 cup chopped toasted hazelnuts
- 1/2 cup heavy cream (for ganache)
- 1/2 cup semi-sweet chocolate chips (for ganache)
- Fresh raspberries or strawberries (for garnish)
This trifle starts with a rich fudge brownie mix. Make sure to follow the box's instructions for the best texture. You will also need heavy whipping cream to create a fluffy topping. The powdered sugar adds sweetness, while the vanilla extract enhances the cream's flavor.
Chocolate hazelnut spread is the star of the show. It brings a creamy texture and a nutty taste that pairs perfectly with the brownies. You will also need toasted hazelnuts. These add a crunchy element and deepen the hazelnut flavor.
For the chocolate ganache, you’ll mix heavy cream with semi-sweet chocolate chips. This will provide a smooth and decadent layer in your trifle. Lastly, fresh berries like raspberries or strawberries add a burst of color and freshness, making each bite delightful.
Gather these ingredients, and you are ready to create a rich and creamy chocolate hazelnut brownie trifle that everyone will love!
Step-by-Step Instructions
Prepping the Brownies
First, preheat your oven as the box instructs. Prepare the brownie batter using the mix, eggs, water, and oil. Pour the batter into a greased square baking pan. Bake it according to the box's time. Once baked, let it cool completely before cutting the brownies into squares.
Whipping the Cream
To whip the cream, use a medium bowl and a hand mixer. Start whipping the heavy cream until you see soft peaks. Then, slowly add powdered sugar and vanilla extract. Keep whipping until you achieve stiff peaks. This will give your trifle a nice, fluffy texture.
Making the Hazelnut Cream
In a separate bowl, combine the chocolate hazelnut spread with half of the whipped cream. Use a spatula to gently fold them together. Be careful not to deflate the whipped cream. This creates a creamy hazelnut mixture that will add richness to your trifle.
Assembling the Trifle
Choose clear serving glasses or a large trifle dish for a pretty look. Start with a layer of brownie squares at the bottom. Spoon the hazelnut cream mixture over the brownies. Drizzle some chocolate ganache on top. Sprinkle toasted hazelnuts and add a layer of whipped cream. Repeat the layers until the dish is full. Finish with whipped cream on top. Garnish with fresh raspberries or strawberries. Chill the trifles for at least 30 minutes before serving. This helps all the flavors blend beautifully.
Tips & Tricks
Perfecting the Brownies
To get fudgy brownies, follow these tips:
- Use the right pan. A metal pan works best.
- Don't overmix the batter; mix just until combined.
- Check for doneness early; a toothpick should have moist crumbs.
You can also bake brownies in a slow cooker. Grease the cooker and pour in the batter. Cook on high for about two hours.
Whipped Cream Secrets
To keep whipped cream stable, add a little cornstarch. This helps it hold its shape for longer. You can also chill your bowl and beaters before whipping for better results. For flavor variations, try adding cocoa powder or a splash of almond extract. These add depth to your whipped cream.
Layering Techniques
For a great look, use clear glasses. This shows off all the beautiful layers. Start with brownies at the bottom and alternate layers. Use a spoon to create even layers. For portion control, use small glasses. This allows everyone to enjoy their own trifle without overindulging.
Pro Tips
- Use Quality Chocolate: For the best flavor, choose high-quality semi-sweet chocolate chips for your ganache. The taste will significantly enhance the overall richness of your trifle.
- Let Brownies Cool Completely: Ensure your brownies are completely cooled before cutting them into squares. This will help them hold their shape better when layered in the trifle.
- Chill Before Serving: Allow your assembled trifles to chill in the refrigerator for at least 30 minutes. This helps the flavors meld together and makes for a more enjoyable dessert experience.
- Experiment with Layers: Feel free to add a layer of fresh fruits, like bananas or cherries, between the brownie and cream layers for an extra burst of flavor and texture.
Variations
Gluten-Free Option
To make a gluten-free chocolate hazelnut brownie trifle, start with a gluten-free brownie mix. This swap keeps the taste rich and satisfying. You will still need eggs, water, and oil, so check the mix for these items. Ensure your chocolate hazelnut spread is also gluten-free. This way, you enjoy a delightful treat without gluten.
Vegan Adaptation
For a vegan version, use a plant-based brownie mix. You can find many options in stores. Replace the heavy cream with coconut cream for a creamy texture. Use maple syrup instead of powdered sugar in the whipped cream. This keeps the flavor and texture appealing. Just remember to check your chocolate hazelnut spread for dairy content.
Flavor Enhancements
You can add a splash of coffee liqueur to the brownie mix for a deeper flavor. Vanilla or hazelnut extract also works well. Try incorporating different nuts like walnuts or almonds for extra crunch. Fresh fruits like sliced bananas or strawberries can add a sweet twist, too. These small changes can elevate your trifle to a new level of yum!
Storage Info
Storing Leftovers
To keep your chocolate hazelnut brownie trifle fresh, store it in the fridge. Use an airtight container to prevent drying out. If you have leftovers, they should last about 3 to 4 days. The flavors will meld and may even taste better the next day!
Make-Ahead Tips
You can prepare parts of the trifle ahead of time. Bake the brownies and let them cool completely. You can also whip the cream and make the hazelnut mixture a day before. Just assemble the trifle right before serving for the best texture. Use clear glasses for a beautiful display!
FAQs
Can I use store-bought brownies?
Yes, you can use store-bought brownies. They save time and effort. However, homemade brownies often taste better. With homemade, you can control the texture and richness. Store-bought may not be as fudgy or fresh. If you choose store-bought, pick a high-quality brand. Look for brownies that are moist and rich.
What can I substitute for chocolate hazelnut spread?
You can use peanut butter or almond butter as a substitute. They provide a nutty flavor but differ from chocolate hazelnut spread. Try Nutella for a similar taste if you have it. For a dairy-free option, use sunflower seed butter. Each spread brings its unique taste and texture to the trifle.
How long can I keep the trifle in the refrigerator?
You can keep the trifle in the fridge for up to three days. It stays fresh and tasty within this time. After three days, the layers may lose their crispness. To keep the trifle at its best, cover it tightly with plastic wrap. Enjoy the rich and creamy delight while it’s fresh!
In this article, we explored how to create a delicious chocolate hazelnut brownie trifle. We covered the essential ingredients, prepping, and assembling the trifle step by step. I shared tips for perfect brownies, whipped cream secrets, and creative variations. Plus, we discussed storage and answered common questions.
This trifle is not just a treat; it’s a showstopper for any occasion. Enjoy making it your own!