
Get ready to indulge in a delightful treat: Chocolate Hazelnut Crepes! These simple yet irresistible crepes are perfect for breakfast or dessert. With just a few ingredients, you’ll create a gourmet dish that impresses every time. From whisking the batter to adding creamy chocolate hazelnut spread, I’ll guide you through each step. Join me in unlocking the secrets to making these delicious crepes, and let’s elevate your cooking game together!
Why I Love This Recipe
- Indulgent Flavor: The combination of rich chocolate and nutty hazelnut creates a truly decadent treat that satisfies any sweet tooth.
- Easy to Make: This recipe is simple and straightforward, making it perfect for both novice and experienced cooks.
- Versatile Serving Options: These crepes can be enjoyed for breakfast, dessert, or as a delightful snack at any time of the day.
- Beautiful Presentation: The crepes are not only delicious but also visually appealing, especially when garnished with fresh berries and powdered sugar.
Ingredients
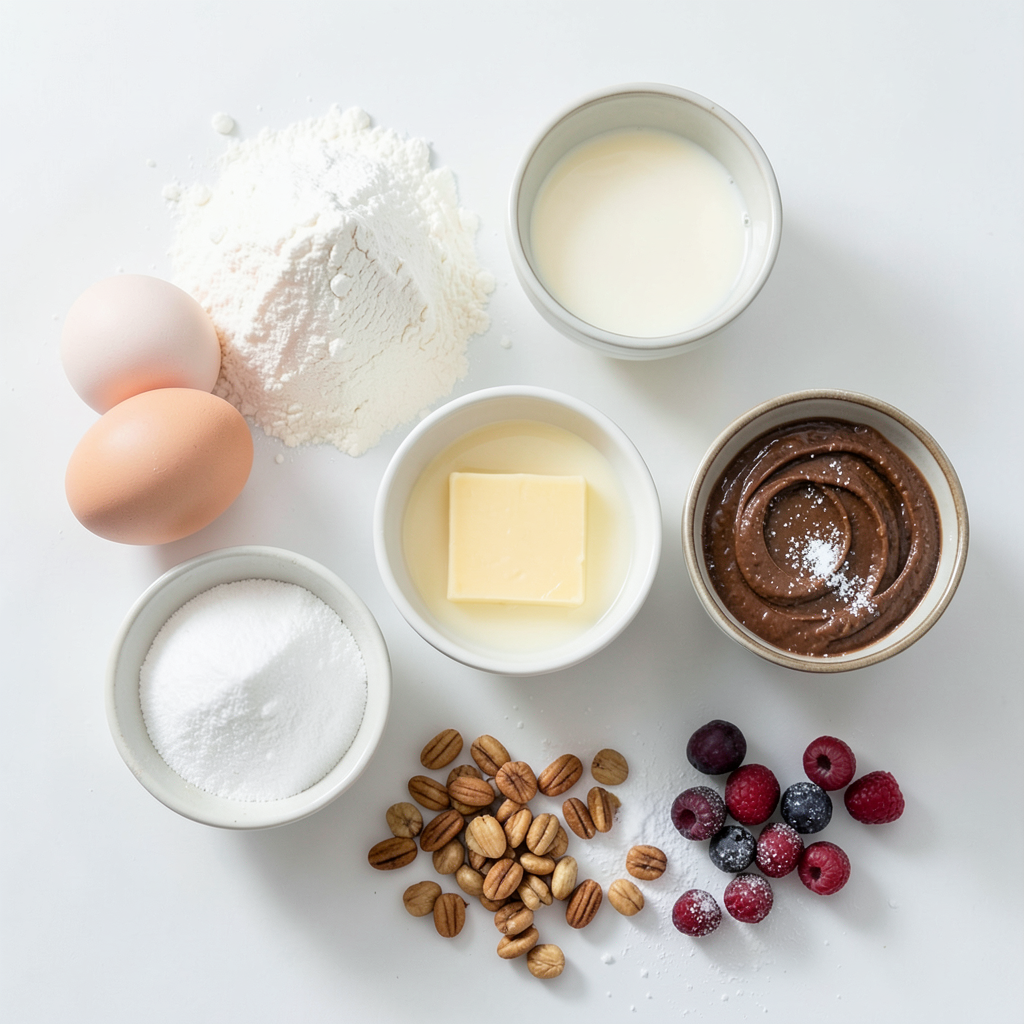
List of Primary Ingredients
- 1 cup all-purpose flour
- 2 large eggs
- 1 ½ cups milk
- 2 tablespoons melted butter, plus extra for cooking
- 2 tablespoons granulated sugar
- ½ teaspoon vanilla extract
- 1 cup chocolate hazelnut spread
- ½ cup chopped hazelnuts, toasted
- Fresh berries for garnish
- Powdered sugar for dusting
To make your delicious chocolate hazelnut crepes, start with simple ingredients. All-purpose flour gives the crepes their structure. You need two large eggs for binding and richness. Milk adds moisture and makes the batter smooth. Melted butter adds flavor, while sugar sweetens the crepes. A touch of vanilla extract enhances the taste.
The star of these crepes is the chocolate hazelnut spread. It brings creamy sweetness and rich flavor. Chopped toasted hazelnuts add crunch and depth. Fresh berries make a bright, colorful garnish. Finally, powdered sugar adds a sweet finish.
Equipment Needed
- Mixing bowl
- Non-stick skillet
- Spatula
- Measuring cups and spoons
Gather a mixing bowl to combine your ingredients. A non-stick skillet helps cook the crepes evenly. Use a spatula to flip them without tearing. Measuring cups and spoons ensure you use the right amounts for each ingredient.
Substitutions and Alternatives
- Gluten-free flour options
- Dairy-free alternatives
If you need gluten-free crepes, use gluten-free flour blends. They work well in this recipe. For dairy-free options, almond or oat milk can replace regular milk. You can use coconut oil instead of butter for a dairy-free fat. These swaps keep the crepes tasty and enjoyable for everyone.
Step-by-Step Instructions
Preparing the Batter
Start by whisking the ingredients together. In a mixing bowl, combine 1 cup of all-purpose flour, 2 large eggs, 1 ½ cups of milk, 2 tablespoons of melted butter, 2 tablespoons of granulated sugar, and ½ teaspoon of vanilla extract. Mix until the batter is smooth and free of lumps.
Letting the batter rest is key. Allow it to sit for about 30 minutes. This helps the gluten relax. Relaxed gluten means tender crepes, which is what we want.
Cooking the Crepes
Next, heat a non-stick skillet over medium heat. Add a small amount of butter to coat the surface. This prevents sticking and gives a nice flavor.
Pour about ¼ cup of the batter into the skillet. Quickly swirl it around to form a thin, even layer. Cook for about 1-2 minutes. You’ll know it’s ready when the edges lift, and the bottom is lightly golden.
Now comes the fun part—flipping the crepe! Carefully use a spatula to flip it over. Cook for an additional minute on the other side. Transfer the cooked crepe to a plate and keep it warm. Repeat this with the remaining batter, adding more butter as needed.
Assembling the Crepes
Once all the crepes are cooked, it’s time to assemble them. Take one crepe and spread about 2 tablespoons of chocolate hazelnut spread on one half. Then, sprinkle about 1 tablespoon of toasted hazelnuts over the spread.
Now, fold the crepe in half, then in half again to form a triangle. This gives you a neat and tasty treat. Serve the crepes warm, and feel free to garnish with fresh berries and a little powdered sugar on top for a sweet touch.
Tips & Tricks
Perfecting Crepes Every Time
To cook crepes evenly, keep your skillet at medium heat. Too hot, and the edges burn. Too low, and they stick. Use a non-stick skillet to help with flipping. When pouring the batter, use about ¼ cup each time. Swirl it quickly to form a thin layer.
Let the crepes rest after cooking. This helps maintain a soft texture. Stack them on a plate with a paper towel between layers to keep them warm and flexible.
Serving Suggestions
For a beautiful presentation, stack the crepes neatly on a plate. Drizzle some extra chocolate hazelnut spread on top. Add fresh berries on the side for color. Dust with powdered sugar for a sweet touch.
These crepes pair well with whipped cream or a scoop of vanilla ice cream. You can also serve them with a cup of coffee or tea for a delightful treat.
Enhancing Flavor
To add more depth, consider mixing spices like cinnamon or nutmeg into your batter. A dash of almond extract can also give a lovely twist.
For a richer chocolate experience, drizzle melted chocolate over the filled crepes. You can also sprinkle extra chopped hazelnuts on top for crunch. Enjoy experimenting with flavors!
Pro Tips
- Chill Your Batter: Allowing your crepe batter to chill in the refrigerator for at least 30 minutes helps achieve a smoother texture and prevents the crepes from tearing during cooking.
- Perfecting the Flip: Use a flexible spatula to gently lift the edges of the crepe before flipping. This helps ensure a clean flip without breaking the crepe.
- Mind the Heat: Cooking crepes over medium heat is crucial. Too high of a heat can burn the crepes, while too low can result in undercooked centers.
- Experiment with Fillings: While chocolate hazelnut spread is delicious, try adding fresh fruits, whipped cream, or even savory options like cheese and spinach for a delightful twist!
Variations
Flavor Variations
You can change up these crepes in fun ways. Adding fruits can bring a fresh taste. Try sliced strawberries, bananas, or blueberries. They add sweetness and color.
You can also mix in nuts or spices. Cinnamon or nutmeg can give a warm flavor. Adding a sprinkle of sea salt can balance the sweetness. Chopped almonds or walnuts can work well too.
Dietary Modifications
For a vegan version, swap out eggs and milk. Use a plant-based milk like almond or oat milk. You can replace eggs with ground flaxseeds or applesauce. This keeps the crepes soft and tasty.
If you want low-sugar options, use a sugar substitute. Look for natural sweeteners like stevia or monk fruit. You can also skip the sugar in the batter. The chocolate hazelnut spread will still give sweetness.
Serving Style Variations
Crepes work great as a dessert, but they can be savory too. Try filling them with cheese and spinach for a tasty meal. You can use ricotta or goat cheese with herbs for a twist.
For dessert, serve these crepes with whipped cream or more chocolate hazelnut spread. Top with fresh berries and a dusting of powdered sugar. This makes a beautiful and tasty dish to enjoy!
Storage Info
Storing Leftover Crepes
To store cooked crepes, stack them with parchment paper between each one. Place them in an airtight container. This method keeps them from sticking together. You can store them in the fridge for up to three days. If you want to keep them longer, freezing is a great option.
Freezing Instructions
To freeze crepes, make sure they are completely cool. Then, stack them with parchment paper in between. Wrap the stack tightly in plastic wrap. Place it in a freezer bag and remove as much air as possible. You can freeze crepes for up to two months. When you're ready to eat them, take out a few crepes. Heat them in a skillet over low heat for about one minute on each side. This helps them regain their soft texture.
Best Practices for Freshness
To keep flavors intact, store crepes in a cool, dry place. Avoid putting them in a damp area. This helps prevent sogginess. When reheating, just warm them until they are heated through. Do not overcook them, or they may become dry. Enjoy your delicious chocolate hazelnut crepes fresh!
FAQs
How do you make crepes more tender?
To make crepes tender, you need to relax the gluten in the batter. This happens when you let the batter sit for about 30 minutes. During this rest time, the flour absorbs the liquid, making it softer. The relaxed gluten helps the crepes become light and fluffy.
Can I make the batter ahead of time?
Yes, you can make the batter ahead of time. Store it in the fridge for up to 24 hours. Before using, just give it a quick whisk to blend it again. This makes it easy to enjoy fresh crepes any day of the week.
What can I use instead of chocolate hazelnut spread?
If you don't have chocolate hazelnut spread, you can use many tasty alternatives. Try peanut butter, almond butter, or even fruit spreads. You can also mix cocoa powder into regular nut butter for a chocolate twist.
Are crepes gluten-free?
Yes, you can make gluten-free crepes. Use gluten-free flour blends instead of all-purpose flour. Rice flour or almond flour also works well. Just make sure to check that other ingredients, like baking powder, are gluten-free too.
How to serve chocolate hazelnut crepes?
Serve your crepes warm for the best taste. You can stack them on a plate and drizzle extra chocolate hazelnut spread on top. Add fresh berries and a dusting of powdered sugar for a pop of color. For a fun twist, serve with whipped cream or a scoop of ice cream.
You now have everything to make delicious chocolate hazelnut crepes. We covered ingredients, equipment, and easy steps. Don’t forget the great tips for flavor and texture.
Crepes are flexible. You can swap ingredients and try endless variations. Use the storage tips to keep them fresh. Enjoy sharing these treats at any meal or event. Happy cooking!