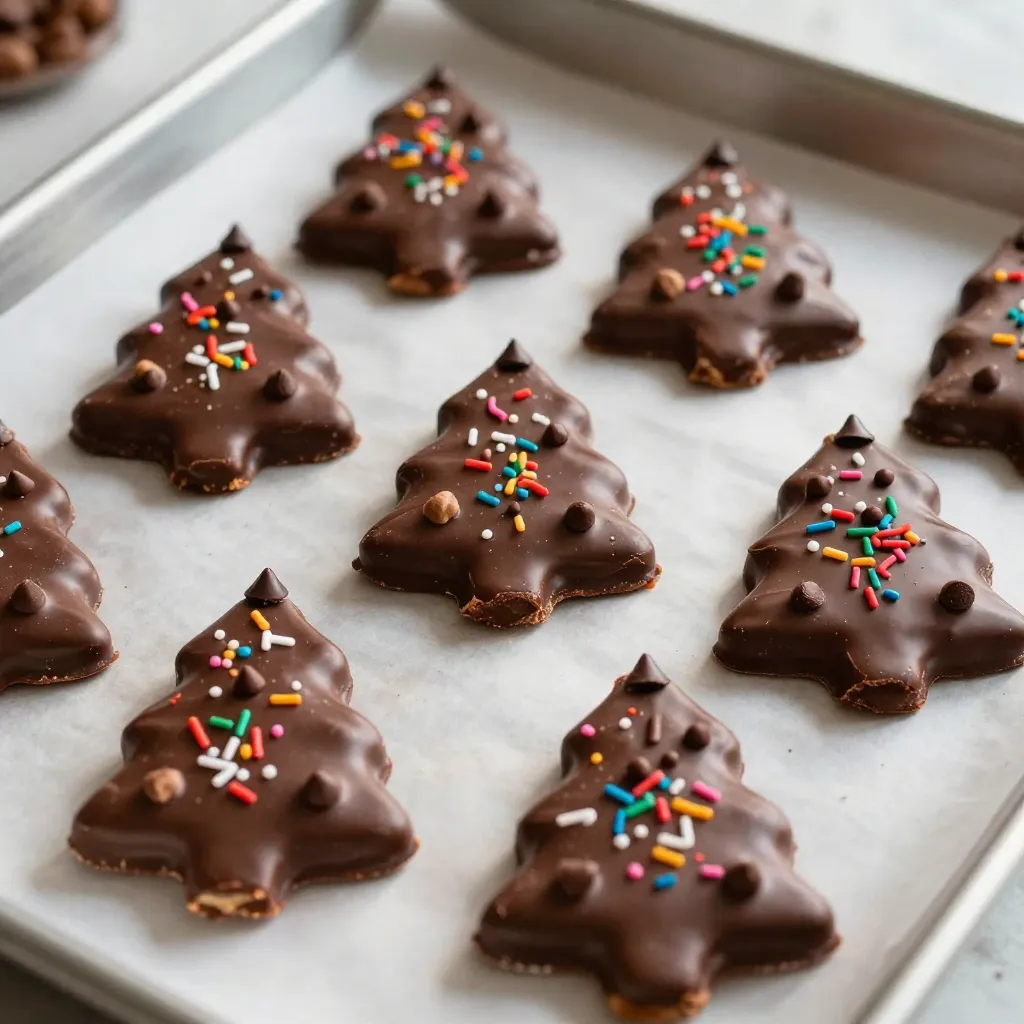
Get ready for a fun holiday treat that kids and adults will love! Chocolate Peanut Butter Christmas Trees are easy to make, and they’re perfect for festive gatherings. You only need a few simple ingredients like creamy peanut butter and chocolate chips. In this blog, I’ll guide you through each step to create these tasty treats, plus share tips, tricks, and creative variations. Let’s make this holiday season sweet!
Why I Love This Recipe
- Festive Fun: These chocolate peanut butter Christmas trees are not only delicious but also bring a playful holiday spirit to your dessert table.
- Easy to Make: With just a few simple ingredients and steps, you can create these adorable treats in no time, making them perfect for last-minute holiday gatherings.
- Customizable Decoration: The option to use green food coloring and various sprinkles allows for creativity, letting you personalize each tree to match your holiday theme.
- Delicious Combination: The pairing of creamy peanut butter and rich chocolate is a timeless favorite that everyone will love, ensuring these treats will be a hit!
Ingredients
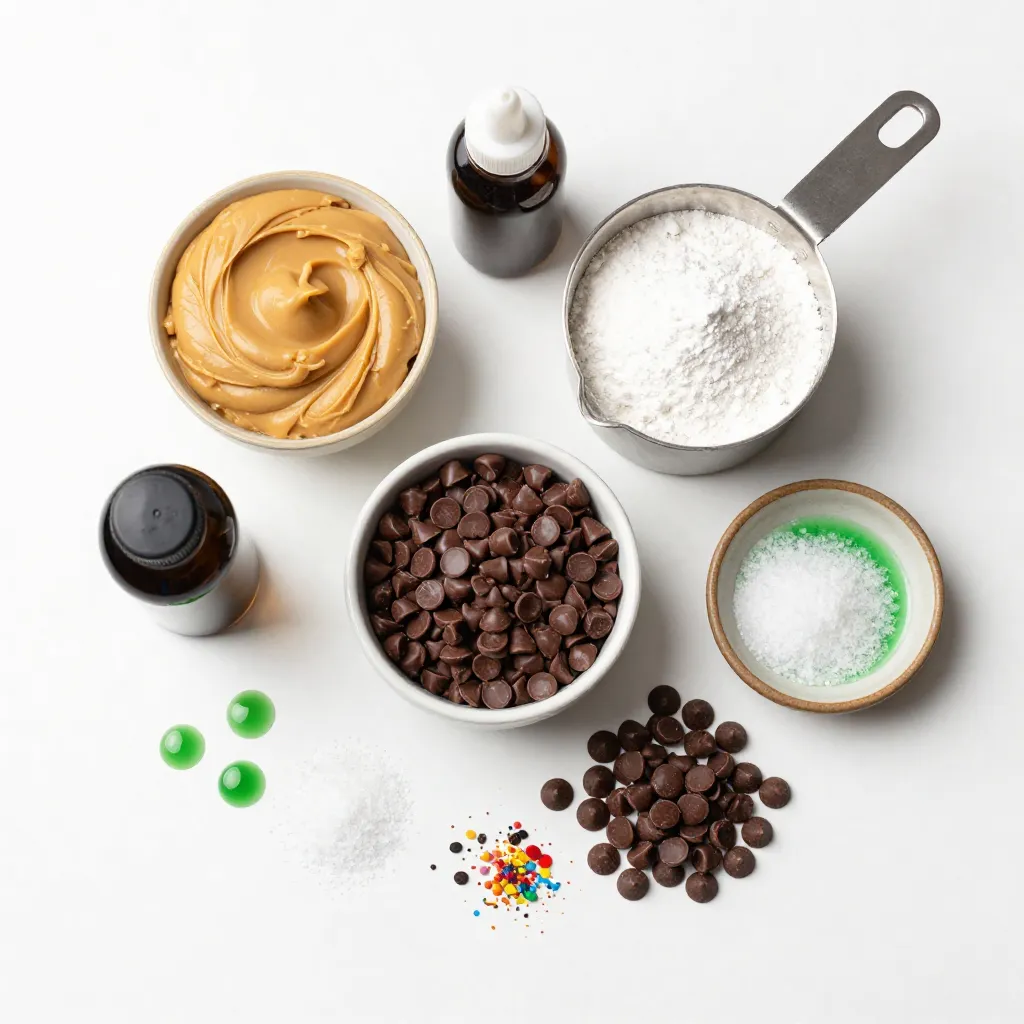
Main Ingredients
– 1 cup creamy peanut butter
– 1/2 cup powdered sugar
– 1 1/2 cups semi-sweet chocolate chips
The main ingredients create the base of the trees. Creamy peanut butter gives a rich taste. Powdered sugar adds sweetness and helps bind the mix. Semi-sweet chocolate chips coat the outside, adding a chocolatey crunch.
Optional Ingredients
– Green food coloring
– Mini chocolate chips
– Sprinkles
Optional ingredients let you get creative. Green food coloring makes the trees festive. Mini chocolate chips work as ornaments, while sprinkles add a fun touch.
Tools Needed
– Mixing bowl
– Parchment paper
– Microwave-safe bowl
You need a mixing bowl to combine the ingredients. Parchment paper lines the baking sheet, preventing sticking. A microwave-safe bowl is used for melting the chocolate. These tools help make the process smooth and easy.
Step-by-Step Instructions
Preparing the Peanut Butter Mixture
– Combine Ingredients
In a mixing bowl, add 1 cup of creamy peanut butter, 1/2 cup of powdered sugar, 1 teaspoon of vanilla extract, and 1/4 teaspoon of salt. Use a spoon to mix everything until smooth.
– Shape the Tree Forms
Divide the mixture into four equal parts. With your hands, shape each part into a triangular tree form. Press firmly to hold the shape, and then place them on a baking sheet lined with parchment paper.
Melting the Chocolate
– Melting Process
Take 1 1/2 cups of semi-sweet chocolate chips and put them in a microwave-safe bowl. Heat them in the microwave in 20-second bursts, stirring after each time. This helps the chocolate melt evenly until it’s smooth.
– Adding Color (Optional)
If you want to add a festive touch, add a few drops of green food coloring to the melted chocolate. Mix well until you achieve your desired shade of green.
Dipping and Decorating
– Coat the Trees
Remove the peanut butter trees from the refrigerator. Dip each tree into the melted chocolate, making sure it’s fully coated. Let any extra chocolate drip off back into the bowl.
– Decorating with Ornaments
While the chocolate is still soft, decorate each tree with mini chocolate chips and sprinkles. These act as ornaments, making your trees look festive and fun.
Tips & Tricks
Perfecting the Peanut Butter Mixture
Achieving the Right Consistency
Mix the creamy peanut butter, powdered sugar, vanilla extract, and salt. You want a smooth and thick mix. If it feels too sticky, add more powdered sugar. If it’s too dry, a bit of peanut butter can help.
Avoiding Cracks in the Trees
Shape each part into a tree form with care. If your trees crack, they may be too cold or dry. Keep your hands slightly warm while forming them. This helps to hold the shape better.
Chocolate Dipping Tips
Ensuring Smooth Coating
Melt the semi-sweet chocolate chips in short bursts. Stir often to avoid burning. If the chocolate seems too thick, add a tiny bit of oil for smoothness.
Techniques for Decoration
Dip each tree fully into the chocolate. Let excess drip off before placing it back down. Decorate while the chocolate is still wet. This helps the mini chocolate chips and sprinkles stick well.
Serving Suggestions
Display Ideas for Holiday Parties
Place the trees on a festive plate or a cake stand. Use colored paper or a nice cloth underneath for extra flair. Consider adding some holiday greens around them for a nice touch.
Pairing with Other Treats
These trees go great with cookies or fudge. You can also serve them with a glass of milk or hot cocoa. This makes a fun treat for kids and adults alike!
Pro Tips
- Use Room Temperature Ingredients: Make sure your peanut butter is at room temperature for easier mixing and smoother texture.
- Chill the Trees Adequately: Chilling the shaped peanut butter trees ensures they hold their shape better when dipped in chocolate.
- Customize the Chocolate: Experiment with different types of chocolate, like dark or white chocolate, for a unique flavor twist.
- Add More Decorations: Get creative with your decorations! Use colored sugar or edible glitter for a festive look.
Variations
Different Flavor Combinations
You can make your Chocolate Peanut Butter Christmas Trees even more fun. Try adding peanut butter swirls. To do this, take some extra peanut butter and swirl it into the mixture before shaping the trees. This adds a nice touch and makes them look great too.
You can also use different types of chocolate. Instead of semi-sweet chocolate, try dark chocolate or milk chocolate. Each will change the taste. Dark chocolate gives a rich flavor, while milk chocolate adds sweetness. Experiment with what you like best!
Seasonal Decorations
Decorations can make your trees pop! Use holiday-themed toppings like edible glitter or colored sugar. This adds a festive touch that everyone will love. You can also use different sprinkles. Change the colors for birthdays or other events. Personalizing the trees makes them special for any occasion.
Healthier Options
If you want to make a healthier version, consider using sugar substitutes. You can replace the powdered sugar with a sugar-free option. This keeps the flavor while lowering calories.
For those with nut allergies, make nut-free versions. Try using sun butter or soy nut butter instead of peanut butter. These options still taste great and let everyone enjoy the treat without worries.
Storage Info
Short-term Storage
To keep your chocolate peanut butter Christmas trees fresh, store them in the fridge. Place the trees in an airtight container. This helps them stay tasty for up to a week. If you don’t have a container, cover the tray tightly with plastic wrap. Avoid stacking the trees to keep their shape intact.
Long-term Storage
For long-term storage, you can freeze the trees. First, let them cool completely after making them. Then, place each tree on a baking sheet and freeze for about an hour. Once frozen, transfer them to a freezer-safe bag. Make sure to squeeze out as much air as possible. They can last up to three months in the freezer.
Reheating Tips
These treats are best enjoyed cold or at room temperature. If you have leftovers, just take them out of the fridge or freezer. Let them sit for a few minutes before eating. This way, the chocolate will soften a bit, making each bite even more enjoyable.
FAQs
How long do Chocolate Peanut Butter Christmas Trees last?
Chocolate Peanut Butter Christmas Trees can last up to one week in the fridge. Keep them in an airtight container. This helps keep them fresh and tasty. If you want them to last longer, you can freeze them. They will stay good for about three months in the freezer.
Can I make these ahead of time?
Yes, you can make these trees ahead of time! They are perfect for holiday prep. You can shape and dip them a few days before your event. Just store them in the fridge. If you freeze them, thaw them in the fridge overnight before serving.
What can I use instead of peanut butter?
If you want a nut-free option, try sun butter. Sun butter tastes great and is safe for school snacks. You can also use almond butter or cashew butter if you like. Each choice gives a unique flavor to your trees.
You’ve learned how to make fun Chocolate Peanut Butter Christmas Trees. We covered the key ingredients, tools, and easy steps to create these treats. Don’t forget the tips to perfect your trees and the fun variations to try. Whether for gifts or parties, they will impress everyone. Storing them is simple, and you can even make them ahead of time. Enjoy this tasty project and have a blast decorating! Let your creativity shine as you share these sweet delights with friends and famil