Chocolate Peanut Butter Whoopie Pies Decadent Delight

WANT TO SAVE THIS RECIPE?

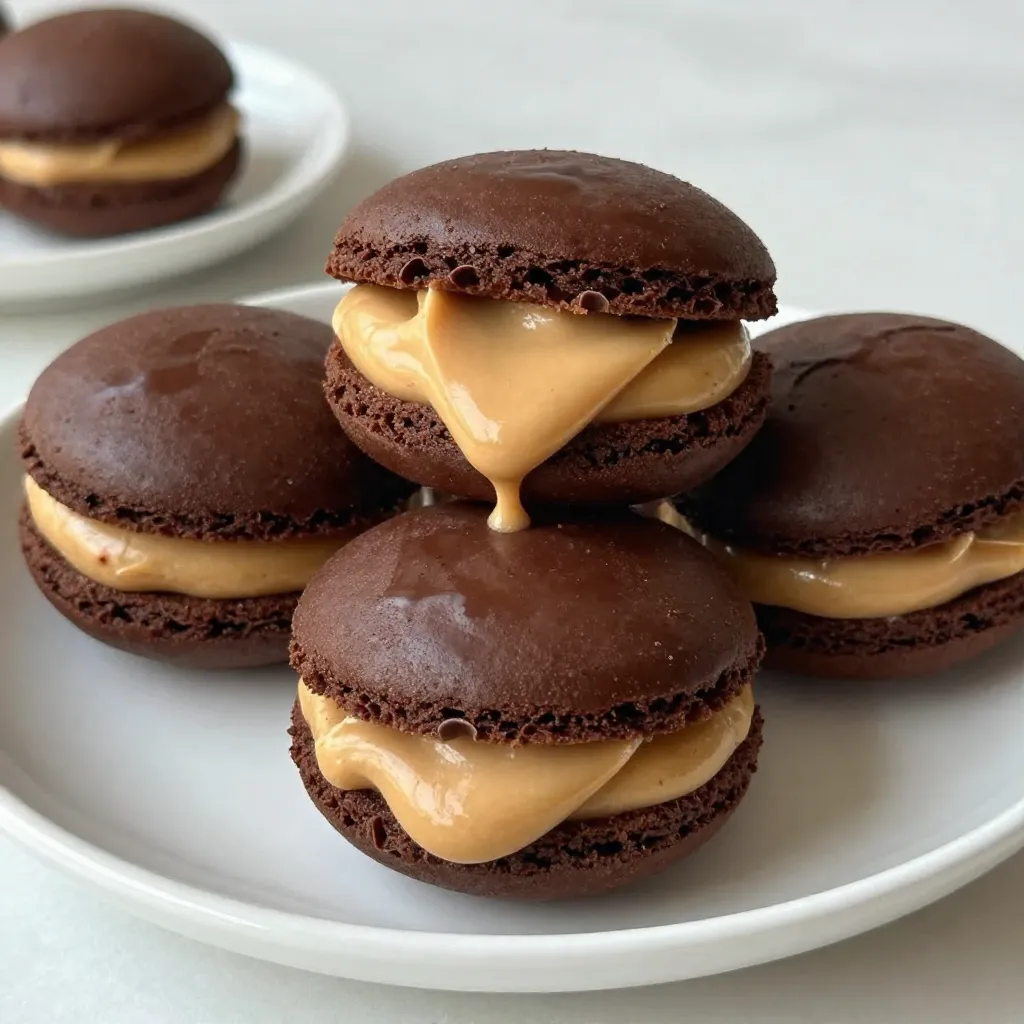
Are you ready to indulge in a treat that combines rich chocolate with creamy peanut butter? In this blog post, I’ll guide you through making Chocolate Peanut Butter Whoopie Pies—a dessert that will make your taste buds dance! From the simple ingredients to the easy step-by-step instructions, you’ll find everything you need to create this decadent delight. Join me on this sweet journey and impress everyone with your baking skills!

Why I Love This Recipe

  1. Decadent Flavor: The rich chocolate paired with creamy peanut butter creates an irresistible combination that satisfies any sweet tooth.
  2. Fun to Make: Whoopie pies are not only delicious but also fun to assemble, making them a great activity for family or friends.
  3. Customizable: You can easily switch up the filling or add different flavors to the cake to suit your taste preferences.
  4. Perfect for Any Occasion: These whoopie pies are great for parties, potlucks, or just a delightful treat at home!
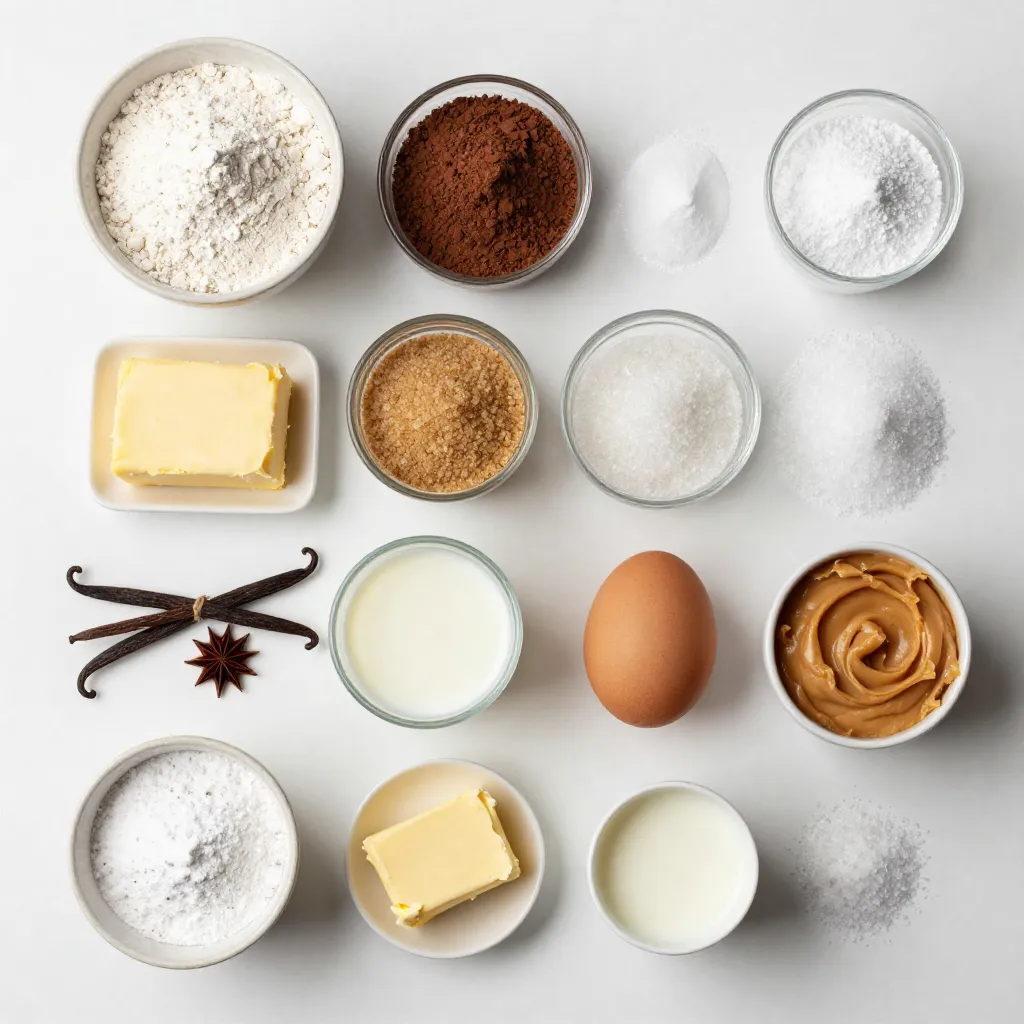
Ingredients

Dry Ingredients

– 1 cup all-purpose flour

– 1/2 cup unsweetened cocoa powder

– 1 teaspoon baking soda

– 1/4 teaspoon salt

Wet Ingredients

– 1/2 cup unsalted butter, softened

– 1 cup brown sugar, packed

– 1/2 cup granulated sugar

– 1 large egg

– 1 teaspoon vanilla extract

– 1/2 cup buttermilk

Peanut Butter Cream Filling Ingredients

– 1/2 cup creamy peanut butter

– 1/4 cup unsalted butter, softened

– 1 cup powdered sugar

– 2 tablespoons milk

– A pinch of salt

The ingredients for these whoopie pies bring together classic flavors. The dry ingredients form the rich chocolate base. The flour and cocoa powder blend well, creating a perfect batter. Baking soda adds a nice rise, while salt enhances the flavors.

The wet ingredients bring moisture and sweetness. Softened butter, brown sugar, and granulated sugar create a fluffy texture. The egg binds everything together, and vanilla extract adds warmth. Buttermilk makes the cakes soft and tender.

For the peanut butter cream filling, we use creamy peanut butter. It brings a rich, nutty flavor. Softened butter ensures a smooth mix. Powdered sugar sweetens the filling, and a little milk helps it spread easily. A pinch of salt balances the sweetness.

This mix of ingredients creates a treat that is both rich and delightful. Each bite is a fun blend of chocolate and peanut butter. Whether you share these or keep them all to yourself, they are sure to please!

Step-by-Step Instructions

Preparation Steps

– Preheat the oven to 350°F (175°C).

– Line two baking sheets with parchment paper.

– In a medium bowl, whisk together:

– 1 cup all-purpose flour

– 1/2 cup unsweetened cocoa powder

– 1 teaspoon baking soda

– 1/4 teaspoon salt

– Set this mixture aside.

Creaming and Combining

– In a large mixing bowl, cream together:

– 1/2 cup unsalted butter, softened

– 1 cup brown sugar, packed

– 1/2 cup granulated sugar

– Mix until light and fluffy for about 3-4 minutes.

– Beat in:

– 1 large egg

– 1 teaspoon vanilla extract

– Gradually add the dry mixture to the butter.

– Alternate with:

– 1/2 cup buttermilk

– Start and end with the dry mix.

– Mix until just combined. Avoid overmixing.

Baking and Cooling

– Use a cookie scoop to drop heaping amounts of batter onto the sheets.

– Leave space for spreading.

– Bake for 10-12 minutes.

– They are done when they spring back slightly when pressed.

– Let them cool on the baking sheet for about 5 minutes.

– Transfer to a wire rack to cool completely.

Making the Filling

– In a medium bowl, beat together:

– 1/2 cup creamy peanut butter

– 1/4 cup unsalted butter, softened

– Gradually add:

– 1 cup powdered sugar

– 2 tablespoons milk

– A pinch of salt

– Mix until creamy and fluffy.

Assembly Steps

– Once the chocolate cakes cool completely, flip half upside down.

– Spread a generous amount of peanut butter filling on each flipped cake.

– Top with another chocolate cake, pressing gently to stick.

Tips & Tricks

Baking Tips

Ensuring proper oven temperature: Always preheat your oven to 350°F (175°C). A hot oven helps the cakes rise well. Use an oven thermometer for accuracy.

Avoiding overmixing the batter: Mix your batter until just combined. Overmixing can make the cakes tough. You want them light and fluffy.

Filling Tips

How to achieve a perfect creamy texture: Beat the peanut butter and butter well. Gradually add powdered sugar and milk. This creates a smooth, fluffy filling.

Flavor variations for the filling: You can add a pinch of cinnamon or vanilla for extra flavor. Try mixing in a bit of chocolate too.

Presentation Tips

Decorating your whoopie pies: Dust your pies with powdered sugar for a pretty look. You can also drizzle melted chocolate on top for fun.

Serving suggestions: Serve your whoopie pies with a glass of milk or coffee. They are great for parties or cozy afternoons at home.

Pro Tips

  1. Use Room Temperature Ingredients: Allow your butter and egg to reach room temperature before mixing. This helps create a smoother batter and ensures even baking.
  2. Don’t Overmix the Batter: When combining the wet and dry ingredients, mix just until incorporated. Overmixing can lead to tough whoopie pies.
  3. Cooling is Key: Let the chocolate cakes cool completely on a wire rack before adding the filling. This prevents the filling from melting and helps maintain the structure of the whoopie pies.
  4. Customize the Filling: Feel free to add a pinch of cinnamon or a splash of vanilla extract to the peanut butter filling for an extra flavor boost!

Variations

Flavor Variations

You can easily change the taste of your whoopie pies. Try adding peppermint or coffee to the peanut butter filling. A splash of peppermint extract can give a fresh kick. For coffee lovers, mix in a teaspoon of instant coffee. It adds a rich depth to the sweet filling.

Another fun option is to use dark chocolate instead of cocoa powder. Dark chocolate gives a more intense flavor. It pairs well with peanut butter. This change makes each bite a little richer and more satisfying.

Dietary Variations

If you need gluten-free options, use a gluten-free flour blend. Many blends work well as a substitute. Just make sure it has a good mix of starch and protein.

For vegan whoopie pies, swap the egg with a flaxseed meal mixture. Mix one tablespoon of flaxseed meal with three tablespoons of water. Let it sit for five minutes to thicken. Replace butter with coconut oil or vegan butter. Use plant-based milk instead of buttermilk. These swaps keep your whoopie pies delicious and cruelty-free.

Storage Info

How to Store Whoopie Pies

To keep your whoopie pies fresh, store them in an airtight container. This method works best for short-term storage. Place a piece of parchment paper between layers to prevent sticking.

For long-term storage, freeze the whoopie pies. Wrap each pie in plastic wrap, then place them in a freezer bag. This protects them from freezer burn and keeps them tasty for up to three months.

Shelf Life

In the refrigerator, your whoopie pies stay fresh for about five days. Remember to check for signs of spoilage. If they look dry or smell off, it’s best to toss them. Mold is also a clear sign they are no longer good to eat. Always trust your senses to ensure your treats are safe.

FAQs

Common Questions

What is the best way to soften butter?

To soften butter, leave it out at room temperature for about 30 minutes. You can also cut it into small pieces for quicker softening. If you’re in a hurry, you can microwave it for about 10 seconds. Just be careful not to melt it! Soft butter works best for mixing and creaming.

Can I use a different type of nut butter?

Yes, you can use almond butter or cashew butter. These can add unique flavors to your whoopie pies. Just make sure the nut butter is creamy to get the right filling texture.

Troubleshooting

Why did my whoopie pies flatten?

Your whoopie pies may flatten if the butter is too warm or if you overmix the batter. Make sure to measure the butter correctly and mix just until combined. Also, check your oven temperature with a thermometer to ensure it’s accurate.

How can I fix dry filling?

If your filling is too dry, add a bit more milk, one teaspoon at a time, until it reaches the right consistency. Mixing longer can also help incorporate air, making it fluffier.

Serving Suggestions

What to serve with whoopie pies?

You can serve whoopie pies with fresh fruit or a scoop of vanilla ice cream. Both complement the chocolate and peanut butter flavors well. They also pair nicely with a scoop of whipped cream.

Ideal beverages to pair with chocolate peanut butter whoopie pies

Pair your whoopie pies with cold milk or a cup of coffee. They also go well with a rich hot chocolate for a sweet treat.

This post covered the essential ingredients and steps to make delicious chocolate peanut butter whoopie pies. You learned how to mix dry and wet ingredients, create a creamy filling, and assemble the pies. We also shared tips on baking, filling variations, and storage methods to keep your treats fresh.

I hope you feel inspired to try making these whoopie pies. They are fun to create and sure to impress! Enjoy the process and savor each bit

- 1 cup all-purpose flour - 1/2 cup unsweetened cocoa powder - 1 teaspoon baking soda - 1/4 teaspoon salt - 1/2 cup unsalted butter, softened - 1 cup brown sugar, packed - 1/2 cup granulated sugar - 1 large egg - 1 teaspoon vanilla extract - 1/2 cup buttermilk - 1/2 cup creamy peanut butter - 1/4 cup unsalted butter, softened - 1 cup powdered sugar - 2 tablespoons milk - A pinch of salt The ingredients for these whoopie pies bring together classic flavors. The dry ingredients form the rich chocolate base. The flour and cocoa powder blend well, creating a perfect batter. Baking soda adds a nice rise, while salt enhances the flavors. The wet ingredients bring moisture and sweetness. Softened butter, brown sugar, and granulated sugar create a fluffy texture. The egg binds everything together, and vanilla extract adds warmth. Buttermilk makes the cakes soft and tender. For the peanut butter cream filling, we use creamy peanut butter. It brings a rich, nutty flavor. Softened butter ensures a smooth mix. Powdered sugar sweetens the filling, and a little milk helps it spread easily. A pinch of salt balances the sweetness. This mix of ingredients creates a treat that is both rich and delightful. Each bite is a fun blend of chocolate and peanut butter. Whether you share these or keep them all to yourself, they are sure to please! {{ingredient_image_1}} - Preheat the oven to 350°F (175°C). - Line two baking sheets with parchment paper. - In a medium bowl, whisk together: - 1 cup all-purpose flour - 1/2 cup unsweetened cocoa powder - 1 teaspoon baking soda - 1/4 teaspoon salt - Set this mixture aside. - In a large mixing bowl, cream together: - 1/2 cup unsalted butter, softened - 1 cup brown sugar, packed - 1/2 cup granulated sugar - Mix until light and fluffy for about 3-4 minutes. - Beat in: - 1 large egg - 1 teaspoon vanilla extract - Gradually add the dry mixture to the butter. - Alternate with: - 1/2 cup buttermilk - Start and end with the dry mix. - Mix until just combined. Avoid overmixing. - Use a cookie scoop to drop heaping amounts of batter onto the sheets. - Leave space for spreading. - Bake for 10-12 minutes. - They are done when they spring back slightly when pressed. - Let them cool on the baking sheet for about 5 minutes. - Transfer to a wire rack to cool completely. - In a medium bowl, beat together: - 1/2 cup creamy peanut butter - 1/4 cup unsalted butter, softened - Gradually add: - 1 cup powdered sugar - 2 tablespoons milk - A pinch of salt - Mix until creamy and fluffy. - Once the chocolate cakes cool completely, flip half upside down. - Spread a generous amount of peanut butter filling on each flipped cake. - Top with another chocolate cake, pressing gently to stick. - Ensuring proper oven temperature: Always preheat your oven to 350°F (175°C). A hot oven helps the cakes rise well. Use an oven thermometer for accuracy. - Avoiding overmixing the batter: Mix your batter until just combined. Overmixing can make the cakes tough. You want them light and fluffy. - How to achieve a perfect creamy texture: Beat the peanut butter and butter well. Gradually add powdered sugar and milk. This creates a smooth, fluffy filling. - Flavor variations for the filling: You can add a pinch of cinnamon or vanilla for extra flavor. Try mixing in a bit of chocolate too. - Decorating your whoopie pies: Dust your pies with powdered sugar for a pretty look. You can also drizzle melted chocolate on top for fun. - Serving suggestions: Serve your whoopie pies with a glass of milk or coffee. They are great for parties or cozy afternoons at home. Pro Tips Use Room Temperature Ingredients: Allow your butter and egg to reach room temperature before mixing. This helps create a smoother batter and ensures even baking. Don’t Overmix the Batter: When combining the wet and dry ingredients, mix just until incorporated. Overmixing can lead to tough whoopie pies. Cooling is Key: Let the chocolate cakes cool completely on a wire rack before adding the filling. This prevents the filling from melting and helps maintain the structure of the whoopie pies. Customize the Filling: Feel free to add a pinch of cinnamon or a splash of vanilla extract to the peanut butter filling for an extra flavor boost! {{image_2}} You can easily change the taste of your whoopie pies. Try adding peppermint or coffee to the peanut butter filling. A splash of peppermint extract can give a fresh kick. For coffee lovers, mix in a teaspoon of instant coffee. It adds a rich depth to the sweet filling. Another fun option is to use dark chocolate instead of cocoa powder. Dark chocolate gives a more intense flavor. It pairs well with peanut butter. This change makes each bite a little richer and more satisfying. If you need gluten-free options, use a gluten-free flour blend. Many blends work well as a substitute. Just make sure it has a good mix of starch and protein. For vegan whoopie pies, swap the egg with a flaxseed meal mixture. Mix one tablespoon of flaxseed meal with three tablespoons of water. Let it sit for five minutes to thicken. Replace butter with coconut oil or vegan butter. Use plant-based milk instead of buttermilk. These swaps keep your whoopie pies delicious and cruelty-free. To keep your whoopie pies fresh, store them in an airtight container. This method works best for short-term storage. Place a piece of parchment paper between layers to prevent sticking. For long-term storage, freeze the whoopie pies. Wrap each pie in plastic wrap, then place them in a freezer bag. This protects them from freezer burn and keeps them tasty for up to three months. In the refrigerator, your whoopie pies stay fresh for about five days. Remember to check for signs of spoilage. If they look dry or smell off, it's best to toss them. Mold is also a clear sign they are no longer good to eat. Always trust your senses to ensure your treats are safe. What is the best way to soften butter? To soften butter, leave it out at room temperature for about 30 minutes. You can also cut it into small pieces for quicker softening. If you're in a hurry, you can microwave it for about 10 seconds. Just be careful not to melt it! Soft butter works best for mixing and creaming. Can I use a different type of nut butter? Yes, you can use almond butter or cashew butter. These can add unique flavors to your whoopie pies. Just make sure the nut butter is creamy to get the right filling texture. Why did my whoopie pies flatten? Your whoopie pies may flatten if the butter is too warm or if you overmix the batter. Make sure to measure the butter correctly and mix just until combined. Also, check your oven temperature with a thermometer to ensure it's accurate. How can I fix dry filling? If your filling is too dry, add a bit more milk, one teaspoon at a time, until it reaches the right consistency. Mixing longer can also help incorporate air, making it fluffier. What to serve with whoopie pies? You can serve whoopie pies with fresh fruit or a scoop of vanilla ice cream. Both complement the chocolate and peanut butter flavors well. They also pair nicely with a scoop of whipped cream. Ideal beverages to pair with chocolate peanut butter whoopie pies Pair your whoopie pies with cold milk or a cup of coffee. They also go well with a rich hot chocolate for a sweet treat. This post covered the essential ingredients and steps to make delicious chocolate peanut butter whoopie pies. You learned how to mix dry and wet ingredients, create a creamy filling, and assemble the pies. We also shared tips on baking, filling variations, and storage methods to keep your treats fresh. I hope you feel inspired to try making these whoopie pies. They are fun to create and sure to impress! Enjoy the process and savor each bite.

Chocolate Peanut Butter Whoopie Pies

Delicious chocolate whoopie pies filled with creamy peanut butter filling.
Prep Time 30 minutes
Cook Time 12 minutes
Total Time 1 hour
Course Dessert
Cuisine American
Servings 12
Calories 250 kcal

Ingredients
  

  • 1 cup all-purpose flour
  • 1/2 cup unsweetened cocoa powder
  • 1 teaspoon baking soda
  • 1/4 teaspoon salt
  • 1/2 cup unsalted butter, softened
  • 1 cup brown sugar, packed
  • 1/2 cup granulated sugar
  • 1 large egg
  • 1 teaspoon vanilla extract
  • 1/2 cup buttermilk
  • 1/2 cup creamy peanut butter
  • 1/4 cup unsalted butter, softened
  • 1 cup powdered sugar
  • 2 tablespoons milk
  • a pinch salt

Instructions
 

  • Preheat your oven to 350°F (175°C). Line two baking sheets with parchment paper.
  • In a medium bowl, whisk together the flour, cocoa powder, baking soda, and salt. Set aside.
  • In a large mixing bowl, cream together the softened butter, brown sugar, and granulated sugar until light and fluffy, about 3-4 minutes.
  • Beat in the egg and vanilla extract until fully incorporated.
  • Gradually add the dry ingredient mixture to the butter mixture, alternating with the buttermilk. Begin and end with the dry ingredients. Mix until just combined, avoiding overmixing.
  • Use a cookie scoop or tablespoon to drop heaping amounts of the batter onto the prepared baking sheets, leaving space between each for spreading.
  • Bake in the preheated oven for 10-12 minutes, or until the cakes spring back when lightly pressed. Let them cool on the baking sheet for about 5 minutes, then transfer to a wire rack to cool completely.
  • In a medium bowl, beat together the peanut butter and butter until smooth. Gradually add the powdered sugar, milk, and salt, mixing until creamy and fluffy.
  • Once the chocolate cakes have cooled completely, flip half of them upside down. Spread a generous amount of peanut butter filling on each flipped cake, and top with another chocolate cake, pressing gently to adhere.
  • Enjoy your whoopie pies right away, or refrigerate them for about 30 minutes to help the filling set.

Notes

Refrigerate for 30 minutes to help the filling set.
Keyword chocolate, dessert, peanut butter, whoopie pies

WANT TO SAVE THIS RECIPE?

Leave a Comment

Recipe Rating