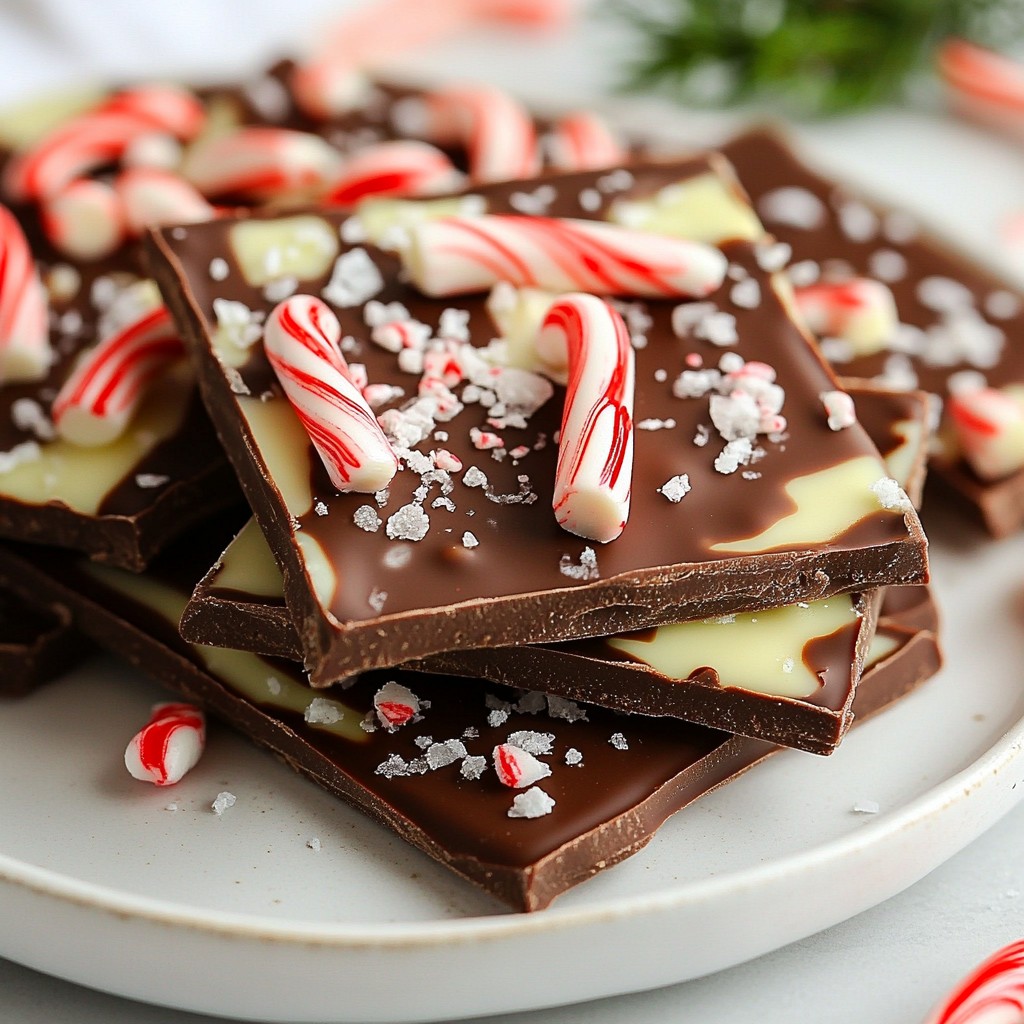
Indulge in the festive spirit with my easy Chocolate Peppermint Bark recipe! This delightful treat combines rich dark chocolate, creamy white chocolate, and the refreshing kick of peppermint. Perfect for gift-giving or holiday snacking, it’s simple to make and fun to customize. In just a few steps, you can create a mouth-watering dessert that everyone will love. Let’s dive into the easy ingredients and instructions to whip up this irresistible treat!
Why I Love This Recipe
- Decadent Flavor Combination: The rich dark chocolate paired with creamy white chocolate and refreshing peppermint creates a delightful balance that is irresistible during the holidays.
- Easy to Make: This recipe requires minimal ingredients and simple steps, making it accessible even for beginner bakers. You'll impress everyone with your culinary skills!
- Perfect for Gifting: Chocolate peppermint bark makes for a lovely homemade gift. Just package it in a festive box or jar, and you have a thoughtful present for friends and family.
- Customizable Treat: You can easily adapt this recipe by adding different toppings or using various types of chocolate, allowing for creativity in each batch!
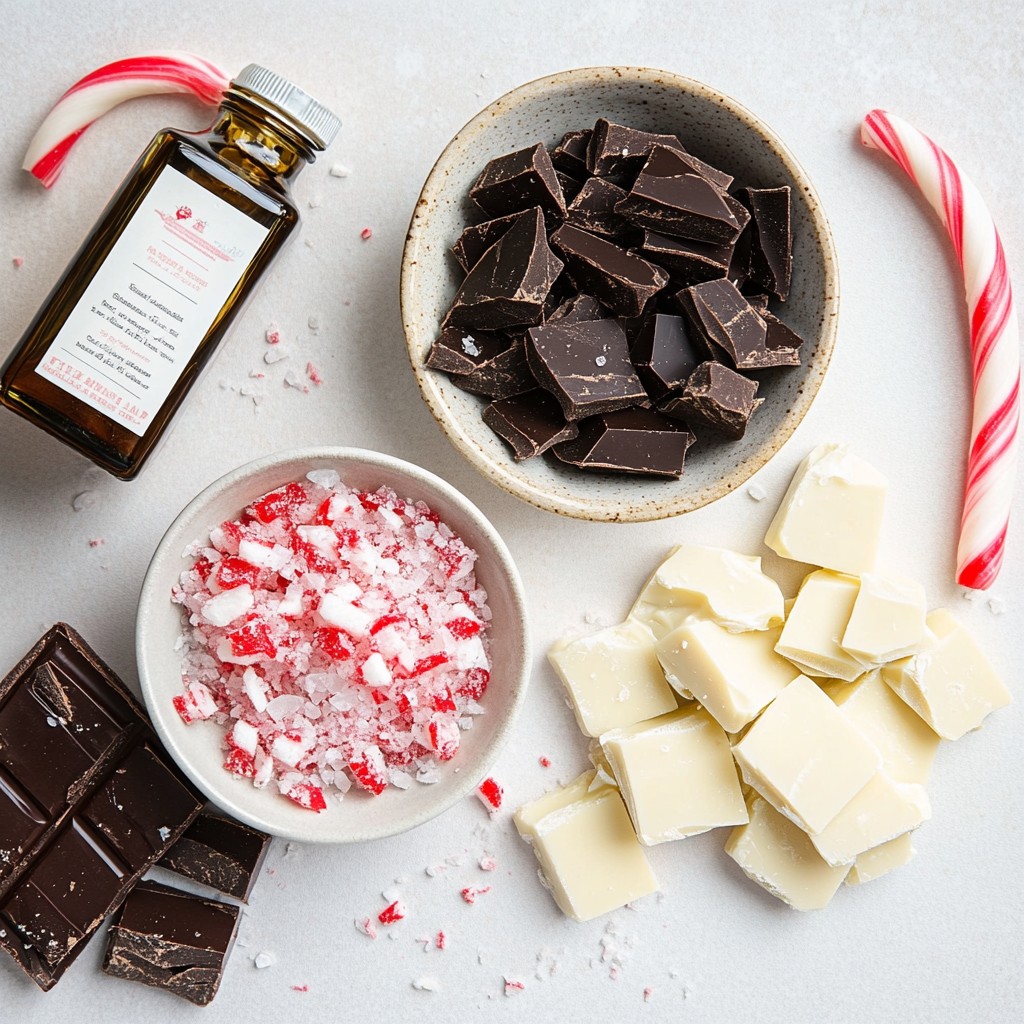
Ingredients
Required Ingredients
- 12 oz dark chocolate, chopped
- 12 oz white chocolate, chopped
- 1 teaspoon peppermint extract
- 1 cup crushed candy canes
- Optional: Sea salt for sprinkling
To make chocolate peppermint bark, start with your ingredients. Dark chocolate and white chocolate each play a key role. Use high-quality chocolate for the best taste. I recommend bittersweet dark chocolate for depth. The white chocolate adds a creamy sweetness that balances the bark.
Next, you need peppermint extract. This gives the bark its classic flavor. A little goes a long way, so don't overdo it. Crushed candy canes add a fun crunch and vibrant color. They also enhance the peppermint taste. If you like, sprinkle some sea salt on top. This little touch makes the flavors pop.
Gather all your ingredients before you start. It makes the process easier and more fun. You’ll enjoy making this festive treat, and the flavors will delight everyone.
Step-by-Step Instructions
Preparation of Baking Dish
- Line a 9x9 inch baking dish with parchment paper.
- Ensure overhang for easy removal.
Melting the Dark Chocolate
- Use a microwave-safe bowl to melt dark chocolate.
- Heat in 30-second intervals, stirring until smooth.
Melting and Adding Peppermint to White Chocolate
- Melt white chocolate using the same method as dark chocolate.
- Stir in peppermint extract after melting.
Assembling the Bark
- Pour melted dark chocolate into the lined dish and refrigerate for setting.
- Pour white chocolate over dark chocolate and immediately add crushed candy canes.
- Optional: Sprinkle with sea salt before refrigerating again.
Cutting and Serving
- Once fully set, remove the bark from the dish and cut into pieces.
Tips & Tricks
Melting Chocolate Perfectly
To melt chocolate perfectly, avoid overheating it. Heat chocolate in a microwave-safe bowl. Use 30-second intervals and stir after each. This keeps it smooth and shiny. If you do not stir, it can burn. Also, always use a dry bowl. A wet bowl can cause chocolate to seize and become grainy.
Customizing Your Bark
You can customize your bark in fun ways. Try using different types of chocolate. Milk chocolate gives a sweet touch. Semi-sweet chocolate adds depth. You can also mix chocolates for a unique flavor. For toppings, think beyond candy canes. Chopped nuts add crunch. Dried fruit gives a chewy texture. Get creative and make it your own!
Presentation Tips
Presentation makes your bark look festive. After cutting, arrange pieces on a bright platter. Garnish with extra crushed candy canes for color. Seasonal serveware adds to the holiday vibe. Use a fun plate or tray that matches your theme. This small touch makes your treat stand out at any gathering.
Pro Tips
- Use High-Quality Chocolate: The quality of chocolate will greatly affect the final taste of your bark. Opt for premium dark and white chocolate for the best flavor.
- Crush Candy Canes with Care: To achieve the perfect texture, place candy canes in a zip-top bag and crush them with a rolling pin. This will prevent large chunks that could disrupt the bark’s smoothness.
- Experiment with Flavors: Feel free to replace peppermint extract with other extracts like orange or almond for a unique twist on your bark.
- Store Properly: Keep your peppermint bark in an airtight container at room temperature for up to two weeks. If storing for longer, refrigerate it but allow it to come to room temperature before serving for the best texture.
Variations
Dark Chocolate and Mint Bark
If you love dark chocolate, try increasing its amount. Use 16 oz of dark chocolate and skip the white chocolate. The richer taste will delight your taste buds. You can still add peppermint extract and crushed candy canes. This version has a deeper flavor and a more intense minty kick.
White Chocolate Peppermint Bark
For a lighter and sweeter treat, focus on white chocolate. Use 24 oz of white chocolate and leave out the dark chocolate. This bark will be creamy and sweet. The peppermint extract still adds that festive flavor. Finish it with crushed candy canes for a crunchy bite.
Creative Additions
Want to get fancy? Try adding different flavors! One option is almond extract for a nutty twist. Just add a teaspoon when mixing the white chocolate. You can also use orange zest for a bright and zesty taste. Simply add a teaspoon when melting the white chocolate. These small changes can make your bark fun and unique!
Storage Info
Proper Storage Techniques
To keep your chocolate peppermint bark fresh, store it in an airtight container. This helps prevent moisture from ruining the texture. Place parchment paper between layers to stop them from sticking together. This way, each piece stays perfect until you are ready to enjoy it.
Ideal Refrigeration Conditions
I recommend keeping the bark in the refrigerator. The cool temperature helps maintain its best quality. Chocolate can melt or become soft at room temperature, especially during warm months. So, always put it back in the fridge after you take out what you want to eat.
Shelf Life of Chocolate Bark
Chocolate peppermint bark stays fresh for about 2-3 weeks when stored properly. After this time, the flavors might fade, and the texture may change. If you notice any white spots, that’s just the chocolate blooming, which is safe but not so pretty. Enjoy your bark while it's fresh for the best taste!
FAQs
Can I use different types of chocolate for the bark?
Yes, you can use many types of chocolate. Dark chocolate gives a rich taste. Milk chocolate adds creaminess. White chocolate is sweet and fun. Each chocolate melts differently. Dark and milk chocolate melt well in the microwave. White chocolate can seize if overheated. Always melt in short bursts and stir often.
How do I make my bark more festive?
To make your bark more festive, try adding fun toppings. Use sprinkles in holiday colors. You can add nuts like almonds or walnuts. Dried fruits like cranberries add color and flavor. Use holiday-themed molds for fun shapes. This adds cheer to your treats!
Can I freeze chocolate peppermint bark?
You can freeze chocolate peppermint bark. Place it in an airtight container. Use parchment paper between layers to avoid sticking. When you want to eat it, let it thaw in the fridge. This keeps the bark fresh and tasty!
What size baking dish should I use?
A 9x9 inch baking dish works well. If you use a larger dish, the bark will be thinner. A smaller dish makes thicker bark. Adjust the melting time a bit if you change the thickness. Just be sure to spread the chocolate evenly!
You've learned how to create delicious chocolate peppermint bark from start to finish. We covered essential ingredients, clear step-by-step instructions, and storage tips to keep your treat fresh. Remember, you can customize the bark with different chocolates and toppings to fit your taste. Get creative and make this sweet treat your own. With these tips, you can impress your family and friends or just enjoy a delightful snack on your own. Enjoy your baking and the joy it brings!