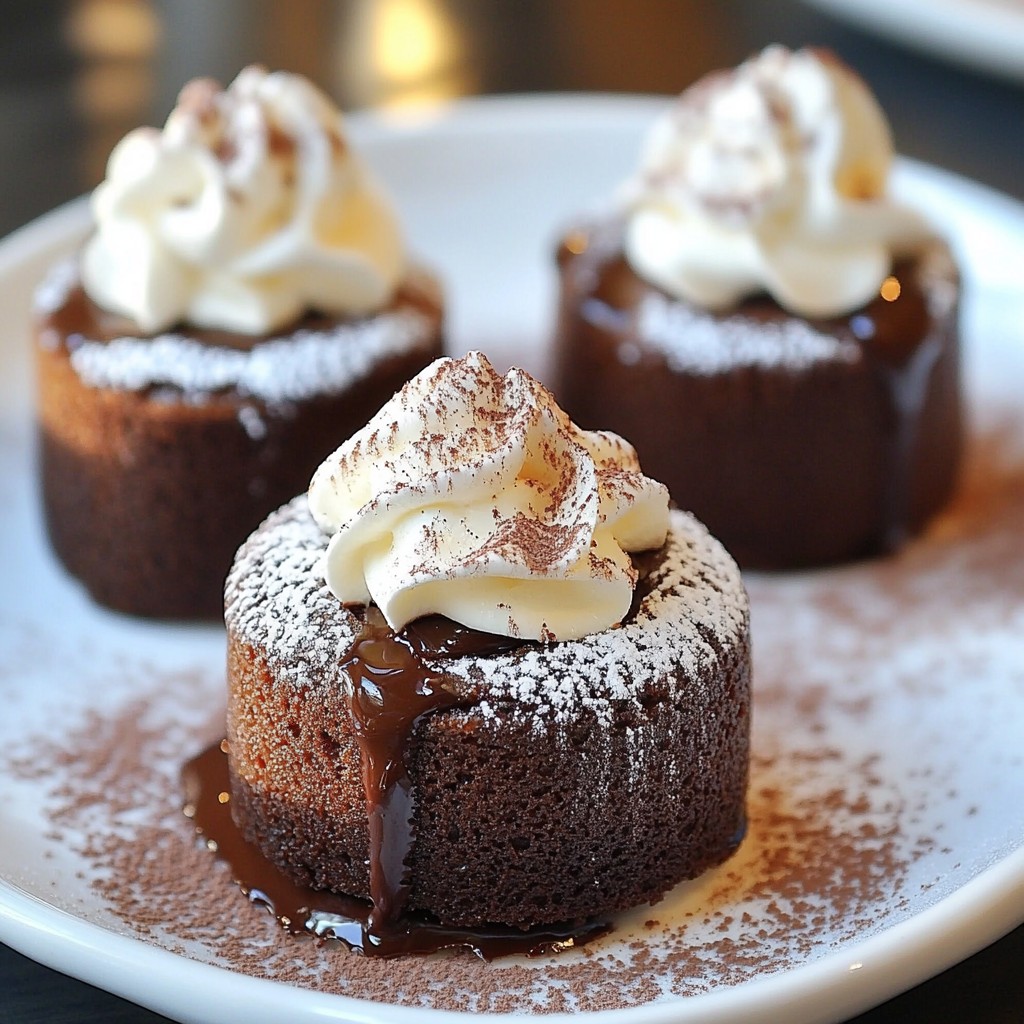
If you crave a rich dessert that oozes chocolate goodness, you're in the right place! Classic chocolate lava cakes are the perfect treat to impress anyone. They combine a warm, gooey center with a firm outer shell. In this post, I’ll share all the tips, tricks, and secrets to help you create your own delicious lava cakes. Let’s dive into this sweet adventure together!
Why I Love This Recipe
- Decadent Flavor: This recipe delivers a rich and indulgent chocolate experience that is sure to satisfy any chocolate lover's cravings.
- Impressive Presentation: The molten center creates a stunning visual when you cut into the cake, making it perfect for special occasions.
- Quick and Easy: With just a 15-minute prep time, you can whip up these delicious treats without spending all day in the kitchen.
- Customizable Toppings: Enhance your lava cakes with whipped cream or vanilla ice cream, adding an extra layer of indulgence to each bite.
Ingredients
Complete Ingredient List
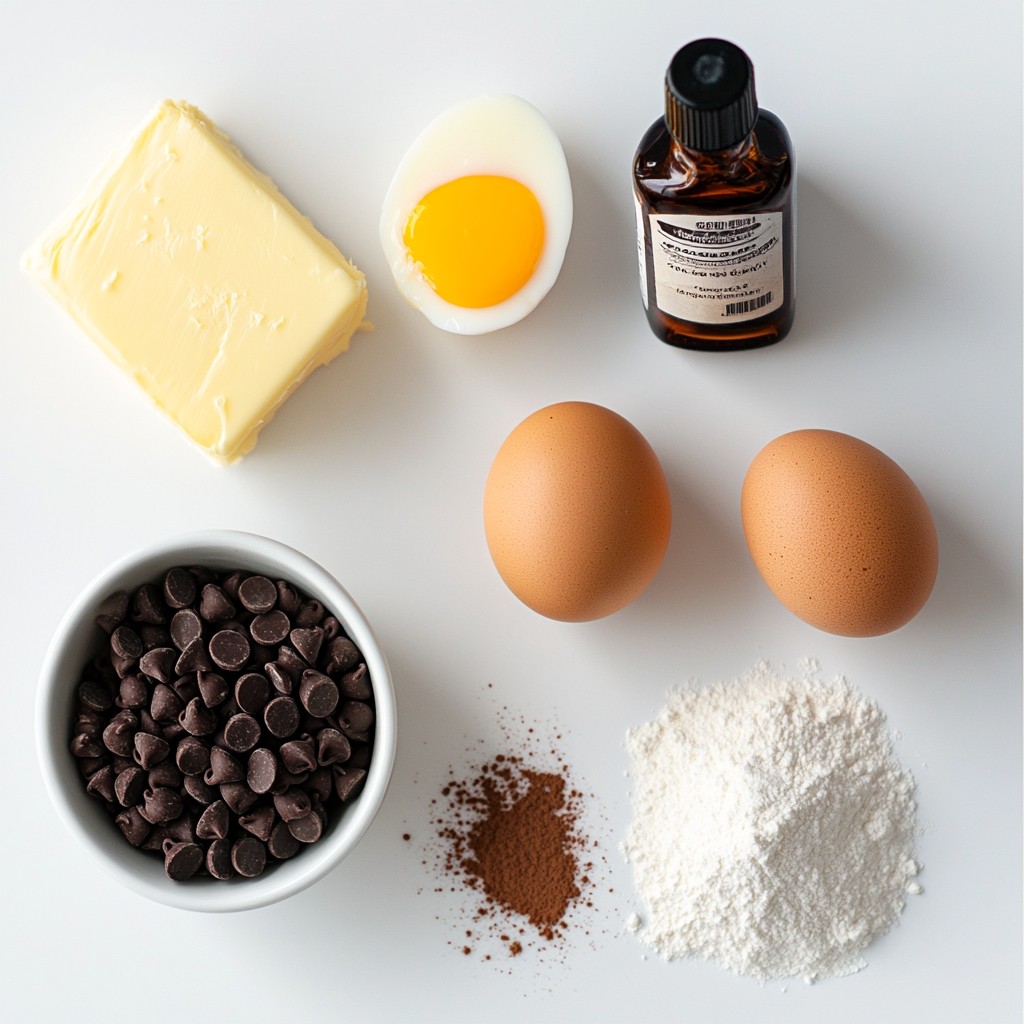
To make classic chocolate lava cakes, gather these ingredients:
- 1/2 cup unsalted butter (1 stick)
- 1 cup semi-sweet chocolate chips
- 2 large eggs
- 2 large egg yolks
- 1/4 cup granulated sugar
- 2 tablespoons all-purpose flour
- 1 teaspoon vanilla extract
- A pinch of salt
- Cocoa powder for dusting
- Optional: whipped cream or vanilla ice cream for serving
Ingredient Substitutions
You can swap some ingredients for different ones based on your needs:
- For butter, use coconut oil for a dairy-free option.
- Use dark chocolate chips for a richer taste.
- If you want a lower sugar option, try using a sugar substitute.
- Replace all-purpose flour with almond flour for a gluten-free cake.
Best Types of Chocolate for Lava Cakes
The type of chocolate you choose matters. Here are some tips:
- Semi-sweet chocolate chips work best for a balanced flavor.
- Dark chocolate gives a deeper taste but is more intense.
- Milk chocolate is sweeter but may not provide the gooey center you want.
- Always use quality chocolate. It makes a big difference in flavor and texture.
Step-by-Step Instructions
Preparing the Ramekins
First, preheat your oven to 425°F (220°C). Grease four ramekins with unsalted butter. This step helps the cakes release easily. Next, dust the greased ramekins with cocoa powder. Tap out any extra cocoa. This will give your cakes a beautiful look.
Melting the Chocolate Mixture
In a microwave-safe bowl, combine 1/2 cup of butter and 1 cup of semi-sweet chocolate chips. Microwave this mixture in 30-second bursts. Stir after each burst until it melts and becomes smooth. This creates a rich chocolate base for your cakes.
Combining Ingredients for the Batter
In a separate bowl, whisk together 2 large eggs, 2 large egg yolks, and 1/4 cup of granulated sugar. Mix until the mixture is fluffy and light in color. This should take about 2-3 minutes. Pour the melted chocolate mixture into this egg mix. Gently fold to combine. Then, add 2 tablespoons of all-purpose flour, 1 teaspoon of vanilla extract, and a pinch of salt. Be careful not to overmix; you want the batter to be smooth yet airy.
Baking Tips for Perfect Lava Cakes
Divide the batter evenly into the prepared ramekins, filling each about three-quarters full. Place the ramekins on a baking sheet. Bake for 12-14 minutes. The edges should be firm, but the center should be soft. Look for puffed and cracked tops. After baking, let them cool for 1 minute. Carefully run a knife around the edges to loosen them. Invert the cakes onto plates to serve. Enjoy your rich and tempting treat!
Tips & Tricks
Achieving the Perfect Lava Center
To get that gooey center, the baking time is key. Bake the cakes for only 12 to 14 minutes. Check the edges; they should be firm while the center looks soft. If you bake too long, you’ll lose the lava effect. Trust me, timing is everything!
Common Mistakes to Avoid
One common mistake is overmixing the batter. Gently fold the ingredients until just combined. Overmixing can lead to dense cakes. Another mistake is not greasing the ramekins well. If the cakes stick, you’ll miss that perfect reveal. Lastly, avoid opening the oven door too soon. This can cause the cakes to deflate.
How to Reheat Leftover Lava Cakes
If you have leftovers, you can easily reheat them. Preheat your oven to 350°F (175°C). Place the cakes on a baking sheet and cover them with foil. Heat for about 10 minutes. This method keeps the center gooey while warming the rest. You can also use the microwave, but be careful. Heat in short bursts, about 10 seconds at a time, to avoid overcooking.
Pro Tips
- Perfectly Greased Ramekins: Ensure that the ramekins are well-greased and dusted with cocoa powder to prevent the cakes from sticking. This will help achieve a clean release when you invert them.
- Chocolate Quality Matters: Use high-quality semi-sweet chocolate chips for a richer flavor. The better the chocolate, the more decadent your lava cake will be.
- Watch the Baking Time: Keep an eye on the baking time. The goal is to have the edges set while keeping the center gooey. If overbaked, you'll lose that delightful lava effect.
- Serving Tip: For an impressive presentation, serve the lava cakes immediately after baking, paired with a scoop of vanilla ice cream or a dollop of whipped cream.
Variations
Adding Flavor Enhancements
You can make your chocolate lava cake even better with some fun flavors. Try adding a splash of orange zest for a citrus twist. You can also use a teaspoon of espresso powder for a richer taste. If you love berries, mix in some raspberries or strawberries into the batter. These little changes can make your dessert pop with new flavors.
Gluten-Free Options
You can easily make this dessert gluten-free. Just swap the all-purpose flour with gluten-free flour. Many brands work well, but look for one that measures the same as regular flour. This way, your cake will still rise and taste great. You can enjoy this treat without the gluten!
Alternatives for Serving
Serving your lava cake with extras makes it even better. A scoop of vanilla ice cream adds creaminess. You can also drizzle warm chocolate sauce on top for extra indulgence. If you love fruit, fresh berries or a berry sauce can lighten up the dish. Another option is to top it with whipped cream for a fluffy touch. These simple additions can change the whole experience!
Storage Info
How to Store Baked Lava Cakes
After baking, let the lava cakes cool for a few minutes. Then, cover them with plastic wrap or aluminum foil. This keeps them fresh. Store the wrapped cakes in the fridge for up to two days. This way, they stay moist and tasty.
Freezing Instructions
You can freeze the lava cakes if you want to keep them longer. First, cool the cakes completely. Then, wrap each one tightly in plastic wrap. Place them in a freezer bag or an airtight container. The cakes can last for up to three months in the freezer. Just remember to label the bags with the date.
Best Way to Reheat Frozen Cakes
To reheat frozen lava cakes, take them out of the freezer. Remove the wrap and place the cakes on a microwave-safe plate. Heat them in the microwave for about 30 seconds. Check to see if they are warm. If not, heat in 10-second intervals until warm. You can also reheat them in the oven. Preheat the oven to 350°F (175°C). Place the cakes on a baking sheet and heat for 10-12 minutes. This will help keep that gooey center!
FAQs
What is the difference between lava cake and molten cake?
Lava cake and molten cake are often the same. Both have a soft center that flows. They use similar recipes and baking times. Some chefs may use different names. The main point is the gooey chocolate inside. You will love the warm, rich chocolate that spills out.
Can I make lava cakes in advance?
Yes, you can prepare lava cakes ahead of time. You can mix the batter and fill the ramekins. Cover them and chill in the fridge for up to a day. When you are ready to bake, take them out. Just add a few extra minutes to the baking time. This lets you enjoy fresh lava cakes with less stress.
What should I serve with chocolate lava cake?
Chocolate lava cake tastes great with many things. You can top it with whipped cream or vanilla ice cream. Fresh berries and chocolate sauce also work well. For a fancy touch, sprinkle some powdered sugar on top. These toppings add texture and flavor. Choose what you love, and enjoy!
In this blog post, we explored the art of making chocolate lava cakes. We covered ingredients, perfect mixing, and baking tips. We shared handy tricks for success and fun variations to try. You can store or reheat these treats easily.
Remember, practice makes perfect! With time, you'll impress everyone with tasty lava cakes. Enjoy the process, and let your creativity shine. Your delicious journey begins now!