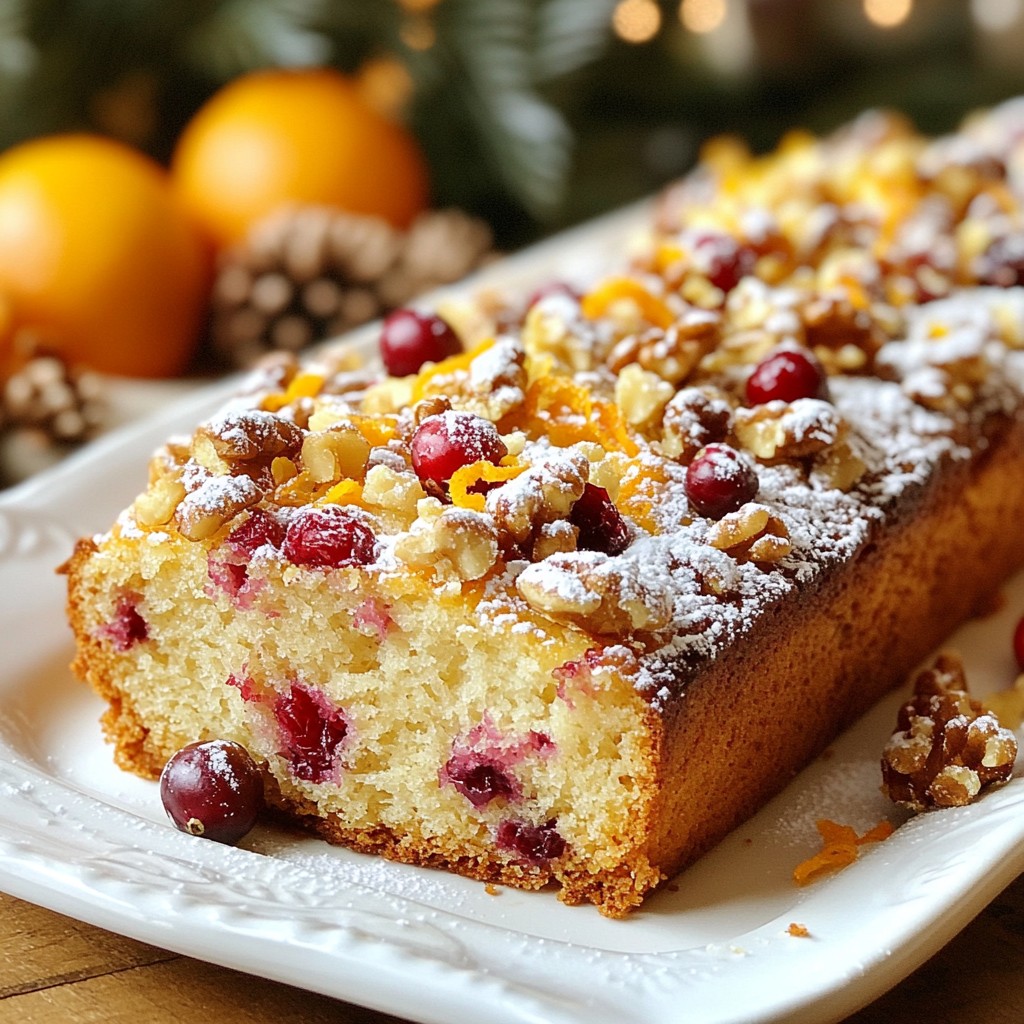
Cranberry Orange Bread is a tasty treat that's easy to make and perfect for sharing. You’ll love the mix of sweet cranberries and zesty oranges in every slice. In this article, I’ll guide you through a simple recipe, plus tips, variations, and storage info. Whether you're new to baking or a pro, you'll find this recipe a delightful addition to your kitchen. Let's get started on this delicious journey!
Why I Love This Recipe
- Bright Flavor: The combination of tart cranberries and zesty orange creates a delightful burst of flavor that brightens any day.
- Easy to Make: This recipe is straightforward and requires minimal prep time, making it perfect for bakers of all skill levels.
- Perfect for Any Occasion: Cranberry Orange Bliss Bread is versatile enough for breakfast, brunch, or as a sweet treat any time of the day.
- Freeze for Later: This bread freezes beautifully, so you can enjoy slices whenever you crave a taste of this deliciousness.
Ingredients
Here are the ingredients you'll need for cranberry orange bread:
- 2 cups all-purpose flour
- 1 cup sugar
- 1 tablespoon baking powder
- 1/2 teaspoon salt
- 1/2 teaspoon baking soda
- 1/2 cup unsalted butter, softened
- 1 large egg
- 1 cup orange juice (freshly squeezed for best flavor)
- Zest of 1 large orange
- 1 cup fresh or frozen cranberries, roughly chopped
- 1/2 cup chopped walnuts (optional)
- 1 teaspoon vanilla extract
Each ingredient plays a vital role in making this bread taste great. All-purpose flour gives the bread its structure. Sugar adds sweetness and helps with browning. Baking powder and baking soda make the bread rise, while salt enhances flavor. The butter keeps it moist and rich.
The large egg binds everything together. Fresh orange juice and zest bring a bright, citrusy flavor, making this bread special. Chopped cranberries offer a tart burst, and walnuts add crunch. You can leave out the walnuts if you prefer a nut-free bread.
Gather these ingredients before you start. This will make cooking easier and more fun!
Step-by-Step Instructions
Preparation Steps
1. Preheating the oven and preparing the loaf pan
First, set your oven to 350°F (175°C). This helps the bread bake evenly. Grease a 9x5-inch loaf pan or line it with parchment paper. This makes it easy to take the bread out later.
2. Mixing dry ingredients
In a large bowl, combine 2 cups of all-purpose flour, 1 cup of sugar, 1 tablespoon of baking powder, 1/2 teaspoon of salt, and 1/2 teaspoon of baking soda. Whisk these together until they mix well.
3. Creaming butter and adding wet ingredients
In another bowl, take 1/2 cup of softened unsalted butter. Beat it until it looks fluffy. Then, add 1 large egg, 1 cup of freshly squeezed orange juice, and 1 teaspoon of vanilla extract. Mix these together until smooth.
4. Combining wet and dry ingredients
Gradually mix the wet ingredients into the dry ingredients. Stir just until they come together. It’s okay if there are some lumps; don’t overmix.
5. Adding cranberries and walnuts
Next, gently fold in 1 cup of roughly chopped fresh or frozen cranberries. If you want, add 1/2 cup of chopped walnuts too. Mix until they are evenly distributed in the batter.
6. Pouring batter into the pan and baking
Pour the batter into your prepared loaf pan. Use a spatula to smooth the top. Bake it in the preheated oven for 50 to 60 minutes. Check with a toothpick in the center; it should come out clean. Keep an eye on it to avoid over-browning.
Enjoy the wonderful aroma as it bakes!
Tips & Tricks
Baking Tips
- How to avoid overmixing
Overmixing can make your bread tough. Mix just until everything is combined. It's okay if there are lumps. This keeps your bread soft and fluffy.
- Checking for doneness
To check if your bread is done, insert a toothpick into the center. If it comes out clean, your bread is ready. If not, bake for a few more minutes.
- Preventing over-browning
To avoid over-browning, cover the top with foil if it gets too dark. Keep an eye on it in the last 10 minutes of baking. This step helps keep the top light and golden.
Serving Suggestions
- Presentation ideas for serving
Slice your bread and serve it on a wooden board. Dust the top with powdered sugar for a nice touch. You can also add some orange zest or whole cranberries for decoration.
- Complementary spreads or drinks
This bread pairs well with cream cheese or butter. A warm cup of tea or coffee also goes well with it. Both drinks enhance the bright flavors of the cranberries and oranges.
Pro Tips
- Fresh Ingredients: Use freshly squeezed orange juice for the best flavor. It makes a significant difference compared to bottled juice.
- Chop Cranberries: Roughly chop your cranberries to ensure they are evenly distributed throughout the bread, enhancing both texture and flavor.
- Don’t Overmix: Mix the batter until just combined to keep the bread light and fluffy. A few lumps are perfectly fine!
- Cooling Time: Allow the bread to cool in the pan for a few minutes before transferring it to a wire rack. This helps prevent it from breaking apart.
Variations
Gluten-Free Option
You can easily make this bread gluten-free. Just swap all-purpose flour for a gluten-free flour blend. Look for a blend that has xanthan gum. This helps the bread rise and hold its shape. Measure it out the same way as regular flour. The texture may change slightly, but it will still taste great.
Vegan Alternative
If you want a vegan version, replace the egg and butter. For the egg, use a flax egg. Mix one tablespoon of flaxseed meal with three tablespoons of water. Let it sit for five minutes until it thickens. For the butter, use coconut oil or a vegan butter substitute. This keeps the bread moist and tasty.
Flavor Variations
You can change the flavors to match your taste. Try adding spices like cinnamon or nutmeg. These spices bring warmth and richness. You can also mix in different fruits. Try blueberries, raspberries, or apples. Each fruit adds a new twist to the classic cranberry orange flavor. Get creative and have fun experimenting!
Storage Info
Storing Cranberry Orange Bread
To keep your cranberry orange bread fresh, store it well. For short-term storage, wrap the bread in plastic wrap. Place it at room temperature for up to three days. This keeps the bread soft and tasty.
For long-term storage, freeze your bread. Slice the loaf before freezing for easy servings. Wrap each slice in plastic wrap and place them in a freezer bag. You can store it this way for up to three months. Just remember to label the bag with the date.
Reheating Tips
When it's time to enjoy your cranberry orange bread, reheating is key. For the best flavor and texture, use an oven or toaster oven. Preheat the oven to 350°F (175°C). Place the slice on a baking sheet and heat for about 10 minutes. This warms the bread and brings out the flavors.
If you're in a hurry, you can use the microwave. Heat a slice for about 15-20 seconds. This method is quick but may not keep the crust as crispy. Enjoy your delicious bread warm for the best experience!
FAQs
Common Questions
Can I use dried cranberries instead of fresh? Yes, you can use dried cranberries. They add sweetness and chewiness. Just chop them into smaller pieces. If you use dried, cut back on sugar slightly.
How can I make this recipe low sugar? To reduce sugar, try using less sugar or a sugar substitute. You can also add mashed bananas for natural sweetness. This will change the flavor a bit, but it works well.
What other fruits pair well with cranberry orange bread? Many fruits blend nicely with cranberry and orange. Try adding blueberries, apples, or even pears. These fruits add moisture and flavor.
How long does the bread last? Cranberry orange bread stays fresh for about 3 days at room temperature. Store it in an airtight container. If you want it to last longer, freeze it.
Can I double the recipe? Yes, you can double this recipe. Just use a larger loaf pan or make two loaves. Keep an eye on the baking time, as it may need a bit longer.
You now have a complete guide to make delicious cranberry orange bread. From selecting ingredients to baking and storage, each step is clear. Use fresh cranberries for the best taste. Don’t hesitate to try variations, like gluten-free or vegan options. Enjoy your baking journey! This bread is perfect for sharing or treating yourself. Remember, practice makes perfect, so keep experimenting. Your kitchen is ready for some tasty fun!