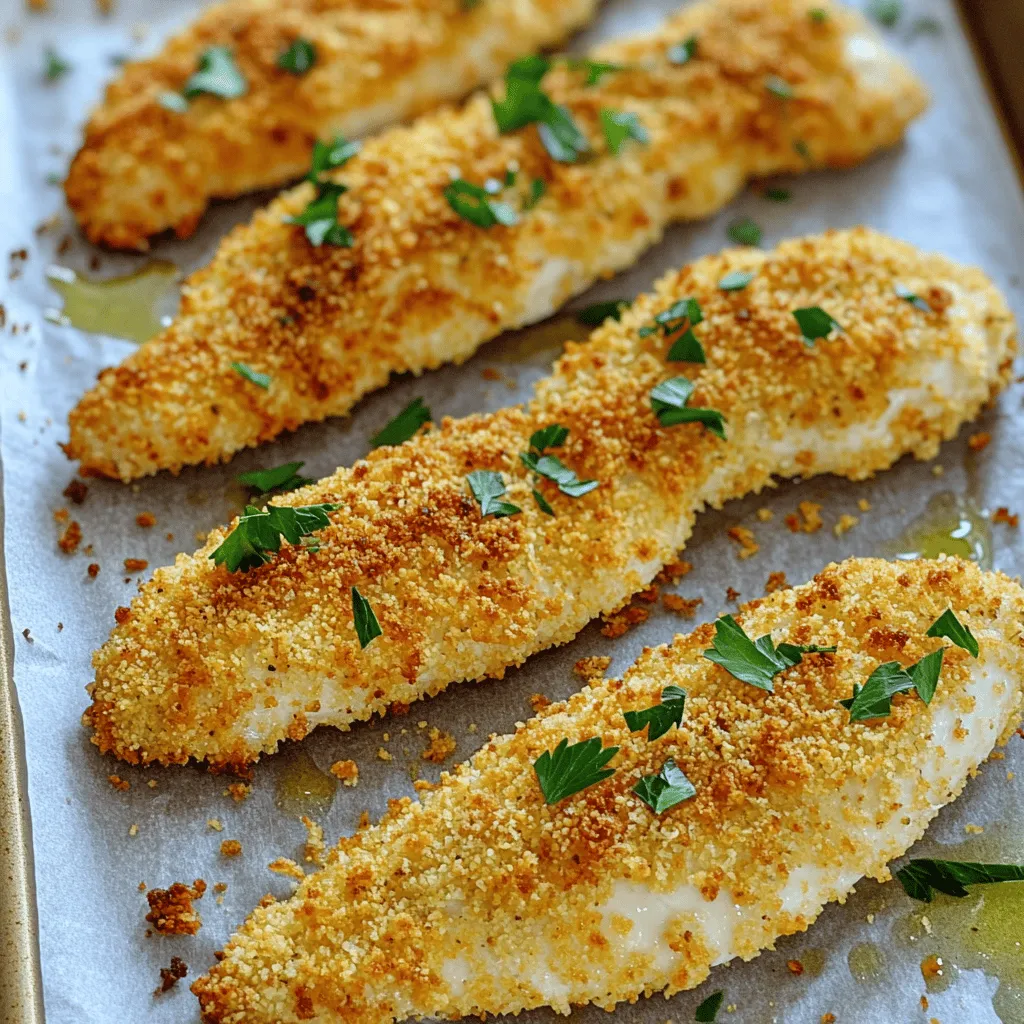
Looking for a quick and easy meal? These Crispy Baked Chicken Tenders are your answer! This simple recipe focuses on fresh chicken breasts soaked in buttermilk, then coated in crunchy breadcrumbs. Perfect for any night, they pair well with tasty dips and sides. I’ll guide you step-by-step through the process. Let’s make a delicious and satisfying meal together!
Ingredients
Main Ingredients
To make crispy baked chicken tenders, you need these key ingredients:
– 1 pound chicken breast, sliced into strips
– 1 cup buttermilk
– 1 cup breadcrumbs (preferably panko for extra crunch)
– 1/2 cup all-purpose flour
– 1 teaspoon garlic powder
– 1 teaspoon onion powder
– 1 teaspoon paprika
– 1/2 teaspoon salt
– 1/2 teaspoon black pepper
These ingredients work together to create a tender center and a crunchy outside. The buttermilk is crucial. It tenderizes the chicken and adds flavor.
Optional Ingredients
You can add a few optional ingredients for extra flair:
– 1/4 teaspoon cayenne pepper (for heat)
– Fresh parsley, for garnish
Cayenne pepper gives a nice kick. Fresh parsley adds a pop of color and freshness.
Recommended Tools
Using the right tools helps make this dish easier:
– Baking sheet
– Parchment paper
– Shallow dishes
The baking sheet holds your chicken tenders. Parchment paper prevents sticking and makes cleanup easy. Shallow dishes help with coating the chicken.
Step-by-Step Instructions
Preparing the Chicken
Start by soaking the chicken strips in buttermilk. This step is key. It makes the chicken tender and juicy. You can soak them for at least 30 minutes, or up to 2 hours in the fridge. While the chicken soaks, preheat your oven to 425°F (220°C). Line a baking sheet with parchment paper. This helps your chicken bake evenly and makes cleanup easy.
Coating the Chicken
Next, it’s time to coat the chicken. In a shallow dish, mix together the flour, garlic powder, onion powder, paprika, salt, black pepper, and cayenne pepper if you like some heat. This mix gives the chicken lots of flavor. Take the soaked chicken strips out of the buttermilk. Let any extra buttermilk drip off. Dip each strip into the flour mix, shaking off the extra. Then, dip it back into the buttermilk. After that, roll it in the breadcrumbs, pressing down to make sure they stick.
Baking Process
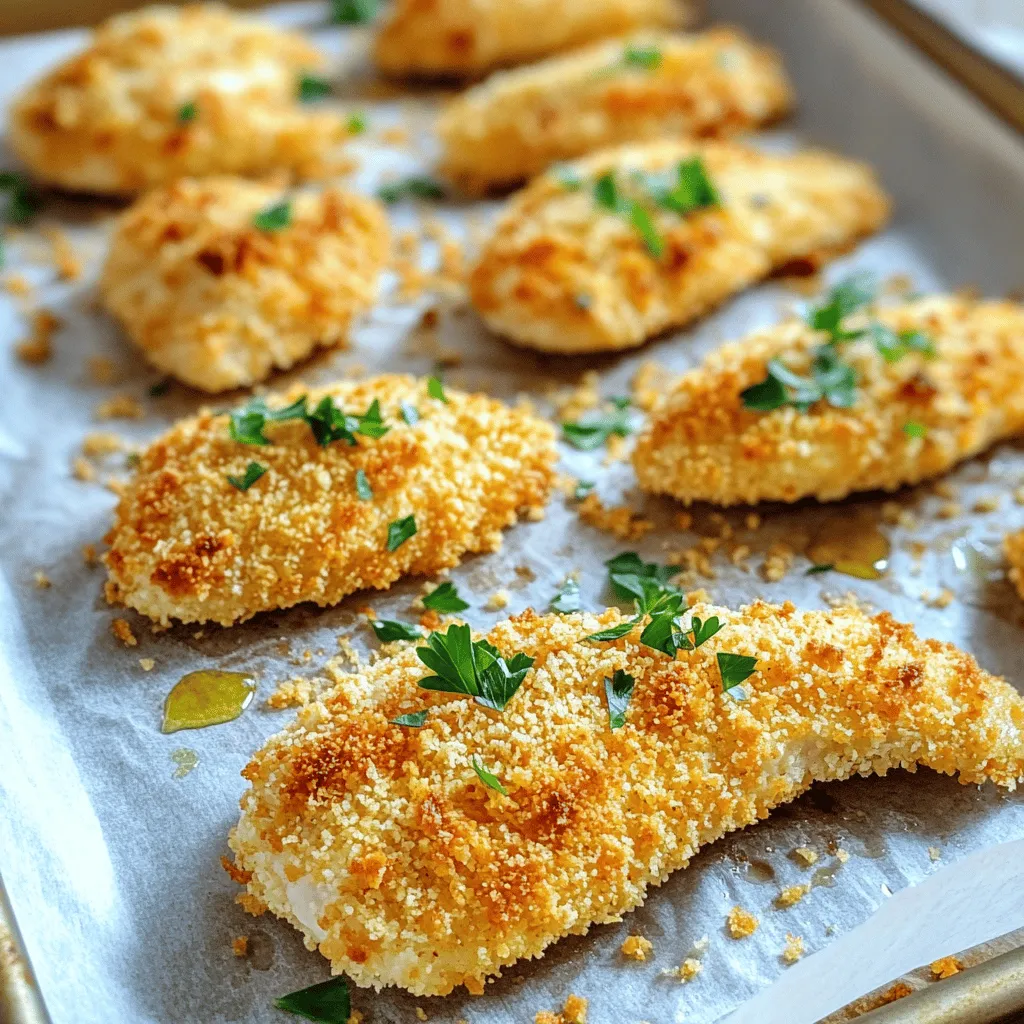
Once your chicken strips are fully coated, arrange them on the baking sheet. Make sure they are not touching each other. This helps them get crispy all around. Drizzle a little olive oil over the chicken. It adds crunch and flavor. Bake the tenders in the oven for about 20-25 minutes. They should turn golden brown and reach an internal temperature of 165°F (75°C). After baking, let them rest for a few minutes. This makes them even better.
Tips & Tricks
Achieving Maximum Crispiness
To get the best crunch, use panko breadcrumbs. Panko is light and airy, making your chicken tenders crispy. Regular breadcrumbs can be fine and dense, which don’t give the same effect.
Another key step is to drizzle olive oil over the chicken before baking. The oil helps to crisp the coating as it cooks. It also adds a nice flavor. Just a little oil goes a long way.
Variations for Added Flavor
You can jazz up your chicken tenders by adding spices or herbs to the breadcrumbs. Try mixing in garlic powder, Italian seasoning, or even a touch of parmesan cheese. This adds depth to the flavor and makes them even more delicious.
If you want to switch things up, consider using alternative coatings. Crushed nuts like almonds or walnuts can add a unique crunch. They also bring a nutty flavor that pairs well with chicken.
Serving Suggestions
To make your meal special, think about the dips and sides you serve with the chicken tenders. Classic options include honey mustard, ranch dressing, or barbecue sauce. These dips enhance the tender’s flavor and give a fun twist.
For sides, serve with fresh veggies, a simple salad, or crispy fries. You can also add a colorful garnish, like fresh parsley, to the plate. It makes the dish look more appealing and brightens up the flavors.
Nutritional Information
Caloric Breakdown
Each serving of these chicken tenders has about 300 calories. They provide a good mix of nutrients. You get around 25 grams of protein, which is great for muscle health. The dish also has 14 grams of fat and 30 grams of carbs.
Health Benefits
These tenders are packed with protein. Protein helps build strong muscles and keeps you full. The chicken breast is lean, making it a smart choice for healthy eating. The seasonings add flavor without extra calories. Plus, using olive oil gives you healthy fats.
Modifying for Dietary Needs
If you’re gluten-free, you can swap out the breadcrumbs. Use gluten-free breadcrumbs or crushed nuts instead. This keeps the taste and texture. To cut calories, use less oil or skip it. You can also bake them longer for extra crispiness without added fat.
Storage Info
Refrigerating Leftovers
To keep your chicken tenders fresh, store them in an airtight container. Make sure they cool to room temperature first. Place a paper towel at the bottom of the container to absorb moisture. This helps keep them crispy. Refrigerated tenders will stay good for about 3 to 4 days.
Reheating Recommendations
When it’s time to enjoy your leftovers, reheating is key. Preheat your oven to 375°F (190°C). Place the chicken tenders on a baking sheet. Bake for about 10 to 15 minutes. This method keeps them crispy and warm. You can also use an air fryer. Set it to 350°F (175°C) for about 5 to 7 minutes. This gives a nice crunch back to the tenders.
Freezing Guidance
Freezing is a great way to save chicken tenders for later. Let them cool completely first. Wrap each tender in plastic wrap, then place them in a freezer bag. Make sure to squeeze out extra air to prevent freezer burn. They can last up to 3 months in the freezer. When ready to eat, thaw them in the fridge overnight before reheating. Enjoy your tasty meal anytime!
FAQs
How do I make crispy chicken tenders without frying?
To make crispy chicken tenders, use the baking method. Start by soaking your chicken in buttermilk. This step helps make the chicken tender. Next, coat the chicken in flour, then dip it back in the buttermilk. Finally, roll it in breadcrumbs. I like to use panko for extra crunch. Drizzle olive oil on the chicken before baking. Bake at 425°F for 20-25 minutes. This method gives you a crispy outside without frying.
Can I use frozen chicken for this recipe?
Yes, you can use frozen chicken. However, you need to thaw it first. I recommend placing the frozen chicken in the fridge overnight. Once thawed, pat it dry with paper towels. Then, follow the same steps from the recipe. If you skip thawing, the chicken will cook unevenly. Always ensure your chicken reaches 165°F for safety.
What dipping sauces go well with chicken tenders?
Many dipping sauces pair well with chicken tenders. Here are a few easy ones to try:
– Honey mustard: Mix honey with mustard for a sweet and tangy dip.
– BBQ sauce: A classic choice that adds a smoky flavor.
– Ranch dressing: Creamy and cool, perfect for dipping.
– Ketchup: Always a favorite, especially for kids.
Feel free to experiment with your favorite sauces!
This blog post covered how to make delicious chicken tenders. You learned about key ingredients like chicken, breadcrumbs, and buttermilk. I shared tips for maximum crispiness, various flavor options, and serving suggestions.
Remember, you can customize these tenders to fit your taste. Baking is a healthier way to enjoy them. With proper storage and reheating, your leftovers can stay tasty. Enjoy making and sharing your chicken tenders!