Easy Creamy Garlic Shrimp Irresistible Dinner Recipe

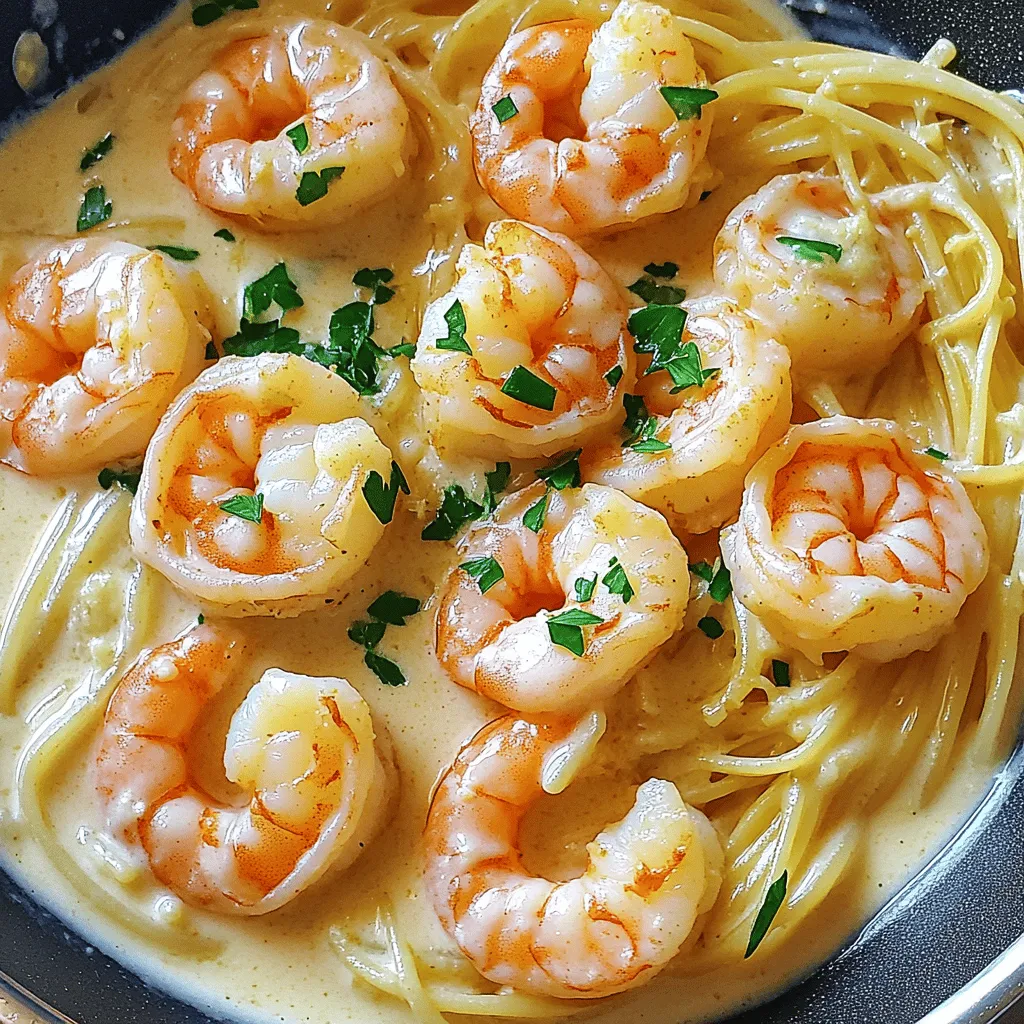
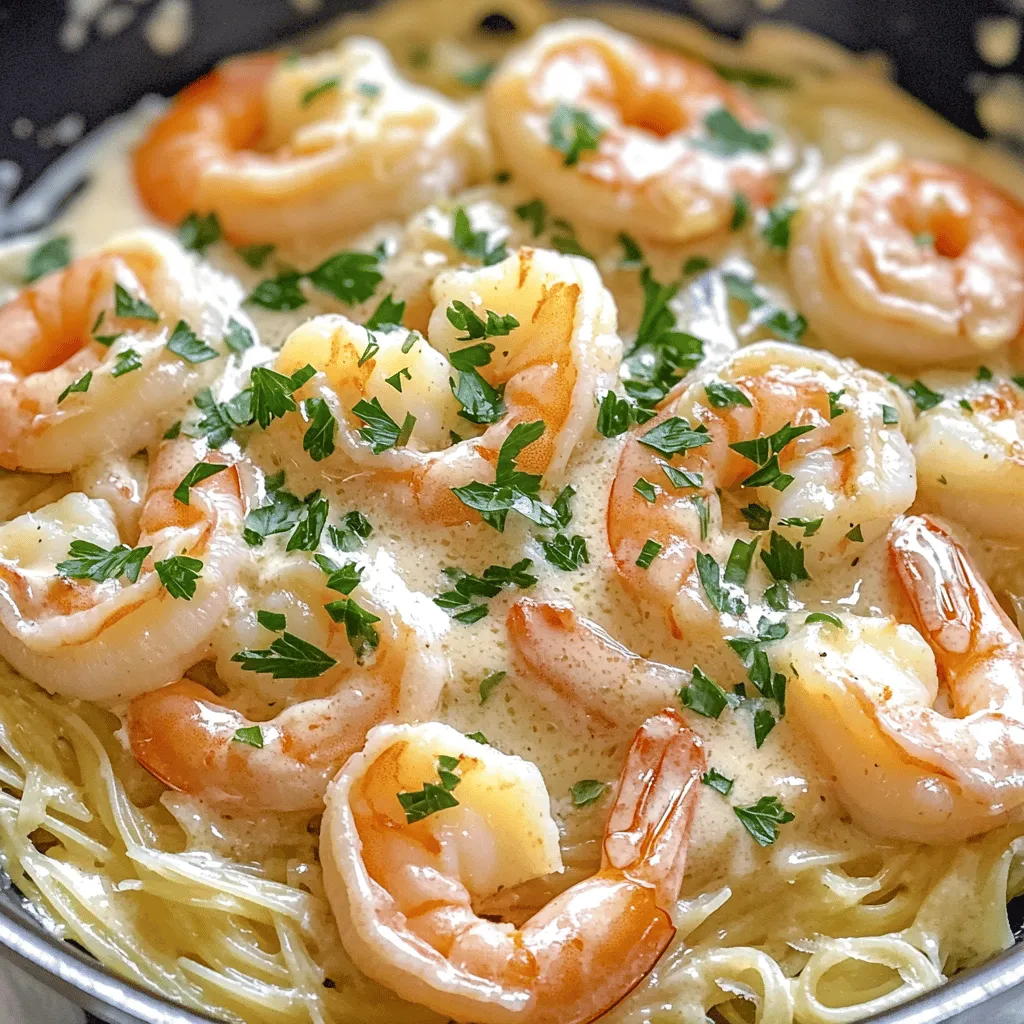
Are you ready to impress dinner guests with a dish that’s simple yet elegant? My Easy Creamy Garlic Shrimp brings rich flavors together in minutes. With just a few key ingredients, you’ll create a meal that dazzles on any dining table. In this post, I’ll guide you through the steps to crafting this delicious dish that pairs perfectly with pasta or rice. Let’s get cooking!

Ingredients

Main Ingredients for Easy Creamy Garlic Shrimp

– 1 pound raw shrimp, peeled and deveined

– 3 tablespoons butter

– 4 cloves garlic, minced

– 1 cup heavy cream

– 1/2 cup grated Parmesan cheese

Seasoning and Garnish

– Salt and pepper to taste

– 1 teaspoon red pepper flakes (optional)

– 2 tablespoons fresh parsley, chopped (for garnish)

Serving Suggestions

– Cooked pasta or rice (for serving)

To make Easy Creamy Garlic Shrimp, gather these simple yet rich ingredients. Start with fresh shrimp, as they provide the best flavor. The butter gives a nice base to your dish. Garlic adds that wonderful aroma and taste. Heavy cream makes it creamy and dreamy. Parmesan cheese adds depth and richness. Don’t forget to season with salt and pepper. If you like a bit of heat, red pepper flakes work great. Finally, garnish with parsley for color and freshness. Serve it over pasta or rice to soak up all that delicious sauce.

You can find the Full Recipe for easy cooking steps to create this mouthwatering dish.

Step-by-Step Instructions

Preparing the Dish

Step 1: Melt the butter over medium heat.

In a large skillet, add the butter. Let it melt slowly. This step builds a rich flavor base.

Step 2: Sauté garlic until fragrant.

Add the minced garlic to the melted butter. Stir it for about 1-2 minutes. Watch closely so it does not burn. The smell will be amazing!

Cooking the Shrimp

Step 3: Add shrimp to the skillet.

Increase the heat to medium-high. Toss in the raw shrimp. Cook for 2-3 minutes until the shrimp turns pink. This means they are cooked through.

Step 4: Pour in heavy cream and stir.

Next, pour in the heavy cream. Stir well to combine the cream with the butter and garlic. This creates a creamy sauce that coats the shrimp.

Final Touches

Step 5: Mix in Parmesan cheese.

Add the grated Parmesan cheese to the skillet. Stir until it melts into the sauce. This adds a nice cheesy flavor.

Step 6: Season and simmer.

Finally, season with salt and pepper. If you like a kick, add red pepper flakes. Let it simmer for another 2 minutes. This thickens the sauce and brings all the flavors together.

Now, you can enjoy this dish over cooked pasta or rice for a complete meal. For the full recipe, check out the Easy Creamy Garlic Shrimp section.

Tips & Tricks

Perfecting Your Garlic Shrimp

Choosing the right shrimp

Select fresh or frozen shrimp that is raw and deveined. Look for shrimp that is firm and has a slight ocean scent. Avoid shrimp with a strong fishy smell. For this recipe, I prefer medium to large shrimp. They cook evenly and stay juicy.

How to avoid overcooking shrimp

Shrimp cooks quickly. Aim for 2-3 minutes in the skillet. Watch for color change from gray to pink. Remove shrimp as soon as they turn pink. Overcooking makes shrimp rubbery and tough.

Enhancing Flavor

Adding herbs and spices

Boost flavor by adding fresh herbs like parsley or basil. A pinch of red pepper flakes gives a nice kick. You can also include lemon zest for a fresh taste. These flavors elevate the dish and make it special.

Serving suggestions with sides

Serve creamy garlic shrimp over pasta or rice. This adds a hearty base. Add a side of steamed veggies for color and crunch. Garlic bread pairs well too, soaking up the creamy sauce.

Cooking Equipment

Best skillet types

Use a large skillet for even cooking. A non-stick skillet makes cleanup easy. Cast iron works well for heat retention, but requires more care. Always preheat your skillet before adding shrimp.

Recommended tools for ease

Keep a sturdy spatula on hand. It helps flip shrimp without breaking them. Measuring cups and a garlic press make prep faster. A good knife is essential for mincing garlic finely. For the full recipe, check out the details above.

Variations

Different Proteins

You can switch the shrimp for chicken or scallops. Chicken thighs work great. Cook them until golden brown. Then, follow the same steps as in the recipe. Scallops are another tasty choice. Sear them for about 2-3 minutes. They cook fast, so watch them closely. For a vegetarian option, use mushrooms. Slice them thick and sauté until they’re soft. They soak up the sauce well.

Flavor Enhancements

Adding sun-dried tomatoes brings a burst of flavor. Chop them up and add them when you pour in the cream. They add a nice tang. You can also toss in fresh spinach or kale. Add them after the cream, and let them wilt. They boost nutrition and color. Each bite will feel fresh and lively.

Dietary Adjustments

For low-carb options, skip the pasta or rice. Serve the creamy garlic shrimp over zucchini noodles instead. This keeps it light and healthy. If you need a dairy-free sauce, use coconut milk. It gives a creamy texture without dairy. Just make sure to adjust the seasoning since coconut has a sweeter taste. These swaps help fit different diets while keeping the dish delicious.

Storage Info

How to Store Leftovers

To keep your creamy garlic shrimp fresh, refrigerate it right away. Place the shrimp in an airtight container. Make sure it cools to room temperature before sealing. This helps keep moisture in and prevents bacteria growth. For freezing, use freezer-safe bags or containers. Remove as much air as possible to avoid freezer burn. Label the container with the date for easy tracking.

Reheating Instructions

You can reheat shrimp in both the microwave and on the stovetop. The microwave is quick and easy. Use a microwave-safe dish and cover it loosely to keep moisture in. Heat in short bursts, stirring often. For stovetop reheating, use low heat in a skillet. Add a splash of cream or water to keep it creamy. This helps avoid rubbery shrimp. Always check that shrimp is hot all the way through before serving.

Shelf Life

In the fridge, creamy garlic shrimp lasts about 3 days. Store it properly to maintain freshness. If you notice a sour smell, off color, or unusual texture, it’s best to throw it away. These are signs of spoilage. Always trust your senses when it comes to food safety. For the best taste, enjoy it within the first couple of days.

For the full recipe, check out Easy Creamy Garlic Shrimp.

FAQs

How do I know when the shrimp is cooked?

You can tell shrimp is cooked by its color and texture. Look for a bright pink hue. The shrimp should curl into a C shape. If it turns white and opaque, it’s ready. Cook it for about 2-3 minutes per side. Overcooked shrimp become tough.

Can I make creamy garlic shrimp in advance?

Yes, you can make creamy garlic shrimp ahead of time. Cook it as usual, then cool it down. Store it in an airtight container in the fridge. For best results, reheat it gently on the stove. Add a splash of cream to keep it rich and smooth.

What can I serve with creamy garlic shrimp?

Creamy garlic shrimp pairs well with many sides. Here are some great options:

– Cooked pasta, like fettuccine or linguine

– White rice or jasmine rice

– Steamed broccoli or asparagus

– Garlic bread or a fresh salad

These sides will complement the rich flavors of the shrimp. Enjoy your meal! For the full recipe, check out the Easy Creamy Garlic Shrimp section.

This creamy garlic shrimp recipe is quick and easy. You learned about the key ingredients, simple steps, and helpful tips for success. Consider your options to change flavors or proteins. Storing leftovers and reheating correctly will keep your dish tasty.

With these insights, you can create a meal that impresses everyone. Enjoy the process and have fun in the kitchen!

- 1 pound raw shrimp, peeled and deveined - 3 tablespoons butter - 4 cloves garlic, minced - 1 cup heavy cream - 1/2 cup grated Parmesan cheese - Salt and pepper to taste - 1 teaspoon red pepper flakes (optional) - 2 tablespoons fresh parsley, chopped (for garnish) - Cooked pasta or rice (for serving) To make Easy Creamy Garlic Shrimp, gather these simple yet rich ingredients. Start with fresh shrimp, as they provide the best flavor. The butter gives a nice base to your dish. Garlic adds that wonderful aroma and taste. Heavy cream makes it creamy and dreamy. Parmesan cheese adds depth and richness. Don't forget to season with salt and pepper. If you like a bit of heat, red pepper flakes work great. Finally, garnish with parsley for color and freshness. Serve it over pasta or rice to soak up all that delicious sauce. You can find the Full Recipe for easy cooking steps to create this mouthwatering dish. - Step 1: Melt the butter over medium heat. In a large skillet, add the butter. Let it melt slowly. This step builds a rich flavor base. - Step 2: Sauté garlic until fragrant. Add the minced garlic to the melted butter. Stir it for about 1-2 minutes. Watch closely so it does not burn. The smell will be amazing! - Step 3: Add shrimp to the skillet. Increase the heat to medium-high. Toss in the raw shrimp. Cook for 2-3 minutes until the shrimp turns pink. This means they are cooked through. - Step 4: Pour in heavy cream and stir. Next, pour in the heavy cream. Stir well to combine the cream with the butter and garlic. This creates a creamy sauce that coats the shrimp. - Step 5: Mix in Parmesan cheese. Add the grated Parmesan cheese to the skillet. Stir until it melts into the sauce. This adds a nice cheesy flavor. - Step 6: Season and simmer. Finally, season with salt and pepper. If you like a kick, add red pepper flakes. Let it simmer for another 2 minutes. This thickens the sauce and brings all the flavors together. Now, you can enjoy this dish over cooked pasta or rice for a complete meal. For the full recipe, check out the Easy Creamy Garlic Shrimp section. Choosing the right shrimp Select fresh or frozen shrimp that is raw and deveined. Look for shrimp that is firm and has a slight ocean scent. Avoid shrimp with a strong fishy smell. For this recipe, I prefer medium to large shrimp. They cook evenly and stay juicy. How to avoid overcooking shrimp Shrimp cooks quickly. Aim for 2-3 minutes in the skillet. Watch for color change from gray to pink. Remove shrimp as soon as they turn pink. Overcooking makes shrimp rubbery and tough. Adding herbs and spices Boost flavor by adding fresh herbs like parsley or basil. A pinch of red pepper flakes gives a nice kick. You can also include lemon zest for a fresh taste. These flavors elevate the dish and make it special. Serving suggestions with sides Serve creamy garlic shrimp over pasta or rice. This adds a hearty base. Add a side of steamed veggies for color and crunch. Garlic bread pairs well too, soaking up the creamy sauce. Best skillet types Use a large skillet for even cooking. A non-stick skillet makes cleanup easy. Cast iron works well for heat retention, but requires more care. Always preheat your skillet before adding shrimp. Recommended tools for ease Keep a sturdy spatula on hand. It helps flip shrimp without breaking them. Measuring cups and a garlic press make prep faster. A good knife is essential for mincing garlic finely. For the full recipe, check out the details above. {{image_2}} You can switch the shrimp for chicken or scallops. Chicken thighs work great. Cook them until golden brown. Then, follow the same steps as in the recipe. Scallops are another tasty choice. Sear them for about 2-3 minutes. They cook fast, so watch them closely. For a vegetarian option, use mushrooms. Slice them thick and sauté until they’re soft. They soak up the sauce well. Adding sun-dried tomatoes brings a burst of flavor. Chop them up and add them when you pour in the cream. They add a nice tang. You can also toss in fresh spinach or kale. Add them after the cream, and let them wilt. They boost nutrition and color. Each bite will feel fresh and lively. For low-carb options, skip the pasta or rice. Serve the creamy garlic shrimp over zucchini noodles instead. This keeps it light and healthy. If you need a dairy-free sauce, use coconut milk. It gives a creamy texture without dairy. Just make sure to adjust the seasoning since coconut has a sweeter taste. These swaps help fit different diets while keeping the dish delicious. To keep your creamy garlic shrimp fresh, refrigerate it right away. Place the shrimp in an airtight container. Make sure it cools to room temperature before sealing. This helps keep moisture in and prevents bacteria growth. For freezing, use freezer-safe bags or containers. Remove as much air as possible to avoid freezer burn. Label the container with the date for easy tracking. You can reheat shrimp in both the microwave and on the stovetop. The microwave is quick and easy. Use a microwave-safe dish and cover it loosely to keep moisture in. Heat in short bursts, stirring often. For stovetop reheating, use low heat in a skillet. Add a splash of cream or water to keep it creamy. This helps avoid rubbery shrimp. Always check that shrimp is hot all the way through before serving. In the fridge, creamy garlic shrimp lasts about 3 days. Store it properly to maintain freshness. If you notice a sour smell, off color, or unusual texture, it's best to throw it away. These are signs of spoilage. Always trust your senses when it comes to food safety. For the best taste, enjoy it within the first couple of days. For the full recipe, check out Easy Creamy Garlic Shrimp. You can tell shrimp is cooked by its color and texture. Look for a bright pink hue. The shrimp should curl into a C shape. If it turns white and opaque, it's ready. Cook it for about 2-3 minutes per side. Overcooked shrimp become tough. Yes, you can make creamy garlic shrimp ahead of time. Cook it as usual, then cool it down. Store it in an airtight container in the fridge. For best results, reheat it gently on the stove. Add a splash of cream to keep it rich and smooth. Creamy garlic shrimp pairs well with many sides. Here are some great options: - Cooked pasta, like fettuccine or linguine - White rice or jasmine rice - Steamed broccoli or asparagus - Garlic bread or a fresh salad These sides will complement the rich flavors of the shrimp. Enjoy your meal! For the full recipe, check out the Easy Creamy Garlic Shrimp section. This creamy garlic shrimp recipe is quick and easy. You learned about the key ingredients, simple steps, and helpful tips for success. Consider your options to change flavors or proteins. Storing leftovers and reheating correctly will keep your dish tasty. With these insights, you can create a meal that impresses everyone. Enjoy the process and have fun in the kitchen!

Easy Creamy Garlic Shrimp

Impress your dinner guests with my Easy Creamy Garlic Shrimp, a dish that combines rich flavors in just minutes! With fresh shrimp, garlic, heavy cream, and Parmesan, you'll create a mouthwatering meal perfect over pasta or rice. Follow my simple steps to make this elegant yet easy recipe, ideal for any occasion. Click through to explore this irresistible dinner recipe and elevate your cooking game!

Ingredients
  

1 pound raw shrimp, peeled and deveined

3 tablespoons butter

4 cloves garlic, minced

1 cup heavy cream

1/2 cup grated Parmesan cheese

Salt and pepper to taste

1 teaspoon red pepper flakes (optional)

2 tablespoons fresh parsley, chopped (for garnish)

Cooked pasta or rice (for serving)

Instructions
 

In a large skillet, melt the butter over medium heat.

    Add the minced garlic and sauté for about 1-2 minutes until fragrant, being careful not to burn it.

      Increase the heat to medium-high and add the shrimp to the skillet. Cook for 2-3 minutes or until the shrimp turns pink.

        Pour in the heavy cream and stir well to combine with the butter and garlic.

          Stir in the grated Parmesan cheese, and mix until melted and creamy.

            Season with salt, pepper, and red pepper flakes if using. Let it simmer for another 2 minutes to slightly thicken.

              Remove from heat and garnish with freshly chopped parsley.

                Serve the creamy garlic shrimp over cooked pasta or rice for a complete meal.

                  Prep Time: 5 minutes | Total Time: 15 minutes | Servings: 4

                    Leave a Comment

                    Recipe Rating