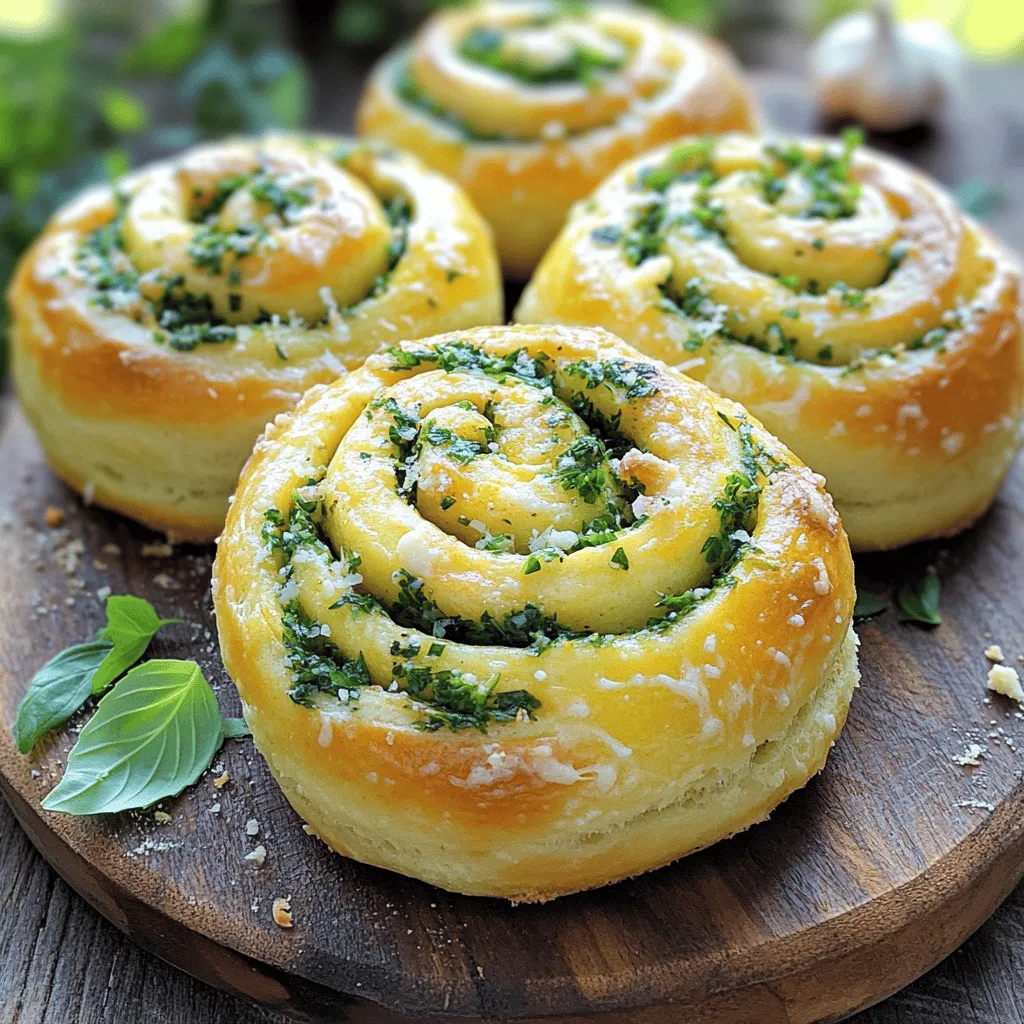
If you’re craving warm, flavorful bread, you’re in the right place! My Herb & Garlic Swirl Rolls are easy to make and packed with taste. With simple ingredients and step-by-step instructions, you will impress family and friends with these delicious rolls. Just imagine serving them fresh from the oven! Let’s dive into this simple recipe and get started on your new favorite bread!
Ingredients
List of Essential Ingredients
– 3 cups all-purpose flour
– 1 packet (2 1/4 teaspoons) active dry yeast
– 1 cup warm water (110°F/45°C)
– 2 tablespoons sugar
– 1 teaspoon salt
– 3 tablespoons olive oil
– 4 cloves garlic, minced
– 1/4 cup fresh parsley, chopped
– 1/4 cup fresh basil, chopped
– 1/4 cup grated Parmesan cheese
– 1/2 teaspoon black pepper
– 1 egg, beaten (for egg wash)
To make my Herb & Garlic Swirl Rolls, you need a few key ingredients. All-purpose flour is a must. It gives the rolls their soft texture. Next, active dry yeast helps the dough rise. Warm water activates the yeast. Sugar feeds the yeast and adds a hint of sweetness. Salt enhances flavor, while olive oil keeps the dough moist.
Garlic is the star ingredient for flavor. Fresh herbs like parsley and basil add freshness and depth. Grated Parmesan cheese gives a savory touch. Black pepper adds a bit of heat. Lastly, an egg wash gives the rolls a shiny finish.
Optional Ingredients
– Additional herbs
– Cheese variations
– Spices for added flavor
You can customize these rolls with optional ingredients. Try adding more herbs like thyme or oregano for extra flavor. Different cheeses like mozzarella or cheddar can make them even richer. You can also add spices like red pepper flakes for a kick. These options let you personalize the rolls to your taste.
Step-by-Step Instructions
Preparing the Dough
– Activating the yeast: Start by mixing warm water, sugar, and yeast in a bowl. Wait about 5 minutes until it foams. This shows the yeast is alive.
– Mixing dry and wet ingredients: Add salt, olive oil, and 2 cups of flour to the yeast mix. Stir until it all blends well.
– Kneading the dough: Transfer the dough to a floured surface. Knead it for 5-7 minutes, making it smooth and elastic.
Allowing the Dough to Rise
– Ideal rising conditions: Place the dough in a greased bowl. Cover it with a damp cloth. Find a warm spot in your kitchen.
– Time needed for rising: Let the dough rise for about 1 hour. It should double in size, showing it’s ready for the next step.
Creating the Herb and Garlic Filling
– Combining the herb ingredients: In a small bowl, mix minced garlic, parsley, basil, Parmesan cheese, and black pepper. This blend gives the rolls their flavor.
– Spreading on the dough: Roll out the dough into a rectangle. Spread the herb and garlic mixture evenly over the dough.
Shaping the Rolls
– Rolling the dough into a log: Start from one long edge and roll the dough tightly into a log. Pinch the seam to seal it well.
– Slicing and placing in the dish: Cut the log into 12 equal slices. Place them in a greased baking dish or on a parchment-lined baking sheet.
Finishing Touches and Baking
– Proofing after shaping: Cover the rolls with a cloth. Let them rise for another 30 minutes to puff up before baking.
– Preparing for the oven: Preheat your oven to 375°F (190°C). Brush the tops with the beaten egg for a shiny finish.
– Baking and finishing: Bake for 20-25 minutes until golden brown. Let cool slightly before serving.
Tips & Tricks
Perfecting the Dough
To make the best Herb & Garlic Swirl Rolls, you need the right dough. Start with the flour. Use all-purpose flour for a soft, fluffy texture. The dough should feel smooth and elastic. Knead it for about 5 to 7 minutes. This helps develop the gluten. You can tell the dough is ready when it springs back after a poke. If it feels sticky, add a little more flour. Avoid adding too much, or the rolls will be tough.
Enhancing Flavor
Want to boost the flavor? Try adding more herbs. Thyme, oregano, or dill work great. You can also mix in some sun-dried tomatoes for a twist. For cheese lovers, different cheeses can really change the taste. Mozzarella gives a creamy texture. Feta adds a salty kick. Just remember to adjust the amount based on your taste.
Baking Tips
Checking for doneness is key. Your rolls should be golden brown on top. You can tap the bottom of a roll. If it sounds hollow, it’s done. For that crispy crust, place a pan of water in the oven. This creates steam and helps the rolls bake evenly. Let them cool before serving to keep the texture perfect.Enjoy your baking!
Variations
Cheese-Stuffed Herb & Garlic Swirl Rolls
You can easily add cheese to these rolls. This step adds a creamy, rich taste that pairs well with herbs. I recommend using mozzarella for a gooey center or sharp cheddar for a bolder flavor. Cream cheese can also work great if you want a softer filling. Simply spread your chosen cheese on top of the herb mix before rolling.
Gluten-Free Version
To make these rolls gluten-free, swap the all-purpose flour with a gluten-free blend. Look for a blend that contains xanthan gum. This helps mimic the texture of wheat flour. Use the same amount as the original recipe. You may need to bake a bit longer, so check for golden brown edges.
Vegan Herb & Garlic Swirl Rolls
For a vegan twist, replace dairy and eggs. Use almond milk or soy milk instead of regular milk. You can also swap butter for vegan margarine. For the egg wash, brush the tops with a mix of plant-based milk and a little maple syrup. This keeps the flavors balanced while making them vegan-friendly.
Storage Info
Storing Leftover Rolls
Store leftover rolls in the fridge. Use an airtight container to keep them fresh. This helps prevent them from drying out. They should last about 3 to 4 days. If you want to enjoy them warm, reheat them in the oven for a few minutes.
Freezing Herb & Garlic Swirl Rolls
You can freeze these rolls for later. First, let them cool completely. Wrap each roll in plastic wrap, then place them in a freezer bag. This keeps the rolls safe from freezer burns. They can last for about 2 to 3 months in the freezer.
To reheat, take them out and let them thaw. You can warm them in the oven or microwave. Enjoy the fresh taste as if they were just baked.
FAQs
How to make Herb & Garlic Swirl Rolls?
To make these rolls, start by mixing warm water, sugar, and yeast. Let it sit. Then, add salt, olive oil, and flour. Mix until you have a dough. Knead it for a few minutes. Let the dough rise until it doubles in size. Roll it out, spread the garlic and herb mixture, then roll it up. Slice the log and let the rolls rise again. Bake until golden. That’s it!
Can I use dried herbs instead of fresh?
Yes, you can use dried herbs! Just remember, dried herbs are stronger. Use about one-third of the amount. For example, if the recipe calls for 1 tablespoon of fresh herbs, use 1 teaspoon of dried instead. This swap works well. The taste may differ slightly, but your rolls will still be tasty!
How long do these rolls stay fresh?
These rolls stay fresh for about 2-3 days at room temperature. Keep them in an airtight container. If you want them to last longer, you can freeze them. They will stay good in the freezer for up to 3 months. Just thaw and warm them when ready to eat.
Where to buy pre-made Herb & Garlic Swirl Rolls?
You can find pre-made rolls at local bakeries. Look for ones that focus on fresh ingredients. Many grocery stores also carry them. Check the bakery section. If you need them fast, some stores have frozen options. Just bake them at home!
Can I double the recipe?
Yes, you can easily double the recipe. Just use twice the amount of each ingredient. Make sure you have a big bowl for mixing. You might need a larger baking dish too. The baking time will stay the same, but check for doneness. Enjoy making more rolls!
You now have all the tools to make delicious Herb and Garlic Swirl Rolls. We covered the essential ingredients, from all-purpose flour to fresh herbs. You learned how to prepare the dough, create a tasty filling, and shape the rolls. I shared tips to perfect your dough and enhance the flavor. You can even try different variations to suit your taste. With proper storage advice, your leftovers will stay fresh. Enjoy your baking journey and the delightful rolls that come from it!