Are you ready to take your dinner game to the next level? Japanese Katsu Bowls are simple, tasty, and fun to make at home. In this guide, I’ll show you how to prepare the perfect katsu, from the ingredients to the cooking techniques. Whether you choose chicken or pork, I’ll help you master this crispy delight. Join me, and let’s create a meal that will impress everyone!
Ingredients
Essential Ingredients for Katsu Bowls
– Chicken or Pork Options
– You can use boneless chicken thighs or pork loin. Both give great flavor and texture. I often prefer chicken for its juiciness.
– Key Seasonings
– Use salt and pepper for basic seasoning. They enhance the meat’s natural taste. Miso paste adds a deep, umami flavor to the sauce.
– Components for Miso Sauce
– The sauce needs miso paste, soy sauce, water, sesame oil, honey, and rice vinegar. Each ingredient works together to create a balanced taste.
Cooking Supplies
– Recommended Kitchen Tools
– You will need a frying pan, three bowls for breading, and a whisk for the sauce. A thermometer helps check oil temperature.
– Best Oils for Frying
– I recommend vegetable oil for frying. It has a high smoke point and a neutral flavor, which is perfect for crispy katsu.
Step-by-Step Instructions
Preparing the Protein
Seasoning the Meat
Start by seasoning your chicken thighs. Use salt and pepper to bring out the flavor. This simple step makes a big difference. Make sure to coat both sides evenly.
Setting Up the Breading Station
Next, prepare your breading station. You will need three bowls. Put flour in the first bowl. In the second bowl, beat one large egg. Finally, fill the third bowl with panko breadcrumbs. This setup helps you coat the meat easily.
Cooking Techniques
Best Practices for Frying
When it’s time to fry, heat about half an inch of vegetable oil in a pan. Aim for 350°F or 175°C. This temperature is key for crispy katsu. Use a thermometer if you have one. It helps ensure perfect frying.
How to Achieve a Perfect Crunch
To get that crunch, carefully place the breaded chicken in the hot oil. Fry for about 4-5 minutes on each side. Look for a golden brown color. Once done, drain the chicken on paper towels to remove excess oil.
Assembling Your Katsu Bowls
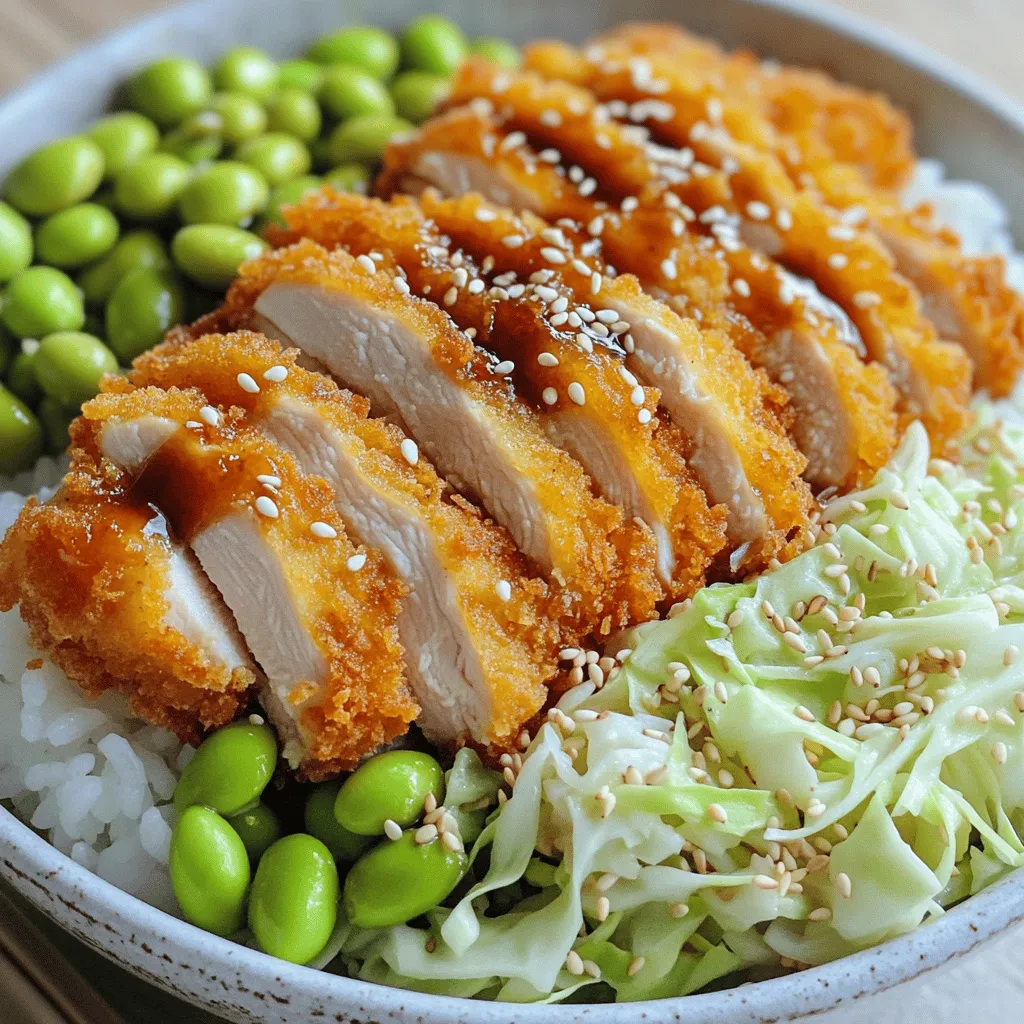
Layering Ingredients
Now it’s time to build your katsu bowls. Start with a scoop of cooked white rice in each bowl. Then, top it with sliced crispy katsu. Add a handful of shredded cabbage and some edamame for crunch.
Drizzling Miso Sauce
Finally, drizzle the miso sauce over the katsu. This sauce adds a rich flavor. For the best taste, don’t be shy with the sauce. Garnish with sesame seeds to finish. Enjoy this delicious meal!
Tips & Tricks
Pro Tips for Perfect Katsu
– Achieving Extra Crunchiness
For a super crunchy katsu, use panko breadcrumbs. They are lighter and crispier than traditional breadcrumbs. Press the panko firmly onto the meat before frying. You can also double bread your katsu. Dredge it in flour, dip in egg, then coat again in panko. This adds more layers for crunch.
– Cooking Times for Different Proteins
Chicken thighs take about 4-5 minutes per side to cook. Pork loin also cooks in the same time. If you use chicken breasts, they may need a minute more due to their thickness. Always check that the meat is cooked to an internal temperature of 165°F.
Making Ahead
– Prepping in Advance
You can prep katsu ahead of time. Bread the meat and store it in the fridge for up to 2 hours. This helps the coating stick better when you fry it. You can also make the miso sauce a day before. Keep it in a sealed container in the fridge until you’re ready to use it.
– Reheating Techniques
To reheat leftover katsu, use an oven. Preheat it to 350°F. Place the katsu on a baking sheet for 10-15 minutes until hot. This keeps the breading crispy. You can also use an air fryer. Set it to 350°F for about 5-7 minutes. This method revives the crunch nicely.
Variations
Chicken vs. Pork Katsu
Flavor Differences
Chicken katsu has a mild taste. It absorbs flavor well. Pork katsu offers a richer, savory profile. The fat in pork gives it a juicy bite. Each option brings a unique twist to your bowl.
Cooking Time Adjustments
Chicken usually cooks faster than pork. Fry chicken for about 4-5 minutes per side. Pork takes a little longer, around 6-7 minutes per side. Always check for doneness with a meat thermometer. Chicken should reach 165°F, while pork is best at 145°F.
Vegetarian and Vegan Options
Tofu Katsu Recipe
For a tasty tofu katsu, use firm tofu. Press it to remove extra water. Cut it into thick slices. Follow the same breading steps as chicken or pork. Fry until golden brown and crispy.
Other Plant-Based Alternatives
You can also try eggplant or tempeh. Eggplant gives a nice texture. Tempeh adds protein and a nutty taste. Both options work well as katsu in your bowl.
Sauce Variations
Spicy Miso Enhancements
For a spicy kick, add chili paste or sriracha to your miso sauce. Start with a small amount. Adjust to your heat preference. This twist adds depth to your dish.
Alternative Sauces to Try
You can use tonkatsu sauce for a sweet and tangy flavor. Or try a sesame dressing for a nutty taste. Experiment with these sauces to find your favorite combination.
Storage Info
Storing Leftovers
To keep your katsu bowls fresh, store them properly. First, let the katsu cool down. Place it in an airtight container. You can keep the rice and toppings in separate containers. This way, the katsu stays crispy, and the rice does not get soggy. Refrigerate your leftovers within two hours of cooking. They will last for about three days. For best flavor, eat them within the first two days.
Freezing Katsu Bowls
Want to save your katsu bowls for later? Freezing them is a great choice. First, make sure the katsu is completely cool. Wrap each piece tightly in plastic wrap. Then, place the wrapped katsu in a freezer-safe bag or container. You can also freeze the rice separately. When you are ready to eat, remove the katsu from the freezer. Thaw it in the fridge overnight.
To keep the texture nice, reheat the katsu in the oven. Set it to 375°F (190°C) for about 10-15 minutes. This helps keep the crunch! If you microwave it, the katsu may turn soggy. Enjoy your meal with the miso sauce once it’s heated through.
FAQs
What is the origin of Katsu Bowls?
Katsu originated in Japan during the late 19th century. It comes from the French dish, “côtelette,” a breaded meat cutlet. The Japanese adapted this idea, creating a crispy and tender dish. Katsu became popular as a quick meal and comfort food. You can find it in many Japanese homes and restaurants today.
Can I use gluten-free breadcrumbs?
Yes, you can use gluten-free breadcrumbs for Katsu Bowls. They work well as a substitute. Look for brands made from rice flour or cornmeal. This option helps those with gluten allergies enjoy Katsu without worry. Just ensure the rest of your ingredients are also gluten-free.
How to serve Katsu Bowls?
Serve Katsu Bowls with simple garnishes. Shredded cabbage adds crunch and freshness. Edamame gives a pop of color and nutrition. You can also sprinkle sesame seeds for a nutty flavor. A drizzle of miso sauce ties all the flavors together nicely. Enjoy it warm for the best taste!
Where to find the best Katsu Bowls?
For authentic Katsu Bowls, seek out Japanese restaurants in your area. Look for places with a good reputation for traditional cuisine. Many cities have spots known for their Katsu. Ask locals for their favorite recommendations. You might discover hidden gems that serve excellent Katsu Bowls.It includes all the steps you need for a delicious meal!
In this guide, we’ve explored the essential ingredients and tools for making katsu bowls. You learned how to properly prepare your protein, achieve the perfect crunch, and assemble delicious bowls. I shared tips for making ahead and offered variations for everyone, including vegetarian options. Remember, katsu bowls are versatile and can be enjoyed in many ways. With these steps and tips, you’ll impress anyone who tries your katsu bowl masterpiece. Enjoy cooking and let your creativity shine!