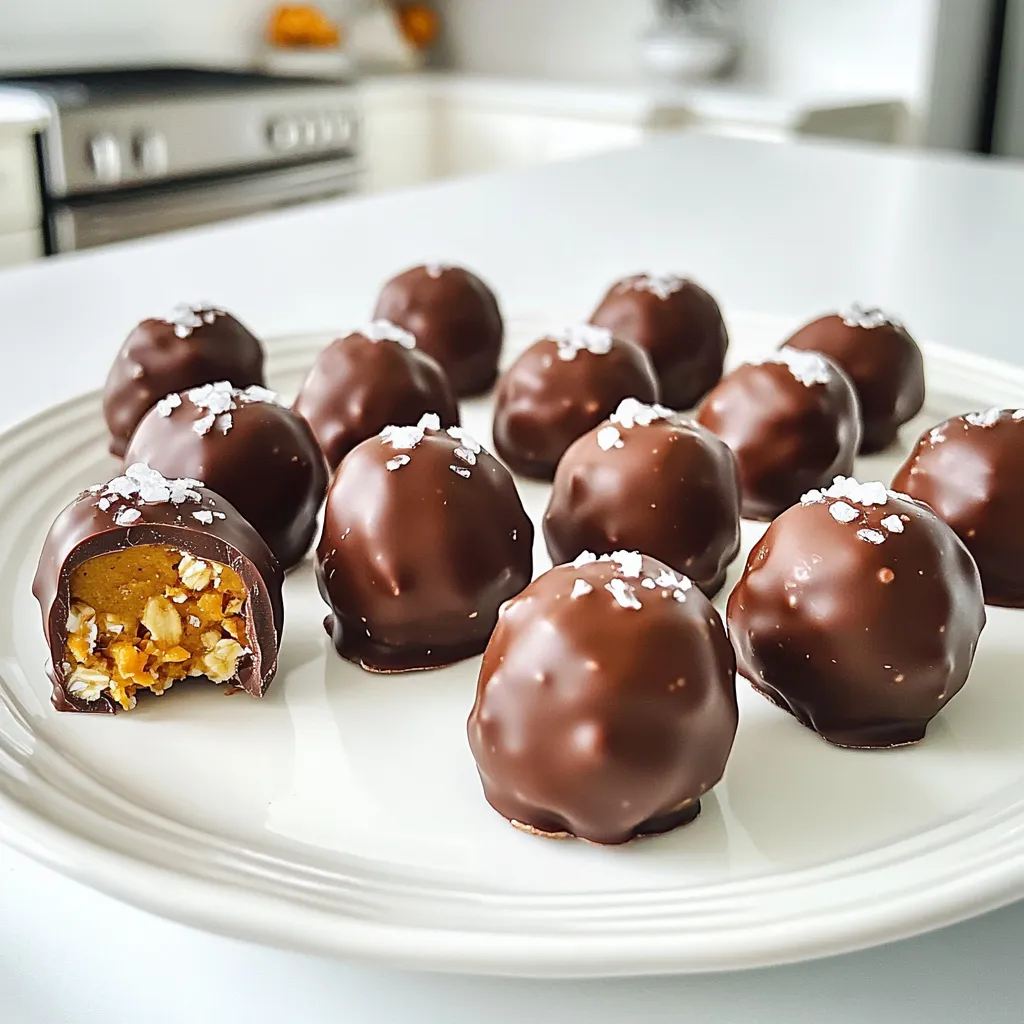
Looking for a fun, easy treat that’s perfect for any occasion? My No-Bake Chocolate Covered Pumpkin Bites will delight your taste buds and satisfy your sweet tooth. With just a few simple ingredients, these bites pack a punch of flavor without the fuss of baking. Follow along as I guide you step-by-step to create a delicious snack that everyone will love. Let’s dive into these tasty bite-sized wonders!
Ingredients
To make delightful no-bake chocolate covered pumpkin bites, you need a few key ingredients. Here’s what you’ll need:
– 1 cup canned pumpkin puree
– 1 cup almond butter (or any nut butter of choice)
– ½ cup maple syrup
– 1 teaspoon vanilla extract
– 2 cups rolled oats
– 1 teaspoon pumpkin pie spice
– 1 cup dark chocolate chips (dairy-free, if desired)
– 1 tablespoon coconut oil
Each ingredient serves a purpose. The canned pumpkin puree gives moisture and flavor. Almond butter adds creaminess and protein. Maple syrup brings natural sweetness, while vanilla extract enhances the flavor. Rolled oats provide texture and heartiness. Pumpkin pie spice adds a warm, cozy taste. Dark chocolate chips offer a rich finish, and coconut oil helps the chocolate melt smoothly.
Using these ingredients, you create a delicious treat that is easy and fun to make. These bites are great for snacks or desserts. Make sure you gather everything before you start!
Step-by-Step Instructions
Preparation of the mixture
First, grab a large mixing bowl. Add 1 cup of canned pumpkin puree, 1 cup of almond butter, ½ cup of maple syrup, and 1 teaspoon of vanilla extract. Stir these until smooth. Make sure everything blends well.
Next, add 2 cups of rolled oats, 1 teaspoon of pumpkin pie spice, and a pinch of salt. Mix all these dry ingredients into the wet mixture. Keep stirring until everything is evenly combined.
Shaping the bites
Now, it’s time to shape the mixture. Line a baking sheet with parchment paper. Take small portions of the mixture in your hands. Roll them into bite-sized balls. Each ball should be about the size of a tablespoon. Place these balls on the prepared baking sheet.
Melting the chocolate
While the bites chill, let’s melt the chocolate. In a microwave-safe bowl, combine 1 cup of dark chocolate chips with 1 tablespoon of coconut oil. Heat in 30-second intervals. Stir in between each interval until fully melted.
Finalizing and setting the bites
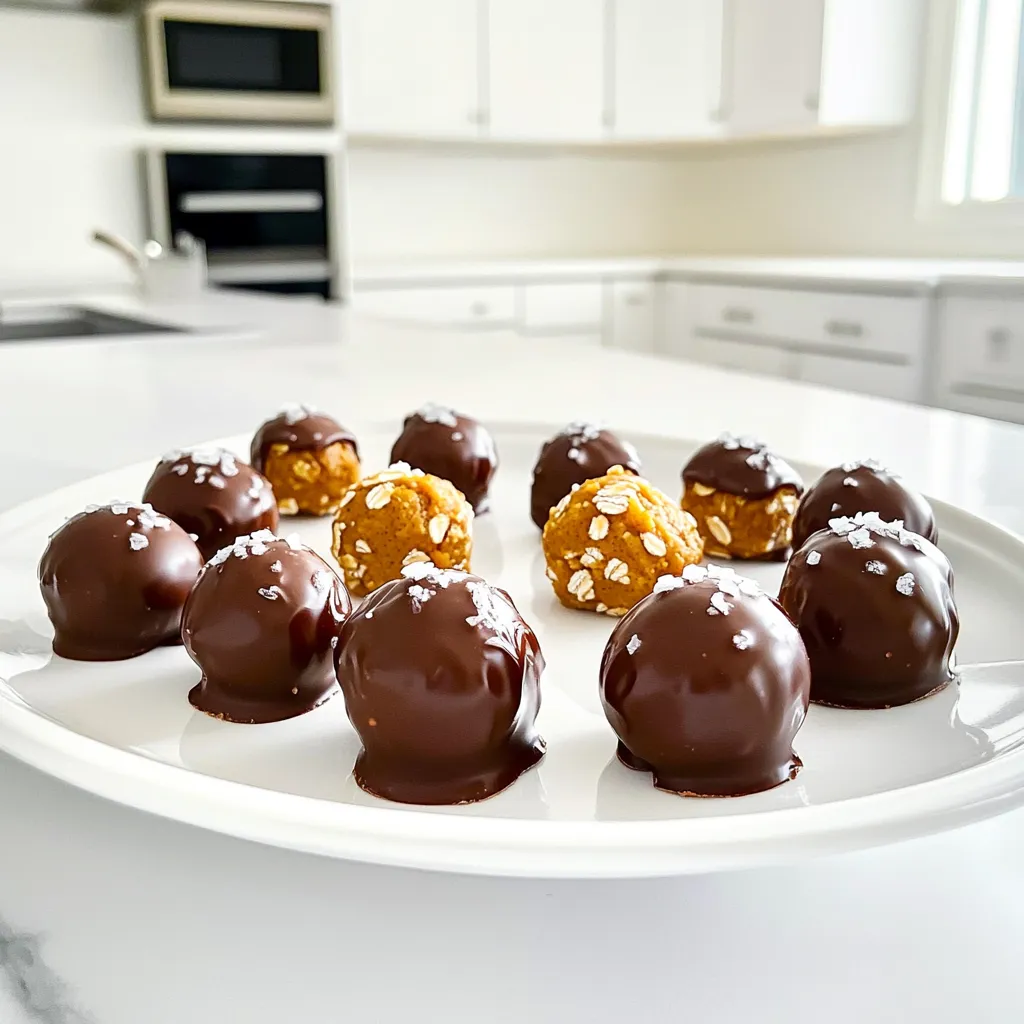
Once the pumpkin bites have chilled for about 30 minutes, take them out. Use a fork to dip each bite into the melted chocolate. Allow any extra chocolate to drip off. Place the coated bites back on the baking sheet.
If you want, sprinkle a pinch of sea salt or crushed nuts on top. This adds a nice crunch. Finally, put the bites back in the fridge for another 30 minutes. This will let the chocolate set completely. Enjoy your sweet treats!
Tips & Tricks
Tips for perfect bites
To get smooth chocolate on your bites, start with good chocolate. I recommend using dark chocolate chips and melting them gently. Mix in a bit of coconut oil to help the chocolate coat better. While melting, stir every 30 seconds to avoid burning.
Chill the pumpkin bites for 30 minutes after shaping them. This helps firm them up. After dipping, chill again for another 30 minutes. This ensures the chocolate sets nicely.
Customization ideas
You can swap sweeteners if you want. Try honey or agave instead of maple syrup. For extra flavor, you can add a dash of cinnamon or nutmeg.
Mix-ins can make your bites unique. Consider adding chopped nuts or seeds for a crunch. Flaxseeds or sunflower seeds work great. You can even fold in some mini chocolate chips for more sweetness.
Presentation suggestions
Serve your pumpkin bites on a colorful plate for an inviting look. Use a wooden board for a rustic touch.
Garnish with a sprinkle of cinnamon or place some pumpkin seeds around the bites. This adds color and makes the plate pop. These easy ideas make your bites party-ready!
Variations
Dietary variations
You can easily adjust this recipe for different diets. For a vegan option, swap the honey for maple syrup. This recipe already uses plant-based ingredients. Use dairy-free chocolate chips for a tasty treat.
For gluten-free bites, make sure you use certified gluten-free oats. This small change ensures everyone can enjoy these bites without worry.
Flavor variations
Adding spices gives your pumpkin bites a fun twist. Try mixing in cinnamon or nutmeg for extra warmth. These spices pair perfectly with pumpkin and chocolate. You can also experiment with different nut butters. Almond butter is great, but peanut butter or cashew butter works well too. Each nut butter brings a unique flavor and texture.
Twists on the recipe
Feel free to get creative with seasonal flavors. You can add chai spices for a cozy taste. This adds a nice twist to the classic pumpkin flavor.
When it comes to chocolate, you have choices. Use dark chocolate for a rich taste, or try white chocolate for a sweeter bite. Each option creates a different experience, making every batch special.
Storage Info
Best storage practices
To keep your no-bake chocolate covered pumpkin bites fresh, store them in the fridge. Place them in an airtight container. This keeps them safe from moisture and odors. If you want to save them longer, freezing works too. Use a freezer-safe container or a zip-top bag. Make sure to remove as much air as possible before sealing.
Shelf life of pumpkin bites
In the fridge, these bites last up to one week. If frozen, they can stay good for about three months. Always check for signs of spoilage. Look for changes in color or texture. A bad smell is another red flag. If you notice these signs, it’s best to toss them.
Reheating and serving post-storage
When you’re ready to enjoy your pumpkin bites, let them thaw in the fridge for a few hours. This slow thaw helps keep their texture. If you need them fast, you can leave them at room temperature for about 30 minutes. Avoid using a microwave, as it can make the chocolate soft and messy. Enjoy them chilled, as they taste the best that way!
FAQs
Can I use fresh pumpkin instead of canned?
Yes, you can use fresh pumpkin. Fresh pumpkin has a different texture. To prepare it, you must cook the pumpkin first. Cut it in half, remove the seeds, and roast it in the oven until soft. Then, scoop out the flesh and blend it until smooth. This process takes more time but can enhance the flavor.
How can I make these bites healthier?
To make these bites healthier, you can reduce the maple syrup. Try using just 1/4 cup instead of 1/2 cup. You can also swap almond butter for a lower-fat nut butter. Using rolled oats with less sugar can also help. Adding chia seeds instead of chocolate chips will add fiber and nutrients.
Are there any nut-free alternatives?
Yes, there are nut-free alternatives. Instead of almond butter, use sunflower seed butter. This option keeps the recipe nut-free and still creamy. You can also use soy nut butter if you prefer. Both options work well and maintain the taste and texture.
Can kids help make these pumpkin bites?
Absolutely! Kids can help with many tasks. They can mix the ingredients in a bowl. Rolling the mixture into balls is fun for them too. Older kids can help melt the chocolate in the microwave. Just make sure they have adult supervision when using heat. This is a great way to bond and have fun in the kitchen.
This post covered how to make delicious pumpkin bites. We discussed key ingredients and how to prepare, shape, and dip them. I shared tips for perfecting your bites and how to customize them. Variations cater to different diets or flavors, making them fun. Finally, we went over the best ways to store your bites.
I hope you enjoy making these treats. You can create your own riffs on them!