No-Bake Chocolate Hazelnut Mousse Cups Delight

If you love a rich, creamy dessert, you’re in for a treat! My No-Bake Chocolate Hazelnut Mousse Cups are perfect for any occasion. They’re easy to make and packed with flavor. With just a few simple ingredients, you’ll whip up a dessert that impresses everyone. Whether it’s for a party or a cozy night in, these mousse cups promise a delightful taste and look that will leave you wanting more. Let’s dive into this sweet adventure!

Ingredients

List of Ingredients

– 1 cup heavy whipping cream

– 1 cup chocolate hazelnut spread

– ½ cup cream cheese, softened

– 2 tablespoons powdered sugar

– 1 teaspoon vanilla extract

– ½ cup chopped toasted hazelnuts

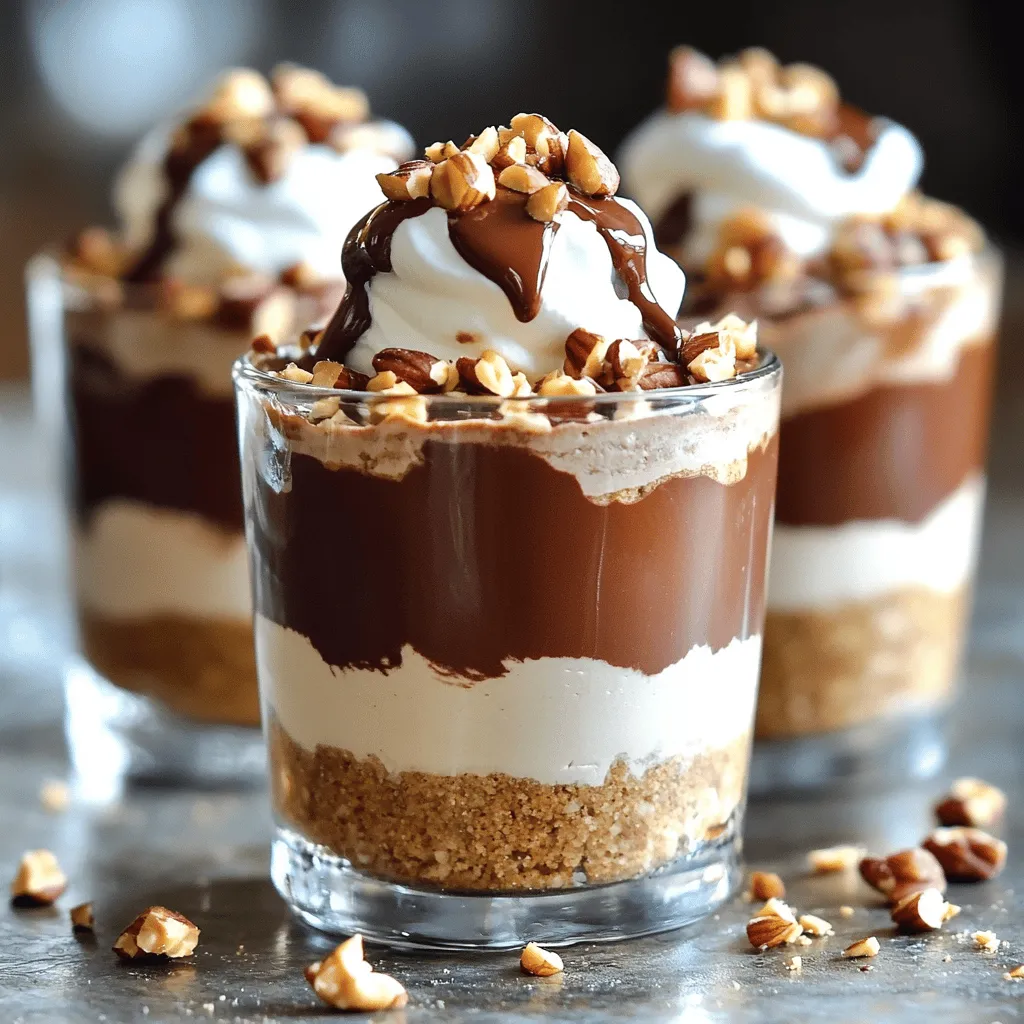
– 1 cup crushed graham crackers

– 2 tablespoons unsalted butter, melted

Ingredient Substitutions

You can swap heavy whipping cream with coconut cream for a dairy-free treat. Use almond cream cheese if you want a vegan option. Instead of powdered sugar, try using granulated sugar. If you don’t have graham crackers, crushed cookies work too. You can also use any nut butter in place of chocolate hazelnut spread, but it will change the flavor.

Tips for Choosing Quality Ingredients

When you choose chocolate hazelnut spread, look for one with minimal ingredients. The best spreads use real hazelnuts and cocoa. For cream, pick a brand with a high-fat content. This will help your mousse stay rich and creamy. Always select fresh nuts for the best crunch. Check for a nice golden color and a crisp texture.

Step-by-Step Instructions

Preparation of the Crust

To start, gather your crushed graham crackers and melted butter. In a mixing bowl, mix the crushed graham crackers with the melted butter. Use a fork to blend until the crumbs look wet. This step helps form a solid base. Next, take your serving cups or small glasses. Spoon the graham cracker mix into each cup. Press it down firmly to create a sturdy crust. Set the cups aside while you make the mousse.

Making the Chocolate Hazelnut Mousse

Now, let’s make the mousse! Grab a large mixing bowl and whip the heavy cream. Beat it until soft peaks form. Be careful not to overwhip, or it may turn grainy. In another bowl, mix the chocolate hazelnut spread, softened cream cheese, powdered sugar, and vanilla extract. Stir until the mix is smooth and well combined. Next, gently fold the whipped cream into the chocolate mix. Use a spatula and be gentle to keep the mousse light and airy.

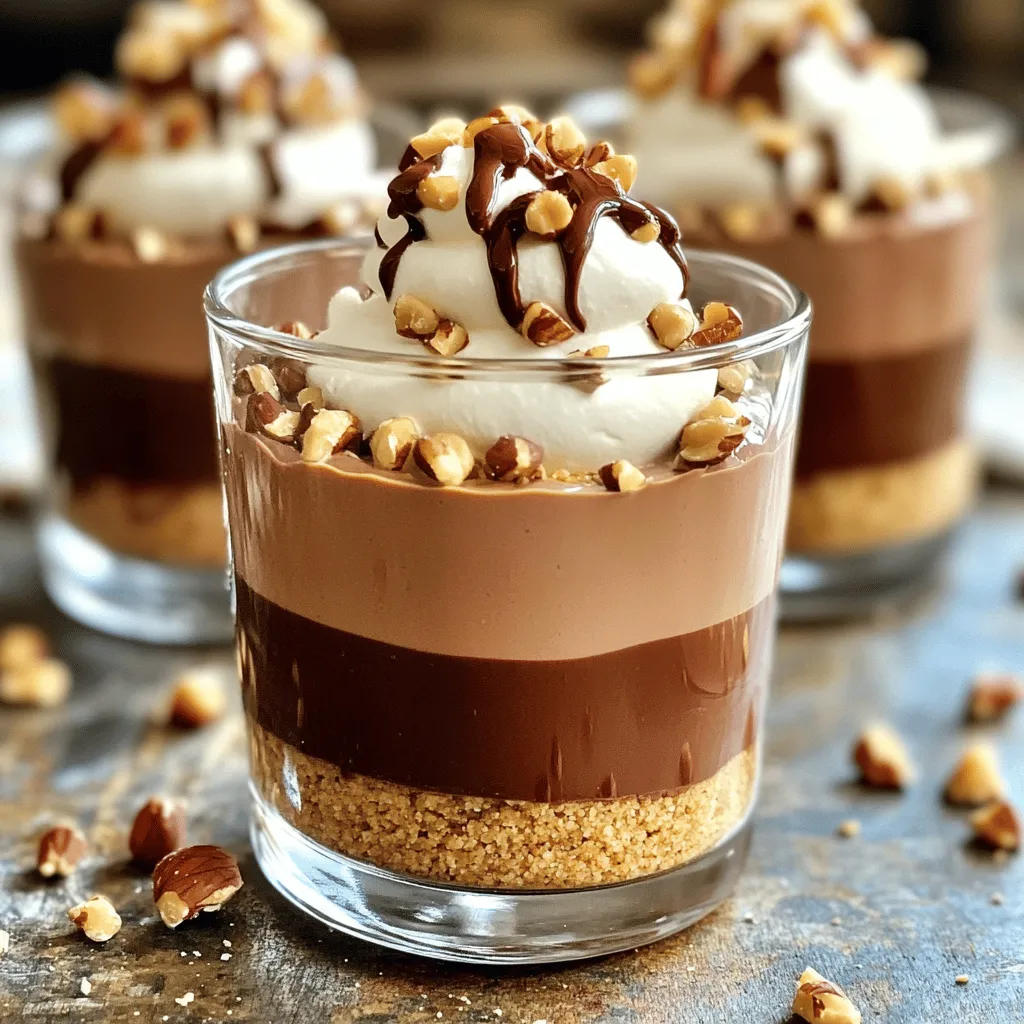
Assembling the Mousse Cups

Once the mousse is ready, it’s time to assemble! Take your cups with the graham cracker crust. Spoon or pipe the mousse over the crust, filling each cup. Leave a little space at the top for garnish. Finally, sprinkle the chopped toasted hazelnuts on top. This adds crunch and flavor. Chill the mousse cups in the fridge for at least 2 hours. This step helps the mousse set perfectly. Enjoy these delicious no-bake chocolate hazelnut mousse cups!

Tips & Tricks

Whipping Cream Techniques

Whipping cream adds a light touch to your mousse. Use cold cream for best results. Start with a clean bowl and beaters. Whip on medium speed until soft peaks form. Be careful; overwhipping can turn your cream grainy. If you see stiff peaks, stop! You want it fluffy, not dry.

Ensuring a Light and Fluffy Mousse

To keep your mousse airy, gently fold whipped cream into the chocolate mixture. Use a spatula and make slow, sweeping motions. This method helps trap air. Avoid stirring too hard. If you deflate the mixture, your mousse will be dense. Remember, light and fluffy is the goal!

Presentation Tips for Serving

Presentation makes these mousse cups special. Use clear cups or small glasses to show off layers. Top with a dollop of whipped cream and some toasted hazelnuts. A drizzle of chocolate sauce also looks nice. Chill them well before serving. Chilled mousse tastes better and holds its shape!

Variations

Alternative Flavors

You can change the taste of your mousse cups easily. Try using peanut butter instead of chocolate hazelnut spread. Mix in half a cup of creamy peanut butter with the cream cheese. Or go tropical with coconut! Use coconut cream for a lighter mousse. Just swap the cream cheese for coconut cream. This adds a fun twist!

Dietary Modifications

If you want a vegan option, use coconut milk instead of heavy cream. Replace cream cheese with a vegan cream cheese. Choose a plant-based chocolate spread too. For a gluten-free treat, use gluten-free graham crackers. These swaps make the dessert fit many diets.

Cup Alternatives

You don’t have to use regular cups for these mousse cups. You can use small jars for a cute look. Chocolate cups are another fun choice. They add an extra layer of flavor! Choose any cup you have at home. Just make sure they can hold the mousse well.

Storage Info

Best Practices for Refrigeration

To keep your no-bake chocolate hazelnut mousse cups fresh, store them in the fridge. Place them in an airtight container. If you don’t have one, cover each cup with plastic wrap. This will help prevent any odors from other foods in the fridge from affecting the taste.

How Long Mousse Cups Last

These mousse cups can last in the fridge for about 3 to 4 days. After that, the texture may change. The mousse might lose some of its fluffiness, but it will still taste great. Just check for any off smells or changes in color before you dig in.

Freezing Options and Tips

You can freeze the mousse cups if you want to keep them longer. Just make sure they are in airtight containers. They can last up to a month in the freezer. When you’re ready to enjoy them, thaw them in the fridge overnight. Avoid defrosting them in the microwave as it can ruin the texture.

FAQs

Can I use a different type of chocolate spread?

Yes, you can use any chocolate spread you like. Nutella is a popular choice. You might enjoy using a dark chocolate spread for a richer taste. Just remember, different spreads can change the mousse’s flavor and texture.

How do I prevent the mousse from deflating?

To keep your mousse fluffy, don’t overwhip the cream. Stop when soft peaks form. Gently fold the whipped cream into the chocolate mix. Use a spatula and be light-handed. This method helps keep air in the mousse.

Can I prepare these mousse cups in advance?

Yes, you can make these mousse cups ahead of time. Prepare them a day before your event. Just store them in the fridge. They need at least two hours to chill and set. This makes them easy for serving later.

What are some serving suggestions for chocolate hazelnut mousse?

Serve these mousse cups cold for the best taste. You can add whipped cream on top for extra fluffiness. A sprinkle of chopped hazelnuts gives a nice crunch. Drizzle some chocolate sauce for a sweet touch. Enjoy them as a treat after dinner!

This blog post detailed how to create delicious chocolate hazelnut mousse cups. We discussed the best ingredients, prepared the crust, made rich mousse, and assembled the cups. I shared tips for light and fluffy mousse, plus how to present your dessert. You learned about fun flavor variations and dietary options. Lastly, we covered storage tips to keep your mousse fresh.

Enjoy experimenting with these recipes and tips. Your mousse cups will impress everyone!

- 1 cup heavy whipping cream - 1 cup chocolate hazelnut spread - ½ cup cream cheese, softened - 2 tablespoons powdered sugar - 1 teaspoon vanilla extract - ½ cup chopped toasted hazelnuts - 1 cup crushed graham crackers - 2 tablespoons unsalted butter, melted You can swap heavy whipping cream with coconut cream for a dairy-free treat. Use almond cream cheese if you want a vegan option. Instead of powdered sugar, try using granulated sugar. If you don't have graham crackers, crushed cookies work too. You can also use any nut butter in place of chocolate hazelnut spread, but it will change the flavor. When you choose chocolate hazelnut spread, look for one with minimal ingredients. The best spreads use real hazelnuts and cocoa. For cream, pick a brand with a high-fat content. This will help your mousse stay rich and creamy. Always select fresh nuts for the best crunch. Check for a nice golden color and a crisp texture. To start, gather your crushed graham crackers and melted butter. In a mixing bowl, mix the crushed graham crackers with the melted butter. Use a fork to blend until the crumbs look wet. This step helps form a solid base. Next, take your serving cups or small glasses. Spoon the graham cracker mix into each cup. Press it down firmly to create a sturdy crust. Set the cups aside while you make the mousse. Now, let's make the mousse! Grab a large mixing bowl and whip the heavy cream. Beat it until soft peaks form. Be careful not to overwhip, or it may turn grainy. In another bowl, mix the chocolate hazelnut spread, softened cream cheese, powdered sugar, and vanilla extract. Stir until the mix is smooth and well combined. Next, gently fold the whipped cream into the chocolate mix. Use a spatula and be gentle to keep the mousse light and airy. Once the mousse is ready, it’s time to assemble! Take your cups with the graham cracker crust. Spoon or pipe the mousse over the crust, filling each cup. Leave a little space at the top for garnish. Finally, sprinkle the chopped toasted hazelnuts on top. This adds crunch and flavor. Chill the mousse cups in the fridge for at least 2 hours. This step helps the mousse set perfectly. Enjoy these delicious no-bake chocolate hazelnut mousse cups! Whipping cream adds a light touch to your mousse. Use cold cream for best results. Start with a clean bowl and beaters. Whip on medium speed until soft peaks form. Be careful; overwhipping can turn your cream grainy. If you see stiff peaks, stop! You want it fluffy, not dry. To keep your mousse airy, gently fold whipped cream into the chocolate mixture. Use a spatula and make slow, sweeping motions. This method helps trap air. Avoid stirring too hard. If you deflate the mixture, your mousse will be dense. Remember, light and fluffy is the goal! Presentation makes these mousse cups special. Use clear cups or small glasses to show off layers. Top with a dollop of whipped cream and some toasted hazelnuts. A drizzle of chocolate sauce also looks nice. Chill them well before serving. Chilled mousse tastes better and holds its shape! {{image_2}} You can change the taste of your mousse cups easily. Try using peanut butter instead of chocolate hazelnut spread. Mix in half a cup of creamy peanut butter with the cream cheese. Or go tropical with coconut! Use coconut cream for a lighter mousse. Just swap the cream cheese for coconut cream. This adds a fun twist! If you want a vegan option, use coconut milk instead of heavy cream. Replace cream cheese with a vegan cream cheese. Choose a plant-based chocolate spread too. For a gluten-free treat, use gluten-free graham crackers. These swaps make the dessert fit many diets. You don’t have to use regular cups for these mousse cups. You can use small jars for a cute look. Chocolate cups are another fun choice. They add an extra layer of flavor! Choose any cup you have at home. Just make sure they can hold the mousse well. To keep your no-bake chocolate hazelnut mousse cups fresh, store them in the fridge. Place them in an airtight container. If you don’t have one, cover each cup with plastic wrap. This will help prevent any odors from other foods in the fridge from affecting the taste. These mousse cups can last in the fridge for about 3 to 4 days. After that, the texture may change. The mousse might lose some of its fluffiness, but it will still taste great. Just check for any off smells or changes in color before you dig in. You can freeze the mousse cups if you want to keep them longer. Just make sure they are in airtight containers. They can last up to a month in the freezer. When you’re ready to enjoy them, thaw them in the fridge overnight. Avoid defrosting them in the microwave as it can ruin the texture. Yes, you can use any chocolate spread you like. Nutella is a popular choice. You might enjoy using a dark chocolate spread for a richer taste. Just remember, different spreads can change the mousse's flavor and texture. To keep your mousse fluffy, don’t overwhip the cream. Stop when soft peaks form. Gently fold the whipped cream into the chocolate mix. Use a spatula and be light-handed. This method helps keep air in the mousse. Yes, you can make these mousse cups ahead of time. Prepare them a day before your event. Just store them in the fridge. They need at least two hours to chill and set. This makes them easy for serving later. Serve these mousse cups cold for the best taste. You can add whipped cream on top for extra fluffiness. A sprinkle of chopped hazelnuts gives a nice crunch. Drizzle some chocolate sauce for a sweet touch. Enjoy them as a treat after dinner! This blog post detailed how to create delicious chocolate hazelnut mousse cups. We discussed the best ingredients, prepared the crust, made rich mousse, and assembled the cups. I shared tips for light and fluffy mousse, plus how to present your dessert. You learned about fun flavor variations and dietary options. Lastly, we covered storage tips to keep your mousse fresh. Enjoy experimenting with these recipes and tips. Your mousse cups will impress everyone!

No-Bake Chocolate Hazelnut Mousse Cups

Indulge in these delightful no-bake chocolate hazelnut mousse cups that are perfect for any occasion! With a rich chocolate hazelnut spread and a creamy texture, these easy-to-make treats feature a crispy graham cracker crust and a sprinkle of toasted hazelnuts for added crunch. Ideal for dessert enthusiasts, this recipe takes just 20 minutes of prep. Click through now to discover how to create these mouthwatering mousse cups that everyone will love!

Ingredients
  

1 cup heavy whipping cream

1 cup chocolate hazelnut spread

½ cup cream cheese, softened

2 tablespoons powdered sugar

1 teaspoon vanilla extract

½ cup chopped toasted hazelnuts

1 cup crushed graham crackers

2 tablespoons unsalted butter, melted

Instructions
 

In a mixing bowl, combine the crushed graham crackers and melted butter. Mix until the crumbs are evenly coated.

    Spoon the graham cracker mixture into the bottom of serving cups or small glasses, pressing it down to create a crust layer. Set aside.

      In a separate bowl, whip the heavy cream until soft peaks form. Be careful not to overwhip.

        In another bowl, combine the chocolate hazelnut spread, softened cream cheese, powdered sugar, and vanilla extract. Mix until smooth and fully combined.

          Gently fold the whipped cream into the chocolate hazelnut mixture, being careful to retain the airiness.

            Once combined, spoon or pipe the mousse over the graham cracker crust in the cups.

              Top with chopped toasted hazelnuts for added texture and flavor.

                Chill the mousse cups in the refrigerator for at least 2 hours before serving to allow them to set properly.

                  Prep Time: 20 minutes | Total Time: 2 hours 20 minutes | Servings: 6

                    - Presentation Tips: Garnish the mousse cups with extra whipped cream and a sprinkle of chopped hazelnuts or a drizzle of chocolate sauce for an elegant finishing touch.

                      Leave a Comment

                      Recipe Rating