No-Bake Oreo Cheesecake Bars Delightful and Simple

WANT TO SAVE THIS RECIPE?

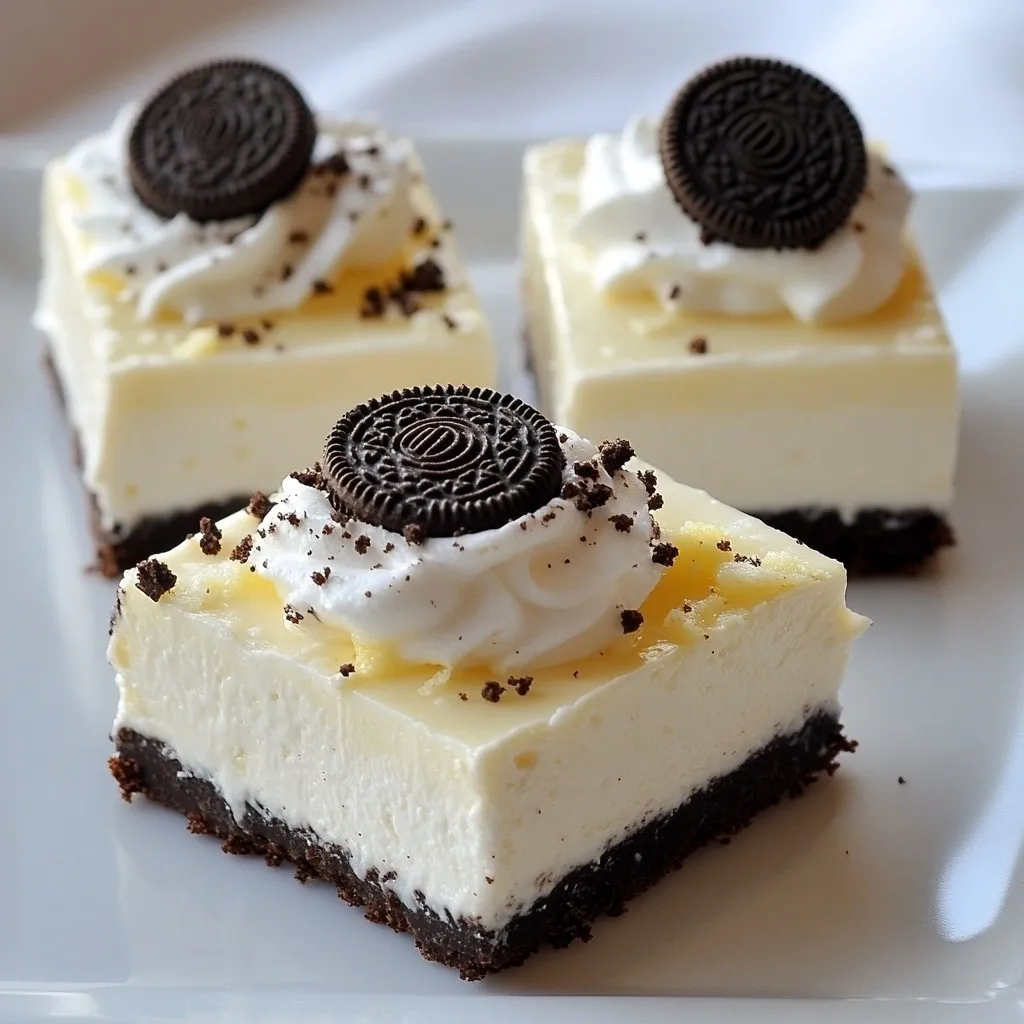
Craving a sweet treat that’s both easy to make and delicious? Let’s dive into the world of No-Bake Oreo Cheesecake Bars! With just a handful of simple ingredients, you can whip up a dessert that is sure to impress. Follow my step-by-step guide and discover tips, tricks, and variations to suit your taste. Ready to make your next dessert a hit? Let’s get started!

Why I Love This Recipe

  1. Decadent Flavor: This no-bake Oreo cheesecake bars are rich, creamy, and packed with the classic chocolate and cream flavors that Oreo lovers adore.
  2. Easy Preparation: No baking required! The straightforward steps make it accessible for bakers of all skill levels.
  3. Perfect for Any Occasion: Whether it’s a family gathering, birthday party, or just a sweet treat for yourself, these bars are always a hit.
  4. Customizable: Feel free to add toppings like whipped cream, chocolate drizzle, or even fruit to make it your own!

Ingredients

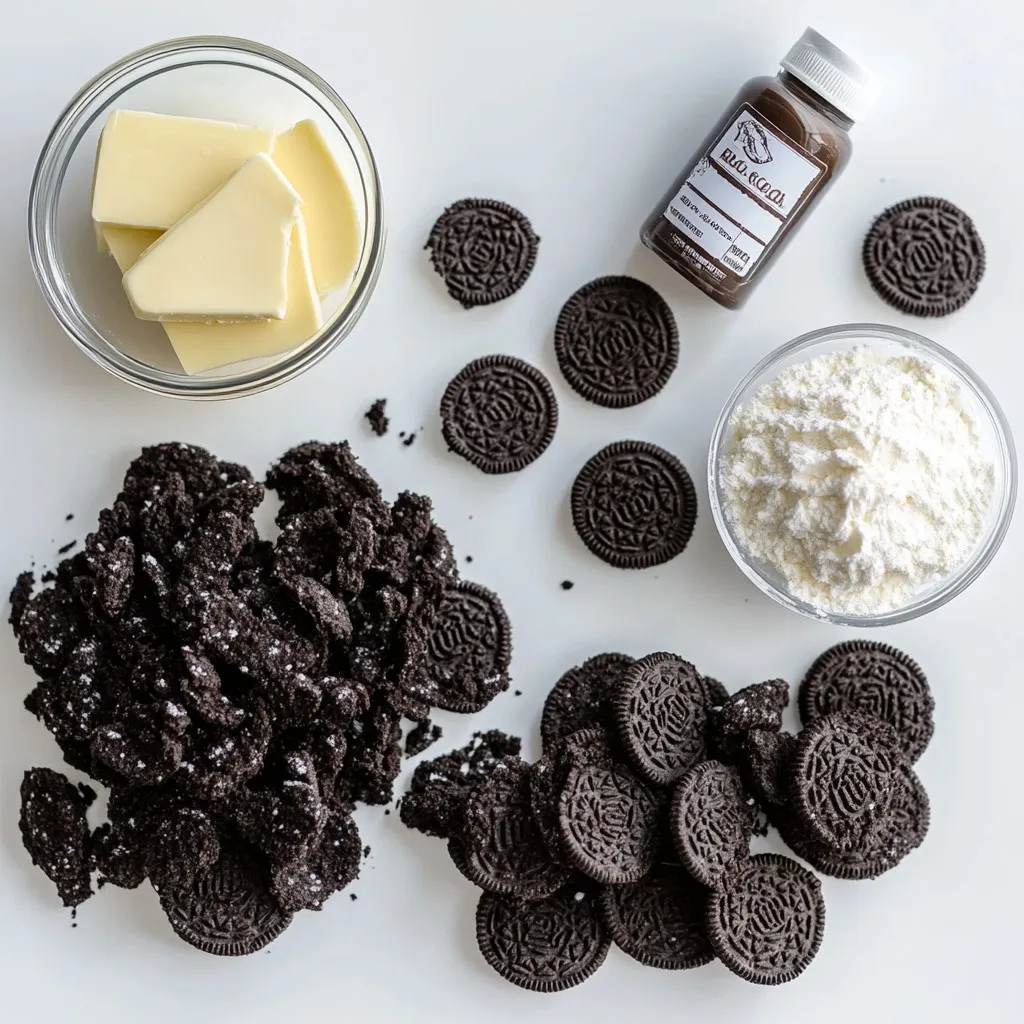
Main Ingredients for No-Bake Oreo Cheesecake Bars

To make these delicious No-Bake Oreo Cheesecake Bars, you will need:

– 20 Oreo cookies, crushed

– 4 tablespoons unsalted butter, melted

– 2 (8 oz) packages cream cheese, softened

– 1 cup powdered sugar

– 1 teaspoon vanilla extract

– 1 cup heavy whipping cream

– 10 Oreo cookies, coarsely chopped (for mixing)

– Additional Oreo cookies for topping

These ingredients create a creamy and rich cheesecake with a crunchy crust. The crushed Oreos provide a yummy flavor that pairs perfectly with the cream cheese.

Optional Toppings and Customizations

You can customize your bars for extra fun! Here are some ideas:

– Add chocolate shavings on top.

– Drizzle with chocolate or caramel sauce.

– Use whipped cream for a light touch.

– Try different cookies for the crust, like chocolate graham crackers.

These toppings enhance the look and taste of your dessert. You can get creative based on what you like.

Tools Needed for Preparation

To prepare these bars, gather these tools:

– Medium mixing bowl

– Large mixing bowl

– Electric mixer

– Spatula

– 9×9 inch baking dish

– Parchment paper for lining

These tools make the process smooth and easy. Have everything ready, and you will enjoy making this tasty treat!

Step-by-Step Instructions

Preparing the Oreo Crust

To make the crust, start by crushing 20 Oreo cookies in a medium bowl. You want them fine. Add 4 tablespoons of melted unsalted butter to the crushed cookies. Mix well until the crumbs soak up the butter. Next, take a 9×9 inch baking dish and line it with parchment paper. Press the Oreo mixture firmly into the bottom of the dish. Make sure it is even. This crust gives a great base for your cheesecake.

Making the Cheesecake Filling

Now, let’s create the creamy filling. In a large bowl, beat 2 packages of softened cream cheese with an electric mixer. Mix until it’s smooth and fluffy. Gradually add 1 cup of powdered sugar and 1 teaspoon of vanilla extract. Blend until everything is creamy and well mixed. In another bowl, whip 1 cup of heavy cream until stiff peaks form. Gently fold this whipped cream into the cream cheese mixture. This step makes your filling light and airy. Lastly, stir in 10 coarsely chopped Oreo cookies for extra flavor.

Assembling and Setting the Bars

Pour the cheesecake filling over the crust in the baking dish. Use a spatula to spread it evenly. For an extra touch, crumble some additional Oreo cookies on top. This adds a nice look and taste. Cover the dish with plastic wrap and place it in the fridge. Let it chill for at least 4 hours or until it sets. Once set, cut the bars into squares and serve. Enjoy the creamy, delicious layers of this no-bake dessert!

Tips & Tricks

How to Achieve the Perfect Texture

To get the best texture for your No-Bake Oreo Cheesecake Bars, focus on the cream cheese. Make sure it’s very soft before mixing. This helps prevent lumps. Beat it well with an electric mixer until smooth. When you whip the heavy cream, ensure you reach stiff peaks. This gives your cheesecake its light, airy feel. Gently fold the whipped cream into the cream cheese mix. Avoid stirring too hard. You want to keep that fluffiness!

Common Mistakes to Avoid

One common mistake is not crushing the Oreo cookies finely enough. Big chunks can make the crust fall apart. Another mistake is over-mixing the cream cheese. This can make your bars dense, not creamy. Also, don’t skip the chilling time. If you cut them too soon, they might not hold their shape. Lastly, using cold cream cheese can lead to lumps. Always let it warm up a bit before mixing.

Serving Suggestions for the Cheesecake Bars

When serving your cheesecake bars, cut them into even pieces. This makes them look nice and neat on the plate. You can add a sprinkle of crushed Oreos on top for a fun touch. To impress your guests, drizzle some chocolate sauce over each slice. Serve them on pretty dessert plates for a special look. A dollop of whipped cream or fresh berries can also brighten up your presentation!

Pro Tips

  1. Chill Your Tools: Before whipping the heavy cream, chill your mixing bowl and beaters for about 15 minutes. This helps the cream whip up faster and achieve stiff peaks more easily.
  2. Use Room Temperature Cream Cheese: Make sure your cream cheese is at room temperature for a smooth and creamy filling. Cold cream cheese can lead to lumps in your cheesecake.
  3. Fresh Crumbs for the Crust: For the best crust texture, use fresh Oreo crumbs. If using pre-crushed cookies, make sure they aren’t too fine; a bit of texture adds to the crust.
  4. Let It Set: Be patient and allow the cheesecake to set for a minimum of 4 hours. For the best flavor and texture, refrigerate overnight if possible.

Variations

Different Cookie Options for the Crust

You can mix it up with different cookies for the crust. Instead of Oreo cookies, try using graham crackers. They give a nice crunch and a hint of sweetness. You might also use chocolate wafer cookies for a rich flavor. If you want a twist, consider using Nutter Butter cookies. They bring a peanut butter taste that pairs well with cheesecake.

Flavor Enhancements and Add-Ins

To make your cheesecake bars even better, consider adding flavor. You can mix in some peanut butter for a creamy nutty taste. Another great option is to add lemon zest. This gives a fresh, zesty kick. If you love chocolate, try folding in mini chocolate chips. They add a fun texture and extra chocolate flavor. You can even use different extracts, like almond or coconut, to change things up.

Alternate Topping Ideas

Toppings can change the look and taste of your bars. Instead of just crumbled Oreos, you can top them with fresh fruit. Berries like strawberries or blueberries add color and freshness. You can also drizzle caramel or chocolate sauce on top for a sweet finish. For a crunchy touch, sprinkle crushed nuts or toffee bits. These add a nice contrast to the creamy cheesecake.

Storage Info

Best Practices for Refrigerating

Store your No-Bake Oreo Cheesecake Bars in an airtight container. This keeps them fresh and tasty. Make sure to separate layers with parchment paper if you stack them. Avoid leaving the bars out at room temperature for a long time. They taste best when chilled.

How Long the Bars Last

These cheesecake bars can last up to five days in the fridge. After that, they might lose their creamy texture. If you notice any moisture or changes in smell, it’s best to toss them. Always check before you dig in!

Freezing Instructions

You can freeze the cheesecake bars for longer storage. Cut them into slices first. Wrap each slice tightly in plastic wrap, then place them in a freezer bag. They can stay in the freezer for up to three months. When you want to enjoy them, just thaw in the fridge overnight.

FAQs

Can I use low-fat cream cheese?

Yes, you can use low-fat cream cheese. It will still work well. The texture might be a bit different, but the taste remains delicious. If you want a lighter version, this is a great option.

How do I know if the cheesecake bars are set?

You can tell the bars are set by gently shaking the pan. If the center jiggles a little, it’s not ready. It should feel firm to the touch. After chilling for at least four hours, they should be perfect for slicing.

Can I make these bars ahead of time?

Absolutely! These bars are great for making ahead. You can prepare them one day before serving. Just store them in the fridge. They will taste even better after chilling overnight.

In this blog post, I shared how to make tasty no-bake Oreo cheesecake bars. We covered the main ingredients, tools needed, and step-by-step instructions. I also shared tips for the perfect texture, common mistakes, and fun variations. These options make each bar unique. Storing them properly helps keep them fresh and yummy.

Remember, these bars are easy to customize. I hope you enjoy making them as much as I d

To make these delicious No-Bake Oreo Cheesecake Bars, you will need: - 20 Oreo cookies, crushed - 4 tablespoons unsalted butter, melted - 2 (8 oz) packages cream cheese, softened - 1 cup powdered sugar - 1 teaspoon vanilla extract - 1 cup heavy whipping cream - 10 Oreo cookies, coarsely chopped (for mixing) - Additional Oreo cookies for topping These ingredients create a creamy and rich cheesecake with a crunchy crust. The crushed Oreos provide a yummy flavor that pairs perfectly with the cream cheese. You can customize your bars for extra fun! Here are some ideas: - Add chocolate shavings on top. - Drizzle with chocolate or caramel sauce. - Use whipped cream for a light touch. - Try different cookies for the crust, like chocolate graham crackers. These toppings enhance the look and taste of your dessert. You can get creative based on what you like. To prepare these bars, gather these tools: - Medium mixing bowl - Large mixing bowl - Electric mixer - Spatula - 9x9 inch baking dish - Parchment paper for lining These tools make the process smooth and easy. Have everything ready, and you will enjoy making this tasty treat! {{ingredient_image_1}} To make the crust, start by crushing 20 Oreo cookies in a medium bowl. You want them fine. Add 4 tablespoons of melted unsalted butter to the crushed cookies. Mix well until the crumbs soak up the butter. Next, take a 9x9 inch baking dish and line it with parchment paper. Press the Oreo mixture firmly into the bottom of the dish. Make sure it is even. This crust gives a great base for your cheesecake. Now, let’s create the creamy filling. In a large bowl, beat 2 packages of softened cream cheese with an electric mixer. Mix until it’s smooth and fluffy. Gradually add 1 cup of powdered sugar and 1 teaspoon of vanilla extract. Blend until everything is creamy and well mixed. In another bowl, whip 1 cup of heavy cream until stiff peaks form. Gently fold this whipped cream into the cream cheese mixture. This step makes your filling light and airy. Lastly, stir in 10 coarsely chopped Oreo cookies for extra flavor. Pour the cheesecake filling over the crust in the baking dish. Use a spatula to spread it evenly. For an extra touch, crumble some additional Oreo cookies on top. This adds a nice look and taste. Cover the dish with plastic wrap and place it in the fridge. Let it chill for at least 4 hours or until it sets. Once set, cut the bars into squares and serve. Enjoy the creamy, delicious layers of this no-bake dessert! To get the best texture for your No-Bake Oreo Cheesecake Bars, focus on the cream cheese. Make sure it’s very soft before mixing. This helps prevent lumps. Beat it well with an electric mixer until smooth. When you whip the heavy cream, ensure you reach stiff peaks. This gives your cheesecake its light, airy feel. Gently fold the whipped cream into the cream cheese mix. Avoid stirring too hard. You want to keep that fluffiness! One common mistake is not crushing the Oreo cookies finely enough. Big chunks can make the crust fall apart. Another mistake is over-mixing the cream cheese. This can make your bars dense, not creamy. Also, don’t skip the chilling time. If you cut them too soon, they might not hold their shape. Lastly, using cold cream cheese can lead to lumps. Always let it warm up a bit before mixing. When serving your cheesecake bars, cut them into even pieces. This makes them look nice and neat on the plate. You can add a sprinkle of crushed Oreos on top for a fun touch. To impress your guests, drizzle some chocolate sauce over each slice. Serve them on pretty dessert plates for a special look. A dollop of whipped cream or fresh berries can also brighten up your presentation! Pro Tips Chill Your Tools: Before whipping the heavy cream, chill your mixing bowl and beaters for about 15 minutes. This helps the cream whip up faster and achieve stiff peaks more easily. Use Room Temperature Cream Cheese: Make sure your cream cheese is at room temperature for a smooth and creamy filling. Cold cream cheese can lead to lumps in your cheesecake. Fresh Crumbs for the Crust: For the best crust texture, use fresh Oreo crumbs. If using pre-crushed cookies, make sure they aren’t too fine; a bit of texture adds to the crust. Let It Set: Be patient and allow the cheesecake to set for a minimum of 4 hours. For the best flavor and texture, refrigerate overnight if possible. {{image_2}} You can mix it up with different cookies for the crust. Instead of Oreo cookies, try using graham crackers. They give a nice crunch and a hint of sweetness. You might also use chocolate wafer cookies for a rich flavor. If you want a twist, consider using Nutter Butter cookies. They bring a peanut butter taste that pairs well with cheesecake. To make your cheesecake bars even better, consider adding flavor. You can mix in some peanut butter for a creamy nutty taste. Another great option is to add lemon zest. This gives a fresh, zesty kick. If you love chocolate, try folding in mini chocolate chips. They add a fun texture and extra chocolate flavor. You can even use different extracts, like almond or coconut, to change things up. Toppings can change the look and taste of your bars. Instead of just crumbled Oreos, you can top them with fresh fruit. Berries like strawberries or blueberries add color and freshness. You can also drizzle caramel or chocolate sauce on top for a sweet finish. For a crunchy touch, sprinkle crushed nuts or toffee bits. These add a nice contrast to the creamy cheesecake. Store your No-Bake Oreo Cheesecake Bars in an airtight container. This keeps them fresh and tasty. Make sure to separate layers with parchment paper if you stack them. Avoid leaving the bars out at room temperature for a long time. They taste best when chilled. These cheesecake bars can last up to five days in the fridge. After that, they might lose their creamy texture. If you notice any moisture or changes in smell, it’s best to toss them. Always check before you dig in! You can freeze the cheesecake bars for longer storage. Cut them into slices first. Wrap each slice tightly in plastic wrap, then place them in a freezer bag. They can stay in the freezer for up to three months. When you want to enjoy them, just thaw in the fridge overnight. Yes, you can use low-fat cream cheese. It will still work well. The texture might be a bit different, but the taste remains delicious. If you want a lighter version, this is a great option. You can tell the bars are set by gently shaking the pan. If the center jiggles a little, it’s not ready. It should feel firm to the touch. After chilling for at least four hours, they should be perfect for slicing. Absolutely! These bars are great for making ahead. You can prepare them one day before serving. Just store them in the fridge. They will taste even better after chilling overnight. In this blog post, I shared how to make tasty no-bake Oreo cheesecake bars. We covered the main ingredients, tools needed, and step-by-step instructions. I also shared tips for the perfect texture, common mistakes, and fun variations. These options make each bar unique. Storing them properly helps keep them fresh and yummy. Remember, these bars are easy to customize. I hope you enjoy making them as much as I do!

No-Bake Oreo Cheesecake Bars

Delicious and easy-to-make cheesecake bars with a creamy Oreo filling and a crunchy crust.
Prep Time 20 minutes
Total Time 4 hours 20 minutes
Course Dessert
Cuisine American
Servings 12
Calories 250 kcal

Ingredients
  

  • 20 cookies Oreo cookies, crushed
  • 4 tablespoons unsalted butter, melted
  • 2 packages cream cheese, softened (8 oz each)
  • 1 cup powdered sugar
  • 1 teaspoon vanilla extract
  • 1 cup heavy whipping cream
  • 10 cookies Oreo cookies, coarsely chopped (for mixing)
  • to taste cookies additional Oreo cookies for topping

Instructions
 

  • In a medium bowl, combine the crushed Oreo cookies and melted butter. Mix until the crumbs are fully coated.
  • Press the Oreo mixture evenly into the bottom of a lined 9x9 inch baking dish to form a crust. Set aside.
  • In a large mixing bowl, beat the softened cream cheese with an electric mixer until smooth.
  • Gradually add in the powdered sugar and vanilla extract, mixing until fully combined and creamy.
  • In another bowl, whip the heavy cream until stiff peaks form.
  • Gently fold the whipped cream into the cream cheese mixture until well combined.
  • Stir in the coarsely chopped Oreo cookies into the mixture.
  • Pour the cheesecake mixture over the crust and spread evenly with a spatula.
  • Crumble additional Oreo cookies on top for decoration.
  • Cover and refrigerate for at least 4 hours or until set.
  • Once chilled, cut into bars and serve.

Notes

Serve in individual slices on dessert plates, garnished with chocolate shavings or drizzled chocolate sauce for an extra touch!
Keyword cheesecake, dessert bars, no-bake, Oreo

WANT TO SAVE THIS RECIPE?

Leave a Comment

Recipe Rating