


Latest & Greatest

Buffalo Chicken Tenders Air Fryer Delicious Recipe
Are you ready to spice up your dinner? These Buffalo Chicken Tenders made in an air fryer are a game
Read more…
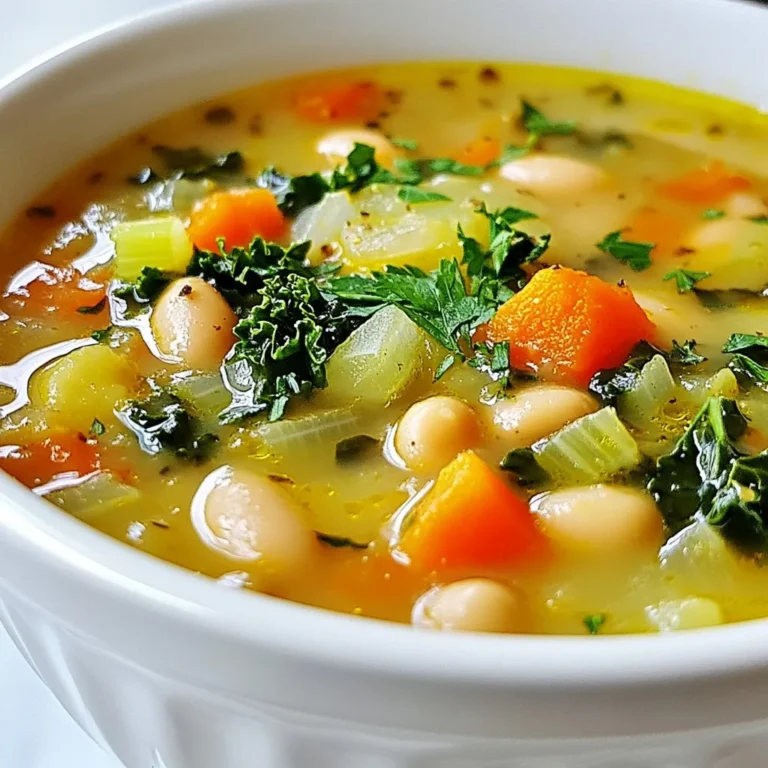
Loaded Baked Potato Soup Slow Cooker Creamy Delight
If you’re craving comfort food, Loaded Baked Potato Soup is the perfect choice! It’s creamy, warm, and full of delicious
Read more…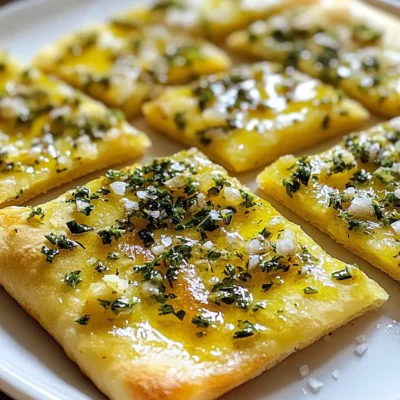
Garlic Herb Flatbread Flavorful and Easy Recipe
Are you ready to impress your friends and family with a delicious Garlic Herb Flatbread? This easy recipe brings the
Read more…
Pumpkin Chocolate Chip Blondies Delightful Fall Treat
Fall is here, and what better way to celebrate than with Pumpkin Chocolate Chip Blondies? These treats combine soft pumpkin
Read more…
Cajun Chicken Alfredo One Pot Delight Tonight
Are you ready for a creamy, spicy delight? This Cajun Chicken Alfredo One Pot recipe is perfect for dinner tonight!
Read more…
Mulled Apple Cider with Orange Festive Flavor Drink
As the chill of fall settles in, nothing warms the soul like a cup of mulled apple cider. This festive
Read more…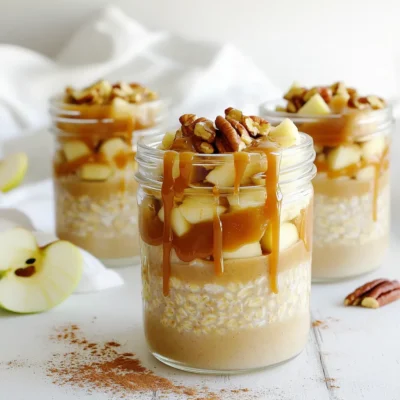
Caramel Apple Overnight Oats Tasty Breakfast Idea
Looking for a fun breakfast that’s both tasty and easy? You’ll love Caramel Apple Overnight Oats! This recipe blends sweet
Read more…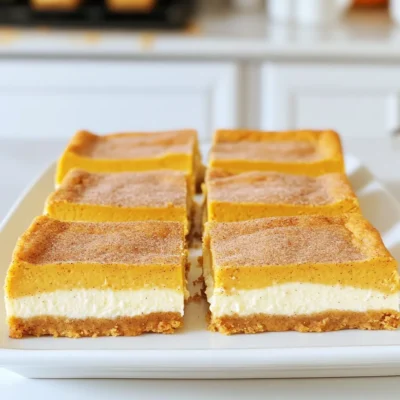
Pumpkin Snickerdoodle Cheesecake Bars Irresistible Treat
Fall brings the perfect blend of spices and sweetness, and these Pumpkin Snickerdoodle Cheesecake Bars are a must-try! In just
Read more…browse recipes


Easiest Homemade Pizza Dough Simple and Tasty Recipe
Making pizza at home is easier than you think! With my simple recipe for Easiest Homemade Pizza Dough, you can whip up delicious pies…
My Latest Desserts
My Latest Recipes

hey,
i’m !
I’m so happy you’re here!
I’m not just sharing recipes I’m sharing a piece of my heart. I hope these dishes bring you comfort, joy, and maybe even a new favorite.
![To make a great chickpea salad sandwich, you need some key ingredients. Here’s what you will need: - 1 can (15 oz) chickpeas, drained and rinsed - 1/4 cup Greek yogurt (or vegan yogurt) - 1 tbsp Dijon mustard - 1 tbsp lemon juice - 1/2 tsp garlic powder - 1/2 tsp smoked paprika - 1/4 cup celery, finely chopped - 1/4 cup red onion, finely chopped - 1/4 cup red bell pepper, diced - 2 tbsp fresh dill, chopped (or 1 tbsp dried) - Salt and pepper to taste - Whole grain or sourdough bread, for serving - Lettuce leaves, for garnish You can also add optional ingredients for a twist. Try adding chopped pickles or avocado for creaminess. You can even mix in some chopped nuts for crunch. If you want to keep this meal vegan, use vegan yogurt instead of Greek yogurt. For the bread, gluten-free options work well too. You can swap whole grain or sourdough for gluten-free bread. Adding more veggies is a great idea! Toss in some carrots, cucumbers, or spinach for added crunch and nutrition. Fresh herbs like parsley or cilantro can give it a fresh taste. Each serving of this chickpea salad sandwich has about 300 calories. You'll get a good mix of nutrients: - Protein: Chickpeas provide plant-based protein. - Fiber: This meal is high in fiber, which helps digestion. - Healthy Fats: If you use olive oil or avocado, you’ll add healthy fats. Eating this sandwich not only fills you up but also gives your body what it needs. Enjoy it as a tasty lunch or snack! For the full recipe, check out the instructions above. To start, you need to mash the chickpeas. Use a fork or potato masher. Aim for a slightly chunky texture. This gives your salad a nice bite. Don't puree them; keep some pieces whole. Next, combine flavors. Add Greek yogurt, Dijon mustard, lemon juice, garlic powder, and smoked paprika. Stir well until everything mixes nicely. This step is key to a flavorful salad. Now it's time to mix all the ingredients. Add the chopped celery, red onion, red bell pepper, and dill. Mix gently to keep the veggies intact. You want even distribution of all flavors. Taste your mixture and adjust seasoning. Add salt and pepper as needed. If you want more zing, add a bit more lemon juice. This will brighten up the overall flavor. To make the sandwich, start by toasting your bread. This adds a great crunch. You can use whole grain or sourdough bread. Toast until golden brown for the best bite. Spread a generous amount of your chickpea salad on one slice. Top with fresh lettuce leaves for a nice crunch. Then, place another slice of bread on top. Cut the sandwich in half for easy eating. Serve with fresh veggie sticks or chips on the side. This adds a delightful touch to your meal. For the complete recipe, check the Full Recipe. - Avoid Over-Mashing: Mash chickpeas until slightly chunky. This gives texture. - Don't Skip the Seasoning: Salt and pepper bring out the flavors. Taste as you mix. - Balance Your Ingredients: Use equal parts of veggies and chickpeas for harmony. Flavor-Enhancing Techniques: - Add Fresh Herbs: Use parsley or cilantro for a fresh kick. - Use Fresh Lemon Juice: This brightens the whole salad. - Experiment with Spices: Try cumin or curry powder for a twist. - Store Salad Separately: Keep chickpea salad in the fridge before assembly. This keeps bread from getting soggy. - Wrap Bread Properly: Store in an airtight container to keep it fresh longer. - Wrap It Up: Use whole wheat wraps instead of bread. - Make Mini Sandwiches: Use slider buns for bite-sized fun. - Pair with Crunchy Sides: Serve with carrot sticks or cucumber slices for freshness. For the full recipe, visit the Chickpea Salad Sandwich section! {{image_2}} You can enjoy a chickpea salad sandwich in many ways. If you're gluten-free, use gluten-free bread. There are many tasty brands available. Look for options made from almond flour or rice flour. These breads taste great and hold the salad well. If you're watching carbs, try lettuce wraps instead of bread. Large lettuce leaves work well. They add crunch and freshness. Just scoop the chickpea salad into the leaves and roll them up. It's a fun, low-carb meal. Want to spice things up? Try adding curry powder for a warm taste. Just a teaspoon can change the whole dish. Another fun option is to mix in avocado. It adds creaminess and healthy fats. You can also explore international flavors like adding cumin or cilantro. These spices give the salad a fresh twist. Planning a party? Scale up your recipe easily. Just double or triple the ingredients. This salad tastes great for picnics too. Serve it in small cups for fun appetizers. You can make these portions smaller for snacks or larger for meals. Each way, the chickpea salad will shine. For the full recipe, check out the previous sections. To keep your leftover chickpea salad fresh, store it in an airtight container. This helps prevent it from drying out. Place the container in the fridge right after serving. For best taste, eat it within three days. You can freeze chickpea salad, but it may change in texture. To freeze it, place the salad in a freezer-safe container. Leave some space at the top because it will expand. When you're ready to eat, thaw it overnight in the fridge. Mix it well before serving to restore its taste. You can keep the salad in the fridge for up to three days. If it smells off or has a strange color, it's time to toss it. Look for any signs of mold or separation; these mean it’s spoiled. Always trust your senses when it comes to food safety. A chickpea salad sandwich is a tasty meal made with mashed chickpeas. It is often mixed with yogurt, spices, and veggies. This dish is popular for its great taste and healthy benefits. Many people love it because it is easy to make and fills you up. Yes, you can use canned chickpeas! Canned chickpeas save time and are very convenient. They are already cooked, so you just need to rinse and mash them. They also have a great soft texture. Dried chickpeas require soaking and cooking, which takes longer. To make this recipe vegan, simply swap out Greek yogurt for vegan yogurt. You can find many tasty vegan yogurt options at stores. Also, check for bread that does not contain dairy or eggs. This way, you can enjoy a delicious vegan meal! Absolutely! You can add many ingredients to make it your own. Try adding diced cucumbers for crunch or chopped avocado for creaminess. You can also mix in fresh herbs like parsley or cilantro. Each addition adds unique flavors and makes the sandwich special. For the full recipe, you can refer to the [Full Recipe]. Chickpea salad sandwiches are fun and easy to make. We covered essential ingredients, tips, and variations. You can mix flavors and customize each meal for your taste. Remember to store leftovers properly to keep them fresh. Whether for a quick lunch or a picnic, this dish shines. You have the tools to create a tasty and nutritious meal. Get creative, enjoy, and share your delicious results!](https://emmasdish.com/wp-content/uploads/2025/06/f6dcc47c-3922-4411-88c6-dd6f558f55a2-300x300.webp)


![- 1 cup jasmine rice - 1 can (400 ml) coconut milk - 1 cup water - Zest of 1 lime - 2 tablespoons fresh lime juice - 1 tablespoon sugar (optional) - 1/2 teaspoon salt - Fresh cilantro, chopped (for garnish) - Lime wedges (for serving) To make Coconut Lime Rice, you need simple ingredients. The jasmine rice gives a nice, soft texture. The coconut milk adds a rich creaminess that pairs well with lime. You can swap jasmine rice for basmati or brown rice. These choices offer different flavors and textures. If you want to make this dish vegan, look for coconut milk made from plants. For lime juice, fresh is best, but bottled works too. Just remember that fresh lime juice has a brighter taste. These substitutions can help you customize your Coconut Lime Rice. You can enjoy this dish no matter your diet or taste. If you want to explore more, check out the Full Recipe for detailed steps and flavors. 1. Start by rinsing the jasmine rice. Place it in a fine-mesh strainer. Rinse it under cold water until the water runs clear. This takes about 2-3 minutes. Rinsing helps remove excess starch. This keeps the rice from becoming too sticky. 2. Next, combine the cooking ingredients. In a medium saucepan, add the rinsed rice. Pour in the can of coconut milk and 1 cup of water. Then, add the lime zest, salt, and sugar if you want it sweeter. Stir everything well to mix. 1. Now, it’s time to boil the mixture. Place the saucepan on the stove over medium-high heat. Bring the mixture to a boil. Keep an eye on it so it doesn’t boil over. 2. Once it boils, reduce the heat to low. Cover the saucepan tightly with a lid. Let it simmer for 15-20 minutes. This helps the rice absorb all the flavors and liquid. Check to see if the rice is tender and the liquid is gone. 1. After cooking, turn off the heat. Let the rice sit covered for an extra 5 minutes. This step steams the rice and makes it fluffy. 2. Fluff the rice with a fork. Then, mix in the fresh lime juice. Taste it and adjust the seasoning if needed. 3. Serve the warm rice on a plate. Garnish with chopped cilantro and add lime wedges on the side. This adds a fresh, zesty burst of flavor to your dish. For the full recipe, you can refer back to the details above. Enjoy your cooking! - Overcooking the rice: This can lead to mushy rice. Keep an eye on the cooking time. Use a timer to help you. - Incorrect liquid ratios: Use the right amounts of coconut milk and water. Too much liquid makes the rice soggy. - Adding spices or herbs: Try mixing in some cumin or coriander for a warm note. Fresh herbs like mint or basil can add a nice twist. - Adjusting sweetness levels: If you love sweet, add a bit more sugar. For a zesty kick, add extra lime juice. - Best pairings with Coconut Lime Rice: This rice pairs well with grilled chicken, shrimp, or fish. It also goes great with stir-fried vegetables. - Presentation tips for a beautiful dish: Serve the rice in a bowl and top with fresh cilantro. Add lime wedges on the side for a pop of color. For a fun look, use a ring mold to shape the rice. Check out the Full Recipe for all the details you need to make this tasty side dish! {{image_2}} You can make Coconut Lime Rice even more fun by adding tropical fruits. Pineapple chunks or mango pieces bring a sweet burst of flavor. Just toss in the fruit when you fluff the rice. You can also add nuts and seeds for a crunchy texture. Try toasted coconut flakes or slivered almonds. These additions make the dish fresh and exciting. If you follow a gluten-free diet, this rice works perfectly. All the ingredients are gluten-free, so enjoy without worry. For those on low-carb diets, consider using cauliflower rice instead of jasmine rice. It absorbs flavors well and gives you that coconut and lime taste without the carbs. Want to take your Coconut Lime Rice on a world tour? Try incorporating Asian flavors like ginger or garlic. A splash of soy sauce can add depth. For a Latin twist, mix in black beans or corn for a colorful, hearty dish. You can also serve it with spicy salsa for a fun fusion. This rice pairs with many cuisines, making it versatile for any meal. For the full recipe, check out the [Full Recipe] above! After you make Coconut Lime Rice, let it cool first. Once cooled, put it in an airtight container. This helps keep it fresh. Store it in the fridge for up to four days. Make sure to cover it well to avoid drying out. If you want to enjoy it later, take it out and reheat it gently. You can freeze Coconut Lime Rice for longer storage. Place the cooled rice in freezer-safe bags or containers. Try to remove as much air as you can. Label the bags with the date. The rice can last up to three months in the freezer. When you want to eat it, pull it out and let it thaw in the fridge overnight. To reheat, place it in a microwave-safe dish. Add a splash of water to keep it moist. Microwave on low heat, stirring often. You can also warm it up on the stove with a little water. This keeps the rice fluffy and tasty. For the full recipe, check out the earlier section! Coconut lime rice is a flavorful side dish made with jasmine rice, coconut milk, and lime. This dish comes from various tropical regions, where coconut and lime grow abundantly. It brings a bright and zesty flavor to any meal. The creamy coconut milk pairs perfectly with the tangy lime, making it a favorite at many tables. You can serve it with grilled seafood, spicy dishes, or fresh salads. Yes, you can make coconut lime rice ahead. It stores well and reheats nicely. To prep, cook the rice as directed in the Full Recipe. Let it cool completely before placing it in an airtight container. Store it in the fridge for up to three days. If you want to keep it longer, you can freeze it for up to a month. When ready to eat, just reheat it in a microwave or on the stove with a splash of water to bring back its moisture. To achieve a creamy texture, use full-fat coconut milk. This gives the rice a rich taste. Rinse the rice well before cooking to remove excess starch. This step prevents the rice from becoming too sticky. If you want it even creamier, add a bit more coconut milk during cooking. Once cooked, fluff it gently with a fork and mix in the lime juice. This adds brightness and helps create a silky consistency. Coconut lime rice pairs well with many dishes. Try serving it with grilled shrimp or chicken for a tasty main course. It also goes great with spicy curries or stews. For a lighter meal, serve it with a fresh salad or grilled vegetables. You can even use it as a base for a rice bowl topped with your favorite proteins and veggies. The options are endless! Coconut Lime Rice is a simple yet tasty dish. You learned about the key ingredients, cooking steps, and common mistakes. We explored fun ways to change the recipe, like adding fruits or different spices. Proper storage tips help keep your rice fresh. This dish shines as a side or main. Enjoy your cooking journey, and don't hesitate to experiment with flavors.](https://emmasdish.com/wp-content/uploads/2025/06/02837926-9ed0-4c4d-b9a3-92a87b00b2a1-300x300.webp)
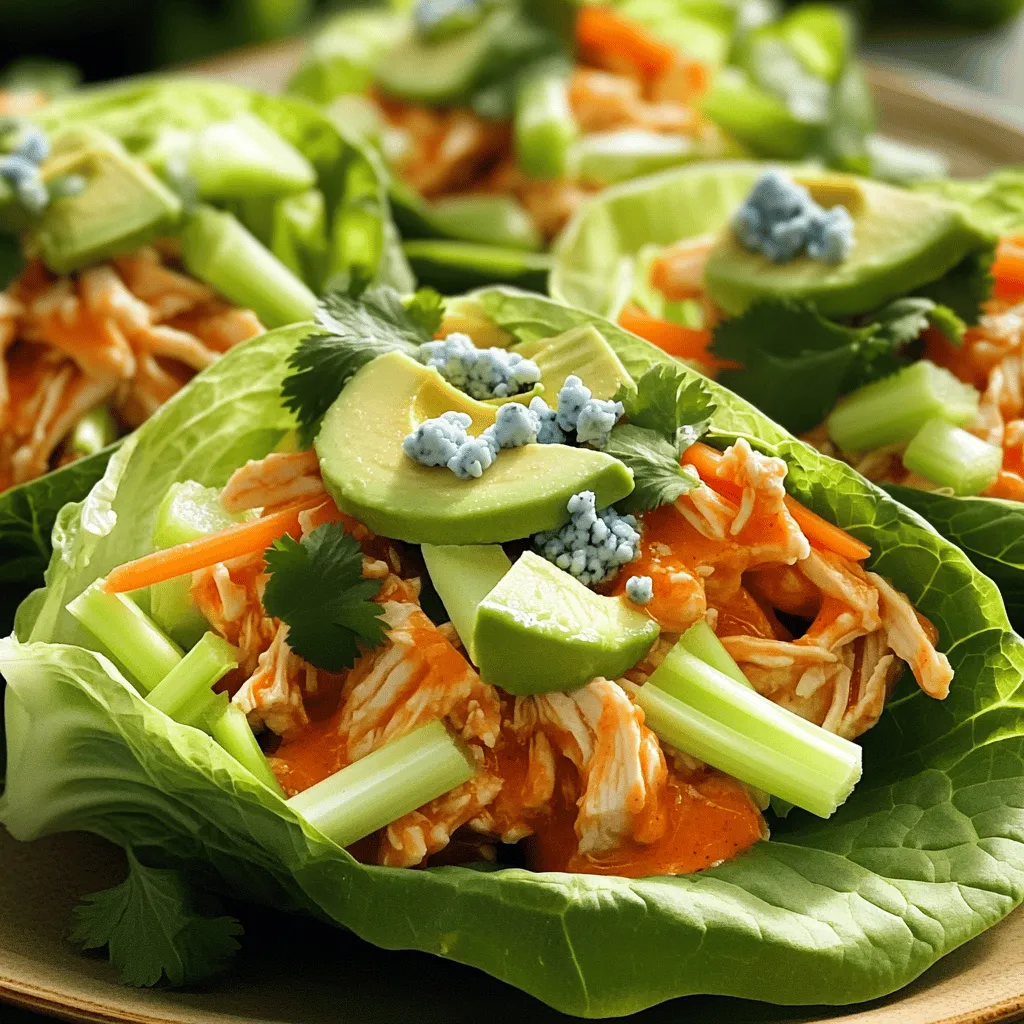
Buffalo Chicken Lettuce Wraps Healthy and Easy Meal
Looking for a healthy, easy meal that packs a punch of flavor? Buffalo Chicken Lettuce Wraps are your answer! This dish combines spicy buffalo…