Latest & Greatest

Spinach Stuffed Chicken Breasts Tasty and Healthy Dish
If you’re searching for a dish that’s both tasty and healthy, look no further! Spinach stuffed chicken breasts combine lean
Read more…
Hot Chocolate Cookies Decadent and Irresistible Treat
Craving something sweet? Let’s dive into the world of hot chocolate cookies! These treats blend gooey chocolate chips, soft marshmallows,
Read more…
Easy Lasagna Soup Flavorful Comfort in One Bowl
Are you craving a warm, hearty meal that’s as comforting as a hug in a bowl? Look no further! My
Read more…
Sweet Pineapple Chicken & Rice Tasty Dinner Idea
Craving a quick and tasty dinner? This Sweet Pineapple Chicken & Rice is the answer! With juicy chicken, fresh pineapple,
Read more…
Cinnamon Roll Cake Delightful and Simple Recipe
If you crave a warm, gooey treat that’s easier than traditional cinnamon rolls, you’ll love my Cinnamon Roll Cake! This
Read more…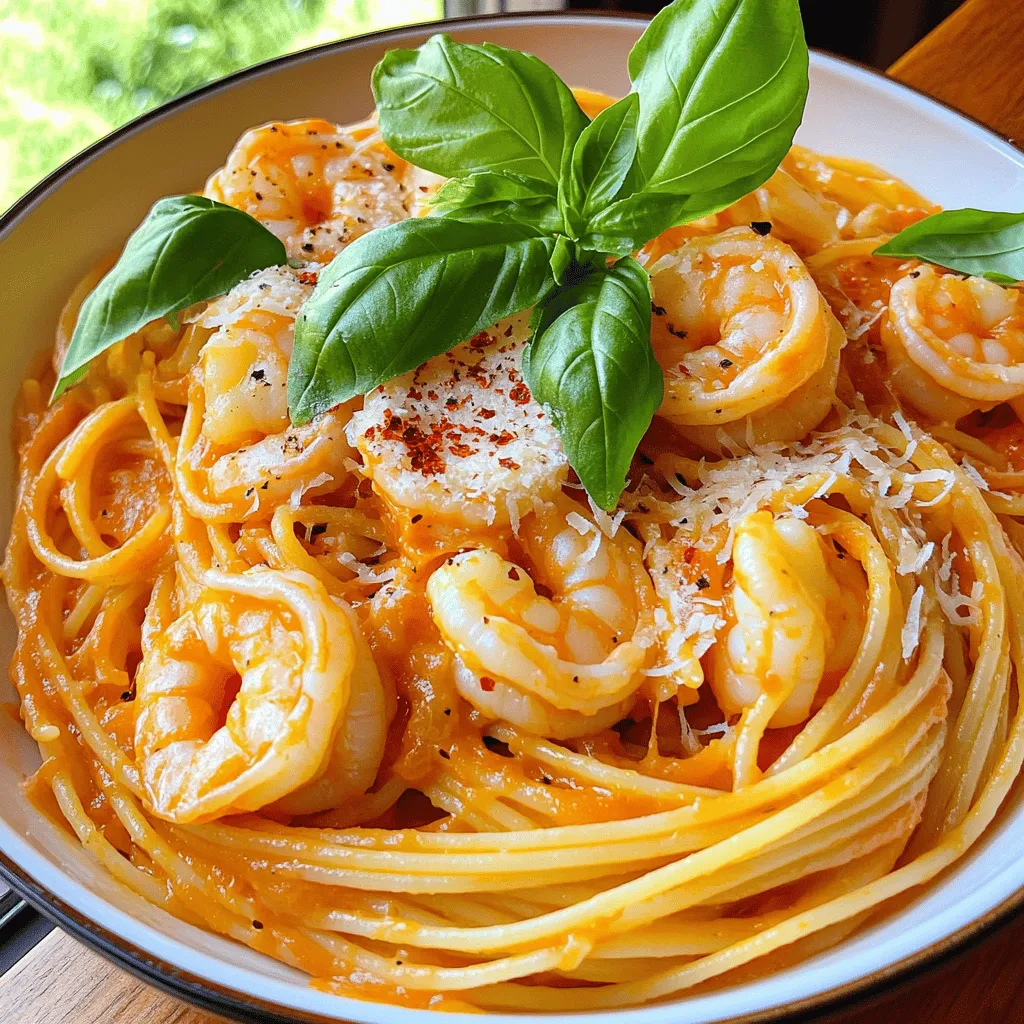
Savory Spaghetti with Shrimp in Creamy Tomato Sauce
Are you ready to impress your family or friends with a delicious pasta dish? In this blog post, I’ll guide
Read more…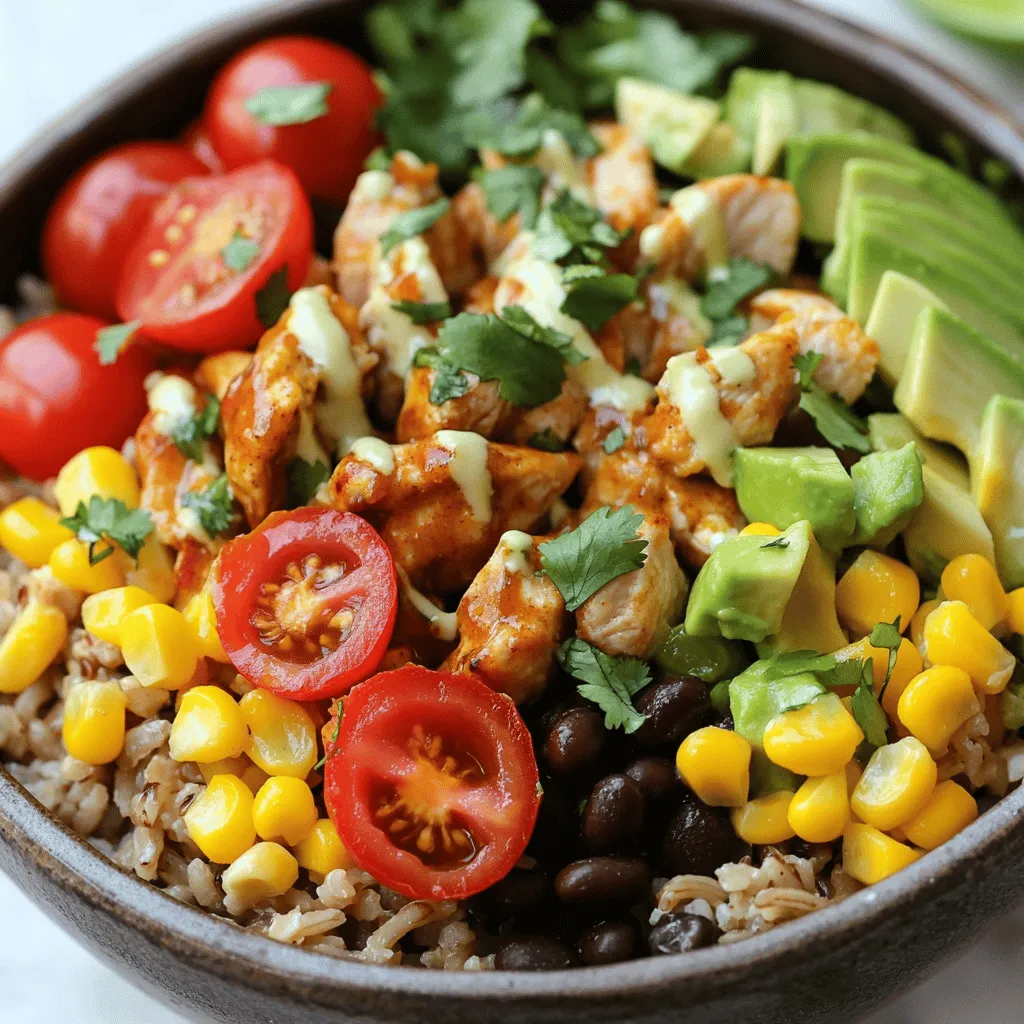
Chicken Burrito Bowl Flavorful Meal Prep Guide
Are you ready to transform your meal prep with a delicious Chicken Burrito Bowl? This guide offers quick recipes and
Read more…
Chocolate Lasagna Delightful No-Bake Dessert Recipe
If you’re craving a simple yet delightful dessert, you’ve come to the right place! This Chocolate Lasagna is a no-bake
Read more…browse recipes


Air Fryer Buffalo Chicken Taquitos Flavorful Snack
Looking for a fun and tasty snack? Try my Air Fryer Buffalo Chicken Taquitos! They pack a spicy kick, and they’re easy to make.…
My Latest Desserts
My Latest Recipes

hey,
i’m !
I’m so happy you’re here!
I’m not just sharing recipes I’m sharing a piece of my heart. I hope these dishes bring you comfort, joy, and maybe even a new favorite.


![Fresh spinach is the star of this salad. I use 4 cups of washed and dried spinach leaves. Spinach adds a vibrant green color and a mild flavor. It is rich in vitamins A and C, iron, and fiber. This base gives the salad its fresh and nutritious feel. Next, I add 1 cup of mixed berries. I love using strawberries, blueberries, and raspberries. They not only taste great, but they also bring antioxidants to the dish. Berries add sweetness and a pop of color. They brighten up each bite and make the salad exciting. I like to include a variety of other ingredients for texture and flavor. Here’s what I use: - 1/2 cup cooked quinoa, cooled - 1/4 cup walnuts, chopped - 1/4 cup feta cheese, crumbled - 2 tablespoons chia seeds - 1/4 cup red onion, thinly sliced - 3 tablespoons balsamic vinaigrette - Salt and pepper to taste Quinoa gives the salad protein and a nutty taste. Walnuts add crunch, while feta cheese brings a creamy element. Chia seeds are small but mighty, packed with nutrients. The red onion adds a slight bite, and the balsamic vinaigrette ties everything together. You can find the full recipe with preparation instructions to make this delicious salad. Start by washing and drying four cups of fresh spinach leaves. Place them in a large salad bowl. This leafy green is your salad's foundation. It offers vitamins and minerals, making it healthy and crunchy. Next, take half a cup of cooked quinoa. Make sure it's cooled down. Sprinkle it evenly over the spinach. Quinoa adds protein and fiber to your salad. Now, let's add the fun part: the superfoods! Grab one cup of mixed berries, like strawberries, blueberries, and raspberries. Scatter them across the top of your salad. These fruits bring sweetness and vibrant colors. After that, chop a quarter cup of walnuts. Add these to the bowl for a nice crunch. Then, crumble a quarter cup of feta cheese and sprinkle it on top. Feta adds a tangy taste. Add a quarter cup of thinly sliced red onion for some zing. Finally, sprinkle two tablespoons of chia seeds over everything. Chia seeds are tiny but packed with nutrition. Drizzle three tablespoons of balsamic vinaigrette over your salad. This dressing ties all the flavors together. Gently toss the salad to mix everything. Be careful not to bruise the spinach leaves. Season with salt and pepper to taste. Adjust it to your liking. You can serve the salad in a large bowl or divide it into individual servings. For a fancy touch, garnish each plate with extra berries and chia seeds. Enjoy your Berry Spinach Superfood Salad! For the full recipe, check out the details above. When making your Berry Spinach Superfood Salad, fresh ingredients matter. Look for bright, crisp spinach leaves. They should be deep green and free from brown spots. When it comes to berries, choose ones that are plump and firm. Strawberries should be red all over, while blueberries and raspberries should be vibrant and juicy. Fresh quinoa adds a nice texture, so use it right after cooking. Finally, select walnuts that are crunchy and not stale. For this salad, a balsamic vinaigrette works wonders. It adds a sweet and tangy flavor that pairs well with the berries. You can also try a lemon vinaigrette for a zesty touch. If you prefer creamier dressings, a light yogurt dressing is a great choice. Just remember to keep it light, so it doesn’t overpower the fresh flavors. To make your salad pop, add a mix of textures. The crunch of walnuts complements the soft berries perfectly. You can also toss in some seeds, like pumpkin or sunflower seeds, for extra crunch. For a burst of flavor, add thin slices of red onion. If you want a bit more saltiness, crumbled feta cheese is a great addition. These simple tweaks can elevate your Berry Spinach Superfood Salad to a whole new level. For the full recipe, check the details above. {{image_2}} You can boost the protein in your Berry Spinach Superfood Salad. Try adding grilled chicken or shrimp for a heartier meal. Tofu is a great option for a plant-based source. You can also mix in hard-boiled eggs or chickpeas. Each option adds flavor and nutrition. Switch up the fruits based on what is in season. In the spring, use fresh strawberries. Summer might call for peaches or cherries. In the fall, consider adding apples or pears. Each fruit will change the taste and keep the salad exciting. While balsamic vinaigrette is my go-to, you can change it up. A lemon vinaigrette can add brightness. Honey mustard dressing gives a sweet and tangy kick. For a creamy touch, try yogurt-based dressings. Each dressing will give the salad a unique flavor profile. For the complete recipe, check out the [Full Recipe]. You should store your Berry Spinach Superfood Salad in the fridge. Use an airtight container to keep it fresh. This salad stays good for about three days. If you see any wilting, eat it soon. For the best taste, enjoy it within 24 hours. To keep your ingredients fresh, store spinach and berries separately. Spinach wilts quickly, while berries can mold. Wash and dry spinach right before use. For berries, rinse them under cold water just before serving. This way, they remain crisp and juicy. You can prep ingredients the night before. Wash and chop everything except the spinach. Store each ingredient in separate containers. When you’re ready to eat, mix them together. This saves time and makes meal prep easy. Enjoy a fresh salad without the fuss! For the full recipe, check out the Berry Spinach Superfood Salad. This salad packs a powerful punch of nutrients. Spinach is rich in vitamins A, C, and K. It also has iron and calcium. Berries are full of antioxidants, which help protect your cells. They can boost your heart health and improve brain function. Quinoa adds protein and fiber, making it a complete meal. Walnuts provide healthy fats, which are good for your heart. Chia seeds are great for digestion and help you feel full. To make the Berry Spinach Superfood Salad vegan, simply leave out the feta cheese. You can replace it with a vegan cheese or skip it entirely. The salad still tastes great without it. You can enhance the flavors with extra nuts or seeds. This keeps the salad satisfying and nutritious. Yes, you can use frozen berries in this salad. Just make sure to thaw them first. Drain any excess liquid to avoid making the salad soggy. Frozen berries can be just as nutritious as fresh ones. They work well and save time, especially when fresh berries are not in season. Using frozen berries can also add a fun twist to your salad. For the full recipe, check the main section. This blog post showed how to make a Berry Spinach Superfood Salad. You learned about the key ingredients: fresh spinach, mixed berries, and extras that boost flavor. We covered step-by-step instructions for prepping and serving. Tips for selecting ingredients and dressing options helped you enhance your salad. Variations let you customize with proteins and seasonal fruits. We also shared storage tips to keep your salad fresh. Enjoy making this healthy dish. It’s easy and tasty! Now, you can impress your friends and family with your new skills.](https://emmasdish.com/wp-content/uploads/2025/06/ed68670f-61e3-4ee1-9cf1-77221924be16-300x300.webp)
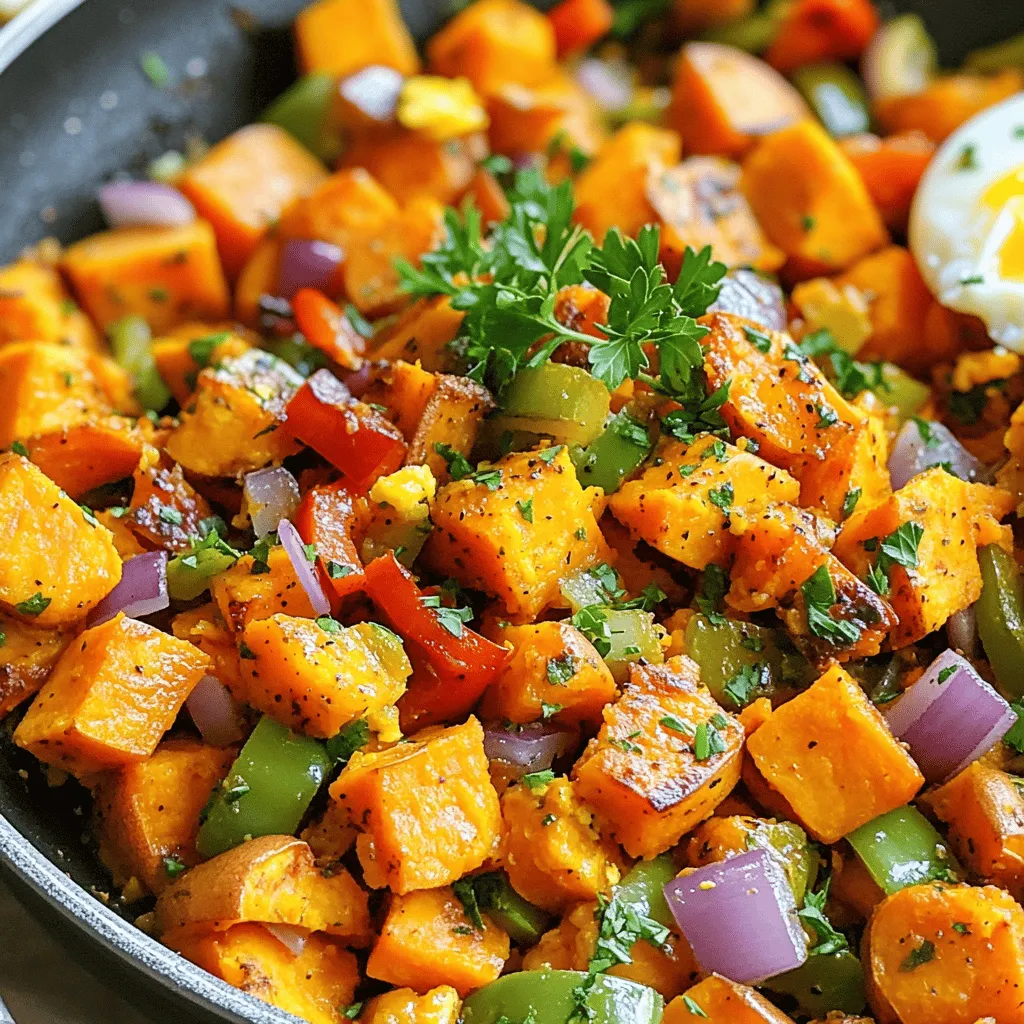
Sweet Potato Hash Flavorful and Easy Breakfast Dish
Looking for a quick and tasty breakfast? Sweet Potato Hash is your answer! This dish is not only colorful and fun to make, but…