


Latest & Greatest

Spicy Korean Beef Bowls Simple and Tasty Recipe
Are you craving a dish that packs a punch? Spicy Korean Beef Bowls are the answer! This quick and easy
Read more…
Smothered Chicken and Rice Flavorful Comfort Dish
Looking for a warm and filling meal that hits the spot every time? Smothered Chicken and Rice is the perfect
Read more…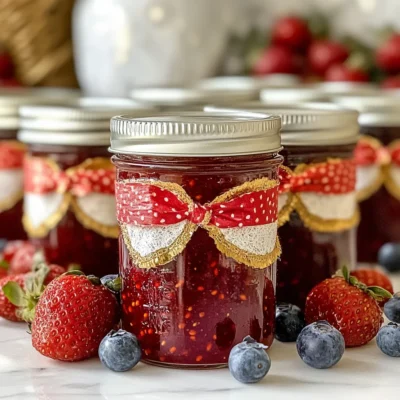
Amish Christmas Jam Festive and Flavorful Delight
Are you ready to spread some joy this holiday season? Amish Christmas Jam brings festive flavors to your table, perfect
Read more…
Chicken Tortellini Broccoli Delightful Creamy Dish
Are you ready to whip up a tasty meal? My Chicken Tortellini Broccoli dish is creamy, rich, and packed with
Read more…
Teriyaki Ground Beef Stir-Fry Quick and Flavorful Meal
Looking for a quick and tasty meal? You’ve landed in the right place! This Teriyaki Ground Beef Stir-Fry is easy
Read more…
Grilled Cheese Burrito Copycat Easy and Tasty Recipe
Craving something cheesy and satisfying? Look no further! This Grilled Cheese Burrito Copycat recipe gives you the best of both
Read more…
Chicken Enchiladas with White Sauce Simple Recipe
Are you ready to spice up your dinner routine? In this simple recipe for Chicken Enchiladas with White Sauce, I’ll
Read more…
Homemade Sloppy Joes Simple and Flavorful Recipe
Are you ready to spice up your weeknight dinners? Homemade Sloppy Joes offer a tasty twist on a classic meal.
Read more…browse recipes


Sausage Tortellini Soup Warm and Cozy Delight
Get ready for a warm and cozy delight with this Sausage Tortellini Soup! I’ll guide you through each step to make this hearty dish…
My Latest Desserts
My Latest Recipes

hey,
i’m !
I’m so happy you’re here!
I’m not just sharing recipes I’m sharing a piece of my heart. I hope these dishes bring you comfort, joy, and maybe even a new favorite.

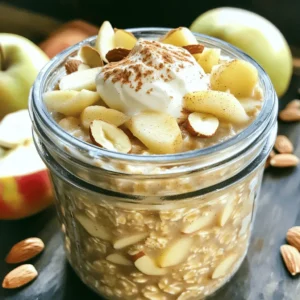
![- 1 cup rolled oats - 2 cups almond milk (or any milk of choice) - 2 ripe bananas, mashed - 4 tablespoons peanut butter (smooth or crunchy) - Optional sweeteners and flavors: - 2 tablespoons honey or maple syrup - 1 teaspoon vanilla extract - 1/2 teaspoon cinnamon - Pinch of salt These ingredients come together to create a creamy and tasty breakfast. The rolled oats are the base. They soak up the milk and flavors overnight. The bananas add sweetness and creaminess. Peanut butter provides protein and healthy fats. I love using almond milk, but you can pick any milk you like. - Sliced bananas - Chopped nuts - Chia seeds - Dark chocolate chips Toppings make your oats fun and unique. Sliced bananas add freshness. Chopped nuts give a nice crunch. Chia seeds are great for extra nutrition. If you like chocolate, dark chocolate chips are a delicious choice. You can mix and match to find your favorite combo! For the full recipe, check out Peanut Butter Banana Bliss Overnight Oats. To start, grab a large mixing bowl. In this bowl, combine the following ingredients: - 1 cup rolled oats - 2 cups almond milk (or any milk of choice) - 2 ripe bananas, mashed - 4 tablespoons peanut butter (smooth or crunchy) - 2 tablespoons honey or maple syrup (optional) - 1 teaspoon vanilla extract - 1/2 teaspoon cinnamon - Pinch of salt Stir the mixture well until everything blends evenly. You want to make sure the oats soak up the flavors. Next, divide the mixture into jars or airtight containers. This helps with serving later. Seal the jars tightly and place them in the fridge. Let them chill overnight for the best results. If you're in a rush, you can chill them for at least 4 hours. This waiting time allows the oats to absorb the milk and flavors, making them creamy and delicious. When you're ready to eat, take the jars out of the fridge. Stir the oats well before serving. If they are too thick for your liking, add a splash of almond milk to thin them out. Now comes the fun part—toppings! You can add sliced bananas, chopped nuts, chia seeds, or dark chocolate chips. Enjoy this tasty breakfast right away, or take it with you for a meal on the go. Oats soak up the milk overnight. This makes them soft and creamy. The longer they sit, the better they taste. If you want a thicker mix, use less almond milk. For a creamier texture, add more. Adjust it to find your perfect blend. Feel free to mix it up with different nut butters. Almond butter or cashew butter can add new flavors. You can also add fruits like berries or apples. Chia seeds or flaxseeds boost nutrition, too. Experiment with what you enjoy most. Layer your oats in clear jars. This shows off the beautiful colors and textures. Use meal prep containers that are easy to grab. This makes breakfast quick and fun. {{image_2}} I love to mix up my Peanut Butter Banana Overnight Oats with fun flavors. Here are two of my favorites: - Chocolate Peanut Butter Banana Oats: Add 2 tablespoons of cocoa powder to the mix. This gives a rich, chocolatey taste that pairs well with the peanut butter and banana. You can also top with dark chocolate chips for extra sweetness. - Tropical Peanut Butter Banana Oats: Swap one banana for fresh pineapple chunks. This gives your oats a bright, tropical twist. Add some shredded coconut for extra flavor and texture. You can make this recipe fit your needs easily. Here’s how: - Making it vegan or gluten-free: Use almond milk or any plant-based milk. For gluten-free oats, just check the label to ensure they are certified gluten-free. - Lowering sugar content options: You can skip the honey or maple syrup. The bananas provide enough natural sweetness. If you want a bit more, try adding a dash of vanilla extract instead. For the full recipe, check out [Full Recipe]. To keep your overnight oats fresh, use airtight containers. These will help keep moisture in and air out. You can store them in the fridge for up to five days. This makes it easy to grab a healthy breakfast on busy mornings. You can freeze leftover oats if you want to save them for later. Divide the oats into freezer-safe containers. Leave some space at the top for expansion. They can stay in the freezer for about three months. When you are ready to eat, thaw them overnight in the fridge. You can also warm them in the microwave. Add a splash of almond milk if they seem dry. Enjoy them warm for a cozy breakfast! Peanut Butter Banana Overnight Oats can last up to five days in your fridge. Store them in airtight containers. To keep them fresh, avoid adding toppings until you are ready to eat. If you notice any off smells or changes in texture, it’s best to discard them. You can use steel-cut oats, but the texture will be different. Steel-cut oats are chewier and take longer to soften. If you use them, soak them overnight in milk first. This helps them absorb liquid and become less crunchy. If you want a different flavor, you can try almond butter or sunflower seed butter. These options are tasty and still provide good protein. If you need a nut-free version, sunflower seed butter works great and has a nice taste. Yes, this recipe is perfect for meal prep! You can make several jars at once. This way, you’ll have breakfast ready for the week. Just prepare, store in the fridge, and grab a jar when you’re in a rush. Check out the Full Recipe for more details. Peanut butter banana overnight oats are easy and fun to make. We covered the key ingredients, clear steps, and helpful tips to ensure a tasty outcome. You can customize it with different flavors and toppings to fit your taste. Remember, these oats store well and can suit various diets. Whether you enjoy them for breakfast or a snack, they are full of nutrition. Try making your version, and savor every bite! Enjoy the deliciousness and simplicity of overnight oats in your meals.](https://emmasdish.com/wp-content/uploads/2025/07/9f51e583-c377-44a3-b26d-6ceff2a967a8-300x300.webp)

Oven Baked Chicken Bites Quick and Tasty Snack
Looking for a quick and tasty snack? Oven Baked Chicken Bites might just be your new favorite treat! They’re easy to make and packed…